109640
41
Zoom out
Zoom in
Vorherige Seite
1/58
Nächste Seite
GB 10
assembly
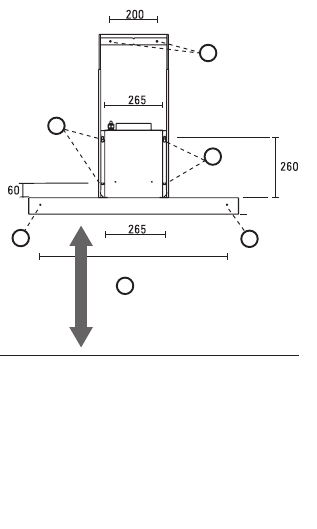
The most important dimensions are shown on the previous
page. You can set the height of the telescopic pipe. Take the
allowable tolerances into account.
Position the discharge and the electrical connection in such
a way that it will be easy to hook up the hood.
Tip: Before starting to drill, check that there are no
installation pipes present.
1. Determine the place and height of the extractor hood
with respect to the hob. Account for the minimum
distance between the hob and the extractor hood (1).
2. Mark off the position of the 2 mounting holes for the wall
brackets (2) and the 4 mounting holes for the extractor
hood (3). The V-marking marks the middle of the bracket.
You may also use the 2 extra mounting holes on the back
of the extractor hood (4).
3. Drill the mounting holes and the push plugs into them.
4. Fit the extractor hood horizontally using the upper 2 key-
shaped holes of the motor housing.
5. Fix the extractor hood using the 2 lowermost holes in the
motor housing and (optionally) the 2 holes on the back of
the extractor hood (accessible via the filter openings).
6. Put the plug in the socket.
7. Connect the discharge hose (not supplied) to the
discharge pipe and the extractor hood.
general
mounting wall hood
70
1
2
3
3
4
4
88020553_HL_ES1811QM_GB.qxp 21-12-2006 09:05 Pagina GB 10
41

Brauchen Sie Hilfe? Stellen Sie Ihre Frage.

Forenregeln

Missbrauch melden von Frage und/oder Antwort

Libble nimmt den Missbrauch seiner Dienste sehr ernst. Wir setzen uns dafür ein, derartige Missbrauchsfälle gemäß den Gesetzen Ihres Heimatlandes zu behandeln. Wenn Sie eine Meldung übermitteln, überprüfen wir Ihre Informationen und ergreifen entsprechende Maßnahmen. Wir melden uns nur dann wieder bei Ihnen, wenn wir weitere Einzelheiten wissen müssen oder weitere Informationen für Sie haben.

Art des Missbrauchs:

Zum Beispiel antisemitische Inhalte, rassistische Inhalte oder Material, das zu einer Gewalttat führen könnte.

Beispielsweise eine Kreditkartennummer, persönliche Identifikationsnummer oder unveröffentlichte Privatadresse. Beachten Sie, dass E-Mail-Adressen und der vollständige Name nicht als private Informationen angesehen werden.

Forenregeln

Um zu sinnvolle Fragen zu kommen halten Sie sich bitte an folgende Spielregeln:

Neu registrieren

Registrieren auf E - Mails für ATAG ES 1511 QM wenn:


Sie erhalten eine E-Mail, um sich für eine oder beide Optionen anzumelden.


Andere Handbücher von ATAG ES 1511 QM

ATAG ES 1511 QM Bedienungsanleitung - Deutsch, Englisch, Holländisch, Französisch - 7 seiten


Das Handbuch wird per E-Mail gesendet. Überprüfen Sie ihre E-Mail.

Wenn Sie innerhalb von 15 Minuten keine E-Mail mit dem Handbuch erhalten haben, kann es sein, dass Sie eine falsche E-Mail-Adresse eingegeben haben oder dass Ihr ISP eine maximale Größe eingestellt hat, um E-Mails zu erhalten, die kleiner als die Größe des Handbuchs sind.

Ihre Frage wurde zu diesem Forum hinzugefügt

Möchten Sie eine E-Mail erhalten, wenn neue Antworten und Fragen veröffentlicht werden? Geben Sie bitte Ihre Email-Adresse ein.


Info