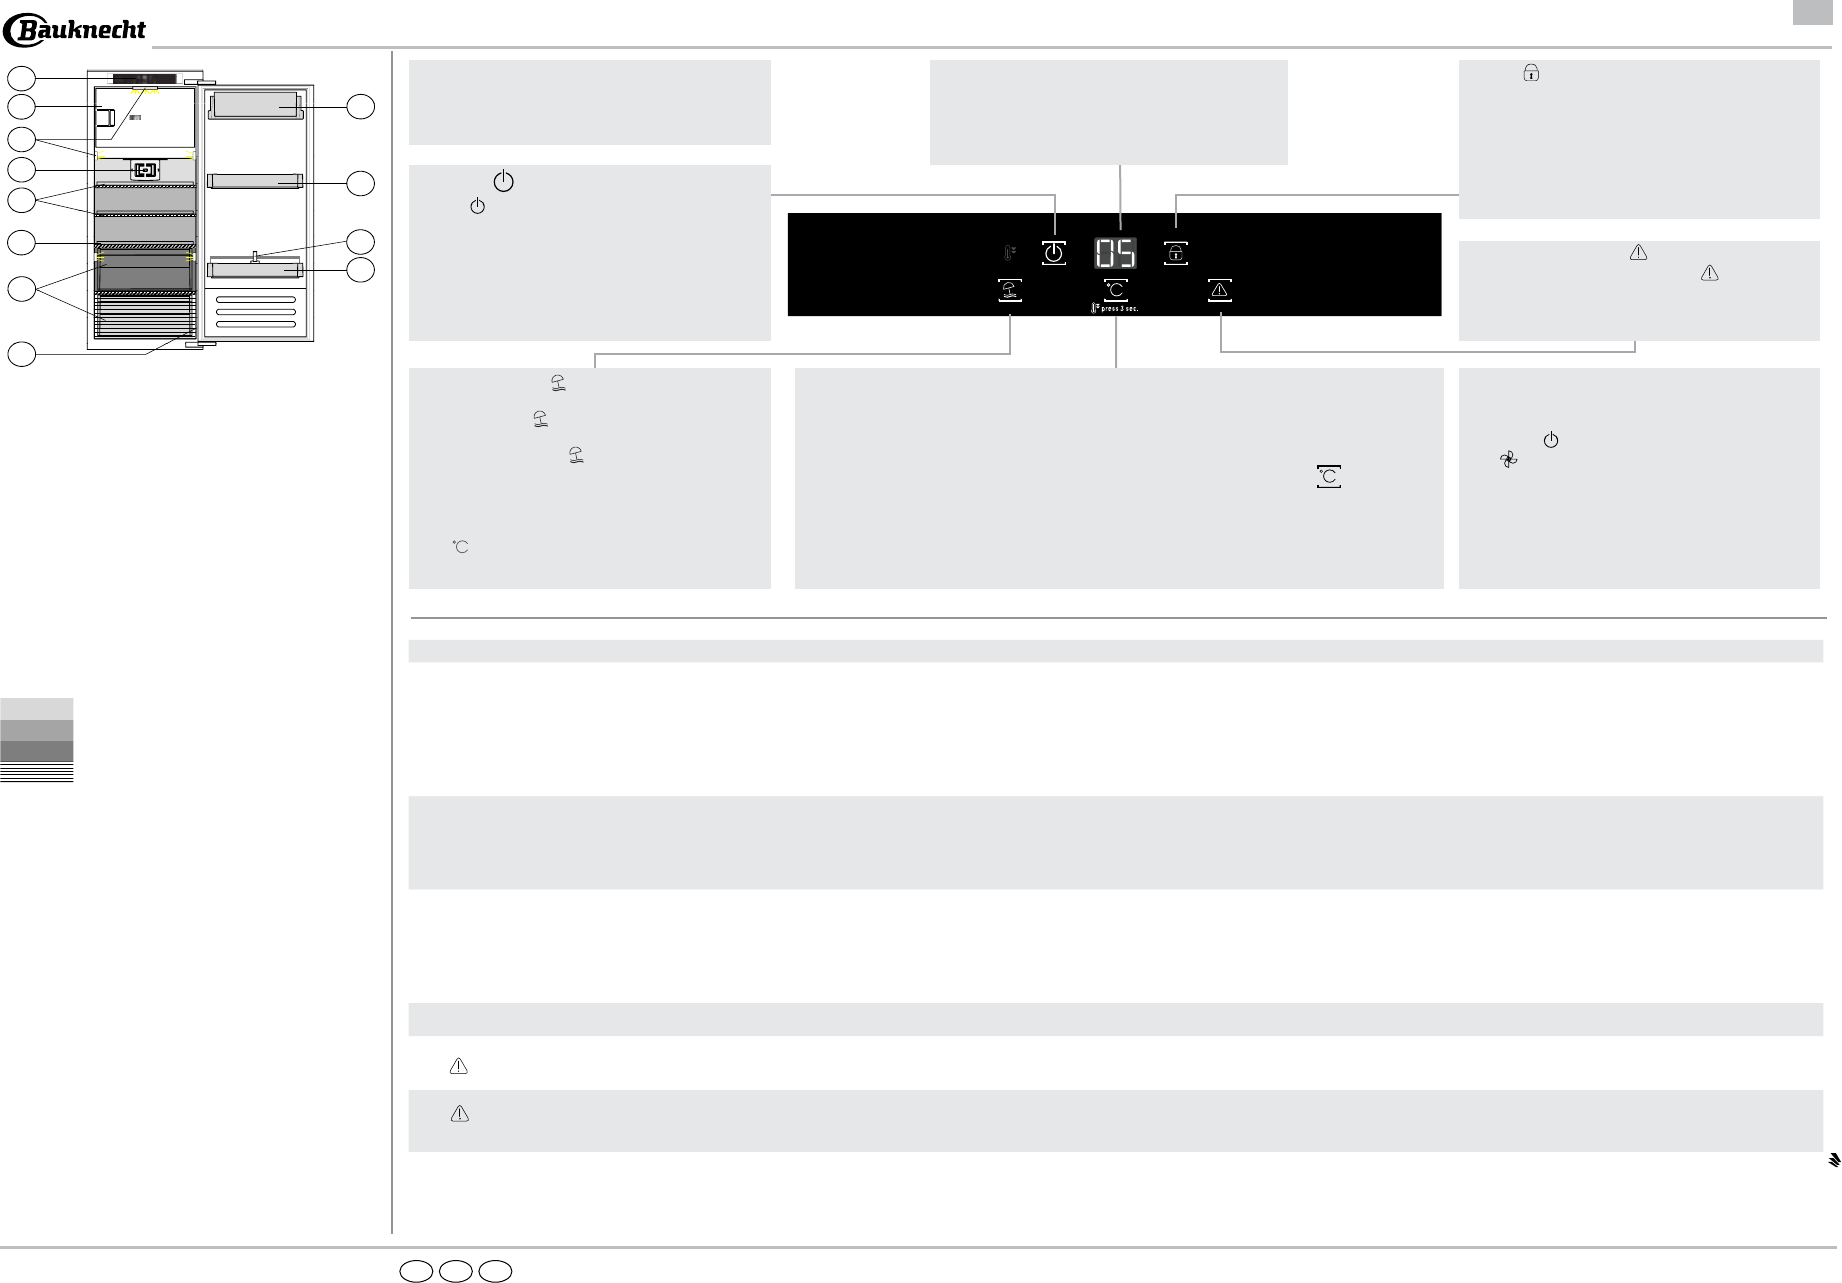
B.Freezer compartment (if the refrigerator has one)
C.LED indicators (depending on model)
D.Fan with filter (if present), see specific instructions
for filter
E. Shelves
F.Level covering the fruit and vegetable drawer
G. Fruit and vegetable drawers
H.Rating plate (placed on the side of the fruit and
vegetable drawer)
I and L.Door shelves
M. Bottle holder (if provided)
N.Bottle shelf
Least cold zone
Medium zone
Coldest zone
Fruit & vegetable zone
Note:
All of the drawers, door shelves and shelves
can be removed.
The ideal storage temperatures for the food are
pre‑set in the factory.
Read the instructions carefully before using the
appliance.
Features, technical data and images may vary
according to the model.
5019 400 00957
What to do if...Possible reasons:Solutions:
The control panel is switched off, the appliance does not work.
The appliance may be in On/Stand‑by mode.
There may be an appliance power supply problem.
Turn the appliance on pressing the On/Stand‑by button. Check that:
‑ there is not a power outage
‑ the plug is properly inserted in the power socket and the mains double‑pole switch (if present) is in the correct position
(i.e. allows the appliance to be powered)
‑ the household electrical system protection devices are efficient
‑ the power cable is not broken.
The internal light does not work.
The light may need replacing.
The appliance may be in On/Stand‑by mode.
‑ Models with LED lights: contact the authorised Technical Assistance Service.
‑ Turn the appliance on pressing the On/Stand‑by button.
The temperature inside the compartments is not cold enough.There could be various causes (see “Solutions”).
Check that:
‑ the door close properly
‑ the appliance is not installed near a heat source
‑ the set temperature is adequate
‑ the circulation of air through the ventilation grilles on the base of the appliance is not obstructed.
There is water on the bottom of the refrigerator compartment.The defrost water drain is obstructed.Clean the defrosting water drain (see section “Maintaining and cleaning the appliance”).
The red
icon is flashing and a sound signal is activated.
Door open alarm
It is activated when the door remains open for a prolonged period of time.
To turn the sound signal off, close the door of the product.
The red
icon will light up, a sound signal is activated and the letter
"F" is flashing on the display.
Malfunction alarm
The alarm indicates the malfunction of a technical component.
Call the authorized Technical Assistance Service. To turn the sound signal off, briefly press the “Turn off sound alarm” button.
Fan
The fan is pre‑set to ON.
You can turn the fan on/off by pressing the “Key Lock” button and
“On/Stand‑by”
button at the same time for 3 seconds.
The lit icon indicates that the fan is on and therefore the
ProFresh function is on. If the ambient temperature exceeds 27°C,
or if drops of water are present on the glass shelves, it is essential
that the fan is on to ensure the proper preservation of the food.
Deactivation of the fan allows energy consumption to be optimised.
Note: the fan restarts automatically after a power cut or after turning
off the appliance.
ProFresh Function
Enables the function to rapidly reach optimal storage conditions in
terms of internal temperature and humidity.
In order for it to function correctly, the fan must also be turned on.
Temperature display
The display shows the refrigerator compartment temperature
(between 2°C and 7°C).
Note: some noises, such as gurgles and hissing, caused by the refrigeration system, are normal
Appliance temperature
It is possible to set a different temperature with the °C button.
Fast Freeze/Cool Function (Fast Cooling)
To quickly cool the refrigerator compartment, or six hours before putting a large quantity of food to be frozen in the
freezer compartment (if there is one), turn on the “Fast Cooling” function by pressing the °C button
for 3 seconds.
When the function is turned on, the icon will be displayed. The function turns off automatically after 6 hours, or manually
by pressing the “°C” button for 3 seconds.
Note: do not put foods that are to be frozen in contact with others that are already frozen.
A.
Electronic control unit
A.
Electronic control unit
B.
Freezer compartment (if the refrigerator has one)
C.
LED indicators (depending on model)
C.
LED indicators (depending on model)
D.
Fan with filter (if present), see specific instructions for filter
E.
Shelves
F.
Level covering the fruit and vegetable drawer
F.
Level covering the fruit and vegetable drawer
G.
Fruit and vegetable drawers
H.
Rating plate (placed on the side of the fruit and vegetable drawer)
H.
Rating plate (placed on the side of the fruit and vegetable drawer)
I and L.
Door shelves
I and L.
Door shelves
M.
Bottle holder (if provided)
N.
Bottle shelf
N.
Bottle shelf
Least cold zone
Medium zone
Medium zone
Coldest zone
Coldest zone
Fruit & vegetable zone
A.
Electronic control unit
B.
Freezer compartment (if the refrigerator has one)
B.
Freezer compartment (if the refrigerator has one)
C.
LED indicators
C.
LED indicators
D.
Fan with filter (if present), see specific instructions for filter
D.
Fan with filter (if present), see specific instructions for filter
E.
Shelves
E.
Shelves
F.
Level covering the fruit and vegetable drawer
F.
Level covering the fruit and vegetable drawer
G.
Fruit and vegetable drawers
H.
Rating plate (placed on the side of the fruit and vegetable drawer)
You can use this function in the event of your prolonged absence.
Press the “Vacation” button for 3 seconds to turn the function
on. The display will show the temperature of the refrigerator
compartment (12°C) and the icon will light up. After activating
the function, remove the food from the appliance and keep the
door closed ‑ the appliance will maintain a suitable temperature to
prevent odours from forming.
To turn off the function, press briefly the button or act on the °C
button .
Key lock
The key lock can be activated/deactivated by keeping the “key
lock” button pressed for 3 seconds, until a confirmation sound
is heard (the icon lights up immediatly and into few seconds
disappear). If you press any button while the key lock is active,
you will hear a sound and the “Key Lock” icon will flash.
On/Stand-by
Press the button for 3 seconds to turn the appliance off.
In Stand‑by mode, the icon will light up and the light in the
refrigerator compartment does not turn on.
To turn the product on again, a brief press on the button is
sufficient.
Note: this procedure does not disconnect the appliance from the
electricity supply.
Turning off the sound alarm
To turn off the sound alarm, briefly press the button.
Brauchen Sie Hilfe? Stellen Sie Ihre Frage.
Missbrauch melden von Frage und/oder Antwort
Libble nimmt den Missbrauch seiner Dienste sehr ernst. Wir setzen uns dafür ein, derartige Missbrauchsfälle gemäß den Gesetzen Ihres Heimatlandes zu behandeln. Wenn Sie eine Meldung übermitteln, überprüfen wir Ihre Informationen und ergreifen entsprechende Maßnahmen. Wir melden uns nur dann wieder bei Ihnen, wenn wir weitere Einzelheiten wissen müssen oder weitere Informationen für Sie haben.
Art des Missbrauchs:
Forenregeln
Um zu sinnvolle Fragen zu kommen halten Sie sich bitte an folgende Spielregeln:
Lesen Sie zuerst die Anleitung;
Schauen Sie nach, ob die Frage bereits gestellt wurde;
Stellen Sie die Frage so deutlich wie nur einigermaßen möglich;
Erwähnen Sie was Sie bereits versucht haben um das Problem zu lösen;
Ist Ihr Problem von einem Besucher gelöst dann lassen Sie ihn / sie wissen in diesem Forum;
Falls Sie reagieren möchten, so verwenden Sie bitte das Antworten- Formular;
Da ihre Frage für alle Besucher sichtbar ist, sollten Sie lieber keine persönliche Daten erwähnen.
Neu registrieren
Registrieren auf E - Mails für Bauknecht KRIF 3141 wenn:
neue Frage gestellt werden
neue Handbücher vorhanden sind
Sie erhalten eine E-Mail, um sich für eine oder beide Optionen anzumelden.
Das Handbuch wird per E-Mail gesendet. Überprüfen Sie ihre E-Mail.
Wenn Sie innerhalb von 15 Minuten keine E-Mail mit dem Handbuch erhalten haben, kann es sein, dass Sie eine falsche E-Mail-Adresse eingegeben haben oder dass Ihr ISP eine maximale Größe eingestellt hat, um E-Mails zu erhalten, die kleiner als die Größe des Handbuchs sind.
Ihre Frage wurde zu diesem Forum hinzugefügt
Möchten Sie eine E-Mail erhalten, wenn neue Antworten und Fragen veröffentlicht werden? Geben Sie bitte Ihre Email-Adresse ein.