790592
14
Zoom out
Zoom in
Vorherige Seite
1/32
Nächste Seite
DANE TECHNICZNE
SCHEMAT POŁĄCZEŃ ELEKTRYCZNYCH
Sygnał wideo CVBS Pobór prądu <40mA
Sygnał NTSC Moc <0,35W
Efektywna liczba
pikseli
688X528 Klasa
wodoszczelności
IP67
Napięcie DC12V Zakres temperatury
roboczej
-20 °C ~
+65 °C
Min. natężenie
światła
0,1 lux Zakres temperatury
przechowywania
-30 °C ~
+80 °C
Wyposażenie dodat-
kowe
VK-RVC 4.X (10-metrowy kabel przedłużający RCA);
SF-RVC 4.X (ltr sygnału)
Pozostałe Widok do tyłu z linią parkowania, przełącznik formal-
ny/lusterka, przełącznik linii parkowania, podwójna
funkcja sterowania podwójną cewką
Zwrócić uwagę na
strzałki podczas
podłączania
EEqquuaall DDiiaammeetteerr
UUPP
UUPP
B. Installation Guide For Bracket-Mount Camera
Blue loop: Cut to switch to front view
Purple or white loop: Cut to turn off parking line
Switch Loop Instructions:
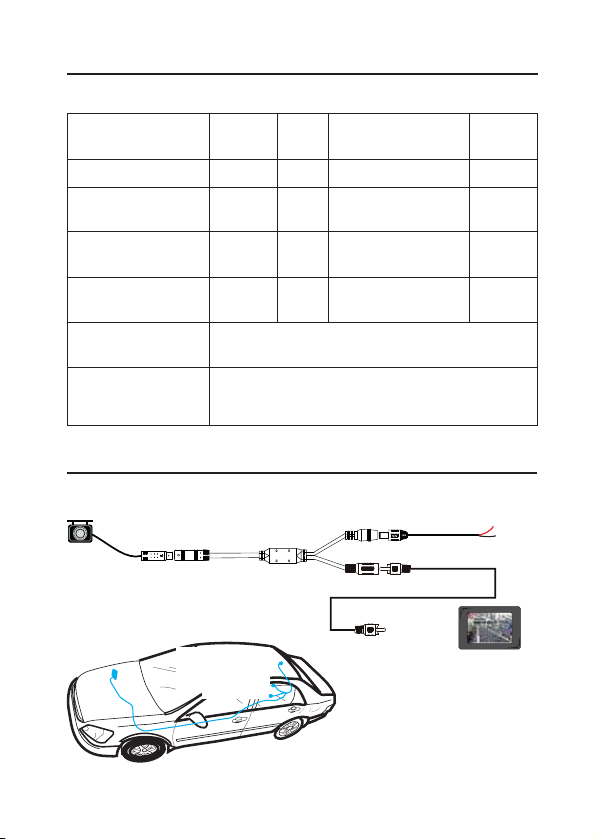
Wiring Diagram
Remarks:
Beside flush and bracket mount cameras, we also
have bolt mount camera series, which is mounted
by following steps:
1. Select suitable flat position near the license plate light and mark it.
2. Drill a hole according to the bolt diameter.
3. Put the bolt vertically (against ground) into the hole and fix the bolt
with the screw supplied from inside.
4. Some models come with up/down image switch option, and can be
mounted with its bolt horizontal (against ground) and its lens
downward.
1.Choose a flat position near license
plate light and make a small hole
for the first screw with a drill.
2. Use a screw driver to fix the first
screw (but not tightly).
3. Get the power/video cables connected,
and then adjust the camera properly to find
the best position for the other screw
according to the camera image in monitor.
4. Mark the position found for second
screw and make a hole with a drill.
5. Fix the second screw with a
screw driver.
A. Installation Guide For Flush-Mount Camera
B
A
1.Check to be sure the hole saw
used is with equal diameter to
that of camera.
2. Adjust the camera to turn the
UP arrow mark straight upwards.
3. Put the harness through the
hole made on bumper before
fixing the camera.
4. Put the camera into the hole and
use your two thumbs to press it
evenly for tight and flat mounting.
B
A
Special type installation locationUniversal type installation location
Parameters
Current
Consumption
Power
Waterproof Grade
Operating
temperature range
Other
Optional accessories
-20 ~ +65
VK-RVC 4.X (10 meter RCA extension cable); SF-RVC 4.X (signal filter)
Rear view with parking line, formal/ mirror switch, parking line swich, dual-coil control dual
functions
Video signal
Signal
Effective Pixels
Voltage
Min Illumination
CVBS
NTSC
DC12V
0.1 Lux
688X528
<40mA
IP67
Storage
temperature range -30 ~ +80
<0.35W
Kamera
do wejścia
wideo RCA
monitora
Zasilacz sieciowy
Przewód czerwony do
lampy cofania (+12V)
Przewód czarny do masy
Schemat połączeń dotyczy
większości (ale nie wszyst-
kich) modeli kamery, a pod-
czas wykonywania połączeń
należy również zwracać
uwagę na etykiety lub oznac-
zenia na przewodach.
Wyświetlacz
LCD Kamera do
lampy cofania
do masy
14

Brauchen Sie Hilfe? Stellen Sie Ihre Frage.

Forenregeln

Missbrauch melden von Frage und/oder Antwort

Libble nimmt den Missbrauch seiner Dienste sehr ernst. Wir setzen uns dafür ein, derartige Missbrauchsfälle gemäß den Gesetzen Ihres Heimatlandes zu behandeln. Wenn Sie eine Meldung übermitteln, überprüfen wir Ihre Informationen und ergreifen entsprechende Maßnahmen. Wir melden uns nur dann wieder bei Ihnen, wenn wir weitere Einzelheiten wissen müssen oder weitere Informationen für Sie haben.

Art des Missbrauchs:

Zum Beispiel antisemitische Inhalte, rassistische Inhalte oder Material, das zu einer Gewalttat führen könnte.

Beispielsweise eine Kreditkartennummer, persönliche Identifikationsnummer oder unveröffentlichte Privatadresse. Beachten Sie, dass E-Mail-Adressen und der vollständige Name nicht als private Informationen angesehen werden.

Forenregeln

Um zu sinnvolle Fragen zu kommen halten Sie sich bitte an folgende Spielregeln:

Neu registrieren

Registrieren auf E - Mails für Blaupunkt RVC 4.1 KH wenn:


Sie erhalten eine E-Mail, um sich für eine oder beide Optionen anzumelden.


Das Handbuch wird per E-Mail gesendet. Überprüfen Sie ihre E-Mail.

Wenn Sie innerhalb von 15 Minuten keine E-Mail mit dem Handbuch erhalten haben, kann es sein, dass Sie eine falsche E-Mail-Adresse eingegeben haben oder dass Ihr ISP eine maximale Größe eingestellt hat, um E-Mails zu erhalten, die kleiner als die Größe des Handbuchs sind.

Ihre Frage wurde zu diesem Forum hinzugefügt

Möchten Sie eine E-Mail erhalten, wenn neue Antworten und Fragen veröffentlicht werden? Geben Sie bitte Ihre Email-Adresse ein.


Info