English - 4
Protection Guard with Quick Clamp
☞
The protection guard is preadjusted to the
diameter of the spindle collar. If required,
the tightening tension of the clamping
bracket can be changed by tightening or
loosening the adjustment screw 8. Always
ensure that the protection guard 7 is
seated tightly on the spindle collar.
Open the clamping lever 9.
Place the protection guard 7 on the spindle collar
of the machine head and turn to the required po-
sition (working position).
To fasten the protection guard 7, close the
clamping lever 9.
The closed side of the protection guard 7
must always point to the operator.
Auxiliary Handle
■ For all work with the machine, the auxiliary
handle must be mounted.
Screw the auxiliary handle 5 into the head of the
machine according to the working method.
Vibration Damping
The integrated vibration damper 4 and the vibra-
tion-dampening auxiliary handle reduce occur-
ring vibrations to below 2.5 m/s
2
according to
EN 50 144, and enable vibrational-reduced and
thus more agreeable and secure working.
Do not make any alterations to the vi-
bration damper 4 and the auxiliary han-
dle. Do not continue to use damaged
parts.
Hand Guard
For work with the rubber sanding plate 21 or with
the cup brush 24/disc brush/flap disc, the hand
guard 19 (accessory) is to be mounted. The hand
guard 19 is fastened with the auxiliary handle 5.
■ Before any work on the machine itself, pull
the mains plug.
Use only grinding tools with a permissi-
ble speed at least as high as the no-load
speed of the machine.
Grinding and cutting discs become very
hot while working; do not touch until
they have cooled.
■ Clean the grinder spindle and all parts to be
mounted. For clamping and loosening the
grinding tools, lock the grinder spindle 6 with
the spindle lock button 2.
Actuate the spindle lock button 2 only when
the grinder spindle is at a standstill!
Grinding/Cutting Disc
Pay attention to the dimensions of the grinding
disc. The mounting hole diameter must fit the
mounting flange 10 without play. Do not use re-
ducers or adapters.
When using a diamond cutting disc, take care
that the direction-of-rotation arrow on the dia-
mond cutting disc and the direction of rotation of
the machine (direction-of-rotation arrow on the
machine head) agree.
For mounting, see the illustration page.
Screw on the clamping nut 12 and tighten with
the two-pin spanner (see Section “Quick-clamp-
ing Nut”).
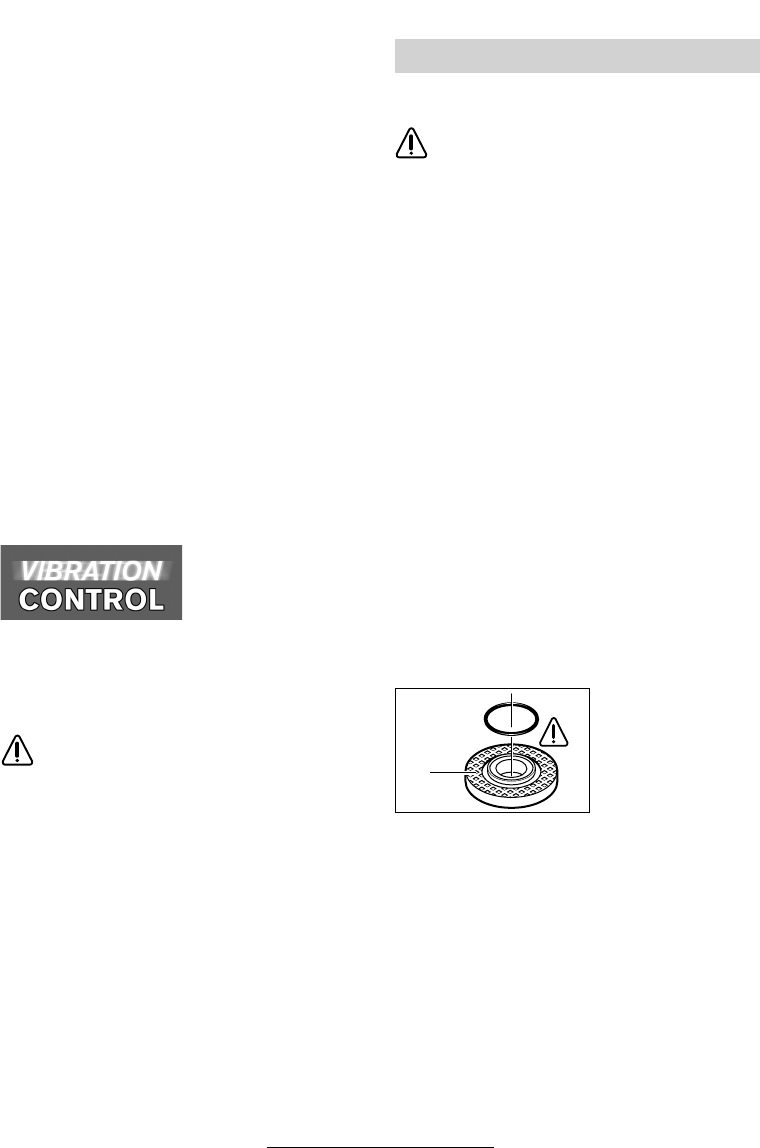
An O-ring (plastic
part) is inserted in
the mounting
flange 10 around the
spigot.
If the O-ring is missing or is damaged, it must
in all cases be replaced (Order No.
1 600 210 039) before the mounting flange 10 is
mounted.
☞
After mounting the grinding tool and be-
fore switching on, check that the grind-
ing tool is correctly mounted and that it
can turn freely.
Mounting the Grinding Tools
10
18 • 1 609 929 F55 • TMS • 18.12.03