19
Installation
Deutsch
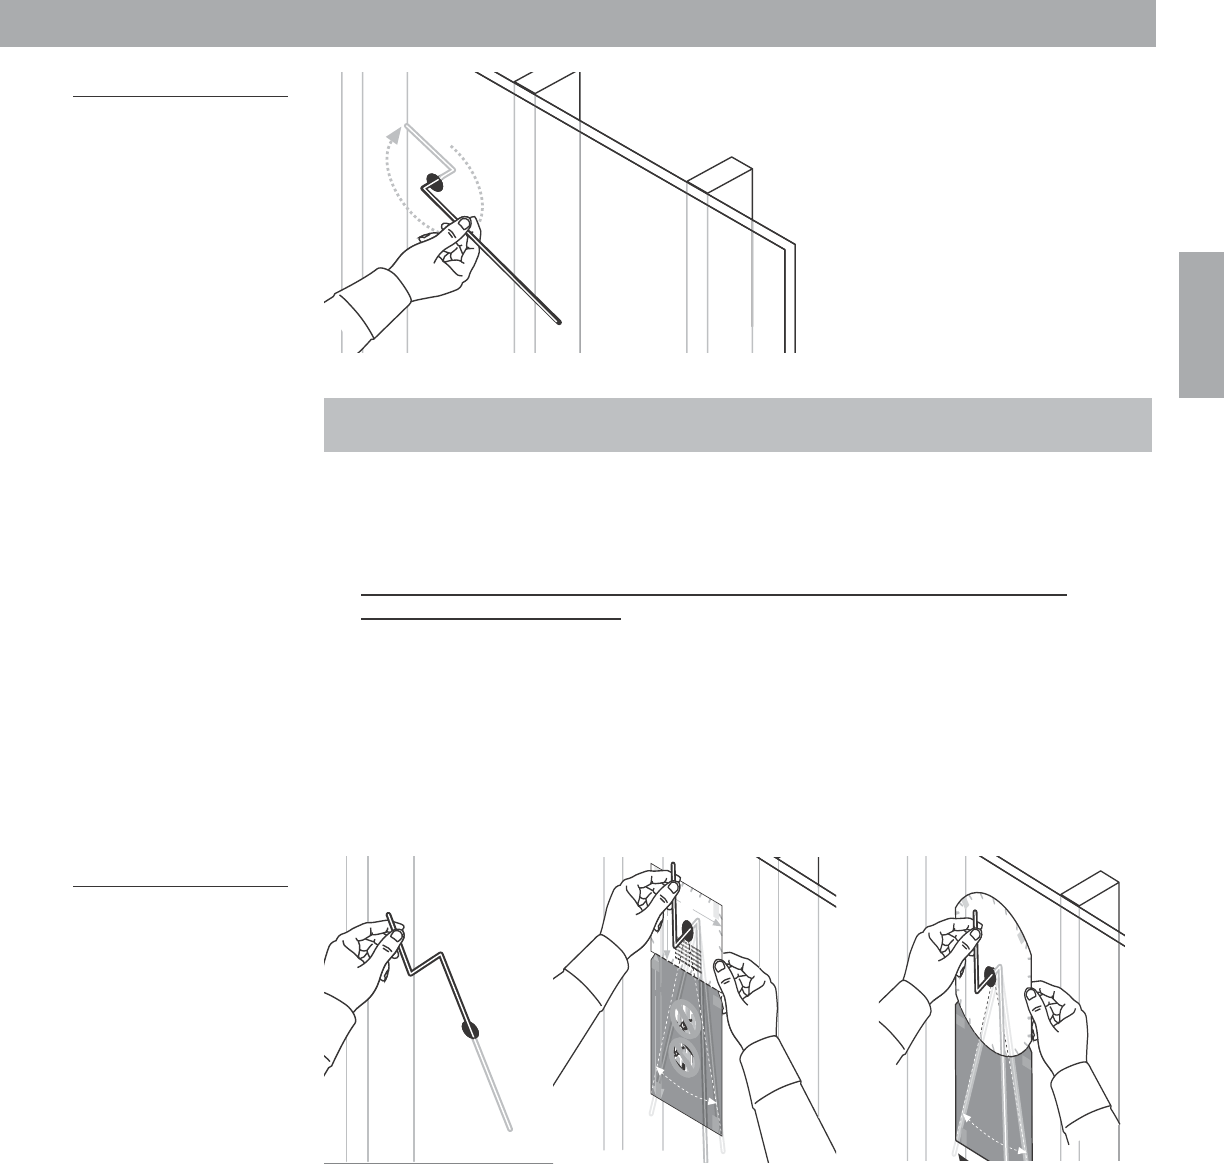
Abbildung 19
Prüfung des Freiraums für
die Lautsprecherbreite
•Wenn sich der Draht problemlos um 360˚ dr
•Wenn Sie den Draht nicht mit der ganzen Länge des kurzen Endes um 360˚ drehen
können, müssen Sie an anderer Stelle erneut eine Probebohrung setzen. Wiederholen
Sie dann die Schritte 3 und 4.
Ziehen Sie nun den Draht heraus.
5. So prüfen Sie mit dem langen Drahtende, ob genügend Fr
Probebohrung vorhanden ist:
Halten Sie den Draht am kurzen Ende. Führen Sie das lange Ende vom Loch aus
senkrecht nach unten in den Hohlraum hinter der Oberfläche ein (Abbildung 20a).
Tipp:V
Schwenken Sie den Draht in der Bohrung, und überstreichen Sie dabei den Winkel von
links nach rechts wie auf der Schablone abgebildet. Damit stellen Sie sicher
Hohlraum am unteren Ende sowohl lang genug als auch br
Tipp:Bewegen Sie den Draht beim Prüfen der Länge einmal nahe an der Ober
einmal etwas davon entfernt.
Abbildung 20
Einführen des langen
Drahtendes (a) und
seitliches Schwenken, um
die Länge zu prüfen (b)
•Wenn Sie den Draht problemlos einführ
können, fahren Sie mit dem nächsten Schritt fort: „W
Lautsprecher vorber
•Wenn Sie unter der Oberfläche einer Innenwand auf ein Hindernis stoßen, führen Sie
den Draht nach oben gerichtet erneut ein. W
frei ist, können Sie den Lautspr
Außenwand wird von der Installation mit dem Gehäuse nach oben abgeraten. W
in diesem Fall auf ein Hindernis stoßen, müssen Sie an anderer Stelle erneut eine
Probebohrung setzen. Wiederholen Sie dann die Schritte 3, 4 und 5.
Für Lautsprecher mit runder Fr wird zusätzlich oberhalb des Lautspr
Freiraum benötigt.
360˚
a
5
1
/
2
" (14 cm)
8
1
/
1
6
" (2 0.5 cm)
14
1
/
2
" (36.9 cm)
TAPE
HERE
TAPE
HERE
TAPE
HERE
WHITE CUT OUT AREA
WHITE CUT OUT AREA
Pilot
Hole
WARNING: Make sure the spot chosen is safe for cutting. Do not cut through
surfaces that have hazards, such as electrical wiring, conduits or plumbing,
concealed behind them. If you are not sure, consult a professional installer
before you proceed.
DO NOT
CUT AROUND
GRAY AREA
English & Translations
W
A
R
N
IN
G
: Make sure the spot chosen is safe for cutting. Do not cut through surfaces that have hazards, such as electrical
wiring, conduits or plumbing, concealed behind them. If you are not sure, consult a professional installer before you proceed.
W
A
R
N
IN
G
: Make sure the spot chosen is safe for
drilling. Do not cut through surfaces that have hazards
concealed behind them, such as electrical wiring,
conduits or plumbing. If you are not sure, consult a
professional installer before you proceed.
W
A
R
N
IN
G
: Make sure the spot chosen is safe for
drilling. Do not cut through surfaces that have hazards
concealed behind them, such as electrical wiring,
conduits or plumbing. If you are not sure, consult a
professional installer before you proceed.
W
A
R
N
IN
G
: Make sure the
spot chosen is safe for
drilling. Do not cut through
surfaces that have hazards
concealed behind them,
such as electrical wiring,
conduits or plumbing. If you
are not sure, consult a
professional installer
before
you proceed.
W
A
R
N
IN
G
: Make
sure the spot chosen
is safe for drilling. Do
not cut through
surfaces that have
hazards concealed
behind them, such
as electrical wiring,
conduits or
plumbing. If you are
not sure, consult a
professional installer
before you proceed.
W
A
R
N
IN
G
: Make sure the spot chosen is safe
for drilling. Do not cut through surfaces that have
hazards concealed behind them, such as
electrical wiring, conduits or plumbing. If you
are not sure, consult a professional installer
before you proceed.
W
A
R
N
IN
G
: Make sure the spot
chosen is safe for drilling. Do not cut
through surfaces that have hazards
concealed behind them, such as
electrical wiring, conduits or plumbing.
If you are not sure, consult a
professional installer before you
proceed.
9" (22.9 cm)
TAPE
HERE
T
ra
n
s
la
tio
n
s
b
e
lo
w
TAPE
HERE
TAPE
HERE
DO NOT
CUT AROUND
GRAY AREA
DO NOT
CUT AROUND
GRAY AREA
DO NOT
CUT AROUND
GRAY AREA
DO NOT
CUT AROUND
GRAY AREA
DO NOT
CUT AROUND
GRAY AREA
DO NOT
CUT AROUND
GRAY AREA
DO NOT
CUT AROUND
GRAY AREA
(b)
oder
TAPE
HERE
W
HITE CU
T OUT AREA
W
HITE CUT O
UT AREA
P
ilo
t H
o
le
WARNING: Make sure the spot chosen is safe for cutting.
Do not cut through surfaces that have hazards, such as
electrical wiring, conduits or plumbing, concealed behind
them. If you are not sure, consult a professional installer
before you proceed.
DO N OT
CUT A ROUND
GRAY A REA
W
A
R
N
IN
G
: Make sure the spot chosen is safe for cutting. Do not cut through surfaces that have hazards, such as electrical
wiring, conduits or plumbing, concealed behind them. If you are not sure, consult a professional installer before you proceed.
W
A
R
N
IN
G
: Make sure the spot chosen is safe for
drilling. Do not cut through surfaces that have
hazards
concealed behind them, such as electrical wiring,
conduits or plumbing. If you are not sure, consult a
professional installer before you proceed.
W
A
R
N
IN
G
: Make sure the spot chosen is safe for
drilling. Do not cut through surfaces
that have hazards
concealed behind them, such as electrical wiring,
conduits or plumbing. If you are not sure, consult a
professional installer before you proceed.
W
A
R
N
IN
G
: Make
sure the spot chosen
is safe for drilling. Do
not cut through
surfaces that have
hazards concealed
behind them, such
as electrical wiring,
conduits or
plumbing. If you are
not sure, consult a
professional installer
before you proceed.
W
A
R
N
IN
G
: Make sure the spot
chosen is safe for drillin
g. Do not cut
through surfaces that have hazards
concealed behind them, such as
electrical wir
ing, conduits or plumbing.
If you are not sure, consult a
professional installer before you
proceed.
TAPE
HERE
T
ra
n
sla
tio
n
s b
e
lo
w
TAPE
HERE
English &
T
ranslations
W
A
R
N
IN
G
: Make
sure the spot chosen
is safe for drilling.
Do
not cut through
surfaces that have
hazards concealed
behind them, such
as electrical wiring,
conduits or
plumbing. If you are
not sure, consult a
professional installer
before you proceed.
W
A
R
N
IN
G
: Make
sure the spot chosen
is safe for dri
lling. Do
not cut through
surfaces that have
hazards concealed
behind them, such
as electrical wiring,
conduits or
plumbing. If you are
not sure, consult a
professional installer
before you proceed.
W
A
R
N
IN
G
: Make sure the spot
chosen is safe for dril
ling. Do not cut
through surfaces that have hazards
concealed behind them, such as
electrical wiring, conduits or plu
mbing.
If you are not sure, consult a
professional installer before you
proceed.
T
A
P
E
H
E
R
E
TAPE
HERE
DO NOT
CUT A ROUND
GRAY AREA
DO N OT
CUT A ROUND
GRAY AREA
DO NOT
CUT A ROUND
GRAY AREA
DO NOT
CUT AROUND
GRAY A REA
DO N OT
CUT AROUND
GRAY A REA
DO N OT
CUT A ROUND
GRAY AREA
DO N OT
CUT AROUND
GRAY A REA
HD OG GER.book Page 19 Tuesday, July 8, 2003 4:40 PM