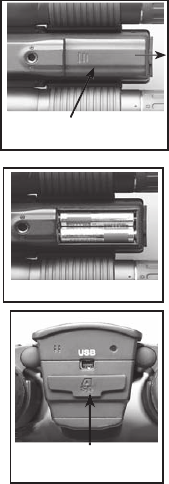
Loading Batteries
Inserting An SD Card
Turn the Compact Instant Replay over, and slide open the battery cover in the
direction as shown on the right. Insert 2 AAA Alkaline or Lithium batteries into
the compartment in the direction indicated by the diagrams inside, then slide the
battery cover back in place until it clicks. Note: Rechargeable NiMh type batteries
may also be used, but some models may not deliver adequate current to power
the Instant Replay. NiMh batteries with a current rating of 2300 mAh or higher
are recommended.
The camera can store from about 15 up to 642 photos in the 16 MB internal
memory, depending on resolution and quality settings (refer to the chart at the back
of this manual). To expand the available storage, you may add an optional Secure
Digital (SD) type memory card, with any capacity up to 1 GB. The card is inserted
into the slot on the back of the camera pod, as shown in the last diagram. Insert
the SD card with the label side facing down. Note: be sure the power is turned off
before inserting or removing cards to prevent possible loss of fi les or damage to the
card. A new card will not require formatting, but a card that has been previously used
in
other devices should be formatted by the Compact Instant Replay before storing
photos on it (See “Setup Menu” in the following section). Note that this will erase all
fi les previously stored on the card, so be sure they have been downloaded or copied
fi rst if you wish to keep them.
Basic Binocular and Camera Setup
Before taking photos or videos, take a few moments to set up the Compact Instant Replay for your individual eyesight and user prefer-
ences. Leave the rubber eyecups in their “up”position if you are not wearing glasses, or roll them down if you are. Grasp the left and
right sides of the binocular, and pull them apart or push them together while looking through the binocular to adjust the eyepiece
spacing until your view is a single circular image. Find a distant object with fi ne detail (tree, sign, brick wall, etc), and adjust the center
focus knob until the object appears sharp when viewed through the left binocular eyepiece only. Then, looking at the same object
through just the right side of the binocular, simply rotate the right eyepiece until the image is equally sharp for your right eye. This is
called the diopter adjustment, and compensates for any difference in sight between your left and right eyes. Once set by following this
initial procedure, you may leave the diopter adjustment alone and just use the center focus knob to bring objects at any distance into
sharp focus through the binoculars (the minimum focus distance is about 16 feet).
Your digital photos and videos are not affected by the center focus knob, as the camera lens located between the binocular objective
lenses does not require focusing. It is preset so that objects ranging from approximately 60 feet to infi nity will be in focus. Note that
the binocular is capable of focusing closer than the camera. Check the live preview image on the LCD display to make sure you are
far enough away to ensure sharp photos. The camera lens provides 8x magnifi cation, which is the same as the binocular’s optics, and is
aligned so that and object centered in the binocular’s view will also be centered in your photos or videos. Therefore, it is not necessary
to have the LCD turned on or even raised while you are shooting photos or videos. Reducing use of the LCD will extend battery life
signifi cantly.
You may want to go into the camera’s menu and set the correct date before using the camera for the fi rst time. Raise the LCD display
and press the power button. After the red power light is on, press LCD/Mode to turn on the display. Press the Menu/OK button in
the center of the keypad, then press the Down arrow 3 times to get to the “Setup” menu. Press the Right arrow once, followed by the
Down arrow to get to “Date”. Then press the Right arrow key twice to enter the Date setup. Use the Left/Right arrow keys to select the
part of the date you want to change, then press Up or Down to change it. To change the date format so Month, Day, and Year are in the
desired order, move to the “arrows” icon on the upper left of the date display and press the Up/Down keys. Set the time (24 hr format)
with the 4 numbers at the bottom of the date display, so that the date will automatically change at midnight for your location. Once
date & time are set, press the Menu/OK button once, then again to save your setting and exit. You can then press the Down arrow key
and chose whether you want the date to appear on the display and your photos or not (“Show Date On/Off”). Then keep pressing the
Left arrow until you are back to “Setup”, move down to “Exit” and press Menu/OK.
Battery Compartment
Cover
Batteries Installed
Card Slot
(lift cover)
8
9