3) Connect the flexible tubing to the connector and
barbecue as described in part d).
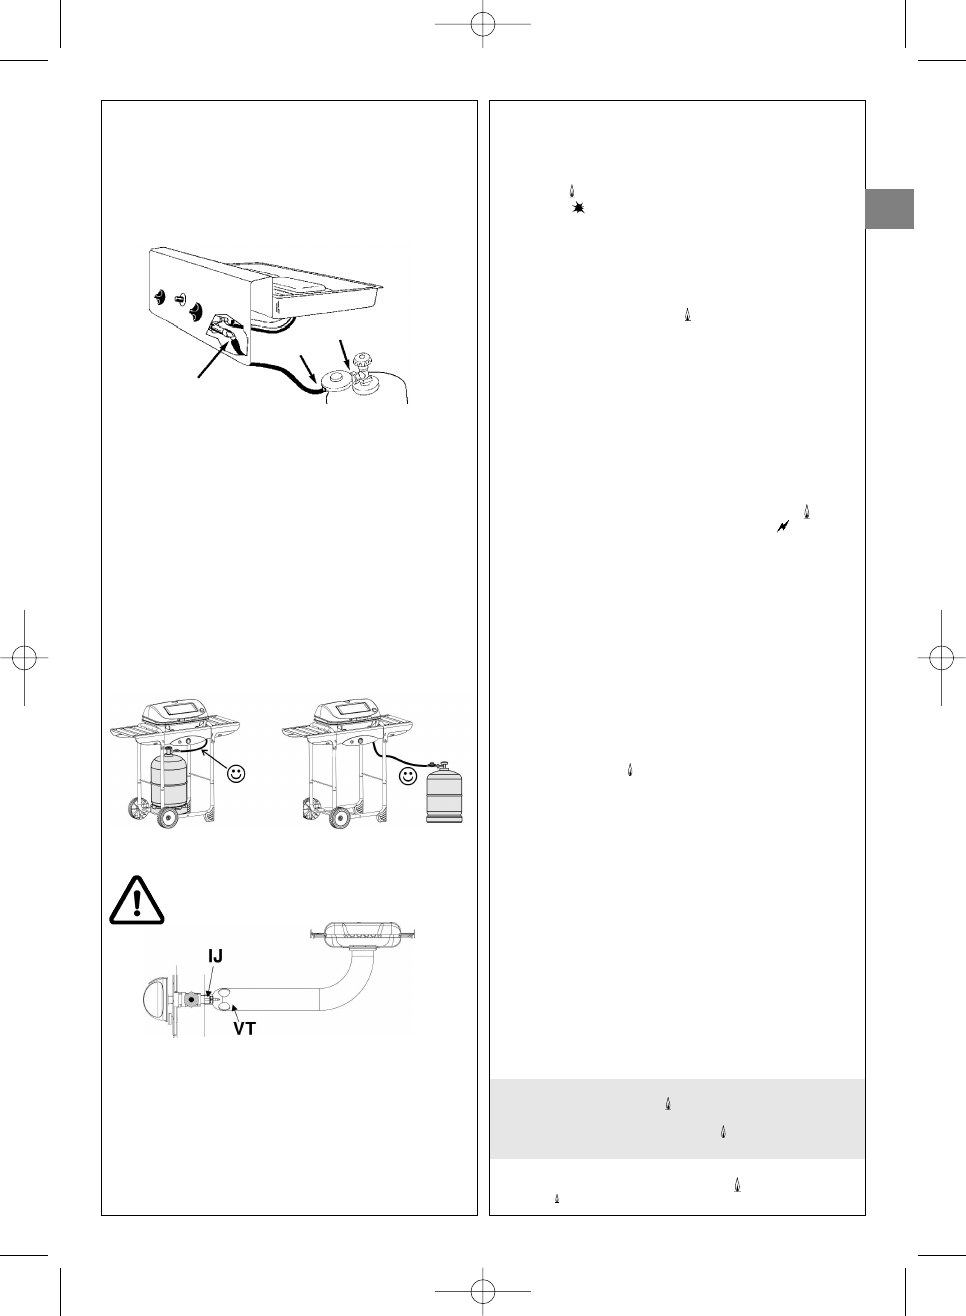
4) Fit the regulator onto the gas cylinder in accordance
with its instructions.
5) Use a gas leak solution to test for leaks. Important:
never use a naked flame to check for gas leaks.
6) Apply the solution to the connections cylinder/regulator/
hose/apparatus (the control knobs should remain
closed: off position (l)). Open the gas cylinder valve.
7) Bubbles in the gas leak solution indicate that there are
gas leaks.
8) The leak can be stopped by tightening any hose
connection or replacing any faulty component. The
barbecue must not be used until the leak is stopped.
9) Close the valve on the gas cylinder.
Important:
Check for leaks at least once per year and each time the
gas cylinder is replaced.
g) PRIOR TO USE
Never use the barbecue until the instructions have been
read carefully and understood. Also, make certain that:
- there are no leaks
- the venturi tube is not blocked (example: spider webs)
- the hose does not touch any components which may get hot.
- that the ventilation openings in the gas receptacle
housing are not obstructed, if appropriate.
Check that the venturi tube (VT) covers the
injector (IJ).
h) LIGHTING THE GRILL
If your apparatus has 2 control knobs
Read steps 1 to 7 before beginning with step 1.
1) Never light the barbecue with the lid closed, only
with the lid open.
2) Make sure the 2 control knobs are in the "off" (l)
position.
3) Push the end of the hose completely onto the
regulator nozzle and secure with a suitable clip. Fit the
regulator onto the gas cylinder in accordance with its
instructions.
4) Open the gas cylinder valve.
5) Press one of the 2 control knobs and turn it to the full
flame ( ) position, then immediately press the igniter
button ( ) until you hear the click. Repeat 3 or 4
times if necessary until the burner is lit.
6) If the burner fails to light, turn the control knob to the
"off" position (l). Wait 5 minutes before repeating the
operation.
7) As soon as the burner is lit, the other burner
automatically lights when the second control knob is
placed in the full flame ( ) position without pushing
the automatic igniter button again.
Important:
If the burner fails to light after the 2
nd
attempt, turn the
control knobs to the "off" position (l) and check that the
burner oulets and venturi tubes are not blocked.
If your apparatus has only 1 control knob
Read steps 1 to 5 before beginning with step 1.
1) Never light the barbecue with the lid closed, only
with the lid open.
2) Make sure the control knob is in the "off" (l) position.
3) Open the gas cylinder valve.
4) Push the adjustment lever down and turn it anti-
clockwise until it is in the full flow position ( ), then
immediately press the ignition button ( ).
down until you hear a click. Repeat 3 or 4 times if
necessary.
5) If the burner does not ignite after 4 or 5 attempts, wait
5 minutes and then repeat the operation.
Important:
If the burner fails to light after the 2
nd
attempt, turn the
control knob to the "off" position (l) and check that the
burner outlets and the venturi tube are not blocked.
i) GRILL MANUAL LIGHTING
If the automatic ignition should fail to operate, turn the
control knob to the "off" position (l) and wait 5 minutes.
Insert a burning match into one of the side openings of the
base, and turn the knob on the right of the control panel
onto the full flame ( ) position.
j) EXTINGUISHING THE GRILL
Return the control knobs to the "off" position (l), then
close the cylinder valve.
k) REPLACING THE GAS CYLINDER
- Always work in a well ventilated area and never in the
presence of a flame, spark or heat source.
- Return the control knobs in the "off" position (l) then
close the cylinder valve.
- Remove the regulator, check that the sealing joint is in
good condition.
- Put the full cylinder in place, refit the regulator, taking care
not to apply stress to the hose. Check for gas leaks.
l) OPERATION
It's recommended that protective gloves be worn to
handle components which may be very hot.
Before cooking, preheat the barbecue for about 10
minutes in the full flame ( ) position with the lid closed.
When using the barbecue for the first time, preheat for
about 20 minutes in the full flame ( ) position, in order to
eliminate the smell of paint from new components.
Cooking speed can be regulated via the adjustment
buttons: between the full flow position ( ) and medium flow
position ( ).
GB
9