The extractor hood should only be
connected to an earthed socket that has
been installed according to relevant
regulations.
If possible, site the earthed socket directly
behind the chimney panelling.
q
The earthed socket should be
connected via its own circuit.
q
If the earthed socket is no longer
accessible following installation of the
extractor hood, ensure that there is a
permanently installed disconnector.
If it is necessary to wire the extractor
hood directly into the mains:
The extractor hood should only be
connected to the electricity supply by a
properly qualified electrician.
A separator must be installed in the
household circuit. A suitable separator is a
switch that has a contact gap of more than
3 mm and interrupts all poles. Such
devices include circuit breakers and
contactors.
ṇ If the connecting cable for this
appliance is damaged, the cable must be
replaced by the manufacturer or his
customer service or a similarly qualified
person in order to prevent serious injury to
the user.
Electrical data:
Are to be found on the name plate inside
the appliance after removal of the filter
frame.
ṇ Before undertaking any repairs,
always disconnect the extractor hood from
the electricity supply.
Length of the connecting cable: 1.30 m.
This extractor hood corresponds to EC
regulations concerning RF interference
suppression.
Electrical connection
WARNING: THIS APPLIANCE MUST BE
EARTHED
IMPORTANT: Fitting a Different Plug:
The wires in the mains lead are coloured in
accordance with the following code:
Green and Yellow – Earth
Blue – Neutral
Brown – Live
If you fit your own plug, the colours of
these wires may not correspond with the
identifying marks on the plug terminals.
This is what you have to do:
1.Connect the green and yellow (Earth)
wire to the terminal in the plug marked
‘E’ or with the symbol ( ), or
coloured green or green and yellow.
2.Connect the blue (Neutral) wire to the
terminal in the plug marked ‘N’ or
coloured black.
3.Connect the brown (Live) wire to the
terminal marked ‘L’, or coloured red.
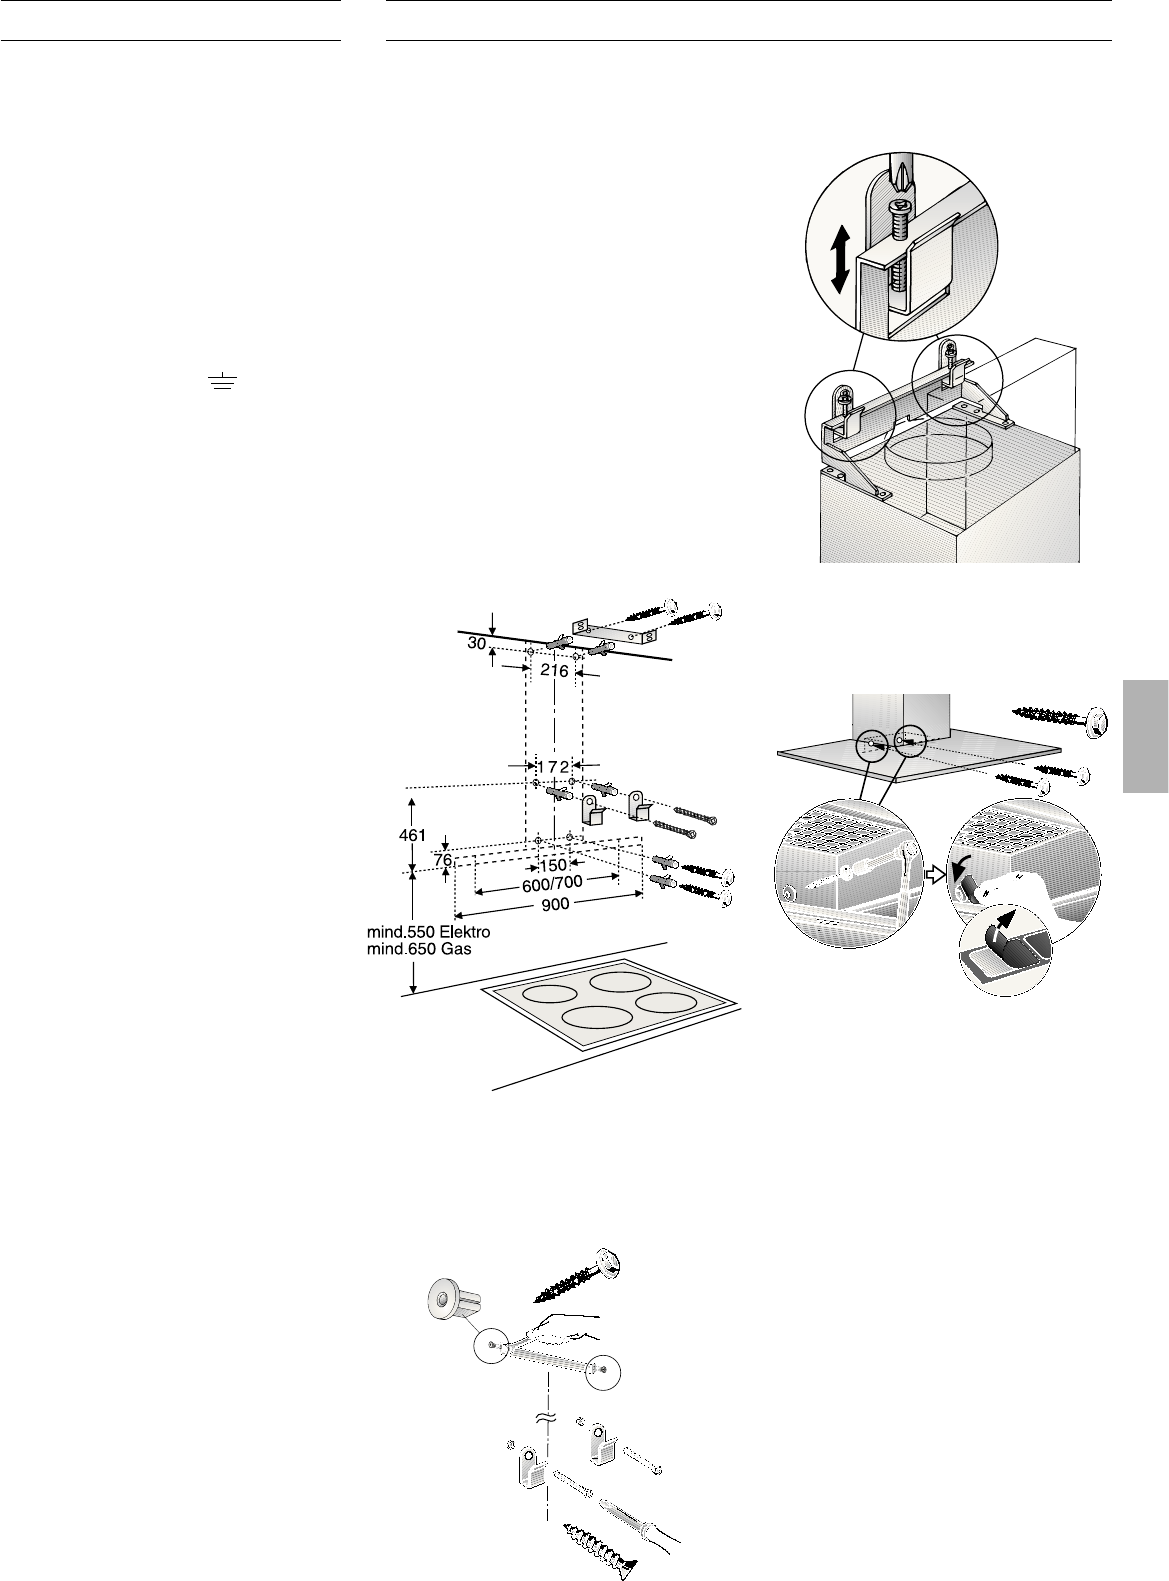
Installation
This extractor hood is intended to be
mounted onto the kitchen wall.
1. Remove the grease filter
(refer to Operating Instructions).
2. Draw a line on the wall from the ceiling
to the lower edge of the hood at the
centre of the location where the hood is
going to be mounted.
3. Use the template to mark the points on
the wall where the screws will be
mounted. In order to make it easier to
hook the hood onto the screws, draw
the outline of the area where the hood
will be attached.
ṇ Ensure that the minimum distance bet-
ween the hob and the extractor hood is
maintained – 550 mm for an electric hob
and 650 mm for a gas hob. The bottom
edge of the template equates to the lower
edge of the extractor hood.
4. Drill 4 x l 8 mm holes for the extractor
hood and 2 x l 8 mm holes for the
chimney panelling. Insert plugs into the
holes so that they are flush with the wall.
7. Attach the extractor hood.
Adjust the height and align horizontally
with the adjusting screws.
Note: Take into account any special
accessories that are going to be fitted.
5. Attach the 2 enclosed spacers to the
fixing bracket for the flue duct panelling.
6. Screw on the upper and the two lower
fixing brackets.
08. Screw in lower screws (hex screws).
09. Stick protective film over the holes of
the 2 lower mounting bolts in the
protective grid.
10. Connect up the air outlet pipe.
11. Connect the hood to the electricity
supply.
12. Remove the protective film from the two
flue ducts.
ṇ Take care not to damage the
stainless steel surfaces which are
susceptible to scratches etc.
13. Insert the upper flue duct (slots
downwards) into the lower flue duct.
ṇ Protect the cover panels from
scratches, for example by laying the
template used for marking the wall over
the top edge of the lower section.