155597
188
Zoom out
Zoom in
Vorherige Seite
1/197
Nächste Seite
Nederlands
1
Gebruikershandleiding
DEZE GEBRUIKSAANWIJZING KAN FOUTEN EN OMISSIES BEVATTEN.
ONTWERP EN SPECIFICATIE ZIJN ONDERHEVING AAN VERANDERING ZONDER
VOORAFGAANDE MEDEDELING.
Niets van dit document mag gereproduceerd of overgedragen worden in welke vorm of op welke
wijze, elektronisch of mechanisch, dan ook; hieronder vallen fotokopiëren en opnemen of het
vertalen naar een andere taal met welk doel dan ook zonder de vooraf geschreven toestemming
van de fabrikant.
Alle genoemde merknamen, logos en geregistreerde handelsmerken zijn eigendom van hun
respectievelijke eigenaren.
© 2006. Alle rechten voorbehouden.
Versie 1.0 04202006
Lees dit boekje en neem de waarschuwende mededelingen in acht voordat u het product
gebruikt.
Waarschuwing! Onjuist gebruik van de batterij kan er voorzorgen dat de batterij heet wordt
en explodeert.
Electrical and electronic equipment ( EEE ) contains materials, parts and
substances which can be dangerous to the enviroment and harmful to human
health if waste of electrical and electronic equipment ( WEEE ) is not disposed
of correctly.
Equipments which are marked with the WEEE logo (as shown on the left ),
should not be thrown away with your household waste. Contact your Local
Authority Waste Disposal Department as they will be able to provide details
of the recycling options available in your area.
Note:
Elektrische en elektronische apparaatuur (EEE ‘Electrical and electronic equipment’) bevat
materiaal, onderdelen en substanties die schadelijk
voor het milieu en gevaarlijk voor de menselijke gezondheid kunnen zijn als afval van
elektronische en elektrische apparaten
(WEEE ‘Wast of electrical and electronic equipment’) niet op de juiste wijze verwijderd wordt.
A
pparaten die gemarkeerd zijn met het WEE
E
-logo (zoals links afgebeeld), dienen niet met uw
gewone huishoudafval weggegooid te worden.
Neem contact op met uw Gemeente omdat zij in staat zijn om meer informatie te geven over
de recycling opties
Beschikbaar in uw
g
emeente.
Opmerking:
Nederlands
2
Inhoud
Introductie------------------------------------------------------------------------------------------------------------------ 4
Eigenschappen------------------------------------------------------------------------------------------------------------ 4
Verpakkingsinhoud------------------------------------------------------------------------------------------------------- 4
Overzicht------------------------------------------------------------------------------------------------------------------- 5
Bediening van de knoppen--------------------------------------------------------------------------------------------- 6
Display----------------------------------------------------------------------------------------------------------------------- 7
On-screenmenu bediening---------------------------------------------------------------------------------------------- 8
Aan- en uitschakelen--------------------------------------------------------------------------------------------------- 9
Veranderen van modus------------------------------------------------------------------------------------------------ 9
Naar het Hoofdmenu --------------------------------------------------------------------------------------------------- 9
Het afspelen van een film ----------------------------------------------------------------------------------------------10
Een film overslaan-----------------------------------------------------------------------------------11
Snel vooruit- en achteruitspoelen----------------------------------------------------------------11
Het afspelen van een song-------------------------------------------------------------------------------------------- 11
Een Song overslaan--------------------------------------------------------------------------------- 12
Snel vooruit- en achteruitspoelen---------------------------------------------------------------- 12
FM Radio (optioneel)----------------------------------------------------------------------------------------------------- 12
Het kiezen van kanalen---------------------------------------------------------------------------- 12
Dictafoon-------------------------------------------------------------------------------------------------------------------- 13
Opnamemodus--------------------------------------------------------------------------------------- 14
Het afspelen van de dictafoon----------------------------------------------------------------------------------------- 14
Een opname overslaan----------------------------------------------------------------------------- 15
Snel vooruit- en achteruitspoelen---------------------------------------------------------------- 15
Foto’s bekijken--------------------------------------------------------------------------------------------------------------15
E-Book------------------------------------------------------------------------------------------------------------------------16
Systeeminstellingen-------------------------------------------------------------------------------------------------------16
Klok------------------------------------------------------------------------------------------------------ 17
LCD instelling---------------------------------------------------------------------------------------- 17
Verander de On-screenmenutaal---------------------------------------------------------------- 18
ScreenSaver Selectie------------------------------------------------------------------------------ 19
Stroom uit---------------------------------------------------------------------------------------------- 19
Herhaalmodus---------------------------------------------------------------------------------------- 19
Online modus----------------------------------------------------------------------------------------- 20
Controleer het geheugen------------------------------------------------------------------------- 20
Toon firmaware versie------------------------------------------------------------------------------20
Firmware upgrade----------------------------------------------------------------------------------- 20
Game functie----------------------------------------------------------------------------------------------------------------20
Herhaalmodus------------------------------------------------------------------------------------------------------------ 21
EQ-Modus------------------------------------------------------------------------------------------------------------------ 21
Veranderen van de afspeelsnelheid------------------------------------------------------------------------------- 22
A-B Herhalen---------------------------------------------------------------------------------------------------------------22
Herhaaltijden---------------------------------------------------------------------------------------------------------------22
Replay Gap----------------------------------------------------------------------------------------------------------------- 22
Het installeren van de driver en software----------------------------------------------------------------------- 23
Systeem vereisten---------------------------------------------------------------------------------------------------------23
Het installeren van de driver en software------------------------------------------------------------------------ 23
AMV-conversie------------------------------------------------------------------------------------------------------------- 25
1. Samenvatting------------------------------------------------------------------------------------ 25
2. Het installeren van de software------------------------------------------------------------------ 25
3. Het gebruiken van de software------------------------------------------------------------------ 26
4. Converteer het bestand---------------------------------------------------------------------------- 28
Nederlands
3
5. Het downloaden van mediabestanden van internet en het converteren van bestanden.......... 41
6. Opgelet----------------------------------------------------------------------------------------------- 41
Mediamanager ------------------------------------------------------------------------------------------------------------ 42
1 Mediamanager introductie-------------------------------------------------------------------------- 42
2 Installeren en verwijderen-------------------------------------------------------------------------- 42
3 Snelstartgids------------------------------------------------------------------------------------------- 43
4 Aanwijzingen------------------------------------------------------------------------------------------- 45
5 Het converteren van ACT. Audio naar WAV-audio ---------------------------------------- 55
Songteksten bewerken-------------------------------------------------------------------------------------------------58
Het downloaden van MP3 en WMA songs of AMV-films----------------------------------------------------59
Mapbeheer en navigatie------------------------------------------------------------------------------------------------62
Mapbeheer en navigatie-------------------------------------------------------------------------------------------------62
Mapnavigatie--------------------------------------------------------------------------------------------------------------- 62
Submap----------------------------------------------------------------------------------------------------------------------62
Root Directory-------------------------------------------------------------------------------------------------------------- 62
Het gebruik van de USB massa-opslagfunctie---------------------------------------------------------------- 62
Het ontkoppelen van de USB-kabel--------------------------------------------------------------------------------62
Het formatteren van het interne geheugen---------------------------------------------------------------------- 64
Het gebruiken van de software--------------------------------------------------------------------------------------- 64
Formatteren in Windows ® --------------------------------------------------------------------------------------------- 64
Probleemoplossing----------------------------------------------------------------------------------------------------- 65
Technische specificaties---------------------------------------------------------------------------------------------- 67
Nederlands
4
Introductie
Bedankt voor het aanschaffen van onze digitale MP3-speler. U kunt deze
veelzijdige MP3-speler niet alleen gebruiken voor het afspelen van MP3 en WMA
tracks maar ook voor het afspelen van AMV-films, het opnemen van stemmen en
USB flash disk.
Eigenschappen
z Kleuren TFT 1.8” display
z Ondersteunt het afspelen van MP3 (MPEG 1/2 Layer2) en WMA-muziek
z Ondersteunt het afspelen van AMV-films
z Game ondersteuning
z E-book ondersteuning
z Ondersteunt JPG, BMP en GIF-afbeeldingen
z Digitale dictafoon
z USB mass storage functie voor gegevens opslag
z 7 EQ-instellingen
z Lithium accu die lange speeltijd ondersteunt
z Driver installatie is niet nodig (behalve voor Windows® 90/98SE)
Verpakkingsinhoud
z Gebruikershandleiding
z Koptelefoons
z 2,5mm tot 3,5mm koptelefoonadapter
z Siliconen zak
z Stroom oplader
z USB-kabel
z CD met daarop de driver en software
Nederlands
5
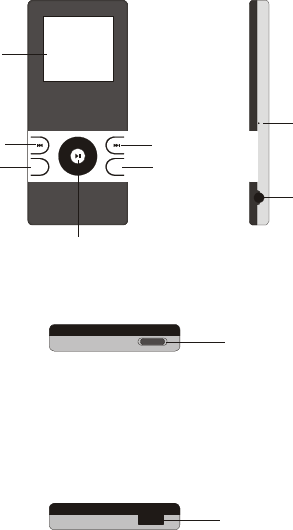
Overzicht
Voor- en rechterzijde
Boven- en onderkant
OFF ONOFF ON
On/Off
USB Port
MENU VOL
Next/
Fast Forward
Menu/Confirm/
Display Lyric
Display
Volume+/-
Previous/
Fast Backward
Microphone
Earphone Jack
Play/Pause
Nederlands
6
Bediening van de knoppen
Bediening
KOPTELEFOONA
ANSLUITING
Sluit de koptelefoon aan op de koptelefoonaansluiting.
USB-poort Sluit de USB-kabel aan op de USB-poort van de computer voor
het uploaden van tracks.
MICROFOON Microfoon voor de dictafoon
NEXT/
FAST FORWARD
z Druk in de AFSPEELMODUS de knop in en laat het
onmiddellijk weer los om naar de volgende track te
gaan.
z Houd in de AFSPEELMODUS de knop ingedrukt om
snel vooruit te spoelen.
MENU/
CONFIRM/
DISPLAY LYRIC
z Houd in de STOPMODUS deze knop ingedrukt om naar
het hoofdmenu te gaan om de modi te veranderen.
z Druk in het menu of submenu pagina deze knop om de
selectie van de menu items te bevestigen.
z Houd in de AFSPEELMODUS deze knop ingedrukt om
de songtekst te tonen. (de songtekst is
noodzakelijkerwijs bewerkt door de gebruiker voordat
deze op het LCD-scherm verschijnt).
PREVIOUS/
FAST BACKWARD
z Druk in de AFSPEELMODUS de knop in en laat het
onmiddellijk weer los om naar de vorige song te gaan.
z Houd in de AFSPEELMODUS de knop ingedrukt om
snel terug te spoelen.
VOLUME +
VOLUME -
z Druk op de VOL-knop om het volume in te stellen,
verhoog het volume door op de NEXT-knop te drukken.
z Druk op de VOL-knop om het volume in te stellen,
verlaag het volume door op de PREVIOUS-knop te
drukken.
ON/
OFF/
z Schuif in de uit-modus de knop naar rechts om de
speler aan te zetten.
z Schuif in de STOP-modus de knop naar links om de
speler uit te schakelen.
PLAY
PAUSE/
z Als het apparaat zich in de STOPMODUS bevindt druk
dan op de knop om de tracks af te spelen
z Als het apparaat zich in de AFSPEELMODUS bevindt
druk dan op de knop om de afspelende track te
pauzeren.
z Wanneer de ON/OFF-knop op ON gericht staat, houd
deze dan ingedrukt om de speler uit te schakelen.
DISPLAY Toont de functioneringsstatus, songteksten met achtergrondlicht.
Nederlands
7
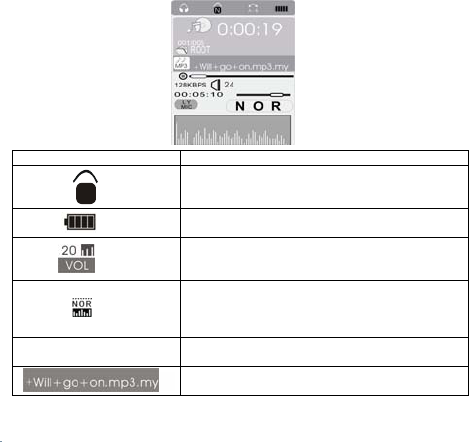
Display
Display icoon Functie
Herhaalmodus
Laat de op dit moment gebruikte herhaalmodus zien.
Accu niveau
Toont het niveau van de accu.
Volume verhoging of verlaging
Toont het huidige volume
EQ-modus
Geeft de huidige modus van de equalizer aan. Er zijn
7 verschillende EQ-instellingen beschikbaar om uit te
selecteren.
128KBPS Bit rate
Laat de bit rate van de song zien.
De naam van de spelende song
Laat de naam van de huidige song zien
N
Nederlands
8
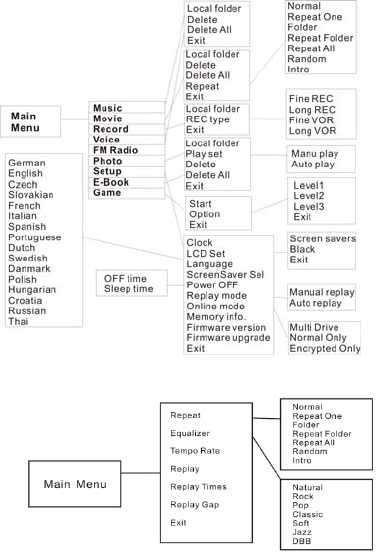
On-screenmenu bediening
Tijdens de STOPMODUS (er speelt geen song of opname)
Opmerking: “FM” is alleen beschikbaar voor een speler met een ingebouwde FM-functie.
Tijdens de AFSPEELMODUS (er speelt song of opname).
Nederlands
9
Aan- en uitschakelen
Het aanzetten van het apparaat.
Schuif de ON/OFF-knop naar links om de speler aan te zetten. Het opstartlogo
verschijnt op het scherm.
Het uitzetten van het apparaat.
Schuif de ON/OFF-knop naar rechts om de speler uit te zetten.
Opmerking: Wanneer de ON/OFF-knop op ON gericht staat, houd dan de PLAY/PAUSE-knop
ingedrukt om de speler uit te schakelen.
Accu niveau
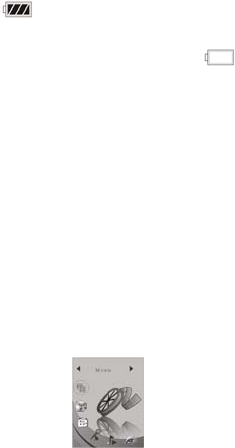
Het batterij icoontje op het display toont het accu niveau.
Accu bijna leeg
Als het batterij icoontje het volgende toont dan geeft het aan dat de accu
bijna leeg is. Laad uw speler opnieuw op met de oplader.
Accu opladen
Gebruik de USB-kabel om het apparaat en energie oplader aan te sluiten voor het
heropladen. Wanneer het indicatielampje groen gaat branden, is het helemaal
opgeladen.
Opmerking: 1. Laat de accu helemaal op voordat het apparaat voor de eerste keer gebruikt wordt.
2.Laat de accu opnieuw op als het apparaat voor een lange tijd niet gebruikt is.
Het veranderen van de modus
Naar het hoofdmenu
1. Schuif de ON/OFF-knop naar enter onderaan de hoofmenupagina. U bent
nu in de hoofdmenupagina.
*Opmerking: “FM” is alleen beschikbaar voor een speler met een ingebouwde FM-functie.
Nederlands
10
2. Druk op de PREVIOUS/NEXT-knop om naar andere menu items te gaan in
de volgorde van Movie, Music, FM Radio, Record, Voice, Photo Browse, E-
book, System setup en Game.
3. Selecteer het door u gewenste menu item en druk nogmaals op de
MENU/CONFIRM-knop om naar de submenupagina te gaan.
Het afspelen van een film.
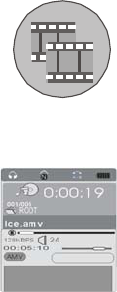
1. Na het betreden van de hoofdmenupagina, selecteer Movie en druk op de
MENU/CONFIRM – knop om naar de filmafspeelmodus te gaan.
Opmerking: Alleen het AMV-formaat wordt afgespeeld in de Afspeelmodus.
2. Het display zal teruggaan naar het volgende scherm in de STOPMODUS.
3. Druk op de PREVIOUS/NEXT-knop om de door u gewenste film te
selecteren.
4. Druk op de PLAY/PAUSE knop om de geselecteerde AMV-film af te spelen.
Als er geen AMV-bestanden zijn, dan verschijnt: “No Movie Files” op het
display.
Nederlands
11
Een film overslaan.
Druk op de PREVIOUS/NEXT-knop om naar de volgende of vorige film te gaan.
Snel vooruit- en achteruitspoelen
Snel voor- of achteruit door de PREVIOUS/NEXT-knop ingedrukt te houden tijdens
het afspelen van een film.
Het afspelen van een song.
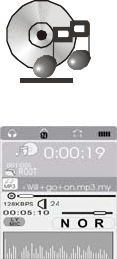
1. Na het betreden van de hoofdmenupagina, selecteer Music en druk op de
MENU/CONFIRM – knop om naar de songafspeelmodus te gaan.
Opmerking: Alleen MP3 en WMA-formaat worden afgespeeld in de Afspeelmodus.
2. Het display zal naar het volgende scherm in de STOPMODUS gaan.
3. Druk op de PREVIOUS/NEXT-knop om de door u gewenste song te
selecteren.
4. Druk op de PLAY/PAUSE knop om de geselecteerde MP3 of WMA-muziek
af te spelen. Als er geen MP3 en WMA-bestanden zijn, dan verschijnt: “No
Files” op het display.
Nederlands
12
Een song overslaan
Druk op de PREVIOUS/NEXT-knop om naar de volgende of vorige song te gaan.
Snel vooruit- en achteruitspoelen
Snel voor- of achteruit door de PREVIOUS/NEXT-knop ingedrukt te houden tijdens
het afspelen van muziek.
*FM Radio
*Opmerking: “FM” is alleen beschikbaar voor een speler met een ingebouwde FM-functie.
Het kiezen van kanalen.
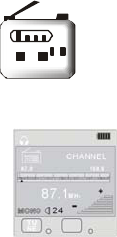
1. Na het betreden van de hoofdmenupagina, selecteer FM en druk op de
MENU/CONFIRM – knop om naar de FM-radiomodus te gaan.
2. Houd de PREVIOUS/NEXT-knop ingedrukt, de speler kan nu automatisch
scannen naar FM-kanalen, gebruikers zijn vrij om verschillende FM-kanalen
te kiezen.
3. Bewaar gevonden FM-kanalen.
Druk op de MENU/CONFIRM-knop om naar het FM submenupagina te gaan,
druk op de MENU/CONFIRM-knop om de Save functie te selecteren.
4. Selecteer de opgeslagen FM-kanalen.
Druk op de PLAY-knop om het in sequentie opgeslagen FM-kanaal te
selecteren.
Nederlands
13
Dictafoon
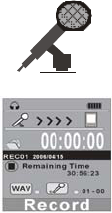
1. Na het betreden van de hoofdmenupagina, selecteer Record en druk op de
MENU/CONFIRM – knop om naar de dictafoonmodus te gaan.
Opmerking: De opgenomen stem zal alleen in ACT of WAV-formaat
opgeslagen worden. Stel het van te voren in voordat er opgenomen gaat
worden.
2. Het volgende display zal verschijnen als u naar de Dictafoonmodus gegaan
bent.
3. Voordat u gaat opnemen, kunt u het REC – type instellen. Druk op de
MENU-knop om naar REC type te gaan, en druk daarna op de
PREVIOUS/NEXT-knop om de REC-modus te selecteren.
4. Er zijn vier verschillende opname modi beschikbaar: Fine Rec, Long REc,
Fine VOR en Long VOR. Druk op de MENU/CONFIRM-knop om de selectie
te bevestigen.
5. Plaats de geluidsbron in de nabijheid van de ingebouwde microfoon. Druk
op de PLAY / PAUSE-knop om het opnemen te beginnen. U kunt de
PLAY/PAUSE-knop indrukken om de opname te pauzeren of te stoppen.
Wanneer u klaar bent met opnemen houd u de PLAY/PAUSE-knop ingedrukt. Laat
de knop los als de tekst “Saving…” op het display verschijnt. De opgenomen
audiobestanden worden standaard opgeslagen in de Root Directory. Zie de
Verander van Directory paragraaf voor details.
Nederlands
14
Opnamemodus
Fine REC
Het heeft een hoge opname kwaliteit in WAV-formaat maar de
bestandsgrootte is relatief gezien groter.
Long REC
Het heeft een lage opname kwaliteit in WAV-formaat maar de
bestandsgrootte is relatief gezien kleiner.
Fine VOR
De dictafoon begint wanneer er een geluid gehoord wordt. Als er geen geluid
is, dan zal het opnemen pauzeren. Het zal doorgaan met opnemen als ere
en geluid gehoord wordt.
Het heeft een hogere opname kwaliteit en is gevoeliger, relatief gezien, dan
de 8K VOR.
Opmerking: Deze functie van de Fine VOR is onbelangrijk als de omgeving niet stil genoeg
is.
Long VOR
De dictafoon begint wanneer er een geluid gehoord wordt. Als er geen
geluid is, dan zal het opnemen pauzeren. Het zal doorgaan met opnemen
als ere en geluid gehoord wordt.
Het heeft een lager opname kwaliteit en is minder gevoelig, relatief gezien,
dan de 32K VOR.
Het afspelen van de dictafoon.
1. Na het betreden van de hoofdmenupagina, selecteer Voice en druk op de
MENU/CONFIRM – knop om naar de Playing Recorded Voice-modus te
gaan.
2. Het display zal teruggaan naar het volgende scherm in de STOPMODUS.
Nederlands
15
3. Druk op de PREVIOUS/NEXT-knop om de door u gewenste opname te
selecteren.
4. Druk op de PLAY/PAUSE knop om de geselecteerde audiobestanden af te
spelen. Als er geen opgenomen audiobestanden zijn, dan verschijnt: “No
Files!” op het display.
Een opname overslaan.
Druk op de PREVIOUS/NEXT-knop en laat deze onmiddellijk los om naar de
vorige of volgende opname te gaan.
Snel vooruit- en achteruitspoelen
Houd de PREVIOUS/NEXT-knop ingedrukt om snel vooruit- of achteruit te spoelen.
Foto’s bekijken.
1. Na het betreden van de hoofdmenupagina, selecteer Photo Browse en druk
op de MENU/CONFIRM – knop om naar de View photos functie te gaan.
Opmerking: Alleen JPG, BMP en GIF-formaat worden afgespeeld in de
Photo Browse functie.
2. Druk op de PREVIOUS/NEXT-knop om de door u gewenste foto te
selecteren.
E-book
Nederlands
16
1. Na het betreden van de hoofdmenupagina, selecteer E-book en druk op de
MENU/CONFIRM – knop om naar de E-book functie te gaan.
Opmerking: Alleen TXT-formaat wordt afgespeeld in de E-book functie.
2. Druk op de PREVIOUS/NEXT-knop om het door u gewenste artikel te
selecteren.
Systeeminstellingen.
2. Na het betreden van de hoofdmenupagina druk op de PREVIOUS/NEXT-
knop om de SETUP functie te selecteren.
2. Druk op de MENU/CONFIRM knop om naar
het SETUP menupagina te gaan.
Clock
LCD Set
Language
ScreenSaver Sel
Power Off
Replay Mode
Online Mode
Memory Info
Firmware version
Firmware Upgrade
Exit
Nederlands
17
Clock
1. Na het betreden van de SETUP menupagina, selecteer klok.
2. Druk op de VOLUME- knop om naar het instellen van Year, Month, Day en
Time te gaan.
3. Druk op de PREVIOUS/NEXT-knop om Year, Month, Day en Time te
verhogen of te verlagen.
4. Druk op de MENU/CONFIRM knop om de huidige datum en tijd instellingen
te bevestigen.
LCD instelling.
Na het betreden van de SETUP menupagina druk op de PREVIOUS/NEXT-knop
om de LCD Set functie te selecteren. Er zijn screensavers en Black onder deze
optie.
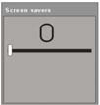
Screen Savers
1. Selecteer, na het betreden van het LCD Set submenu, Screen Savers door
op de MENU/CONFIRM-knop te drukken.
2. Druk op de PREVIOUS/NEXT-knop om de Screen Savers op 0, 5, 10, 15,
20, 25 of 30 seconden in te stellen. In de inactieve modus (er wordt geen
knop ingedrukt) zal het LCD-scherm automatisch naar de geselecteerde
screensaver gebaseerd op door u ingestelde lengte. U kunt "'0" instellen om
deze functie uit te schakelen. Zie de Screensaver selectie om een
screensaver te selecteren.
Verander de Black tijd van het LCD-scherm.
1. Selecteer, na het betreden van het LCD Set submenu, BLACK door op de
MENU/CONFIRM-knop te drukken.
Nederlands
18
2. Druk op de PREVIOUS/NEXT-knop om de tijd van het scherm zwart maken
in 0, 5,10,15, 20 25,of 30 seconden in te stellen. In de inactieve modus (er
wordt geen knop ingedrukt) gaat het LCD-scherm automatisch op zwart na
het door u ingestelde aantal seconden.
U kunt “0” instellen om deze functie uit te schakelen.
Verander de On-screenmenutaal
Na het betreden van de SETUP menupagina druk op de PREVIOUS/NEXT-knop
om de SETUP functie te selecteren. De onderstaande elf talen zijn beschikbaar.
Screensaver selectie
Na het betreden van het SETUP men, druk op de PREVIOUS/NEXT-knop om
ScreenSaver Sel te selecteren. U kunt de PREVIOUS/NEXT-knop indrukken om te
kiezen tussen No 1 en No 2. Er zijn twee soorten schermafbeeldingen waaruit u
kunt kiezen.
Uitschakelen
1. Na het betreden van de SETUP menupagina druk op de PREVIOUS/NEXT-
knop om de Power off functie te selecteren. Deze optie heeft Off Time en
Sleep Time als opties.
Simple Chinese
English
Trad Chinese
Japanese
Korean
French
German
Italian
Spanish
Portuguese
Dutch
Swedish
Denmark
Polish
Hungarian
Czech
Russia
Thai
Nederlands
19
2. Druk voor OFF Time op de PREVIOUS/NEXT-knop om de uitschakelingtijd op
0, 10, 20, 30, 40, 50 of 60 seconden in te stellen. In de STOP-modus zal de
speler automatisch uitgeschakeld worden op basis van de tijdslengte die u
ingesteld heeft. U kunt “0” instellen om deze functie uit te schakelen.
3. Druk voor SLEEP Time op de PREVIOUS/NEXT-knop om de sleep time op 0,
10, 20, 30, 40, 50 of 60 seconden in te stellen. In de inactieve modus (er
wordt geen knop ingedrukt) gaat de speler automatisch uit na het door u
ingestelde aantal seconden.
U kunt “0” instellen om deze functie uit te schakelen.
Herhaalmodus
Er zijn twee opties: Manual Replay en Auto Replay, druk op de PREVIOUS/NEXT-
knop om de door u gewenste optie te selecteren.
Online Modus
Installeer de software en schakel de partitie delen en het instellen van het
wachtwoord functies in voor dat u deze functie gebruikt. Zie Het delen van een
partitie en Het instellen van een wachtwoord voor informatie.
Er zijn drie keuzemogelijkheden: Multi Drive, Normal Only en Encrypted Only.
Multi-Drive
Als u de Multi Drive selecteert, dan kan de gebruiker zowel de normale als de
gecodeerde drive zien.
Normal Only
Als u Normal Only selecteert, dan kan de gebruiker alleen de normale drive zien
terwijl de gecodeerde drive verborgen is.
Encrypted Only
Als u Encrypted Only selecteert, dan kan de gebruiker alleen de gecodeerde drive
zien terwijl de normale drive verborgen is.
Opmerking: Deze functie kan alleen ondersteunt worden onder Windows 98/Me/XP of Windows
2000 met SP4 en de partitie verdeel functie ingeschakeld.
Geheugen controle
Nederlands
20
Selecteer na het betreden van de SETUP menupagina, Memory Info door op de
MENU/CONFIRM-knop te drukken om het gebruikte geheugen te controleren. Het
gebruikte geheugen wordt getoond op het scherm.
Toon Firmware versie.
Selecteer na het betreden van de SETUP menupagina Firmware Version door op
MENU/CONFIRM te drukken. De datumcode en de versie van de firmware wordt
als referentie op het display getoond.
Firmware Upgrade
Het wordt gebruikt als er een firmware upgrade is.
Opmerking: Het wordt ten sterkste aangeraden om het upgraden te laten uitvoeren door
een gekwalificeerd monteur om schade aan de speler te vermijden.
Game functie
1. Na het betreden van de hoofdmenupagina, selecteer Game en druk op de
MENU/CONFIRM – knop om naar de Game functie te gaan. Er slechts één
spel op deze speler beschikbaar.
Herhaalmodus
Druk in de AFSPEELMODUS op de MENU/CONFIRM-knop en selecteer Repeat
om naar de herhaalmodus te gaan. Er zijn zeven herhaalmodi beschikbaar:
Normal, Repeat One, Folder, Repeat Folder, Repeat All, Random en Intro.
Normal
Nederlands
21
Alle tracks wordt één voor één afgespeeld en gestopt bij de laatste track
totdat u deze functie uitschakelt.
Repeat One
De spelende muziek wordt één keer herhaald totdat u deze functie
uitschakelt.
Folder
Alle muziekbestanden in de geselecteerde map worden afgespeeld totdat u
deze functie uitschakelt.
Repeat Folder
Alle muziekbestanden in de geselecteerde map worden continu afgespeeld
totdat u deze functie uitschakelt.
Repeat All
Alle tracks zullen afgespeeld worden vanaf de eerste tot en met de laatste
en dan herhaald worden van de eerst tot en met de laatste totdat u deze
functie uitschakelt.
Random
Alle muziekbestanden in de op dit moment spelende map worden willekeurig
afgespeeld totdat u deze functie uitschakelt.
Intro
Alle tracks van de huidige tot en met de laatste zullen één voor één voor 10
seconden afspelen totdat u deze functie uitschakelt.
De instelling van de REPEAT-modus is toepasbaar in de Playing Song en
Playing Recorded Voice-modus
EQ-modus.
Druk in de AFSPEELMODUS op de MENU/CONFIRM-knop en selecteer EQ om
naar de EQ-modus te gaan. Er zijn zeven EQ-modi beschikbaar: DBB, Natural,
Rock, Pop, Classic, Soft en Jazz
Druk op de PREVIOUS/NEXT-knop om de EQ-modus te veranderen en druk op de
MENU/CONFIRM knop om de EQ-modus te bevestigen.
De instelling van de EQ-modus is toepasbaar in de Playing Song en Playing
Recorded Voice-modus.
Nederlands
22
Veranderen van de afspeelsnelheid
1. Druk in de AFSPEELMODUS op de MENU/CONFIRM-knop en selecteer
Tempo Rate om naar het submenu te gaan.
2. Druk op de PREVIOUS/NEXT-knop om de afspeelsnelheid van de song aan
te passen. Een statusbalk wordt getoond op het scherm.
Opmerking: Deze eigenschap wordt ondersteund MP3-songs maar geen WMA-songs.
A-B herhaling
1. Druk in de AFSPEELMODUS op de MENU/CONFIRM-knop en selecteer het
Replay submenu om de A-B Repeat functie in te schakelen.
2. Het A teken knippert op het display en wacht om ingesteld te worden. Druk
op PREVIOUS/NEXT om de A markering in te stellen. De A markering is
ingesteld als het knipperen van het A teken stopt.
3. Het B teken knippert op het display en wacht om ingesteld te worden. Druk
de MENU/CONFIRM-knop naar rechts om de B markering in te stellen. De B
markering is ingesteld als het knipperen van het B teken stopt.
4. De muziek tussen de A en B markering wordt één keer herhaald.
U kunt het afspelen stoppen als u op de MENU/CONFIRM knop drukt om de
A – B herhaalfunctie uit te schakelen.
Replay Times
Opmerking: Deze functie functioneert als de A – B Repeat is ingeschakeld.
Druk in de AFSPEELMODUS op de MENU/CONFIRM-knop en selecteer Replay
Times om naar het submenu te gaan. Het aantal herhaaltijden kan aangepast
worden.
Replay Gap
Opmerking: Deze functie functioneert als de A – B Repeat en de Replay Time ingeschakeld zijn.
Druk in de AFSPEELMODUS op de MENU/CONFIRM-knop en selecteer Replay
Gap om naar het submenu te gaan. De inactieve lengte tussen markering A en
markering B kan ingesteld worden.
Opmerking: Zie de sectie Overzicht voor een gedetailleerde knop bediening.
Het installeren van de driver en software
Nederlands
23
Systeem vereisten
z PC met processor uit de Pentium klasse of sneller.
z 64MB RAM
z USB-poort
z Een CD-ROM drive voor het installeren van software.
z 30MB vrije hard disk ruimte
z Windows® 98SE/Me of Windows® 2000/XP
De driver en software bevatten het volgende in één setup.exe bestand:
Opmerkingen: Het wordt niet aangeraden deze software te installeren op MAC OS.
1. De driver voor Windows ® 98/98SE.
Deze driver zorgt er voor dat uw speler goed functioneert onder Windows ®
98/98SE.
2. Een programma om ACT-audiobestanden naar WAV-audiobestanden te
converteren.
Er kunnen alleen ACT-audiobestanden op de speler afgespeeld worden.
Als u het bestand op uw PC wilt afspelen, dan dient u het ACT-bestand te
converteren naar een WAV-audiobestand. Dit formaat kan op de meeste
muziekprogramma’s afgespeeld worden (d.w.z. Windows ® Mediaspeler).
3. Een programma voor het converteren van videobestanden naar AMV-
videobestanden.
Als u het bestand wilt afspelen op de speler, dan dient u de verschillende
videobestanden te converteren naar AMV-bestanden.
4. Een programma om het interne geheugen van de speler te formatteren, het
partitioneren van het geheugen en het instellen van een wachtwoord voor
bestandsbescherming.
5. Een programma voor het upgraden van de firmware.
Het installeren van de driver en software
Als u Windows ® 98/98Se gebruikt, dan moet de driver installeren voor dat uw
bestanden op uw speler downloaden.
Opmerking: Als u gebruikt maakt van Windows ® Me/2000/XP dan kun de volgende installatie
procedures overslaan.
Nederlands
24
Stap 1. Dubbelklik op Setup.exe om de installatie van de driver te beginnen. Volg
de on-screen menu wizard aanwijzingen op om de installatie te voltooien.
Stap 2: Nadat de installatie voltooid is dient u uw computer te herstarten.
Nederlands
25
Het converteren van ACT-audio naar WAV-audio.
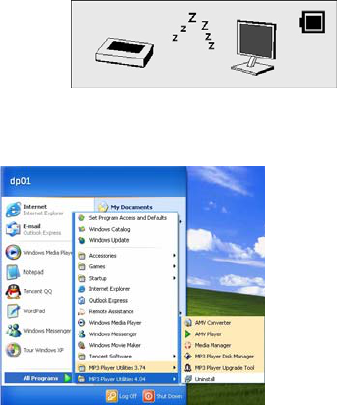
Stap 1: Klik, na het installeren van de driver en de software op de Start knop,
selecteer: Programma’s > MP3 Player utilities 4.04 > Media Manager
Stap 2: Het volgende scherm zal verschijnen:
Nederlands
26
Stap 3: Klik op de ‘Add file” knop om het ACT-audiobestand dat u wilt converteren
naar een WAV-audiobestand te selecteren.
Stap 4: Klik op de rechtermuistoets om het volgende scherm te doen verschijnen,
selecteer dan “To WAV”.
Nederlands
27
Selecteer ook het doelpad voor het AMV-videobestand.
Stap 5: Klik op de “OK”-knop om het converteren te beginnen. U zult zien dat het
WMA-audiobestand geconverteerd is.
Het converteren van een ander videoformaat naar AMV-video.
Stap 1: Klik, na het installeren van de driver en de software, op de Start knop,
selecteer Alle programma’s > MP3 Player Utilities 4.04 > AMV Converter.
Nederlands
28
Stap 2: Het volgende scherm zal verschijnen:
Stap 3: Klik op de Input File knop om het ASF-videobestand dat u naar een AMV-
videobestand wilt converteren, te selecteren.
Nederlands
29
Klik ook op de Output File knop om het doelpad voor het AMV-videobestand te
selecteren.
Stap 4: Klik op de Convert-knop om het converteren te beginnen. U zult zien dat
het AMW-videobestand geconverteerd is.
Opmerking: De software kan ook DAT, WMV en het AVI-videoformaat in AMV-video converteren.
Zorg er voor dat u Microsoft DirectX 9.0 of hoger geïnstalleerd hebt voor de AMV Converter.
Bij het converteren van RealMedia, Quicktime of het MPEG2-videobestandsformaat, installeer
eerst het gerelateerde DirectShow filter. Anders functioneert de AMV Converter niet normaal.
Het formatteren van het interne geheugen
Stap 1: Het aansluiten van de USB-kabel op de MP3-speler en uw computer. Het
volgende scherm zal verschijnen:
Nederlands
30
Stap 2: Klik op de Startknop, selecteer: Programma’s > MP3 Player Utilities 4.04>
MP3 Player Disk Manager.
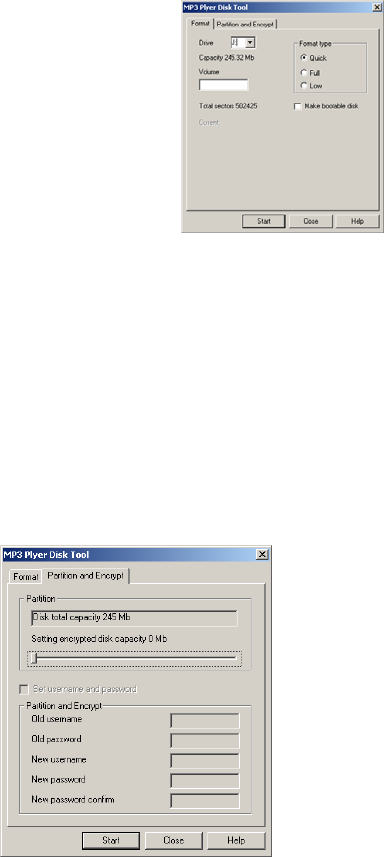
Stap 3: Het volgende scherm zal verschijnen:
De drive voor de speler wordt automatisch gedetecteerd en de driveletter wordt op
het scherm vertoond. U kunt de drive naar de speler noemen en het type
formattering selecteren, klik dan op de Startknop om het formatteren te beginnen.
Opmerking: Ontkoppel de USB-kabel niet, of schakel de stroom niet uit tijdens het formatteren.
Het kan er voor zorgen dat de speler niet goed functioneert.
Nederlands
31
Partitioneren en het instellen van het wachtwoord.
De geheugencapaciteit van de speler kan in twee partities verdeeld worden. Alle
bestanden opgeslagen op één van de partities worden verborgen en beschermd
door een wachtwoord nadat de software geïnstalleerd is op uw computer.
Opmerking: Voor Windows 200 dient u er voor te zorgen dat Service Pack 4 (SP4) op uw
computer geïnstalleerd is. Anders kan er slechts één van de partities waargenomen worden
onder Windows 2000.
1. Klik op de Startknop, selecteer Programma’s > MP3 Player Utilities 4.04 >
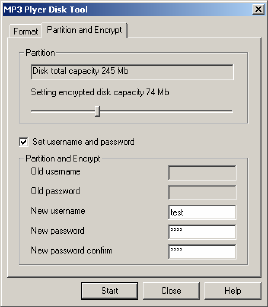
MP3 Player Disk Tools en ga naar het tabblad Partition and Encrypt.
Nederlands
32
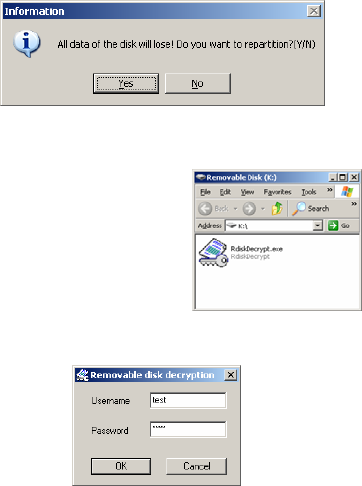
2. Selecteer de capaciteit van de gecodeerde disk in en stel de login naam en het
wachtwoord in. Klik op Start.
3. Er zal een waarschuwing gegeven worden om u eraan te herinneren dat alle
gegevens op de disk gewist zullen worden. Klik op YES om door te gaan en wacht
één minuut.
Nederlands
33
4. Een gecodeerde drive zal verschijnen en er zit een bestand in genaamd
RdiskDecrupt.exe wat gegenereerd is op de gecodeerde drive.
5. Klik op RdiskDecrupt.exe. Het volgende scherm verschijnt. Voer de juiste
loginnaam en wachtwoord in om toegang te verkrijgen tot de gecodeerde drive.
U heeft toestemming om bestanden te naar de gecodeerde drive te slepen en te
kopiëren. Als de speler ontkoppeld wordt van de computer en er dan weer
aangekoppeld wordt, dan kan de gebruiker geen bestanden zien in de gecodeerde
disk. Als u de verborgen bestanden weer wilt zien, herhaal dan de stappen 3 en 4
om naar de gecodeerde drive te gaan.
6. U heeft toestemming om de loginnaam en wachtwoord te resetten in
Programma’s > MP3 Player Utilities 1.45 > MP3 Player Disk Tools.
Het bewerken van Songteksten.
Aanwijzingen die u leren om de songteksten synchroon te bewerken met de songs.
Stap 1: Klik op de Startknop, ga naar Programma’s > Bureau – accessoires >
Kladblok om een nieuw tekstdocument te openen.
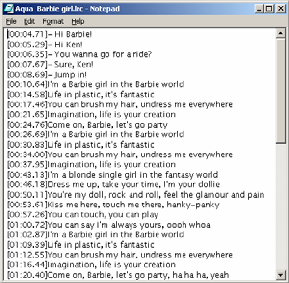
Stap 2: Schrijf de songteksten in het volgende formaat. De overeenkomende tijd
met de songteksten dient in het formaat van vierkante haakjes [ ] getypt te worden.
Nederlands
34
Stap 3: Sla het tekstbestand dan op met een .LRC extensie.
Stap 4: Kopieer het songtekstbestand (.LRC) en
song naar de speler onder dezelfde
Directory. U zult de songteksten op
het display zien.
Opmerking: De songteksten scroll functie dient
ingeschakeld te zijn, voor meer informatie hierover
zie de Lyric sectie.
Het downloaden van MP3 en WMA-songs of AMV-films.
Opmerking: De getoonde schermen in dit en de volgende hoofdstukken zijn van toepassing op
Windows ® XP, andere Window versies® kunnen schermen tonen die lichtelijk verschillen.
Nederlands
35
Stap 1: Controleer of uw speler aan staat.
Stap 2: Doe de USB-kabel goed in de USB-poorten van uw computer en speler.
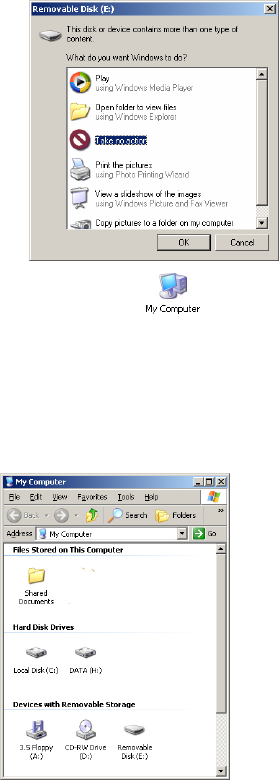
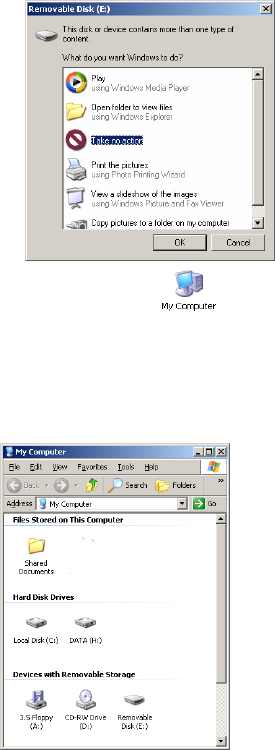
Stap 3: Zodra de kabels er goed in zitten, zal het volgende scherm verschijnen: Als
dit scherm niet verschijnt doe dan de USB-kabels er nogmaals in.
Het volgende scherm zal verschijnen:
Opmerking: Negeer het volgende scherm als u Windows ® XP niet gebruikt.
Stap 4: Dubbelklik op My computer op het bureaublad en het
volgende scherm zal verschijnen.
Nederlands
36
U zult Removable Disk in het scherm zien.
Aangezien Windows® een driveletter toewijst aan de Removable Disk volgens de
systeemconfiguratie van de computer, kan de driveletter verschillen als de speler
op een andere computer aangesloten wordt.
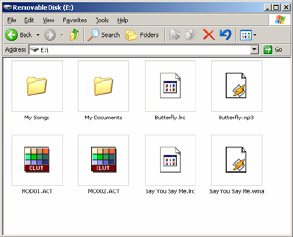
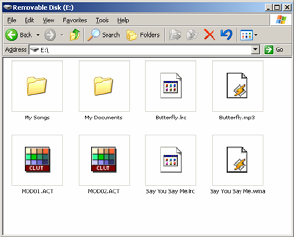
Stap 5: Dubbelklik op Removable Disk.
Opmerking: “Bezig…” zal verschijnen tijdens het down- of uploaden van de bestanden, haal op dit
moment de USB-kabel er niet uit of schakel de speler niet uit. Wanner “Bezig…” van het display
verdwijnt, dan kunt u de kabel ontkoppelen.
Nederlands
37
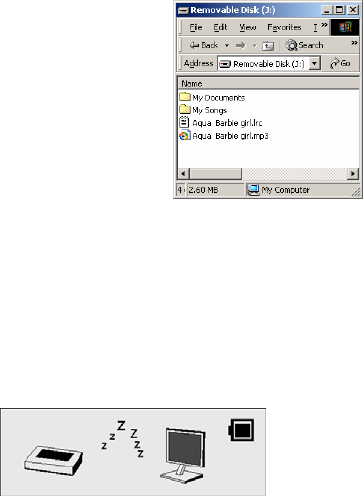
Stap 6: Sleep het MP3 en WMA-muziekbestand of AMV-bestand naar
Removable Disk.
Opmerking: U kunt alle soorten directories en bestanden creëren in Removable Disk.
De bestandsextensie .LRC is de songtekstbestand (lyriek) die de songteksten
synchroon opslaat met de track. Zie hiervoor het Editing Lyrics (Bewerken van
songteksten) voor details.
De ACT-bestandsextensie is het dictafoonbestand wat als speciale audioformaat
ontwikkeld is door de leverancier. Wat betreft algemene audiosoftware spelers op
de markt, deze kunnen geen ACT-bestanden afspelen. Daarom is het
noodzakelijk om ACT-bestanden te converteren naar WAV-formaat om het af te
spelen op algemene software audiospelers zoals Microsoft ® Windows ® Media
Player. Zie hiervoor Converting. ACT audio to .WAV audio
(Het converteren
van ACT-audio naar WAV-audio) sectie voor meer informatie.
De ASF-bestandsextensie is het videobestand wat als speciale videoformaat
ontwikkeld is door de leverancier. Wat betreft algemene videosoftware spelers op
de markt, deze kunnen geen ASF-videobestanden afspelen. Daarom is het
noodzakelijk om ASF-bestanden te converteren naar AMV-formaat om het af te
spelen op algemene software videospelers zoals Microsoft ® Windows ® Media
Player. Zie hiervoor Converting. ASF audio to .AMV video (Het converteren
van ASF-video naar AMV-video) sectie voor meer informatie.
Nederlands
38
Mapbeheer en navigatie
Mapbeheer
IN de ROOT directory kunt u de map maken om de song te beheren voor een
gemakkelijke navigatie en beheer. In elke map, submap of ROOT directory is er
geen enkele beperking van het aantal songs en het maximaal aantal map lagen is
8.
Map navigatie
1. Druk in de Stopmodus op de MODE-knop en selecteer de Lokale map.
2. De gecreëerde mapnamen in de eerste laag staan op het scherm. Kies de
door u gewenste mapnaam door op de MODE-knop links of rechts in te
drukken.
3. Druk de MODE-knop in om uw keuze te bevestigen.
Submap
1. U kunt elke map betreden om naar de door u gewenste submap te gaan.
Druk daarna op de MODE-knop voor bevestiging.
2. U kunt terug gaan naar de vorige laag door ‘/’ op het LCD-scherm te
selecteren.
Root Directory
1. U kunt ‘ROOT’ selecteren door terug te gaan naar de root directory.
Het gebruik van de USB massa-opslagfunctie
De USB-massa-opslag functie maakt het u mogelijk om de speler als een diskdrive
van u computer te gebruiken. U kunt bestanden van alle formaten van en naar de
speler kopiëren of wissen. Volg dezelfde procedures als in Downloading MP3 and
WMA songs (Het downloaden van MP3 en WMA-songs )voor meer informatie.
Opmerking: “Busy(Bezig)…” zal verschijnen tijdens het down- of uploaden van de bestanden, haal
op dit moment de USB-kabel er niet uit of schakel de speler niet uit. Als “Busy(Bezig)…” van het
display verdwijnt, dan kunt u de kabel ontkoppelen.
Het ontkoppelen van de USB-kabel
Voordat u de USB-kabel van uw speler of computer ontkoppelt, neem de volgende
procedures in acht voor het veilig verwijderen van de kabel.
Nederlands
39
Opmerking: Sla deze procedures over als u Windows® 98/98SE.
Opmerking: “Busy(Bezig)…” zal verschijnen tijdens het down- of uploaden van de bestanden, haal
op dit moment de USB-kabel er niet uit of schakel de speler niet uit. Als “Busy(Bezig)…” van het
display verdwijnt, dan kunt u de kabel ontkoppelen.
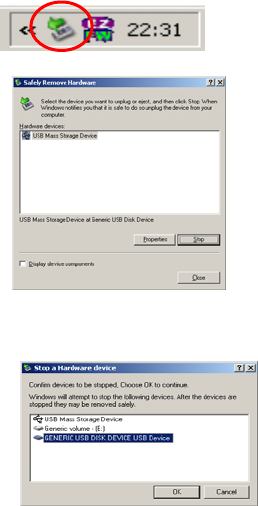
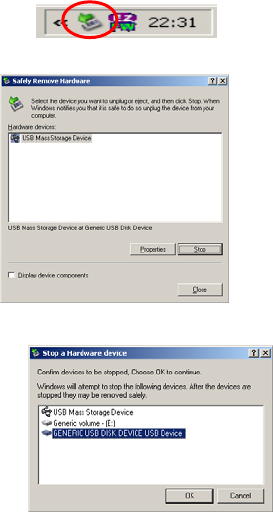
Stap 1: Dubbelklik op Removable Disk (Verwijderbare Disk) in de system tray,
wat zich aan de rechteronderzijde van het bureaublad bevindt.
Stap 2: Het volgende scherm zal verschijnen: Klik op de Stop-knop.
Stap 3: Een ander scherm zal verschijnen. Selecteer: “GENERIC USB DISK
DEVICE USB Device” en klik op de toets OK ter bevestiging
.
Nederlands
40
Stap 4: Klik op de Close(Sluiten)-knop om het scherm te sluiten. U kunt nu de
USB-kabel ontkoppelen van de USB-poort van uw computer.
Het formatteren van het interne geheugen
Er zijn twee manieren om het interne geheugen te formatteren.
Opmerking: Deze formatteringsprocedure zal er voor zorgen dat alle bestanden in de speler
gewist worden.
Het gebruiken van de software
Zie de Installing Driver and Software-Utilities (Het installeren van de driver en
Software) sectie voor informatie.
He gebruik van Formatteren in Windows®
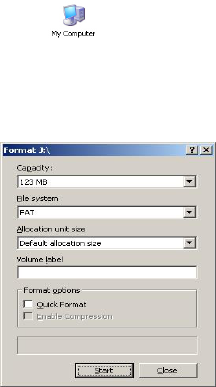
1. Click op My Computer op uw bureaublad.
2. En u zult een Removable Disk zien, rechtsklik op Removable Disk en klik
op Format in het menu.
3. Nadat u op Format geklikt heeft, zult u het volgende scherm zien en kunt u
op Start drukken om het formatteren te beginnen.
Nederlands
41
Probleemoplossing
Symptoom Oorzaken Oplossing
Het display gaat niet aan
als er op de
POWER(AAN/UIT)-knop
gedrukt wordt
De batterij is leeg z Laad de batterij
opnieuw op.
De software (op de CD) zijn
nog niet geïnstalleerd op
Windows ® 98/98SE.
z Doe de CD er in.
z Klik op setup om de
software te
installeren.
z Volg de on-screen
aanwijzingen op om
de installatie te
voltooien.
De software utilities van de
speler (op de CD-ROM)
conflicteert met andere
software drivers die
geïnstalleerd zijn op uw
computer
z De-installeer de
software utilities
van de speler
z Herstart uw
computer
z Herinstalleer de
software utilities
opnieuw.
Na het er in doen van de
speler in de USB-poort
van uw computer wordt
Removable Disk
(Verwijderbare Disk)
Drive niet gevonden in
My Computer (Deze
Computer)
U moederbord ondersteunt
de USB-aansluiting niet.
Neem contact op met de
fabrikant van uw
moederbord om de
moederbord driver te
upgraden.
Het muziek bestand op
de speler kan niet gewist
worden.
Het attribuut van het
muziekbestand is ingesteld
als Alleen-lezen
Verander het attribuut van
het muziekbestand.
De afspeeltijd speelt
chaotisch af bij het
afspelen van een MP3-
muziekbestand.
Een MP3-muziekbestand
wordt samengeperst in VBR-
formaat wat er voor kan
zorgen dat de
afspeelsnelheid van een
MP3-muziekbestand varieert.
Als het MP3-muziekbestand
afspeelt dan zal de variabele
snelheid er voor zorgen dat
de afspeeltijd chaotisch
verloopt.
Comprimeer het MP3-
muziek bestand in een vaste
compressie snelheid i.p.v.
een variabele compressie
snelheid.
Als de speler aangesloten
of afgesloten wordt van
de computer verschijnt er
een ongewone
foutmelding op de
computer
Dit wordt veroorzaakt door
het plotselinge ontkoppelen
van de USB-poort tijdens de
bestandsoverdracht.
Het wordt aanbevolen de
speler niet plotseling van de
USB-poort in de computer te
ontkoppelen als er een
bestandsoverdracht
plaatsvindt of het interne
geheugen geformatteerd
wordt.
Nederlands
42
Als de MP3-speler het MP3-
muziekbestand niet kan
afspelen, ga dan naar de
volgende track totdat de
MP3-muziekbestanden niet
meer in MPEG LAYER1
en/of MPEG1 LAYER 2
gecomprimeerd worden.
Wis bestanden die niet in de
speler afgespeeld kunnen
worden.
Mijn speler kan geen
MP3-muziek bestanden
afspelen
De meeste MP3-
muziekbestanden die op de
markt gebracht worden zijn
gecomprimeerd in MPEG1,
MPEG2 LAYER3-standaard.
In de begin dagen werden
sommige MP3-
muziekbestanden
gecomprimeerd in MPEG1
LAYER1 en MPEG2
LAYER2. Let op: uw speler
ondersteunt geen MPEG1
LAYER1, MPEG1 LAYER2 of
een MP3 gecomprimeerd in
meer dan één compressie
standaard.
Verander de compressie
standaard van een MP3-
muziekbestand in MPEG1
LAYER3.
De speler ondersteunt de
compressie standaard van
het betreffende
muziekbestand niet.
De speler ondersteunt
slechts MPEG1, MPEG2
LAYER3 en WMA-
muziekbestanden.
Compressiesnelheid buiten
bereik.
z De reikwijdte van de
MP3
compressiesnelheid
is:
32Kbps~384Kbps
z De reikwijdte van
de WMA
compressiesnelheid
is:
64Kbps~128Kbps
Als het muziekbestand
niet normaal afgespeeld
kan worden of u hoort
een lang piepgeluid.
Tip: Als u de compressie standaard en snelheid van het
muziekbestand niet weet, dan kunt u gewone
muziekspelers (bijvoorbeeld Winamp) gebruiken om de
muziek informatie te bekijken.
Na het formatteren van
het interne geheugen van
de speler d.m.v. onze
software, sluit en heropen
de software; de MP3-
speler is niet meer te
zien.
Er kan wat systeem
informatie gewist zijn tijdens
het formatteren.
Ontkoppel de speler en sluit
deze weer opnieuw aan.
Er was geen driver
geïnstalleerd op Windows®
98/98 SE
Installeer de driver De computer kan de
USB-kabel niet
detecteren.
Onveilige verwijdering van de
USB-kabel.
Het formatteren van het
interne geheugen
Nederlands
43
Technische specificaties
Capaciteit
128MB/256MB/512MB/1GB/2GB intern Flash
Geheugen
Display Kleuren TFT-scherm
Interface USB 2.0 high speed
Power Lithium accu
Bestandstype
.MP3 (32kbps – 384kbps), .WMA (64kbps – 128kbps)
voor muziek bij een constante Bit Rate
.ACT en WAV voor opgenomen audiobestanden
AMV voor filmbestanden.
TXT voor E-book bestanden.
JPG, BMP en GIF voor fotobestanden
Geluids-/lawaairatio 90dB
Koptelefoon uitgaand
vermogen
9mWx, 32ohm
Besturingssysteem
Windows® 98SE/Me /2000/XP
MAC OS 9.0, 10.0
Afmetingen 39mm(B) x 90mm(H) x 8mm(D)
Gewicht 45g
English
1
USER’S MANUAL
THIS INSTRUCTION BOOK MAY CONTAIN ERRORS AND OMISSIONS.
DESIGN AND SPECIFICATION ARE SUBJECT TO CHANGE WITHOUT NOTICE.
No part of this document may be reproduced or transmitted in any form or by any means,
electronics or mechanical, including photocopying and recording or translated to another language
for any purpose without the prior written consent of the manufacturer.
All brand names, logos and registered trademarks mentioned are property of their respective
owners.
© 2006. All right reserved.
Version 1.0 04202006
Please read this booklet and note the warning statements before using the product.
Warning! Improper use of battery might cause the battery to turn hot or explode.
Electrical and electronic equipment ( EEE ) contains materials, parts and
substances which can be dangerous to the enviroment and harmful to human
health if waste of electrical and electronic equipment ( WEEE ) is not disposed
of correctly.
Equipments which are marked with the WEEE logo (as shown on the left ),
should not be thrown away with your household waste. Contact your Local
Authority Waste Disposal Department as they will be able to provide details
of the recycling options available in your area.
Note:
English
2
Table of Contents
Introduction---------------------------------------------------------------------------------------------------------------- 4
Features--------------------------------------------------------------------------------------------------------------------- 4
Package Contents--------------------------------------------------------------------------------------------------------- 4
Overview-------------------------------------------------------------------------------------------------------------------- 5
Buttons Operation--------------------------------------------------------------------------------------------------------- 6
Display----------------------------------------------------------------------------------------------------------------------- 7
On-screen-menu Operation--------------------------------------------------------------------------------------------- 8
Power On and Off-------------------------------------------------------------------------------------------------------- 9
Changing Mode----------------------------------------------------------------------------------------------------------- 9
Entering Main Menu Page-----------------------------------------------------------------------------------------------9
Playing Movie---------------------------------------------------------------------------------------------------------------10
Skip a movie------------------------------------------------------------------------------------------- 11
Fast Forward and Backward-----------------------------------------------------------------------11
Playing Song --------------------------------------------------------------------------------------------------------------- 11
Skip a Song------------------------------------------------------------------------------------------- 12
Fast Forward and Backward---------------------------------------------------------------------- 12
FM Radio (optional)------------------------------------------------------------------------------------------------------- 12
Choosing Channels--------------------------------------------------------------------------------- 12
Recording Voice----------------------------------------------------------------------------------------------------------- 13
Recording Mode-------------------------------------------------------------------------------------- 14
Playing Recorded Voice------------------------------------------------------------------------------------------------- 14
Skip a Voice------------------------------------------------------------------------------------------- 15
Fast Forward and Backward---------------------------------------------------------------------- 15
View Photos-----------------------------------------------------------------------------------------------------------------15
E-Book------------------------------------------------------------------------------------------------------------------------16
System Settings------------------------------------------------------------------------------------------------------------ 16
Clock---------------------------------------------------------------------------------------------------- 17
LCD Set------------------------------------------------------------------------------------------------ 17
Change On-screen-menu Language ---------------------------------------------------------- 18
ScreenSaver Sel------------------------------------------------------------------------------------- 19
Power off----------------------------------------------------------------------------------------------- 19
Replay Mode------------------------------------------------------------------------------------------ 19
Online Mode------------------------------------------------------------------------------------------ 20
Check Memory--------------------------------------------------------------------------------------- 20
Show Firmware Version----------------------------------------------------------------------------20
Firmware upgrade----------------------------------------------------------------------------------- 20
Game Function------------------------------------------------------------------------------------------------------------ 20
Repeat Mode--------------------------------------------------------------------------------------------------------------- 21
EQ Mode-------------------------------------------------------------------------------------------------------------------- 21
Changing Playing Rate------------------------------------------------------------------------------------------------- 22
A-B Repeat------------------------------------------------------------------------------------------------------------------22
Replay Times---------------------------------------------------------------------------------------------------------------22
Replay Gap----------------------------------------------------------------------------------------------------------------- 22
Installing Driver and Software Utilities--------------------------------------------------------------------------- 23
System Requirements----------------------------------------------------------------------------------------------------23
Driver and Software Utilities Installation----------------------------------------------------------------------------- 23
AMV Convert-------------------------------------------------------------------------------------------------------------- 25
1. Summarize--------------------------------------------------------------------------------------- 25
2. Installing software---------------------------------------------------------------------------------- 25
3. Using the software---------------------------------------------------------------------------------- 26
4. Convert the flie-------------------------------------------------------------------------------------- 28
English
3
5. Download media files from internet and convert files--------------------------------- 41
6. Attention---------------------------------------------------------------------------------------------- 41
Media Manager----------------------------------------------------------------------------------------------------------- 42
1 Media manager Introduction---------------------------------------------------------------------- 42
2 Install and Uninstall----------------------------------------------------------------------------------- 42
3 Quick Start Guide------------------------------------------------------------------------------------- 43
4 Instructions--------------------------------------------------------------------------------------------- 45
5 Converting .ACT. audio to WAV.audio. ------------------------------------------------------- 55
Editing Lyrics------------------------------------------------------------------------------------------------------------- 58
Downloading MP3 and WMA songs or AMV movies---------------------------------------------------------59
Folder Management and Navigation-------------------------------------------------------------------------------62
Folder Management-------------------------------------------------------------------------------------------------------62
Folder Navigation---------------------------------------------------------------------------------------------------------- 62
Sub-Folder-------------------------------------------------------------------------------------------------------------------62
Root Directory-------------------------------------------------------------------------------------------------------------- 62
Using USB Mass Storage Function-------------------------------------------------------------------------------- 62
Disconnecting the USB Cable--------------------------------------------------------------------------------------- 62
Formatting the Internal Memory------------------------------------------------------------------------------------ 64
Using the Formatting Software Utilities----------------------------------------------------------------------------- 64
Using the Formatting in Windows®---------------------------------------------------------------------------------- 64
Trouble Shooting-------------------------------------------------------------------------------------------------------- 65
Technical Specifications---------------------------------------------------------------------------------------------- 67
English
4
Introduction
Thank you for choosing our digital MP3 player. You can use this versatile MP3
player not only for playing MP3 and WMA songs, but also playing AMV movie,
recording voice and serving as a USB flash disk, etc.
Features
z Colour TFT 1.8’’ display
z Support MP3 (MPEG1/2 Layer2) and WMA music playback
z Support AMV movie play
z Support Game function
z Support E-Book function
z Sopport JPG, BMP and GIF picture
z Digital voice recorder
z USB mass storage function for data storage
z 7 EQ settings
z Lithium battery supports long playing time
z No driver installation is required (except Windows® 98/98SE)
Package Contents
z User's manual
z Earphones
z 2.5mm to 3.5mm Earphones adaptor
z Silicon pouch
z Power charger
z USB cable
z CD including the driver and software utilities
English
5
Overview
Front and Right
Top and Botton
OFF ONOFF ON
On/Off
USB Port
MENU VOL
Next/
Fast Forward
Menu/Confirm/
Display Lyric
Display
Volume+/-
Previous/
Fast Backward
Microphone
Earphone Jack
Play/Pause
English
6
Buttons Operation
Operation
EARPHONE JACK Insert the earphone plug into the earphone jack
USB PORT Connect the USB cable to the USB port of the computer for
uploading the songs
MICROPHONE Microphone for voice recording
NEXT/
FAST FORWARD
z In PLAYING mode, press the button and release
immediately to jump to next song.
z In PLAYING mode, press and hold the button to fast
forward
MENU/
CONFIRM/
DISPLAY LYRIC
z In STOP mode, press and hold the button to enter the
Main Menu page for changing the modes.
z Under Menu or Sub-menu page, press the button to
confirm to the selection of menu items.
z IN PLAYING mode, press and hold the button to display
the lyric (The lyric is necessary edited by the user before
shown on the LCD display)
PREVIOUS/
FAST BACKWARD
z In PLAYING mode, press the button and release
immediately to jump to previous song
z In PLAYING mode, press and hold the button to fast
backward the song
VOLUME +
VOLUME -
z Press the VOL button to tune volume, increase the
volume by pressing NEXT button.
z Press the VOL button to tune volume, decrease the
volume by pressing PREVIOUS button.
ON/
OFF/
z In IDLE mode, slide the button rightward to power on
the player
z In STOP mode, slide the button leftward power off the
player
PLAY/
PAUSE/
z In STOP mode, press the button to play the songs
z In PLAYING mode, press the button to pause the
playing song
z When the ON/OFF button is locating at ON, press and
hold the button to turn on and turn off the player.
DISPLAY Display the operating status, lyrics with backlight
English
7
Display
Display Icon Function
Repeat Mode
Show the current repeat mode used.
Battery Level
Show the battery level.
Volume increase or decrease
Show the current volume
Mode of Equalizer
Indicate the current mode of equalizer used. 7
different EQ settings are available for selection.
128KBPS Bit Rate
Show the bit rate of the song
The Name of Playing Song
Show the playing song currently
N
English
8
On-screen-menu Operation
In STOP mode (No song or voice is playing)
Remark: “FM” is only applicable for the player with built-in FM function.
In PLAY mode (A song or voice is playing)
English
9
Power On and Off
Power On
Slide the ON/OFF button leftward to switch the player on. The startup logo appears
on the display.
Power Off
Slide the ON/OFF button rightward to switch the player off.
Note: When the ON/OFF button is locating at ON, press and hold the PLAY/PAUSE button to turn
on and turn off the player.
Battery Level
The battery icon on the display shows the battery level.
Low Battery
When the battery icon shows in , it indicates the battery power is running
out. Please recharge your player with the power charger.
Charge Battery
Use usb cable to connect the unit and power charger for recharging. When the
indicated light turns green, the battery is full charged.
Note: 1. Do full charge the battery before the unit is used for first time.
2.Re-charge the battery if the unit is not used for a long time.
Changing Mode
Entering Main Menu Page
1. Slide ON/OFF button to enter below Main Menu page. You’ve entered the
Main Menu page.
* Remark: “FM” is only applicable for the player with built-in FM function.
English
10
2. Press PREVIOUS/NEXT button to jump to other menu items in sequence of
Movie,Music, FM radio, Record, Voice, Photo Browse, E-Book, System
setup and Game.
3. Select your desired menu item and press MENU/CONFIRM button again to
enter sub-menu page.
Playing Movie
1. After entering Main Menu page, select Movie and press MENU/CONFIRM
button to enter Playing movie mode.
Note: Only .AMV format will be played under Playing Movie mode.
2. The display will return to the following screen in STOP mode.
3. Press PREVIOUS/NEXT button to select your desired movie.
4. Press PLAY/PAUSE button to start playing selected .AMV movie. If there is
no .AMV files, “No Movie Files” will show on the display.
English
11
Skip a Movie
Press PREVIOUS/NEXT button to jump to next or previous movie.
Fast Forward and Backward
Fast forward or backward by press and hold the PREVIOUS/NEXT button during
playing movie
Playing Song
1. After entering Main Menu page, select Music and press MENU/CONFIRM
button to enter Playing Song mode.
Note: Only .MP3 and .WMA format will be played under Playing Song mode.
2. The display will enter to the following screen in STOP mode.
3. Press PREVIOUS/NEXT button to select your desired song.
4. Press PLAY/PAUSE button to start playing selected .MP3 or .WMA music. If
there is no .MP3 and .WMA files, “No Files” will show on the display.
English
12
Skip a Song
Press NEXT/PREVIOUS button to jump to next or previous song.
Fast Forward and Backward
Fast forward or backward by press and hold PREVIOUS/NEXT during playing
music
* FM Radio
* Remark: “FM” is only applicable for the player with built-in FM function.
Choosing Channels
1. After entering Main Menu page, select FM and press MENU/CONFIRM
button to enter FM radio mode.
2. Press and hold PREVIOUS/NEXT button, the player can scan FM channels
automatically, uers are free to choose different FM channels.
3. Save FM Channels searched
Press MENU/CONFIRM button to enter FM Sub-menu Page, press
MENU/CONFIRM button to select Save function.
4. Select FM Channels saved
Press PLAY button to Select FM Channel saved in sequence.
English
13
Recording Voice
1. After entering Main Menu page, select Record and press MENU/CONFIRM
button to enter Recording Voice mode.
Note: The recorded voice will be saved in .ACT or .WAV only. Please pre-set before
starting voice recording
.
2. following display will show once you’ve entered Recording Voice mode
3. Before recording, you may set your REC type. Press MENU button to enter
REC Type, then press PREVIOUS/NEXT button to select REC Mode.
4. There are four recording modes available: Fine REC, Long REC, Fine VOR
and Long VOR. Press MENU/CONFIRM button to confirm the selection.
5. Put the sound source near the built-in microphone. Then press
PLAY/PAUSE button to start recording. You are allowed to press
PLAY/PAUSE button to pause or stop the recording.
When you finished the recording, press and hold PLAY/PAUSE button. Release
the button when the wording of “Saving…” shows on the display. The recorded
audio files will be saved under Root Directory as default. Refer to Change
Directory section for details.
English
14
Recording Mode
Fine REC
It performs High recording quality in .WAV file format but the file size is
relatively larger.
Long REC
It performs Low recording quality in .ACT file format but the file size is
relatively smaller
Fine VOR
The voice recording starts when there is a sound. If there is no sound, the
recording will pause. It will resume recording when there is a sound.
It performs higher recording quality and more sensitive relatively than 8K
VOR.
Note: This function of Fine VOR is insignificant if the environment is not silent enough.
Long VOR
The voice recording starts when there is a sound. If there is no sound, the
recording will pause. It will resume recording when there is a sound.
It performs lower recording quality and less sensitive relatively than 32K
VOR.
Playing Recorded Voice
1. After entering Main Menu page, select Voice and press MENU/CONFIRM
button to enter Playing Recorded Voice mode.
English
15
2. The display will return to the following screen in STOP mode.
3. Press PREVIOUS/NEXT button to select your desired voice.
4. Press PLAY/PAUSE button to start playing selected audio files. If there is no
recorded audio file, “No Files!” will show on the display.
Skip a Voice
Press PREVIOUS/NEXT button and release immediately to jump to previous or
next recorded voice.
Fast Forward and Backward
Press and hold PREVIOUS/NEXT button to fast backward or forward.
View Photos
1. After entering Main Menu page, select Photo Browse and press
MENU/CONFIRM button to enter View photoes function.
Note: Only ..JPG, .BMP and .GIF format will be played under Photo Browse function.
2. Press PREVIOUS/NEXT button to select your desired photo.
English
16
E-book
1. After entering Main Menu page, select E-book and press MENU/CONFIRM
button to enter E-book function.
Note: Only .TXT format will be played under E-book function.
2. Press PREVIOUS/NEXT button to select your desired article.
System Settings
2. After entering Main Menu page, press PREVIOUS/NEXT button to select
System Function.
English
17
2. Press MENU/CONFIRM button to enter
System Function menu page.
Clock
1. After entering Sys Function menu page, select Clock.
2. Press VOLUME button to enter setting of Year, Month, Date and Time
3. Push PREVIOUS/NEXT button for Year, Month, Date and Time increment
and decrement
4. Press MENU/CONFIRM button to confirm the current date and time settings.
LCD Set
After entering Sys Function menu page, press PREVIOUSNEXT button to select
LCD Set Function. There are Screen savers and Black under this option.
Screen Savers
1. After entering the LCD Set sub-menu, select Screen Savers by pressing
MENU/CONFIRM button.
2. Press PREVIOUS/NEXT button to set the Screen Savers to 0/5/10/15/20/25
/30 seconds. In the IDLE mode (no button is pressed), the LCD will turn to
the selected screen saver automatically based on the duration you set.You
may set “0” to disable this function. Please refer to ScreenSaver Sel for
how to choose screen saver.
Clock
LCD Set
Language
ScreenSaver Sel
Power Off
Replay Mode
Online Mode
Memory Info
Firmware version
Firmware Upgrade
Exit
English
18
Change LCD Black time
1. After entering LCD Set sub-menu page, select BLACK by pressing
MENU/CONFIRM button.
2. Press PREVIOUS/NEXT botton to set the black time in 0/10/20/30 seconds.
In the IDLE mode (no button is pressed), the LCD will be black automatically
based on the duration you set.
You may set “0” to disable this function.
Change On-screen-menu Language
After entering System Function menu page, press PREVIOUS/NEXT button to
select Language Function. Eleven languages are available as below.
Simple Chinese
English
Trad Chinese
Japanese
Korean
French
German
Italian
Spanish
Portuguese
Dutch
Swedish
Denmark
Polish
Hungarian
Czech
Russia
Thai
English
19
ScreenSaver Sel
After entering the Sys Function menu, press the PREVIOUS/NEXT button to select
ScreenSaver Sel. You can press PREVIOUS/NEXT button to choose between No
1 and No 2. There are two kind screen pictures for your choosing.
Power off
1. After entering System Function menu page, press PREVIOUS/NEXT button to
select Power off Function. There are Off Time and Sleep Time under this
option.
2. For Off Time, press PREVIOUS/NEXT button to set the off time in
0/10/20/30/40/50/60 seconds. In the STOP mode, the player will be off
automatically based on the duration you set. You may set “0” to disable this
function.
3. For Sleep Time, press PREVIOUS/NEXT botton to set the sleep time in
0/10/20/30/40/50/60/70/80/90/100/110/120 seconds. In the IDLE mode (no
button is pressed), the player will be off automatically based on the duration
you set.
You may set “0” to disable this function.
Replay Mode
There are Manual Replay and Auto Replay, press PREVIOUS/NEXT button to
choose your desired option.
Online Mode
Please install the software and enable the function of dividing partition and setting
password before using this function. Refer to Dividing Partition and Setting
Password for details
There are three selections including Multi Drive, Normal Only and Encrypted Only.
Multi-Drive
If you select Multi-Drive, the user can both see the normal drive and encrypted
drive.
Normal Only
If you select Normal Only, the user can only see the normal drive while the
encrypted drive is hidden.
English
20
Encrypted Only
If you select Encrypted Only, the user can only see the encrypted drive while the
normal drive is hidden.
Note: This function can be only supported on Windows 98/Me/XP or Windows 2000 with SP4 and
the function of dividing partition is enabled.
Check Memory
After entering Sys Function menu page, select Memory Info by pressing
MENU/CONFIRM button to check the used memory. The used memory will be
shown on the display.
Show Firmware Version
After entering Sys Function menu page, select Firmware Version by pressing
MENU/CONFIRM. The date code, version of the firmware will be shown on the
display for reference.
Firmware Upgrade
It will be used when there is an upgrade of firmware.
Note: It is highly recommend upgrading the firmware by the qualified engineer to prevent
from any damages caused to the player.
Game function
1. After entering Main Menu page, select Game and press MENU/CONFIRM
button to enter E-book function. Only one game in this player is available.
English
21
Repeat Mode
In PLAYING mode, press MENU/CONFIRM button and select Repeat to enter the
Repeat mode. Seven Repeat Modes are available: Normal, Repeat One, Folder,
Repeat Folder, Repeat All, Random, Intro.
Normal
All music will be played one by one and stopped at the last music until you
disable this function.
Repeat One
The playing music will be re-played once until you disable this function.
Folder
All music files in the selected folder will be played once until you disable this
function.
Repeat Folder
All music files in the selected folder will be continuously playback until you
disable this function.
Repeat All
All music will be played from the beginning to the last one and then repeated
from the beginning to the last one until you disable this function.
Random
All music of the currently playing folder
will be randomly playback until you
disable this function.
Intro
All music from the current one to the last one will play for 10 seconds one by
one until you disable this function.
The setting of Repeat mode is able to apply in Playing Song and Playing
Recorded Voice mode.
EQ Mode
In PLAYING mode, press MENU/CONFIRM button and select EQ Select to enter
the EQ mode. Seven EQ mode are available: DBB, Natural, Rock, Pop, Classic,
Soft and Jazz
English
22
Press PREVIOUS/NEXT button to change the EQ mode and press
MENU/CONFIRM button to confirm the EQ mode.
The setting of EQ mode is able to apply in Playing Song and Playing Recorded
Voice mode.
Changing Playing Rate
1. In PLAYING mode, press MENU/CONFIRM button and select Tempo Rate
to enter the sub menu.
2. Press PREVIOUS/NEXT button to adjust the playing rate of a song. A status
bar will be shown on the display.
Note: This feature only supports in MP3 song while it doesn’t support in WMA song.
A-B Repeat
1. In PLAYING mode, press MENU/CONFIRM button and select Replay sub
menu to enable A-B Repeat function.
2. The mark A is flashing on the display and waiting for setting. Press
PREVIOUS/NEXT to set the mark A. Mark A is set if flashing of Mark A
stops.
3. The mark B is flashing on the display and waiting for setting. Push
MENU/CONFIRM button rightward to set the mark B. Mark B is set if
flashing of Mark B stops.
4. The music between mark A and mark B will be repeated once
You may stop the playing until you press MENU/CONFRIM button to disable
A-B Repeat function.
Replay Times
Note: This function is workable when the A-B Repeat is enabled.
In PLAYING mode, press MENU/CONFIRM button and select Replay Times to
enter the sub-menu. The number of replay times can be adjusted.
Replay Gap
Note: This function is workable when the A-B Repeat and Replay Time are enabled.
In PLAYING mode, press MENU/CONFIRM button and select Replay Gap to enter
the sub-menu. The idle duration between mark A and mark B can be adjusted.
Note: Refer to Overview section for detailed buttons operation.
English
23
Installing Driver and Software Utilities
System Requirements
z PC with Pentium class or faster processor
z 64MB RAM
z USB port
z CD-ROM drive for software installation
z 30MB free hard disk space
z Windows® 98/98SE/Me or Windows® 2000/XP
The Driver and Software Utilities contain the followings in one Setup.exe file.
Noted: The software is not recommended to install on MAC OS.
1. The driver for Windows® 98 /98SE
A driver makes your player properly work on Windows® 98/98SE.
2. The software utilities for converting .ACT audio file to .WAV audio file
.ACT audio files can only be played in the player. If you want to play the .ACT
on your PC, you have to convert .ACT to .WAV audio files, which can be
playback on common software players (i.e. Windows® Media Player).
1. The software utilities for formatting internal memory and setting the partition
and password for file read-write protection.
4. The software utilities for upgrading the firmware.
Driver and Software Utilities Installation
If you are using Windows® 98/98SE, you must install the driver before
downloading any files to your player.
Note: If you are using Windows® Me/2000/XP, you may skip the following installation procedures.
English
24
Step 1. Double click on Setup.exe to start the driver installation. Follow the on-
screen-menu guide you to complete the installation.
Step 2: After installation is completed, please restart your computer.
English
25
AMV Convert
1.Summarize
This tool is used for transforming media files into the AMV format which can be
played on the MP3/MP4 Player. Following video types can be converted:The AVI
format file: .avi ; The Windows Media format file: .asf, .wmv ; The MPEG1 format
file: .mpg, .mpeg ; The real player format file: .rm ; The quick time format file: .mov ;
The MPEG2 format file: .vob.
Windows platform :Windows98, Windows Me, Windows2000, Windows XP.
Windows Media Player 9.0 or above. The DirectX 9.0 or above.
2. Installing software
The AMV Convert Tool install fast, operate in brief. Two ways to install
software:
2.1 Install automatically
Start the PC, after entering the system of Windows, put the CD of the tool into the
CDROM, the system will run procedure automatically. Please adhere to hint to
click the "next move" button one by one in order, while installing successful click
the "close" button, complete the install.
2.2 Install manually
If the PC did not set the auto-run the function, then need to move the start
procedure:
2.2.1 First, double click the Setup.exe file at the root of CD.
2.2.2 Adhere to click the "next move" button, be to hint to install successful click
the "close" button, complete the install.
After installation is completed, "MP3 Player Utilities" can be started from the [start]-
[program] menu. Select the "AMV Convert Tool" software."the AMV Convert Tool"
is the AMV format conversion tool, but "AMV Player" is the AMV on the PC
document player, can browse to broadcast the AMV file that was come out by the
conversion tool.
English
26
3. Using the software
3.1 Adding a media file
After run this tool, Click "input file" button and select a movie file that needs to be
converted.
3.2 Add the media file
After run the tool, click "input file" button right side of the column to increase
the file that want to conversion. After click the button, will flick the path window
automatically. Click "files of type" small button to choose the file type. Clicks
"open" button after selected files, the interface runs as follow the picture: (that
picture provides reference only).
English
27
After add the file, in "input file" column, can show the path of the file, as follows the
red of the picture marks to show. The status column displays the related
information of these add files such as check box, the file name and path, status
and file length etc:
NOTE: Here, we use WMV file as an example, for reference only.
3.3 Play the media file
This conversion tool
contains function of
playing media file, but the
premise of playing is you
have already succeeded
to install related decoding
tool. Details please refer
to following text.
At status column click
selected file, click "play"
button play this file.
English
28
After the file start play, progress column can show the progress. After playing
complete, the status of this file is changed from the "unconvert" to "success"; Time
also would change actual time length; At this time, on the tool interface of "stop",
"pause" button is valid at the same time, click these two buttons can stop or pause
play the file.
Note: When the file status change from "unconvert" to "success", it expressing that
PC has already installed the decoding tool of this file type. This tool can play
that media files normally, and can carry on the conversion after stopping play.
Certainly, can also carry on the conversion directly before did not play the media
files, but for converting the file successful, we suggest that customer makes sure
first that file can play normally, then carry on the conversion.
4. Converting the file
In the status bar, the left side of each media file has the check box and sequence
number. The check box used for continuous conversion of several medial files of
choice. The lately-increase file default setting is being picked out.If the check box
didn’t pick out that expressing this file will not be converted.
4.1 Choose the file that needs to be converted
The media file selected in 3.1 will be visible in the list at the lower part of the
screen. Several media files can be selected and be added to the list. These files
will be converted once the convert button is pushed.
English
29
4.1.1 Excluding a specific media file
If conversion of a specific media file in the list is not wanted, a specific file can be
deselected by clicking the little box. The marker will disappear and this file will not
be converted.
4.1.1.1 Whether media needs to convert or not, can click the check box make
selection or cancel directly.
English
30
4.1.1.2 In addition to directly clicking the check box, can also right click the
file and select the "select" or "unselect" to make selection or cancel.
4.2 Select destination
The AMV file of this conversion tool default conserve path is C:\.Before convert,
Click the "output file" button and select the target where the converted files
need to be saved can specify the position of the file of AMV. At flick dialog box,
after choosing the specify saved path; please click the "OK" button.
After completing the above step, at the convert interface "output file" column will
display the path that files of AMV deposit.
English
31
4.3 The parameter setting
This conversion tool has the function of the AMV file parameter setting, the
interception video fragment, video width and height, picture format and image
quality etc.
The methods that enter to property interface contain two kinds of the following:
A. select one or more media files, then click on the button in the "output
information" box
B. select one or more media files, then right click mouse, and select "setting"
The "choice" does not mean the check box of the media file, but mean to click
the file name with the mouse, make that file background color as blue.
The concrete method will elaborate on in
the continuation. This conversion tool
default setting as follows picture:
4.3.1 Fragment selection
Intercept the video fragment means to intercept a need of fragment file to
conversion. At this time, the customer needs to set start position and end positions.
It contain two kinds of methods, the operation is as follows:
English
32
4.3.1.1 Fragment selection with the property settings
First choose "cut source video snippet" selection box, enabling video start time
point and end time point. Input the desired start and stop time.
The above example: Selection of the current media files from 1 min1 0 sec to 3 min
20 sec.
If "cut source video snippet" is not selected, the whole media file will be converted.
4.3.1.2. Fragment selection during playback
During playback starting point and end
point can also be selected with the
corresponding "Start position" and
"End position" buttons.
English
33
Press the start position button, at the S.Time column will show the selected
begging point time.
Press the end position button, at the E.Time column will show the selected point
end time.
English
34
When a fragment is chosen, the selected points will be indicated: Start time, end
time, fragment time, total time.
If you want to cancel the fragment intercept, can click "cancel choice" button. Time
column become total time; recover the interface that in front of click "choice" button,
while convert will convert the whole document.
Notice: 4.3.1.1 methods of the interception video frequency fragments relatively be
applicable to single or several files to do the
fragment of the interception together; 4.3.1.2
methods of the interception video fragments
only use of while playing file, and only to just
the file that playing is valid.
4.3.2 Choosing video resolution of AMV file
Choose between 208*176 and 160*120 pixels.
Please choose the correct mode depend on
your MP3 Player.
English
35
4.3.3 Picture transform
There are 6 kinds of picture transform: Normal,
UpDown, LeftRight, UpDown-LeftRight, Deasil 90
and Anticlock wise 90. The default choice is
Normal, the interface is as follow the picture:
4.3.4 Image quality
There are three kinds of image quality: high,
middle and low.
English
36
4.3.5 Insert picture for none picture
For converting the better effect, need to pick out those options. The options is be
picked out, please use default setting.
4.3.6 Replacing the audio file
Substitutes the old audio file with the new audio file, means to choose the new
audio file (the WAV type) substitute the current video file speech part, video part is
not change.
Choose the new audio file, click button ,open the add window, the interface
runs
as follow the picture:
Above picture, press the button to choose the new audio part file path, then
press OK button to complete.
After selected new audio file, there will display the path of the file in the interface of
the "substitute new audio for old audio", please press the OK button to complete.
As follow the picture:
English
37
After adding the new audio file, the "Property setting" interface is as follow the
picture:
If you want to cancel the substitution of the audio file, enter the substitute dialog
box, don’t choose any audio file and make the "Substitute new audio for old audio"
column display blank, then click "OK" button, before exit the "Property setting"
interface, click the "OK" button again, you can cancel the substitution.
English
38
4.3.7 Insert wave for not enough wave
For better effect, please use the default setting that not is selected.
4.3.8 Miscellaneous setting:
4.3.8.1 Overwrite file
Overwrite file is replacing the current file by new converted AMV file. This options
default is to pick out. If this options did not be pick out, the then born file of AMV
has already exist to converting wrong.
4.3.8.2 Play after converting
Play after converting means AMV Player begin playing AMV files automatically
after conversion.
In the Miscellaneous setting, we suggest use the default setting.
Click the "OK" button after completing the operation of the above step, complete
the property setting operation.
Notice: The above-mentioned system parameter setting, conversion is valid to the
selected file, unselected will use the default setting.
Here of pick out not means to
choose the check box, but click the file name to make that background color is blue, then
click the "setting" button or click the right key to choose the choice of "setting".
4.3.9 Copy AMV file to the MP3 Player automatically
If needs copy the AMV files
to the MP3 Player
automatically after
converting, you should
connect the device to PC.
Make sure the connection
is finished, click on the
button in the tool
interface, there will display
the connecting interface of
tool
and MP3 Player, as the
picture:
English
39
Click on the button to choose the conserve path of the AMV files in G:\. As
above picture, there are two check boxes: "Copy AMV file to" and "Delete after
copy", if they are selected, it will realize the functions, else the functions will be
canceled. "Delete after copy" means to delete the AMV files which are saved on
the HDD, viz. the files in the conserve path that "output file" column displays.
4.3.10 Skin setting
Click the "Setting" button in the tool interface
to enter the property setting interface, choose
"skin setting" option, there are two modes
provided: "Ocean" and "Classic". As follow the
picture:
In the above pictures, we choose the "Ocean"
mode, if choose "Classic" mode, the
picture is as follows:
English
40
4.4 Convert file
After complete the system setting, make sure the check box had been selected
that wants to convert. Click convert button
in the tool interface, the
procedure begin to converts all files one by one in order, the file status is one by
one in order from "unconvert" to "success", at the same time in convert progress
column show the convert progress, the interface as follow the picture:
After conversion is completed, the AMV Player will play the AMV file automatically.
While playing the file, click the right key on the image, choose property to check
the video width and height and frame per second etc. The playing interface is as
follow the picture:
English
41
In addition to the method of the above conversion, can also choose file from the
HDD, clicking the right key, choose "beginning video conversion" at the menu that
flick open, the procedure will start to convert directly.
5. Download media files from internet and convert files
5.1 Search media files
This tool has the function of downloading media files from internet, viz. after
searching out the media files, click the right key on the file link, choose "add to
AMV convert tool", then choose "yes" in the dialog box that flick open.
If you want to search more files, enter the next dialog box and click the "OK" button.
5.2 Download the media files
Make sure the searching is finished, choose the desired file(select or cancel the
check box), the default is to select all, then click the "OK" button again.
After making sure the downloading file, you can still use the check box to select or
cancel the downloading files at this time, then click the "Download" button.
If the file can be downloaded normally, it will display the downloading process, and
the status will show "success" after downloading. If it can not be downloaded
cause of some reasons, the status will show "failed".
Finish downloading, click "OK" button, then click the "OK" button in the dialog box
to close it.
5.3 Convert the media files
After downloading the media files successfully by using the above methods, the
tool will run automatically, and add the media files which were downloaded this
time to the convert list.
The files will be saved in the install path, through the "file name" column, you can
check the conserve path of the file, e.g. D:\Program Files\MP3 Player Utilities
4.01\AMVConverter\data
Convert files, the convert methods are the same as the above 4(converting the file),
please get reference from it to convert media files.
6. Attention
6.1 If you want to convert Real player, QuickTime or MPEG2 files, please first
install the corresponding decoder.
English
42
6.2 When you convert Real player, QuickTime or MPEG2 (DVD) format files, and
your Windows Media player cannot play this file, then you need to install
corresponding compatible decoder for Windows Media player, until the Media
Player will play this file, otherwise the conversion software will not function.
6.3 When small size AMV file is converted to big size AMV file, if the setting of
"picture transform" is Normal, it is not allowed to convert; else if the setting is other
option, it can be converted but it will reserve the small size and frame per second
of the source AMV file.
6.4 There is no limit while big size AMV is converted to small size AMV file.
6.5 While playing the SWF format files, the tool will use IE browser to play it.
6.6 This tool doesn’t support the audio and the video character display of the AMV
file which is converted from Flash(SWF file).
6.7 For the moment, the tool does not support “intercept the video
fragment”function of SWF file.
6.8 The operation picture of this help document provides the reference only, please
follows the real tool of the concrete edition.
Media Manager
1 Media Manager Introduction
Manager the multi-media music files in the MP3 player and computer,
including .MP3, .WMA, .OGG, .ASF, .WMV, .AVI, .AG8, .JPEG, etc.
2 Install and Uninstall
2.1 Operational Conditions
Operation system
Simplified Chinese, and English version of Windows XP
Minimum requirement
CPU speed 200MHz or above
Storage 32MB above
Display Card: Standard VGA 256 colors display mode or above
Hard disk: Traditional Installation 300MB
CD-Rom drive: 8X or above
Soundcard (not compulsory)
English
43
Suggested standard of equipment
CPU Speed 500MHz or above
Storage 64MB or above
Display Card:SVGA 16 colors display mode or above
2.2 Installation software
The installation of Media Manager is convenient, simple and fast. The procedures are as follows:
After the starting up of the Window, insert the disc into the CD-Rom drive, and the installation
program will run automatically.
If your computer does not have automatic running on devices, then you have to customize your
installation: Find and double click the file Setup.exe from the root folder of the disc. This is the file
for setting up the program.
Installation completed pops up after the installation is finished. Click the Finish button on
the pop up window.
2.3 Software start-up
After the completion of the installation, you can start the program as the following procedures:
Click the Menu Start and then choose All Programs. Then click the item Media
Manager.
If you have chosen add a short cut for Media Manager on your desktop, you can simply
double click the Media Manager icon on your desktop and run the program.
2.4 Uninstall the Media Manager
The uninstallation of Media Manager is simple. You can easily delete all related files and
programs.
Choose the Add/ Remove programs from the control panel to remove the Media Manager
3 Quick Start Guide
3.1 To manage multi-media folders in the computer and MP3 player
These multi-media folders are stored in the USB Disk of the MP3 player. Among
those, audio files are stored in the folder \Music.
when you add a multimedia file from PC's hard disk into the multimedia library, you can select the
files from a certain content list.
The format of multi media files which are extracted from audio CD are Ogg. You can add ID3
messages (Name/ Performer/ Albrum/ Artist/ Type) for those files.
English
44
When you are browsing the multi-media folders of the computer or MP3 player, you are able to
delete files from the folders.You can look over the nature of multi media files, e.g. ID3 messages,
file size, length of time, name, etc.
You can browse your multi-media files according to their Name/ Performer/ Album/ Artist/ Type/
file location, and arrange files according to the above categories.
You can choose any multi-media files of the computer and transfer them to the MP3 player.
You can also transfer files from the MP3 player to the computer.
3.2 Managing the Playlists in the computer and MP3 player
You can establish, remove, and rename the Playlists of the computer or MP3 player.
You can pick and put files from multi-media folders to the play list in the computer.
You can pick and put files from multi-media folders to the play list in the MP3 player.
You can transfer the Playlist in computer to the MP3 player.
You can also transfer Playlists from many MP3 players to the computer, together with other media
files in those MP3 players.
Play the media file in the Playlist of PC and MP3, choose one of the files in the Playlist to play in
auto boundary, there are four modes such as Repeat One, Repeat All, Play in sequence and
Shuffle.
3.3 Manage the Record Base in PC and player.
There three categories in the player, Music, Voice and Picture, which are transferred from the
Record Base, the Picture category will be available in the feature. Put the music files in folder
\Record\Music, language files in folder \Record\Voice, and Image files in folder \Record\Picture.
Browse and delete the media files.
Browse the preference of the files, such as information about ID3, capacity, playing time, files
name.
Browse the Record category in PC and MP3 Player, arrange the serial according to the name,
playing time and path of the media files.
It’s available to transfer the files which are been chosen in the media category of PC to the media
category in MP3 player.
3.4 Play the media files.
There are Fast forward, rewind, Play and Pause functions
The nature of files is displayed in tumbling cycle.
English
45
When the users use the Playlist for playing the music, he can choose from four modes: Sequence,
repeat one, repeat all, shuffle.
If only one file is chosen to be played; only the sequence and repeat one are available
You can select any multimedia files from the multimedia file library to set a Playlist
You can select any multimedia files from the MP3 Player to set a Playlist
You can select any multimedia files from the record folder in the computer to set a Playlist
You can select any multimedia files from the record folder in the MP3 to set a Playlist
The playing scope can be all files from one Playlist
3.5 Support PC system:
Windows XP
3.6 It supports language:
It supports simplified Chinese, English
It supports traditional Chinese
4 Instructions
4.1 Main interface
There are 5 zones in the main interface, including content list (PC and MP3), playback, condition
hint, menu, and short cut.
English
46
Folder Menu:
Open/ Play, Delete File, Add file, Add Folder, Add URL, Quit (Alt+Q)
Media Menu:
Paste URL (V), Podcast Favorite (O), Update Song, Downloading Stop (P), Switch View, Refresh
(F5), New Playlist, and Rename Playlist
Play Menu:
Pause, Stop (S), Prev, next, Mode (N)
Play-> Mode Menu:4
Sequence, Repeat One, Repeat All, Random
Help Menu:
Help, About
Shortcuts:
Add file, Add folder, New Playlist, Refresh, and Switch.
4.2 Playback formats
Descriptions: This tool supports file formats which are like SDK35 as follows:
Description on file format
Podcast file(xml) (*.xml;*php;*asp)
Microsoft record file (*drv-ms)
Midi file (Midi) (*.midi)
English
47
Windows media file (asf) (*.asf)
windows picture file (Jpg)(*.ogg)
Windows video file (avi) (*.avi;*.wmv)
Audio file (wav) (*.wav;*.snd)
Video file (mpeg)(*.mpeg)
4.3 Manage the media library in the computer and MP3 player
4.3.1 Add media files to the library
Choose Add file from the Media (M), then a window pops up. You can choose one or more
media files from the recognized player, Close the window, and the interface will notify the library is
renewed.
Choose one or more media files from the audio CD, and add them to the library of the computer.
After that, close the window and the interface will show the updated library.
Interface Display
 
File formats:
Pod cast file (xml) (*.xml;*php;*asp)
Microsoft record file(*.drv-ms)
Midi file (Midi) (*.midi)
Windows media file (asf) (*.asf)
Windows picture file (Jpg)(*.ogg)
Windows video file (avi) (*.avi;*.wmv)
English
48
Windows audio file (wav) (*.wav;*.snd)
Video file(mpeg) (*.mpeg)
4.3.2 Add folders to the library of the computer
You can pick a folder from the connected player, and add it to the library of the computer. Then
close the window. The interface will show the updated library.
Choose the starter for the Audio CD, add all files under this starter to the library. Close the window
after finished. The interface will show the updated library.
Display Interface
 
4.3.3 Browse and Delete media files
The list shows all media files in the library
Highlight one or more media files in the list, and choose delete from the Edit menu, and
confirm the delete.
Interface Display
Two files are chosen to be deleted in the above picture
4.3.4 Transfer files from the library of the computer to that of the
MP3
Choose one or more media files from the library list. Right click the send button, and transfer
the files to the MP3 Player.
English
49
The window pops up due to the failure in transferring Chinese files or with insufficient space.
4.3.5 Transfer files from MP3 players to the computer
Choose files from the interface list and right click the transfer button.
Update the ID3 Playlist after the transfer
The window pops up due to the failure in transferring Chinese files or with insufficient space.
4.4 Manage the Playlist of the computer and MP3 Player
4.4.1 Establish a new Playlist
Choose Add new Playlist from the Media Menu (M). Then add a new Playlist too in the MP3
player box. Edit the Playlist name.
The maximum of the name is 32 alphabets, and there should be no identical Playlist name.
There are 16 Playlists at maximum.
Interface Display
4.4.2 Delete/ Rename the Playlist
Right Click the Playlist that you chose and choose Delete and confirm.
English
50
Right Click the Playlist that you chose and choose Rename. Make sure it doesnt have an
identical name with another Playlist
Interface Display
4.4.4 Mutual transfer of Playlist of the computer and MP3 player
Choose any Playlist listed in the PC menu box. Click download and thus it will be transferred
to the MP3 player.
Both the Playlist itself and the files in the Playlist are transferred to the MP3 Player.
Choose the Playlist for transfer. Same procedures for transferring to the computer.
4.4.5 Delete files from the Playlist
Choose any Playlists from either computer or MP3 player
4.5 Manage the record library of the computer and MP3 Player
4.5.1 Browse and Delete Media files
Choose those media files from the record folder from the menu, meanwhile the chosen files are
shown in the content list.
Choose any files from the content list, and choose delete files from the editing menu. Then a
window pops up and you can confirm the deletion.
English
51
Interface Display
 
4.5.2 Mutual transfer of recording files of the computer and MP3 player
The list of the computer is corresponding to that of the MP3 player. Media files can only be
transferred to the list correspond. For example, the folder music files from the computer can
only be transferred to the music in the MP3 player.
Choose a folder under the recording folder, and then choose any media files and right click the
button transfer. Thus, files are transferred to the recording folder.
Transfer of Chinese files or with insufficient disc space.
4.5.3 Picture display
Double click on the media files chosen from the content list, and a window pops up.
4.6 Arrange the content list
4.6.1 Arrange the media list
Click on the list title, use this item as the key word for arranging the sequence.
If you click on the ascendant sequence button, the sequence will be changed to descendent, vice
versa.
English
52
4.6.2 Arrange the Playlists
Click on the list title, use this item as the key word for arranging the sequence of the Playlists.
The interchange of ascendant and descendent order is like the one of the media list above.
4.7 Playing of music files
4.7.1 Playing of multiple music files
Music media files from the computer or MP3 player are both playable.
From the content list, click on one media files and stop the file which is currently playing, and start
the playing of the chosen file.
From the content list, click on one media files choose play from the pop-up list, stop the file
which is currently playing, and start the playing of the chosen file
‘Repeat one and play in sequence are the only ways in playing multiple media files.
4.7.2 Play the Playlists
Files in the Playlists of computer and MP3 player are playable.
From the content list or menu, right click any Playlist and choose play.
There are four styles of playing the music files from the Playlist: Play in sequence, repeat one,
repeat all and shuffle.
Fast forward, Rewind and position scroll
You can use fast forward or rewinding when the files are being played.
When the files is paused or stopped, you can change the position by using the scroll.
4.7.3 Tumbling of the file details
When the file is playing, the file name and the playback time tumbles in a cycle.
4.8 Podcast Favorite functions
4.8.1 Add URL
Podcast can download the media file from the internet URL address to the MP3 player. You can
enjoy the music or radio at any moment and everywhere.Podcast can automatically incept and
download the program which will be saved in the content list.
Choose the Add URL item and input then confirm the files URL address which will be
saved in the content list.
English
53
Interface Display:
 
You can subscribe to the web site from which you want to receive content, Double click this file in
the content list, and the information will be delivered automatically to your MP3 player.
 
English
54
4.8.2 Podcast Favorite
Podcast Favorite function is add the title and URL link address to the Podcast Favorite list that
you can use it more convenient in the future.
Choose the Media menu and click the Podcast Favorite item, fill in the Title and the URL address
in the pop-up window.
Interface display:
Postcast use RSS2.0 file format to transmit information, this is different from other format file. If
inspection fail or the provided link is invalidation, it will show channel URL check false.
English
55
Click Add button This URL will be added in the Podcast Favorite list. Press the Paste button it will
subscribe or update the audio/video files automatically to the content list.
Interface display:
 
5 Converting .ACT. audio to WAV.audio.
Step 1: After installing the driver and software utilities, click Start button, select
Programs > MP3 Player Utilities 4.04> Media Manager
English
56
Step 2. Click the Media Manager and you will see the following picture.
Step 3 Click Add File to choose your desired .ACT file. Note: Files of Types should
be “All files”.
English
57
Step 4. Choose the .ACT file and press the right button of the mouse, click the
“ ToWav” to convert the .ACT file into .WAV file,
English
58
Editing Lyrics
Instructions for teaching you to edit the lyrics synchronously with the songs.
Step 1: Click Start button, go to Programs > Accessories > Notepad to open a new
text document.
Step 2: Write the lyrics as the following format. The corresponding time to lyrics
should be typed in [ ] bracket format.
Step 3: Then save the text file in extension of .LRC file.
Step 4: Copy the lyrics file (.LRC) and its
song into the player under the same
directory. You will see the lyrics
on the display.
Note: The function of scrolling lyrics
should be enabled; please refer to Lyric
section for details.
English
59
Downloading MP3 and WMA songs or AMV films
Note: The screens shown below apply to Windows® XP, other versions of Windows® may display
slightly different screens.
Step 1: Ensure your player is on.
Step 2: Firmly plug the USB cable into the USB ports of your computer and player.
Step 3: Once the connection is properly made, the following screen will display. If
this screen doesn’t show, please re-connect the USB cable once more.
The following screen will appear.
Note: Please ignore the following screen if you are not using Windows® XP.
Step 4: Double click My Computer on the Desktop and a Window will
display as follow.
English
60
You will find Removable Disk in the Window.
Since Windows® will assign a drive letter to the Removable Disk according to
system configuration of the computer, the drive letter may be different when the
player is connected to a different computer.
Step 5: Double click Removable Disk.
Note: “Busy…” will appear during downloading or uploading the files, please don’t disconnect the
USB cable or turn off the player at this moment. When “Busy…” disappears from the display, you
may disconnect the cable.
English
61
Step 6: Drag and drop .MP3 and .WMA music file or .AMV file into
Removable Disk.
Note: You are allowed to create any directories and files in Removable Disk.
The file in the extension of .LRC is the lyric file which stores the lyrics
synchronously with its song. Please refer to the Editing Lyrics section for details.
The file in extension of .ACT is the recorded voice file which is the special audio
format developed by the vendor. For common software audio players in the market,
it can’t play .ACT audio files. Therefore, an .ACT file is necessary to convert
to .WAV for playback on the common software audio players such as Microsoft®
Windows® Media Player. Please refer to Converting. ACT audio to .WAV audio
section for details.
The file in the extension of .ASF is the video file which is the special video format
developed by the vendor. For common software video players in the market, it
can’t play .ASF video files. Therefore, an .ASF file is necessary to convert to .AMV
file for playback on the common software video players such as Microsoft®
Windows® Media Player. Please refer to Converting. ASF audio to .AMV video
section for details.
English
62
Folder Management and Navigation
Folder Management
Under the ROOT directory, you may create the folder to manage the songs for
easy navigation and management. Under the each folder, subfolder or ROOT
directory.
Folder Navigation
1. In the Stop mode, press the MENU button and select Local Folder.
2. The created folder names in the first layer are listed on the display. Choose
your desired folder name by pushing the PREV/NEXT button left or right.
3. Press the MENU button to confirm your selection
Sub-folder
1. You may enter each folder in order to locate your desired sub-folder. Then
press MENU button for confirmation.
2. You may go back to the previous layer by selecting “/” on the LCD display
Root Directory
1. You may select “ROOT” for going backwards to the root directory.
Using USB Mass Storage Function
USB mass storage function allows you to access the player as a disk drive of your
computer. You can Copy and Delete the files with any formats into/from the player.
Follow the same procedures in Downloading MP3 and WMA songs for details.
Note: “Busy…” will appear during downloading or uploading the files, please don’t disconnect the
USB cable or turn off the player at this moment. When “Busy…” disappears from the display, you
are allowed to disconnect the cable.
Disconnecting the USB Cable
Before you disconnect the USB cable from your player or computer, please note
the following procedures should be done for safety removal.
Note: Please ignore these procedures if you are using Windows®98/98SE.
English
63
Note: “Busy…” will appear during downloading or uploading the files, please don’t disconnect the
USB cable or turn off the player at this moment. When “Busy…” disappears from the display, you
are allowed to disconnect the cable.
Step 1: Double click the Removable Disk, which is at the bottom right hand corner
of your desktop.
Step 2: The following window will appear. Click Stop button.
Step 3: Another window will pop up. Select “GENERIC USB DISK DEVICE USB
Device” and click OK button to confirm.
English
64
Step 4: Click Close button to exit the window. You are allowed to disconnect the
USB cable from the USB port of your computer.
Formatting the Internal Memory
There are two ways to format the internal memory.
Note: This formatting procedure will cause all files in the player to be lost.
Using the Formatting Software Utilities
Please refer to Installing Driver and Software Utilities section for details.
Using the Formatting in Window
1. Click My Computer on your desktop.
2. And you will see Removable Disk, right click on Removable Disk and click
Format on the menu.
3. After you have clicked Format, you will see the following screen, then click
Start button to start formatting.
English
65
Trouble Shooting
Symptom Reasons Solution
Press the POWER
button, the display does
not turn on
The battery has run out z Recharge the
battery.
The software utilities
(included in CD) has not yet
been installed on Windows®
98/98SE
z Insert the CD
z Click the setup to
install the software
utilities
z Follow the on-
screen instructions
to complete
installation
The software utilities of the
player (included in CD)
conflicts with other software
drivers which were installed
on your computer
z Uninstall the
software utilities of
the player
z Restart your
computer
z Re-install the
software utilities
again
After plugging the player
into the USB port of your
computer, Removable
Disk Drive cannot be
found in My Computer
Your motherboard doesn’t
support the USB connection
Contact the manufacturer of
your motherboard to
upgrade the motherboard
driver
The music file on the
player cannot be deleted
The attribute of the music file
is set as Read Only
Change the attribute of the
music file
The playing time displays
disorderly when playing
mp3 music
An mp3 music file is currently
compressed in VBR format,
which can vary the
compression speed of mp3
music. When the mp3 music
is playing, the variable speed
will cause the playing time
displays to be disorderly
Compress the mp3 music in
fix compression speed rather
than variable compression
speed
When the player is
connected or
disconnected to/from your
computer, there is an
unusual error on the
computer
It is due to the sudden
disconnection from the USB
port during the transference
the files
It is recommended that the
user should not suddenly
unplug the player from the
USB port of computer when
the files are being
transferred or when the
internal memory is being
formatted.
My player can’t play the
mp3 music files
Most of the mp3 music files
on the market are
compressed in MPEG1,
MPEG2, LAYER3 standard.
In earlier days, some mp3
music were compressed in
If the mp3 player can’t play
the mp3 music file, skip to
the next song until the mp3
music files are not
compressed in MPEG1
LAYER1 /MPEG1 LAYER2.
English
66
Delete those files which can’t
be played in the player
MPEG1 LAYER1 and
MPEG1 LAYER2. Please
note our player does not
support MPEG1 LAYER1,
MPEG1 LAYER2 or an mp3
compressed in more than
one compression standard.
Change the compression
standard of an mp3 music
file in MPEG1 LAYER3
The player doesn’t support
such a compression standard
of the playing music file
The player can only support
MPEG1 MPEG2 LAYER3
and WMA music files
Out of the range of
compression speed
z The range of MP3
compression
speed:
32Kbps~384Kbps
z The range of WMA
compression
speed:
64Kbps~128Kbps
If the music file can’t be
played normally or you
hear a long beep sound
Tips: If you don’t know the compression standard and
speed of the music file, you should use those common
music players (i.e. Winamp) to check the music information.
After formatting the
internal memory of the
player by using our
software utilities, close
and re-open the software,
the mp3 player can’t be
detected
Some system information
may be deleted during
formatting
Disconnect the player and
then re-connect
No driver has been installed
on Windows® 98/98SE
Install driver The computer can’t detect
the USB cable
Unsafe removal of the USB
cable
Format the internal memory
English
67
Technical Specifications
Capacity
128MB/256MB/512MB/1GB/2GB internal flash
memory
Display Colour TFT display
Interface USB 2.0 high speed
Power Lithium battery
File type
.MP3 (32kbps – 384kbps), .WMA (64kbps –
128kbps) for music at Constant Bit Rate
.ACT and .WAV for recorded audio files
.AMV for movie files
.TXT for E-Book files
.JPG, .BMP and GIF for photo files
S/N ratio 90dB
Earphones output
power
9mWx, 32ohm
Operating System
Windows® 98/98SE/Me/2000/XP
MAC OS 9.0, 10.0
Dimensions 39mm(W) x90mm(H) x 8mm(D)
Weight 45g
Français
1
MANUEL DE L’UTILISATEUR
IL SE PEUT QUE CE GUIDE D’UTILISATION CONTIENNE DES ERREURS ET DES
OMISSIONS
LE DESIGN ET LES SEPCIFICATION SONT SUJETS A MODIFICATION SANS PREAVIS
Aucune partie de ce document ne peut être reproduite ou transmise sous n'importe quelle forme
que ce soit ou de quelque façon que ce soit, électronique ou mécanique, y compris le
photocopiage et l'enregistrement ou la traduction dans une autre langue pour quelque raison que
ce soit sans la permission écrite préalable du fabricant.
Tous les noms de marque, logos ou les marques déposées mentionnés sont la propriété de leurs
propriétaires respectifs.
© 2006. Tous droits réservés.
Version 1.0 04202006
Veuillez lire ce livret et prendre connaissance des avertissements de sécurité avant de
faire fonctionner l'appareil.
Avertisssement! Une utilisation non appropriée du chargeur peut faire chauffer la pile ou la
faire exploser.
Electrical and electronic equipment ( EEE ) contains materials, parts and
substances which can be dangerous to the enviroment and harmful to human
health if waste of electrical and electronic equipment ( WEEE ) is not disposed
of correctly.
Equipments which are marked with the WEEE logo (as shown on the left ),
should not be thrown away with your household waste. Contact your Local
Authority Waste Disposal Department as they will be able to provide details
of the recycling options available in your area.
Note:
Les equipements électroniques et électroniques (EEE) contiennenent des matériaux, des composants et
des substances qui peuvent être dangereuses pour l’environnement et nocifs à l’homme si ces
équipements électroniques et électriques ne sont pas détruits de manière approprié. (DEEE).
Les équipements qui sont marqués du logo DEEE (comme indiqué sur la gauche), ne doivent pas être
jetés dans une poubelle domestique. Veuillez contacter votre le service de votre Autorité Locale en charge
des déchets afin d’obtenir les informations nécessaires sur les réglementations de recyclage dans votre
localité.
Français
2
Table des Matieres
Introduction --------------------------------------------------------------------------------------------------------------------4
Caractéristiques --------------------------------------------------------------------------------------------------------------- 4
Contenu du Coffret -------------------------------------------------------------------------------------------------------------4
Vue d'ensemble--------------------------------------------------------------------------------------------------------------- ..5
Fonctions des boutons --------------------------------------------------------------------------------------------------------6
Affichage--------------------------------------------------------------------------------------------------------------------------..7
Fonctionnement menu écran------------------------------------------------------------------------------------------------ 8
Power On et Off-------------------------------------------------------------------------------------------------------------... 9
Changer de Mode------------------------------------------------------------------------------------------------------------- 9
Entrer dans la page de menu principal----------------------------------------------------------------------------------- 9
Regarder un Film------------------------------------------------------------------------------------------------------------- 10
Sauter un Film--------------------------------------------------------------------------------------------- 11
Fast Forward et Backward----------------------------------------------------------------------------- 11
Lire une chanson------------------------------------------------------------- ----------------------------------------------- 11
Sauter une chanson------------------------------------------------------------------------------------ 12
Fast Forward et Backward----------------------------------------------------------------- ---------- 12
Radio FM(en option)------------------------------------------------------------------------------------------------------- -- 12
Choisir des chaînes------------------------------------------------------------------------------------ 12
Enregistrement vocal-------------------------------------------------------------------------------------------------------- 13
Mode d’enregistrement-------------------------------------------------------------------------------- 14
Lire l’enregistrement vocal----------------------------------------------------------------------------------------------------14
Sauter un enregistrement vocal------------------------------------------------------------------------15
Fast Forward et Backward------------------------------------------------------------------------------15
Regarder des Photos-----------------------------------------------------------------------------------------------------------15
E-livre-------------------------------------------------------------------------------------------------------------------------------16
Réglages Système--------------------------------------------------------------------------------------------------------------16
Horloge-------------------------------------------------------------------------------------------------------17
Réglage LCD------------------------------------------------------------------------------------------------17
Changer la Langue du Menu Ecran--------------------------------------------------------------------18
Sélection Economiseur d’Ecran-------------------------------------------------------------------------19
Power Off-------------------------------------------------------------------------------------------------- 19
Mode Replay ---------------------------------------------------------------------------------------------- 19
Mode Online----------------------------------------------------------------------------------------------- 20
Vérifier la Mémoire--------------------------------------------------------------------------------------- 20
Montrer la Version micro-logiciel-----------------------------------------------------------------------20
Firmware upgrade--------------------------------------------------------------------------------------- 20
Fonction Jeux-------------------------------------------------------------------------------------------------------------------- 20
Mode Repeat-------------------------------------------------------------------------------------------------------------------- 21
Mode EQ------------------------------------------------------------------------------------------------------------------------- 21
Changez le taux de lecture--------------------------------------------------------------------------------------------------22
A-B Repeat-----------------------------------------------------------------------------------------------------------------------22
Replay Times--------------------------------------------------------------------------------------------------------------------22
Replay Gap---------------------------------------------------------------------------------------------------------------------- 22
Installer le Driver et les Utilitaires du Logiciel-------------------------------------------------------------------------23
Système Requis------------------------------------------------------------------------------------------------------------- -----23
Installation des Utilitaires du Driver et du Logiciel------------------------------------------------------------------- -----23
Convertisseur AMV---------------------------------------------------------------------------------------------------------- ---- 25
Français
3
1. Résumé---------------------------------------------------------------------------------------------------- ----25
2. Installer le Logiciel-------------------------------------------------------------------------------------- -- 25
3. Utiliser le Logiciel-------------------------------------------------------------------------------------- --- 26
4. Convertir un fichier------------------------------------------------------------------------------------- --- 28
5. Téléchargez des fichiers média depuis l’Internet et convertir les fichiers---------------- --- 41
6. Attention------------------------------------------------------------------------------------------------- - --- 41
Media Manager-------------------------------------------------------------------------------------------------------------- - - 42
1.Introduction à la gestion de médias----------------------------------------------------------------------42
2 Installer et Désinstaller------------------------------------------------------------------------------------- 42
3. Guide de Démarrage Rapide------------------------------------------------------------------------------43
4 Instructions--------------------------------------------------------------------------------------------------- 45
5 Convertir. ACT. audio en WAV.audio. ------------------------------------------------------------------55
Editer des Paroles-------------------------------------------------------------------------------------------------------------- 58
Téléchargez des chansons MP3 et WMA ou des films AMV------------------------------------------------------59
Gestion Dossier et Navigation-----------------------------------------------------------------------------------------------62
Folder Management----------------------------------------------------------------------------------------------------------….62
Folder Navigation-------------------------------------------------------------------------------------------------------------….62
Sub-Folder----------------------------------------------------------------------------------------------------------------------….62
Root Directory----------------------------------------------------------------------------------------------------------------- ….62
Fonction Utilisation de le Périphérique de Stockage USB---------------------------------------------------------62
Débranchez le Câble USB-----------------------------------------------------------------------------------------------------62
Formater la mémoire interne-------------------------------------------------------------------------------------------------64
Utiliser les Utilitaires de Formatage du Logiciel----------------------------------------------------------------------------64
Utiliser le Formatage dans Windows®---------------------------------------------------------------------------------------64
Résolution de problèmes------------------------------------------------------------------------------------------------------65
Spécifications Techniques----------------------------------------------------------------------------------------------------67
Français
4
Introduction
Merci d’avoir choisi ce lecteur MP3. Vous pouvez utiliser ce lecteur MP3 versatile
non seulement pour lire des chansons en format MP3 et WMA mais aussi pour
regarder des films AMV, faire des enregistrements vocaux et vous en servir
comme périphérique USB,etc.
Caractéristiques
z Affichage couleur TFT 4,5cm
z Supporte la lecture de musique en format MP3 (MPEG1/2 Layer2) et
WMA
z Supporte la lecture de films en format AMV
z Supporte la Fonction Jeux
z Supporte la fonction E-livre
z Supporte les images JPG, BMP et GIF
z Enregistreur Vocal digital
z Fonction Périphérique de stockage USB pour l’enregistrement de
données.
z Réglages 7 EQ
z Pile Lithium qui permet un temps de lecture plus long
z Pas d’installation de pilote requise (excepté pour Windows® 98/98SE)
Contenu du Coffret
z Manuel de l’utilisateur
z Ecouteurs
z Adaptateur Ecouteurs de 2.5mm à 3.5mm
z Etui en silicone
z Chargeur
z Câble USB
z CD comprenant le pilote et les utilitaires du logiciel.
Français
5
Vue d’Ensemble
Avant et Arrière
Dessus et dessous
OFF ONOFF ON
On/Off
USB Port
MENU VOL
Next/
Fast Forward
Menu/Confirm/
Display Lyric
Display
Volume+/-
Previous/
Fast Backward
Microphone
Earphone Jack
Play/Pause
Français
6
Fonctions des boutons
Fonctionnement
EARPHONE JACK
Insérer la prise casque dans le jack pour le casque.
USB PORT
Reliez le câble USB au port USB de l’ordinateur pour
télécharger les chansons.
MICROPHONE
Microphone pour l’enregistrement vocal
NEXT/
FAST FORWARD
z En mode PLAYING, appuyez sur le bouton et relâchez
immédiatement pour aller à la chanson suivante.
z En mode PLAYING, appuyez et maintenez la touche
enfoncée pour faire une avance rapide.
MENU/
CONFIRM/
DISPLAY LYRIC
z En mode STOP, appuyez sur le bouton et maintenez-le
enfoncé pour entrer dans la page du Menu Principal
afin de changer les modes.
z Sous la page de Menu ou Sous-Menu , appuyez sur le
bouton pour confirmer la sélection des items du menu
z En mode PLAYING, appuyez sur le bouton et
maintenez-le enfoncé pour afficher les paroles (les
paroles sont nécessairement éditées par l’utilisateur
avant d’être affichées sur l’écran LCD.)
PREVIOUS/
FAST BACKWARD
z E n mode PLAYING, appuyez sur le bouton et relâchez
immédiatement pour aller à la chanson précédente.
z En mode PLAYING, appuyez et maintenez la touche
enfoncée pour faire un retour rapide.
VOLUME +
VOLUME -
z Appuyez sur le bouton Vol pour régler le volume,
augmentez-le en appuyant sur le bouton NEXT
z Appuyez sur le bouton Vol pour régler le volume,
baissez-le en appuyant sur le bouton PREVIOUS
ON/
OFF/
z En mode INACTIF, faites glisser le bouton vers la
droite pour allumer le lecteur.
z En mode STOP, faites glisser le bouton vers la gauche
pour éteindre le lecteur.
PLAY/
PAUSE/
z En mode STOP, appuyez sur le bouton pour lire les
chansons.
z En mode PLAYING, appuyez sur le bouton pour mettre
la chanson en pause.
z Lorsque le bouton ON/OFF est placé sur ON, appuyez
sur le bouton et maintenez-le enfoncé pour allumer et
éteindre le lecteur.
DISPLAY
Affiche l’état de marche et les paroles avec une lumière de fond.
Français
7
Affichage
Icône d’affichage Fonction
Mode répétition
Montre le mode de répétition en cours utilisé
Niveau de la batterie
Indique le niveau de la batterie.
Augmentation ou abaissement du volume
Indique le volume actuel
Mode de l’Egaliseur
Indique le mode en cours de l’égaliseur utilisé 7
réglages différents de l’EQ sont disponibles pour la
sélection.
128KBPS
Taux Bit
indique le taux de bits de la chanson
Nom de la Chanson en Lecture
Indique la chanson en cours de lecture
N
Français
8
Fonctionnement du menu écranEn mode STOP (Pas de chanson ou de
voix n’est en lecture)
Remarque : “FM” ne s’applique qu’au lecteur qui a une fonction FM intégrée.
En mode PLAY (Une chanson ou une voix est lue)
Français
9
Power On et Off
power On
Faites glisser le bouton ON/OFF vers la gauche pour allumer le lecteur. Le logo de
démarrage apparaît à l’écran
Power Off
Faites glisser le bouton ON/OFF vers la droite pour éteindre le lecteur.
Note: Lorsque le bouton ON/OFF est placé sur ON, appuyez sur le bouton PLAY/PAUSE et
maintenez-le enfoncé pour allumer et éteindre le lecteur.
Niveau de la pile
L’icône de la pile à l’écran indique un niveau faible.
Pile faible
Lorsque l’icône de la pile s’affiche à l’écran dans , elle indique que
l’énergie de la pile diminue. Please recharge your player with the power charger.
Charger la pile
Utilisez le câble USB pour relier l’appareil et le chargeur pour recharger. Lorsque
le témoin est vert, cela signifie que la batterie est entièrement chargée.
Note: 1. Chargez entièrement la pile avant d’utiliser l’appareil pour la première fois.
2. Rechargez la pile si l’appareil n’est pas utilisé pendant une période prolongée.
Changer le mode
Entrer dans la page de menu principal
1. Faites glisser le bouton ON/OFF pour entrer dans la page du Menu Principal
ci-dessous Vous êtes entré dans la page du Menu Principal.
* Remarque : “FM” ne s’applique qu’au lecteur qui a une fonction FM intégrée.
Français
10
2. Appuyez sur le bouton PREVIOUS/NEXT pour aller à d’autres items du
menu en séquence: Movie,Music, FM radio, Record, Voice, Photo Browse,
E-livre, System setup et Game.
3. Choisissez l’item du menu souhaité et appuyez à nouveau sur le bouton
MENU/CONFIRM pour entrer dans la page de sous-menu.
Playing movie(Regarder des Films)
1. Après être entré dans la page du Menu principal, sélectionnez Movie et
appuyez sur le bouton MENU/CONFIRM pour entrer dans le mode de
Playing movie (lecture de films).
Note: Seuls le format AMV peut être lu sous le mode Playing Movie (Lecture de Films).
2. L’écran retournera à l’écran suivant en mode STOP
3. Appuyez sur le bouton PREVIOUS/NEXT pour sélectionner le film désiré.
4. Appuyez sur le bouton PLAY/PAUSE pour commencer à lire le film AMV
sélectionné. S’il n’y a pas de fichiers AMV, “No Movie Files” s’affichera à
l’écran.
Français
11
Sauter un film
Appuyez sur le bouton PREVIOUS/NEXT pour aller au film suivant ou précédent.
Avance et Retour RapidesFaites une avance ou un retour rapides en appuyant
sur le bouton PREVIOUS/NEXT et en le maintenant enfoncé pendant la lecture de
films.
Playing Song (Lire une chanson)
1. Après être entré dans la page du Menu principal, sélectionnez Music et
appuyez sur le bouton MENU/CONFIRM pour entrer dans le mode de
Playing Song(lecture de chansons).
Note: Seuls les formats MP3 et .WMA peuvent être lus sous le mode Playing Song (Lecture de
Chansons.)
2. L’écran entrera dans l’écran suivant en mode STOP
3. Appuyez sur le bouton PREVIOUS/NEXT pour sélectionner la chanson
désirée.
4. Appuyez sur le bouton PLAY/PAUSE pour commencer à lire la chanson
MP3 ou WMA. S’il n’y a pas de fichier MP3 et .WMA, “No Files” s’affichera à
l’écran.
Sauter une chanson
Appuyez sur le bouton PREVIOUS/NEXT pour aller à la chanson suivante ou
précédente.
Français
12
Avance et Retour Rapides
Faites une avance ou un retour rapides en appuyant sur le bouton
PREVIOUS/NEXT et en le maintenant enfoncé pendant la lecture de musique.
* Radio FM
* Remarque : “FM” ne s’applique qu’au lecteur qui a une fonction FM intégrée.
Choisir des stations
1. Après être entré dans la page du Menu principal, sélectionnez FM et
appuyez sur le bouton MENU/CONFIRM pour entrer dans le mode radio FM.
2. Appuyez sur le bouton PREVIOUS/NEXT et maintenez-le enfoncé, le lecteur
peut faire un balayage automatique des stations FM. Les utilisateurs
peuvent choisir différentes station FM.
3. Sauvegarder les stations FM trouvées.
Appuyez sur le bouton MENU/CONFIRM pour entrer dans la Page de Sous-
Menu FM. Appuyez sur le bouton MENU/CONFIRM pour sélectionner la
fonction Save.
4. Sélectionner des Stations FM sauvegardées
Appuyez sur le bouton PLAY pour sélectionner la station FM sauvegardée
en séquence.
Enregistrement vocal
Français
13
1. Après être entré dans la page du Menu principal, sélectionnez Record et
appuyez sur le bouton MENU/CONFIRM pour entrer dans le mode
d’enregistrement vocal.
Note: L’enregistrement vocale sera sauvegardée en format ACT ou .WAV uniquement.
Veuillez prérégler avant de procéder à l’enregistrement vocal.
2. L’écran suivant vous indiquera lorsque vous serez entré dans le mode
Recording Voice(Enregistrement Vocal).
3. Avant l’enregistrement, vous devez régler votre type REC. Appuyez sur le
bouton MENU pour entrer dans REC Type, puis appuyez sur le bouton
PREVIOUS/NEXT pour sélectionner Mode REC.
4. Il y a quatre modes d’enregistrement disponibles Fine REC, Long REC, Fine
VOR et Long VOR. Appuyez sur le bouton MENU/CONFIRM pour confirmer
la sélection.
5. Mettez la source de son près du microphone intégré. Ensuite, appuyez sur
le bouton PLAY/PAUSE pour commencer à enregistrer. Vous pouvez
appuyer sur le bouton PLAY/PAUSE pour mettre ne pause ou arrêter
l’enregistrement.
Lorsque l’enregistrement est terminé, appuyez sur le bouton PLAY/PAUSE et
maintenez-le enfoncé. Relâchez le bouton lorsque le message “Saving…” apparaît
à l’écran. Les fichiers audio enregistrés seront sauvegardés par défaut sous Root
Directory. Veuillez vous référer à la section Change Directory pour plus
d’informations.
Mode d’enregistrement
Fine REC
Français
14
Effectue une qualité élevée de l’enregistrement dans un format de fichier
WAV mais la taille du fichier est relativement plus grande.
Long REC
Effectue une qualité faible de l’enregistrement dans un format de fichier ACT
mais la taille du fichier est relativement plus petite.
Fine VOR
L’enregistrement vocal commence lorsqu’il y a un son. S’il n’y a pas de son,
l’enregistrement sera en pause. L’enregistrement reprendra lorsqu’il y aura
un son.
Il effectue une qualité d’enregistrement plus élevée et relativement plus
sensible que 8K VOR.
Note: Cette fonction de Fine VOR est insignifiante si l’environnement n’est pas suffisament
calme.
Long VOR
L’enregistrement vocal commence lorsqu’il y a un son. S’il n’y a pas de son,
l’enregistrement sera en pause. L’enregistrement reprendra lorsqu’il y aura
un son.
Il effectue une qualité d’enregistrement plus faible et relativement plus
sensible que 32K VOR.
Playing Recorded Voice(Lire l’enregistrement vocal)
1. Après être entré dans la page du Menu principal, sélectionnez Voice et
appuyez sur le bouton MENU/CONFIRM pour entrer dans le mode de
Playing Recorded Voice (lecture d’enregistrement vocal).
2. L’écran retournera à l’écran suivant en mode STOP
Français
15
3. Appuyez sur le bouton PREVIOUS/NEXT pour sélectionner la chanson
désirée.
4. Appuyez sur le bouton PLAY/PAUSE pour commencer à lire les fichiers
audio. S’il n’y a pas de fichier enregistré, “No Files” s’affichera à l’écran.
Sauter un enregistrement vocal
Appuyez sur le bouton PREVIOUS/NEXT et relâchez immédiatement pour sauter
un enregistrement vocal en avant ou en arrière.
Avance et Retour Rapides
Appuyez sur le bouton PREVIOUS/NEXT et maintenez-le enfoncé pour faire une
avance ou un retour rapides.
Regarder des Photos
1. Après être entré dans la page du Menu principal, sélectionnez Photo Browse
et appuyez sur le bouton MENU/CONFIRM pour entrer dans la fonction de
visualisation de photos.
Note: Seuls les formats JPG, .BMP et .GIF seront lus sous la fonction Photo Browse
2. Appuyez sur le bouton PREVIOUS/NEXT pour sélectionner la photo désirée.
E-livre
1. Après être entré dans la page du Menu principal, sélectionnez E-livre et
appuyez sur le bouton MENU/CONFIRM pour entrer dans la fonction E-livre.
Note: Seuls le format TXT sera lu sous la fonction E-livre
Français
16
2. Appuyez sur le bouton PREVIOUS/NEXT pour sélectionner l’article désiré.
Réglages système
2. Après être entré dans la page du Menu Principal, appuyez sur le bouton
PREVIOUS/NEXT pour sélectionner Réglage Système.
2. Appuyez sur le bouton MENU/CONFIRM pour entrer
Page du menu System Function (Réglage Système)
Horloge
1. Après être entré dans la page de menu Réglage Système, Sélectionner
Clock.
2. Appuyez sur le bouton VOLUME pour entrer dans le réglage de Année,
Mois, Jour et Heure
Clock
LCD Set
Language
ScreenSaver Sel
Power Off
Replay Mode
Online Mode
Memory Info
Firmware version
Firmware Upgrade
Exit
Français
17
3. Poussez le bouton PREVIOUS/NEXT pour l’Année, le Mois, la Date et
l’Heure en croissance ou en décroissance.
4. Appuyez sur le bouton MENU/CONFIRM pour confirmer la date en cours et
les réglages de l’heure.
Réglage LCD
Après être entré dans la page de menu Réglage Système, appuyez sur le bouton
PREVIOUS/NEXT pour sélectionner la Fonction LCD Set Il y a Economiseurs
d’Ecran et Noir sous cette option.
Economiseurs d’Ecran
1. Après être entré dans le sous-menu de Réglage LCD, sélectionnez Screen
Savers en appuyant sur le bouton MENU/CONFIRM
2. Appuyez sur le bouton PREVIOUS/NEXT pour régler les Economiseurs
d’Ecran sur 0/5/10/15/20/25 /30 secondes. En mode IDLE(INACTIF) (pas de
touche enfoncée), le LCD se mettra automatiquement en économiseur
d’écran en fonction de la durée que vous avez réglé. Vous pouvez régler “0”
pour désactiver cette fonction. Veuillez vous référer à la Sélection
Economiseur d’écran pour voir comment en sélectionner un.
Changer le temps mort LCD
1. Après être entré dans le sous-menu de Réglage LCD, sélectionnez BLACK
en appuyant sur le bouton MENU/CONFIRM
Français
18
2. Appuyez sur le bouton PREVIOUS/NEXT pour régler le temps-mort sur
0/5/10/15/20/25 /30 secondes. En mode IDLE(INACTIF)(pas de touche
enfoncée), l’écran LCD deviendra noir automatiquement en fonction de la
durée que vous avez sélectionnée.
Pour désactiver cette fonction, réglez sur “0”
Changer la Langue du Menu Ecran
Après être entré dans la page du Menu Principal, appuyez sur le bouton
PREVIOUS/NEXT pour sélectionner la Fonction Langue. Il y a onze langues
disponibles comme suit :
Sélection Economiseur d’Ecran
Après être entré dans le menu Réglage Système, appuyez sur le bouton
PREVIOUS/NEXT pour sélectionner ScreenSaver Sel. Vous pouvez appuyer sur
le bouton PREVIOUS/NEXT pour choisir entre No 1 et No 2. Il y a deux types
d’images d’écran parmi lesquels vous pouvez choisir.
Power Off
1. Après être entré dans la page du Menu Principal, appuyez sur le bouton
PREVIOUS/NEXT pour sélectionner la Fonction Power off . Sous cette
fonction, il y a Off Time et Sleep Time
2. Pour Off Time (Temps d’arrêt), appuyez sur le bouton PREVIOUS/NEXT pour
régler le temps d’arrêt sur 0/10/20/30/40/50/60 secondes. En mode STOP, le
Simple Chinese
English
Trad Chinese
Japanese
Korean
French
German
Italian
Spanish
Portuguese
Dutch
Swedish
Denmark
Polish
Hungarian
Czech
Russia
Thai
Français
19
lecteur sera éteint automatiquement en fonction de la durée que vous avez
réglée. Pour désactiver cette fonction, réglez sur “0”
3. Pour Sleep Time, appuyez sur le bouton PREVIOUS/NEXT pour régler le
temps sleep sur 0/10/20/30/40/50/60/70/80/90/100/110/120 secondes. En
mode IDLEINACTIF (pas de touche enfoncée), le lecteur s’éteindra
automatiquement en fonction de la durée que vous avez sélectionnée.
Pour désactiver cette fonction, réglez sur “0”
Mode Replay (répétition)
Il y a Manual Replay (manuel) et Auto Replay (automatique). Appuyez sur le
bouton PREVIOUS/NEXT pour choisir l’option désirée.
Mode On-line
Veuillez installer le logiciel et activer la fonction de division de partition et régler le
mot de passe avant d’utiliser cette fonction. Veuillez vous référer à la Diviser la
Partition et Régler le Mot de Passe pour plus d’informations.
Il y a trois sélections qui comprennent Multi Drive, Normal Only et Encrypted Only
Multi-Drive
Si vous sélectionnez Multi-Drive, l’utilisateur peut voir à la fois le lecteur normal et
le lecteur crypté.
Normal Only
Si vous sélectionnez Normal Only, l’utilisateur ne peut voir que le lecteur normal
alors que le lecteur crypté est caché.
Encrypted Only
Si vous sélectionnez Encrypted Only, l’utilisateur ne peut voir que le lecteur crypté
alors que le lecteur normal est caché.
Note: Cette fonction n’est supporté que sous Windows 98/Me/XP ou Windows 2000 avec SP4 et
la fonction de division de partition est activée.
Vérification de la Mémoire
Après être entré dans la page menu Réglage Système, sélectionnez Memory Info
en appuyant sur le bouton MENU/CONFIRM pour vérifier la mémoire qui a été
utilisée. La mémoire utilisée s’affichera à l’écran.
Français
20
Montrer la Version du Micro-logiciel
Après être entré dans la page menu Réglage Système, sélectionnez Firmware
Version en appuyant sur le bouton MENU/CONFIRM. Le code date, la version du
micro-logiciel seront affichés à l’écran pour référence.
Mise à jour Micro-logiciel
Sera utilisé lorsqu’il y aura une mise à jour de Mircro-logiciel.
Note: Il est vivement recommandé de faire mettre à jour le micro-logiciel par un ingénieur
qualifié afin d’éviter d’endommager votre lecteur.
Fonction Jeux
1. Après être entré dans la page du Menu principal, sélectionnez Game et
appuyez sur le bouton MENU/CONFIRM pour entrer dans la fonction E-livre.
Un seul jeu est disponible sur ce lecteur.
Mode Repeat (répétition)
En mode PLAYING (LECTURE), appuyez sur le bouton MENU/CONFIRM et
sélectionnez Repeat pour entrer en mode Repeat. Il y a sept modes repeat
disponibles : Normal, Repeat One, Folder, Repeat Folder, Repeat All, Random,
Intro.
Normal
Toute la musique sera lue chanson par chanson et le lecteur s’arrêtera
lorsque ce que vous désactiverez la fonction..
Repeat One
La musique sera répétée une fois jusqu’à ce que vous désactiviez cette
fonction.
Folder
Français
21
Tous les fichiers musicaux du dossier choisi seront lus une fois jusqu’à ce
que vous désactiviez cette fonction
Repeat Folder
Tous les fichiers musicaux du dossier choisi seront lus en continu jusqu’à ce
que vous désactiviez cette fonction
Repeat All
Toutes la musique sera lue du début jusqu’à la dernière chanson et répétée
du début à la fin jusqu’à ce que vous désactiviez cette fonction
Random
Toute la musique du dossier en cours sera lue de manière aléatoire jusqu’à
ce que vous désactiviez cette fonction
Intro
Toute la musique : de la première piste à la dernière, sera lue pendant 10
secondes morceau par morceau jusqu’à ce que vous désactiviez cette
fonction
Le réglage du mode Repeat peut être activé en mode Playing
Song(lecture de Chanson) et en mode Playing Recorded Voice(Lecture
d’enregistrement vocal).
Mode EQ
En mode Playing (LECTURE), appuyez sur le bouton MENU/CONFIRM et
sélectionnez EQ Select pour entrer en mode EQ. Il y a sept modes EQ
disponibles : DBB, Natural, Rock, Pop, Classic, Soft et Jazz
Appuyez sur le bouton PREVIOUS/NEXT pour changer le mode EQ et appuyez
sur le bouton MENU/CONFIRM pour confirmer le mode EQ.
Le réglage du mode EQ peut être activé en mode Playing Song(lecture de
Chanson) et en mode Playing Recorded Voice (Lecture d’enregistrement
vocal).
Changer le Taux de lecture
1. En mode PLAYING(LECTURE), appuyez sur le bouton MENU/CONFIRM et
sélectionnez Tempo Rate pour entrer dans le sous-menu.
2. Appuyez sur le bouton PREVIOUS/NEXT pour régler le taux de lecture d’une
chanson. Une barre d’état s’affichera à l’écran.
Note: Cette caractéristique ne supporte que les chansons au format MP3 et non au format WMA.
Répétition A-B
1. En mode LECTURE, appuyez sur le bouton MENU/CONFIRM et
sélectionnez le sous-menu Replay pour activer la fonction A-B Repeat.
Français
22
2. Le point A clignote à l’écran et attend le réglage. Appuyez sur
PREVIOUS/NEXT pour régler le point A. Le point A est réglé si le
clignotement du point A s’arrête.
3. Le point B clignote à l’écran et attend d’être réglé. Poussez le bouton
MENU/CONFIRM vers la droite pour régler le point B. Le point B est réglé si
le clignotement du point B s’arrête
4. La musique entre le point A et le point B sera répétée une fois.
Vous pouvez arrêter la lecture jusqu’à ce que vous appuyez sur le bouton
MENU/CONFRIM pour désactiver la fonction A-B Repeat
Replay Times
Note: Cette fonction ne fonctionne que si A-B Repeat est activée.
En mode LECTURE, appuyez sur le bouton MENU/CONFIRM et sélectionnez
Replay Times pour entrer dans le sous-menu. Le nombre de répétitions peut être
réglé.
Replay Gap
Note: Cette fonction ne fonctionne que si A-B Repeat et Replay Time sont activés.
En mode LECTURE, appuyez sur le bouton MENU/CONFIRM et sélectionnez
Replay Gap pour entrer dans le sous-menu. La durée d’inactivité entre le point A et
le point B peut être réglée.
Note: Veuillez vous référer à la section Aperçu pour le fonctionnement détaillé des boutons.
Français
23
Installer le Driver et les Utilitaires du Logiciel
Conditions requises système
z PC avec Pentium ou processeur plus rapide.
z 64MB RAM
z Port USB
z Lecteur CD-ROM pour l’installation du logiciel
z 30MB d’espace libre sur le disque dur
z Windows® 98/98SE/Me ou Windows® 2000/XP
le Pilote et les Utilitaires du Logiciel contiennent le fichier Setup.exe suivant
Remarque : Il est recommandé d’utiliser le logiciel pour l’installation sur MAC OS.
1. Pilote pour Windows® 98 /98SE
Ce lecteur vous permet de faire fonctionner correctement votre lecteur sous
Windows® 98/98SE.
2. Un programme pour convertir les fichiers audio ACT en fichiers audio WAV.
Les fichiers audio ACT ne peuvent être lues que sur le lecteur. Si vous
souhaitez lire le fichier sur votre PC, vous devez convertir le fichier ACT eb
fichier audio WAV. Ce format peut être lu sur la plupart des programmes
musicaux (c’est à dire Windows® Media Player).
3. Un programme de conversion de différents fichiers vidéo en fichiers vidéo
AMV
Si vous souhaitez lire le fichier sur le lecteur, vous devez convertir les
différents fichiers audio en fichiers AMV.
4. Un programme pour formater la mémoire interne du lecteur, divisant la
mémoire ne partitions et qui règle un mot de passe dans le but de protéger
le fichier.
5. Un programme de mise à jour du micro-logiciel.
Installation des Utilitaires du Driver et du Logiciel
Si vous utilisez Windows® 98/98SE, vous devez installer le pilote avant de
télécharger des fichiers sur votre lecteur.
Note: Si vous utilisez Windows® Me/2000/XP, vous pouvez sauter les procédures d’installation
suivantes.
Français
24
Etape 1 : Double-cliquez sur Setup.exe pour démarrer l’installation du pilote.
Suivez le menu à l’écran pour vous guider dans l’installation.
Etape 2 : Une fois l’installation terminée, veuillez redémarrer votre ordinateur.
Français
25
Convertir ACT audio en .WAV audio
Etape 1 : Après avoir installé le pilote et les utilitaires du logiciel, cliquez sur le
bouton Start, sélectionnez : Programs > MP3 Player Utilities4.04> Media Manager
Etape 2 : Le menu suivant s’affichera :
Etape 3 : Cliquez sur le bouton “Add File” pour sélectionner le fichier audio ACT
que vous voulez convertir en fichier audio WAV.
Français
26
Etape 4 : Cliquez sur le bouton droit de la souris pour obtenir l’écran suivant, puis
sélectionnez “ To WAV”.
Sélectionnez aussi le chemin de destination du fichier vidéo AMV.
Français
27
Etape 5 : Cliquez sur le bouton « OK » pour commencer la conversion. Vous
verrez que le fichier audio WMA a été converti.
Convertir un format vidéo différent en format vidéo AMV
Etape 1 : Après avoir installé le pilote et les utilitaires du logiciel, cliquez sur le
bouton Start, sélectionnez All Programs > MP3 Player Utilities 4.04 > AMV
Converter
Etape 2 : Le menu suivant s’affichera :
Français
28
Etape 3 : Cliquez sur le bouton Input File et sélectionnez le fichier vidéo ASF que
vous voulez convertir en fichier vidéo AMV.
Cliquez aussi sur le bouton Output File pour sélectionner le chemin de destination
du fichier vidéo AMV.
Français
29
Etape 4 : Cliquez sur le bouton Convert pour commencer la procédure de
conversion. Vous verrez que le fichier vidéo AMV a été converti.
Note: Le logiciel peut aussi convertir les formats vidéo DAT, .WMV, .AVI en format vidéo AMV
Pour le convertisseur AMV, assurez-vous que vous avez installé Microsoft DirectX 9.0 ou plus.
Lorsque vous convertissez des fichiers audio RealMedia, QuickTime, MPEG2, veuillez d’abord
installer le filtre DirectShow correspondant. Sinon, AMV ne fonctionne pas correctement.
Formater la mémoire interne
Etape 1 : Connecter le câble USB au lecteur MP3 et votre ordinateur. L’écran
suivant s’affichera.
Etape 2 : Cliquez sur le bouton Start, sélectionnez : Programs > MP3 Player
Utilities 4.04> MP3 Player Disk Manager.
Français
30
Etape 3 : L’écran suivant s’affichera :
Le pilote du lecteur est détecté automatiquement et la lettre pilote s’affichera à
l’écran. Vous pouvez nommer le pilote du lecteur et sélectionner le type de
formatage, puis cliquez sur le bouton Start pour commencer la procédure de
formatage.
Note: Ne pas débrancher le câble USB ou éteindre le courant pendant le formatage. Cela pourrait
entraîner un dysfonctionnement du lecteur.
Diviser la Partition et Régler le Mot de Passe
La capacité de mémoire du lecteur peut être divisée en deux parties. Tous les
fichiers sont enregistrés sous une des sections et seront cachés et protégés par un
mot de passe une fois que le logiciel est installé sur votre ordinateur.
Français
31
Note: Pour Windows 2000, veuillez vous assurer que votre ordinateur a installé Service Pack 4
(SP4). Sinon, une seule des sections sera détectée sur Windows 2000.
1. Cliquez sur le bouton Start, sélectionnez Programs > MP3 Player Utilities
4.04 > MP3 Player Disk Tools et appuyez sur l’onglet Partition et Encrypt
2. Veuillez sélectionner la capacité du disque codé et régler le nom de connexion
et le mot de passe. Cliquez sur Start.
Français
32
3. Un avertissement apparaîtra pour vous rappeler que toutes les données du
disque seront perdues. Veuillez cliquer sur YES pour continuer, ensuite attendez
une minute.
4. Un lecteur codé apparaîtra et un fichier RdiskDecrupt.exe sera créé sous le
lecteur codé.
Français
33
5. Veuillez cliquer sur RdiskDecrupt.exe. La fenêtre suivante apparaîtra. Veuillez
entrer le nom et le mot de passe pour accéder au lecteur codé.
Vous pouvez et copier et coller les fichiers dans le lecteur codé Si le lecteur est
débranché de l’ordinateur puis rebranché, l’utilisateur ne peut pas voir les fichiers
dans le lecteur codé. Si vous voulez revoir les fichiers cachés, répétez l’ »tape 3 et
4 pour entrer dans le lecteur codé.
6. Vous pouvez réinitialiser le nom de connexion et le mot de passe dans
Programs > MP3 Player Utilities 1.45 > MP3 Player Disk Tools
Editer les paroles
Instructions afin de vous enseigner comment éditer les paroles de manière
synchronisée avec les chansons.
Etape 1 : Cliquez sur le bouton Start, aller à Programs > Accessories > Notepad
pour ouvrir un nouveau document texte.
Etape 2 : Ecrivez les paroles dans le format suivant. Le temps correspondant aux
paroles doit être tapé sous le format parenthèses [ ].
Etape 3 : Suivez ensuite le fichiers texte en extension fichier LRC.
Français
34
Etape 4 : Copiez le fichier de paroles (.LRC) et
sachanson dans le lecteur sous le même
répértoire. Vous verrez les paroles
à l’écran.
Note: La fonction de défilement des paroles.
doit être activée, veuillez vous référer à la section
Paroles pour plus d’informations.
Télécharger des chansons MP3 et WMA ou des films
AMV
Note: Les écrans affichés ci-dessous s’appliquent à Windows® XP, il se peut que les autres
versions de Windows® affichent un écran légèrement différent.
Etape 1 : Assurez-vous que le lecteur est allumé.
Etape2 : Branchez le câble USB fermement dans les ports USB de votre
ordinateur et de votre lecteur.
Etape3 : Une fois que la connexion est bien faite, l’écran suivant s’affiche. Si cet
écran ne s’affiche pas, veuillez à nouveau connecter le câble USB.
Français
35
L’écran suivant s’affichera.
Note: Veuillez ignorer l’écran suivant si vous n’utilisez pas Windows® XP.
Etape 4 : Double-cliquez sur My Computer sur votre Bureau et une
Fenêtre s’affichera comme suit.
Vous trouverez Removable Disk. dans la Fenêtre
Français
36
Comme Windows® attribuera une lettre de lecteur au Removable Disk. en
fonction de la configuration système de votre ordinateur, la lettre peut être
différente lorsque vous connectez votre lecteur à un autre ordinateur.
Etape 5 : Double-cliquez sur Removable Disk.
Note: “Busy…” s’affichera pendant le téléchargement ou le chargement de fichiers. Veuillez ne
pas déconnecter le câble USB ou éteindre le lecteur à ce moment-là. Lorsque “Busy…” disparaît
de l’écran, vous pouvez débrancher le câble.
Français
37
Etape 6 : Copiez et coller le fichier musical MP3 et .WMA ou le fichier AMV sur
le
Disque amovible .
Note: Vous ne pouvez pas créer de répertoires ou de fichiers sur le Removable Disk..
Le fichier d’extension de LRC est le fichier de paroles qui enregistre les paroles en
synchronisation avec la chanson. Veuillez vous référer à la section Editer des
paroles pour plus d’informations.
Le fichier en extension de ACT est le fichier d’enregistrement vocal qui est un
format audio spécial développé par le fabricant. Pour les lecteurs audio lecteurs de
logiciels audio de base vendus sur le marché, il n’est pas possible de lire les
fichiers audio ACT. Par conséquent, il est nécessaire de convertir le fichier ACT en
format WAV pour la lecture sur les lecteurs de logiciels audio de base tels que
Microsoft® Windows® Media Player. Veuillez vous référer à la section Convertir
ACT audio en WAV audio pour plus d’informations.
Le fichier en extension de ASF est le fichier de format vidéo spécial développé par
le fabricant. Pour les lecteurs de logiciels audio de base vendus sur le marché, il
n’est pas possible de lire les fichiers vidéo ASF. Par conséquent, il est nécessaire
de convertir le fichier ASF en format AMV pour la lecture sur les lecteurs de
logiciels vidéos de base tels que Microsoft® Windows® Media Player. Veuillez
vous référer à la section Convertir ACT audio en WAV audio pour plus
d’informations.
Français
38
Gestion de Dossiers et Navigation
Gestion de dossiers
Sous le répertoire ROOT, vous pouvez créer le dossier pour gérer les chansons
pour une navigation et une gestion faciles. Sous chaque dossier, le sous-dossier et
le répertoire ROOT, il n’y a pas de limites de chansons et le nombre maximum de
couches du dossier est 8.
Navigation Dossier
1. En mode Arrêt, appuyez sur le bouton MODE et sélectionnez le Dossier
Local.
2. Les noms du dossier créés dans la première couche sont listés à l’écran.
Choisissez le nom de dossier désiré en poussant le bouton MODE à gauche
ou à droite.
3. Appuyez sur le bouton MODE pour confirmer votre sélection.
Sous-dossier
1. Il se peut que vous deviez entrer dans chaque dossier pour localiser le sous-
dossier voulu. Appuyez ensuite sur le bouton MODE pour confirmation.
2. Vous devrez peut-être retourner à la couche précédente en sélectionnant “/”
sur l’écran LCD.
Répertoire Root
1. Vous pouvez sélectionnez “ROOT” pour retourner au répertoire root.
Fonction Utilisation de le Périphérique de Stockage
USB
Le périphérique de stockage USB vous permet d’accéder au lecteur en tant que
lecteur de disque de votre ordinateur. Vous pouvez Copier et Effacer les fichiers
de n’importe quel format dans/depuis le lecteur. Pour les détails, suivez les
procédures de la section Télécharger des chansons MP3 et WMA.
Note: “Busy…” s’affichera pendant le téléchargement ou le chargement de fichiers. Veuillez ne
pas déconnecter le câble USB ou éteindre le lecteur à ce moment-là. Lorsque “Busy…” disparaît
de l’écran, vous pouvez débrancher le câble.
Débrancher le câble USB
Français
39
Avant de débrancher le câble USB de votre lecteur ou ordinateur, veuillez noter la
procédure suivante pour retirer le matériel en toute sécurité.
Note : Veuillez ignorer ces procédures si vous utilisez Windows®98/98SE.
Note : ''Occupé…'' apparaîtra pendant le téléchargement ou le chargement des fichiers, veuillez
ne pas débrancher le câble USB ou éteindre le lecteur à ce moment là. Si ''Occupé'' disparaît de
l'écran vous pouvez débrancher le câble.
Etape 1: Double cliquez sur le Removable Disk , qui est en bas à droite de votre
bureau.
Etape 2: La fenêtre suivante apparaîtra. Cliquez sur le bouton Stop.
Etape 3: Une autre fenêtre apparaîtra. Sélectionnez '' GENERIC USB DISK
DEVICE USB Device '' et cliquez sur OK pour confirmer.
Français
40
Etape 4: Cliquez sur le bouton Fermer pour sortir de la fenêtre. Vous pouvez
débrancher le câble USB du port USB de votre ordinateur.
Formater la mémoire interne
Il y a deux manières de formater la mémoire interne.
Note: Cette procédure de formatage entraînera une perte de tous les fichiers présents sur le
lecteur.
Utiliser les Utilitaires de Formatage du Logiciel
Veuillez vous référer à la section Installer le Pilote et Utilitaires du Logiciel pour
les détails.
Formater la mémoire interne
1. Cliquez My Computer …………. sur votre bureau.
2. Vous verrez Removable Disk., faites un clic droit sur Removable Disk. et
cliquez sur Format sur le menu.
3. Après avoir cliqué sur Format, vous verrez l'écran suivant et cliquez
Démarrer pour démarrer formatage.
Français
41
Résolution de problèmes
Problème Raisons Solution
Appuyez sur le bouton
POWER, l'écran ne
s'affiche pas.
La batterie n’a plus d’énergie. z Charger la
batterie
Les utilitaires du logiciel
(inclus sur le CD) n’ont pas
encore été installés sur
installed on Windows®
98/98SE
z Insérez le CD
z Cliquez sur setup
pour installer les
utilitaires du
logiciel.
z Suivez les
instructions à
l’écran pour
terminer
l’installation
Les utilitaires du logiciel du
lecteur (inclut dans le CD)
entre en conflit avec d'autres
pilotes de logiciels qui étaient
installés sur votre ordinateur.
z Désinstallez les
utilitaires du logiciel du
lecteur.
z Redémarrer votre
ordinateur
z Réinstallez les utilitaires
du logiciel de nouveau
Après avoir branché le
lecteur dans le port USB
de votre ordinateur, le
pilote du Removable
Disk. ne peut pas trou
dans Poste de Travail.
Votre carte mère ne supporte
pas la connexion USB.
Contactez le fabricant de
votre carte mère pour mettre
à jour le pilote de la carte
mère.
Le fichier musique sur le
lecteur ne peut être
effa
Les attributs du fichier
musique sont réglés en
Lecture Seule.
Changez les attributs du
fichier musique.
Le temps de lecture
s'affiche dans l'ordre en
lecture de fichier musique
MP3.
Un fichier MP3 en cours est
compressé en format VBR ce
qui fera varier la vitesse de
compression d'un morceau
MP3. Lorsque la musique
MP3 est en cours de lecture,
la vitesse variable fera que le
temps de lecture se
Compressez la musique
MP3 en vitesse de
compression fixe plut?t
qu'en vitesse de
compression variable
Lorsque le lecteur est
branché ou débranché de
votre ordinateur, une
erreur apparaîtra sur
l'ordinateur.
Cela est dû à une
déconnexion soudaine du
périphérique USB pendant le
transfert de fichiers.
Il est recommandé à
l’utilisateur de ne pas
débrancher soudainement le
lecteur du périphérique USB
de l’ordinateur lorsque des
fichiers sont transférés ou
que la mémoire interne est
en train d’être fdormattée.
Français
42
Si le lecteur MP3 ne peut lire
les fichiers musique MP3,
passez au morceau suivant
jusqu'à ce que les fichiers
musique MP3 ne soient pas
compressés en MPEG1
LAYER1 /MPEG1 LAYER2.
Effacez les fichiers qui ne
peuvent être lus dans le
lecteur.
Mon lecteur ne peut lire
les fichiers musique MP3
La plupart des fichiers
musique MP3 sur le marché
sont commercialisés en
MPEG1, MPEG2, LAYER3
standard. Au début certains
morceaux MP3 étaient
compresses en MPEG1
LAYER1 et MPEG1 LAYER2.
Veuillez noter que votre
lecteur ne supporte pas le
MPEG1 LAYER1, MPEG1
LAYER2 ou un mp3
compressé plus d'une fois en
standard.
Changez le standard de
compression d'un fichier
musique Mp3 en MPEG1
LAYER3
Le lecteur ne supporte pas
de telle compression
standard du fichier musique
en lecture.
Le lecteur ne supporte pas
les fichiers musique MPEG1
MPEG2 LAYER3 et WMA.
Hors de portée de la vitesse
de compression
z La portée de la vitesse
de compression MP3:
32Kbps~384Kbps
z La portée de la vitesse
de compression WMA:
64Kbps~128Kbps
Si le fichier musique ne
peut être lu normalement
ou si vous entendez un
long bip.
Conseils : Si vous ne connaissez pas le standard de
compression ou la vitesse de compression des fichiers
musicaux, vous devriez utiliser les lecteurs de musique
communs comme Winamp pour vérifier les informations du
fichier..
Après avoir formaté la
mémoire interne du
lecteur en utilisant les
utilitaires du logiciel,
après avoir fermé et
ouvert le logiciel, le
lecteur MP3 ne peut pas
être détecté
Il se peut que certaines
informations système soient
effacées pendant le
formatage.
Débranchez le lecteur puis
rebranchez-le.
Aucun pilote n'a été installé
sur Windows® 98/98SE.
Installez le pilote. L'ordinateur ne détecte
pas le câble USB.
Le câble a USB débranché
de manière incorrecte.
Formater la mémoire interne
Français
43
Spécifications Techniques
Capacité: 128MB/256MB/512MB/1GB/2GB Mémoire Flash
Affichage
Affichage TFT couleur
Interface
USB 2.0 haute vitesse
Alimentation
Batterie Lithium
Type de fichier
MP3 (32kbps – 384kbps), .WMA (64kbps – 128kbps)
pour la musique à Taux de Bit Constant
ACT et .WAV pour les fichiers audio enregistrés.
AMV pour les fichiers de films.
TXT pour les fichiers E-Livre
JPG, .BMP et GIF pour les fichiers photos
Rapport S/B
90dB
Alimentation en sortie
des écouteurs
9mWx, 32ohm
Système d'exploitation
Windows® 98/98SE/Me/2000/XP
MAC OS 9.0, 10.0
Dimensions
39mm(W) x90mm(H) x 8mm(D)
Poids
45g
Deutsch
1
BENUTZERHANDBUCH
DIESE BEDIENUNGSANLEITUNG ENTHÄLT UNTER UMSTÄNDEN FEHLER UND
AUSLASSUNGEN.
VERÄNDERUNGEN VON SPEZIFIKATIONEN UND DESIGN OHNE VORHERIGE
ANKÜNDIGUNG VORBEHALTEN.
Dieses Dokument darf in keiner Weise ohne vorherige schriftliche Genehmigung des Herstellers
vervielfältigt oder übertragen werden, weder elektronisch noch mechanisch, einschließlich
Fotokopie oder Aufzeichnung oder Übersetzung in andere Sprachen.
Alle Markennamen, Logos und eingetragenen Markenzeichen sind das Eigentum der
entsprechenden Rechteinhaber.
© 2006. Alle Rechte vorbehalten.
Version 1.0 04202006
Bitte lesen Sie diese Bedienungsanleitung vor Inbetriebnahme des Geräts und achten
besonders auf die Warnhinweise.
Warnung! Unsachgemäße Benutzung des Netzteils kann den Akku erhitzen oder
explodieren lassen.
Electrical and electronic equipment ( EEE ) contains materials, parts and
substances which can be dangerous to the enviroment and harmful to human
health if waste of electrical and electronic equipment ( WEEE ) is not disposed
of correctly.
Equipments which are marked with the WEEE logo (as shown on the left ),
should not be thrown away with your household waste. Contact your Local
Authority Waste Disposal Department as they will be able to provide details
of the recycling options available in your area.
Note:
Elektrische und elektronische Geräte enthalten Materialien, Teile und Substanzen,
die gefährlich für Mensch und Umwelt sein können, wenn Sie auf unsachgemäße
Weise entsorgt werden.
Geräte die mit dem WEEE-Logo markiert sind (siehe links) sollten nicht mit dem
Hausmüll entsorgt werden. Wenden Sie sich an Ihre örtliche Müllverwaltung für
Einzelheiten und Informationen zum Recycling dieses Geräts.
Hinweis:
Deutsch
2
Inhalt
Einleitung--------------------------------------------------------------------------------------------------------------------------- 4
Eigenschaften und Funktionen---------------------------------------------------------------------------------------------------- 4
Verpackungsinhalt-------------------------------------------------------------------------------------------------------------------- 4
Überblick------------------------------------------------------------------------------------------------------------------------------- 5
Tastenbedienung-------------------------------------------------------------------------------------------------------------------- 6
Display----------------------------------------------------------------------------------------------------------------------------------- 7
Bildschirmmenübedienung ---------------------------------------------------------------------------------------------------------8
Ein-/Ausschalten---------------------------------------------------------------------------------------------------------------------9
Betriebsart wechseln---------------------------------------------------------------------------------------------------------------9
Aufrufen des Hauptmenüs----------------------------------------------------------------------------------------------------------9
Wiedergabe von Videos-----------------------------------------------------------------------------------------------------------10
Videodateien überspringen ---------------------------------------------------------------------------------11
Schnellvorlauf / Schnellrücklauf----------------------------------------------------------------------------11
Musikwiedergabe--------------------------------------------------------------------------------------------------------------------11
Musikdateien überspringen ---------------------------------------------------------------------------------12
Schnellvorlauf / Schnellrücklauf----------------------------------------------------------------------------12
UKW-Radiofunktion (optional)----------------------------------------------------------------------------------------------------12
Kanalauswahl---------------------------------------------------------------------------------------------------12
Sprachaufnahme--------------------------------------------------------------------------------------------------------------------13
Aufnahmemodus----------------------------------------------------------------------------------------------14
Aufnahmewiedergabe--------------------------------------------------------------------------------------------------------------14
Sprachdateien überspringen-------------------------------------------------------------------------------15
Schnellvorlauf / Schnellrücklauf---------------------------------------------------------------------------15
Bilder ansehen-----------------------------------------------------------------------------------------------------------------------15
E-Books-------------------------------------------------------------------------------------------------------------------------------16
Systemeinstellungen---------------------------------------------------------------------------------------------------------------16
Uhrzeit------------------------------------------------------------------------------------------------------------17
LCD-Einstellungen------------------------------------------------------------------------------------------- 17
OSD-Sprache -------------------------------------------------------------------------------------------------18
Bildschirmschoner – Einstellungen ---------------------------------------------------------------------19
Selbstausschaltung------------------------------------------------------------------------------------------19
Wiederholungsmodus------------------------------------------------------------------------------- ------19
Onlinemodus---------------------------------------------------------------------------------------------------20
Speicherinformationen---------------------------------------------------------------------------------------20
Firmware-Version---------------------------------------------------------------------------------------------20
Firmware-Upgrade--------------------------------------------------------------------------------------------20
Spielfunktion-------------------------------------------------------------------------------------------------------------------------20
Wiederholungsmodus-----------------------------------------------------------------------------------------------------------21
Equalizermodus--------------------------------------------------------------------------------------------------------------------21
Wechseln der Wiedergabegeschwindigkeit------------------------------------------------------------------------------22
A-B Abschnittswiederholung--------------------------------------------------------------------------------------------------22
Wiederholungsanzahl -----------------------------------------------------------------------------------------------------------22
Wiederholungsintervall----------------------------------------------------------------------------------------------------------22
Deutsch
3
Installation der Treiber und Utility-Software ----------------------------------------------------------------------------23
Systemanforderungen------------------------------------------------------------------------------------------------------------23
Installation der Treiber und Utility-Software ---------------------------------------------------------------------------------23
Dateien vom ACT-Format ins WAV-Format konvertieren-------------------------------------------------------25
1. Zusammenfassunfg-------------------------------------------------------------------------------- 25
2. Installition der Software---------------------------------------------------------------------------- 25
3. Benutzung der Software---------------------------------------------------------------------------- 26
4. Dateikonvertierung--------------------------------------------------------------------------------- 28
5. Herunterladen von Multimediadateien aus dem Internet und deren Konvertierung- 41
6. Warnhinweis------------------------------------------------------------------------------------------ 41
Media Manager----------------------------------------------------------------------------------------------------------- 42
1 Einleitung zum Media manager ----------------------------------------------------------------- 42
2 Installation und Deinstallation--------------------------------------------------------------------- 42
3 Schnellstartanleitung-------------------------------------------------------------------------------- 43
4 Anweisungen----------------------------------------------------------------------------------------- 45
5 Konvertieren von Dateien verschiedener Videoformate ins AMV-Format------------- 55
Liedtexte bearbeiten----------------------------------------------------------------------------------------------------58
Speichern von MP3- und WMA-Dateien oder AMV-Filmdateien----------------------------------------- 59
Ordnerverwaltung und Navigation----------------------------------------------------------------------------------62
Ordnerverwaltung ---------------------------------------------------------------------------------------------------------62
Ordnernavigation ---------------------------------------------------------------------------------------------------------62
Unterverzeichnisse ------------------------------------------------------------------------------------------------------62
Hauptordner---------------------------------------------------------------------------------------------------------------- 62
Benutzung der USB-Massenspeicherfunktion---------------------------------------------------------------- 62
Abtrennen des USB-Kabels--------------------------------------------------------------------------------------- 62
Formatieren des internen Speichers------------------------------------------------------------------------------ 64
Benutzung der Formatierungssoftware ------------------------------------------------------------------- 64
Formatieren unter Windows® ---------------------------------------------------------------------------------------- 64
Fehlerbehebung-------------------------------------------------------------------------------------------------------- 65
Technische Daten ------------------------------------------------------------------------------------------------------ 67
Deutsch
4
Einleitung
Vielen Dank für die Wahl unseres digitalen MP3-Players. Sie können mithilfe
dieses vielseitigen MP3-Players nicht nur MP3- und WMA-Dateien wiedergeben,
sondern auch AMV-Filmdateien und Sprachaufnahmen machen. Zudem kann er
als USB-Disc und vieles anderes mehr benutzt werden.
Eigenschaften und Funktionen
z Farb-TFT 1,8’’ Display
z Unterstützt MP3- (MPEG1/2 Layer2) und WMA-Musikwiedergabe
z Unterstützt AMV-Filmdateiwiedergabe
z Spielfunktion
z E-Bookfunktion
z JPG-, BMP- und GIF-Unterstützung
z Digitales Sprachaufnahmegerät
z USB-Massenspeicherfunktion
z 7 verschiedene Equalizereinstellungen
z Lithiumbatterie für besonders lange Wiedergabezeiten
z Keine Treiberinstallation benötigt (außer bei Windows® 98/98SE)
Verpackungsinhalt
z Benutzerhandbuch
z Kopfhörer
z 2,5 mm auf 3,5 mm Kopfhöreradapter
z Silikontasche
z Ladegerät
z USB-Kabel
z CD mit Treibern und Utility-Software
Deutsch
5
Überblick
Ansicht Vorne und Rechts
Ansicht Oben und Unten
OFF ONOFF ON
On/Off
USB Port
MENU VOL
Next/
Fast Forward
Menu/Confirm/
Display Lyric
Display
Volume+/-
Previous/
Fast Backward
Microphone
Earphone Jack
Play/Pause
Deutsch
6
Tastenbedienung
Bedienung
KOPFHÖRERAUS
GANG
Stecken Sie den Kopfhörerstecker in den Kopfhörerausgang
USB-PORT Verbinden Sie das Gerät mithilfe eines USB-Kabels über den
USB-Port zu einem Computer, um Songs auf dem Gerät zu
speichern.
MIKROFON Mikrofon für Sprachaufnahmen
NEXT/
FAST FORWARD
z Betätigen Sie diese Taste während der Wiedergabe und
lassen Sie sie dann wieder los, um zum nächsten Titel
zu springen
z Halten Sie diese Taste während der Wiedergabe
gedrückt, um den Schnellvorlauf zu aktivieren
MENU/
CONFIRM/
DISPLAY LYRIC
z Im gestoppten Zustand können Sie durch
Gedrückthalten dieser Taste das Hauptmenü aktivieren.
z Betätigen Sie diese Taste zur Auswahlbestätigung,
wenn Sie sich im Menü oder Untermenü befinden.
z Halten Sie diese Taste während der Wiedergabe
gedrückt, um Liedtexte anzuzeigen (die entsprechenden
Liedtexte müssen vorher angepasst werden, um
angezeigt werden zu können).
PREVIOUS/
FAST BACKWARD
z Betätigen Sie diese Taste während der Wiedergabe und
lassen Sie sie dann wieder los, um zum vorigen Titel zu
springen
z Halten Sie diese Taste während der Wiedergabe
gedrückt, um den Schnellrücklauf zu aktivieren
VOLUME +
VOLUME -
z Betätigen Sie die VOL-Taste zum Aktivieren der
Lautstärkeregelung. Erhöhen Sie die Lautstärke durch
Betätigung der NEXT-Taste.
z Betätigen Sie die VOL-Taste zum Aktivieren der
Lautstärkeregelung. Verringern Sie die Lautstärke durch
Betätigung der PREVIOUS-Taste.
ON/
OFF/
z Wenn der Player ausgeschaltet ist, können Sie ihn mit
diesem Schalter anschalten.
z Wenn die Wiedergabe gestoppt ist, können Sie den
Player mit diesem Schalten ausschalten.
PLAY/
PAUSE/
z Betätigen Sie diese Taste im gestoppten Zustand, um
die Wiedergabe zu starten.
z Während der Wiedergabe können Sie durch Betätigung
dieser Taste die Wiedergabe vorübergehend anhalten.
z Wenn der ON/OFF-Schalter in der ON-Position ist,
können Sie den Player mit dieser Taste an- und
ausschalten.
DISPLAY
Zeigt den momentanen Zustand und Liedtexte mit
Hintergrundbeleuchtung an.
Deutsch
7
Display
Displaysymbol Funktion
Wiederholungsmodus
Zeigt den momentanen Wiederholungszustand
Batteriestandsanzeige
Zeigt den momentanen Batteriestand.
Lautstärke erhöhen oder verringern
Zeigt die momentanen Lautstärke an
Equalizermodus
Zeigt welcher Equalizer momentan benutzt wird 7
verschiedene Equalizereinstellungen stehen zur
Auswahl zur Verfügung
128KBPS Bitrate
Zeigt die Bitrate des jeweiligen Titels an
Titelname
Zeigt an welcher Musiktitel wiedergegeben wird
N
Deutsch
8
Bildschirmmenübedienung
Im gestoppten Zustand (keine Wiedergabe von Sprach- oder Musikdateien)
Anmerkung: Der FM-Modus ist nur verfügbar bei Modellen mit eingebauter Radiofunktion.
Während der Wiedergabe (Sprach- oder Musikdateien werden abgespielt)
Deutsch
9
Ein-/Ausschalten
Einschalten
Schieben Sie den ON/OFF-Schalter in die ON-Position, um den Player
anzuschalten. Ein Start-Logo erscheint im Display.
Ausschalten
Schieben Sie den ON/OFF-Schalter nach rechts, um den Player auszuschalten.
Hinweis: Wenn der ON/OFF-Schalter in der ON-Position ist, können Sie den Player durch
Gedrückthalten der PLAY/PAUSE-Taste ein- und ausschalten.
Batteriestand
Das Batteriesymbol
im Display zeigt den aktuellen Batteriestand an.
Batteriestrom niedrig
Sobald das Batteriesymbol folgendermaßen aussieht
bedeutet dies, dass
der Batteriestrom zu Neige geht. Laden Sie dann den Player bitte mithilfe der
mitgelieferten Ladegeräts wieder auf.
Aufladen des Akkus
Verbinden Sie das USB-Kabel mit dem Gerät und dem Ladegerät, um den Akku
aufzuladen. Wenn die Kontrolllampe grün aufleuchtet, zeigt dies an, dass der Akku
vollständig aufgeladen ist.
Hinweis:
1. Laden Sie den Akku vor der Inbetriebnahme vollständig auf.
2. Laden Sie den Akku auch bei Nichtbenutzung regelmäßig auf.
Betriebsart wechseln
Aufrufen des Hauptmenüs
1. Betätigen Sie den ON/OFF-Schalter zum Aufrufen des Hauptmenüs. Sie
befinden sich nun im Hauptmenü.
*Anmerkung: Der FM-Modus ist nur verfügbar bei Modellen mit eingebauter Radiofunktion.
Deutsch
10
2. Benutzen Sie die PREVIOUS/NEXT-Tasten, um einen Menüpunkt zu
wählen. Es stehen folgende Menüpunkte zur Verfügung: Movie, Music, FM
radio, Record, Voice, Photo Browse, E-Book, System setup und Game.
3. Wählen Sie einen beliebigen Menüpunkt und betätigen Sie die
MENU/CONFIRM-Taste zum Aktivieren des jeweiligen Untermenüs.
Wiedergabe von Videos
1. Wählen Sie „Movie“ sobald Sie sich im Hauptmenü befinden und betätigen
Sie die MENU/CONFIRM-Taste, um den Videowiedergabemodus zu
aktivieren.
Hinweis: Im Videowiedergabemodus können nur Dateien im AMV-Format wiedergegeben
werden.
2. Das Display zeigt folgenden Zustand an, wenn der Player sich im
gestoppten Zustand befindet.
3. Benutzen Sie die PREVIOUS/NEXT-Tasten zur Auswahl des gewünschten
Videos.
Deutsch
11
4. Betätigen Sie die PLAY/PAUSE-Taste zum Starten der Wiedergabe der
ausgewählten AMV-Datei. Falls keine AMV-Dateien vorhanden sind, wird im
Display „No Movie Files“ angezeigt.
Videodateien überspringen
Benutzen Sie die PREVIOUS/NEXT-Tasten, um zur vorigen bzw. nächsten
Videodatei zu springen.
Schnellvorlauf / Schnellrücklauf
Halten Sie die PREVIOUS/NEXT-Tasten gedrückt, um den Schnellvorlauf bzw.
Schnellrücklauf zu aktivieren.
Musikwiedergabe
1. Wählen Sie „Music“ sobald Sie sich im Hauptmenü befinden und betätigen
Sie die MENU/CONFIRM-Taste, um den Musikwiedergabemodus zu
aktivieren.
Hinweis: Im Musikwiedergabemodus können nur Dateien im MP3- oder WMA-Format
wiedergegeben werden.
2. Das Display zeigt folgenden Zustand an, wenn der Player sich im
gestoppten Zustand befindet.
3. Benutzen Sie die PREVIOUS/NEXT-Tasten zur Auswahl der gewünschten
Musikdatei.
Deutsch
12
4. Betätigen Sie die PLAY/PAUSE-Taste zur Wiedergabe der gewünschten
MP3- bzw.WMA-Datei. Falls keine MP3- oder WMA-Dateien vorhanden sind,
wird im Display „No Files“ angezeigt.
Musiktitel überspringen
Benutzen Sie die PREVIOUS/NEXT-Tasten, um zur vorigen bzw. nächsten
Musikdatei zu springen.
Schnellvorlauf / Schnellrücklauf
Halten Sie die PREVIOUS/NEXT-Tasten gedrückt, um den Schnellvorlauf bzw.
Schnellrücklauf zu aktivieren.
* UKW-Radiofunktion
*Anmerkung: Der FM-Modus ist nur verfügbar bei Modellen mit eingebauter Radiofunktion.
Kanalauswahl
1. Wählen Sie „FM“ sobald Sie sich im Hauptmenü befinden und betätigen Sie
die MENU/CONFIRM-Taste, um den Radiomodus zu aktivieren.
2. Halten Sie die PREVIOUS/NEXT-Tasten gedrückt und der Player fängt
automatisch an nach UKW-Sendern zu suchen. Der Benutzen kann dann
verschiedene Sender wählen.
3. Speichern von gefundenen Radiosendern
Betätigen Sie die MENU/CONFIRM-Taste zum Aktivieren des FM-
Untermenüs. Betätigen Sie dann die Taste erneut zur Auswahl der
Speicherfunktion (Save).
Deutsch
13
4. Auswahl gespeicherter UKW-Sender
Benutzen Sie die PLAY-Taste zur Auswahl der Radiosender in
gespeicherter Reihenfolge.
Sprachaufnahme
1. Wählen Sie „Record“ sobald Sie sich im Hauptmenü befinden und betätigen
Sie die MENU/CONFIRM-Taste, um den Sprachaufnahmemodus zu
aktivieren.
Hinweis: Die Aufnahmen können lediglich im ACT- oder WAV-Dateiformat gespeichert
werden. Stellen Sie den entsprechenden Modus bitte im Aufnahmemenü ein, bevor Sie mit
der Aufnahme beginnen
.
2. Die folgende Anzeige erscheint sobald Sie den Sprachaufnahmemodus
aktivieren.
3. Vor der Aufnahme ist es sinnvoll den Aufnahmemodus (REC Type)
einzustellen. Betätigen Sie die MENU-Taste zur Eingabe der Aufnahmeart
(REC Type) und betätigen Sie die PREVIOUS/NEXT-Tasten zur Auswahl
der Aufnahmeart.
4. Es stehen vier verschiedene Aufnahmearten zur Verfügung: Fine REC, Long
REC, Fine VOR und Long VOR Betätigen Sie die MENU/CONFIRM-Taste
zur Bestätigung Ihrer Auswahl.
5. Halten Sie die Tonquelle in die Nähe des eingebauten Mikrofons. Betätigen
Sie die PLAY/PAUSE-Taste zum Starten der Aufnahme. Sie können durch
Betätigung der PLAY/PAUSE-Taste die Aufnahme vorübergehend anhalten
oder stoppen.
Deutsch
14
Wenn Sie mit der Aufnahme fertig sind, halten Sie die PLAY/PAUSE-Taste
gedrückt. Lassen Sie die Taste los, wenn im Display „Saving...“ angezeigt wird. Die
aufgenommenen Dateien werden standardmäßig im Hauptverzeichnis abgelegt.
Lesen Sie dazu den Abschnitt Verzeichnis Wechseln für mehr Informationen.
Aufnahmemodus
Fine REC (Aufnahme bei hoher Qualität)
Dadurch werden Aufnahmen mit hoher Qualität im WAV-Format erzeugt. Die
Dateigröße ist dabei allerdings relativ groß.
Long REC (Aufnahme bei niedriger Qualität / Langaufnahme)
Dadurch werden Aufnahmen mit niedriger Qualität im ACT-Format erzeugt.
Die Dateigröße ist dabei allerdings relative klein. Dementsprechend können
längere Aufnahmen erzeugt werden.
Fine VOR (Automatische Aufnahme bei hoher Qualität)
Das Gerät startet die Aufnahme, sobald Töne vernehmbar sind. Wenn kein
Ton vorhanden ist, stoppt die Aufnahme automatisch. Das Gerät fährt mit
der Aufnahme fort, sobald erneut Töne vernehmbar sind.
Diese Aufnahmeart verwendet eine höhere Qualität mit wesentlich feineren
Aufnahmen als 8K VOR.
Hinweis: Die Fine VOR-Funktion ist nicht empfehlenswert, wenn zu viele
Umgebungsgeräusche vorhanden sind.
Long VOR (Automatische Aufnahme bei niedriger Qualität /
Langaufnahme)
Das Gerät startet die Aufnahme, sobald Töne vernehmbar sind. Wenn kein
Ton vorhanden ist, stoppt die Aufnahme automatisch. Das Gerät fährt mit
der Aufnahme fort, sobald erneut Töne vernehmbar sind.
Diese Aufnahmeart verwendet eine schlechtere Qualität mit geringerer
Empfindlichkeit als 32K VOR.
Aufnahmewiedergabe
1. Wählen Sie „Voice“ sobald Sie sich im Hauptmenü befinden und betätigen
Sie die MENU/CONFIRM-Taste, um den Sprachwiedergabemodus zu
aktivieren.
Deutsch
15
2. Das Display zeigt folgenden Zustand an, wenn der Player sich im
gestoppten Zustand befindet.
3. Benutzen Sie die PREVIOUS/NEXT-Tasten zur Auswahl der gewünschten
Sprachdatei.
4. Betätigen Sie die PLAY/PAUSE-Taste zum Starten der Wiedergabe der
ausgewählten Audiodateien. Falls keine Aufnahmedateien vorhanden sind,
wird im Display „No Files!“ angezeigt.
Sprachdateien überspringen
Betätigen Sie die PREVIOUS/NEXT-Tasten, um zur vorigen bzw. nächsten
Sprachdatei zu springen.
Schnellvorlauf / Schnellrücklauf
Halten Sie die PREVIOUS/NEXT-Tasten gedrückt, um den Schnellvorlauf bzw.
Schnellrücklauf zu aktivieren.
Bilder ansehen
1. Wählen Sie „Photo Browse“_sobald Sie sich im Hauptmenü befinden und
betätigen Sie die MENU/CONFIRM-Taste, um den Fotomodus zu aktivieren.
Hinweis: Die Fotofunktion unterstützt lediglich Dateien im JPG-, BMP- und GIF-Format.
Deutsch
16
2. Benutzen Sie die PREVIOUS/NEXT-Tasten zur Auswahl der gewünschten
Bilddatei.
E-books
1. Wählen Sie „E-book“ sobald Sie sich im Hauptmenü befinden und betätigen
Sie die MENU/CONFIRM-Taste, um den E-Book-Funktion zu aktivieren.
Hinweis: Im E-Book-Modus können nur Dateien im TXT-Format angezeigt werden.
2. Benutzen Sie die PREVIOUS/NEXT-Tasten zur Auswahl der gewünschten
Textdatei.
Systemeinstellungen
1. Wählen Sie „System Function“sobald Sie sich im Hauptmenü befinden und
betätigen Sie die PREVIOUS/NEXT-Taste, um das Systemeinstellungsmenü
zu aktivieren.
2. Betätigen Sie die MENU/CONFIRM-
Taste, um das Systemeinstellungsmenü zu
aktivieren.
Clock
LCD Set
Language
ScreenSaver Sel
Power Off
Replay Mode
Online Mode
Memory Info
Firmware version
Deutsch
17
Uhrzeit (Clock)
1. Wählen Sie auf der Systemeinstellungsseite „Clock“.
2. Betätigen Sie die VOLUME-Taste zur Einstellung von Jahr, Monat, Tag und
Uhrzeit.
3. Benutzen Sie die PREVIOUS/NEXT-Taste zum Verändern der Werte für
Jahr, Monat, Tag und Uhrzeit.
4. Betätigen Sie die MENU/CONFIRM-Taste zur Bestätigung der neuen
Datums- und Uhrzeiteinstellung.
LCD-Einstellungen
Wählen Sie mithilfe der PREVIOUS/NEXT-Tasten auf der Systemeinstellungsseite
„LCD Set“. Es stehen die Optionen „Screen savers“ und „Black“ zur Verfügung.
Screen Savers (Bildschirmschoner)
1. Wählen Sie im LCD-Einstellungsmenü die Option „Screen Savers“, indem
Sie die MENU/CONFIRM-Taste betätigen.
2. Benutzen Sie die PREVIOUS/NEXT-Tasten zum Einstellen der
Bildschirmschoneranzeigezeit auf 0/5/10/15/20/25/30 Sekunden. Wenn für
die von Ihnen eingestellten Zeitdauer keine Taste betätigt wird, wird
Deutsch
18
automatisch der Bildschirmschonermodus aktiviert. Sie können die Funktion
deaktivieren, indem Sie 0 als Zeitwert einstellen. Lesen Sie dazu bitte den
Abschnitt ScreenSaver Sel, um zu lernen wie Sie einen Bildschirmschoner
auswählen.
Einstellen der Hintergrundbeleuchtungszeit
1. Wählen Sie im LCD-Einstellungsmenü die Option „BLACK“, indem Sie die
MENU/CONFIRM-Taste betätigen.
2. Benutzen Sie die PREVIOUS/NEXT-Tasten zum Einstellen der
Hintergrundbeleuchtungszeit auf 0/10/20/30 Sekunden. Bei keiner
Tastenbetätigung, wird das LCD automatisch entsprechend der von Ihnen
eingestellten Zeitdauer schwarz.
Sie können diese Funktion ausschalten, indem Sie den Wert auf 0 setzen.
Einstellen der OSD-Sprache
Wählen Sie mithilfe der PREVIOUS/NEXT-Tasten auf der Systemeinstellungsseite
„Language“. Es stehen Ihnen folgende elf Sprachen zur Auswahl zur Verfügung:
Simple Chinese
English
Trad Chinese
Japanese
Korean
French
German
Italian
Spanish
Portuguese
Dutch
Swedish
Denmark
Polish
Hungarian
Czech
Deutsch
19
ScreenSaver Sel (Bildschirmschoner – Einstellungen)
Wählen Sie mithilfe der PREVIOUS/NEXT-Tasten auf der Systemeinstellungsseite
„ScreenSaver Sel“. Benutzen Sie die PREVIOUS/NEXT-Tasten zur Auswahl
zwischen No 1 und No 2. Es stehen zwei Bildschirmhintergründe zu Auswahl zur
Verfügung:
Power off (Automatische Abschaltung)
1. Wählen Sie mithilfe der PREVIOUS/NEXT-Tasten auf der
Systemeinstellungsseite „Power off“. Es stehen die Optionen „Off Time“ und
„Sleep Time“ zur Verfügung.
2. Benutzen Sie die PREVIOUS/NEXT-Tasten zum Einstellen der
Selbstabstellungszeit (Off time) auf 0/10/20/30/40/50/60 Sekunden. Im
gestoppten Zustand geht der Player automatisch nach der von Ihnen
eingestellten Zeit aus. Sie können diese Funktion ausschalten, indem Sie den
Wert auf 0 setzen.
3. Benutzen Sie die PREVIOUS/NEXT-Tasten zum Einstellen der Schlafzeit
(Sleep time) auf 0/10/20/30/40/50/60/70/80/90/100/110/120 Sekunden. Bei
keiner Tastenbetätigung geht der Player automatisch nach der von Ihnen
eingestellten Zeit aus.
Sie können diese Funktion ausschalten, indem Sie den Wert auf 0 setzen.
Replay Mode (Wiederholungsmodus)
Es stehen die Optionen manuelle Wiederholung (Manual Replay) und
automatische Wiederholung (Auto Replay) zur Verfügung. Benutzen Sie die
PREVIOUS/NEXT-Tasten zur Auswahl der gewünschten Wiederholungsart.
Online Mode (Onlinemodus)
Deutsch
20
Installieren Sie bitte zuerst die Software und erlauben Sie Partitionieren mit
Passwort (Dividing Partition and Setting Password), bevor Sie diese Funktion
benutzen. Lesen Sie dazu bitte den Abschnitt Partitionierung und Einstellen des
Passworts für weitere Informationen.
Es stehen drei Optionen zur Verfügung: zwei Laufwerke (Multi Drive), Normal und
verschlüsselt (Encrypted).
Multi-Drive (zwei Laufwerke)
Wenn Sie die Multi-Drive-Option wählen, können Sie sowohl das normale
Laufwerk, als auch das verschlüsselte sehen.
Normal Only (normales Laufwerk)
Wenn Sie die Normal-Only-Option wählen, können Sie nur das normale Laufwerk
sehen während das verschlüsselte versteckt bleibt.
Encrypted Only (nur verschlüsseltes Laufwerk)
Wenn Sie die Encrypted-Only-Option wählen, können Sie nur das verschlüsselte
Laufwerk sehen während das normale versteckt bleibt.
Hinweis: Diese Funktion wird nur unter Windows 98/Me/XP oder Windows 2000 mit SP4 bei
aktivierter Partitionierungsfunktion unterstützt.
Check Memory (Speicherinformationen)
Wählen Sie „Memory“ sobald Sie sich im Systemeinstellungsmenü befinden und
betätigen Sie die MENU/CONFIRM-Taste, um zu überprüfen wie viel Speicherplatz
belegt ist. Der verbrauchte Speicherplatz wird auf dem Display angezeigt.
Anzeige der Firmware-Version
Wählen Sie auf der Systemeinstellungsseite „Firmware Version“, indem Sie die
MENU/CONFIRM-Taste betätigen. Die Firmwareversion des Players und das
Firmwaredatum wird auf dem Display angezeigt.
Firmware-Upgrade
Diese Funktion wird für Firmware-Upgrades benutzt.
Hinweis: Es wird dringend empfohlen Firmwareupgrades nur durch ausgebildete
Fachkräfte durchführen zu lassen, um mögliche Schäden am Player zu vermeiden.
Deutsch
21
Spielfunktion
1. Wählen Sie „Game“ sobald Sie sich im Hauptmenü befinden und betätigen
Sie die MENU/CONFIRM-Taste, um das vorhandene Spiel zu starten. Es
gibt nur ein Spiel auf dieser Version des Players.
Wiederholungsmodus
Betätigen Sie während der Wiedergabe die MENU/CONFIRM-Taste und wählen
„Repeat“ zum Aktivieren des Wiederholungsmodus. Es stehen sieben
Wiederholungsarten zur Verfügung: Normal, Repeat One, Folder, Repeat Folder,
Repeat All, Random, Intro.
Normal
Alle Musikdateien werden nacheinander wiedergegeben. Die Wiedergabe
stoppt nach der letzten Datei.
Repeat One (Einzelwiederholung)
Die aktuelle Musikdatei wird wiederholt bis die Funktion wieder abgestellt
wird.
Folder (Verzeichniswiedergabe)
Alle Musikdateien im gewählten Verzeichnis werden einmal wiedergegeben.
Repeat Folder (Verzeichniswiederholung)
Alle Musikdateien im gewählten Verzeichnis wiederholt bis die Funktion
wieder abgestellt wird.
Repeat All (Alle wiederholen)
Alle Musikdateien werden der Reihe nach wiedergegeben und dann solange
wiederholt, bis die Funktion deaktiviert wird.
Deutsch
22
Random (Zufallswiedergabe)
Alle Musikdateien im gewählten Verzeichnis werden in zufälliger Reihenfolge
wiedergegeben.
Intro-Wiedergabe
Jeweils die ersten 10 Sekunden aller Musikdateien von der momentanen
Musikdatei bis zur letzten werden wiedergegeben.
Der Wiederholungsmodus ist sowohl für den Musikwiedergabe- als auch
den Sprachwiedergabemodus gültig.
Equalizermodus (EQ)
Betätigen Sie während der Wiedergabe die MENU/CONFIRM-Taste und wählen
„EQ“ zum Aktivieren des Equalizer-Modus. Es stehen sieben Equalizer zur
Verfügung: DBB, Natural, Rock, Pop, Classic, Soft und Jazz
Benutzen Sie die PREVIOUS/NEXT-Tasten, um den Equalizer zu wechseln und
betätigen Sie die MENU/CONFIRM-Taste zur Bestätigung.
Der Equalizermodus ist sowohl für den Musikwiedergabe- als auch den
Sprachwiedergabemodus gültig.
Wechseln der Wiedergabegeschwindigkeit
1. Betätigen Sie während der Wiedergabe die MENU/CONFIRM-Taste und
wählen „Tempo Rate“ zum Aktivieren des entsprechenden Untermenüs.
2. Betätigen Sie die PREVIOUS/NEXT-Tasten zum Verändern der
Wiedergabegeschwindigkeit eines Musiktitels. Eine Statusanzeige wird auf
dem Display angezeigt.
Hinweis: Diese Funktion ist nur für MP3-Dateien verfügbar. WMA-Dateien werden nicht unterstützt.
A-B Repeat (A-B Abschnittswiederholung)
1. Betätigen Sie während der Wiedergabe die MENU/CONFIRM-Taste und
wählen das „Replay“ Untermenü zum Aktivieren der A-B
Abschnittswiederholung.
2. Punkt A blinkt im Display, um von Ihnen gesetzt zu werden. Benutzen Sie
die PREVIOUS/NEXT-Tasten zum Setzen des Anfangspunkts A. Der
Anfangspunkt ist gesetzt, wenn das A aufhört zu blinken.
3. Punkt B blinkt im Display, um von Ihnen gesetzt zu werden. Drücken Sie die
MENU/CONFIRM-Taste nach rechts, um den Endpunkt B zu setzen. Der
Endpunkt ist gesetzt, wenn das B aufhört zu blinken.
Deutsch
23
4. Der Abschnitt zwischen den Punkten A und B wird einmal wiederholt.
Betätigen Sie die MENU/CONFIRM-Taste, um die A-B
Abschnittswiederholung abzubrechen.
Replay Times (Wiederholungsanzahl)
Hinweis: Diese Funktion ist verfügbar, wenn die A-B Abschnittswiederholung aktiviert ist.
Betätigen Sie während der Wiedergabe die MENU/CONFIRM-Taste und wählen
Replay Times“ zum Aktivieren des entsprechenden Untermenüs. Die Anzahl der
Wiederholungen kann nun eingestellt werden.
Replay Gap (Wiederholungsintervall)
Hinweis: Diese Funktion ist verfügbar, wenn die A-B Abschnittswiederholung und die
Wiederholungsanzahl aktiviert sind.
Betätigen Sie während der Wiedergabe die MENU/CONFIRM-Taste und wählen
Replay Gap“ zum Aktivieren des entsprechenden Untermenüs. Der
Pausenintervall zwischen den Wiederholungen kann nun verändert werden.
Hinweis: Gehen Sie zum Abschnitt Überblick für genaue Bedienungshinweise.
Installation der Treiber und Utility-Software
Systemanforderungen
z PC mit Pentium CPU oder höher
z 64MB RAM
z USB-Port
z CD-ROM-Laufwerk zur Softwareinstallation
z 30MB freier Festplattenspeicher
z Windows® 98/98SE/Me oder Windows® 2000/XP
Die Treiber und Utility-Software beinhaltet folgendes in einer Setup.exe Datei.
Anmerkung: Es wird nicht empfohlen die Software unter MAC OS zu installieren.
1. Treiber für Windows® 98 /98SE
Diese Treiber sorgen für einwandfreien Betrieb Ihres Players unter
Windows® 98/98SE.
2. Ein Programm zum Konvertieren von Dateien im ACT-Format zu Dateien im
WAV-Format.
ACT-Dateien können nur auf dem Player abgespielt werden. Wenn Sie
diese Dateien auf Ihrem PC wiedergeben möchten, müssen Sie sie zuerst in
WAV-Dateien umwandeln. Das WAV-Format kann von nahezu allen
Musikprogrammen abgespielt werden (z. B. Windows® Media Player).
Deutsch
24
3. Ein Programm zum Konvertieren von verschiedenen Video-Dateiformaten zu
Dateien im AMV-Videoformat.
Wenn Sie Videodateien auf Ihrem Player abspielen möchten, müssen Sie
zuerst die Dateien in AMV-Dateien umwandeln.
4. Ein Programm zum Formatieren des Internen Speichers des Players,
Partitionierung und Setzen eines Passworts zum Schutz Ihrer Daten.
5. Ein Programm für Firmware-Upgrades.
Installation der Treiber und Utility-Software
Wenn Sie Windows® 98/98SE benutzen, müssen Sie zuerst die Treiber
installieren, um Dateien auf Ihrem Player speichern zu können.
Hinweis: Wenn Sie Windows® Me/2000/XP benutzen, können Sie diesen Installationsvorgang
überspringen.
Schritt 1: Doppelklicken Sie auf Setup.exe zum Starten der Treiberinstallation.
Stellen Sie den Installationsvorgang entsprechend der Bildschirmanzeige auf dem
Monitor fertig.
Deutsch
25
Schritt 2: Führen Sie nach der Installation bitte einen Neustart Ihres Computers
durch.
Dateien vom ACT-Format ins WAV-Format konvertieren
Schritt 1: Nach der Installation der Treiber und der Utility-Software, klicken Sie auf
Start und gehen Sie auf: Programs > MP3 Player Utilities4.04> Media Manager
Deutsch
26
Schritt 2: Danach wird folgendes Fenster angezeigt:
Schritt 3: Klicken Sie auf „Add File“ und wählen Sie die ACT-Dateien, die Sie in
WAV-Dateien umwandeln möchten.
Schritt 4: Klicken Sie auf die rechte Maustaste zur Anzeige des folgenden
Fensters und klicken Sie auf „To WAV“.
Deutsch
27
Wählen Sie den Zielpfad zum Ablegen der WAV-Audiodateien.
Schritt 5: Klicken Sie auf OK, um die Dateien zu konvertieren. Danach können Sie
Ihre Audiodateien in dem von Ihnen angegeben Pfad finden.
Deutsch
28
Konvertieren von Dateien verschiedener Videoformate ins AMV-
Format
Schritt 1: Nach der Installation der Treiber und der Utility-Software klicken Sie bitte
auf Start und gehen auf Programs > MP3 Player Utilities 4,04 > AMV Converter.
Schritt 2: Danach wird folgendes Fenster angezeigt:
Schritt 3: Klicken Sie auf Input File und wählen Sie die ASF-Dateien, die Sie in
AMV-Dateien umwandeln möchten.
Deutsch
29
Klicken Sie danach auf Output File, um einen Zielpfad für Ihre AMV-Videos
anzugeben.
Deutsch
30
Schritt 4: Klicken Sie auf Convert, um die Datei zu konvertieren. Danach können
Sie Ihre AMV-Dateien in dem von Ihnen angegeben Pfad finden.
Hinweis: Dieses Programm kann ebenfalls DAT-, WMV- und AVI-Dateien in AMV-Videos umwandeln.
Der AMV Converter erfordert die Installation von Microsoft DirectX 9.0 oder höher.
Zum Umwandeln RealMedia, QuickTime und MPEG2-Formaten muss zuvor der entsprechende
DirectShow-Filter installiert werden. Andernfalls können die entsprechenden Dateien nicht
umgewandelt werden.
Formatieren des internen Speichers
Schritt 1: Verbinden den MP3-Player mithilfe des USB-Kabels mit Ihrem Computer.
Folgende Anzeige erscheint im Display Ihres Players:
Schritt 2: Klicken Sie unter Windows auf „Start“ und wählen Sie: Programs > MP3
Player Utilities 4.04> MP3 Player Disk Manager.
Deutsch
31
Schritt 3: Danach wird folgendes Fenster
angezeigt:
Der benötigte Treiber wird automatisch erkannt und auf dem Bildschirm erscheint
ein entsprechendes Laufwerkssymbol. Sie können dem Laufwerk einen Namen
geben und die Art der Formatierung wählen klicken Sie danach auf Start, um mit
dem Formatieren zu beginnen.
Hinweis: Während des Formatierungsvorgangs sollte das USB-Kabel nicht abgetrennt werden, da
sonst Funktionsstörungen im Player auftreten können.
Partitionierung und Einstellen des Passworts
Der Speicher des Players kann in zwei Partitionen unterteilt werden. Alle Dateien
die auf einer der Partitionen werden versteckt und passwortgeschützt nachdem die
Software auf Ihrem Computer installiert wurde.
Hinweis: Achten Sie bei Windows 2000 bitte darauf, dass Sie das Service Pack 4 (SP4) installiert
haben. Andernfalls kann unter Windows 2000 nur eine der beiden Partitionen erkannt werden.
1. Klicken Sie auf Start und gehen Sie dann auf Programs > MP3 Player
Utilities 4.04 > MP3 Player Disk Tools. Nachdem das Fenster erscheint,
gehen Sie bitte auf die Seite „Partition and Encrypt“.
Deutsch
32
2. Stellen Sie die Kapazität des verschlüsselten Laufwerks ein und erstellen Sie
einen Loginnamen und ein Passwort. Klicken Sie dann auf Start.
Deutsch
33
3. Eine Warnmeldung erscheint die Sie darauf hinweist, dass alle Daten auf der
Disc gelöscht werden. Klicken Sie bitte auf YES zum Fortfahren und warten Sie
eine Minute.
4. Das verschlüsselte Laufwerk wird geöffnet und die Datei RdiskDecrupt.exe wird
im Hauptverzeichnis des Laufwerks abgelegt.
5. Klicken Sie auf RdiskDecrupt.exe und folgendes Fenster erscheint. Geben Sie
dann bitte den korrekten Loginnamen und Passwort ein, um auf das Laufwerk
zugreifen zu können.
Deutsch
34
Es ist Ihnen, wie bei anderen Verzeichnissen auch, erlaubt Dateien per Drag &
Drop auf das verschlüsselte Laufwerk zu ziehen. Wenn die Verbindung zwischen
Computer und Player unterbrochen wird, kann der Benutzer die Dateien im
verschlüsselten Laufwerk nicht mehr sehen. Möchten Sie dann erneut auf die
Dateien zugreifen, so müssen Sie die Schritte 3 und 4 wiederholen.
6. Es ist möglich einen neuen Benutzernamen und Passwort zu setzen, indem
Sie das Programm in Programs > MP3 Player Utilities 1.45 > MP3 Player
Disk Tools erneut starten.
Liedtexte bearbeiten
Anleitung zur Bearbeitung von Liedtexten zur synchronen Liedtextanzeige.
Schritt 1: Klicken Sie auf Start und gehen Sie dann auf Programs > Accessories >
Notepad, um ein neues Textdokument zu erstellen.
Schritt 2: Schreiben Sie die Liedtexte im folgenden Format. Der entsprechende
Zeitpunkt zum Text wird in eckigen Klammer [ ] vor den Text gestellt.
Schritt 3: Speichern Sie die Textdatei dann mit einer .LRC Dateiendung.
Deutsch
35
Schritt 4: Kopieren Sie die
Liedtextdateien (.LRC) und die
entsprechenden Songs in das gleiche
Verzeichnis. Der Liedtext wird dann auf
dem Display angezeigt.
Hinweis: Die Scrollfunktion für Liedtexte sollte
aktiviert werden. Lesen Sie dazu den Abschnitt
Liedtexte für genauere Informationen.
Speichern von MP3- und WMA-Dateien oder AMV-
Videodateien
Hinweis: Die in der Anleitung abgebildeten Screenshots beziehen sich auf Windows® XP und
können bei anderen Windows-Versionen Unterschiede aufweisen.
Schritt 1: Vergewissern Sie sich, dass Ihr Player angeschaltet ist.
Schritt 2: Verbinden Sie die USB-Ports von Player und Computer über das
mitgelieferte USB-Kabel.
Schritt 3: Bei erfolgreicher Verbindung erscheint folgende Anzeige. Sollte diese
Anzeige nicht erscheinen, verbinden Sie das USB-Kabel bitte erneut.
Folgende Anzeige erscheint auf dem Monitor.
Hinweis: Wenn Sie nicht Windows® XP können Sie den Hinweis auf das folgende Fenster
ignorieren
.
Deutsch
36
Schritt 4: Doppelklicken Sie auf My Computer auf dem Desktop und
ein Fenster erscheint mit folgenden Merkmalen.
Sie werden unter den Laufwerken ein mit Removable Disk gekennzeichnetes
Laufwerk vorfinden.
Deutsch
37
Windows® gibt dem Laufwerk entsprechend der Systemkonfiguration einen
Laufwerksbuchstaben. Da diese Konfiguration von Computer zu Computer
verschieden sein können, kann es sein, dass das Laufwerk auf anderen
Computern einen anderen Buchstaben zugeordnet bekommt.
Schritt 5: Doppelklicken Sie auf das Laufwerk.
Hinweis: Während des Kopierens von oder zum Player erscheint „Busy...“ im Display des Players.
Dann sollten Sie auf keinen Fall den Player ausschalten oder vom Computer trennen. Sie können
die Verbindung auftrennen, sobald der Busy-Schriftzug verschwindet.
Deutsch
38
Schritt 6: Ziehen Sie beliebige MP3- und WMA-Dateien oder AMV-Dateien auf
das Laufwerk.
Hinweis: Es steht Ihnen frei auf dem Laufwerk Unterverzeichnisse zu erstellen.
Dateien mit der Endung LRC sind Liedtextdateien die zu einem entsprechenden
Song synchrone Liedtexte enthalten. Lesen Sie bitte dazu den Abschnitt Editing
Lyrics (Liedtexte bearbeiten) für mehr Informationen.
Dateien mit der Endung ACT sind Sprachaufnahmedateien in einem
herstellerspezifischen Format. Normale Mediaplayer sind nicht in Lage ACT-
Dateien wiederzugeben. Es ist darum notwendig die Dateien in WAV-Dateien zu
konvertieren, damit sie von Programmen wie Microsoft® Windows® Media Player
abgespielt werden können. Lesen Sie bitte den Abschnitt Converting. ACT audio
to WAV audio (Dateien vom ACT-Format ins WAV-Format konvertieren) für
weitere Informationen.
Dateien mit der Endung ASF sind Videodateien in einem herstellerspezifischen
Format. Normale Mediaplayer sind nicht in Lage ASF-Dateien wiederzugeben. Es
ist darum notwendig ASF-Dateien in AMV-Dateien zu konvertieren, damit sie von
Programmen wie Microsoft® Windows® Media Player abgespielt werden können.
Lesen Sie bitte den Abschnitt Converting. ASF audio to AMW video (Dateien
vom ASF-Format ins AMV-Format konvertieren) für weitere Informationen.
Deutsch
39
Ordnerverwaltung und Navigation
Ordnerverwaltung
Im Hauptverzeichnis können Sie weitere Verzeichnisse anlagen, um Ihre Songs
der Einfachheit halber zu ordnen und zu verwalten. Die maximale Anzahl von
Songs in Verzeichnissen, Unterverzeichnissen oder im Hauptverzeichnis ist
unbegrenzt. Maximal werden bis zu 8 Ebenen von Verzeichnissen unterstützt.
Ordnernavigation
1. Betätigen Sie im gestoppten Zustand die MODE-Taste und wählen Sie ein
Verzeichnis.
2. Die erstellten Verzeichnisnamen im Hauptverzeichnis werden auf dem
Display angezeigt. Wählen Sie ein Verzeichnis Ihrer Wahl, indem Sie die
MODE-Taste nach rechts oder links drücken.
3. Betätigen Sie dann die MODE-Taste zur Bestätigung Ihrer Auswahl.
Unterverzeichnisse
1. Sie können auf jedes einzelne Verzeichnis zugreifen, um auf darin
befindliche Unterverzeichnisse zugreifen zu können. Betätigen Sie dann die
MODE-Taste zur Bestätigung.
2. Sie können ein Verzeichnis nach oben gehen, indem Sie den Querstrich
„/“ auf der Dateiliste im LCD-Display gehen.
Hauptordner
1. Wählen Sie „ROOT“, um zum Hauptverzeichnis zurückzukehren.
Benutzung der USB-Massenspeicherfunktion
Mit der USB-Massenspeicherfunktion können Sie den Player als ganz normale USB-
Disc benutzen. Sie können Dateien jeglicher Art kopieren oder löschen. Gehen Sie
auf die gleiche Weise vor wie im Abschnitt Downloading MP3 and WMA-songs
(Speichern von MP3- und WMA-Dateien oder AMV-Filmdateien) beschrieben.
Hinweis: Während des Kopierens von oder zum Player erscheint „Busy...“ im Display des Players.
Dann sollten Sie auf keinen Fall den Player ausschalten oder vom Computer trennen. Sie können
die Verbindung auftrennen, sobald der Busy-Schriftzug verschwindet.
Deutsch
40
Abziehen des USB-Kabels
Vor dem Abziehen des USB-Kabels von Player oder Computer müssen Sie
zunächst folgenden Schritten folgen.
Hinweis: Bitte ignorieren, falls Sie Windows®98/98SE benutzen.
Hinweis: “Busy…” erscheint während des Uploads oder Downloads der Dateien. Bitte ziehen Sie
nun das USB-Kabel keinesfalls ab. Erst wenn “Busy…” im Display erlischt, darf das USB-Kabel
abgezogen werden.
Schritt 1: Doppelklicken Sie Removable Disk unten rechts auf dem Bildschirm.
Schritt 2: Nachstehendes Fenster erscheint. Klicken Sie Stop.
Schritt 3: Ein neues Fenster öffnet sich. Wählen Sie “GENERIC USB DISK
DEVICE USB Device” und klicken OK zur Bestätigung.
Deutsch
41
Schritt 4: Klicken Sie Close zum Verlassen des Fensters. Nun können Sie das
USB-Kabel sicher abziehen.
Formatieren des internen Speichers
Es stehen zwei Wege zum Formatieren des internen Speichers zur Verfügung:
Hinweis: Durch Formatieren des Speichern gehen sämtliche Daten, die sich auf dem Player
befinden, verloren.
Benutzung der Formatierungssoftware
Lesen Sie dazu bitte Installing Driver and Software-Utilities(Installation der
Treiber und Utility-Software) für weitere Informationen.
In Windows® formatieren
1. Klicken Sie My Computer auf dem Bildschirm.
2. Ein Removable Disk erscheint, Rechtsklick auf Removable Disk und dann
im Menü Format klicken.
3. Nach dem Klicken von Format erscheint das nachstehende Fenster, klicken
Sie Start.
Deutsch
42
Fehlerbehebung
Symptom Ursache Behebung
Mit POWER schaltet
sich das Display
nicht ein.
Der Akku ist leer. Laden Sie den Akku auf.
Unter Windows® 98/98SE:
Die Software-Utilities (auf der
mitgelieferten CD) wurden
noch nicht installiert
Legen Sie die CD ein
Starten Sie das Setup-
Programm, um mit der
Installation der Treiber und
Utility-Software zu beginnen
Folgen Sie den
Bildschirmanweisungen zur
Fertigstellung des
Installationsvorgangs.
Die Software des Players (auf
CD) ist mit anderen Teibern
auf dem Computer nicht
kompatibel.
z Deinstallieren Sie die
Player-Software.
z Starten Sie Ihren Computer
erneut.
z Installieren Sie die Software
erneut.
Nach dem
Anschluss des
Players über USB
Port am Computer
wird das
Removable Disk
nicht in My
Computer erkannt.
Ihre Hauptplatine unterstützt
keinen USB Port.
Setzen Sie sich mit Ihrem
Fachhändler in Verbindung.
Musikdateien auf
dem Player können
nicht gelöscht
werden.
Die Datei ist Read Only. Ändern Sie das Attribut der
Musikdatei.
Die Spielzeiten
werden bei MP3
Wiedergabe nicht
korrekt angezeigt.
Eine MP3 Musikdatei ist in
VBR Format komprimiert, was
die Kompressions-
geschwindigkeit variieren
kann. Hierdurch kann die
Spielzeit falsch angezeigt
werden.
Komprimieren Sie die MP3
Musikdatei mit fester
Geschwindigkeit.
Deutsch
43
Fehleranzeige beim
Anschließen oder
Abtrennen des
Players vom
Computer.
Der Grund ist das Abtrennen
des USB-Kabels während der
Datenübertragung.
Der Player sollte während der
Datenübertragung oder während
des Formatierens keinesfalls
abgezogen werden.
Kann der Player die Datei nicht
wiedergeben, dann springen Sie
bitte zum nächsten Song, der
nicht in MPEG1 LAYER1
/
MPEG1 LAYER2 komprimiert
ist.
Löschen Sie jene Dateien, die
nicht wiedergegeben werden
können.
Der Player kann die
MP3 Musikdateien
nicht wiedergeben.
Die meisten MP3
Musikdateien sind in MPEG1,
MPEG2, LAYER3 Standard
komprimiert. In der
Vergangenheit wurden
Dateien auch in MPEG1
LAYER1 und MPEG1 LAYER2
komprimiert. Dieser Player
unterstützt MPEG1 LAYER1,
MPEG1 LAYER2 oder
Kompession in mehr als einem
Standard nicht.
Ändern Sie die
Kompressionsrate zu MPEG1
LAYER3.
Der Player unterstützt den
Kompressionsstandard nicht.
Der Player unterstützt nur
MPEG1 MPEG2 LAYER3 und
WMA Musikdateien.
Außerhalb der
Kompressionsgeschwindigkeit.
z Kompession:
32Kbps~384Kbps
z WMA Kompression:
64Kbps~128Kbps
Die Musikdatei kann
nicht richtig
wiedergegeben
werden oder ein
Signalton ertönt
Tipps: Sind Ihnen Kompressionsstandard und Geschwindigkeit
der Musikdatei nicht bekannt, dann können Sie die Informationen
mit einem herkömmlichen Music Player (z.B. Winamp)
überprüfen.
Nach dem
Formatieren des
internen Speichers
kann der Player
nicht mehr vom
Computer gefunden
werden
Beim Formatieren wurden
wichtige Systeminformationen
gelöscht
Schließen Sie den Player erneut
an den Computer an
Kein Treiber installiert unter
Windows® 98/98SE.
Installieren Sie den Treiber. Der Computer
erkennt den USB
Port nicht.
Das USB-Kabel wurde
unsicher abgezogen.
Formatieren Sie den Speicher.
Deutsch
44
Technische Daten
Kapazität
128MB/256MB/512MB/1GB/2GB Flash Memory
Display
Farb-TFT-Display
Schnittstelle
USB 2.0 high speed
Stromversorgung
Lithiumakku
Dateiformate
MP3 (32kbps – 384kbps), WMA (64kbps –
128kbps) für Dateien mit konstanter Bitrate
ACT und WAV für Sprachaufnahmen
AMV für Videodateien
TXT für E-Book-Dateien
JPG, BMP und GIF für Bilddateien
Rauschabstand
90dB
Ausgangsleistung
Kopfhörer
9mWx, 32
Betriebssystem
Windows® 98/98SE/Me/2000/XP
MAC OS 9.0, 10.0
Abmessungen
39 mm (B) x 90 mm (H) x 8 mm (T)
Gewicht
45 g
188

Brauchen Sie Hilfe? Stellen Sie Ihre Frage.

Forenregeln

Missbrauch melden von Frage und/oder Antwort

Libble nimmt den Missbrauch seiner Dienste sehr ernst. Wir setzen uns dafür ein, derartige Missbrauchsfälle gemäß den Gesetzen Ihres Heimatlandes zu behandeln. Wenn Sie eine Meldung übermitteln, überprüfen wir Ihre Informationen und ergreifen entsprechende Maßnahmen. Wir melden uns nur dann wieder bei Ihnen, wenn wir weitere Einzelheiten wissen müssen oder weitere Informationen für Sie haben.

Art des Missbrauchs:

Zum Beispiel antisemitische Inhalte, rassistische Inhalte oder Material, das zu einer Gewalttat führen könnte.

Beispielsweise eine Kreditkartennummer, persönliche Identifikationsnummer oder unveröffentlichte Privatadresse. Beachten Sie, dass E-Mail-Adressen und der vollständige Name nicht als private Informationen angesehen werden.

Forenregeln

Um zu sinnvolle Fragen zu kommen halten Sie sich bitte an folgende Spielregeln:

Neu registrieren

Registrieren auf E - Mails für Difrnce mp 1100 1gb wenn:


Sie erhalten eine E-Mail, um sich für eine oder beide Optionen anzumelden.


Das Handbuch wird per E-Mail gesendet. Überprüfen Sie ihre E-Mail.

Wenn Sie innerhalb von 15 Minuten keine E-Mail mit dem Handbuch erhalten haben, kann es sein, dass Sie eine falsche E-Mail-Adresse eingegeben haben oder dass Ihr ISP eine maximale Größe eingestellt hat, um E-Mails zu erhalten, die kleiner als die Größe des Handbuchs sind.

Ihre Frage wurde zu diesem Forum hinzugefügt

Möchten Sie eine E-Mail erhalten, wenn neue Antworten und Fragen veröffentlicht werden? Geben Sie bitte Ihre Email-Adresse ein.


Info