1. Vergrendelknopen ter opberging en bij transport
2. Bedieningspaneel
A.Hoofdschakelaar aan/uit voor verhitting
(naargelang model)
B.Stoomschakelaar (naargelang model)
C. Booster inschakelknop (naargelang model)
D. Controlelampje netspanning (naargelang
model)
E.Controlelampje voor het vervangen van de
ontkalkingspatroon (naargelang model)
F.Controlelampje thermostaat
3.Temperatuurkeuze thermostaat
4.Warmteplaat
5.Gewatteerde strijk/stoomtafel
6.Instelvak voor de ontkalkingscassette in het
waterreservoir
7.Waterreservoir
8.Hendel voor het openen/sluiten van de pers en
toenemende druk van de warmteplaat
9.Ontkalkingscassette
10.Perskussen (hulpstuk kan optioneel zijn)
DESCRIZIONE
1. Pulsanti di bloccaggio per la sistemazione ed il
trasport
2. Tableau de bord
A.Interruttore MARCIA-ARRESTO dell’
avviamento riscaldamento (secondo il
modello)
B.Interruttore del vapore(secondo il modello)
C. Interruttore funzione Booster (secondo il
modello)
D. Spia luminosa del collegamento elettrico
(suivant modèle)
E.Spia rivelatrice di cambiamento della
cartuccia anticalcare (secondo il modello)
F.Spia luminosa della temperatura
3.Termostato selettore della temperatura
4.Piastra riscaldante
5.Tavolo da stiro imbottito e a vapore
6.Alloggio nel serbatoio per la cartuccia
anticalcare
7.Serbatoio dell’acqua
8.Maniglia per apertura, chiusura della pressa e
pressione progressiva della piastra riscaldante.
Comando automatico del vapore
9.Cartuccia anticalcare
10.Cuscinetto (questo accessorio può essere
opzionale)
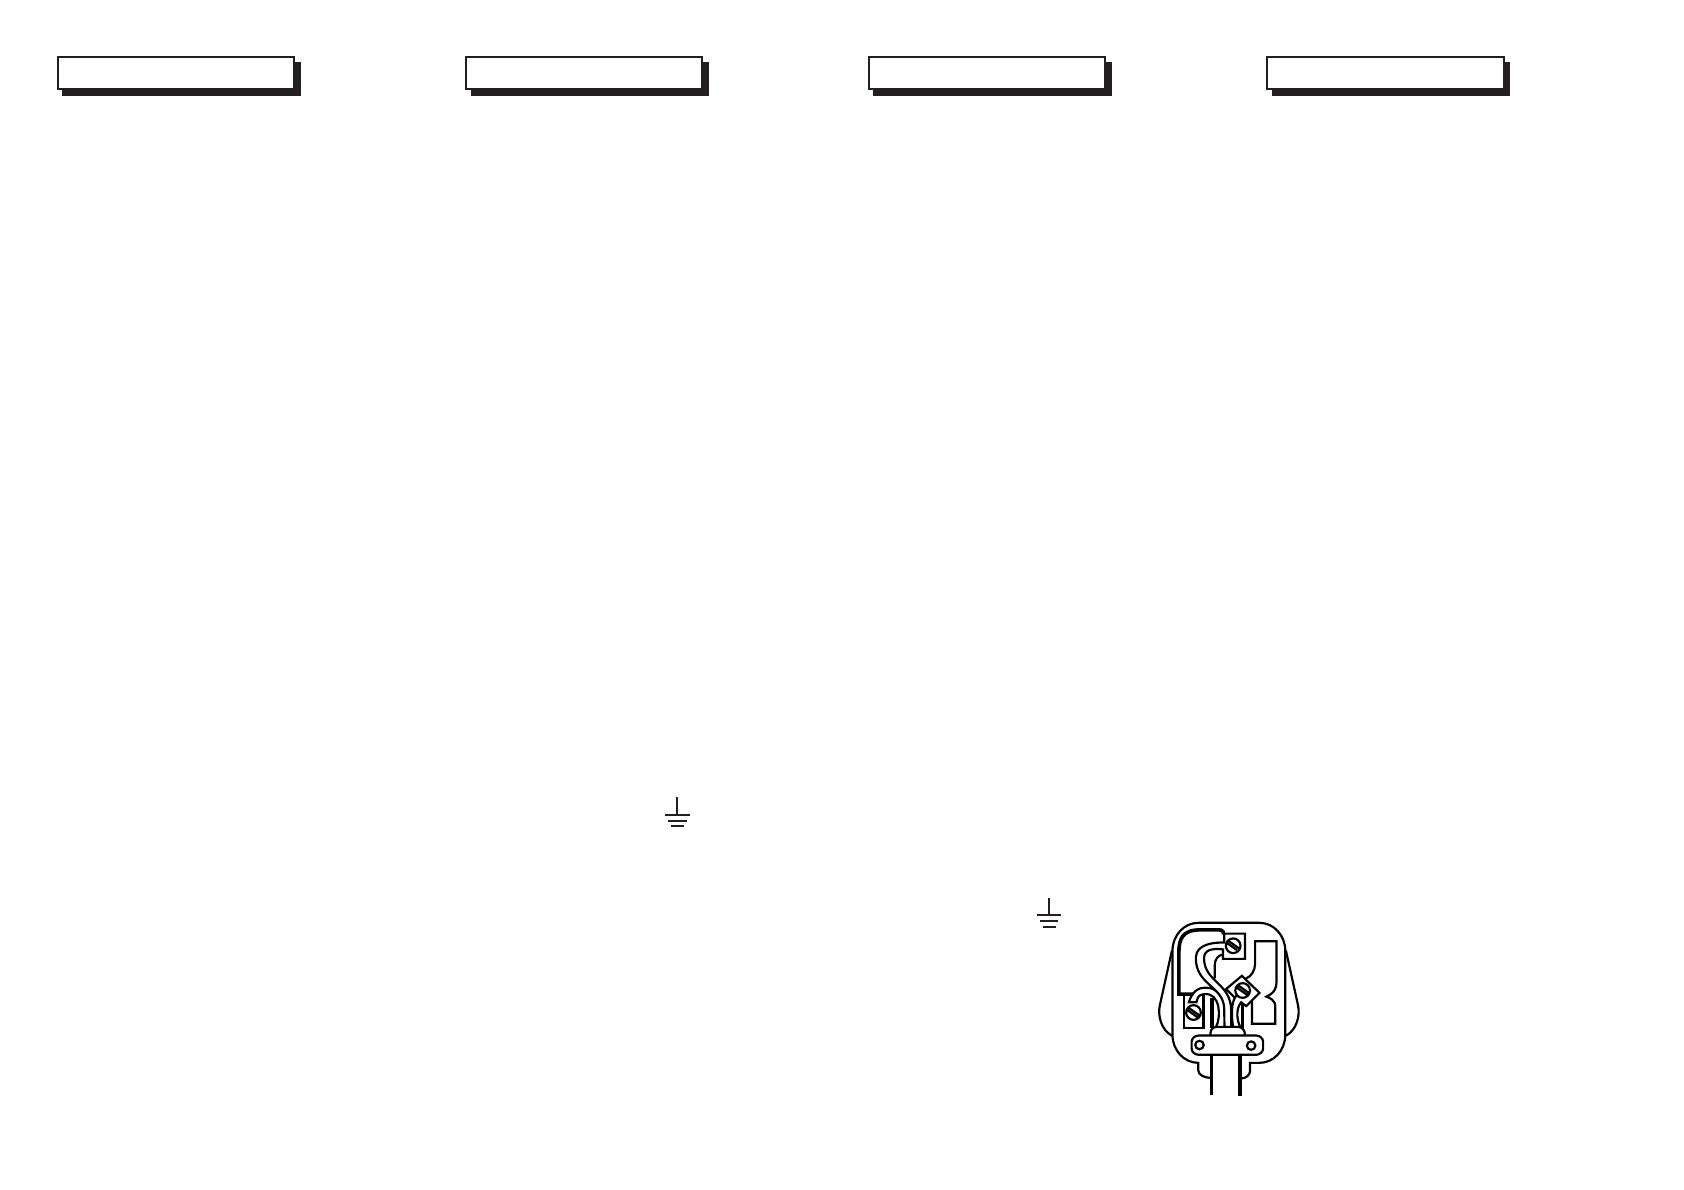
Wiring instructions
IMPORTANT FOR U.K. ONLY
WARNING - THIS APPLIANCE MUST BE EARTHED
The cores in the mains lead are coloured in accordance with the following code :
BLUE : NEUTRALBROWN : LIVEGREEN AND YELLOW : EARTH
CONNECTING INSTRUCTIONS
As the colours of the cores in the mains lead of this appliance may not correspond with the coloured markings identifying the terminals in your plug proceed as follows : the core
which is coloured BROWN must be connected to the terminal which is marked with the letter Lor coloured RED.
The core which is coloured BLUE must be connected to the terminal which is marked with the letter N or coloured BLACK.
The core which is coloured GREEN or GREEN and YELLOW must be connected with the terminal which is marked with the letter E or the earth simbol or coloured
GREEN or GREEN and YELLOW.
IF THE TERMINALS OF YOUR 3 PIN PLUG ARE UNMARKED OR IF YOUR INSTALLATION IS FITTED WITH A2 PIN PLUG, CONSULTAQUALIFIED ELECTRICIAN.
IF A13 AMP. PLUG IS FITTED, FITA13 AMP. FUSE.
IMPORTANT SAFETY DEVICE
The mains lead supplied with this equipment is fitted with a 13 amp plug which is fitted with a 13 amp fuse. If you need to examine or change the fuse a correct 13 amp
fuse to BS1362 must be fitted, and the fuse cover must be replaced.If you lose or damage the fuse cover, the plug MUST NOTbe used until a replacement is obtained
from your local After Sales Service Centre.
WARNING : If you cut off the moulded plug, throw it away immediately. This plug is not rewireable and will cause electric shock if it were plugged into an electrical socket.
Libble nimmt den Missbrauch seiner Dienste sehr ernst. Wir setzen uns dafür ein, derartige Missbrauchsfälle gemäß den Gesetzen Ihres Heimatlandes zu behandeln. Wenn Sie eine Meldung übermitteln, überprüfen wir Ihre Informationen und ergreifen entsprechende Maßnahmen. Wir melden uns nur dann wieder bei Ihnen, wenn wir weitere Einzelheiten wissen müssen oder weitere Informationen für Sie haben.
Art des Missbrauchs:
Forenregeln
Um zu sinnvolle Fragen zu kommen halten Sie sich bitte an folgende Spielregeln:
Lesen Sie zuerst die Anleitung;
Schauen Sie nach, ob die Frage bereits gestellt wurde;
Stellen Sie die Frage so deutlich wie nur einigermaßen möglich;
Erwähnen Sie was Sie bereits versucht haben um das Problem zu lösen;
Ist Ihr Problem von einem Besucher gelöst dann lassen Sie ihn / sie wissen in diesem Forum;
Falls Sie reagieren möchten, so verwenden Sie bitte das Antworten- Formular;
Da ihre Frage für alle Besucher sichtbar ist, sollten Sie lieber keine persönliche Daten erwähnen.
Neu registrieren
Registrieren auf E - Mails für Domena SP4000 wenn:
neue Frage gestellt werden
neue Handbücher vorhanden sind
Sie erhalten eine E-Mail, um sich für eine oder beide Optionen anzumelden.
Das Handbuch wird per E-Mail gesendet. Überprüfen Sie ihre E-Mail.
Wenn Sie innerhalb von 15 Minuten keine E-Mail mit dem Handbuch erhalten haben, kann es sein, dass Sie eine falsche E-Mail-Adresse eingegeben haben oder dass Ihr ISP eine maximale Größe eingestellt hat, um E-Mails zu erhalten, die kleiner als die Größe des Handbuchs sind.
Ihre Frage wurde zu diesem Forum hinzugefügt
Möchten Sie eine E-Mail erhalten, wenn neue Antworten und Fragen veröffentlicht werden? Geben Sie bitte Ihre Email-Adresse ein.