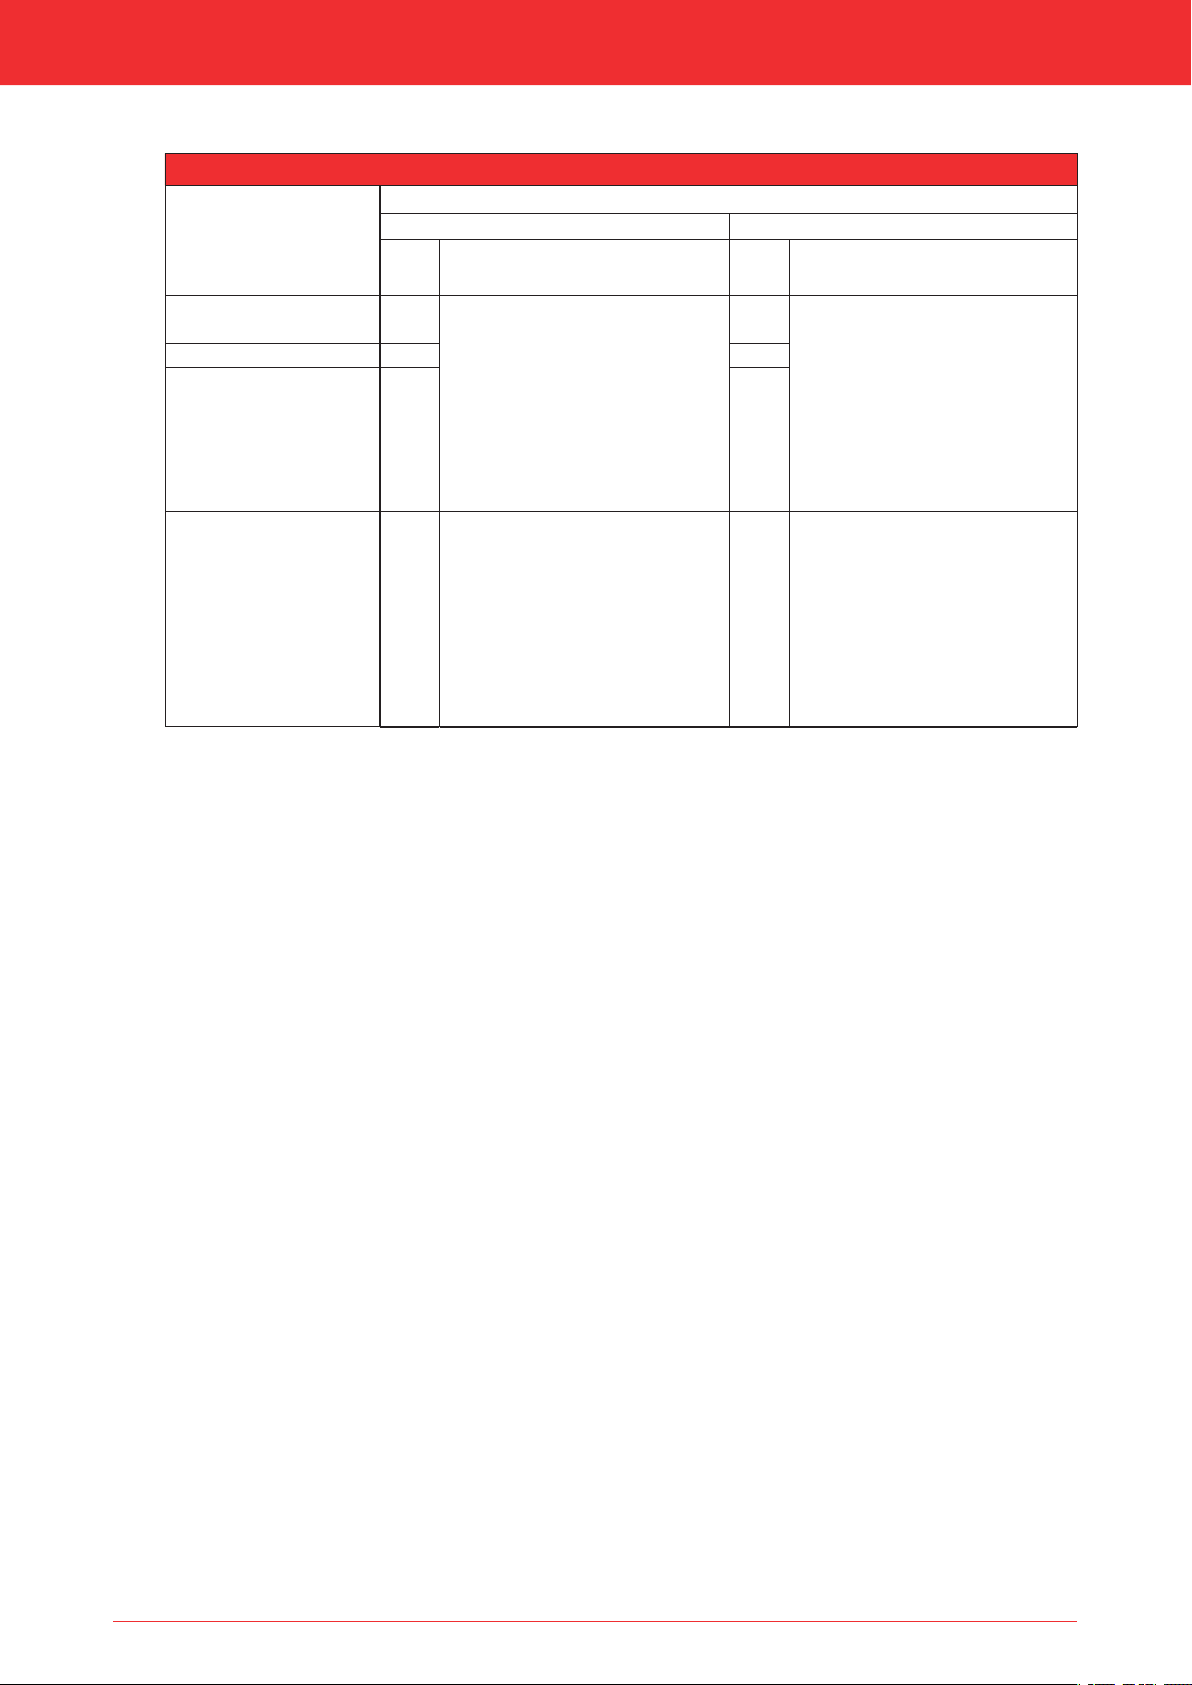
Installation manual16SystemDRU LAS AG-1 150/100DRU LAS ES-I 150/100DRU LAS ES-I 200/130DRU PV-I 100/60(also see:installation manuelPowerVent®)DRU LAS ES-E 200/150/100Ø(mm)≥250≥300≥200≥204Ø(mm)≥154≥204≥104≥204NotesThe terminal hole may be covered with a rosette made of non-combustible material. This terminal hole must be ventilated.A 2 mm wide ventilation opening around the tube is sufficient. The space between the tube and the combustible material may not be filled with insulation material.The distance from combustible material may be 0 mm.The terminal hole does not require ventilation.If a clip binding is placed in a terminal hole, a hole diameter of Ø230mm must be maintained.NoteMake terminal hole all around 2mm larger than the diameter of the concentric system to prevent "ticking"and such like.The terminal hole does not require ventilation.Make terminal hole all around 2mm larger than the diameter of the concentric system to prevent "ticking" and such like.The terminal hole does not require ventilation.If a clip binding is placed in a terminal hole, a hole diameter of Ø230 mm must be maintained.3-Maintain a distance of at least 50 mm between the outside of the concentric system and the walls and/or ceiling. If the system is built in (for instance) a cove, it should be made with non combustible, heat-resistant material all around it. This does not apply to the insulated concentric system (DRU LAS ES-E 200/150/100).-Some heat-resistant insulation materials contain volatile components that will spread an unpleasant smell for a prolonged time; these are not suitable.The concentric system is constructed from (the flue spigot of) the appliance.If, due to constructional circumstances, the concentric system is placed first, it is possible to connect the appliance by means of a telescopic pipe piece.Place the concentric system as follows:1Build the system up from (the flue spigot of) the appliance.1Connect the concentric pipe pieces and, if necessary, the bend(s).1Apply a clip binding with silicon sealing ring on each connection (does not apply to DRU LAS ES-E 200/150/100, here the sealing ring is inside the tube).1Use a sheet metal screw to fix the clip binding to the pipe on locations that cannot be reached after installation.1Attach the concentric system with sufficient fastening brackets, so that the weight is not resting on the appliance.Observe the following;-Place the first fastening bracket 0.5 metre from the appliance, at the most.-Place a fastening bracket maximum 0.1 metre from each bend, if the bends are more than 0.25 metre away from each other. If two bends are closer to one another than 0.25 metre, 1 fastening bracket between these bends will be sufficient.-At least every 1 metre, place a fastening bracket at slanted and horizontal sections.-At least every 2 metres, place a fastening bracket at vertical sections.1Fasten a roof terminal with anchor cables, if it protrudes more than 1,5 metres above the terminal.1Determine the remaining length for the wall or roof terminal and cut it to size, make sure the correct insertion length is maintained.1Place the wall terminal with the (groove/folded) seam at the top. Attach the wall terminal from the outside by means of four screws.Hole diameter and executionCombustible materialNon combustible materialTable 7-2: Terminals
Libble nimmt den Missbrauch seiner Dienste sehr ernst. Wir setzen uns dafür ein, derartige Missbrauchsfälle gemäß den Gesetzen Ihres Heimatlandes zu behandeln. Wenn Sie eine Meldung übermitteln, überprüfen wir Ihre Informationen und ergreifen entsprechende Maßnahmen. Wir melden uns nur dann wieder bei Ihnen, wenn wir weitere Einzelheiten wissen müssen oder weitere Informationen für Sie haben.
Art des Missbrauchs:
Forenregeln
Um zu sinnvolle Fragen zu kommen halten Sie sich bitte an folgende Spielregeln:
Lesen Sie zuerst die Anleitung;
Schauen Sie nach, ob die Frage bereits gestellt wurde;
Stellen Sie die Frage so deutlich wie nur einigermaßen möglich;
Erwähnen Sie was Sie bereits versucht haben um das Problem zu lösen;
Ist Ihr Problem von einem Besucher gelöst dann lassen Sie ihn / sie wissen in diesem Forum;
Falls Sie reagieren möchten, so verwenden Sie bitte das Antworten- Formular;
Da ihre Frage für alle Besucher sichtbar ist, sollten Sie lieber keine persönliche Daten erwähnen.
Neu registrieren
Registrieren auf E - Mails für DRU Maestro 60 RCH wenn:
neue Frage gestellt werden
neue Handbücher vorhanden sind
Sie erhalten eine E-Mail, um sich für eine oder beide Optionen anzumelden.
Das Handbuch wird per E-Mail gesendet. Überprüfen Sie ihre E-Mail.
Wenn Sie innerhalb von 15 Minuten keine E-Mail mit dem Handbuch erhalten haben, kann es sein, dass Sie eine falsche E-Mail-Adresse eingegeben haben oder dass Ihr ISP eine maximale Größe eingestellt hat, um E-Mails zu erhalten, die kleiner als die Größe des Handbuchs sind.
Ihre Frage wurde zu diesem Forum hinzugefügt
Möchten Sie eine E-Mail erhalten, wenn neue Antworten und Fragen veröffentlicht werden? Geben Sie bitte Ihre Email-Adresse ein.