GEBRUIK V
Fig. 7
Fig. 8
Fig. 9
Fig. 10
Fig. B
R L F
P
G
Fig. 1
M
H
I
Fig. 12
R
G
140
210
170
250
Fig.
S
T
GERECHT TEMP GERECHT TEMP
VLEES GEBAK
V 220
RUNDGEBRAAD 250 CAKE 190
OSSEGEBRAAD 240 BRIOCHES
KALFSGEBRAAD 220 BISCUITDEEG 235
LAMSGEBRAAD 220 KOEKJES 190
ROAST 230 ZOET BLADERDEEGGEBAK 200
HAAS 235 ROZIJNENGEBAK 200
KONIJN 220 STRUDEL
KALKOEN 235 LANGE VINGERS 290
GANS 225 200
EEND 235 PUDDING V 200
KIP 200-225 TOAST 250
VIS 200-225 BROOD 230
10 35
BRANDER MET VEILIGHEIDSTHERMOKOPPEL
Bij branders die voorzien zijn van een veiligheidsthermokoppel,
moet u de knop na inschakeling van de brander nog ongeveer 10
seconden vast blijven houden (fig.9), zodat de veiligheidsklep in
werking treed
t.
bovenbeschreven handelingen herhalen.
Gebruik van de oven
De oven voor gebruik voorverwarmen op de gewenste temperatuur
.
Nadat de gewenste temperatuur bereikt is, de gerechten in de
oven zetten en de baktemperatuur controleren. Zet de oven 5
minuten voor het verstrijken van de bereidingstijd uit om de
restwarmte te gebruiken. Hieronder volgt een lijst met indicatieve
bereidingstijden van verschillende gerechten (tabel C).
LET OP: de inschakelknop niet langer dan 15 seconden
vasthouden.
Als de brander van de oven niet aangaat, de ovendeur tenminste
1 minuut open laten st
aan voordat u de knop opnieuw indrukt.
Elektrische inschakeling
Om de grillbrander in te schakelen, de knop indrukken en tegen
de klok in op de stand (Fig. 7) zetten; tegelijkertijd op de
elektrische inschakelknop op het paneel (aangegeven met het
symbool ) drukken.
Als er geen elektrische stroom is, kan de brander ook worden
aangestoken met een lucifer (fig. 10).
BRANDER MET VEILIGHEIDSTHERMOKOPPEL
Bij branders die voorzien zijn van een veiligheidsthermokoppel
moet u de knop na inschakeling van de brander nog ongeveer 10
seconden vast blijven houden (fig.9), zodat de veiligheidsklep in
werking treed
t.
bovenbeschreven handelingen herhalen.
- Plaats de knoppenbescherming S en laat de deur halfopen
(zie fig.
LET OP
De grill moet worden gebruikt met half geopende deur .
Plaats de knoppenbescherming S en laat de deur halfopen
(zie fig.
Braadspit - ( Mod. 1920 ).
V
- SL en zet
het stevig en goed uitgebalanceerd vast tussen de twee vorkjes
F, om een onnodige overbelasting van de reductor R (fig. 1
te vermijden.
- Plaats het spit op support G , na het andere uiteinde ervan in
het gat P van het motortje R (fig. 1
Plaats support G volledig in de oven, om de spies I in het gat
H van motor M van het braadspit te laten vallen (Fig. 12).
- Zet de druippan met een beetje water erin onder het spit.
- Draai de knop op symbool (fig. B)
- Om het spit te verwijderen moet u andersom te werk gaan en
knop Aen een handschoen van isolerende wol gebruiken
(Fig 13).
GAS CONNECTION
Fig. 2
1/2”
2
1
3
4
5
L
N
A
Applance type Supply single-phase 230 V~
T
ype of cable section
All gas + elett. oven Rubber H05 RR-F
Applance type Supply single-phase 230 V~
T
ype of cable section
All gas + gas oven Rubber H05 RR-F
The appliance must be connected to the gas piping in a workmanlike
way and in conformity with the regulations in force which lay down
the inst
allation of a safety valve at the end of the piping.
For butane and propane a pressure reducer conforming to the
standards in force may perform this task.
The seal gaskets must be in accordance with rules.
Once the gas appliance has been connected, check the connection
seal by means of soapy water
.
The end of the attachment is threaded.
The possible connections are:
We recommend to check wether the appliance has been foreseen
for the kind of gas distributed.
- by rigid pipe in iron or copper
- by flexible tube in stainless steel with continuing wall, with
mechanical connection in accordance with rules. The tube must
be directly connected to the manifold elbow (see Fig.2).
-
This tube must be connected directly on the push-on connector
concerning the gas used, and it must be blocked with a band.
In the last case, check the tube's printed date of expiry and
replace it before this date.
STOP
INLET
Certain types of cookers can be set for sypply both on the right
and lef
thand side. In this case it is sufficient to reverse the position
of the cad nipple reducer
leakage of gas.
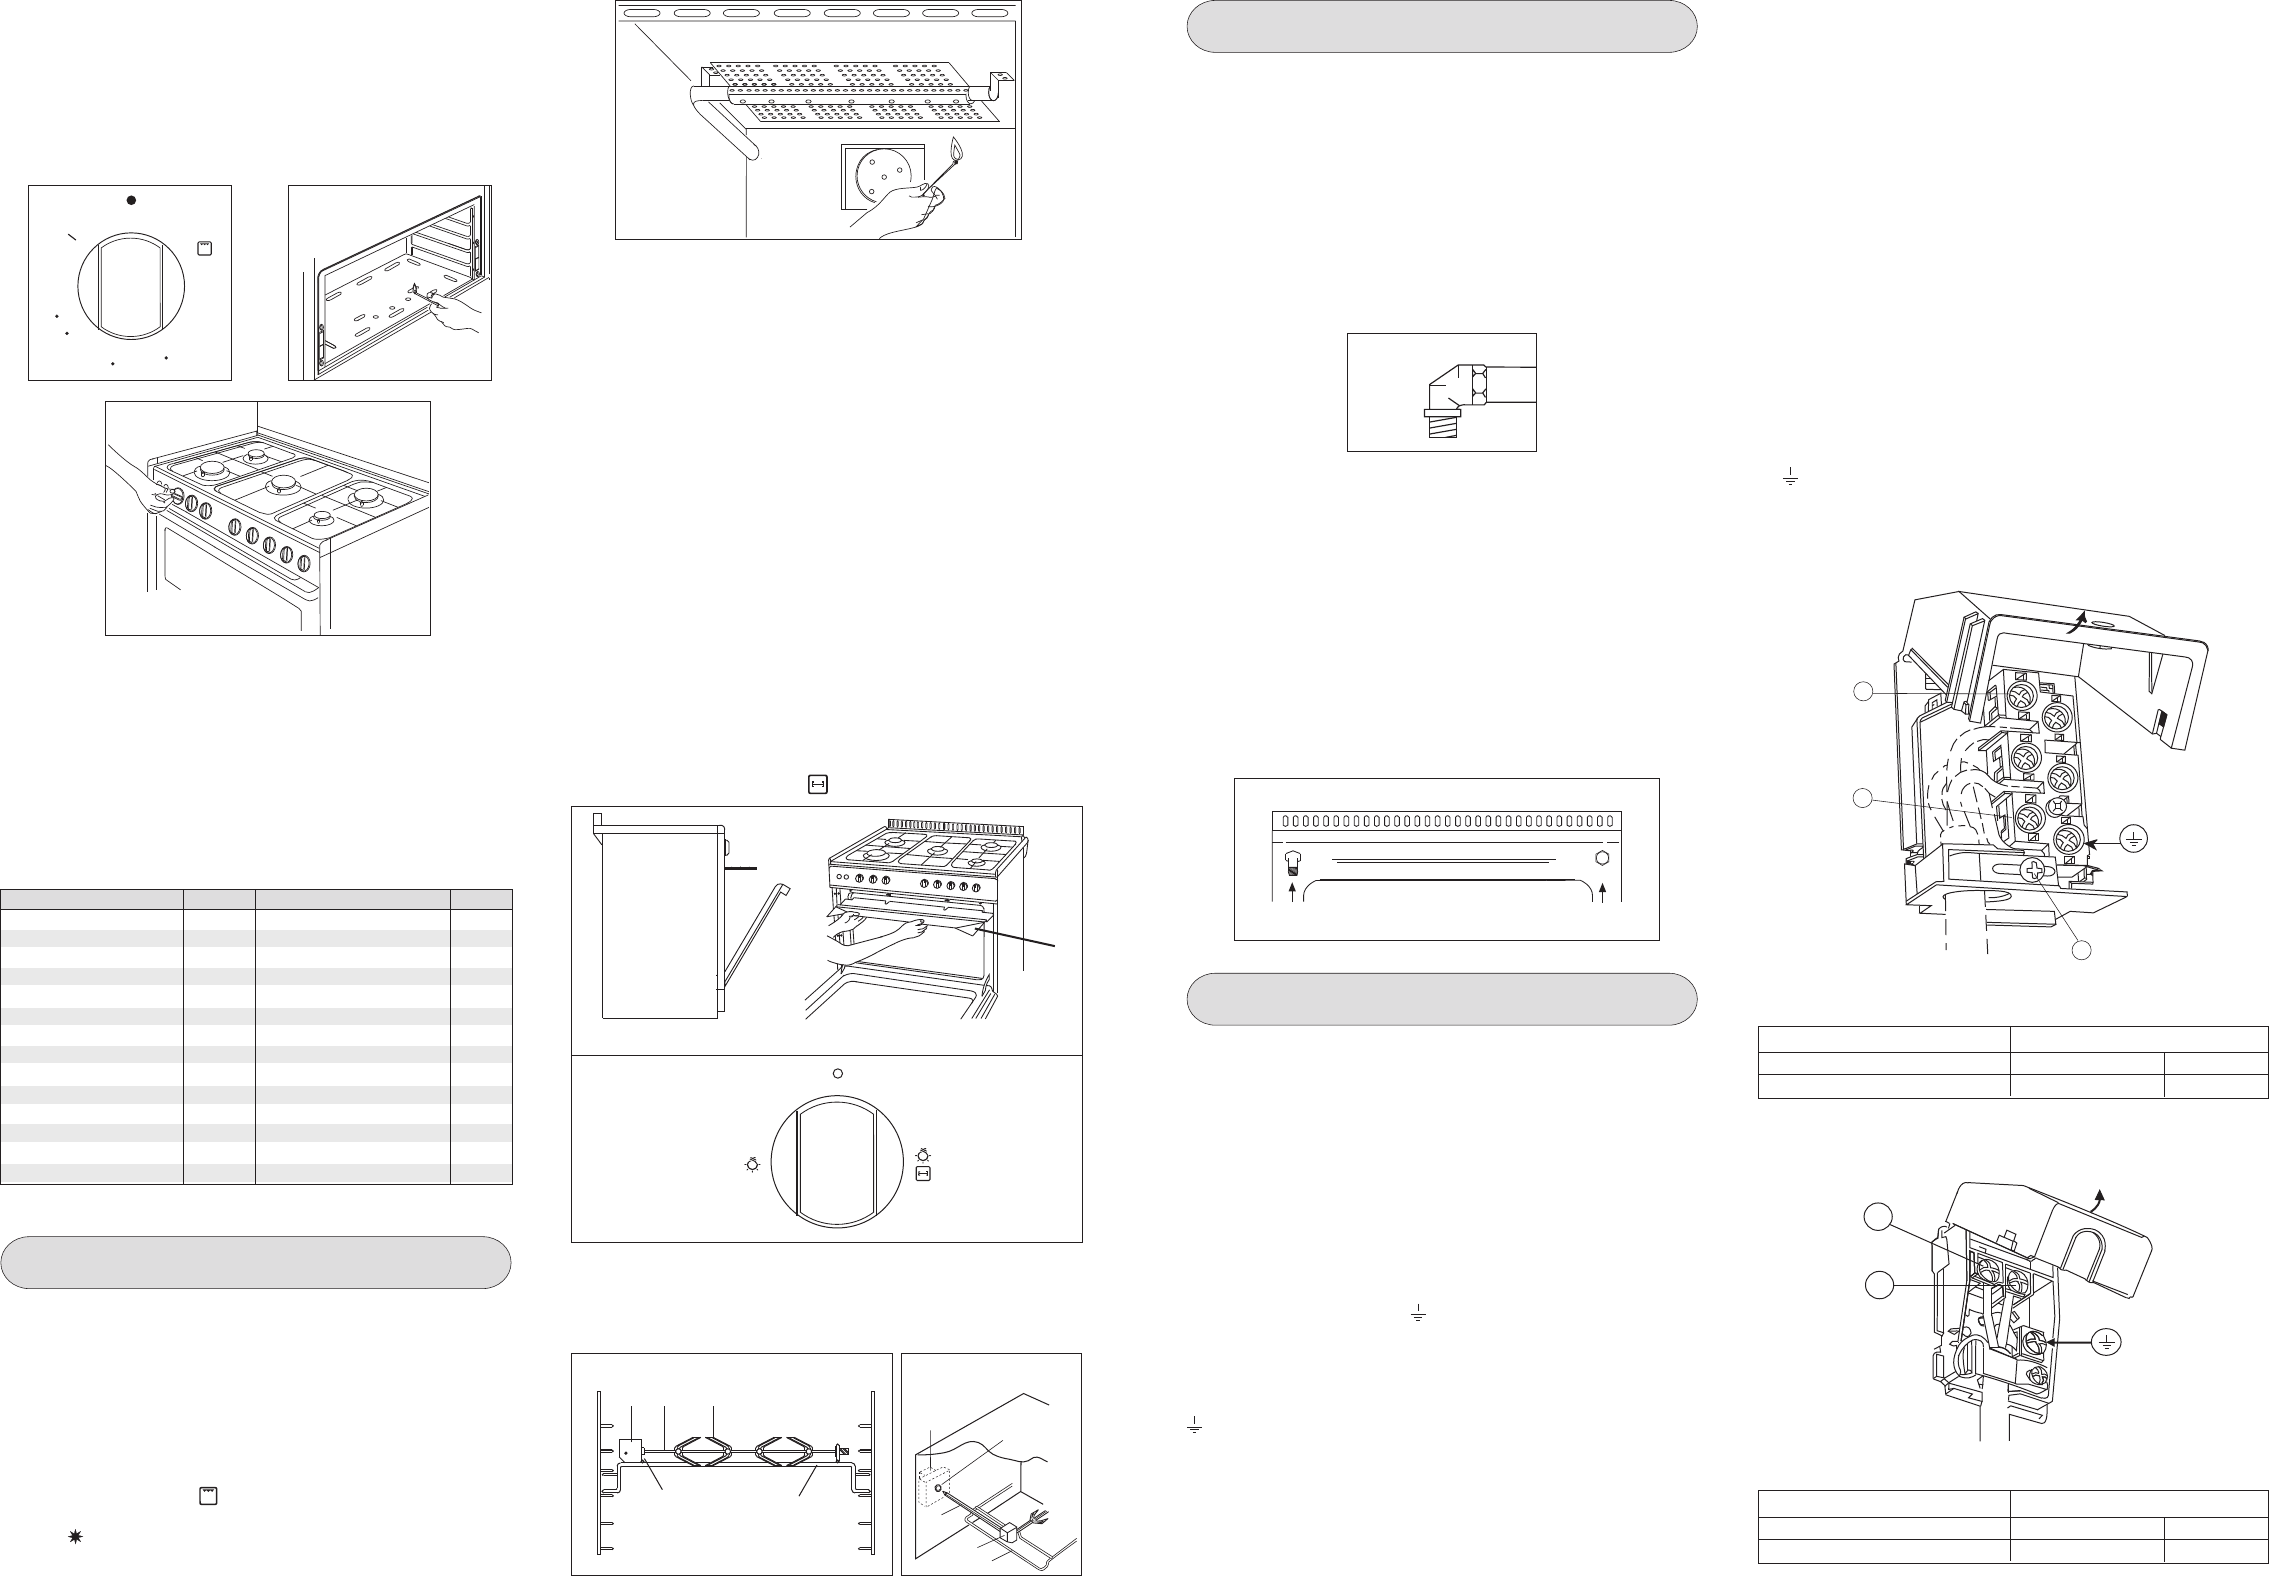
ELECTRICAL CONNECTION
REPLACEMENT OF THE CABLE
In case the cable is damaged, replace it in accordance with the
following instructions:
- open the box of the supply board as described on the picture
below;
- unscrew screw “A” fixing the cable;
- replace the cable with one of the same lenght and in accordance
with the features described on the t
able; switch the appliance
off, and close the gas t
- the ‘green-yellow” earth wire must be connected to the terminal
“ “ and it must be about 10 mm longer thean the live wires;
- the “blue” neutral wire must be connected to the terminal marked
with letter “N”;
- the live wire must be connected to the terminal marked with letter
“L”.
This appliance must be earthed by law
the appliance to the electrical supply
, check that the earth
system in your house is working correctly
Check that unit voltage and power
applied on the appliance, are correct for the supply
that the feeding network is protected by a powerful switch able to
disconnect completely the network with a contacts sep
at least 3 mm. Be sure that the earth wire green/yellow is not
interrupted by the switch.
Important:
- green/yellow = earth " "
- blue = neutral “N”
- brown = live “L”
The wire coloured green/yellow must be connected to the terminal
in the plug which is marked with letter 'E' or by the earth symbol
or coloured green or green/yellow
be connected to the terminal which is marked with letter 'N' or
coloured black. The wire coloured brown must be connected to
the terminal which is marked with letter 'L' or coloured red. The
supply cable must not come into contact with any component the
temperature of which exceeds the ambient temperature by 50°C.
If a plug is used for connection, the plug to be connected to the
supply cable and the socket to which it is connected must be of
Connection of the appliance to the power mains should be done
by a licensed electrician familiar with local safety regulations.
3 x 1,5 mm
2
the same type (conforming to the standards).
plug or the s
that there is sufficient cable allo
of the unit.If the plug is non-re
follohe plug m
There is shock hazard when this plug is inserted in a socket-outlet
elsewhere in the house
fitted.
supplier
3 x 0,75 mm
2
L
N