the device to work properly). We generally recommend that you place it in the appropriate support when not using it.
Emergency switch:
In case the remote control does not work, you can turn on and off the stove with the button positioned on the rear of the stove near the power cord. (See image
on p. 14 EMERGENCY SWITCH)
PANEL DESCRIPTION
Button (P1) Programmable thermostat access key.
Button (P2) On/off key.
Button (P3) Hold the P3 key to view useful information.
Button (P4) Press the P4 key until the ROOM TEMPERATURE menu appears
on the display and then change the value using the P5 and P6 keys.
Button (P5) Up key. You can also use it to scroll through the menus.
Button (P6) Down key. You can also use it to scroll through the menus.
QUICK MENU
The P4 key (SET/menu) allows you to open the menu functions. Press it for several times to browse through the pages below:
Maximum heat output setting: Use the P5 and P6 keys to increase and respectively decrease the maximum heat output SET. Press P4 again to go to the next
page.
ROOM 1 Temperature setting: Use the P5 and P6 keys to increase and respectively decrease ROOM 1 ROOM TEMPERATURE. Press P4 again to go to the next
page.
ROOM 2 Temperature setting: Use the P5 and P6 keys to increase and respectively decrease ROOM 2 ROOM TEMPERATURE. Press P4 again to go to the next
page.
ROOM 3 Temperature setting: Use the P5 and P6 keys to increase and respectively decrease ROOM 3 ROOM TEMPERATURE. Press P4 again to go to the main
page.
ROOM 4 Temperature setting: Go to general settings menu.
User menu
Open the main page and then hold the P4 key:
•EXIT: returns to main page.
•PRE-LOAD: opens the pre-load function.
•SYSTEM STATUS: displays the page that contains information on the current status of the system.
•PELLET SET: allows the user to adapt the functionality of the system to the quality of the pellets used.
•BLOWER SET: allows the user to adapt the power of the blowers.
•GENERAL SETTING: open the "general settings" submenu.
PRE-LOAD: (available only when the stove is off), There are two pre-load methods available:
NORMAL: hold the P5 key (up) as long as you want the auger tube to work. Press P3 to exit.
AUTO: carries out a pre-load at a time set. Press P3 to exit.
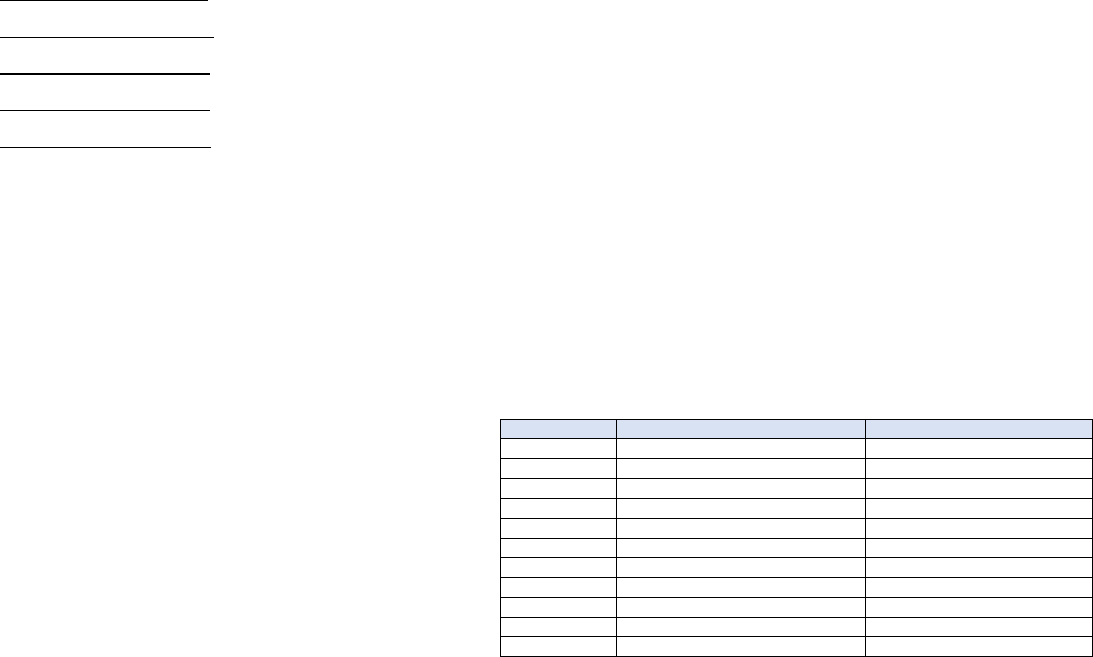
SYSTEM STATUS: it displays in order: Pellet type settings correction table:
•the status of the stove
•the fume temperature in °C
•the speed of the fume fan in revolutions/minute
•the current heat output level
•room 1 temperature in °C
•auger tube motor speed in rpm
•room 2 temperature in °C
•room 3 temperature in °C
•the speed of the exchanger fan 1 expressed as a percent
•the speed of the exchanger fan 2 expressed as a percent
•the speed of the exchanger fan 3 expressed as a percent
•the speed of the exchanger fan 4 expressed as a percent
•flow rate error
Use the P5, P6 keys to scroll through the pages. Press p4 to exit.
PELLET SET: Use the P5 and P6 keys to select the desired load settings and confirm by pressing P4.
BLOWER SET: Use the P5 and P6 keys to select the blower area on which you want to make the changes. Select using the P4 key. To view the settings for the
selected ventilation area. Use the increase/decrease (P5/P6) keys to select the desired mode. In AUTO mode the fans will operate at maximum 90%. The system
will decrease the maximum speed of the blower once you switch to bars. When all the bars will be empty, the blowers will have a maximum speed of 70%. Blower
3 and blower 4 are connected together. Therefore, if you change the speed on blower 3 you will also change it on blower 4.
BLOWER 3 SET SPEED = BLOWER 4 SET SPEED
General settings, the display shows in order:
•EXIT: returns to main page.
•TIMER SETTING: open the time and date settings page. Switch between fields using the P4 (SET) key. Use the P5 and P6 keys to select the desired values.
Note that, thanks to the system calendar, you do not need to set the day of the week. Press P4 to exit.
•ROOM 4 TEMPERATURE: ROOM 4 temperature setting and display of the current temperature.
•DISPLAY OFF: enables/disables programmed shut-down of the display. Eanbles/disables display shut-down mode after 300" of inactivity. Press P4 to exit.
•ECO STOP: enables/disables the stand-by mode. Use the P5 and P6 keys to enable/disable the stand-by function. Press P4 to exit.
PROBE ON RADIO (Y/N): enables the room temperature sensor placed inside the handheld remote control. Use the P5 and P6 buttons to enable/disable the
room temperature sensor installed in the handheld remote control. Press P4 to exit, for zone 1. If the communication between the handheld remote control and
the stove is lost, the stove will automatically take the standard room temperature sensor as reference.
•LANGUAGE SET: allows you to select the desired language.
•LOGS: it displays the events (alarms) log.
•SERVICE: it displays information on the stove status.
•AIR FLOW CONTROL: enables/disables flow control Use the P5 and P6 key to toggle between flow control operating mode (default) or traditional operating
mode. The flow control operating mode ensures best performance. Press P4 to exit.
•ECO-STOP HYSTERESIS+: positive hysteresis of the room temperature sensor. E.G.: ECO-STOP HYSTERESIS+ value = 1.0. The stove enters the ECO
STOP mode when the room temperature exceeds the set room temperature by 1.0° C.
•ECO-STOP HYSTERESIS-: negative hysteresis of the room temperature sensor. E.G.: ECO-STOP HYSTERESIS- value = 1.0.
The stove resumes its operation once the room temperature drops below the set room temperature by 1.0 °C.
Programmable thermostat
The programmable thermostat function allows for the programming of the stove automatic switching on and off and of the SET temperature and SET heat output
hallo das disple wo mir hab hatt nur 3 knöffe und mir bekommen es nicht eingestelt und ihr fine ich darüber nix wie es get Eingereicht am 12-12-202113:58
Libble nimmt den Missbrauch seiner Dienste sehr ernst. Wir setzen uns dafür ein, derartige Missbrauchsfälle gemäß den Gesetzen Ihres Heimatlandes zu behandeln. Wenn Sie eine Meldung übermitteln, überprüfen wir Ihre Informationen und ergreifen entsprechende Maßnahmen. Wir melden uns nur dann wieder bei Ihnen, wenn wir weitere Einzelheiten wissen müssen oder weitere Informationen für Sie haben.
Art des Missbrauchs:
Forenregeln
Um zu sinnvolle Fragen zu kommen halten Sie sich bitte an folgende Spielregeln:
Lesen Sie zuerst die Anleitung;
Schauen Sie nach, ob die Frage bereits gestellt wurde;
Stellen Sie die Frage so deutlich wie nur einigermaßen möglich;
Erwähnen Sie was Sie bereits versucht haben um das Problem zu lösen;
Ist Ihr Problem von einem Besucher gelöst dann lassen Sie ihn / sie wissen in diesem Forum;
Falls Sie reagieren möchten, so verwenden Sie bitte das Antworten- Formular;
Da ihre Frage für alle Besucher sichtbar ist, sollten Sie lieber keine persönliche Daten erwähnen.
Neu registrieren
Registrieren auf E - Mails für Eva Calor Mara wenn:
neue Frage gestellt werden
neue Handbücher vorhanden sind
Sie erhalten eine E-Mail, um sich für eine oder beide Optionen anzumelden.
Das Handbuch wird per E-Mail gesendet. Überprüfen Sie ihre E-Mail.
Wenn Sie innerhalb von 15 Minuten keine E-Mail mit dem Handbuch erhalten haben, kann es sein, dass Sie eine falsche E-Mail-Adresse eingegeben haben oder dass Ihr ISP eine maximale Größe eingestellt hat, um E-Mails zu erhalten, die kleiner als die Größe des Handbuchs sind.
Ihre Frage wurde zu diesem Forum hinzugefügt
Möchten Sie eine E-Mail erhalten, wenn neue Antworten und Fragen veröffentlicht werden? Geben Sie bitte Ihre Email-Adresse ein.