PRIOR TO THE CHIMNEY CONNECTION, TO ENSURE THE CORRECT PERFORMANCE OF THE STOVE, YOU MUST RESPECT THE FOLLOWING TYPES
OF INSTALLATION:
7.5 KW INSERTS
The chimney flue must be installed with 0.5m of pipe of Ø80mm certified to EN 1856-2.
04.4 PELLET KITCHEN
(Electronics p. 19 – 31)
IMPORTANT: THE LENGTH OF THE FLUE DUCT MUST BE OF MAX. 6 METERS WITH A DIAMETER OF 80 mm; EVERY 90° CURVE OR (T) CONNECTION
IS CONSIDERED AS 1 METER OF PIPE.
PRIOR TO THE CHIMNEY CONNECTION, TO ENSURE THE CORRECT PERFORMANCE OF THE STOVE, YOU MUST RESPECT THE FOLLOWING TYPES
OF INSTALLATION:
The pellet stove must be fitted with a 0.5 m-long pipe (Φ 80 mm) certified to EN 1856-2 standard.
The pellet stove, depending on the model you have purchased, can be installed flush or with free-standing installation. In the case of free-standing installation
respect the following distances from combustible wall, Page 10 – 11.
If you want to build the stove into other pieces of the kitchen, you can safely place the furniture close to the hob. The safety distance is given by the heads of the
screws installed in the lid. You can close the space between the lid and the hob with a high-temperature-proof silicone, Page 10 – 11.
This type of stove combines the convenience of pellets with the
proven tradition of an economic kitchen with which it is possible
to prepare meals and heat the environment at the same time.
Thanks to technology, in this case also not only is it possible to
cook but the appliance was created to provide plenty of space to
do so. In addition the pellets are easy to handle, both in terms of
power and for the precise temperature management, with no
mess or clutter. This economical ventilated pellet stove is
equipped with a frontal pellet loading system that is very easy to
use and which makes it extremely practical in everyday use. Its
wide top plate, available in steel or glass ceramic, is perfect for
cooking meals using the heat given off. The fume outlet is top or
rear. In winter, the forced ventilation facilitates rapid and uniform
heating of the entire environment while in summer it is possible
to cook without forced ventilation. Conceived to be functional, the
design was not secondary, in fact the large glass panel was intended to make the fire visible. Available in both the recessed and free-standing version.
Before installing the stove rotate the rear upstand (if any), by loosening the screws.
To install the stove with rear exhaust, it is necessary to break the semi-cut on the rear and then install the pipes.
04.5 PELLET KITCHEN WITH OVEN
(Electronics p. 19 – 31)
IMPORTANT: THE LENGTH OF THE FLUE DUCT MUST BE OF MAX. 6 METERS WITH A DIAMETER OF 80 mm; EVERY 90° CURVE OR (T)
CONNECTION IS CONSIDERED AS 1 METER OF PIPE.
PRIOR TO THE CHIMNEY CONNECTION, TO ENSURE THE CORRECT PERFORMANCE OF THE STOVE, YOU MUST RESPECT THE FOLLOWING
TYPES OF INSTALLATION:
The pellet stove with oven must be installed with 0,5 meters of pipe Φ 80mm certified according to the EN 1856-2 norm.
The pellet stove with oven can be flush mounted or it can have a free installation. Page 10 – 11.
If you want to build the stove into other pieces of the kitchen, you can safely place the furniture close to the hob. The safety distance is given by the heads of the
screws installed in the lid. You can close the space between the lid and the hob with a high-temperature-proof silicone. Page 10 – 11.
Before installing the kitchen it is necessary to rotate the rear backsplash (if present), by unscrewing the screws.
If you want to install the stove with rear outlet please break the pre-cut in the back and then install the pipes.
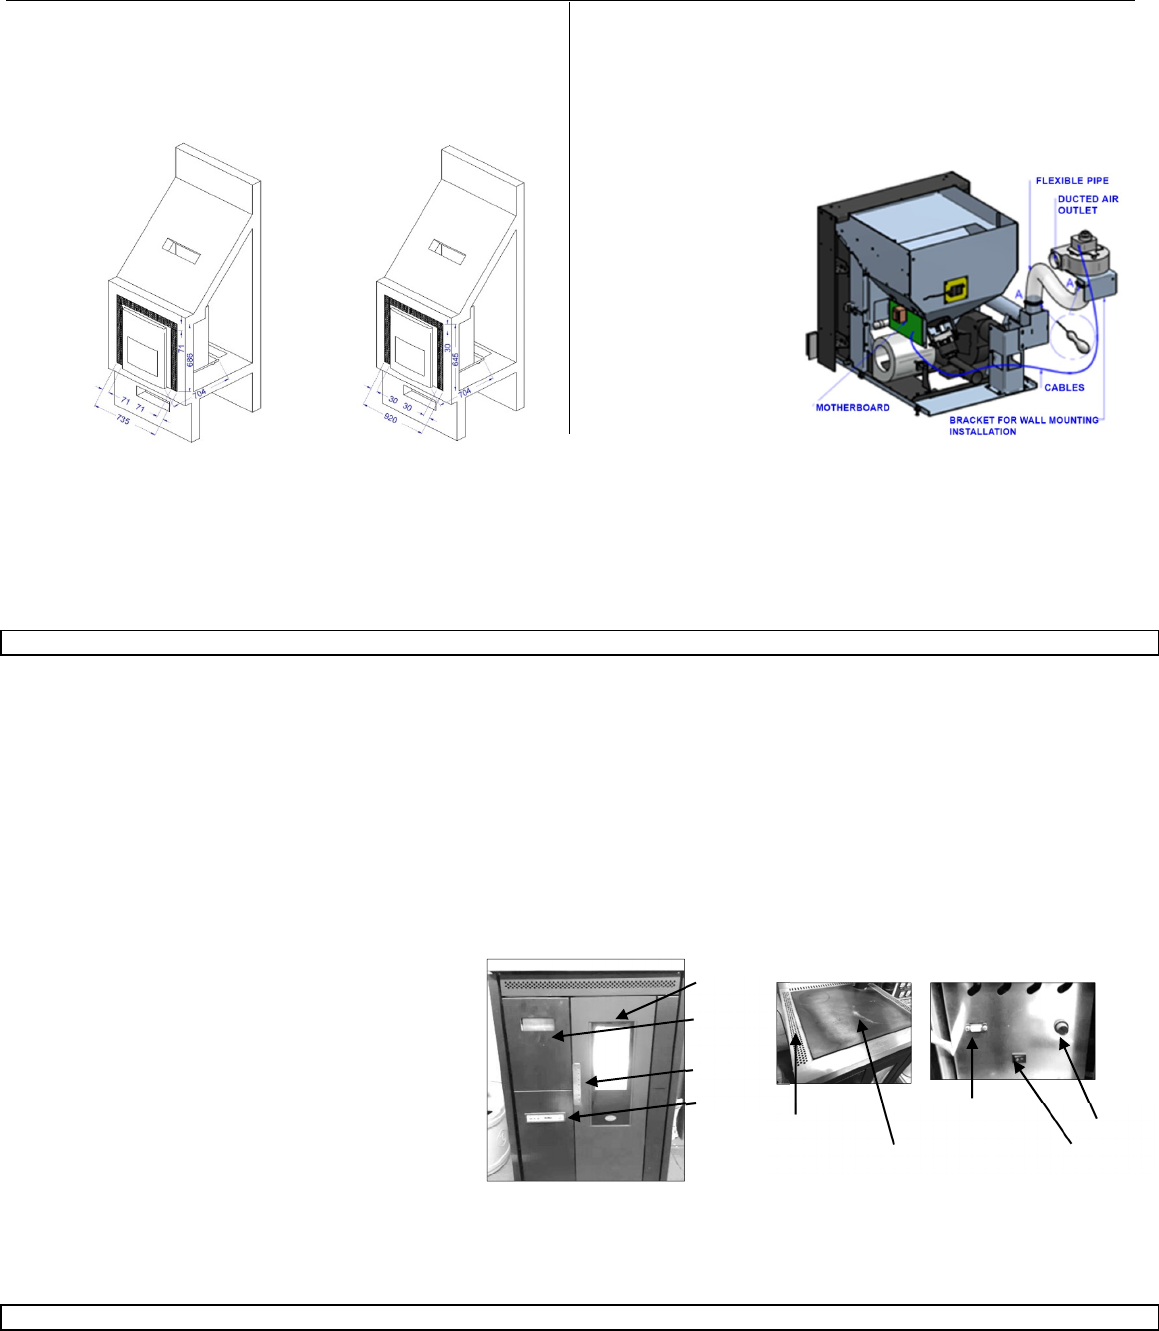
Ducting system
The devices which can be equipped with ducting systems are the 11KW
inserts, not removed for loading.
After installing the insert, fix the bracket with the second blower to the wall in a
comfortable position and if possible, not above the flexible pipe supplied with
the product. Carefully tighten the clamps and connect the blower to another
flexible pipe to channel the air into another room. The second fan setting is on
page 17.
11 KW INSERTS
Suitably isolated the beam above the insert if present. Any extraordinary
maintenance operations shall be carried out by authorised staff, with the
insert switched off, after slightly lifting its front side and pulling it out.
Pellet feeding: remove the upper drawer and fill it with pellet. This operation
can also be performed while the insert is running.
Libble nimmt den Missbrauch seiner Dienste sehr ernst. Wir setzen uns dafür ein, derartige Missbrauchsfälle gemäß den Gesetzen Ihres Heimatlandes zu behandeln. Wenn Sie eine Meldung übermitteln, überprüfen wir Ihre Informationen und ergreifen entsprechende Maßnahmen. Wir melden uns nur dann wieder bei Ihnen, wenn wir weitere Einzelheiten wissen müssen oder weitere Informationen für Sie haben.
Art des Missbrauchs:
Forenregeln
Um zu sinnvolle Fragen zu kommen halten Sie sich bitte an folgende Spielregeln:
Lesen Sie zuerst die Anleitung;
Schauen Sie nach, ob die Frage bereits gestellt wurde;
Stellen Sie die Frage so deutlich wie nur einigermaßen möglich;
Erwähnen Sie was Sie bereits versucht haben um das Problem zu lösen;
Ist Ihr Problem von einem Besucher gelöst dann lassen Sie ihn / sie wissen in diesem Forum;
Falls Sie reagieren möchten, so verwenden Sie bitte das Antworten- Formular;
Da ihre Frage für alle Besucher sichtbar ist, sollten Sie lieber keine persönliche Daten erwähnen.
Neu registrieren
Registrieren auf E - Mails für Eva Calor Sofia wenn:
neue Frage gestellt werden
neue Handbücher vorhanden sind
Sie erhalten eine E-Mail, um sich für eine oder beide Optionen anzumelden.
Das Handbuch wird per E-Mail gesendet. Überprüfen Sie ihre E-Mail.
Wenn Sie innerhalb von 15 Minuten keine E-Mail mit dem Handbuch erhalten haben, kann es sein, dass Sie eine falsche E-Mail-Adresse eingegeben haben oder dass Ihr ISP eine maximale Größe eingestellt hat, um E-Mails zu erhalten, die kleiner als die Größe des Handbuchs sind.
Ihre Frage wurde zu diesem Forum hinzugefügt
Möchten Sie eine E-Mail erhalten, wenn neue Antworten und Fragen veröffentlicht werden? Geben Sie bitte Ihre Email-Adresse ein.