Check regularly that neither cord nor plug is •
damaged. Do not use if they are damaged or if the
appliance has been dropped or damaged in any
other way.
If the appliance, cord or plug have been damaged, •
have the appliance inspected and if necessary
repaired by an authorised repairer. Never try to
repair the appliance yourself. Please contact the
store where you bought the appliance for repairs
under the guarantee. Unauthorised repairs or
modications to the appliance will invalidate the
guarantee.
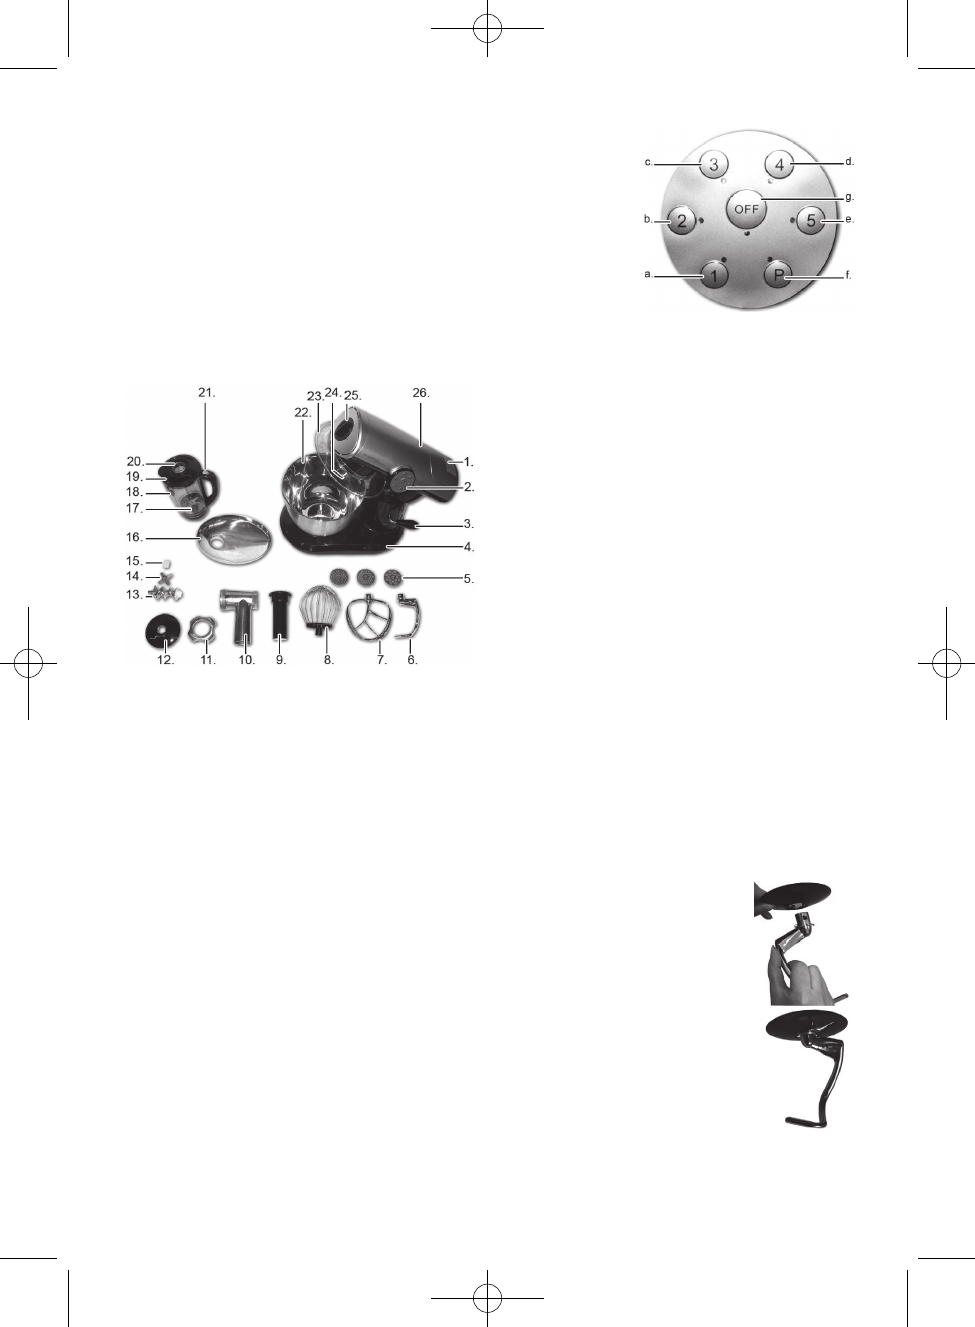
KEY TO THE MAIN COMPONENTS OF THE
APPLIANCE
Cover for blender opening1.
Control panel2.
Arm release handle3.
Motor section4.
Meat screens (3 pcs.)5.
Dough hook6.
Dough whisk7.
Balloon whisk8.
Tamper9.
Meat grinder body10.
Meat grinder body ring nut11.
Splash guard12.
Scroll13.
Knife14.
Silicone coupling for scroll15.
Tray16.
Blade17.
Blender jug18.
Blender jug lid19.
Cap20.
Release button for lid21.
Mixing bowl22.
Lid23.
Motor spindle (not visible on picture)24.
Accessories socket25.
Arm26.
Control panel
Speed 1 buttona.
Speed 2 buttonb.
Speed 3 buttonc.
Speed 4 buttond.
Speed 5 buttone.
P button f.
(pulse function)
OFF button g.
(switch off/pause)
PRIOR TO FIRST USE
Remove all packaging and transport materials from •
the inside and outside of the appliance.
Check that the appliance has no visible damage •
and that no parts are missing.
To remove any excess metal from the production •
process, we recommend you t the scroll (13), knife
(14) and meat screen (5) in the meat grinder body
(10) (see below) and allow the appliance to run for
approximately 2 minutes with each meat screen
without food. Then clean the accessories before
use.
Clean all parts that come into contact with food •
before using the appliance for the rst time (or
after prolonged storage). See “Cleaning”.
USING YOUR KITCHEN APPLIANCE
Assembly
Place the motor section (4) on a at surface, e.g. 1.
a kitchen counter, and make sure it is standing
rmly.
Check that the protective cover is tted in the 2.
accessory socket (25) and that the cover for
the blender opening (1) has been tted over the
blender opening.
Tilt down the arm release handle (3). The arm (26) 3.
tilts upwards.
Fit the lid (23) onto the underside of the arm 4.
and turn it slightly to the left, so that it locks into
position.
Fit the mixing bowl (22) in the recess on the 5.
motor section base. Turn the mixing bowl slightly
clockwise, so it locks into position.
First mount the splash guard (12) 6.
on the dough hook (6) or the dough
whisk (7) (see the pictures). Turn the
accessory clockwise until the metal
pins lock into position.
Then t the desired accessory onto 7.
the accessory shaft (24) on the
underside of the arm.
The dough hook is used for o
heavy dough, minced meat or
other demanding kneading jobs.
The dough whisk is used to mix o
lighter types of dough.