505873
29
Zoom out
Zoom in
Vorherige Seite
1/38
Nächste Seite
TECHNICAL - 4
TTEECCHHNNIICCAALL
((ccoonnttiinnuueedd))
Connection to the Mouse Control
1. PS/2, ADB or Serial Mouse
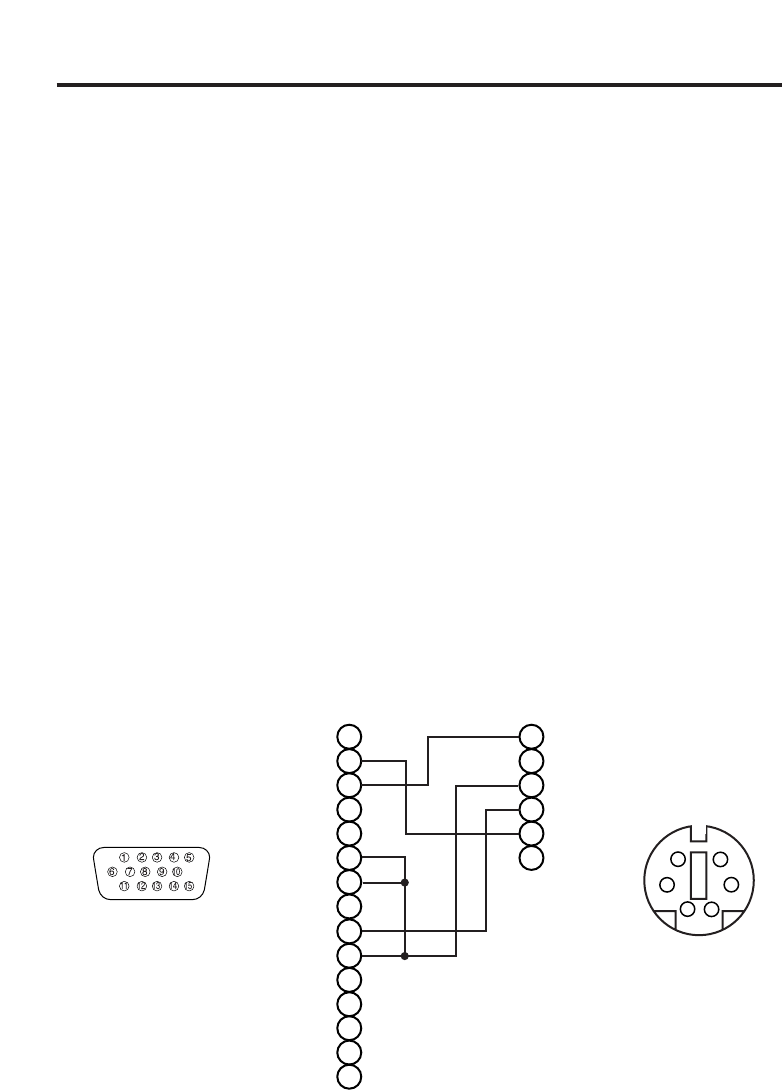
(1) Turn off the projector and computer, and connect the two units with the appropriate cable. For
PS/2 mouse control (for IBM and compatible), use the enclosed mouse cable. For others, consult
your dealer.
(2) Disconnect the USB cable from the projector if it is connected. Then turn on the projector.
(3) Turn on the computer.
(4)
Start the mouse function. If the mouse has not been started, reboot the computer (soft reboot or
reboot buttons). Refer to the descriptions of DISC PAD and MOUSE/RIGHT button of page 4.
2. USB Mouse
(1) Connect the projector and computer with a suitable commercially available USB cable. Consult
your dealer to get the cable, if you need.
(2) Start the mouse function. Refer to the descriptions of DISC PAD and MOUSE/RIGHT
button of page 4.
NOTE:
Before connecting, read the instruction manuals of the devices to be connected.
In the case of notebook type computers with an internal pointing device, the mouse control
function will not work unless the internal pointing device is disabled. In such case, disable the
internal pointing device and change the BIOS setting to select an external mouse before the
operations described in (1) to (5) above.
Also, some computers may not have a utility program to operate a mouse.
Refer to the computer hardware manual for detail.
PS/2 Mouse
2
1
4
3
6
5
2
1
4
3
6
5
8
7
10
9
12
11
14
13
15
CLK
DATA
SEL0
RTS
GND
+5V
DATA
GND
+5V
CLK
2
1
4
3
6
5
Mouse jack
Mini DIN 6-pin
Projector
Computer
CONTROL Terminal
D-sub 15-pin shrink jack
29

Brauchen Sie Hilfe? Stellen Sie Ihre Frage.

Forenregeln

Missbrauch melden von Frage und/oder Antwort

Libble nimmt den Missbrauch seiner Dienste sehr ernst. Wir setzen uns dafür ein, derartige Missbrauchsfälle gemäß den Gesetzen Ihres Heimatlandes zu behandeln. Wenn Sie eine Meldung übermitteln, überprüfen wir Ihre Informationen und ergreifen entsprechende Maßnahmen. Wir melden uns nur dann wieder bei Ihnen, wenn wir weitere Einzelheiten wissen müssen oder weitere Informationen für Sie haben.

Art des Missbrauchs:

Zum Beispiel antisemitische Inhalte, rassistische Inhalte oder Material, das zu einer Gewalttat führen könnte.

Beispielsweise eine Kreditkartennummer, persönliche Identifikationsnummer oder unveröffentlichte Privatadresse. Beachten Sie, dass E-Mail-Adressen und der vollständige Name nicht als private Informationen angesehen werden.

Forenregeln

Um zu sinnvolle Fragen zu kommen halten Sie sich bitte an folgende Spielregeln:

Neu registrieren

Registrieren auf E - Mails für Hitachi CPX325W wenn:


Sie erhalten eine E-Mail, um sich für eine oder beide Optionen anzumelden.


Andere Handbücher von Hitachi CPX325W

Hitachi CPX325W Bedienungsanleitung - Deutsch - 26 seiten

Hitachi CPX325W Bedienungsanleitung - Englisch - 38 seiten

Hitachi CPX325W Bedienungsanleitung - Französisch - 26 seiten


Das Handbuch wird per E-Mail gesendet. Überprüfen Sie ihre E-Mail.

Wenn Sie innerhalb von 15 Minuten keine E-Mail mit dem Handbuch erhalten haben, kann es sein, dass Sie eine falsche E-Mail-Adresse eingegeben haben oder dass Ihr ISP eine maximale Größe eingestellt hat, um E-Mails zu erhalten, die kleiner als die Größe des Handbuchs sind.

Ihre Frage wurde zu diesem Forum hinzugefügt

Möchten Sie eine E-Mail erhalten, wenn neue Antworten und Fragen veröffentlicht werden? Geben Sie bitte Ihre Email-Adresse ein.


Info