ΕΛΛΗΝΙΚΑ 45
Εγκ
ΠΡΟΣΟΧΗ: Εάν σε κ
συσκευή,. διατηρήστε την σε όρθια θέση. Εάν είναι απολύτως
απαραίτητο, μπορείτε να τη γείρετε προς τα πίσω.
Σύνδεσηπαροχήςνερού
Η προσαρμογή της παροχής νερού για εγκ
πραγματοποιείται μόνο από ειδικευμένο τεχνικ
Οι εύκαμπτοι σωλήνες εισόδου κ
τοποθετηθούν προς τα αριστερά ή προς τα δεξιά προκειμένου
να επιτευχθεί η καλύτερη δυνατή εγκατάσταση.
βεβαιωθείτε ότι το πλυντήριο πιάτων δεν έχει κλίση και δεν
συνθλίβει τους εύκαμπτους σωλήνες.
Σύνδεσητουεύκαμπτουσωλήναεισαγωγήςνερού
• Αφήστε το νερό να τρέξει έως ότου να είναι εντελώς καθαρό.
• Βιδώστε σφιχτά τον εύκ
και ανοίξτε τη βάνα.
Αν ο εύκαμπτος σωλήνας εισόδου δεν είναι αρκετά μακρύς,
επικοινωνήστε με το ειδικ
τεχνικό.
Η πίεση του νερού πρέπει να είναι μέσα στις τιμές που
υποδεικνύονται στο
διαφορετικά το πλυντήριο πιάτων μπορεί να μη λειτουρ
σωστά.
Βεβαιωθείτε ότι ο εύκαμπτος σωλήνας δεν εί
δεν συμπιέζεται.
Προδιαγραφέςσύνδεσηςνερού
Παροχήνερού κρύο ή ζεστό (έως 60 °C)
Είσοδοςνερού 3/4”
Ισχύςνερού
Πίεση
0,05 ÷ 1 MPa (0,5 ÷ 10 bar)
7,25 – 145 psi
Εύκαμπτοςσωλήναςπαροχής:
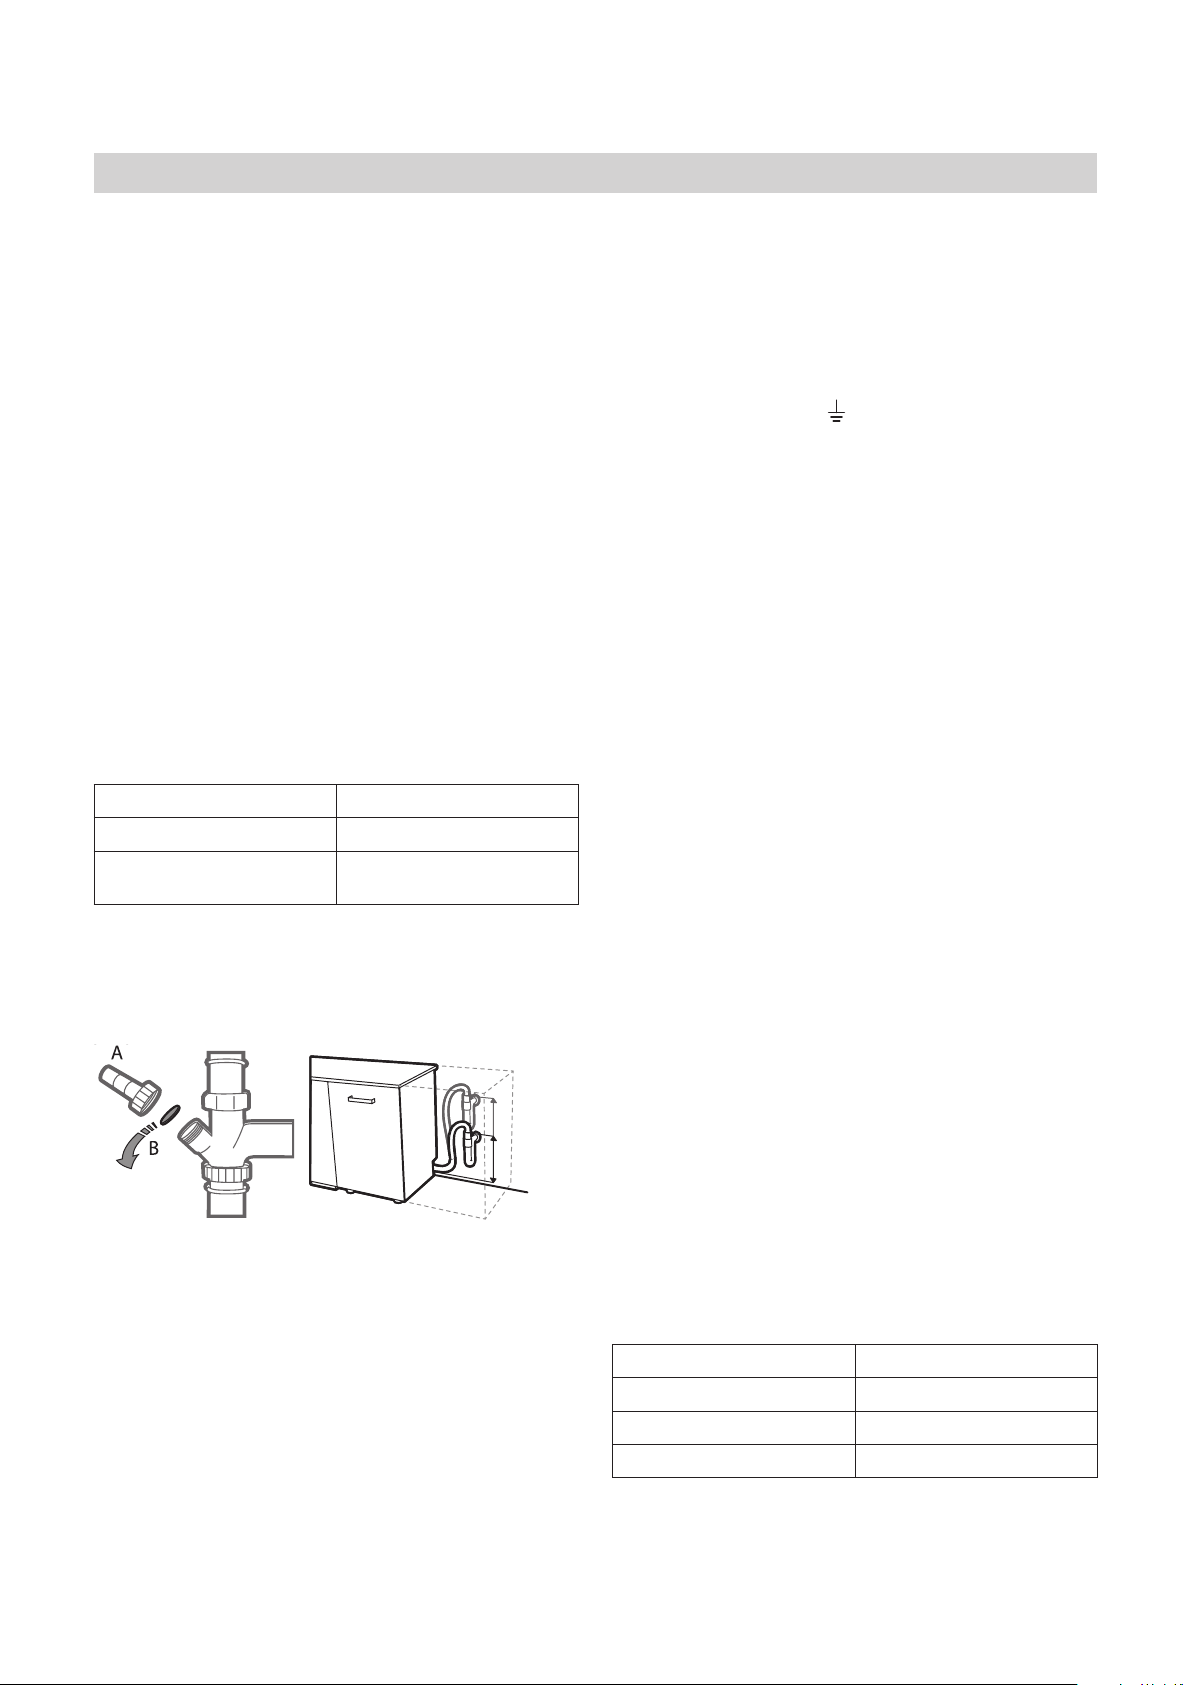
Σύνδεσητουεύκαμπτουσωλήναεξαγωγήςνερού
Συνδέστε τον εύκ
με ελάχιστη διάμετρο 2cm A.
INSTALLATION
ENGLISH
A TTENTION: If the appliance must be moved at any time, keep it
in an upright position; if absolutely necessary , it may be tilted onto
its back.
CONNECTING THE W A TER SUPPL Y
Adaptation of the water supply for installation should only be
performed by a qualified technician
The water inlet and outlet hoses may be positioned towards the
right or the left in order to achieve the best possible installation.
Make sure the dishwasher does not bend or squash the hoses.
CONNECTING THE W A TER INLET HOSE
• Run the water until it is perfectly clear .
• Screw the inlet hose tightly into position and turn on the tap.
If the inlet hose is not long enough, contact a specialist store or
an authorised technician.
The water pressure must be within the values indicated in the
T e c h n i c a l Data table - otherwise the dishwasher may be function
properly .
Make sure the hose is not bent or compressed.
SPECIFICA TIONS FOR THE CONNECTION OF THE W A TER
SUPPL Y HOSE:
CONNECTING THE W A TER OUTLET HOSE
Connect the outlet hose to a drain duct with a minimum diameter
of 2 cm A .
The outlet hose connection must be at a height ranging from
40 to 80 cm from the floor or surface where the dishwasher rests
Before connecting the water outlet hose to the sink drain, remove
the plastic plug B .
ANTI-FLOODING PROTECTION
Anti-flooding protection. T o ensure floods do not occu , the dishwasher
is provided with a special system which blocks the water supply in
the event of anomalies or leaks from inside the appliance.
Some models are also equipped with the supplementary safety
device New Aqua Stop , which guarantees anti-flooding protectio
even in the event of a supply hose rupture.
Under no circumstances should the water inlet hose be cut as it
contains live electrical parts.
ELECTRICAL CONNECTION
W ARNING: Under no circumstances should the water inlet
hose be cut as it contains live electrical parts.
Before inserting the plug into the electrical socket, make sure that:
• The socket is earth and complies with current regulations;
• The socket can withstand the maximum load of the applian-
ce as shown on the data plate located on the inside of the door
(see PRODUCT DESCRIPTION) .
• The power supply voltage falls within the values indicated on
the data plate on the inside of the door .
• The socket is compatible with the plug of the appliance.
If this is not the case, ask an authorised technician to replace the
plug (see AFTER-SALES SER VICE) . Do not use extension ca -
bles or multiple sockets. Once the appliance has been installed,
the power supply cable and the electrical socket should be easily
accessible.
The cable should not be bent or compressed.
If the power supply cable is damaged, have it replaced by the
manufacturer or its authorised T echnical Assistance Service in
order to prevent all potential hazards.
The Company shall not be held responsible for any incidents, if
these regulations are not observed.
POSITIONING AND LEVELLING
1.
2.
Position the dishwasher on a level sturdy floo . If the floor i
u n e v e n , the front feet of the appliance may be adjusted until
it reaches a horizontal position. If the appliance is levelled
correctly , it will be more stable and much less likely to move or
cause vibrations and noise while it is operating.
Before recessing the dishwasher , stick the adhesive transparent
strip under the wooden shelf in order to protect it from any con -
d e n s a t i o n which may form.
3.
4.
Place the dishwasher so that its sides or back panel are in
contact with the adjacent cabinets or the wall. This appliance
can also be recessed under a single worktop.
T o adjust the height of the rear foot, turn the red hexagonal
bushing on the lower central part at the front of the dishwasher
using a hexagonal spanner with an opening of 8 mm. T urn the
spanner in a clockwise direction to increase the height and in
an anticlockwise direction to decrease it.
DIMENSIONS AND CAP ACITY :
MIN 40 cm
MAX 80 cm
W A TER SUPPL Y cold or hot (max. 60°C)
W A TER INT AKE 3/4”
POWER OF W A TER
PRESSURE
0.05 ÷ 1 MPa (0.5 ÷ 10 bar)
7.25 – 145 psi
WIDTH 598 mm
HEIGHT 820 mm
DEPTH 555 mm
CAP ACITY 13 standard place-settings
Η σύνδεση του εύκαμπτου σωλήνα εξόδου πρέπει να βρίσκεται
σε ύψος που κυμαίνεται από 40 έως 80 cm από το πάτωμα ή
την επιφάνεια στην οποία βρίσκεται το πλυντήριο πιάτων Πριν
συνδέσετε τον εύκ
αποστράγγισης, αφαιρέστε την πλαστικό τάπα B.
Προστασίααπόυπερχείλιση
Προστασία από υπερχείλιση. Προκειμένου να αποφευχθούν
τα φαινόμενα υπερχείλισης, το πλυντήριο πιάτων παρέχεται
με ένα ειδικό σύστημα που μπλοκ
περίπτωση προβλημάτων ή διαρροών από το εσωτερικό της
συσκευής.
Ορισμένα μοντέλ
διάταξη ασφάλειας New Aqua Stop, που εξασφαλίζει την
προστασία από υπερχείλιση ακόμη κ
τρυπήσει ένας εύκαμπτος σωλήνας παροχής.
Τ
Aquastop
Σε καμία περίπτωση δεν πρέπει ο εύκ
νερού να κόβεται κ
Ηλεκτρικήσύνδεση
ΠΡΟΕΙΔΟΠΟΙΗΣΗ:Σεκ
εύκαμπτοςσωλήναςεισόδουνερούνακ
περιέχειενεργάηλεκτρικ
Πριν βάλετε το φις στην πρίζα, βεβαιωθείτε ότι:
• Η πρίζα διαθέτει γείωση κ
τρέχο
• Η πρίζα είναι κ
INSTALLATION
ENGLISH
A TTENTION: If the appliance must be moved at any time, keep it
in an upright position; if absolutely necessary , it may be tilted onto
its back.
CONNECTING THE W A TER SUPPL Y
Adaptation of the water supply for installation should only be
performed by a qualified technician
The water inlet and outlet hoses may be positioned towards the
right or the left in order to achieve the best possible installation.
Make sure the dishwasher does not bend or squash the hoses.
CONNECTING THE W A TER INLET HOSE
• Run the water until it is perfectly clear .
• Screw the inlet hose tightly into position and turn on the tap.
If the inlet hose is not long enough, contact a specialist store or
an authorised technician.
The water pressure must be within the values indicated in the
T e c h n i c a l Data table - otherwise the dishwasher may be function
properly .
Make sure the hose is not bent or compressed.
SPECIFICA TIONS FOR THE CONNECTION OF THE W A TER
SUPPL Y HOSE:
CONNECTING THE W A TER OUTLET HOSE
Connect the outlet hose to a drain duct with a minimum diameter
of 2 cm A .
The outlet hose connection must be at a height ranging from
40 to 80 cm from the floor or surface where the dishwasher rests
Before connecting the water outlet hose to the sink drain, remove
the plastic plug B .
ANTI-FLOODING PROTECTION
Anti-flooding protection. T o ensure floods do not occu , the dishwasher
is provided with a special system which blocks the water supply in
the event of anomalies or leaks from inside the appliance.
Some models are also equipped with the supplementary safety
device New Aqua Stop , which guarantees anti-flooding protectio
even in the event of a supply hose rupture.
Under no circumstances should the water inlet hose be cut as it
contains live electrical parts.
ELECTRICAL CONNECTION
W ARNING: Under no circumstances should the water inlet
hose be cut as it contains live electrical parts.
Before inserting the plug into the electrical socket, make sure that:
• The socket is earth and complies with current regulations;
• The socket can withstand the maximum load of the applian-
ce as shown on the data plate located on the inside of the door
(see PRODUCT DESCRIPTION) .
• The power supply voltage falls within the values indicated on
the data plate on the inside of the door .
• The socket is compatible with the plug of the appliance.
If this is not the case, ask an authorised technician to replace the
plug (see AFTER-SALES SER VICE) . Do not use extension ca -
bles or multiple sockets. Once the appliance has been installed,
the power supply cable and the electrical socket should be easily
accessible.
The cable should not be bent or compressed.
If the power supply cable is damaged, have it replaced by the
manufacturer or its authorised T echnical Assistance Service in
order to prevent all potential hazards.
The Company shall not be held responsible for any incidents, if
these regulations are not observed.
POSITIONING AND LEVELLING
1.
2.
Position the dishwasher on a level sturdy floo . If the floor i
u n e v e n , the front feet of the appliance may be adjusted until
it reaches a horizontal position. If the appliance is levelled
correctly , it will be more stable and much less likely to move or
cause vibrations and noise while it is operating.
Before recessing the dishwasher , stick the adhesive transparent
strip under the wooden shelf in order to protect it from any con -
d e n s a t i o n which may form.
3.
4.
Place the dishwasher so that its sides or back panel are in
contact with the adjacent cabinets or the wall. This appliance
can also be recessed under a single worktop.
T o adjust the height of the rear foot, turn the red hexagonal
bushing on the lower central part at the front of the dishwasher
using a hexagonal spanner with an opening of 8 mm. T urn the
spanner in a clockwise direction to increase the height and in
an anticlockwise direction to decrease it.
DIMENSIONS AND CAP ACITY :
MIN 40 cm
MAX 80 cm
W A TER SUPPL Y cold or hot (max. 60°C)
W A TER INT AKE 3/4”
POWER OF W A TER
PRESSURE
0.05 ÷ 1 MPa (0.5 ÷ 10 bar)
7.25 – 145 psi
WIDTH 598 mm
HEIGHT 820 mm
DEPTH 555 mm
CAP ACITY 13 standard place-settings
για το μέγιστο φορτίο της
συσκευής όπως αναγράφεται στην πλακέτα δεδομένων
που βρίσκεται στο εσωτερικό της πόρτας (βλ. ΠΕΡΙΓΡ
ΠΡΟΪΟΝΤΟ
• Η τάση του παρεχόμενου ρεύματος παρουσιάζει
διακυμάνσεις που περιλαμβάνονται στις τιμές που
αναγράφονται στην πλακέτα δεδομένων στο εσωτερικ
πόρτας.
• Η πρίζα είναι συμβατή με το φις της συσκευής.
Σε αντίθετη περίπτωση, ζητήστε από έναν εξουσιοδοτημένο
τεχνικό να αντικ
ΕΞΥΠΗΡΕΤΗΣΗΣ ΠΕΛΑ
προέκτασης ή πολύπριζα. Αφού γίνει η εγκ
συσκευής, το καλώδιο παροχής ρεύματος και η ηλεκτρική πρίζ
πρέπει να είναι εύκολ
Τ
Αν το καλώδιο τροφοδοσίας είναι κατεστραμμένο, ζητήστε
την αντικατάστασή του από το
εξουσιοδοτημένο Κέντρο τεχνικής Υποστήριξης προκειμένου
να αποφύγετε τους πιθανούς κινδύνους.
Η Εταιρεία δεν μπορεί να θεωρηθεί υπεύθυνη για τυχό
ατυχήματα, όταν δεν τηρούνται αυτοί οι κανο
Τ
1. Τ
επίπεδο πάτωμα. Αν το πάτωμα δεν είναι επίπεδο, μπορεί
να ρυθμίσετε το μπροστινό ποδαράκι της συσκευής έως
ότου φτάσει σε οριζό
σωστά, θα είναι πιο σταθερή και υπάρχει μικρότερη
δυνατότητα να μετακινηθεί ή να προκαλέσει κραδασμούς
και θόρυβο κ
2. Πριν τοποθετήστε το πλυντήριο πιάτων στην εσοχή,
κολλήστε την αυτοκ
το ξύλινο ράφι ώστε να το προστατέψετε από τυχό
συμπύκνωμα που μπορεί να σχηματιστεί.
3. Τ
ή το πίσω καπάκι να είναι σε επαφή με τα κ
ή τον τοίχ
ενιαίο πάγκο.
4. Για να ρυθμίσετε το πίσω ποδαράκι, περιστρέψτε
τον κ
πλευρά της εμπρόσθιας πλευρά του πλυντηρίου πιάτων
χρησιμοποιώντας ένα εξαγωνικό κλειδί των 8 mm.
περιστρέψτε το κλειδί δεξιόστροφα για να αυξήσετε το ύψος
και αριστερόστροφα για να το μειώσετε.
Διαστάσειςκαιχωρητικ
Πλάτος 598 mm
Υψος 820 mm
Βάθος 555 mm
Χωρητικότητα 13 τυπικές ρυθμίσεις θέσης