749835
51
Zoom out
Zoom in
Vorherige Seite
1/64
Nächste Seite
NEDERLANDS 51
Zorg ervoor dat de dop strak is aangedraaid, zodat geen
vaatwasmiddel in de container kan komen tijdens het wasprogramma
(dit kan de waterontharder onherstelbaar beschadigen).
Zodra deze procedure voltooid is voert u een programma zonder
lading uit. Het “Voor-was"-programma alleen is NIET VOLDOENDE.
Achtergebleven zoutoplossing of zoutkorrels kunnen leiden tot
corrosie waardoor de roestvrijstalen onderdelen onherstelbaar
beschadigd worden.
Er wordt geen enkele garantie verleend in geval van klachten die
hierop betrekking hebben.
Gebruik alleen zout dat speciaal voor afwasmachines is
bestemd. Als het zoutreservoir niet gevuld wordt, kunnen de
waterverzachter en het verwarmingselement beschadigd raken
als gevolg van de accumulatie van ketelsteen. Het gebruik van
zout wordt aanbevolen met elk type vaatwasmiddel.
Wanneer u zout moet toevoegen, is u verplicht om de procedure
helemaal uit te voeren alvorens de wascyclus te starten om
corrosie te voorkomen.
De waterhardheidsgraad instellen
Als u de waterontharder perfect wilt laten werken is het essentieel
dat de instelling van de waterhardheid is gebaseerd op de
werkelijke waterhardheid in uw huis. Deze informatie kan bij uw
lokale waterleverancier worden opgevraagd. De fabriek stelt de
standaardwaarde in voor de waterhardheid.
Het apparaat inschakelen door op de toets AAN/UIT te drukken.
Het apparaat uitschakelen door op de toets AAN/UIT te drukken.
Houd de toets
ENGLISH
8


 


󵈐󶐉󱀇󵰂󶌉󱶡
 




 



  
  
  
  
  




󱀔󶔇󵘊󵌊󵔏󶏏




󳼏󵰚󱀖󶌆󱀔󵄍󶏁󶐉󵄕󱀉󵄔󱀃󵔆󵷁󶌑󵔄󵤇󵤄󵄍󵰚󱀅󵔔󵤈󵸆󵏁󵘐󶇁󵐊󶌉󶜂󶌉󵔓
󳤇󱀕󵠆󱀔󵄍󶏁󶈆󶌆󶈗󵼊󶇁󵤔󱀏󵼕󱀇󵤍󵰆󵏍󱀕󵠆󱀘󵄕󵔓󱀔󵼇󶐆󵸆󶇁󵄏󵏁󶐉󵓁









Rinse aid makes dish DRYING easier. The rinse aid dispenser
should be lled when the 
in the control panel is lit.
1. Open the dispenser by pressing and pulling up the tab on
the lid.
2. Carefully introduce the rinse aid as far as the maximum
(110 ml) reference notch of the lling space - avoid spilling it.
If this happens, clean the spill immediately with a dry cloth.
3. Press the lid down until you hear a click to close it.

A
B

If you are not completely satised with the drying results, you can
adjust the quantity of rinse aid used.
Switch the dishwasher on using the ON/OFF button.
Switch it off using the ON/OFF button.
Press button three times - a beep will be heard.
Switch it on using the ON/OFF button.
The current selection level number and rinse aid indicator light ash.
Press button to select the level of rinse aid quantity to be
supplied.
Switch it off using the ON/OFF button.
Setting is complete!
If the rinse aid level is set to ZERO (ECO), no rinse aid will be
supplied. The LOW RINSE AID indicator light will not be lit if you
run out of rinse aid. A maximum of 5 levels can be set according to
the dishwasher model. The factory setting is specic to the model,
please follow instruction above to check this for your machine.
If you see bluish streaks on the dishes, set a low number (1-2).
If there are drops of water or limescale marks on the dishes,
set a high number (3-4).

󳼏󵰚󱀖󶌆󱀅󵔕󵔓󵜆󵸕󱀘󵠊󵌉󱀉󵄔󱀃󵔆󵷁󶌑󵔄󵤇󵤄󵄍󵰚󱀅󵔔󵤈󵸆󵏁󵘐󶇁

To achieve the best washing and drying results, the combined
useof detergent, rinse aid liquid and rened salt is required.
We recommend using detergents that do not contain phosphates
or chlorine, as these products are harmful to the environment.
Good washing results also depend on the correct amount of
detergent being used.
Exceeding the stated amount does not result in a more effective
wash and increases environmental pollution.
The amount can be adjusted to the soil level. In the case of
normally soiled items, use approximately either 35g (powder
detergent) or 35ml (liquid detergent) and additional tea spoon of
detergent directly inside the tub. If tablets are used, one tablet
will be enough.
If the crockery is only lightly soiled or if it has been rinsed with
water before being placed in the dishwasher, reduce the amount
of detergent used accordingly (minimum 25 g/ml) e.g. skip the
powder/gel putted inside the tub.







1.
2.
When measuring out the detergent refer to the mentioned ear-
lier information to add the proper quantity. Inside the dispenser
there are indications to help the detergent dosing.
Remove detergent residues from the edges of the dispenser
and close the cover until it clicks.
3. Close the lid of the detergent dispenser by pulling it up until
the closing device is secured in place.





gedurende 5 seconden ingedrukt, tot u een biep
hoort.
Het apparaat inschakelen door op de toets AAN/UIT te drukken.
Het huidige niveaunummer van de selectie en het controlelampje
van het zout knipperen allebei
Druk op de toets
ENGLISH
8


 


󵈐󶐉󱀇󵰂󶌉󱶡
 




 



  
  
  
  
  




󱀔󶔇󵘊󵌊󵔏󶏏




󳼏󵰚󱀖󶌆󱀔󵄍󶏁󶐉󵄕󱀉󵄔󱀃󵔆󵷁󶌑󵔄󵤇󵤄󵄍󵰚󱀅󵔔󵤈󵸆󵏁󵘐󶇁󵐊󶌉󶜂󶌉󵔓
󳤇󱀕󵠆󱀔󵄍󶏁󶈆󶌆󶈗󵼊󶇁󵤔󱀏󵼕󱀇󵤍󵰆󵏍󱀕󵠆󱀘󵄕󵔓󱀔󵼇󶐆󵸆󶇁󵄏󵏁󶐉󵓁









Rinse aid makes dish DRYING easier. The rinse aid dispenser
should be lled when the 
in the control panel is lit.
1. Open the dispenser by pressing and pulling up the tab on
the lid.
2. Carefully introduce the rinse aid as far as the maximum
(110 ml) reference notch of the lling space - avoid spilling it.
If this happens, clean the spill immediately with a dry cloth.
3. Press the lid down until you hear a click to close it.

A
B

If you are not completely satised with the drying results, you can
adjust the quantity of rinse aid used.
Switch the dishwasher on using the ON/OFF button.
Switch it off using the ON/OFF button.
Press button three times - a beep will be heard.
Switch it on using the ON/OFF button.
The current selection level number and rinse aid indicator light ash.
Press button to select the level of rinse aid quantity to be
supplied.
Switch it off using the ON/OFF button.
Setting is complete!
If the rinse aid level is set to ZERO (ECO), no rinse aid will be
supplied. The LOW RINSE AID indicator light will not be lit if you
run out of rinse aid. A maximum of 5 levels can be set according to
the dishwasher model. The factory setting is specic to the model,
please follow instruction above to check this for your machine.
If you see bluish streaks on the dishes, set a low number (1-2).
If there are drops of water or limescale marks on the dishes,
set a high number (3-4).

󳼏󵰚󱀖󶌆󱀅󵔕󵔓󵜆󵸕󱀘󵠊󵌉󱀉󵄔󱀃󵔆󵷁󶌑󵔄󵤇󵤄󵄍󵰚󱀅󵔔󵤈󵸆󵏁󵘐󶇁

To achieve the best washing and drying results, the combined
useof detergent, rinse aid liquid and rened salt is required.
We recommend using detergents that do not contain phosphates
or chlorine, as these products are harmful to the environment.
Good washing results also depend on the correct amount of
detergent being used.
Exceeding the stated amount does not result in a more effective
wash and increases environmental pollution.
The amount can be adjusted to the soil level. In the case of
normally soiled items, use approximately either 35g (powder
detergent) or 35ml (liquid detergent) and additional tea spoon of
detergent directly inside the tub. If tablets are used, one tablet
will be enough.
If the crockery is only lightly soiled or if it has been rinsed with
water before being placed in the dishwasher, reduce the amount
of detergent used accordingly (minimum 25 g/ml) e.g. skip the
powder/gel putted inside the tub.







1.
2.
When measuring out the detergent refer to the mentioned ear-
lier information to add the proper quantity. Inside the dispenser
there are indications to help the detergent dosing.
Remove detergent residues from the edges of the dispenser
and close the cover until it clicks.
3. Close the lid of the detergent dispenser by pulling it up until
the closing device is secured in place.





om het gewenste hardheidsniveau te selecteren
(zie TABEL WATERHARDHEID).
Het apparaat uitschakelen door op de toets AAN/UIT te drukken.
Instellen is voltooid!
Tabel waterhardheid
Niveau °dH
Duitse
graden
°fH
Franse
graden
°Clark
Engelse
graden
1Zacht 0 - 6 0 - 10 0 - 7
2 Gemiddeld 7 - 11 11 - 20 8 - 14
3 Gemiddeld 12 - 16 21 - 29 15 - 20
4 Hard 17 - 34 30 - 60 21 - 42
5Zeer hard 35 - 50 61 - 90 43 - 62
Het glansspoelmiddelreservoir bijvullen
Glansspoelmiddel maakt het DROGEN van de vaat gemakkelijker.
Het glansspoelmiddelreservoir A moet worden gevuld wanneer
het controlelampje GLANSSPOELMIDDEL BIJVULLEN
ENGLISH
7
Control panel
Product description
 
 󳘐󵰅󵄃󵰆󱀇󵰂󶀔
 
 
 
 
 
 
 
 
 
 
1
2
3
4
5
6
10
7
11
9
8
First use
ADVICE REGARDING THE FIRST TIME USE


FILLING THE SALT RESERVOIR




         
 (see PRODUCT DESCRIPTION)   
 SALT REFILL indicator light 

 


 

 




 


 
 
 
 
 
 
 
 
 
 
 
1 2 3 4 5 6 7 8 9 10 11
3sec
h
op het
bedieningspaneel brandt.
A
B
BA
1. De dispenser
B
openen door het lipje op het deksel in te drukken
en omhoog te trekken.
2. Het glansspoelmiddel zorgvuldig inbrengen tot aan de maximum
(110 ml) insteekgleuf van de vulruimte - voorkom morsen. Wanneer
dit gebeurt het gemorste glansspoelmiddel onmiddellijk met een
droge doek reinigen.
3. Om het te sluiten het deksel naar beneden drukken totdat u een klik
hoort.
Het glansspoelmiddel NOOIT rechtstreeks in de kuip gieten.
De dosering glansspoelmiddel aanpassen
Als u niet volledig tevreden bent over de droogresultaten kunt u de
gebruikte hoeveelheid glansspoelmiddel aanpassen.
De afwasmachine inschakelen met de toets AAN/UIT.
Uitschakelen met de toets AAN/UIT.
Druk driemaal op de toets
ENGLISH
8


 


󵈐󶐉󱀇󵰂󶌉󱶡
 




 



  
  
  
  
  




󱀔󶔇󵘊󵌊󵔏󶏏




󳼏󵰚󱀖󶌆󱀔󵄍󶏁󶐉󵄕󱀉󵄔󱀃󵔆󵷁󶌑󵔄󵤇󵤄󵄍󵰚󱀅󵔔󵤈󵸆󵏁󵘐󶇁󵐊󶌉󶜂󶌉󵔓
󳤇󱀕󵠆󱀔󵄍󶏁󶈆󶌆󶈗󵼊󶇁󵤔󱀏󵼕󱀇󵤍󵰆󵏍󱀕󵠆󱀘󵄕󵔓󱀔󵼇󶐆󵸆󶇁󵄏󵏁󶐉󵓁









Rinse aid makes dish DRYING easier. The rinse aid dispenser
should be lled when the 
in the control panel is lit.
1. Open the dispenser by pressing and pulling up the tab on
the lid.
2. Carefully introduce the rinse aid as far as the maximum
(110 ml) reference notch of the lling space - avoid spilling it.
If this happens, clean the spill immediately with a dry cloth.
3. Press the lid down until you hear a click to close it.

A
B

If you are not completely satised with the drying results, you can
adjust the quantity of rinse aid used.
Switch the dishwasher on using the ON/OFF button.
Switch it off using the ON/OFF button.
Press button three times - a beep will be heard.
Switch it on using the ON/OFF button.
The current selection level number and rinse aid indicator light ash.
Press button to select the level of rinse aid quantity to be
supplied.
Switch it off using the ON/OFF button.
Setting is complete!
If the rinse aid level is set to ZERO (ECO), no rinse aid will be
supplied. The LOW RINSE AID indicator light will not be lit if you
run out of rinse aid. A maximum of 5 levels can be set according to
the dishwasher model. The factory setting is specic to the model,
please follow instruction above to check this for your machine.
If you see bluish streaks on the dishes, set a low number (1-2).
If there are drops of water or limescale marks on the dishes,
set a high number (3-4).

󳼏󵰚󱀖󶌆󱀅󵔕󵔓󵜆󵸕󱀘󵠊󵌉󱀉󵄔󱀃󵔆󵷁󶌑󵔄󵤇󵤄󵄍󵰚󱀅󵔔󵤈󵸆󵏁󵘐󶇁

To achieve the best washing and drying results, the combined
useof detergent, rinse aid liquid and rened salt is required.
We recommend using detergents that do not contain phosphates
or chlorine, as these products are harmful to the environment.
Good washing results also depend on the correct amount of
detergent being used.
Exceeding the stated amount does not result in a more effective
wash and increases environmental pollution.
The amount can be adjusted to the soil level. In the case of
normally soiled items, use approximately either 35g (powder
detergent) or 35ml (liquid detergent) and additional tea spoon of
detergent directly inside the tub. If tablets are used, one tablet
will be enough.
If the crockery is only lightly soiled or if it has been rinsed with
water before being placed in the dishwasher, reduce the amount
of detergent used accordingly (minimum 25 g/ml) e.g. skip the
powder/gel putted inside the tub.







1.
2.
When measuring out the detergent refer to the mentioned ear-
lier information to add the proper quantity. Inside the dispenser
there are indications to help the detergent dosing.
Remove detergent residues from the edges of the dispenser
and close the cover until it clicks.
3. Close the lid of the detergent dispenser by pulling it up until
the closing device is secured in place.





- u zal een biep horen.
Inschakelen met de toets AAN/UIT.
Het huidige niveaunummer van de selectie en het controlelampje
van het glansspoelmiddel knipperen.
De toets
ENGLISH
8


 


󵈐󶐉󱀇󵰂󶌉󱶡
 




 



  
  
  
  
  




󱀔󶔇󵘊󵌊󵔏󶏏




󳼏󵰚󱀖󶌆󱀔󵄍󶏁󶐉󵄕󱀉󵄔󱀃󵔆󵷁󶌑󵔄󵤇󵤄󵄍󵰚󱀅󵔔󵤈󵸆󵏁󵘐󶇁󵐊󶌉󶜂󶌉󵔓
󳤇󱀕󵠆󱀔󵄍󶏁󶈆󶌆󶈗󵼊󶇁󵤔󱀏󵼕󱀇󵤍󵰆󵏍󱀕󵠆󱀘󵄕󵔓󱀔󵼇󶐆󵸆󶇁󵄏󵏁󶐉󵓁









Rinse aid makes dish DRYING easier. The rinse aid dispenser
should be lled when the 
in the control panel is lit.
1. Open the dispenser by pressing and pulling up the tab on
the lid.
2. Carefully introduce the rinse aid as far as the maximum
(110 ml) reference notch of the lling space - avoid spilling it.
If this happens, clean the spill immediately with a dry cloth.
3. Press the lid down until you hear a click to close it.

A
B

If you are not completely satised with the drying results, you can
adjust the quantity of rinse aid used.
Switch the dishwasher on using the ON/OFF button.
Switch it off using the ON/OFF button.
Press button three times - a beep will be heard.
Switch it on using the ON/OFF button.
The current selection level number and rinse aid indicator light ash.
Press button to select the level of rinse aid quantity to be
supplied.
Switch it off using the ON/OFF button.
Setting is complete!
If the rinse aid level is set to ZERO (ECO), no rinse aid will be
supplied. The LOW RINSE AID indicator light will not be lit if you
run out of rinse aid. A maximum of 5 levels can be set according to
the dishwasher model. The factory setting is specic to the model,
please follow instruction above to check this for your machine.
If you see bluish streaks on the dishes, set a low number (1-2).
If there are drops of water or limescale marks on the dishes,
set a high number (3-4).

󳼏󵰚󱀖󶌆󱀅󵔕󵔓󵜆󵸕󱀘󵠊󵌉󱀉󵄔󱀃󵔆󵷁󶌑󵔄󵤇󵤄󵄍󵰚󱀅󵔔󵤈󵸆󵏁󵘐󶇁

To achieve the best washing and drying results, the combined
useof detergent, rinse aid liquid and rened salt is required.
We recommend using detergents that do not contain phosphates
or chlorine, as these products are harmful to the environment.
Good washing results also depend on the correct amount of
detergent being used.
Exceeding the stated amount does not result in a more effective
wash and increases environmental pollution.
The amount can be adjusted to the soil level. In the case of
normally soiled items, use approximately either 35g (powder
detergent) or 35ml (liquid detergent) and additional tea spoon of
detergent directly inside the tub. If tablets are used, one tablet
will be enough.
If the crockery is only lightly soiled or if it has been rinsed with
water before being placed in the dishwasher, reduce the amount
of detergent used accordingly (minimum 25 g/ml) e.g. skip the
powder/gel putted inside the tub.







1.
2.
When measuring out the detergent refer to the mentioned ear-
lier information to add the proper quantity. Inside the dispenser
there are indications to help the detergent dosing.
Remove detergent residues from the edges of the dispenser
and close the cover until it clicks.
3. Close the lid of the detergent dispenser by pulling it up until
the closing device is secured in place.





indrukken om het niveau van het te leveren
glansspoelmiddel te selecteren.
Uitschakelen met de toets AAN/UIT.
Instellen is voltooid!
Als het niveau van het glansspoelmiddel is ingesteld op NUL (ECO) zal
geen glansspoelmiddel worden afgegeven. Het controlelampje LAAG
GLANSSPOELMIDDEL zal niet branden als het glansspoelmiddel op is.
Er kan een maximum van 5 niveaus worden ingesteld, afhankelijk van
het model afwasmachine. De fabrieksinstelling is speciek voor het
model. Volg de bovenstaande instructies om te controleren of dat ook
voor uw machine geldt.
Als u blauwe strepen op het vaatwerk ziet stel dan een laag getal in
(1-2).
Als er druppels water of kalkaanslag op het vaatwerk zijn stel dan
een hoog getal in (3-4).
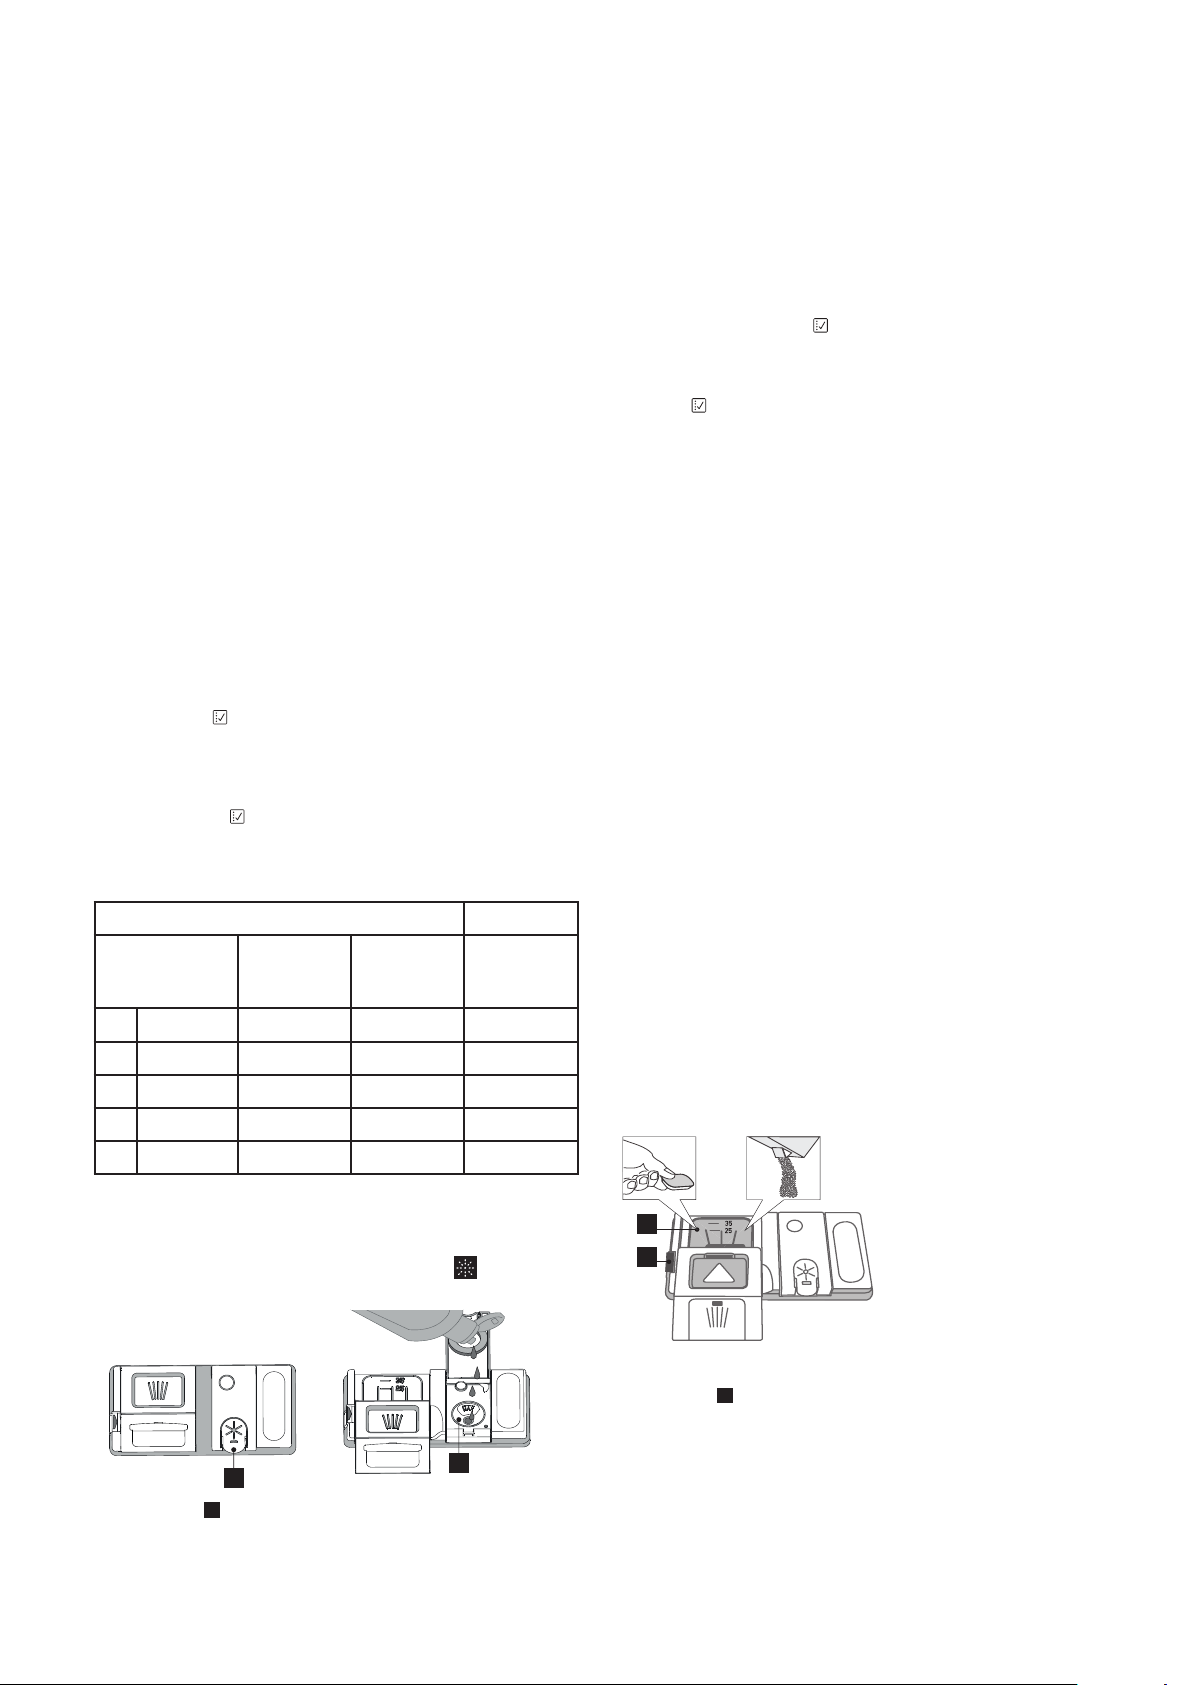
Het vaatwasmiddeldoseerbakje vullen
Gebruik van wasmiddel dat niet is ontworpen voor vaatwassers kan
storingen of schade aan het apparaat veroorzaken.
Voor de beste was- en droogresultaten wordt het gecombineerde
gebruik van vaatwasmiddel, vloeibaar glansspoelmiddel en zout
vereist. Het is raadzaam om vaatwasmiddelen zonder fosfaten of
chloor te gebruiken, aangezien deze producten schadelijk voor het
milieu zijn. Goede wasresultaten zijn ook afhankelijk van de juiste
hoeveelheid vaatwasmiddel.
Het overschrijden van de aangegeven hoeveelheid leidt niet tot
een meer eectieve afwas en doet de milieuvervuiling toenemen.
De hoeveelheid kan aan de mate van vuilheid worden aangepast.
Gebruik bij normaal bevuilde stukken ongeveer 35 g (vaatwasmiddel
in poedervorm) of 35 ml (vloeibaar vaatwasmiddel) en een extra
theelepel vaatwasmiddel direct in de kuip. Als er tabletten worden
gebruikt is één tablet voldoende.
Als het serviesgoed slechts licht bevuild is of als het voordat het in
de afwasmachine wordt geplaatst met water is afgespoeld kan de
hoeveelheid vaatwasmiddel dienovereenkomstig worden verminderd
(minimaal 25 g/ml) door bijv. poeder/gel in de kuip over te slaan.
Druk om de
vaatwasmiddeldoseerbakje
te openen op toets C.
Voer het vaatwasmiddel
alleen in het droge
doseerbakje D in.
Plaats de hoeveelheid
vaatwasmiddel voor
voorspoelen direct in de
kuip.
1. Raadpleeg bij het afmeten van het vaatwasmiddel de eerder
vermelde informatie om de juiste hoeveelheid toe te voegen. In het
doseerbakje
D
zijn er indicaties die helpen het vaatwasmiddel te
doseren.
2. Verwijder de resten vaatwasmiddel van de randen van het
doseerbakje en sluit het deksel totdat het klikt.
3. Sluit het deksel van het vaatwasmiddeldoseerbakje door het
omhoog te trekken tot het sluitingsmechanisme is vastgezet.
Het vaatwasmiddeldoseerbakje opent automatisch op het juiste
moment, volgens het programma. Bij gebruik van alles-in-één
vaatwasmiddelen is het raadzaam om de toets TABLET te gebruiken,
omdat het programma dan zodanig wordt aangepast dat de beste
was- en droogresultaten worden bereikt.
ENGLISH
8


 


󵈐󶐉󱀇󵰂󶌉󱶡
 




 



  
  
  
  
  




󱀔󶔇󵘊󵌊󵔏󶏏




󳼏󵰚󱀖󶌆󱀔󵄍󶏁󶐉󵄕󱀉󵄔󱀃󵔆󵷁󶌑󵔄󵤇󵤄󵄍󵰚󱀅󵔔󵤈󵸆󵏁󵘐󶇁󵐊󶌉󶜂󶌉󵔓
󳤇󱀕󵠆󱀔󵄍󶏁󶈆󶌆󶈗󵼊󶇁󵤔󱀏󵼕󱀇󵤍󵰆󵏍󱀕󵠆󱀘󵄕󵔓󱀔󵼇󶐆󵸆󶇁󵄏󵏁󶐉󵓁









Rinse aid makes dish DRYING easier. The rinse aid dispenser
should be lled when the 
in the control panel is lit.
1. Open the dispenser by pressing and pulling up the tab on
the lid.
2. Carefully introduce the rinse aid as far as the maximum
(110 ml) reference notch of the lling space - avoid spilling it.
If this happens, clean the spill immediately with a dry cloth.
3. Press the lid down until you hear a click to close it.

A
B

If you are not completely satised with the drying results, you can
adjust the quantity of rinse aid used.
Switch the dishwasher on using the ON/OFF button.
Switch it off using the ON/OFF button.
Press button three times - a beep will be heard.
Switch it on using the ON/OFF button.
The current selection level number and rinse aid indicator light ash.
Press button to select the level of rinse aid quantity to be
supplied.
Switch it off using the ON/OFF button.
Setting is complete!
If the rinse aid level is set to ZERO (ECO), no rinse aid will be
supplied. The LOW RINSE AID indicator light will not be lit if you
run out of rinse aid. A maximum of 5 levels can be set according to
the dishwasher model. The factory setting is specic to the model,
please follow instruction above to check this for your machine.
If you see bluish streaks on the dishes, set a low number (1-2).
If there are drops of water or limescale marks on the dishes,
set a high number (3-4).

󳼏󵰚󱀖󶌆󱀅󵔕󵔓󵜆󵸕󱀘󵠊󵌉󱀉󵄔󱀃󵔆󵷁󶌑󵔄󵤇󵤄󵄍󵰚󱀅󵔔󵤈󵸆󵏁󵘐󶇁

To achieve the best washing and drying results, the combined
useof detergent, rinse aid liquid and rened salt is required.
We recommend using detergents that do not contain phosphates
or chlorine, as these products are harmful to the environment.
Good washing results also depend on the correct amount of
detergent being used.
Exceeding the stated amount does not result in a more effective
wash and increases environmental pollution.
The amount can be adjusted to the soil level. In the case of
normally soiled items, use approximately either 35g (powder
detergent) or 35ml (liquid detergent) and additional tea spoon of
detergent directly inside the tub. If tablets are used, one tablet
will be enough.
If the crockery is only lightly soiled or if it has been rinsed with
water before being placed in the dishwasher, reduce the amount
of detergent used accordingly (minimum 25 g/ml) e.g. skip the
powder/gel putted inside the tub.







1.
2.
When measuring out the detergent refer to the mentioned ear-
lier information to add the proper quantity. Inside the dispenser
there are indications to help the detergent dosing.
Remove detergent residues from the edges of the dispenser
and close the cover until it clicks.
3. Close the lid of the detergent dispenser by pulling it up until
the closing device is secured in place.





D
C
51

Brauchen Sie Hilfe? Stellen Sie Ihre Frage.

Forenregeln
1

Forum

ikea-rengora-404.755.72

Suche zurücksetzen

  • Mein Geschirrspüler spült nicht. Von mindestens 5 Spülgängen spült er 1 mal. Mal erwärmt es mal nicht. Ist nicht mal 1 Jahr alt woran liegt das? Eingereicht am 29-5-2023 13:50

    Antworten Frage melden

Missbrauch melden von Frage und/oder Antwort

Libble nimmt den Missbrauch seiner Dienste sehr ernst. Wir setzen uns dafür ein, derartige Missbrauchsfälle gemäß den Gesetzen Ihres Heimatlandes zu behandeln. Wenn Sie eine Meldung übermitteln, überprüfen wir Ihre Informationen und ergreifen entsprechende Maßnahmen. Wir melden uns nur dann wieder bei Ihnen, wenn wir weitere Einzelheiten wissen müssen oder weitere Informationen für Sie haben.

Art des Missbrauchs:

Zum Beispiel antisemitische Inhalte, rassistische Inhalte oder Material, das zu einer Gewalttat führen könnte.

Beispielsweise eine Kreditkartennummer, persönliche Identifikationsnummer oder unveröffentlichte Privatadresse. Beachten Sie, dass E-Mail-Adressen und der vollständige Name nicht als private Informationen angesehen werden.

Forenregeln

Um zu sinnvolle Fragen zu kommen halten Sie sich bitte an folgende Spielregeln:

Neu registrieren

Registrieren auf E - Mails für Ikea Rengora 404.755.72 wenn:


Sie erhalten eine E-Mail, um sich für eine oder beide Optionen anzumelden.


Andere Handbücher von Ikea Rengora 404.755.72

Ikea Rengora 404.755.72 Bedienungsanleitung - Deutsch, Englisch, Französisch, Italienisch - 64 seiten

Ikea Rengora 404.755.72 Zusatzinformation - Alle Sprachen - seiten

Ikea Rengora 404.755.72 Installationsanweisung - Alle Sprachen - 16 seiten


Das Handbuch wird per E-Mail gesendet. Überprüfen Sie ihre E-Mail.

Wenn Sie innerhalb von 15 Minuten keine E-Mail mit dem Handbuch erhalten haben, kann es sein, dass Sie eine falsche E-Mail-Adresse eingegeben haben oder dass Ihr ISP eine maximale Größe eingestellt hat, um E-Mails zu erhalten, die kleiner als die Größe des Handbuchs sind.

Ihre Frage wurde zu diesem Forum hinzugefügt

Möchten Sie eine E-Mail erhalten, wenn neue Antworten und Fragen veröffentlicht werden? Geben Sie bitte Ihre Email-Adresse ein.


Info