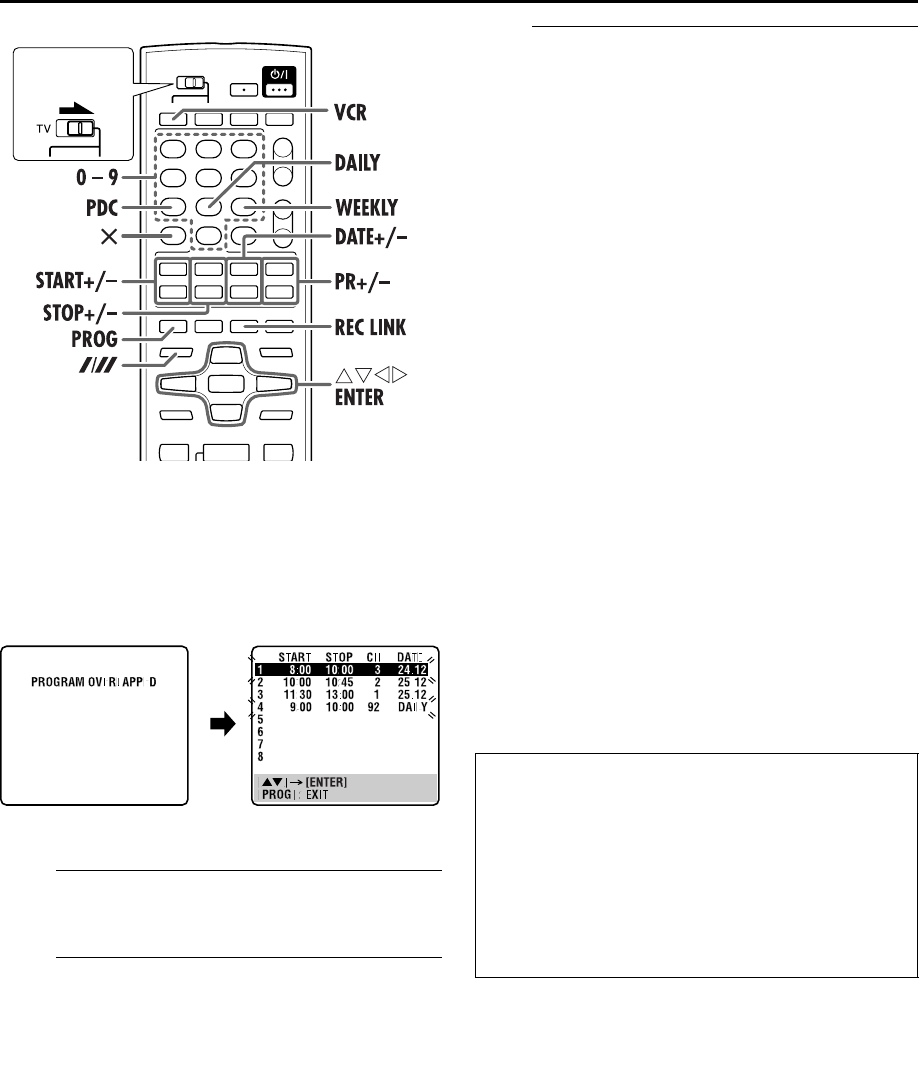
you want to make changes is shown, then press ENTER.
“PROGRAM COMPLETED” appears on the TV screen for
about 5 seconds, then the normal screen appears.
NOTE:
If the overlap is not yet solved, or another overlap occurs with
the timer programme setting after making the last correction on a
programme, the conflicting programmes will be shown on the
Programme Check screen again. Repeat the above steps again
until the overlap is solved.
Automatic Satellite
Programme Recording
This function allows you to automatically record a
satellite programme which is timer-programmed on your
external satellite receiver. Connect a satellite receiver to
the unit’s L-2 IN/DECODER connector and programme
the timer on the satellite receiver. The unit starts or stops
recording by the signals input from the satellite receiver.
After recording, the unit’s power shuts off automatically.
Slide to the
right.
ATTENTION
●Be sure not to turn on the satellite receiver before the
programme is executed; otherwise, the unit will start
recording when the satellite receiver’s power is turned on.
●If you have connected another appliance other than a
satellite receiver to the L-2 IN/DECODER connector, be
sure not to engage the Automatic Satellite Programme
Recording mode; otherwise, the unit will start recording
when the connected appliance’s power is turned on.
●Automatic Satellite Programme Recording and timer-
recording cannot be done at the same time.
XV48EK_01.book Page 28 Thursday, November 18, 2004 10:45 PM
Masterpage:Right-No-Heading
29
Filename [XV48EK_07S-VHS.fm]
Page 29November 18, 2004 10:44 pm
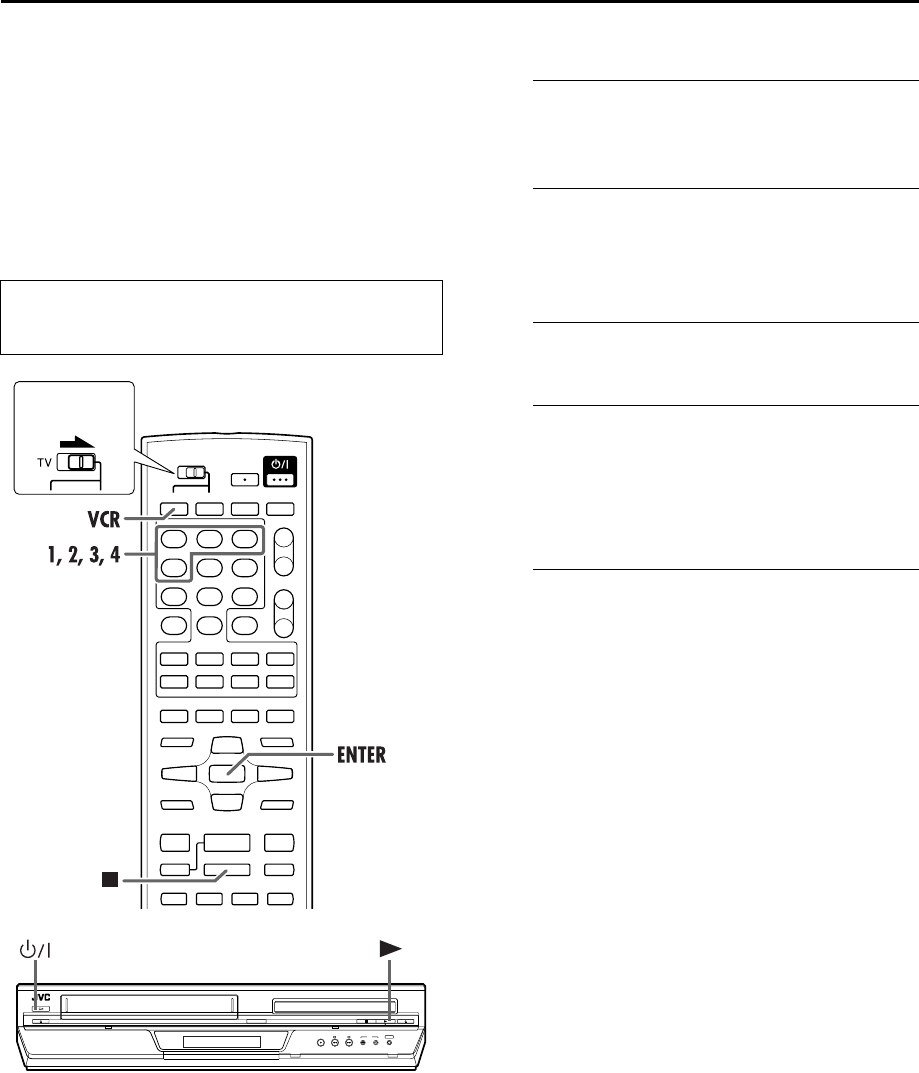
A
Select the VHS deck.
On the unit
Press VCR/DVD repeatedly so that the VCR indicator
lights up.
On the remote control
Press VCR so that the VCR indicator lights up.
B
Select the L-2 SELECT mode.
Set “L-2 SELECT” to “A/V” or “SAT.” (੬pg. 54)
●When you select “SAT,” refer to “IMPORTANT” on page 50.
C
Set the tape speed.
Press p.
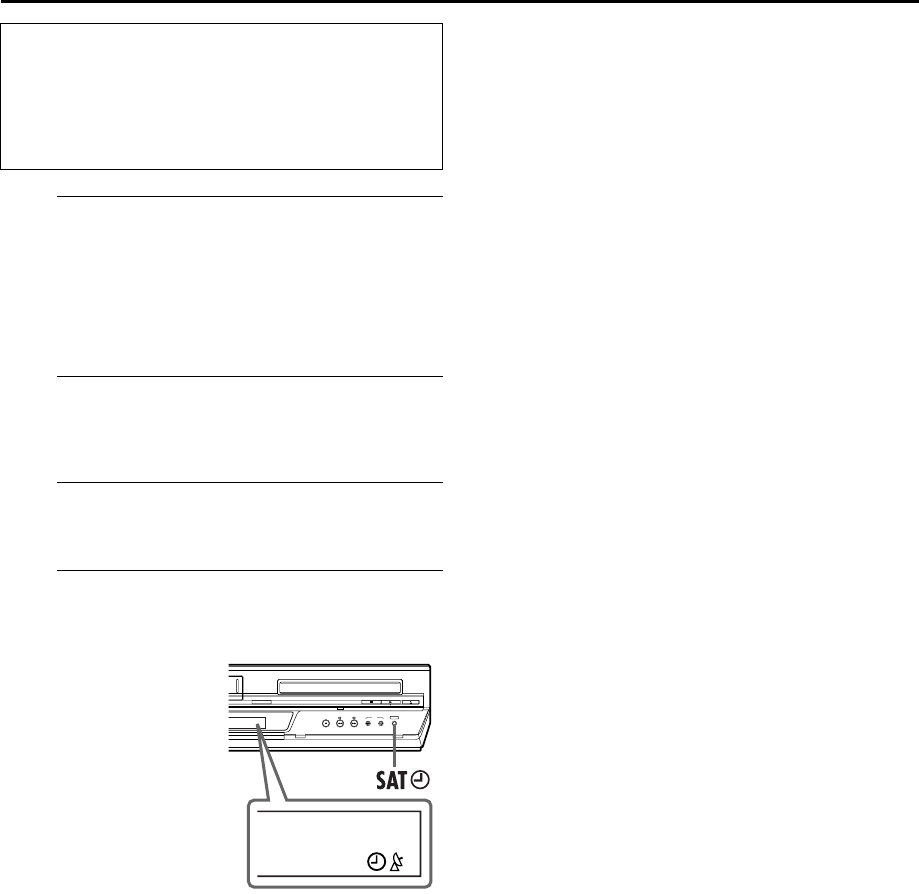
D
Engage the Automatic Satellite Programme
Recording mode.
On the unit
Press and hold SAT# for
about 2 seconds.
On the remote control
Press and hold REC LINK
for about 2 seconds.
●The “N” and “# ” indicators
light up and the unit turns
off automatically.
NOTES:
●Operations on the DVD deck are not possible when the
Automatic Satellite Programme Recording mode is engaged or
timer recording is in progress.
●To disengage the Automatic Satellite Programme Recording
mode, press REC LINK. The “N” indicator goes off.
●If the unit’s power is off, it is not possible to engage the
Automatic Satellite Programme Recording mode.
●In step D, if the “N” indicator does not light but instead blinks
quickly even though your satellite receiver’s power is off,
Automatic Satellite Programme Recording will not work
properly with that satellite receiver*. If this is the case, perform
“Express Timer Programming” (
੬pg. 26) to timer-record a
satellite programme.
*Some satellite receivers output signals even if the power is off.
Automatic Satellite Programme Recording is not possible with those
satellite receivers.
●The “N” indicator blinks while Automatic Satellite Programme
Recording is in progress.
●For timer programming of the satellite receiver, refer to the
instruction manual of the satellite receiver.
●Automatic Satellite Programme Recording is not possible if
your satellite receiver does not have a timer.
●Pressing the unit’s 1 button while Automatic Satellite
Programme Recording is in progress turns off the unit’s power
and disengages the Automatic Satellite Programme Recording
mode.
●If there are more than one satellite programmes you wish to
record with Automatic Satellite Programme Recording, it is not
possible to set different tape speeds for each programme.
●Depending on the type of satellite receiver, the unit may not
record a slight portion of the beginning of the programme or
may record slightly longer than the actual length of the
programme.
●If you engage the Automatic Satellite Programme Recording
mode when the satellite receiver’s power is on, the unit will
not start Automatic Satellite Programme Recording even
though the “N” and “#” indicators blink. When the satellite
receiver shuts off once and is turned back on again, the unit
starts recording.
●You can also record a programme from your cable system in
the same way if the system has a timer.
●The B.E.S.T. system (
੬pg.23) does not work while Automatic
Satellite Programme Recording is in progress.
●Just Clock (
੬pg.65) does not work when the Automatic
Satellite Programme Recording mode is engaged.
Before performing the following steps:
●Make sure the satellite receiver is connected to the unit’s
L-2 IN/DECODER connector. (
੬pg. 50)
●Programme the timer on the satellite receiver.
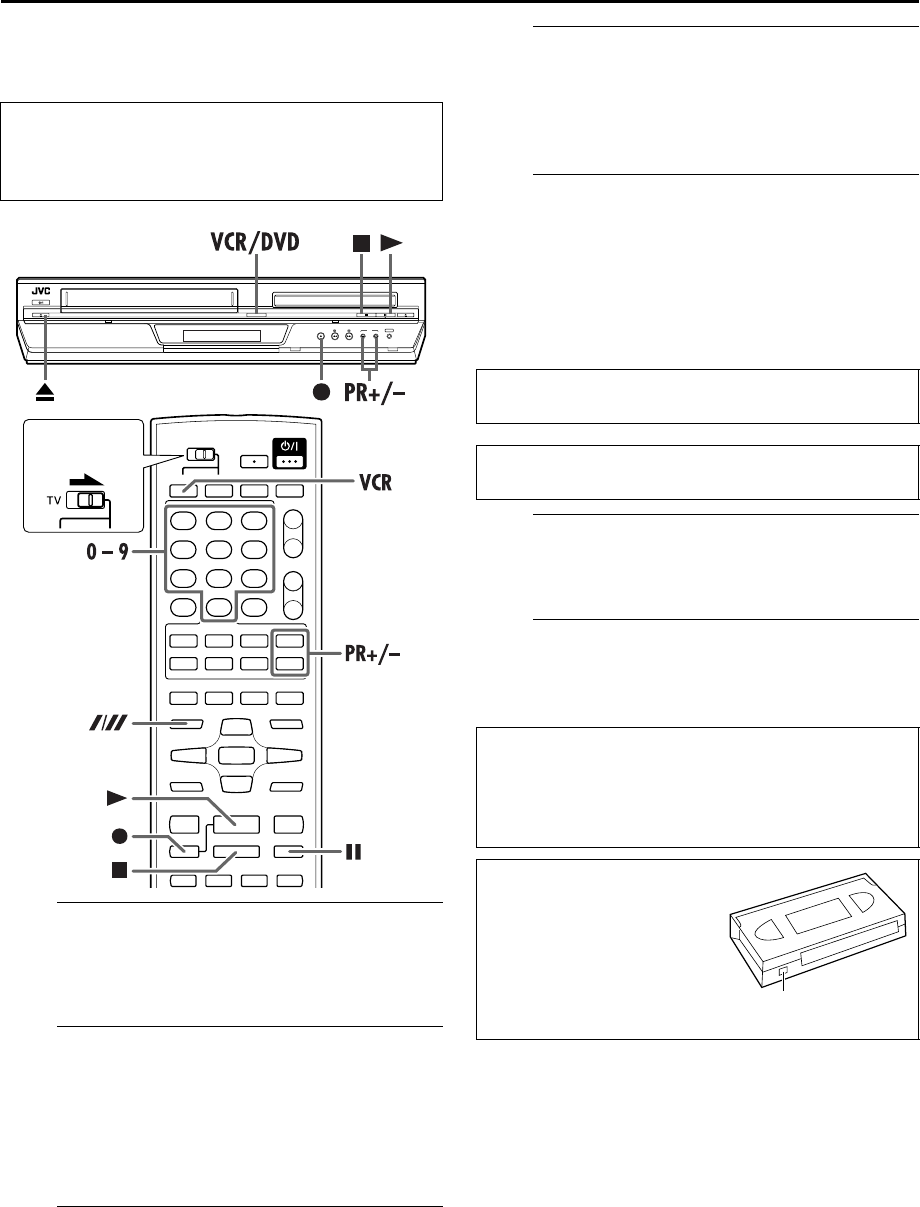
●Insert a cassette with the safety tab in place.
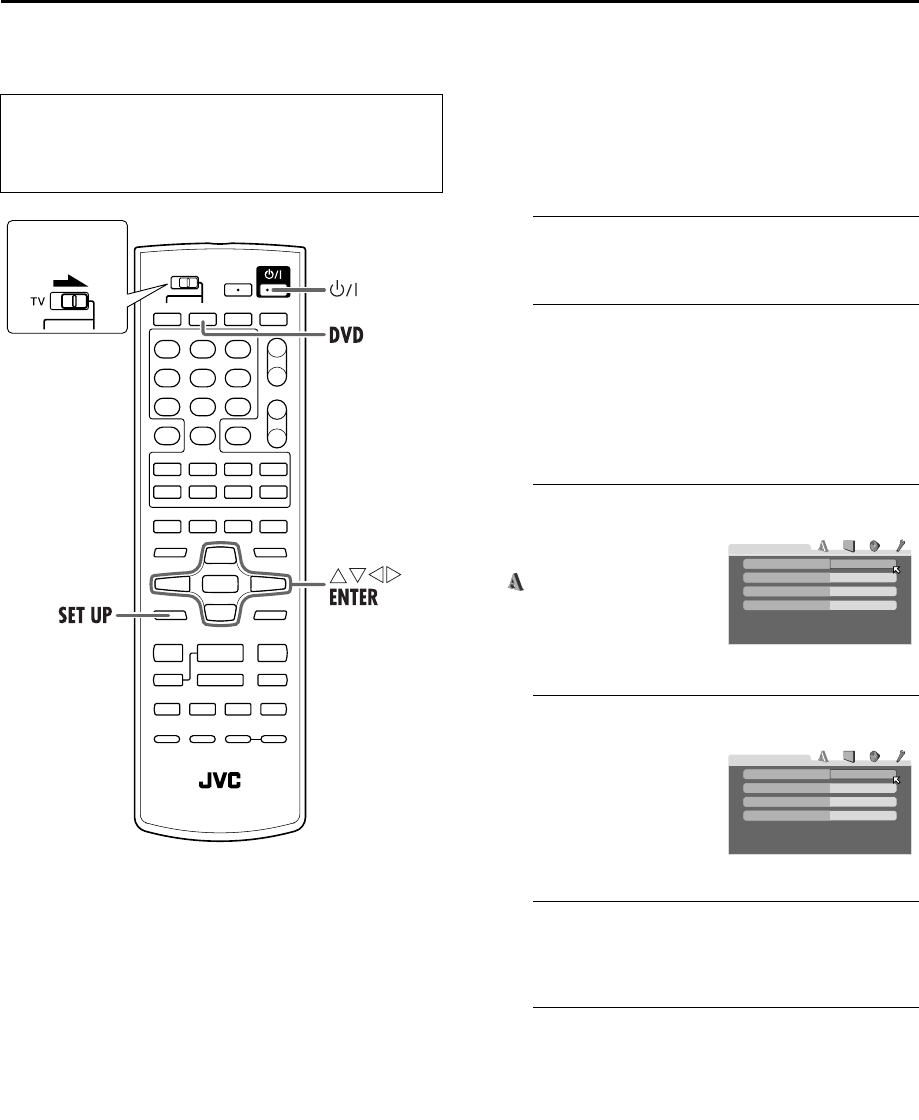
●Slide the TV/VCR/DVD switch on the remote control to the
right.
XV48EK_01.book Page 29 Thursday, November 18, 2004 10:45 PM
Filename [XV48EK_08DVD.fm]
Masterpage:Left0
30
Page 3018 November 2004 10:44 pm
OPERATIONS ON DVD DECK
Basic Playback
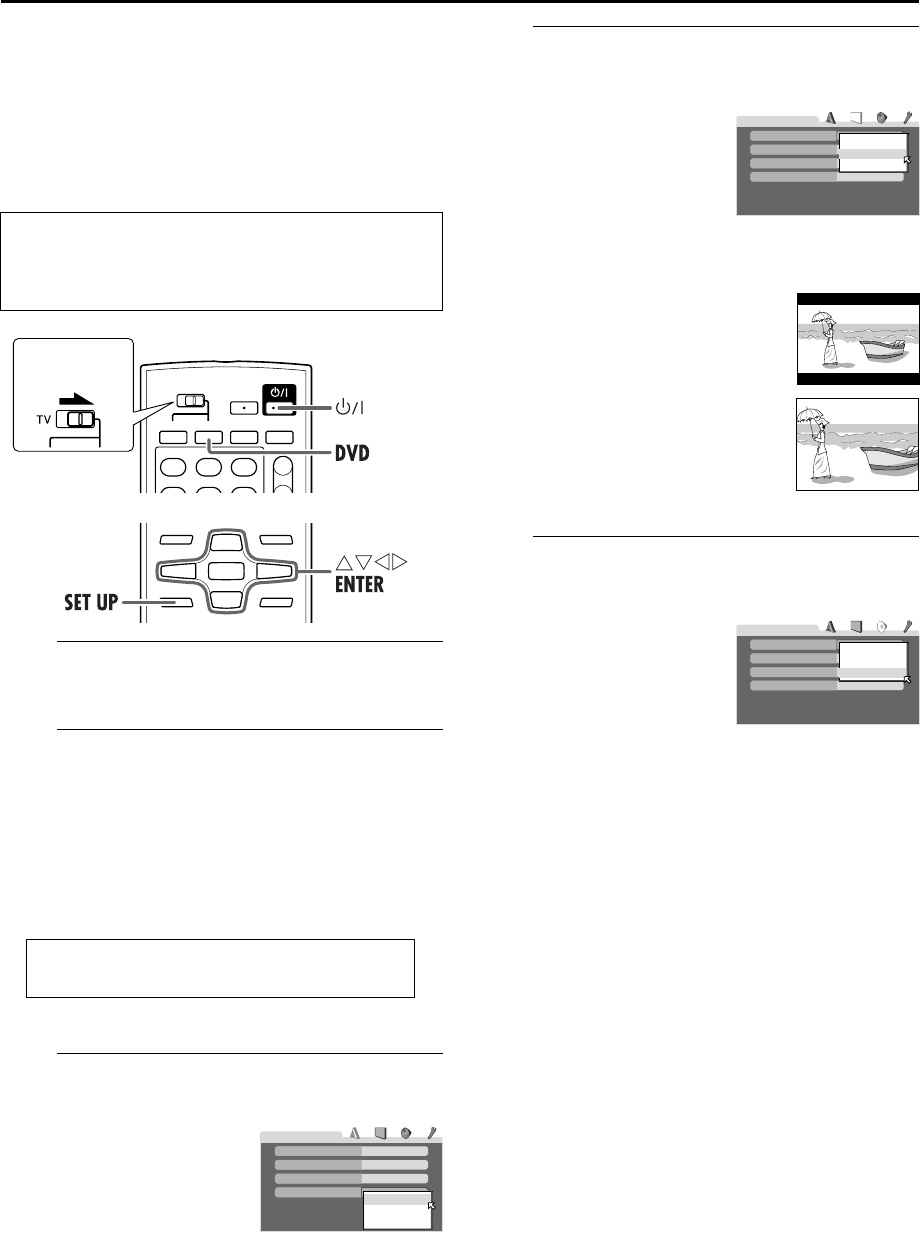
A
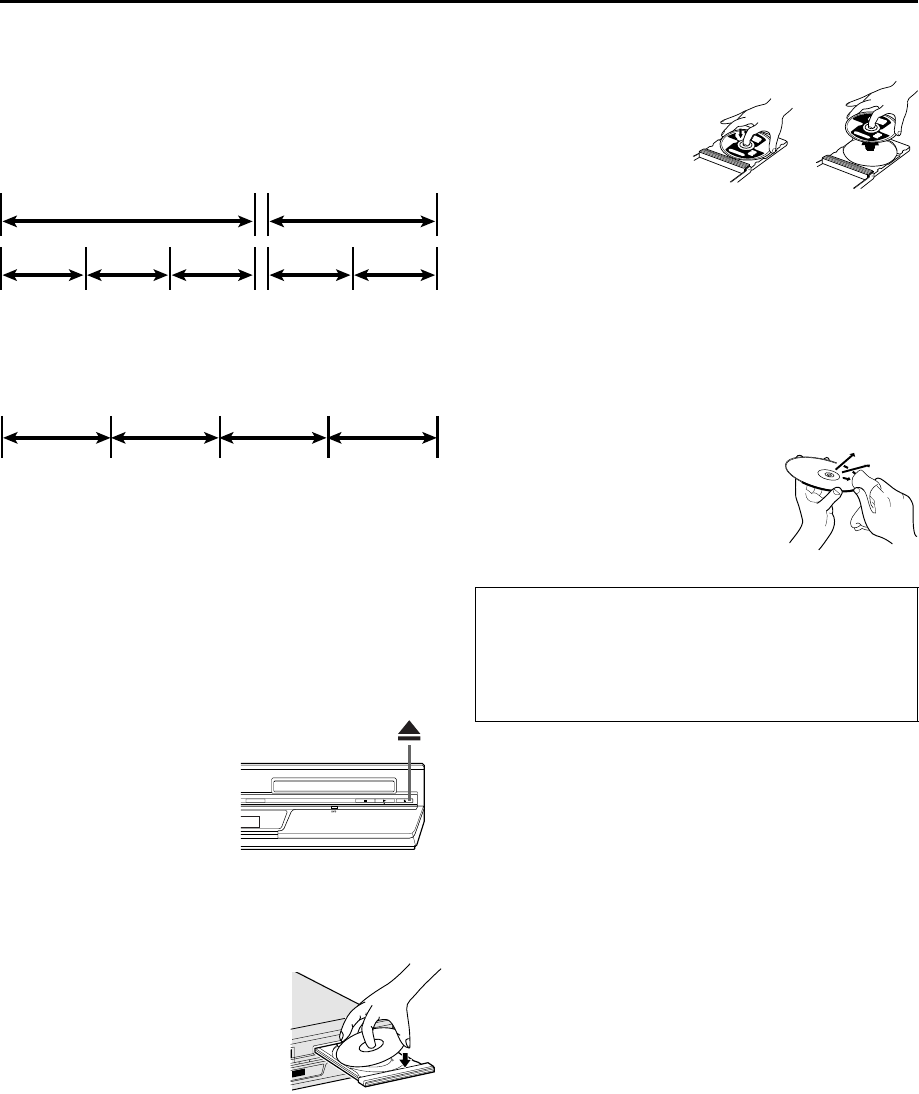
Load the disc.
●For details, refer to “Placing a Disc” (੬pg. 6).
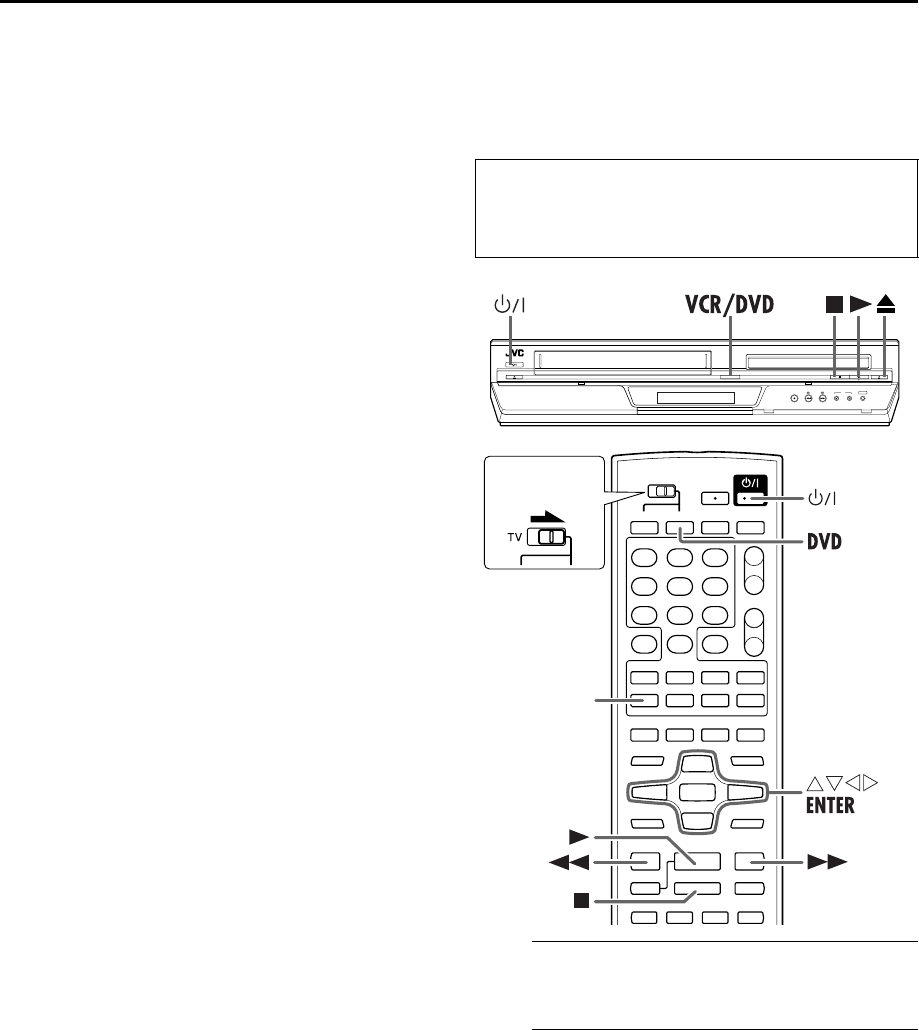
B
Select the DVD deck.
On the unit
Press VCR/DVD repeatedly so that the DVD indicator
lights up.
On the remote control
Press DVD so that the DVD indicator lights up.
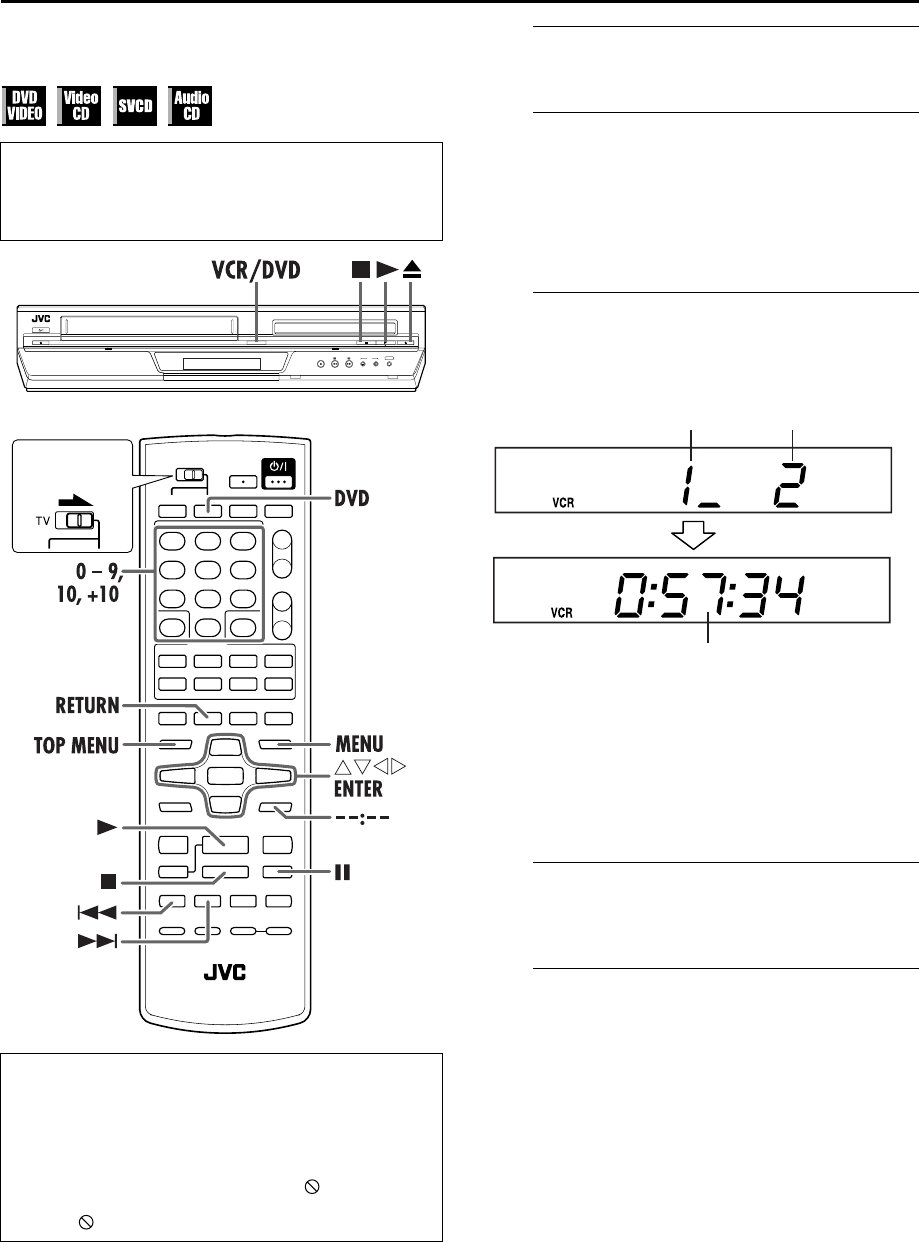
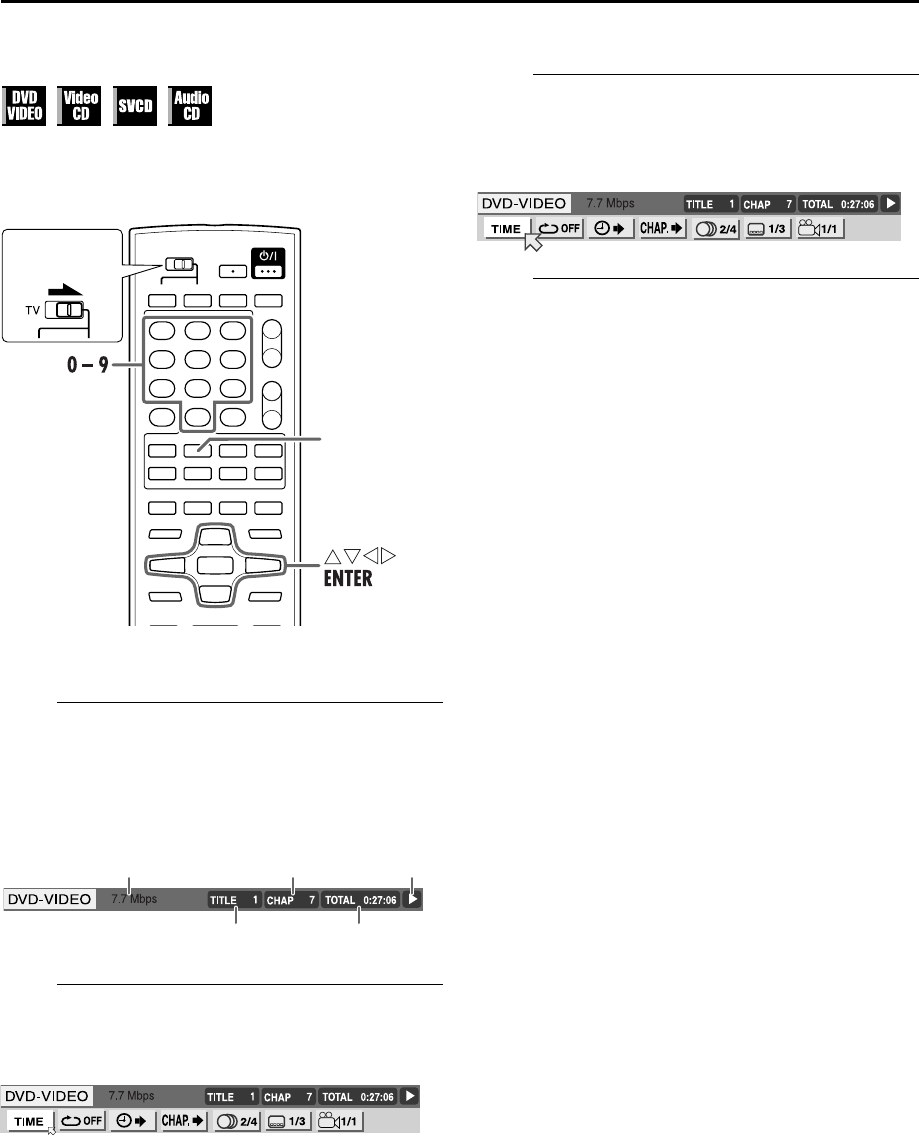
C
Start playback.
Press 4.
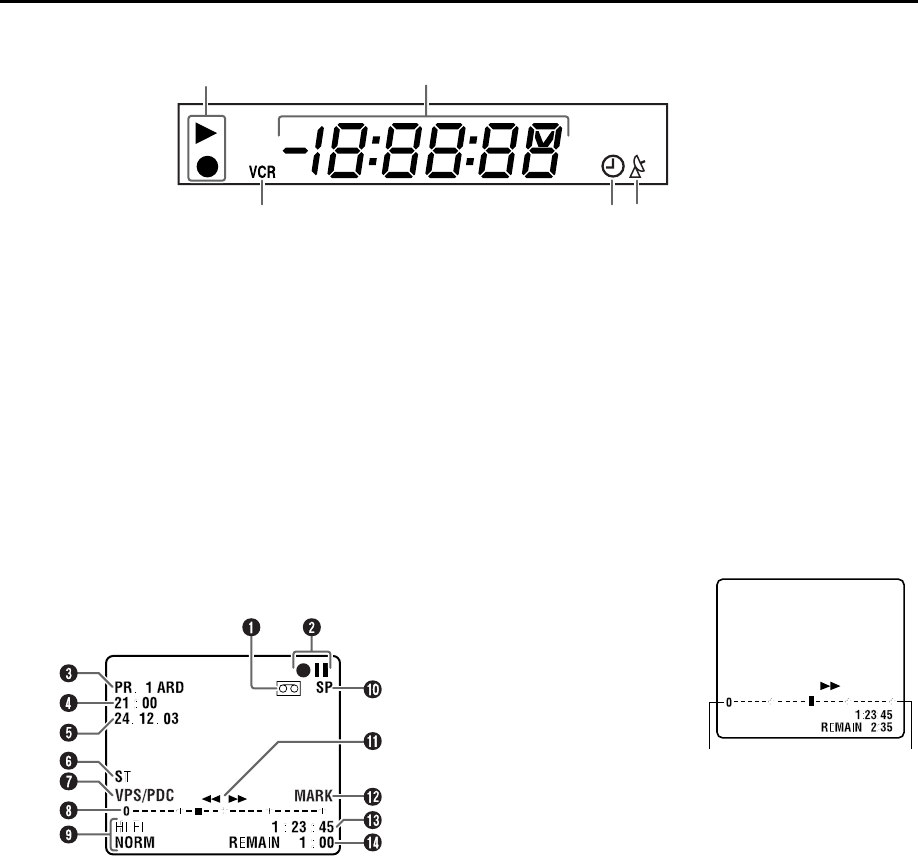
Example: DVD VIDEO
●You can switch the display on the front display panel between
the title/chapter/track number and the playback time by
pressing ––:––.
●It may take a few seconds to start playback.
●When inserting a DVD or Video CD disc, a menu display may
appear on the TV screen. To play back from the menu, refer to
“Locating a Desired Scene Using the DVD Menu” (
੬pg. 31)
or “Locating a Desired Scene Using the Menu of a Video CD/
SVCD with Playback Control (PBC) Function” (
੬pg. 31).
D
Pause playback.
Press 9.
●To resume normal playback, press 4.
E
Stop playback.
Press 8.
●When “RESUME” (੬pg.57) is “ON” or “DISC RESUME,” the
unit memorizes the position on the disc where you have
interrupted playback.
-To resume playback, press
4.
-To stop playback completely, press8again.
●Press x on the DVD deck to open the disc tray, then remove
the disc.
●Turn on the TV and select the video channel (or AV
mode).
●Slide the TV/VCR/DVD switch on the remote
control to the right.
ATTENTION
●You can not use the DVD deck when the VHS deck is in
the Automatic Satellite Programme standby and recording
mode.
●You can use the DVD deck when the VHS deck is in the
timer standby mode.
●If the unit does not accept an operation, appears on the
TV screen. (Operations are occasionally unacceptable
even if is not displayed.)
Slide to the
right.
Title number
Chapter number
Playback time
XV48EK_01.book Page 30 Thursday, November 18, 2004 10:45 PM
Masterpage:Right-No-Heading
31
Filename [XV48EK_08DVD.fm]
Page 3118 November 2004 10:44 pm
Playback Features
Locating a Desired Scene Using the
DVD Menu
DVD VIDEO discs generally have their own menus which show
the disc contents. These menus contain various items such as
titles of movies, names of songs, or artist information, and
display them on the TV screen. You can locate a desired scene
using the DVD menu.
1Access the DVD menu.
Press TOP MENU or MENU.
2Start playback.
Press rtwe to select a
desired item, then press
ENTER.
●It may be possible to select the
desired item using the number
keys depending on the disc.
Locating a Desired Scene Using the
Menu of a Video CD/SVCD with
Playback Control (PBC) Function
Some Video CD/SVCD discs support the PBC function. PBC is an
abbreviation of “PlayBack Control.” A Video CD/SVCD disc
recorded with PBC has its own menus, such as a list of the songs
on the disc. You can locate a specific scene by using the menu.
1Access the PBC menu.
In stop mode
Press 4.
●Depending on a disc, PBC
menu may automatically appear
on the TV screen by simply
loading a disc on the unit. “Pbc”
appears on the front display
panel.
During playback
Press RETURN.
2Start playback.
Press the appropriate number keys.
●The unit starts playback of the selected item.
●When “NEXT” or “PREVIOUS” appears on the TV screen:
Pressing 6 advances to the next page.
Pressing 2 returns to the previous page.
●The method of the operation is different depending on the
disc.
To cancel PBC
Start playback by using the number keys instead of 4.
To reactivate PBC
●Press TOP MENU or MENU.
●Press 8 to stop playback, then press 4
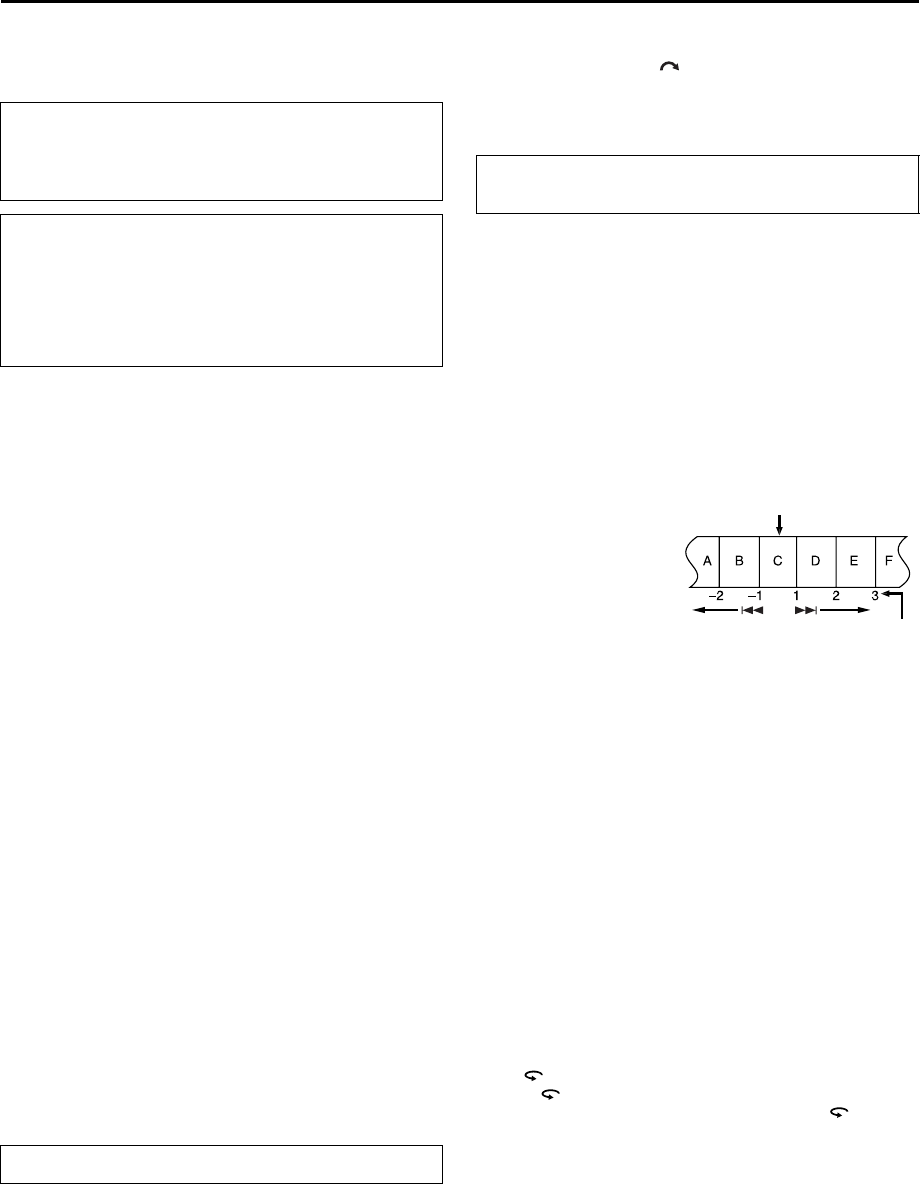
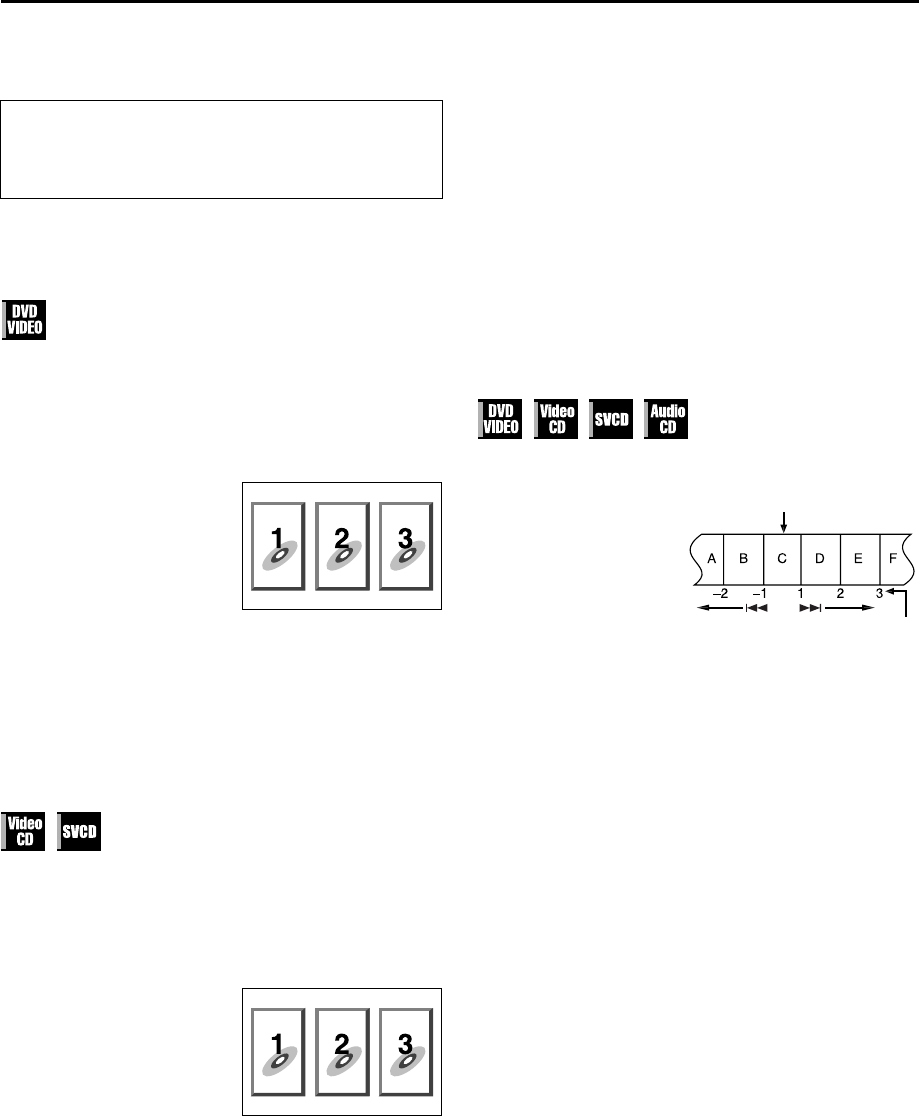
Locating the Start Point of the Item or
Skip the Item
Press 2 or 6 during playback.
Example:
To locate the beginning of
item B from the current
position, press 2 twice.
To locate the beginning of
item D from the current
position, press 6 once.
●When the specified item is
located, playback begins
automatically.
Using the number keys
For DVD VIDEO
●While stopped: title is selected.
●While playing back: chapter is selected.
For Video CD/SVCD/Audio CD
Track is selected.
Examples:
To select 5, press the number key “5.”
To select 25, press the number key “+10,”“+10,” then “5.”
To select 40, press number key “+10” three times, then “10.”
●Turn on the TV and select the video channel (or AV
mode).
●Slide the TV/VCR/DVD switch on the remote
control to the right.
Example:
Current position
The number you press the button
XV48EK_01.book Page 31 Thursday, November 18, 2004 10:45 PM
Filename [XV48EK_08DVD.fm]
Masterpage:Left+
Page 3218 November 2004 10:44 pm
OPERATIONS ON DVD DECK (cont.)
32
Variable Speed Search
During playback, press 5 for forward variable speed
search, or 3 for reverse variable speed search.
●The more times you press, the faster the playback picture
moves.
●To resume normal playback, press 4.
OR
During playback, press and hold 6 for forward
variable speed search, or press and hold 2 for reverse
variable speed search.
●While you press and hold the button, the image is played back
at 5x speed.
●To resume normal playback, release 2 or 6.
NOTE:
During varirable speed search the sound will be muted except
when playing an Audio CD disc or when playing a DVD VIDEO
disc at 1.5x speed search mode.
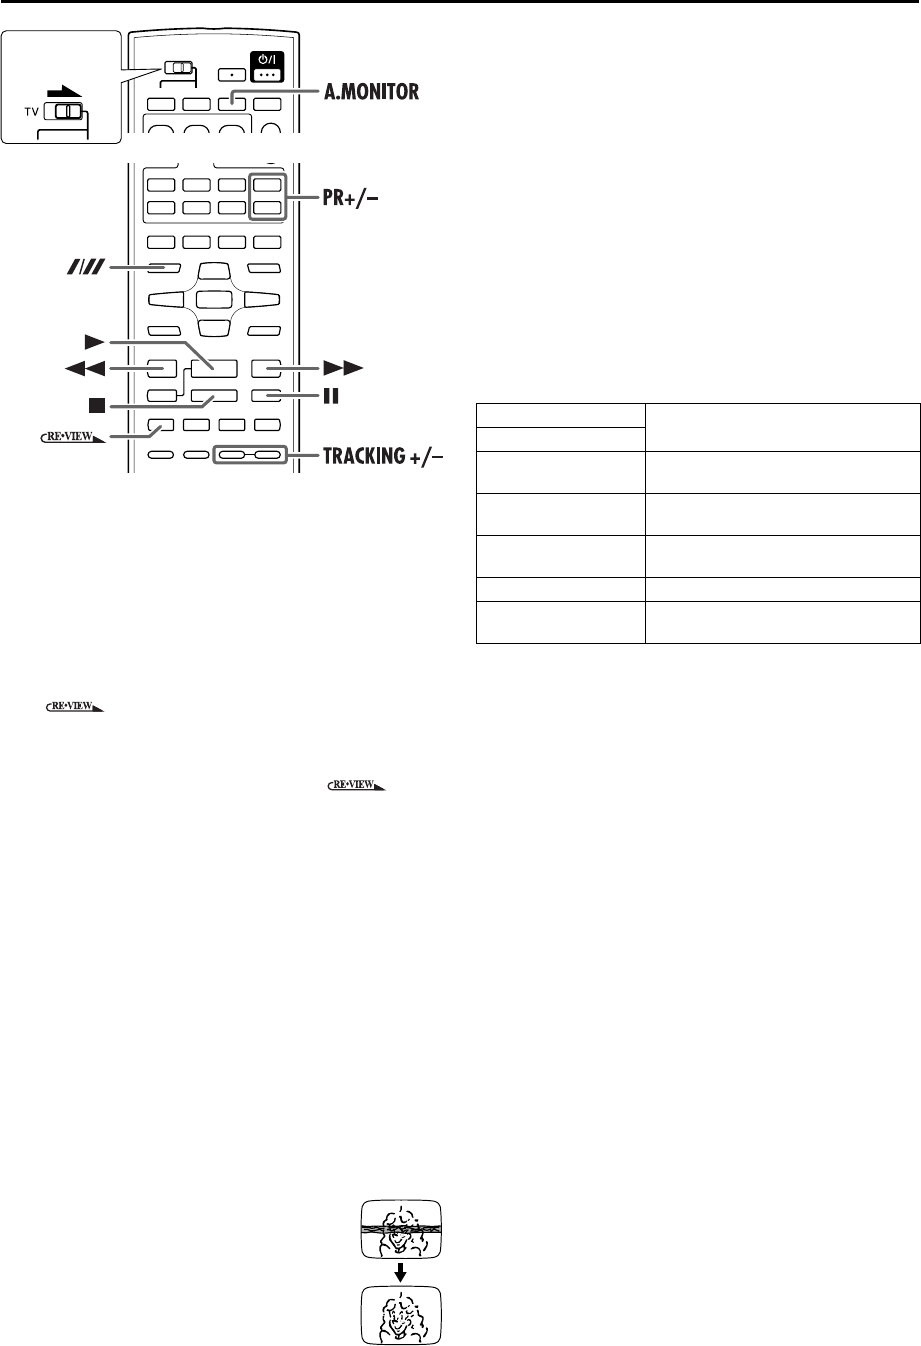
One Touch Replay
Press while playing back a DVD VIDEO disc.
The playback position moves back about 10 seconds before the
current position (only within the same title).
Still Picture/Frame-By-Frame
Playback
1Pause during playback.
Press 9.
2Activate frame-by-frame playback.
Press 9 to advance a still picture.
●To resume normal playback, press 4.
Slow Motion
During playback, press 9, then press 3 for reverse
slow motion playback, or 5 for forward slow motion
playback.
●Each press of 5 changes the playback speed as follows:
1/32]1/16]1/4]1/2
●Each press of 3 changes the playback speed as follows
(only for DVD VIDEO discs):
–1/32]–1/16]–1/4]–1/2
●To resume normal playback, press 4.
NOTES:
●Reverse slow motion playback is possible only with the DVD
VIDEO discs.
●This function may not works for some Video CD or SVCD.
Zooming
Press ZOOM during playback or while paused.
●Each press of ZOOM changes the magnification as follows:
1.5x]2x]4x
●While zoomed, the picture may look coarse or distorted.
Press rtwe to move the
zoomed-in scene.
●To resume normal playback,
press ZOOM repeatedly to select
the normal size.
REPEAT
ZOOM
ON SCREEN
Slide to the
right.
Current magnification
Zoomed-in area
XV48EK_01.book Page 32 Thursday, November 18, 2004 10:45 PM
Masterpage:Right-No-Heading
33
Filename [XV48EK_08DVD.fm]
Page 3318 November 2004 10:44 pm
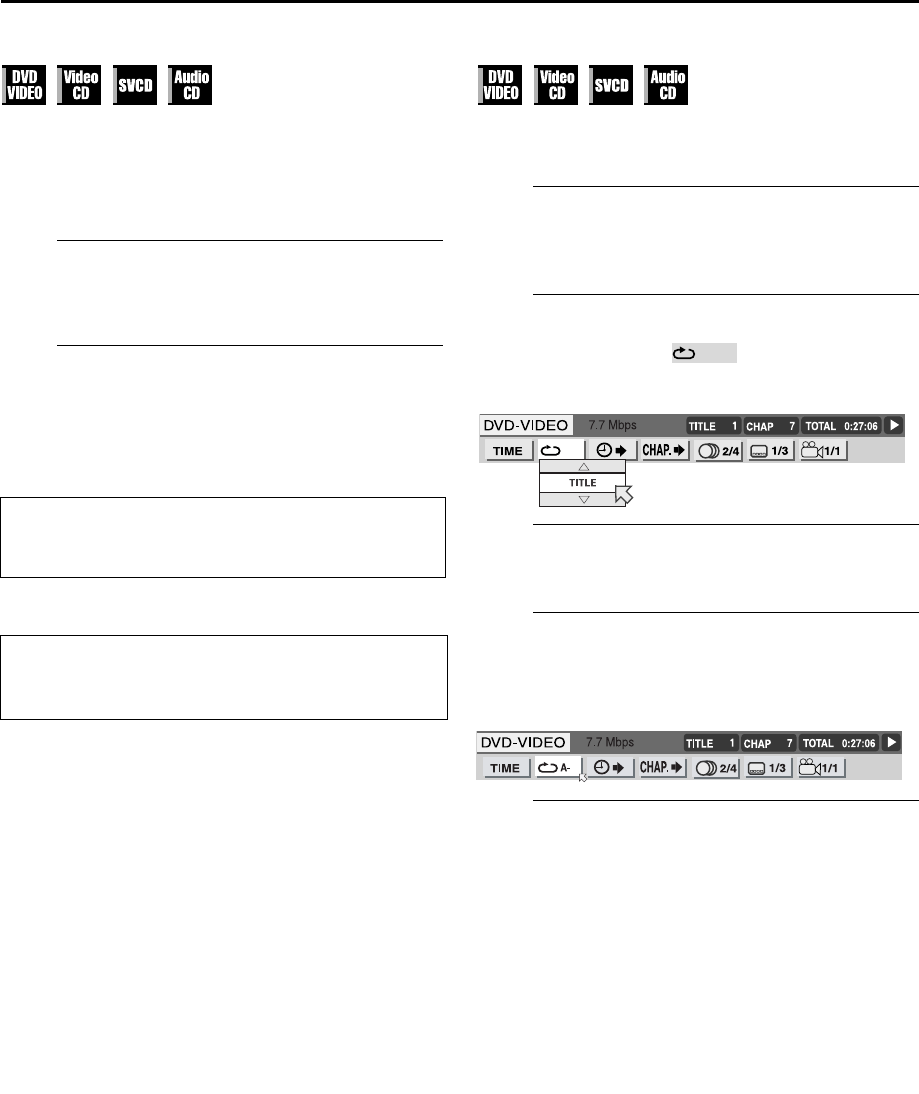
Repeat Playback
You can repeat playback as you like according to the type of
disc.
DVD VIDEO:during playback or in stop mode
Audio CD:during playback or in stop mode
Video CD/SVCD:in stop mode or during playback with PBC
disactivated
A
Access the repeat mode.
Press REPEAT.
●Repeat mode is displayed on the TV.
B
Select the repeat mode.
Press REPEAT repeatedly to select the desired repeat
mode.
DVD VIDEO
CHAP]TITLE]OFF](Back to the beginning)
Video CD/SVCD/Audio CD
TRACK]ALL]OFF](Back to the beginning)
To cancel Repeat Playback,
Press REPEAT repeatedly until “OFF” appears on the TV
screen.
NOTES:
●Repeat Playback is not possible with a Video CD or SVCD
with PBC function.
●Repeat Playback may not work properly depending on the
type of disc being used.
●You cannot select A-B Repeat Playback by pressing REPEAT.
A-B Repeat Playback
You can repeat the desired part.
DVD VIDEO/Audio CD:during playback
Video CD/SVCD:during playback with PBC disactivated
A
Access the on-screen bar.
Press ON SCREEN twice. The on-screen bar appears on
the TV screen.
B
Select the menu item.
Press we to move H to , then press ENTER.
●The following pop-up window appears under the selected
item.
C
Select the repeat mode.
Press rt repeatedly to select “A-B.”
D
Select the start point.
Press ENTER at the beginning of the part you want to
repeat (point A).
●The following display appears in the on-screen bar.
E
Select the end point.
Press
ENTER
at the end of the part you want to repeat (point
B).
●A-B Repeat Playback starts. The selected part of the disc
(between point A and B) is played repeatedly.
To cancel A-B Repeat Playback
Repeat from step A, select “OFF” in step C, then press
ENTER.
To clear the on-screen bar
Press ON SCREEN.
NOTE:
The points A and B must be set in the same title or track.
CHAPTER:The current chapter is played back repeatedly.
TITLE:The current title is played back repeatedly.
OFF:
Each title and chapter is played back once.
TRACK:
The current track is played back repeatedly.
ALL:
All tracks are played back repeatedly.
OFF:
Each track is played back once.
XV48EK_01.book Page 33 Thursday, November 18, 2004 10:45 PM
Filename [XV48EK_08DVD.fm]
Masterpage:Left+
Page 3418 November 2004 10:44 pm
OPERATIONS ON DVD DECK (cont.)
34
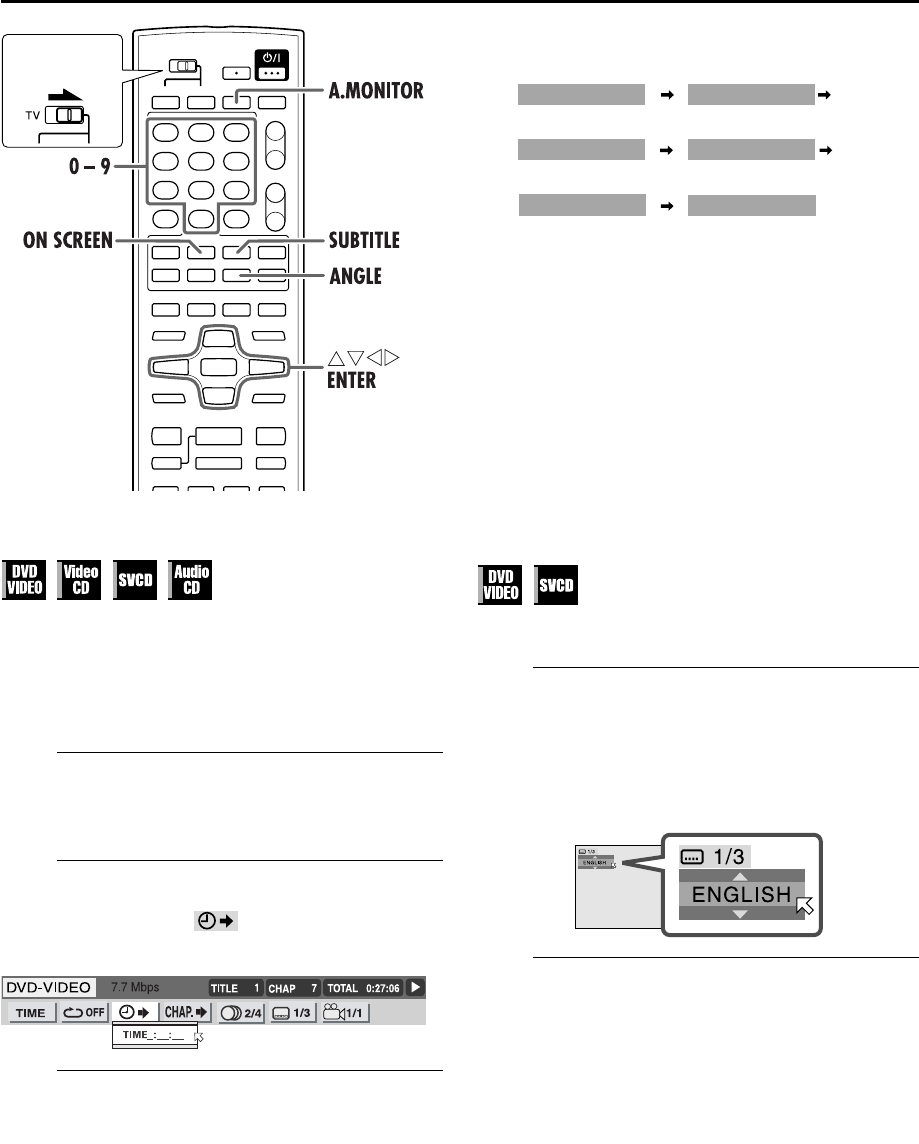
Time Search
You can play back a disc from the desired point by specifying the
elapsed time from the beginning of the current title (for DVD
VIDEO) or the disc (for Audio CD/Video CD) using the Time
Search.
DVD VIDEO/Audio CD: during playback or in stop mode
Video CD/SVCD:during playback with PBC disactivated or in
stop mode
A
Access the on-screen bar.
Press ON SCREEN twice. The on-screen bar appears on
the TV screen.
B
Select the menu item.
Press we to move H to , then press ENTER.
●The following pop-up window appears under the selected
item.
C
Select the time.
Press the number keys (0-9) to enter the time, then press
ENTER.
Example:
To play back from a point 2 (hours): 34 (minutes): 08 (seconds)
elapsed
If you have specified a wrong selection,
Press w repeatedly until the wrong number is erased,
then press number keys to enter the correct numbers.
●The unit starts playback from the specified time.
To clear the on-screen bar
Press ON SCREEN.
NOTES:
●Some DVD VIDEO discs do not contain time information, and
it is not possible to use the Time Search function.
●Time Search cannot be used during Programme and Random
Playback.
Subtitle Selection
You can select subtitle language.
●During playback
A
Access the menu.
Press SUBTITLE.
●The following pop-up window appears on the TV screen.
Example (DVD):“ENGLISH” is selected out of 3 subtitle
languages recorded.
B
Select the subtitle language.
Press rt or SUBTITLE repeatedly to select the desired
subtitle language, then press ENTER.
●Each time you press the button, the subtitle language changes.
●The pop-up window disappears if no operation is done for
about several seconds.
NOTES:
●For DVD VIDEO
Some subtitle languages are abbreviated in the pop-up
window. See “Language Code List” (
੬pg.17).
●For SVCD
An SVCD can contain up to four subtitles. Pressing SUBTITLE
changes the subtitles regardless of whether the subtitles are
recorded or not.
Slide to the
right.
TIME _ : _ _ : _ _
TIME _ : _ _ : _ _TIME 2 : _ _ : _ _
TIME _ : _ _ : _ _TIME 2 : 3 _ : _ _
TIME _ : _ _ : _ _TIME 2 : 3 4 : _ _
TIME _ : _ _ : _ _TIME 2 : 3 4 : 0 _
TIME _ : _ _ : _ _TIME 2 : 3 4 : 0 8
Press 2Press 3
Press 4
Press 8
Press 0
XV48EK_01.book Page 34 Thursday, November 18, 2004 10:45 PM
Masterpage:Right-No-Heading
35
Filename [XV48EK_08DVD.fm]
Page 3518 November 2004 10:44 pm
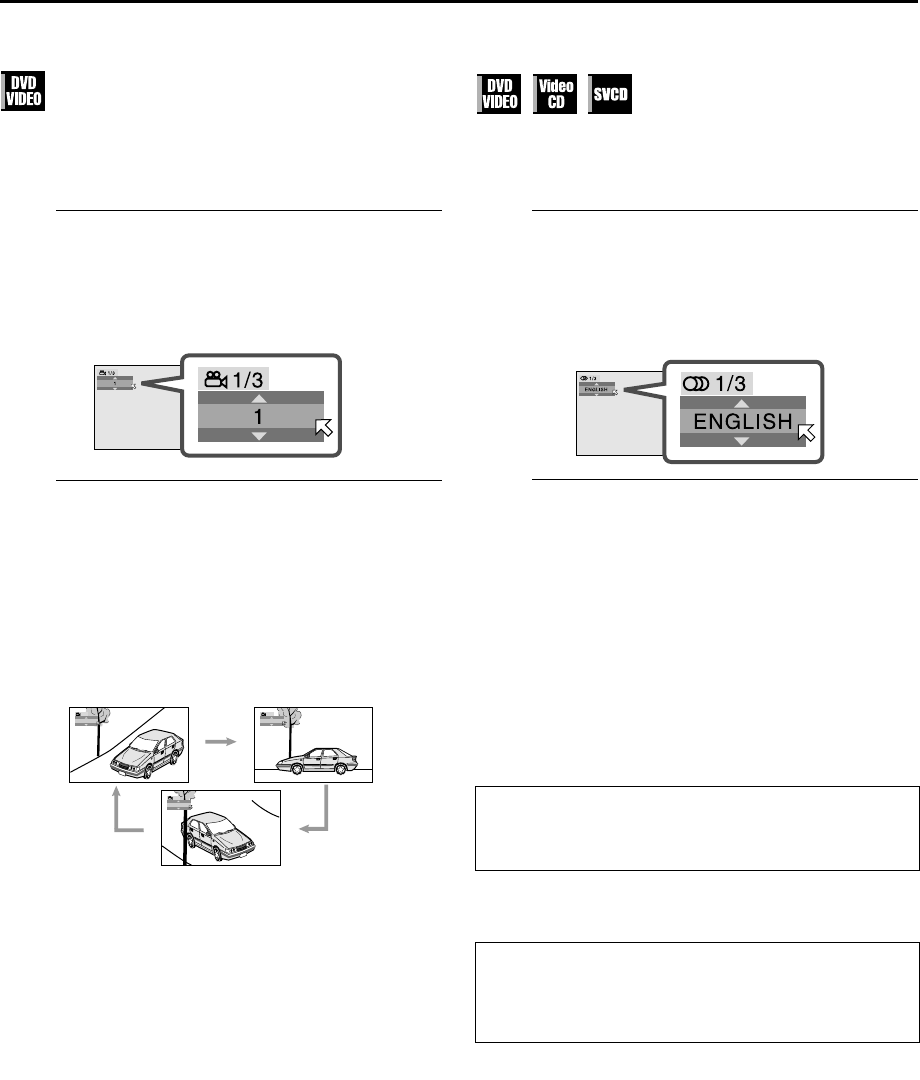
Angle Selection
You can enjoy a variety of scene angles if the DVD VIDEO disc
contains “multi-angle” parts, where multiple cameras were used
to shoot the same scene from different angles.
●During playback
A
Access the menu.
Press ANGLE.
●The following pop-up window appears on the TV screen.
Example:The first view angle is selected out of 3 view angles
recorded.
B
Select the view angle.
Press rt or ANGLE repeatedly to select the desired
view angle, then press ENTER.
●Each time you press the button, the angle of the scene
changes.
●The pop-up window disappears if no operation is done for
about several seconds.
Example:
1/3]2/3]3/3](Back to the beginning)
Audio Language and Sound Selection
The audio selection setting allows you to change the audio
language of a movie, or to listen to karaoke with or without the
vocal.
●During playback
A
Access the menu.
Press A.MONITOR.
●The following pop-up window appears on the TV screen.
Example:“ENGLISH” is selected out of 3 audio languages
recorded during DVD VIDEO playback.
B
Select the audio language.
Press rt or A.MONITOR repeatedly to select the
desired audio language, then press ENTER.
●Each time you press the button, the audio language changes.
●The pop-up window disappears if no operation is done for
about several seconds.
DVD VIDEO (example)
1/3 ENGLISH]2/3 FRENCH]3/3 SPANISH](Back to the
beginning)
Video CD
ST]L]R](Back to the beginning)
SVCD
ST 1]ST 2]L 1]R 1]L 2]R 2](Back to the beginning)
NOTE:
For DVD VIDEO disc, some audio languages are abbreviated in
the pop-up window. See “Language Code List” (
੬pg.17).
1
1/3
2
1/3
3
1/3
ST:
To listen to normal stereo playback.
L:
To listen to L (left) audio channel only.
R:
To listen to R (right) audio channel only.
ST 1/ST 2:
To listen to normal stereo playback of ST 1 or
ST 2 channel.
L 1/L 2:
To listen to the L (left) 1 or 2 audio channel.
R 1/R 2:
To listen to the R (right) 1 or 2 audio channel.
XV48EK_01.book Page 35 Thursday, November 18, 2004 10:45 PM
Filename [XV48EK_08DVD.fm]
Masterpage:Left+
Page 3618 November 2004 10:44 pm
OPERATIONS ON DVD DECK (cont.)
36
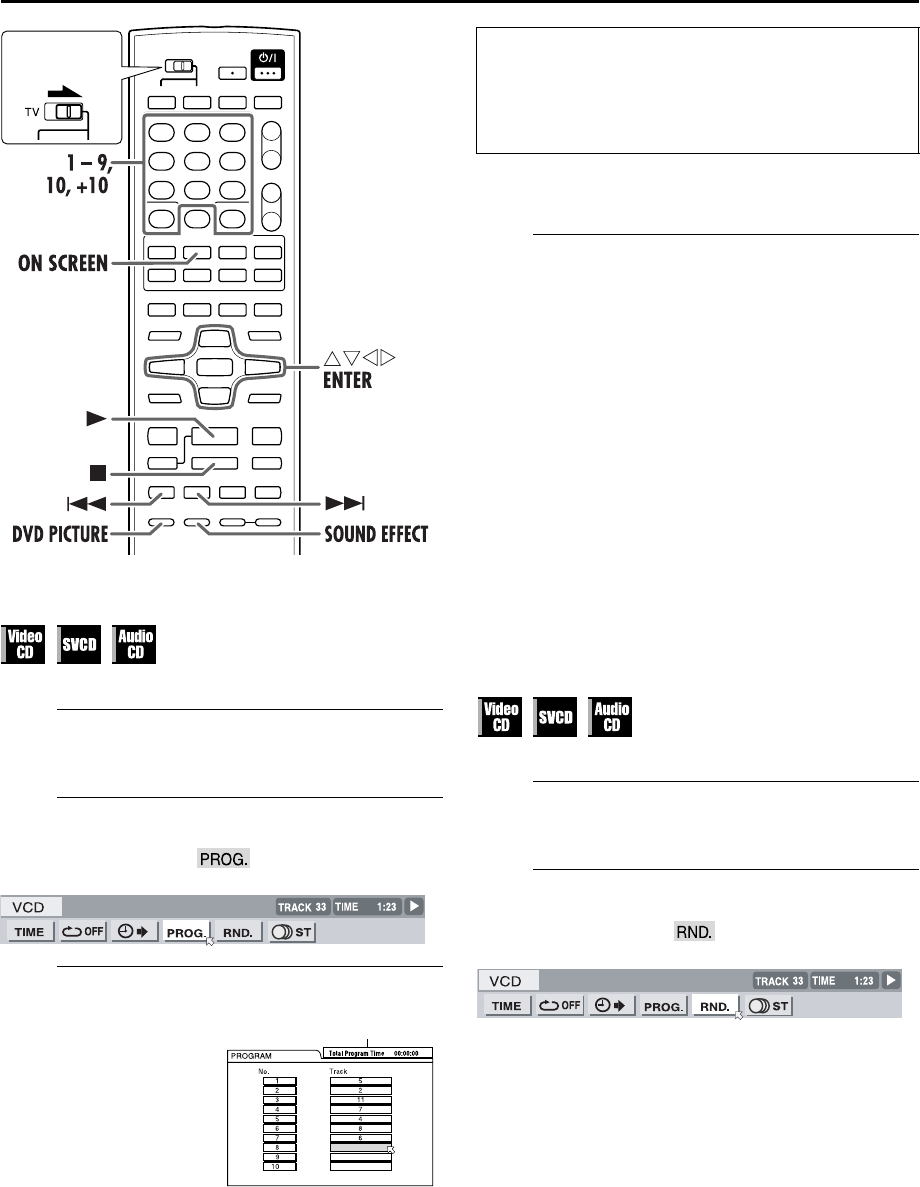
Programme Playback
You can play back up to 99 tracks in the desired order.
A
Access the on-screen bar.
Press ON SCREEN twice in stop mode.
B
Select the menu item.
Press we to move H to , then press ENTER.
●The programme table appears under the on-screen bar.
C
Select the tracks in the desired order.
If you have specified a wrong selection
Press rt to move H to the track to be corrected, then press8.
The track is erased and the next programmed tracks move up.
D
Start playback.
Press 4. Playback starts in the selected order.
●With an Audio CD disc, the programme table remains on the
TV.
●When all of the programmed tracks have been played back,
Programme Playback stops, but the programmed information
remains.
To check the programme contents
During playback, press 8. Playback stops and the
programme table appears on the TV screen.
●You can also check the programme contents through the on-
screen bar during playback.
To clear the programme
Press 8while playback is stopped and the programme
table appears on the TV screen.
To exit from Programme Playback
After clearing the programme, press ON SCREEN.
Random Playback
You can play back all the tracks on the disc in random order.
A
Access the on-screen bar.
Press ON SCREEN twice in stop mode.
B
Select the menu item.
Press we to move H to , then press ENTER.
●Playback starts in random order.
To clear the on-screen bar
Press ON SCREEN.
Press the appropriate
number keys to select the
tracks.
Slide to the
right.
Programme time
Examples:
●To select track 5, press the number key “5.”
●To select 25, press the number key “+10,”“+10,” then
“5.”
●To select 40, press number key “+10” three times, then
“10.”
XV48EK_01.book Page 36 Thursday, November 18, 2004 10:45 PM
Masterpage:Right-No-Heading
37
Filename [XV48EK_08DVD.fm]
Page 3718 November 2004 10:44 pm
Sound Effect
Using the Sound Effect function, you can change the sound field.
●This function works only for analog audio output.
A
Access the selection menu.
Press SOUND EFFECT during playback.
●The current setting appears on the TV screen.
B
Select the Sound Effect mode.
Press SOUND EFFECT repeatedly to select the desired
mode.
●Each time you press SOUND EFFECT, the Sound Effect mode
changes as follows:
SOUND EFFECT:1]SOUND EFFECT:2]
SOUND EFFECT:3]OFF](Back to the beginning)
●As the value becomes bigger, the Sound Effect works stronger.
●The selection menu disappears if no operation is done for
about severalseconds.
To deactivate Sound Effect
Press SOUND EFFECT
repeatedly until “OFF” appears on
the TV screen.
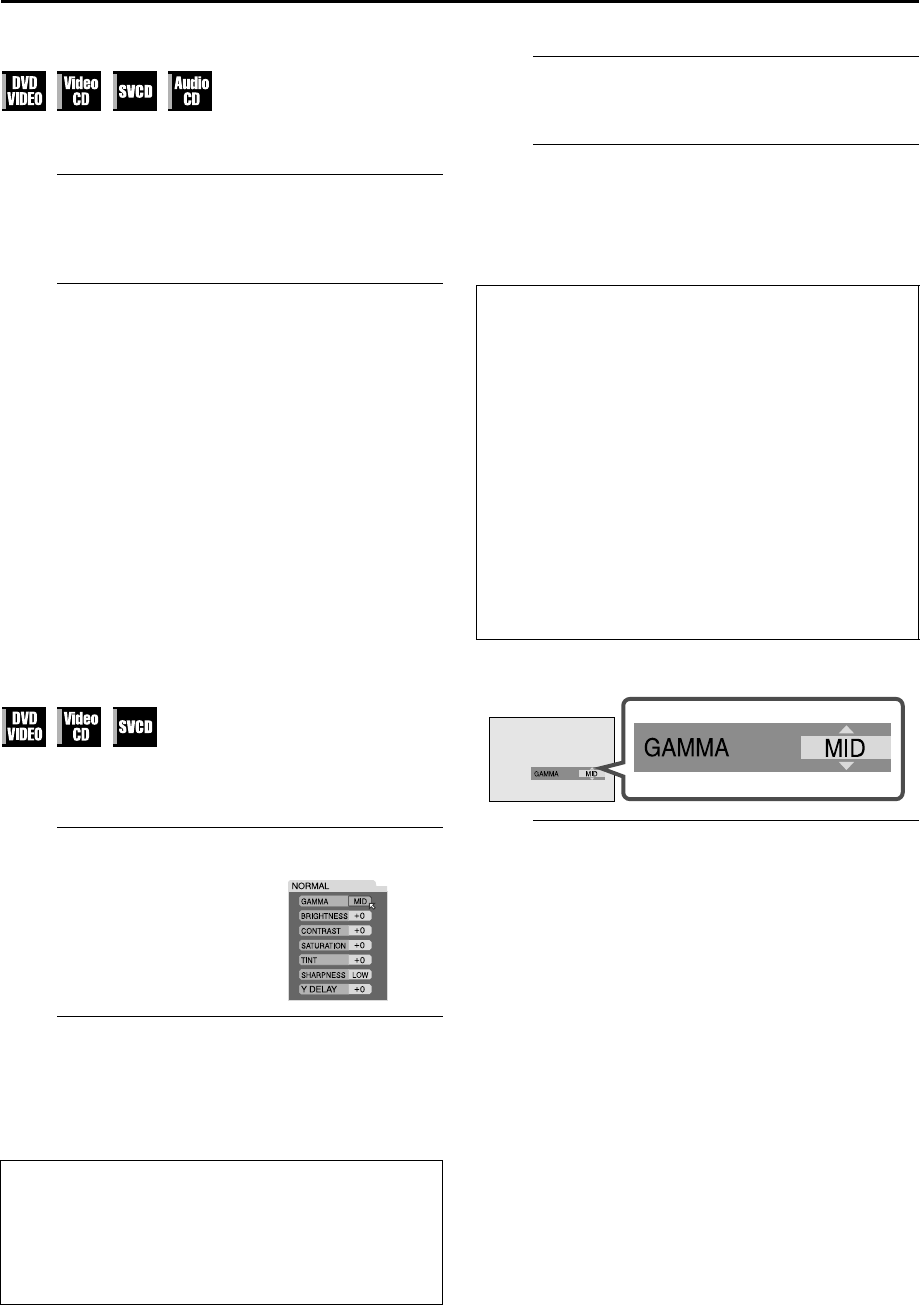
VFP Function
— Adjusting the Picture Quality
The VFP (Video Fine Processor) function enables you to adjust
the picture character according to the type of programming,
picture tone or personal preference.
A
Access the VFP setting menu.
B
Select the VFP mode.
Press we repeatedly.
●Each time you press we, the VFP mode changes as follows:
NORMAL]CINEMA]USER 1]USER 2](Back to the
beginning)
To adjust picture appearance manually
C
Access the USER menu.
Press we repeatedly to select “USER 1” or “USER 2.”
D
Select the parameter.
Press rt repeatedly to select a parameter you want to
adjust, then press ENTER.
●Adjust gradually and confirm picture appearance results are as
preferred.
●VFP menu disappears and the following pop-up window
appears on the TV screen.
E
Adjust the parameter.
Press rt repeatedly to change the setting, then press
ENTER.
●The current VFP settings appear again.
Repeat steps D and E to adjust other parameters.
To return to the normal screen
Press DVD PICTURE.
NOTE:
The VFP setting screen disappears if no operation is done for
more than about 10 seconds.
Press DVD PICTURE during
playback.
●The current setting appears on
the TV screen.
NORMAL:For watching TV in a general room.
CINEMA:For watching a movie software in a room
with suppressed light.
USER1/
USER2:
You can adjust parameters that affect the
picture appearance and store the settings. Go
to step
C.
GAMMA
(LOW/MID/
HIGH):
Adjust this if the neutral color is bright or dark.
The brightness of dark and bright portions is
maintained.
BRIGHTNESS
(–16 to +16):
Adjust this if the picture is bright or dark on
the whole.
CONTRAST
(–12 to +12):
Adjust this if the objects in far and near
positions look unnatural.
SATURATION
(–16 to +16):
Adjust this if the picture is whitish or blackish.
TINT
(–16 to +16):
Adjust this if the appearance of flesh tone is
unnatural.
SHARPNESS
(LOW/ HIGH):
Adjust this if the picture is indistinct.
YDELAY
(–2 to +2):
Adjust this if the picture looks separately or
overlapped.
XV48EK_01.book Page 37 Thursday, November 18, 2004 10:45 PM
Filename [XV48EK_08DVD.fm]
Masterpage:Left+
Page 3818 November 2004 10:44 pm
OPERATIONS ON DVD DECK (cont.)
38
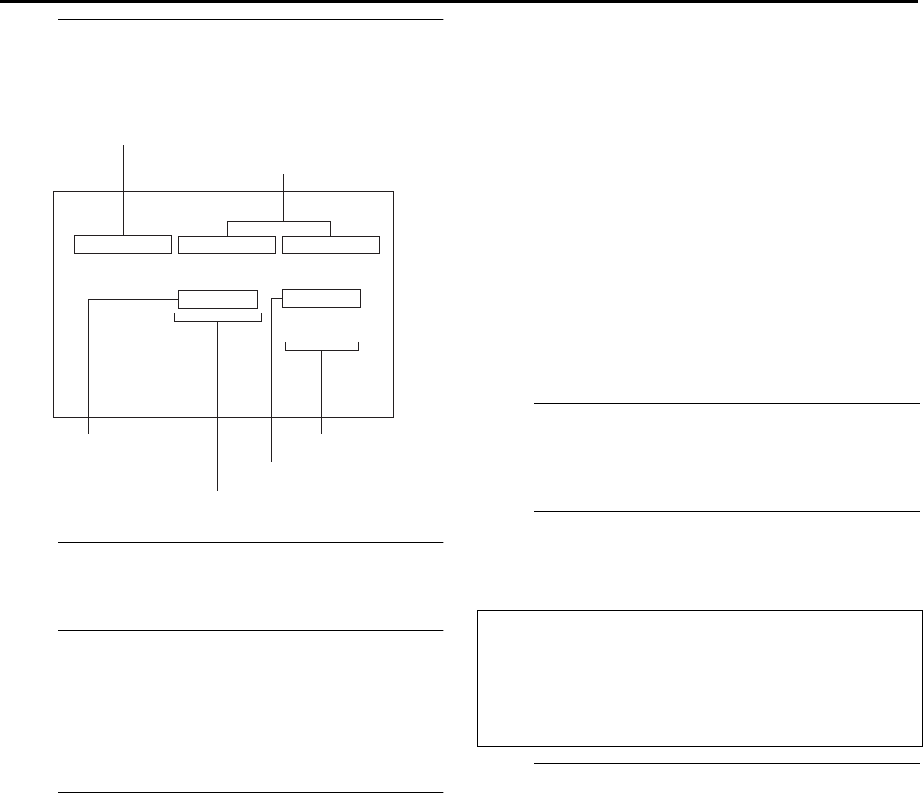
Using the On-Screen Bar
You can check disc information while the disc is loaded and you
can use some functions using the on-screen bar. The on-screen
bar allows you the various playback operations.
How to Access the On-Screen Bar
A
Access the status bar.
Press ON SCREEN when a disc is loaded. The status bar
appears on the TV screen.
Example: During DVD VIDEO playback
B
Access the menu bar.
Press ON SCREEN again. The menu bar appears under
the status bar.
To clear the on-screen bar
Press ON SCREEN.
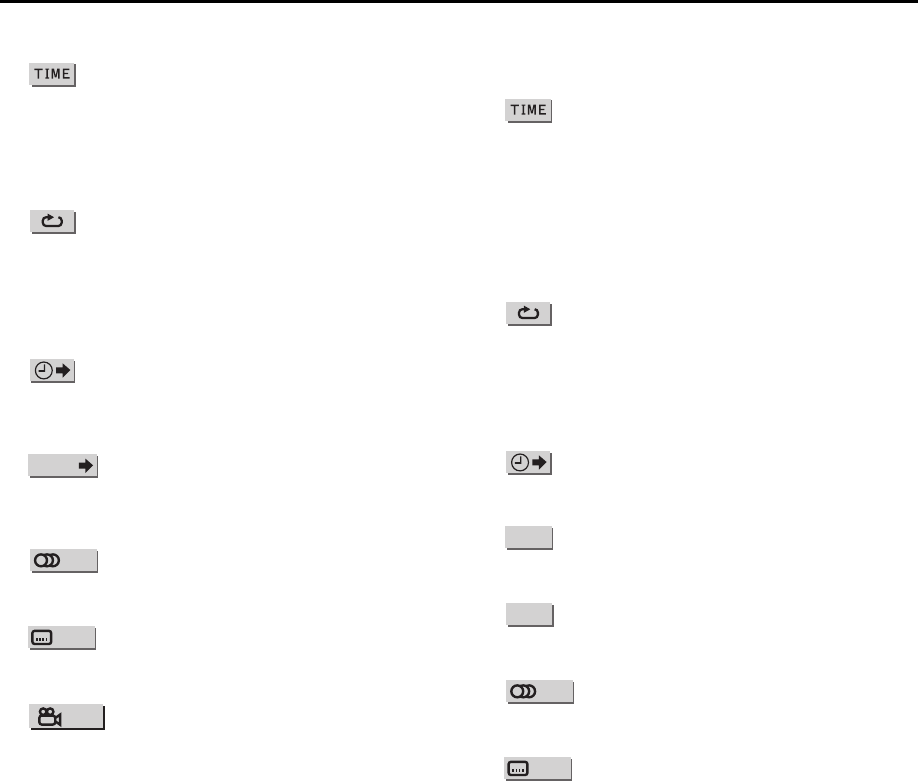
Basic Operation on the Menu Bar
A
Access the menu bar.
Press ON SCREEN twice. The menu bar appears on the
TV screen.
●The currently selected item is highlighted.
B
Select the menu item.
Press we to move H to the item you want to work with,
then press ENTER.
After pressing ENTER
●When a pull-down menu appears, press rt to select the
setting you want, then press ENTER.
●When a number-entry box appears, use the number key to
enter the number you want, then press ENTER.
●When changing the indication of playback time, press ENTER
repeatedly to select the setting you want.
For details about each function, see page 39.
ON SCREEN
Slide to the
right.
Transfer
rate
Chapter
number
Title
number
Playback
time
Playback
status
XV48EK_01.book Page 38 Thursday, November 18, 2004 10:45 PM
Masterpage:Right-No-Heading
39
Filename [XV48EK_08DVD.fm]
Page 3918 November 2004 10:44 pm
Menu Bar Functions for DVD VIDEO
8 Time mode selection
During playback, selects the time mode shown in the status bar
and on the front display.
●TOTAL: Current title elapsed time
●T.REM: Current title remaining time
●TIME: Current chapter elapsed time
●REM: Current chapter remaining time
8 Repeat mode (See also page 33)
Selects the repeat mode during playback.
●CHAPTER: Current chapter repeat
●TITLE: Current title repeat
●A-B: A-B repeat
●OFF: Repeat mode deactivated
8 Time search (See also page 34)
Specifies a time from the beginning of the current title as the
point from which to begin playback.
8 Chapter search
During playback, specifies a desired chapter to be played back
from.
8 Audio selection (See also page 35)
During playback, selects the audio language or sound track.
8 Subtitle selection (See also page 34)
During playback, selects the subtitle language.
8 Angle selection (See also page 35)
During playback, selects a desired scene angle in a multi-angle
part.
Menu Bar Functions for SVCD/Video
CD/Audio CD
8 Time mode selection
Selects the time mode shown in the status bar and on the front
display.
●TIME: Current track elapsed time
●REM: Current track remaining time (while in stop mode,
current track total time)
●TOTAL: Disc elapsed time
●T.REM: Disc remaining time (while in stop mode, disc total
time)
8 Repeat mode (See also page 33)
Selects the repeat mode.
●TRACK: Current track repeat
●ALL: All track repeat
●A-B: A-B repeat
●OFF: Repeat mode deactivated
8 Time search (See also page 34)
Specifies a time from the beginning of the disc as the point from
which to begin playback.
8 Program playback (See also page 36)
While stopped, specifies the playback order of tracks.
8 Random playback (See also page 36)
While stopped, activates random playback.
8 Audio selection (See also page 35)
During Video CD/SVCD playback, selects the audio channel(s).
8 Subtitle selection (See also page 34)
During SVCD playback, selects the subtitle.
CHAP.
PROG.
RND.
XV48EK_01.book Page 39 Thursday, November 18, 2004 10:45 PM
Filename [XV48EK_08DVD.fm]
Masterpage:Left+
Page 4018 November 2004 10:44 pm
OPERATIONS ON DVD DECK (cont.)
40
Audio/Video Files
Playback
Outline
This unit can play back MP3 and JPEG files on a personally
recorded on CD-R/RW and commercially available CD disc.
This unit can also play back DivX files recorded on CD-R/RW
and DVD-R/-RW disc. Some DVD-R and DVD-RW discs
mastered as multi border (multi-session) may not be compatible
with the unit.
●This unit may be unable to play back the disc due to the
characteristics or recording conditions.
Precautions
About files and folders (groups) on the disc
●The unit recognizes up to the fifth layer of groups, 999 files per
group, and up to 250 groups per disc. Files other than MP3/
JPEG/DivX files count in the 999 total.
●Add the appropriate extension, such as “avi,”“divx,”“jpeg,”
and “mp3,” to the file name.
For making your own disc:
●Use “UDF format” as the disc format for DVD-R/-RW.
●Use “ISO 9660” as the disc format for CD-R/RW.
●The unit does not support “packet writing” for CD-R/RW.
●The unit supports discs recorded with up to five multiple
sessions.
For MP3 files:
MP3i and MP3 Pro are not available.
For JPEG files:
The unit cannot play back a picture of more than 5120 x 3413
pixels (baseline JPEG) or 2048 x 1536 pixels (progressive JPEG).
For DivX files:
●The unit supports DivX 5.x, 4.x and 3.11.
●The unit supports the DivX files whose resolution is 720 x 480
pixels or less (30 fps), and 720 x 576 pixels or less (25 fps).
●Audio stream should conform to MPEG 1 Audio Layer-2 or
MPEG Audio Layer-3 (MP3).
●The unit does not support GMC (Global Motion Compression)
and Q-Pel (Quarter Pixel).
●The file encoded in the interlaced scanning mode may not be
played back correctly.
●The unit has its own Registration Code for DivX playback. If
necessary, you can confirm the Registration Code of your
player using the OTHERS menu screen. (
੬pg.57)
Basic Operations
When you insert a disc with groups and files, the Control display
that shows the contents of the disc automatically appears on the
TV screen.
You can specify and play back the desired group/file from the
Control display using the following procedure.
A
Turn on the unit.
Press 1.
B
Select the DVD deck.
On the unit
Press VCR/DVD repeatedly so that the DVD indicator
lights up.
On the remote control
Press DVD so that the DVD indicator lights up.
●Turn on the TV and select the video channel (or AV
mode).
●Slide the TV/VCR/DVD switch
on the remote
control
to the right.
ZOOM
Slide to the
right.
XV48EK_01.book Page 40 Thursday, November 18, 2004 10:45 PM
Masterpage:Right-No-Heading
41
Filename [XV48EK_08DVD.fm]
Page 4123 November 2004 7:18 pm
C
Load the disc.
●For details, refer to “Placing a Disc” (੬pg. 6).
●The Control display appears on the TV.
D
Select a group.
Press we to select the desired group, then press ENTER.
E
Start playback.
Press rt to select the desired file, then press ENTER or
4.
● When press ENTER, the unit play the selected file.
● When press
4, the unit start continuous playback of the
group from the selected file.
F
Stop playback.
Press 8. The Control display appears on the TV screen.
●Press x on the DVD deck to open the disc tray, then remove
the disc.
To pause playback
Press 9.
●To resume normal playback, press 4.
To reverse or advance DivX file playback rapidly
During playback of DivX file, press 3 or 5.
●Each time you press 3 or 5, the playback speed changes
with the following indication on the TV screen:
3 1/5 1]3 2/5 2]3 3/5 3]3 4/5 4
The higher the value is, the faster the playback speed is.
Zooming
Press ZOOM during playback or while paused.
●Each time you press ZOOM, the magnification changes:
- 2 times for DivX files (available only during playback)
- 1.5 and 2 times for JPEG files (This function is not available
for some JPEG files depending on their resolution size and
JPEG format.)
Rotating/Reflecting a Still Picture
While a still picture is played back:
●Pressing we rotates the picture by 90°.
●Pressing
r reflects the picture vertically.
●Pressing
t reflects the picture horizontally.
Repeat Playback
A
Change the playback mode.
Press we to select the current playback mode on the
Control display.
B
Select the repeat mode.
Press ENTER repeatedly to select the desired repeat
mode.
C
Start Repeat Playback.
Press we to move the cursor bar to the file column, then
press 4.
To cancel Repeat Playback,
Select “NORMAL” in step B above.
NORMAL
GROUP
MP3
SLIDESHOW
MIX
--
PICT01.jpg
PICT02.jpg
PICT03.jpg
MUSIC01.mp3
MUSIC02.mp3
DISC CONTROL
Current playback mode
Select these sections to
show the upper layer.
Selected file
File column
Current group
Group column
REPEAT
1:
The current file is played back repeatedly.
REPEAT
GROUP:
The all files in the current group are played back
repeatedly.
REPEAT
ALL:
All files on the disc is played back repeatedly.
XV48EK_08DVD.fm Page 41 Tuesday, November 23, 2004 7:18 PM
Filename [XV48EK_08DVD.fm]
Masterpage:Left+
Page 4218 November 2004 10:44 pm
OPERATIONS ON DVD DECK (cont.)
42
Random Playback
A
Change the playback mode.
Press we to select the current playback mode on the
Control display.
B
Select the random playback mode.
Press ENTER repeatedly to select “RANDOM.”
C
Start Random Playback.
Press we to move the cursor bar to the file column, then
press 4.
●All files in the selected group are played back in random order.
To cancel Random Playback,
Select “NORMAL” in step B above.
Programme Playback
A
Change the playback mode.
Press we to select the current playback mode on the
Control display.
B
Select the programme playback mode.
Press ENTER repeatedly to select “PROGRAM.”
C
Select files.
Press rtwe to select the desired file, then press
ENTER.
●Repeat step 3 until all the desired files are programmed.
●To erase the last programmed file, press
we to move the
cursor bar to the programmed file column, then press
8.
D
Start Programme Playback.
Press 4.
To cancel Programme Playback,
Select “NORMAL” in step B above.
SET UP
Slide to the
right.
XV48EK_01.book Page 42 Thursday, November 18, 2004 10:45 PM
Masterpage:Right-No-Heading
43
Filename [XV48EK_08DVD.fm]
Page 4318 November 2004 10:44 pm
Slide Show Playback (JPEG Files)
You can display JPEG files (still pictures) one after another
automatically.
Press 4 while a JPEG file is selected on the Control
display.
To keep showing the current picture
Press 9
Changing the Picture of the Opening
Display
You can change and set the opening display to your favorite
image.
A
Play back a JPEG file of your favorite image.
B
Access the PICTURE menu screen.
Press SET UP, then press we to show the PICUTRE
menu screen.
C
Select “BACKGROUND.”
Press rt to select “BACKGROUND,” then press ENTER.
D
Select “SAVE AS BACKGROUND.”
Press rt to select “SAVE AS BACKGROUND,” then
press ENTER.
E
Register your image.
Press rt to select “YES,” then press ENTER.
The player starts reading the JPEG file, and the opening
screen is changed after reading the file.
To return to the normal screen
Press SET UP.
XV48EK_01.book Page 43 Thursday, November 18, 2004 10:45 PM
Filename [XV48EK_09Editing.fm]
Masterpage:Left0
44
Page 44November 18, 2004 10:44 pm
EDITING (VHS DECK)
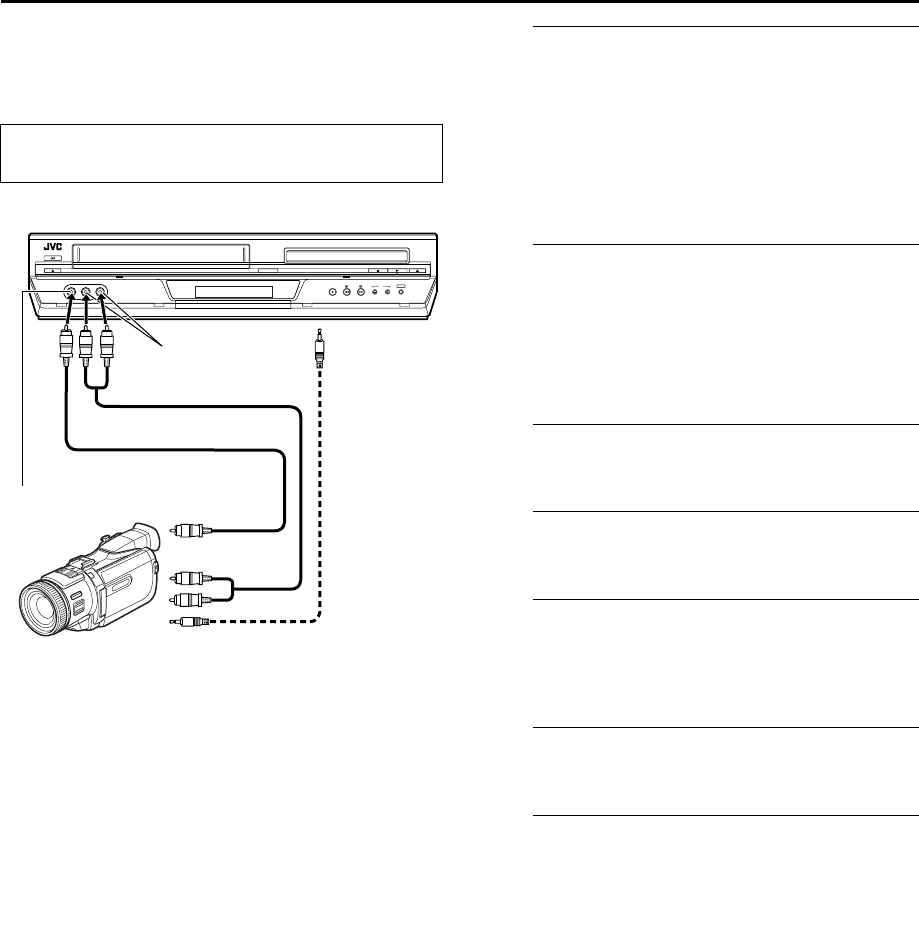
Editing from a Camcorder
You can use a camcorder as the source player and your
unit as the recording deck.
A
Make connections.
Connect the camcorder’s AUDIO OUT and VIDEO OUT
connectors to the unit’s front panel AUDIO and VIDEO
input connectors.
●When using a monaural camcorder, connect its AUDIO OUT
connector to the AUDIO L input connector on your unit.
●When a Master Edit Control-equipped JVC camcorder is used,
the camcorder is capable of controlling the unit. Refer to the
camcorder’s instruction manual for operating procedure.
B
Select the VHS deck.
On the unit
Press VCR/DVD repeatedly so that the VCR indicator
lights up.
On the remote control
Press VCR so that the VCR indicator lights up.
C
Set the unit’s input mode.
Press AUX (number key “0”) and/or PR to select “F-1.”
D
Set the edit mode.
See “PICTURE CONTROL” on page53.
E
Engage the Record Pause mode.
Use 4, 3, or 5 to locate the point where you start
recording, then press and hold 9 and press 7 to engage
the Record Pause mode.
F
Start the camcorder.
Engage the Play mode of the camcorder.
G
Start the unit.
Press 4 to engage the Record mode of the unit.
NOTES:
●All necessary cables can be obtained from your dealer.
●When you select “EDIT” to dub tapes in step D, be sure to
select “AUTO” (or “NORM” when “B.E.S.T.” is set to “OFF”)
after you finish dubbing the tapes.
Slide the TV/VCR/DVD switch on the remote control
to the right.
Recorder
AUDIO OUT
VIDEO OUT
AUDIO input
Player
VIDEO input
Video cable (not provided)
Audio cable (not provided)
EDIT
To PAUSE
connector
Mini-plug cable
(not provided)
(JVC camcorder
only)
XV48EK_01.book Page 44 Thursday, November 18, 2004 10:45 PM
Masterpage:Right-No-Heading
45
Filename [XV48EK_09Editing.fm]
Page 45November 18, 2004 10:44 pm
Editing to or from
Another Video Recorder
You can use your unit as the source player or as the
recording deck.
AWhen using your unit as the source player:
BWhen using your unit as the recording deck:
A
Make connections.
Connect the player’s 21-pin SCART connector to the
unit’s 21-pin SCART connector as illustrated.
AWhen using your unit as the source player:
— connect its L-1 IN/OUT connector to the recording
deck.
BWhen using your unit as the recording deck:
— connect its L-1 IN/OUT or L-2 IN/DECODER
connector to the source player.
B
Select the VHS deck.
On the unit
Press VCR/DVD repeatedly so that the VCR indicator
lights up.
On the remote control
Press VCR so that the VCR indicator lights up.
C
Set the input mode of recording deck.
With this unit, press AUX (number key “0”) and/or PR to
select “L-1” for the L-1 IN/OUT connector, or “L-2” for
the L-2 IN/DECODER connector, depending on the
connector being used.
●When using another recorder as the recording deck, refer to its
instruction manual.
●When using the L-2 IN/DECODER connector, set “L-2
SELECT” to “A/V.” (
੬pg. 54)
D
Set the edit mode.
See “PICTURE CONTROL” on page53.
E
Engage the Record Pause mode of the
recording deck.
Locate the point where you start recording, then engage
the Record Pause mode.
F
Start the source player.
Engage the Play mode of the source player.
G
Start the recording deck.
Engage the Record mode of the recording deck.
NOTES:
●All necessary cables can be obtained from your dealer.
●When you select “EDIT” to dub tapes in step D, be sure to
select “AUTO” (or “NORM” when “B.E.S.T.” is set to “OFF”)
after you finish dubbing the tapes.
●When you use this unit as the source player for editing, be sure
to set “O.S.D.” to “OFF” before starting. (
੬pg.53)
Slide the TV/VCR/DVD switch on the remote control
to the right.
AV mode
21-pin SCART cable
(not provided)
Recorder
Your unit
Another recorder
Player
TV
RecorderYour unit
Player
AV mode
21-pin SCART cable
(not provided)
TV
Another recorder
XV48EK_01.book Page 45 Thursday, November 18, 2004 10:45 PM
Filename [XV48EK_09Editing.fm]
Masterpage:Left+
Page 46November 18, 2004 10:44 pm
EDITING (VHS DECK) (cont.)
46
Dubbing (from DVD to VHS)
You can dub selected scenes from the DVD disc to a cassette,
starting and stopping wherever you wish.
However, it is not possible to dub copy-protected discs.
In such case, “ERROR” appears on the front display panel.
A
Load a cassette and place a disc.
For the VHS deck
Insert a cassette with the record safety tab intact.
For the DVD deck
APress x on the DVD deck to open the disc tray.
BPlace the disc in the disc tray.
CPress x on the DVD deck to close the disc tray.
B
Prepare the VHS deck for dubbing.
APress VCR.
BPress
p to select recording speed.
CSearch for the point where you want to start dubbing
by pressing 4, 5 or 3 then press 8.
C
Prepare the DVD deck for dubbing.
APress DVD.
BStart playback and search for the point where you
want to start dubbing by pressing 4, 5 or 3.
D
Start dubbing.
A little before the dubbing start point, press and hold 7,
then press 4 on the remote control.
●“dub” lights on the front display panel.
E
End dubbing.
Press 8.
●Be sure to press 8 while the VCR indicator lights up on the
unit.
●If you press 8 or x with the DVD deck selected, the dubbing
stopped, but the opening screen is also recorded.
●When you have finished dubbing, press DVD to select the
DVD deck and press 8 to stop playback.
NOTES:
●Set “ON SCREEN GUIDE” to “OFF” (੬pg.57) if you do not
want to record the on-screen display for DVD discs during
dubbing.
●There may be a discrepancy of several seconds between where
you intend editing to start, and where it actually starts.
●The superimposed indication during the operation or dubbing
is not recorded.
●Set “PICTURE CONTROL” to “EDIT.” (
੬pg. 53)
●Turn on the TV and select the video channel (or AV
mode).
●Slide the TV/VCR/DVD switch on the remote
control to the right.
Slide to the
right.
XV48EK_01.book Page 46 Thursday, November 18, 2004 10:45 PM
Masterpage:Right0
47
Filename [XV48EK_09Editing.fm]
Page 47November 18, 2004 10:44 pm
EDITING (DVD DECK)
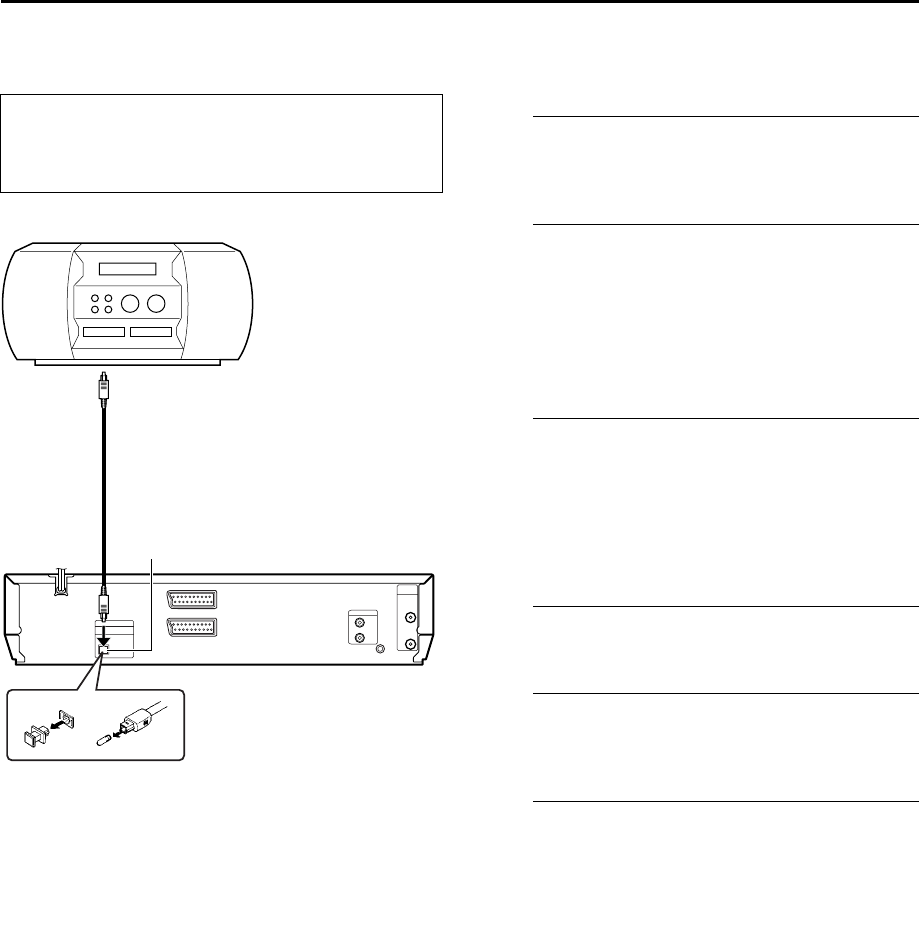
Digital Audio Dubbing
You can dub selected audio from the DVD or Audio CD disc to
an MD etc.
However, it is not possible to dub copy-protected discs.
Example: Dubbing to an MD
A
Make connections.
Connect the optical cable between the unit and the
digital audio device.
B
Place a disc and load an MD.
For the DVD deck
APress x on the DVD deck to open the disc tray.
BPlace the disc in the disc tray.
CPress x on the DVD deck to close the disc tray.
For the digital audio device
Insert an MD.
C
Prepare the DVD deck for dubbing.
APress DVD and select the audio to be dubbed.
BSearch for the point where you want to start dubbing
by pressing 4, 5 or 3 then press 8.
CPress 3 a little, then press 4 to start playback.
DPress 9 to pause playback a little before the start
point.
D
Prepare the audio device for dubbing.
Select the input mode.
E
Start dubbing.
APress 4 to start playback on the DVD deck.
BStart recording on the audio device.
F
End dubbing.
Stop recording on the audio device. Then press 8 to stop
playback on the DVD deck.
NOTES:
●There may be a discrepancy of several seconds between where
you intend editing to start, and where it actually starts.
●You can also dub audio from a Video CD or SVCD. Set
“DIGITAL AUDIO OUTPUT” to “PCM ONLY.” (
੬pg. 15, 56)
●Turn on the TV and select the video channel (or AV
mode).
●Slide the TV/VCR/DVD switch on the remote
control to the right.
Note for connection:
Remove the connector cover from
the unit and remove the protection
cap from the cable.
Digital audio device
(MD deck etc.)
Optical cable
(not provided)
DIGITAL AUDIO OUT
Player
Recorder
XV48EK_01.book Page 47 Thursday, November 18, 2004 10:45 PM
Filename [XV48EK_09Editing.fm]
Masterpage:Left0
48
Page 48November 18, 2004 10:44 pm
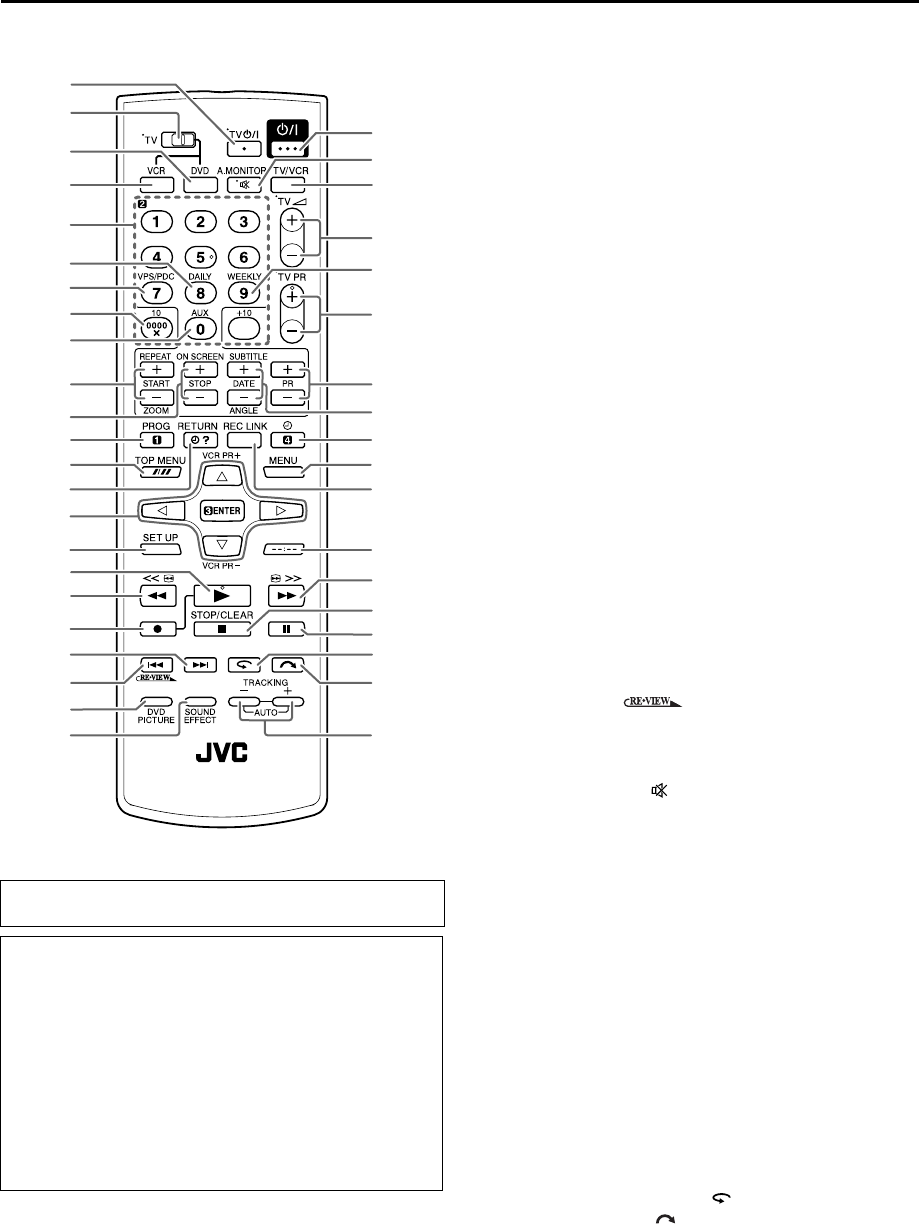
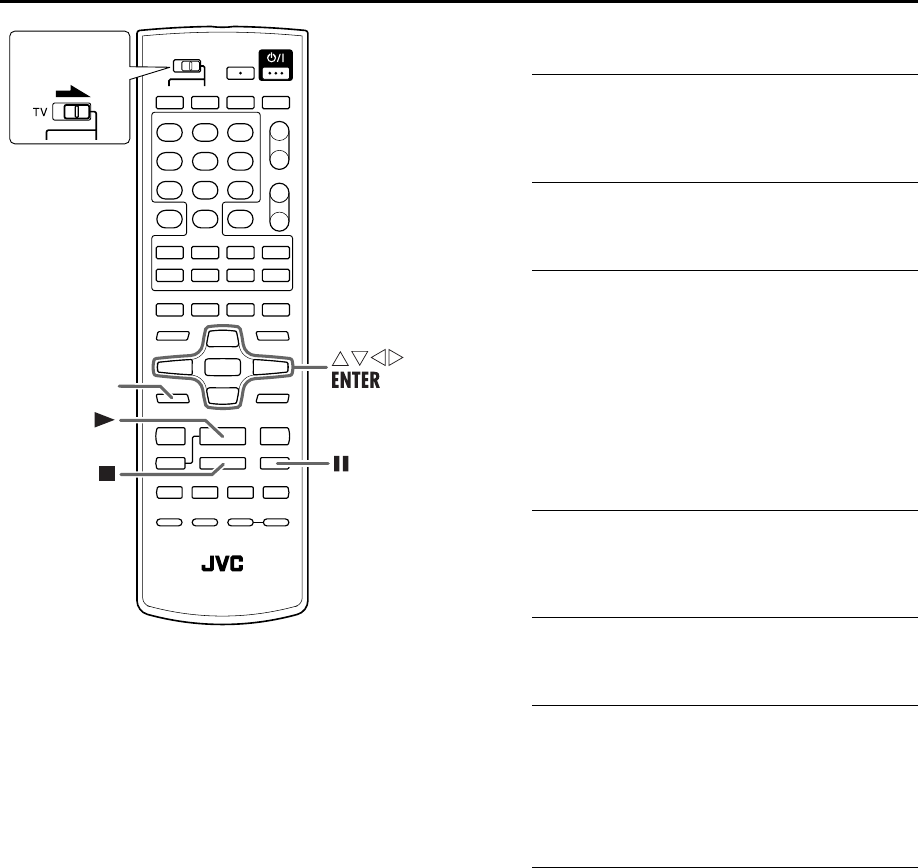
REMOTE CONTROL
Remote Control Functions
Remote A/B/C/D Code Switching
The remote control is capable of controlling four JVC video units
independently. Each of the units can respond to one of four
codes (A, B, C or D). The remote control is preset to send A code
signals because your unit is initially set to respond to A code
signals. You can easily modify your unit to respond to B, C or D
code signals.
On the remote control
Keep pressing VCR down during steps A–B.
A
Change the remote control code.
Press the number key “1” for A, “2” for B, “3” for C, or
“4” for D.
B
Set the remote control code.
Press ENTER to set the code.
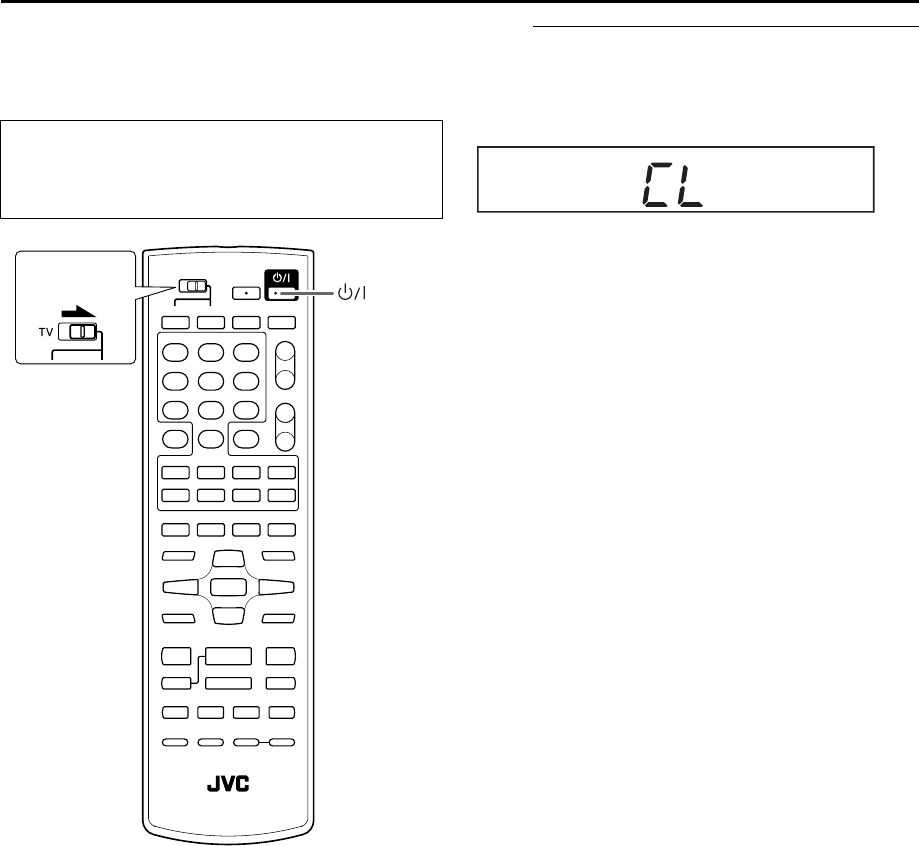
On the unit
C
Turn off the unit.
Press 1.
D
Display the code.
Press 4 on the unit for over 5 seconds while the unit is
turned off. The code currently set appears on the front
display panel.
●If the code displayed on the front display panel is different
from the code set on the remote control, go to stepE.
E
Change the unit’s code.
Press 8 on the remote control. The code currently set on
the remote control will be applied to the unit.
NOTE:
When “POWER SAVE” is set to “ON” (੬pg. 54), it is
impossible to change the remote code.
Before performing the following steps:
Slide the TV/VCR/DVD switch on the remote control to the
right.
Slide to the
right.
XV48EK_01.book Page 48 Thursday, November 18, 2004 10:45 PM
Masterpage:Right-No-Heading
49
Filename [XV48EK_09Editing.fm]
Page 49November 18, 2004 10:44 pm
Operating a JVC TV
Your remote control can operate the basic functions of your JVC
TV set.
IMPORTANT
Although the provided remote control unit is compatible with
JVC televisions, it may not work with your JVC TV, or in some
instances, may have limited function capability.
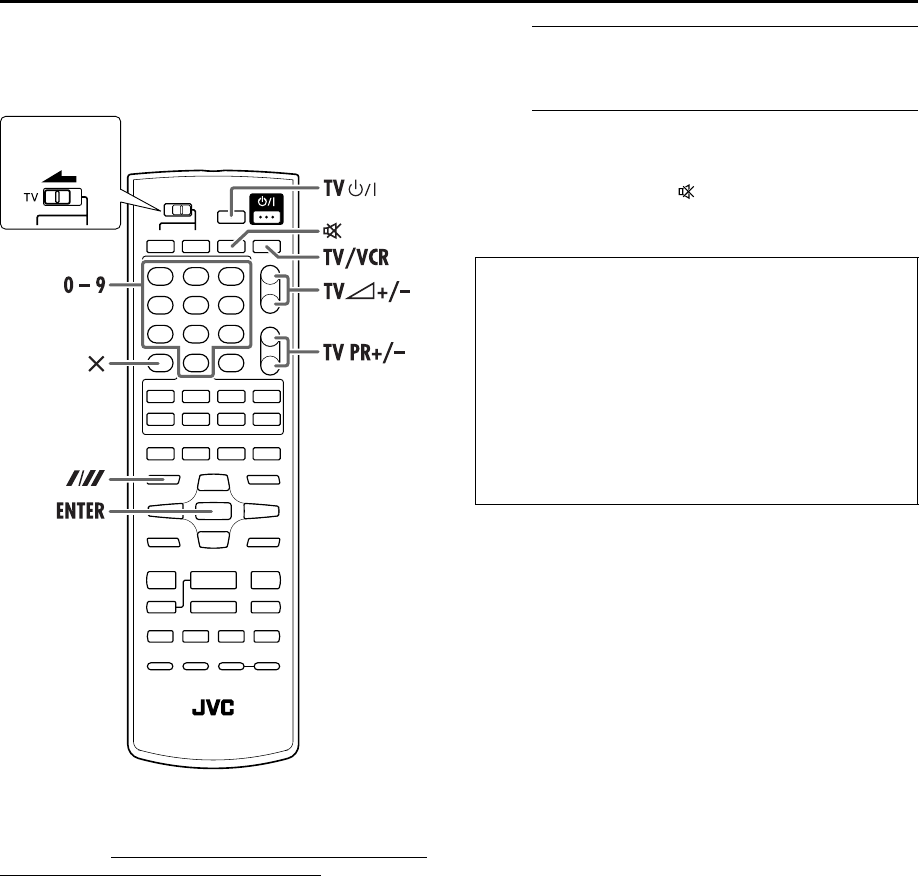
A
Slide the TV/VCR/DVD switch on the
remote control to the left.
B
Operate the TV.
Press the corresponding button: TV 1, TV/VCR, TV%
+/– (Volume), TV PR +/–, (TV Muting), number keys.
●For some JVC TVs, you must press ENTER after having pressed
the number keys.
Slide to the
left.
Control Your JVC TV Using Additional Buttons
Use the number keys, and the p button or & button to
select the TV’s channel.
●The p button corresponds to the 1-digit/2-digit entry
switching button (often labelled – /– –) of your TV’s remote
control.
●With some JVC TVs, the & button corresponds to the 10 +
button of your TV’s remote control.
NOTE:
The way these buttons are used is determined by your TV.
Use these buttons as instructed for your TV’s remote control.
XV48EK_01.book Page 49 Thursday, November 18, 2004 10:45 PM
Filename [XV48EK_09Editing.fm]
Masterpage:Left0
50
Page 50November 18, 2004 10:44 pm
SYSTEM CONNECTIONS
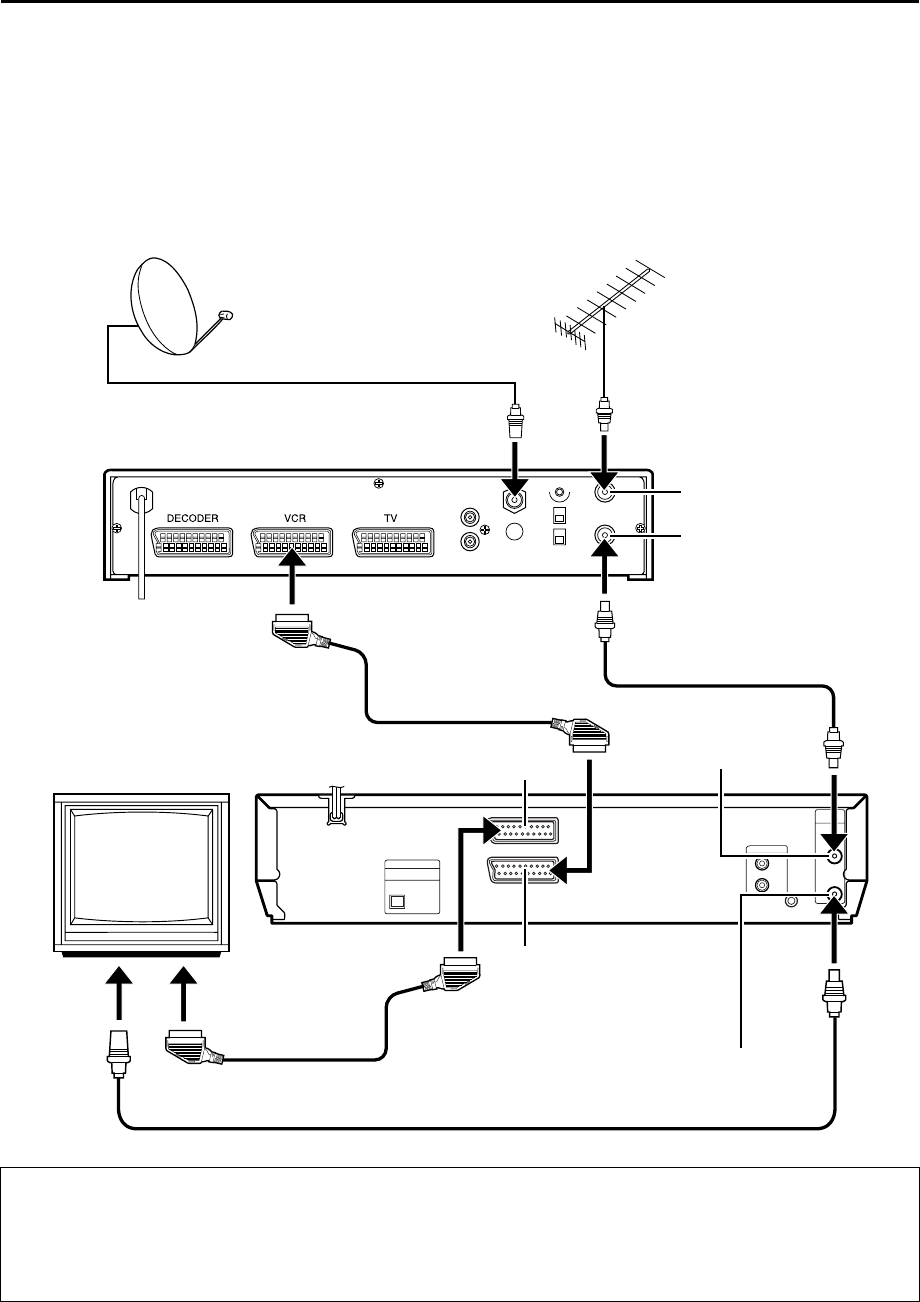
Connecting to a Satellite Receiver
Connect the satellite receiver to the L-2 IN/DECODER
connector, then connect the L-1 IN/OUT connector to
the TV’s connector.
NOTES:
●Set “L-2 SELECT” to “A/V.” (੬pg.54)
●You can use the Automatic Satellite Programme Recording
function (
੬pg. 28) with this connection. (VHS deck only)
●To record a programme via the satellite receiver, select L-2
mode by pressing AUX (number key “0”) and/or PR so that
“L-2” appears on the front display panel. (VHS deck only)
●For details, refer to the instruction manual of the satellite
receiver.
IMPORTANT
When you set “L-2 SELECT” to “SAT” (੬pg.54), it is possible to view a satellite broadcast with the TV set to its AV mode even if
the unit is turned off. When the unit is in Stop mode or recording, press TV/VCR on the remote control to turn off the VCR indicator
on the front display panel.
●If you turn on the unit when the satellite receiver’s power is off, nothing appears on the TV screen. In this case, turn on the
satellite receiver, or set the TV to its TV mode, or press TV/VCR on the remote control to set the unit to the video mode.
Outdoor unit
Satellite cable
Satellite receiver
Aerial
TV aerial cable
TV
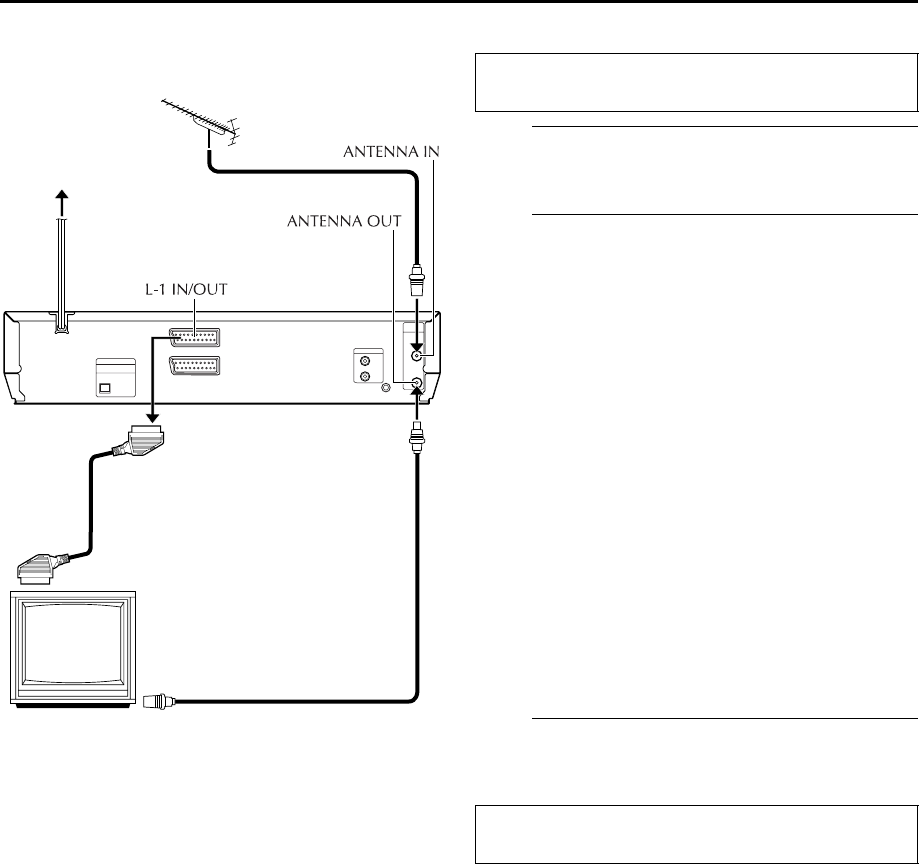
ANTENNA OUT
ANTENNA IN
L-1 IN/OUT
L-2 IN/DECODER
ANTENNA IN
ANTENNA OUT
XV48EK_01.book Page 50 Thursday, November 18, 2004 10:45 PM
Masterpage:Right-No-Heading
51
Filename [XV48EK_09Editing.fm]
Page 51November 18, 2004 10:44 pm
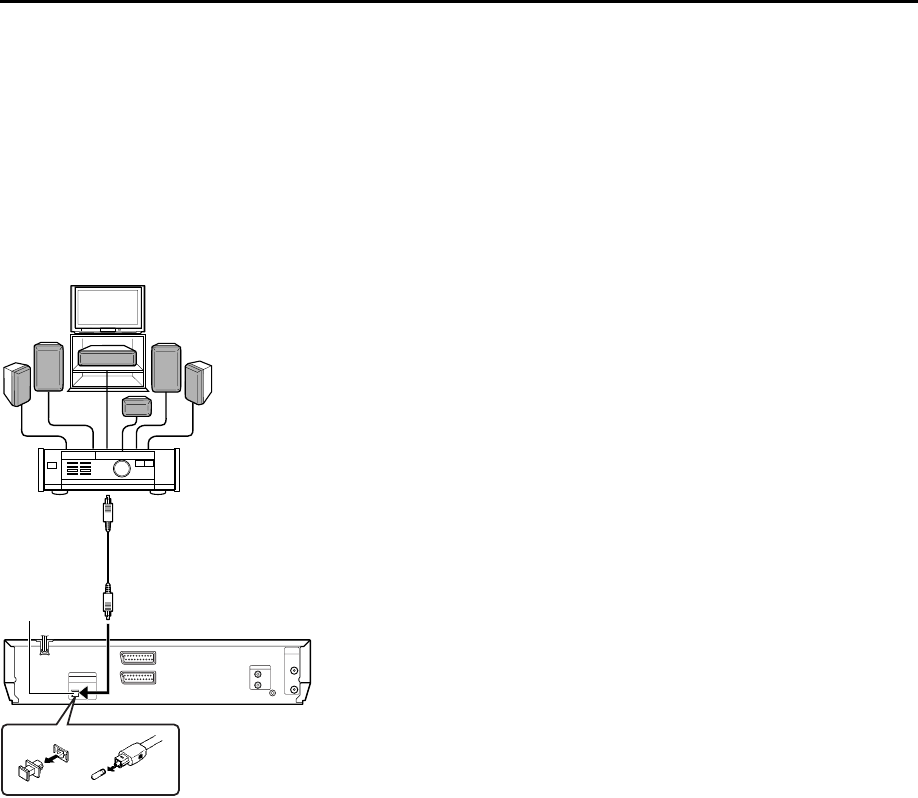
Connecting to a Dolby Digital Decoder or an Amplifier
with a Built-In DTS (DVD deck only)
These instructions enable you to connect your unit to a
Dolby Digital Decoder or an amplifier with built-in DTS.
Make connections.
Connect the optical cable between the unit and the
Dolby Digital Decoder or amplifier with a built-in DTS.
NOTES:
●For Dolby Digital sound, set “DIGITAL AUDIO OUTPUT” to
“DOLBY DIGITAL/PCM.” (
੬pg.15, 56)
●For DTS sound, set “DIGITAL AUDIO OUTPUT” to “STREAM/
PCM.” (
੬pg. 15, 56)
CAUTIONS:
●This unit has a dynamic range of more than 80 dB with regards
to its Hi-Fi audio capability. It is recommended that you check
the maximum level if you are going to listen to the Hi-Fi audio
signals through a stereo amplifier. A sudden surge in the input
level to the speakers may damage them.
●Some speakers and televisions are specially shielded to
prevent television interference. If both are of the non-shielded
type, do not place the speakers adjacent to the TV set as this
can adversely affect the video playback picture.
Note for connection:
Remove the connector cover from
the unit and remove the protection
cap from the cable.
Optical cable
(not provided)
Dolby Digital Decoder or
amplifier with built-in DTS
DIGITAL
AUDIO OUT
To DIGITAL AUDIO
input
XV48EK_01.book Page 51 Thursday, November 18, 2004 10:45 PM
Filename [XV48EK_10Subsidiary.fm]
Masterpage:Left0
52
Page 52November 18, 2004 10:44 pm
SUBSIDIARY SETTINGS
Mode Set (VHS deck)
You can change various mode settings on the Mode Set
screen by following the procedure described below.
●For each mode setting, see pages 53 to 54.
A
Turn on the unit.
Press 1.
B
Select the VHS deck.
On the unit
Press VCR/DVD repeatedly so that the VCR indicator
lights up.
On the remote control
Press VCR so that the VCR indicator lights up.
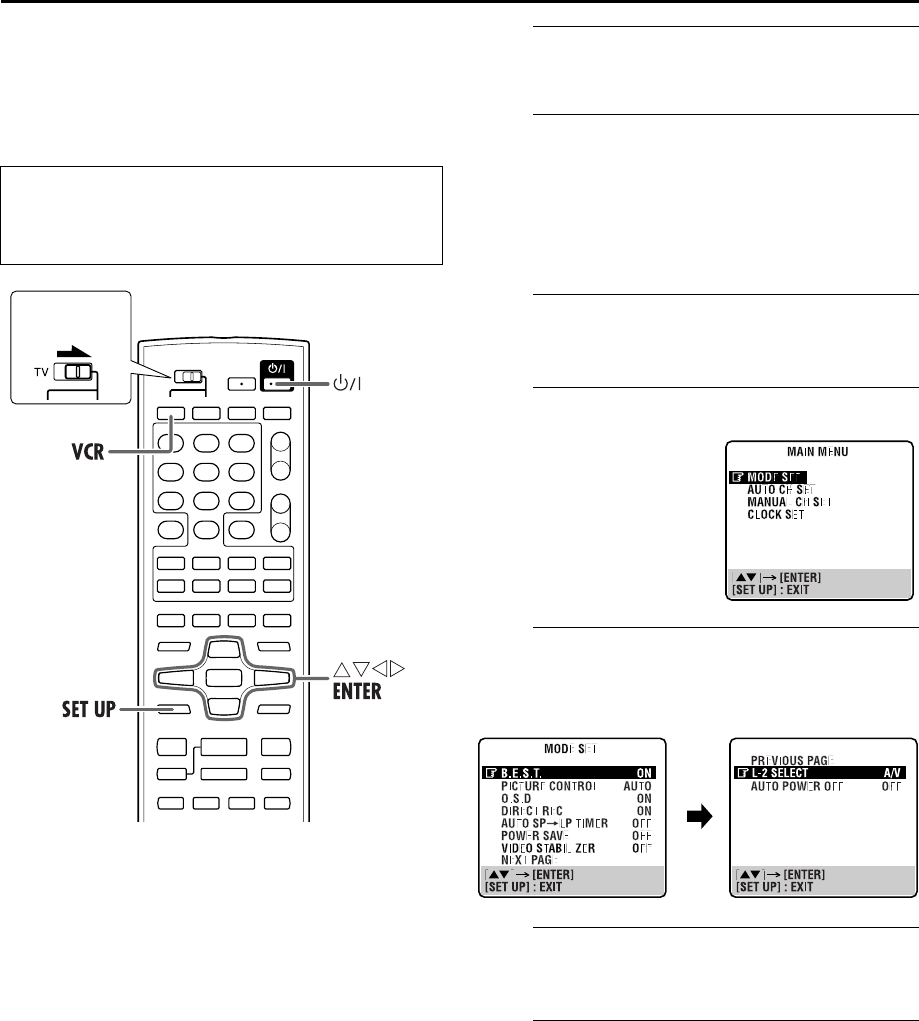
C
Access the Main Menu screen.
Press SET UP.
D
Access the Mode Set screen.
E
Select the mode.
Press rt to move the highlight bar (pointer) to the item
you want to change.
F
Select the mode setting.
Press ENTER or e.
G
Return to the normal screen.
Press SET UP.
●Turn on the TV and select the video channel (or AV
mode).
●Slide the TV/VCR/DVD switch on the remote
control to the right.
Slide to the
right.
Press rt to move the
highlight bar (pointer) to
“MODE SET,” then press
ENTER or e.
XV48EK_01.book Page 52 Thursday, November 18, 2004 10:45 PM
Masterpage:Right-No-Heading
53
Filename [XV48EK_10Subsidiary.fm]
Page 53November 18, 2004 10:44 pm
* The default setting is bold in the table below.
8B.E.S.T. — ON / OFF
You can set the B.E.S.T. (Biconditional Equalised Signal Tracking)
system to “ON” or “OFF.” (
੬pg.23)
NOTES:
●When watching a tape recorded with “B.E.S.T.” set to “ON,” it
is recommended that you leave B.E.S.T. on during playback as
well.
●When watching a rental tape or one recorded on another
video recorder, or when using this unit as the player for
editing, set B.E.S.T. to your preference.
●The B.E.S.T. system works for both SP and LP modes only after
a tape has been inserted and the Record mode is first initiated.
It does not work during recording.
●The B.E.S.T. system does not work while Automatic Satellite
Programme Recording is in progress. (
੬pg.28)
●In the case of timer recordings, the B.E.S.T. system works
before recording is initiated.
●Once the cassette is ejected, the B.E.S.T. data is cancelled. The
next time the cassette is used for recording, B.E.S.T. is re-
performed.
●Pressing the unit’s 7 button while “BEST” is displayed does
not start Instant Timer Recording. (
੬pg.22)
8PICTURE CONTROL— AUTO / EDIT / SOFT
This feature helps you to adjust the playback picture quality
according to your preference. Normally select “AUTO.”
AUTO: Provides the optimised picture benefits of the B.E.S.T.
Picture System.
EDIT: Minimizes picture degradation during editing (recording
and playback).
SOFT: Reduces image coarseness when viewing overplayed
tapes containing a lot of noise.
NOTES:
●When you select “EDIT” or “SOFT,” the selected mode will not
change until you select another mode.
●When you select “EDIT” to dub tapes, be sure to select
“AUTO” after you finish dubbing the tapes.
●When “B.E.S.T.” is “OFF”, “PICTURE CONTROL” switches
automatically from “AUTO” to “NORM.”
8O.S.D. — ON / OFF
When this function is set to “ON,” various operational indicators
appear on the TV screen.
NOTES:
●When you use this unit as the source player for editing, be sure
to set “O.S.D.” to “OFF” before starting.
●During playback, the operation mode indicators may be
disturbed depending on the type of tape being used.
8DIRECT REC — ON / OFF
When this function is set to “ON,” you can easily start recording
the programme that you are watching on your TV. Press and hold
7 and press 4 on the remote control, or press 7 on the unit.
NOTES:
●When you use the Direct Rec function, be sure to use a TV
offering T-V LINK, etc. and connect a fully-wired 21-pin
SCART cable between the unit and the TV. (
੬pg.11)
●If “DIRECT REC” is set to “OFF,” the 7 button functions as
described in “Basic Recording” (
੬pg. 21).
●During Direct Rec, “– –” appears on the front display panel.
●When “DIRECT REC” is set to “ON,” if you press any button
just after pressing 7 on the unit (or 7 and 4 on the remote
control), the unit may not function properly.
8AUTO SP]LP TIMER — ON / OFF
When this function is set to “ON”, the unit automatically
switches to LP mode to allow complete recording if there is not
enough tape to record the entire programme while timer-
recording in SP mode.
For Example:
Recording a programme of 210 minutes in length onto a 180-
minute tape
Make sure you set this function to “ON,” before the timer-
recording starts.
NOTES:
●If you have programmed the unit to timer-record 2 or more
programmes, the second programme and those thereafter may
not fit on the tape if you set “AUTO SP]LP TIMER” to “ON.”
In this case, make sure the mode is not engaged, then set the
tape speed manually during timer programming.
●In order to ensure that the recording fits on the tape, this
feature may leave a slight non-recorded section at the end of
the tape.
●There may be some noise and sound disturbance at the point
on the tape where the unit switches from SP to LP mode.
●The Auto SP
]LP Timer feature is not available during ITR
(Instant Timer Recording), and the feature will not work
properly with any tapes longer than E-180, or with some tapes
of shorter lengths.
●If you perform timer recording with both PDC and the Auto
SP
]LP Timer activated, and the programme goes beyond its
originally scheduled length, there may be times when the
programme cannot be recorded in its entirety.
Total 210 minutes
Approximately 150 minutes Approximately 60 minutes
SP modeLP mode
XV48EK_01.book Page 53 Thursday, November 18, 2004 10:45 PM
Filename [XV48EK_10Subsidiary.fm]
Masterpage:Left+
Page 54November 18, 2004 10:44 pm
SUBSIDIARY SETTINGS (cont.)
54
8POWER SAVE — ON / OFF
When this function is set to “ON,” you can reduce the power
consumption while the unit is turned off.
NOTES:
●During Power Save mode:
— the front display panel will be turned off.
— the Just Clock function (
੬pg.65) does not work.
— the picture may be distorted momentarily when you turn
on/off the unit.
●Power Save does not work when:
— the unit is in the timer mode.
—the unit’s power is turned off after timer-recording or Instant
Timer Recording.
— the Automatic Satellite Programme Recording mode is
engaged. (
੬pg. 28)
— “L-2 SELECT” is set to “DECODER” or “SAT.”
8VIDEO STABILIZER — ON / OFF
When this function is set to “ON,” you can automatically correct
vertical vibration in the picture when playing back unstable
recordings made on another recorder.
NOTES:
●When you finish viewing a tape, be sure to set this function to
“OFF.”
●Regardless of the setting, this function has no effect during
recording and during special effects playback.
●The on-screen display may jitter vertically when this function
is set to “ON.”
●To watch recordings with close-caption, set this function to
“OFF.”
8L-2 SELECT — A/V / DECODER / SAT
Set “L-2 SELECT” to the appropriate mode depending on the
type of appliance connected to the unit’s L-2 IN/DECODER
connector.
A/V: To use this unit as the recording deck with the player
connected to the L-2 IN/DECODER connector, or to use the
satellite receiver connected to the L-2 IN/DECODER
connector.
DECODER: To use a decoder connected to the L-2 IN/DECODER
connector.
SAT: To view a satellite programme with the TV set while the
unit is turned off. (
੬pg.50)
NOTES:
●Decoder function is not available in the U.K.
●If you have a satellite receiver or a decoder connected to the
L-2 IN/DECODER connector, be sure to set “L-2 SELECT” back
to the appropriate mode after editing.
●
If you are not connecting a satellite receiver or a decoder to the
L-2 IN/DECODER connector, leave “L-2 SELECT” set to “A/V.”
●When “L-2 SELECT” is set to “SAT,” “SAT” appears on the TV
screen or front display panel instead of “L-2.”
8AUTO POWER OFF — 3H / OFF
When this function is set to “3H,” the unit is turned off
automatically if no operation is done within 3 hours. “AUTO
POWER OFF IN 3 MIN” appears on the screen 3 minutes before
the unit is turned off.
XV48EK_01.book Page 54 Thursday, November 18, 2004 10:45 PM
Masterpage:Right-No-Heading
55
Filename [XV48EK_10Subsidiary.fm]
Page 55November 18, 2004 10:44 pm
Mode Set (DVD deck)
You can change various mode settings on the Mode Set
screen by following the procedure described below.
●For each mode setting, see corresponding pages.
●The procedure shows how to set “RESUME” to “ON”
on the DVD Set Up menu screen as an example.
A
Turn on the unit.
Press 1.
B
Select the DVD deck.
On the unit
Press VCR/DVD repeatedly so that the DVD indicator
lights up.
On the remote control
Press DVD so that the DVD indicator lights up.
C
Access the DVD Set Up menu screen.
LANGUAGE]PICTURE]AUDIO ]OTHERS
](Back to the beginning)
D
Select the mode.
Press rt to move H to “RESUME,” then press ENTER.
E
Select the mode setting.
Press rt to select “ON,” then press ENTER.
F
Return to the normal screen.
Press SET UP.
LANGUAGE
MENU LANGUAGE (
੬pg. 16)
AUDIO LANGUAGE (
੬pg. 16)
SUBTITLE (
੬pg.16)
ON SCREEN LANGUAGE (
੬pg.15)
PICTURE
MONITOR TYPE (
੬pg. 15)
PICTURE SOURCE (
੬pg. 56)
SCREEN SAVER (
੬pg.56)
BACKGROUND (
੬pg.56)
AUDIO
DIGITAL AUDIO OUTPUT (
੬pg.15)
ANALOG DOWNMIX (
੬pg. 56)
D. RANGE CONTROL (
੬pg. 56)
OUTPUT LEVEL (
੬pg. 56)
OTHERS
RESUME (
੬pg. 57)
ON SCREEN GUIDE (
੬pg. 57)
DivX REGISTRATION (
੬pg. 57)
PARENTAL LOCK (
੬pg. 57)
●Turn on the TV and select the video channel (or AV
mode).
●Slide the TV/VCR/DVD switch on the remote
control to the right.
Slide to the
right.
APress SET UP.
BPress we to select
“OTHERS.”
●Each time you press the
button, the setup menus
change as follows;
ON
OTHERS
RESUME
ON SCREEN GUIDE
ON
DivX REGISTRATION
PARENTAL LOCK
ON
OTHERS
RESUME
ON SCREEN GUIDE
ON
DivX REGISTRATION
PARENTAL LOCK
XV48EK_01.book Page 55 Thursday, November 18, 2004 10:45 PM
Filename [XV48EK_10Subsidiary.fm]
Masterpage:Left+
Page 56November 18, 2004 10:44 pm
SUBSIDIARY SETTINGS (cont.)
56
* The default setting is bold in the table below.
Picture Settings
8MONITOR TYPE —
16:9 / 4:3 LB / 4:3 PS
You can select the monitor type depending on the TV used when
you play back DVD VIDEO discs recorded for wide-screen TVs.
For more details, refer to “Initial Set Up for DVD Deck”
(
੬pg. 15).
8PICTURE SOURCE —
AUTO / FILM / VIDEO (NORMAL) / VIDEO (ACTIVE)
You can obtain optimal picture quality by selecting whether the
content on the disc is processed by field (video source) or by
frame (film source).
Normally set to “AUTO.”
AUTO: Used to play back a disc containing both video and film
source materials. This unit recognizes the picture type (film or
video source) of the current disc according to the disc
information.
FILM: Suitable for playing back a film or progressive source disc.
VIDEO (NORMAL): Suitable for playing back a video source disc
with relatively a few movements.
VIDEO (ACTIVE): Suitable for playing back a video source disc
with relatively a lot of movements.
●If the playback picture is unclear or noisy, or the oblique lines
of the picture are rough, try to change to other modes.
8SCREEN SAVER — ON / OFF
The TV screen may be burned out if a static picture is displayed
for a long time. When this function is set to “ON,” the unit
automatically activates the screen saver function if a static
picture, such as an on-screen display or menu is displayed for
over 5 minutes.
NOTE:
This function is not available for Audio files playback.
8BACKGROUND —
STANDARD / USER / SAVE AS BACKGROUND
You can use your favorite image as the opening display.
STANDARD: Select this to display the JVC original image.
USER: Select this to display your favorite image when a JPEG
image is registered.
SAVE AS BACKGROUND: To register a new image, select this
while a JPEG image is displayed on the TV screen.
Audio Settings
8DIGITAL AUDIO OUTPUT —
PCM ONLY / DOLBY DIGITAL/PCM / STREAM/PCM
Set to the appropriate mode according to the type of the device
connected to DIGITAL AUDIO OUT connector on the rear of
unit.
It is not necessary to set this mode when you connect no device
to the DIGITAL AUDIO OUT connector.
For more details, refer to “Initial Set Up for DVD Deck”
(
੬pg. 15).
8ANALOG DOWNMIX — DOLBY SURROUND / STEREO
Set to the appropriate mode according to your audio system
when you play back a DVD VIDEO disc recorded with surround
multichannel audio. This setting affects only the analogue audio
output signal from the AUDIO OUT connectors when playing
back a DVD VIDEO disc recorded with surround multichannel
audio.
DOLBY SURROUND: Select this when you enjoy multichannel
surround audio by connecting the unit’s analogue AUDIO
OUTPUT connectors (DVD) to a surround decoder.
STEREO: Select this when you enjoy conventional 2-channel
stereo audio by connecting the unit’s analogue AUDIO
OUTPUT connectors (DVD) to a stereo amplifier/receiver or
TV, or when you dub audio of a DVD VIDEO disc recorded
with surround audio to your MD, cassette, etc.
8D. RANGE CONTROL —
WIDE RANGE / NORMAL
/ TV MODE
The dynamic range (the difference between the loudest sound
and the quietest one) can be compressed during playback of a
programme encoded in Dolby Digital format.
This function takes effect when a DVD VIDEO disc recorded in
Dolby Digital format is played back at low or middle volume.
WIDE RANGE: Select this to inactivate this function when you
enjoy wide dynamic range programme.
NORMAL: Normally select this setting to activate this function.
TV MODE: Select this when you hear the sound through the TV's
speaker(s).
8OUTPUT LEVEL — STANDARD / LOW
You can lower the output level of analog audio to accommodate
the unit to the connected A/V equipment.
STANDARD: Normally select this.
LOW: Select this if the sound output from the speaker is
distorted. The output level of analog audio is lowered.
XV48EK_01.book Page 56 Thursday, November 18, 2004 10:45 PM
Masterpage:Right-No-Heading
57
Filename [XV48EK_10Subsidiary.fm]
Page 57November 18, 2004 10:44 pm
NOTES:
●The unit is not equipped with the DTS decoding function.
●When you play back a DVD VIDEO or Audio CD disc with
DTS, use a DTS decoder to get correct signals from your
speakers. Never use the unit’s analog output connectors,
which output incorrect signals that may damage your
speakers.
●If you connect the analog outputs and digital outputs
simultaneously, be sure to select the source of the amplifier
correctly, or set the level control of the amplifier connected to
the analog outputs to minimum.
Others Settings
8RESUME — ON / OFF / DISC RESUME
You can select the resume playback mode.
ON: The unit resumes playback from the position where
playback has been stopped if the disc is still in the disc tray.
OFF: This function is deactivated.
DISC RESUME: The unit resumes playback of the last 30 discs
played. The unit retains a memory of the stopped position of
each disc even if the disc is removed from the disc tray.
NOTE:
This function is not available for Audio CD discs and Audio/
Video files playback.
8ON SCREEN GUIDE — ON / OFF
When this function is set to “ON,” the unit can display “on-
screen guide” icons or characters which show the conditions of
the unit or disc.
8DivX REGISTRATION
The unit has its own Registration Code for DivX playback. You
can confirm the code of your unit.
NOTE:
Once you played back a disc created by using the Registration
Code, the unit’s code is overwritten by a totally different new
one for copyright protection purpose.
8PARENTAL LOCK
Select this, then press ENTER to show the PARENTAL LOCK
menu screen for limiting playback by children.
Parental Lock
This function restricts playback of DVD VIDEO discs which
contains violent (and other) scenes according to the level set by
the user. Scenes which are limited by this function are not played
or replaced with other scenes.
8COUNTRY CODE
Select the code of your country/area. (੬pg.58)
8SET LEVEL
Select the level of restriction. (“1” is the strictest.)
8PASSWORD
Enter your password by pressing the number keys(0-9).
8EXIT
Select this, then press ENTERto go back to the OTHERS menu
screen.
NOTES:
●Some DVD VIDEO discs cannot be played by this function. If
you try to play such a disc, the PARENTAL LOCK menu screen
appears on the TV screen and asks whether you want to
release the lock or not.
To release the lock and play, select “TEMPORARY RELEASE,”
press ENTER, then enter your password. Otherwise, eject the
disc.
●To change the setting of the limitation, you need to enter your
password.
●If you forget your pass word, enter “8888.”
Playback discs
Output
STREAM/PCMDOLBY DIGITAL/PCMPCM ONLY
DVD VIDEO with
48 kHz, 16/20/24 bit linear
PCM
48 kHz, 16 bit linear PCM
DVD VIDEO with DTSDTS bitstream48 kHz, 24 bit stereo linear PCM
DVD VIDEO with Dolby
Digital
Dolby Digital bitstream
48 kHz, 24 bit stereo linear
PCM
Video CD/SVCD/Audio CD44.1 kHz, 16 bit stereo linear PCM
Audio CD with DTSDTS bitstream44.1 kHz, 24 bit stereo linear PCM
CD-R/RW recorded MP3
,
CD-R/RW or DVD-R/RW
recorded DivX
Linear PCM
XV48EK_01.book Page 57 Thursday, November 18, 2004 10:45 PM
Filename [XV48EK_10Subsidiary.fm]
Masterpage:Left+
Page 58November 23, 2004 1:08 pm
SUBSIDIARY SETTINGS (cont.)
58
Country/Area Code List for Parental Lock
AD
AE
AF
AG
AI
AL
AM
AN
AO
AQ
AR
AS
AT
AU
AW
AZ
BA
BB
BD
BE
BF
BG
BH
BI
BJ
BM
BN
BO
BR
BS
BT
BV
BW
BY
BZ
CA
CC
CF
CG
CH
CI
CK
CL
CM
CN
CO
CR
CU
CV
CX
CY
CZ
DE
DJ
DK
DM
DO
DZ
EC
EE
EG
EH
ER
Andorra
United Arab Emirates
Afghanistan
Antigua and Barbuda
Anguilla
Albania
Armenia
Netherlands Antilles
Angola
Antarctica
Argentina
American Samoa
Austria
Australia
Aruba
Azerbaijan
Bosnia and Herzegovina
Barbados
Bangladesh
Belgium
Burkina Faso
Bulgaria
Bahrain
Burundi
Benin
Bermuda
Brunei Darussalam
Bolivia
Brazil
Bahamas
Bhutan
Bouvet Island
Botswana
Belarus
Belize
Canada
Cocos (Keeling) Islands
Central African Republic
Congo
Switzerland
Côte d’Ivoire
Cook Islands
Chile
Cameroon
China
Colombia
Costa Rica
Cuba
Cape Verde
Christmas Island
Cyprus
Czech Republic
Germany
Djibouti
Denmark
Dominica
Dominican Republic
Algeria
Ecuador
Estonia
Egypt
Western Sahara
Eritrea
ES
ET
FI
FJ
FK
FM
FO
FR
FX
GA
GB
GD
GE
GF
GH
GI
GL
GM
GN
GP
GQ
GR
GS
GT
GU
GW
GY
HK
HM
HN
HR
HT
HU
ID
IE
IL
IN
IO
IQ
IR
IS
IT
JM
JO
JP
KE
KG
KH
KI
KM
KN
KP
KR
KW
KY
KZ
LA
LB
Spain
Ethiopia
Finland
Fiji
Falkland Islands (Malvinas)
Micronesia (Federated States of)
Faroe Islands
France
France, Metropolitan
Gabon
United Kingdom
Grenada
Georgia
French Guiana
Ghana
Gibraltar
Greenland
Gambia
Guinea
Guadeloupe
Equatorial Guinea
Greece
South Georgia and the South
Sandwich Islands
Guatemala
Guam
Guinea-Bissau
Guyana
Hong Kong
Heard Island and McDonald
Islands
Honduras
Croatia
Haiti
Hungary
Indonesia
Ireland
Israel
India
British Indian Ocean Territory
Iraq
Iran (Islamic Republic of)
Iceland
Italy
Jamaica
Jordan
Japan
Kenya
Kyrgyzstan
Cambodia
Kiribati
Comoros
Saint Kitts and Nevis
Korea, Democratic People’s
Republic of
Korea, Republic of
Kuwait
Cayman Islands
Kazakhstan
Lao People’s Democratic
Republic
Lebanon
LC
LI
LK
LR
LS
LT
LU
LV
LY
MA
MC
MD
MG
MH
ML
MM
MN
MO
MP
MQ
MR
MS
MT
MU
MV
MW
MX
MY
MZ
NA
NC
NE
NF
NG
NI
NL
NO
NP
NR
NU
NZ
OM
PA
PE
PF
PG
PH
PK
PL
PM
PN
PR
PT
PW
PY
QA
RE
RO
RU
RW
Saint Lucia
Liechtenstein
Sri Lanka
Liberia
Lesotho
Lithuania
Luxembourg
Latvia
Libyan Arab Jamahiriya
Morocco
Monaco
Moldova, Republic of
Madagascar
Marshall Islands
Mali
Myanmar
Mongolia
Macau
Northern Mariana Islands
Martinique
Mauritania
Montserrat
Malta
Mauritius
Maldives
Malawi
Mexico
Malaysia
Mozambique
Namibia
New Caledonia
Niger
Norfolk Island
Nigeria
Nicaragua
Netherlands
Norway
Nepal
Nauru
Niue
New Zealand
Oman
Panama
Peru
French Polynesia
Papua New Guinea
Philippines
Pakistan
Poland
Saint Pierre and Miquelon
Pitcairn
Puerto Rico
Portugal
Palau
Paraguay
Qatar
Réunion
Romania
Russian Federation
Rwanda
SA
SB
SC
SD
SE
SG
SH
SI
SJ
SK
SL
SM
SN
SO
SR
ST
SV
SY
SZ
TC
TD
TF
TG
TH
TJ
TK
TM
TN
TO
TP
TR
TT
TV
TW
TZ
UA
UG
UM
US
UY
UZ
VA
VC
VE
VG
VI
VN
VU
WF
WS
YE
YT
YU
ZA
ZM
ZR
ZW
Saudi Arabia
Solomon Islands
Seychelles
Sudan
Sweden
Singapore
Saint Helena
Slovenia
Svalbard and Jan Mayen
Slovakia
Sierra Leone
San Marino
Senegal
Somalia
Suriname
Sao Tome and Principe
El Salvador
Syrian Arab Republic
Swaziland
Turks and Caicos Islands
Chad
French Southern Territories
Togo
Thailand
Tajikistan
Tokelau
Turkmenistan
Tunisia
Tonga
East Timor
Turkey
Trinidad and Tobago
Tuvalu
Taiwan
Tanzania, United Republic of
Ukraine
Uganda
United States Minor Outlying
Islands
United States
Uruguay
Uzbekistan
Vatican City State (Holy See)
Saint Vincent and the Grenadines
Venezuela
Virgin Islands (British)
Virgin Islands (U.S.)
Viet Nam
Vanuatu
Wallis and Futuna Islands
Samoa
Ye me n
Mayotte
Yugoslavia
South Africa
Zambia
Zaire
Zimbabwe
XV48EK_10Subsidiary.fm Page 58 Tuesday, November 23, 2004 1:08 PM
Masterpage:Right-No-Heading
59
Filename [XV48EK_10Subsidiary.fm]
Page 59November 18, 2004 10:44 pm
Tuner Set
Your unit needs to memorize all necessary stations in channel
positions in order to record TV programmes. Auto Channel Set
automatically assigns all receivable stations in your area to call
them up by using the PR buttons without going through any
vacant channels.
Auto Channel Set
A
Turn on the unit.
Press 1.
B
Select the VHS deck.
On the unit
Press VCR/DVD repeatedly so that the VCR indicator
lights up.
On the remote control
Press VCR so that the VCR indicator lights up.
C
Access the Main Menu screen.
Press SET UP.
D
Perform Auto Channel Set.
●When you have connected
the unit to a TV offering T-V
Link via a fully-wired 21-pin
SCART cable (
੬pg.11), the
unit automatically performs
the Preset Download and the
T-V LINK screen will appear.
(
੬pg.13)
●The Auto Set screen appears,
and remains on screen while
the unit searches for
receivable stations.
As Auto Channel Set progresses, the “q” mark on the TV screen
moves from left to right. Wait until the TV screen as shown in
step E appears.
E
View the Confirmation screen.
After “SCAN COMPLETED” is
displayed on the TV screen for
about 5 seconds, the
Confirmation screen looking
like the one to the right
appears. The stations your unit
located appear on the
Confirmation screen —
channel positions (PR),
channels (CH) and station names (ID –
੬pg.62). The
blueback screen and the programme currently being
broadcast by the blinking station appear alternately for 8
seconds each. To view the next page, use the rtwe
button on the remote control.
●The Guide Program numbers will also be set automatically
during Auto Channel Set.
F
Return to the normal screen.
Press SET UP.
●Using the Confirmation screen, you can skip or add channel
positions, enter station names and perform other operations.
Refer to pages 60 – 61 for the procedures.
●
Depending on reception conditions, the stations may not be
stored in order, and the station names may not be stored correctly.
IMPORTANT
Perform the following steps only if —
— Auto Channel Set has not been set correctly by Auto Set
Up or by Preset Download. (
੬pg.12, 13)
— you have moved to a different area or if a new station
starts broadcasting in your area.
●Turn on the TV and select the video channel (or AV
mode).
●Slide the TV/VCR/DVD switch on the remote
control to the right.
Slide to the
right.
Press rt to move the
highlight bar (pointer) to
“AUTO CH SET,” then press
ENTER or e twice.
IMPORTANT
●
In certain reception conditions, station names may not be
stored correctly, and Auto Guide Program Number Set may
not work properly. If the Guide Program numbers are not set
properly when you timer-record a TV programme using the
VIDEO Plus+ system, the unit will record a TV programme
of a different station. When programming the timer using the
VIDEO Plus+ system, be sure to check the desired channel
is selected correctly. (
੬
pg. 24, “VIDEO Plus+
®
Timer
Programming”)
●
Your unit memorizes all detected stations even if reception
of some of them is poor. You can delete those stations with
an unacceptable picture. (
੬
pg. 60, “Deleting a Channel”)
BeginningEnd
XV48EK_01.book Page 59 Thursday, November 18, 2004 10:45 PM
Filename [XV48EK_10Subsidiary.fm]
Masterpage:Left+
Page 60November 18, 2004 10:44 pm
SUBSIDIARY SETTINGS (cont.)
60
NOTES:
●Fine tuning is performed automatically during Auto Channel
Set. If you want to perform tuning manually, refer to page 61.
●If you perform Auto Channel Set when the aerial cable is not
connected properly, “SCAN COMPLETED –NO SIGNAL–”
appears on the TV screen in stepE. When this happens, make
sure of the aerial connection and press ENTER; Auto Channel
Set will take place again.
Manual Channel Set
Store channels that were not stored during Auto Set Up
(
੬pg. 12), Preset Download (੬pg.13) or Auto Channel Set
(
੬pg. 59).
A
Access the Main Menu screen.
Press SET UP.
B
Access the Confirmation screen.
Press rt to move the highlight bar (pointer) to
“MANUAL CH SET”, then press ENTER or e. The
Confirmation screen appears.
C
Select the channel position.
D
Select the band.
E
Input the channel.
Press the number keys to input the channel number you
want to store.
●Input “0” before any single number entries.
●To input the registered station name (ID –
੬pg.62), press e
until “– – – –” (ID setting) begins blinking, then press rt.
●For fine tuning adjustment, press e until “+/–” begins blinking,
then press rt. While tuning, “+” or “–” appears.
●When “L-2 SELECT” is set to “A/V” or “SAT,” the “DECODER”
setting cannot be changed. (
੬pg.54)
F
Enter new channel information.
Press ENTER and the Confirmation screen appears.
●Repeat steps C– F as necessary.
G
Close the Confirmation screen.
Press SET UP.
●To change positions, see “Changing Station Channel Position”
(
੬pg.61).
●
If you wish to set station names other than the ones registered
in your unit, see “Setting Station Names Manually” (
੬
pg.61).
Deleting a Channel
A
Select the item.
Press rtwe until the item you want to delete begins
blinking.
B
Delete a channel.
Press &.
●The item directly beneath the cancelled one moves up one
line.
●Repeat steps A and B if necessary.
C
Close the Confirmation screen.
Press SET UP.
Press rtwe until an open
position in which you want to
store a channel begins
blinking, then press ENTER.
The Manual Channel Set
screen appears.
●The blueback screen and the
programme currently being
broadcast by the selected
channel appear alternately for 8
seconds each.
(Example) To store in position 6.
Press rt to change the
band between CH (regular)
and CC (cable), then press e.
ATTENTION
Guide Program numbers are not set when channels are
stored manually. (
੬pg.24, “VIDEO Plus+
®
Timer
Programming”)
Perform steps A and B of “Manual Channel Set” on page 60
to access the Confirmation screen before continuing.
XV48EK_01.book Page 60 Thursday, November 18, 2004 10:45 PM
Masterpage:Right-No-Heading
61
Filename [XV48EK_10Subsidiary.fm]
Page 61November 18, 2004 10:44 pm
Changing Station Channel Position
A
Select the item.
Press rtwe until the item you want to move begins
blinking. Then press ENTER and the station name (ID)
and its channel (CH) number begin blinking.
B
Select the new position.
Press rtwe to move the station to the new channel
position, then press ENTER.
Example:If you moved the station in position 4 to position 2, the
stations originally in positions 2 and 3 each move
down one space.
●Repeat steps A and B if necessary.
C
Close the Confirmation screen.
Press SET UP.
Setting Station Names by ID Code
Set station names by ID codes (“ID”
)
that are registered in your unit.
A
Select the item.
Press rtwe until the item you want begins blinking.
B
Access the Manual Channel Set screen.
Press ENTER twice.
C
Select the new station.
D
Switch the stations.
Press ENTER.
●The Confirmation screen appears.
●Repeat steps A–D if necessary.
E
Close the Confirmation screen.
Press SET UP.
Setting Station Names Manually
You can set station names manually.
A
Select the character for station name.
B
Enter the new character.
Press rt to cycle through the characters (A–Z, 0–9, –,
f, +, I (space) ) and stop when the desired character is
indicated, then press e to enter. Enter the remaining
characters the same way (maximum of 4). After entering
all characters, press ENTER.
●The Confirmation screen appears.
●If you make a mistake, press w until the incorrect character
begins blinking. Then enter the correct character by pressing
rt.
C
Close the Confirmation screen.
Press SET UP.
NOTE:
The characters available for the station name (ID) are A–Z, 0–9, –,
f
, +,
I
(space) (maximum of 4).
Fine-Tuning a Stored Channel
A
Select the channel to fine-tune.
Press rtwe until the channel you want to tune begins
blinking.
B
Access the Manual Channel Set screen.
Press ENTER twice. The Manual Channel Set screen
appears.
C
Perform tuning.
Press e until “+/–” begins blinking, then press rt to
obtain the best picture quality. After finishing adjustment,
press ENTER.
●The Confirmation screen appears.
●Repeat steps A– C if necessary.
D
Close the Confirmation screen.
Press SET UP.
Perform steps A and B of “Manual Channel Set” on page 60
to access the Confirmation screen before continuing.
Perform steps A and B of “Manual Channel Set” on page 60
to access the Confirmation screen before continuing.
Press e until the station
name (ID) begins blinking,
then press rt until the new
station’s name (ID) you want
to store begins blinking.
Registered station names
(
੬pg.62) appear as you
press rt.
Perform steps A and B of “Manual Channel Set” on page 60
to access the Confirmation screen and then perform steps A
and B of “Setting Station Names by ID Code” above before
continuing.
Press e until the first letter of
the station name begins
blinking.
Perform steps A and B of “Manual Channel Set” on page 60
to access the Confirmation screen before continuing.
XV48EK_01.book Page 61 Thursday, November 18, 2004 10:45 PM
Filename [XV48EK_10Subsidiary.fm]
Masterpage:Left+
Page 62November 18, 2004 10:44 pm
SUBSIDIARY SETTINGS (cont.)
62
TV Station and ID List
*The “ID” abbreviation is what is shown on-screen in lieu of the station name. The “ID” abbreviation is listed in the Confirmation screen and is displayed
on the TV screen when the unit is tuned to a different station.
STATION NAME ID*
Anglia TV
ARD
ARTE
BBC Group
BBC1
BBC2
Berlin 1
Berlin 2
Border TV
Bayern1
Bayern3
BRT1
BRT2
Children Ch
Canal +
CNN
Channel TV
Central TV
Channel 4
Channel 5
DRS
DR TV
DSF
Euronews
Euronews
Eurosports
France1
France2
France3
Granada TV
Grampian TV
Hessen1
Hessen3
HRT
HTV
ITV Network
Kabelkanal
London
MDR
MTV
Nord3
NDR1
NDR3
NED1
NED2
NED3
Network 2
NRK
N-TV
Offener Kanal
ORF1
ORF2
ORF3
OWL 3
Premiere
PR07
RAI1
RAI2
RAI3
RB1
RB3
Rikisutvarpid-S
RTBF 1
RTBF 2
RTE 1
RTL
RTL 2
RTP
ANGL
ARD
ARTE
BBC
BBC1
BBC2
BLN1
BLN2
BORD
BR1
BR3
BRT1
BRT2
CHLD
CH+
CNN
CHNL
CNTR
CH 4
CH 5
DRS
DRTV
DSF
EURN
EURO
EURS
FR1
FR2
FR3
GRNA
GRMP
HR1
HR3
HRT
HTV
ITV
KABL
LNDN
MDR
MTV
N3
NDR1
NDR3
NED1
NED2
NED3
NET2
NRK
N-TV
OKAN
ORF1
ORF2
ORF3
OWL3
PRMI
PR07
RAI1
RAI2
RAI3
RB1
RB3
RKPS
RTB1
RTB2
RTE1
RTL
RTL2
RTP
STATION NAME ID*
SAT
SAT 1
Scottish TV
SC4
SDR
SDR1
SFB1
SFB3
SKY
Sky One
Sky Net
Sport
SR 1
Super RTL
STV Test
STV 1
STV 2
Suedwest3
SWF 1
Schweiz4
TYNE TEES
Text
TF1
TNT int
TRT int
TSI
TSR
TSW
TVE
TV Polonia
TVP 1
TVP 2
TVS
TV2
TV5
Tele Zurich
Ulster TV
Veronica
VIVA
VIVA2
VOX
VTM
VT4
West1
West3
YLE 1
YLE 2
Yorkshire TV
ZDF
Zurich 1
3SAT
SAT
SAT1
SCOT
SC4
SDR
SDR1
SFB1
SFB3
SKY
SKY1
SKYN
SPRT
SR1
SRTL
STVT
STV1
STV2
SWR
SWF1
SWZ4
TEES
TEXT
TF1
TNT
TRT
TSI
TSR
TSW
TVE
TVPA
TVP1
TVP2
TVS
TV2
TV5
TZUR
ULST
VERN
VIVA
VIV2
VOX
VTM
VT4
WDR1
WDR3
YLE1
YLE2
YORK
ZDF
ZUR1
3SAT
XV48EK_01.book Page 62 Thursday, November 18, 2004 10:45 PM
Masterpage:Right-No-Heading
63
Filename [XV48EK_10Subsidiary.fm]
Page 63November 18, 2004 10:44 pm
TV Station Channel Number Guide
Only the main stations are listed. There are in addition many relay stations, and full lists are available from the BBC and ITV.
Libble nimmt den Missbrauch seiner Dienste sehr ernst. Wir setzen uns dafür ein, derartige Missbrauchsfälle gemäß den Gesetzen Ihres Heimatlandes zu behandeln. Wenn Sie eine Meldung übermitteln, überprüfen wir Ihre Informationen und ergreifen entsprechende Maßnahmen. Wir melden uns nur dann wieder bei Ihnen, wenn wir weitere Einzelheiten wissen müssen oder weitere Informationen für Sie haben.
Art des Missbrauchs:
Forenregeln
Um zu sinnvolle Fragen zu kommen halten Sie sich bitte an folgende Spielregeln:
Lesen Sie zuerst die Anleitung;
Schauen Sie nach, ob die Frage bereits gestellt wurde;
Stellen Sie die Frage so deutlich wie nur einigermaßen möglich;
Erwähnen Sie was Sie bereits versucht haben um das Problem zu lösen;
Ist Ihr Problem von einem Besucher gelöst dann lassen Sie ihn / sie wissen in diesem Forum;
Falls Sie reagieren möchten, so verwenden Sie bitte das Antworten- Formular;
Da ihre Frage für alle Besucher sichtbar ist, sollten Sie lieber keine persönliche Daten erwähnen.
Neu registrieren
Registrieren auf E - Mails für JVC HRXV48 wenn:
neue Frage gestellt werden
neue Handbücher vorhanden sind
Sie erhalten eine E-Mail, um sich für eine oder beide Optionen anzumelden.
Das Handbuch wird per E-Mail gesendet. Überprüfen Sie ihre E-Mail.
Wenn Sie innerhalb von 15 Minuten keine E-Mail mit dem Handbuch erhalten haben, kann es sein, dass Sie eine falsche E-Mail-Adresse eingegeben haben oder dass Ihr ISP eine maximale Größe eingestellt hat, um E-Mails zu erhalten, die kleiner als die Größe des Handbuchs sind.
Ihre Frage wurde zu diesem Forum hinzugefügt
Möchten Sie eine E-Mail erhalten, wenn neue Antworten und Fragen veröffentlicht werden? Geben Sie bitte Ihre Email-Adresse ein.