611418
23
Zoom out
Zoom in
Vorherige Seite
1/28
Nächste Seite
Leveling
Do not use power tools when performing the leveling procedure.
To enhance the appearance and maintain performance, the
refrigerator should be level. (side to side)
Note
Complete any required door reversal, panel installation and/or a water
supply connection, before leveling.
Materials Needed
3/8” hex head driver
A Spirit level
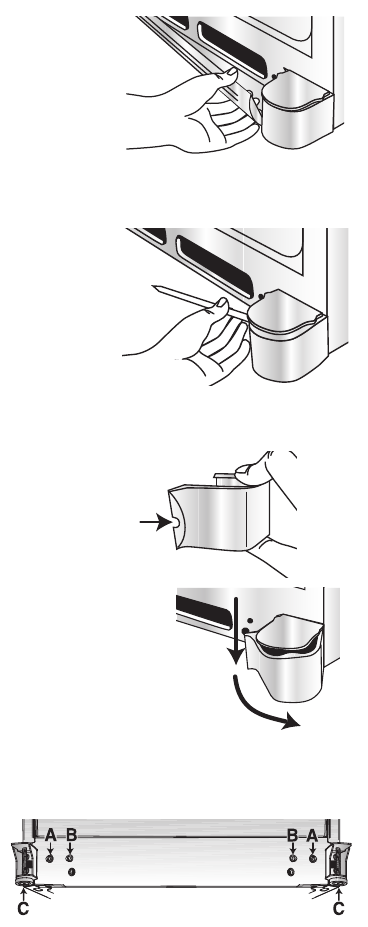
1. Remove the toe grille.
Grasp firmly and pull out carefully to unclip.
2. Remove the bottom bracket cover(s).
Place the eraser end of a pencil or similar blunt tool in the cover
notch.
Use a slight pressure to carefully pry the cover loose.
Continue the downward pressure to the notched side of the cover
while swinging it off.
3. Using hex head driver, turn the front adjustment screws (A) on each
side to raise or lower the front of the refrigerator.
Note
Some models only have adjustment screws “A”.
4. Selected models also have rear adjustment screws (B). Using the hex
head driver, turn each of these adjustment screws (B) to raise or
lower the rear of the refrigerator.
5. Using spirit level, make sure front of refrigerator is 6 mm or half
bubble higher than back of refrigerator and that the refrigerator is
level from side to side.
6. Turn stabilizing legs (C) clockwise until firmly against floor.
7. Freezer drawer models only: Turn adjustment screws (A)
anticlockwise to allow the full weight of the refrigerator to rest on the
stabilizing legs.
8. Replace the bracket cover(s).
Position cover into the outer edge of the hinge.
Swing the cover toward the cabinet and snap it into
place.
9. Replace the toe grille.
Note
For proper reinstallation, ensure the “top” marking on
the interior of the toe grille is oriented correctly.
Align the toe grille mounting clips with the lower cabinet slots.
Snap bottom portion into place first. Press down firmly on the top of
the grille until top portion snaps into place.
Installation
23
23

Brauchen Sie Hilfe? Stellen Sie Ihre Frage.

Forenregeln

Missbrauch melden von Frage und/oder Antwort

Libble nimmt den Missbrauch seiner Dienste sehr ernst. Wir setzen uns dafür ein, derartige Missbrauchsfälle gemäß den Gesetzen Ihres Heimatlandes zu behandeln. Wenn Sie eine Meldung übermitteln, überprüfen wir Ihre Informationen und ergreifen entsprechende Maßnahmen. Wir melden uns nur dann wieder bei Ihnen, wenn wir weitere Einzelheiten wissen müssen oder weitere Informationen für Sie haben.

Art des Missbrauchs:

Zum Beispiel antisemitische Inhalte, rassistische Inhalte oder Material, das zu einer Gewalttat führen könnte.

Beispielsweise eine Kreditkartennummer, persönliche Identifikationsnummer oder unveröffentlichte Privatadresse. Beachten Sie, dass E-Mail-Adressen und der vollständige Name nicht als private Informationen angesehen werden.

Forenregeln

Um zu sinnvolle Fragen zu kommen halten Sie sich bitte an folgende Spielregeln:

Neu registrieren

Registrieren auf E - Mails für KitchenAid KRFC 9016 wenn:


Sie erhalten eine E-Mail, um sich für eine oder beide Optionen anzumelden.


Andere Handbücher von KitchenAid KRFC 9016

KitchenAid KRFC 9016 Bedienungsanleitung - Deutsch - 28 seiten

KitchenAid KRFC 9016 Bedienungsanleitung - Holländisch - 28 seiten

KitchenAid KRFC 9016 Bedienungsanleitung - Französisch - 28 seiten


Das Handbuch wird per E-Mail gesendet. Überprüfen Sie ihre E-Mail.

Wenn Sie innerhalb von 15 Minuten keine E-Mail mit dem Handbuch erhalten haben, kann es sein, dass Sie eine falsche E-Mail-Adresse eingegeben haben oder dass Ihr ISP eine maximale Größe eingestellt hat, um E-Mails zu erhalten, die kleiner als die Größe des Handbuchs sind.

Ihre Frage wurde zu diesem Forum hinzugefügt

Möchten Sie eine E-Mail erhalten, wenn neue Antworten und Fragen veröffentlicht werden? Geben Sie bitte Ihre Email-Adresse ein.


Info