English
1 On/off switch
2 Electronic adjusting dial
3 Dust hood
4 Base plate
5 Saw bench mounting
6 Clamping wheel
7 Saw blade
8 Clamping lever
9 Dust extractor ø 35 mm
Technical data 6235 E
Input watts 350
Output watts 220
Idling speed stroke number/min. 3400
Control range strokes/min. 450–2500
Stroke height mm 19
Cutting depth into:
Wood mm 60
Soft steel mm 4
Mitre cuts up to ° 22.5 and 45
Weight kg 1.8
Use
This saw is a general-purpose jigsaw for all sawing jobs
on hardwoods, soft woods, coated woods, chipboard,
plywood, metal and plastics up to the given cutting
depth.
Safety instructions and prevention of accidents
Before operating the machine, please read through the
operating instructions completely, follow the Safety In-
structions in this manual as well as the general Safety In-
structions for Power Tools in the accompanying booklet.
Caution!
Ⴇ Always remove the mains connector from the appli-
ance before making changes to the tool.
Ⴇ Never put your hands in the vicinity of the tappet or
saw blade (7) while the machine is running – risk of
injury.
Ⴇ To avoid injuries, wear protective gloves when
changing the saw blade.
Clamping saw blade
Ⴇ Rotate clamping lever (8) as far as it will go and
hold in place.
Ⴇ Insert saw blade (7) as far as it will go.
Ⴇ Release clamping lever (8).
Important (must be observed)
Ⴇ Press jigsaw against saw blade tip on wooden
board, until clamping lever (8) springs back to its
starting position.
Ⴇ It is only by doing this that the secure clamping of
the saw blade (7) can be ensured and the hood (3)
can be closed.
Unclamping saw blade
Ⴇ Rotate clamping lever (8) as far as it will go and
hold in place.
Ⴇ Remove saw blade (7).
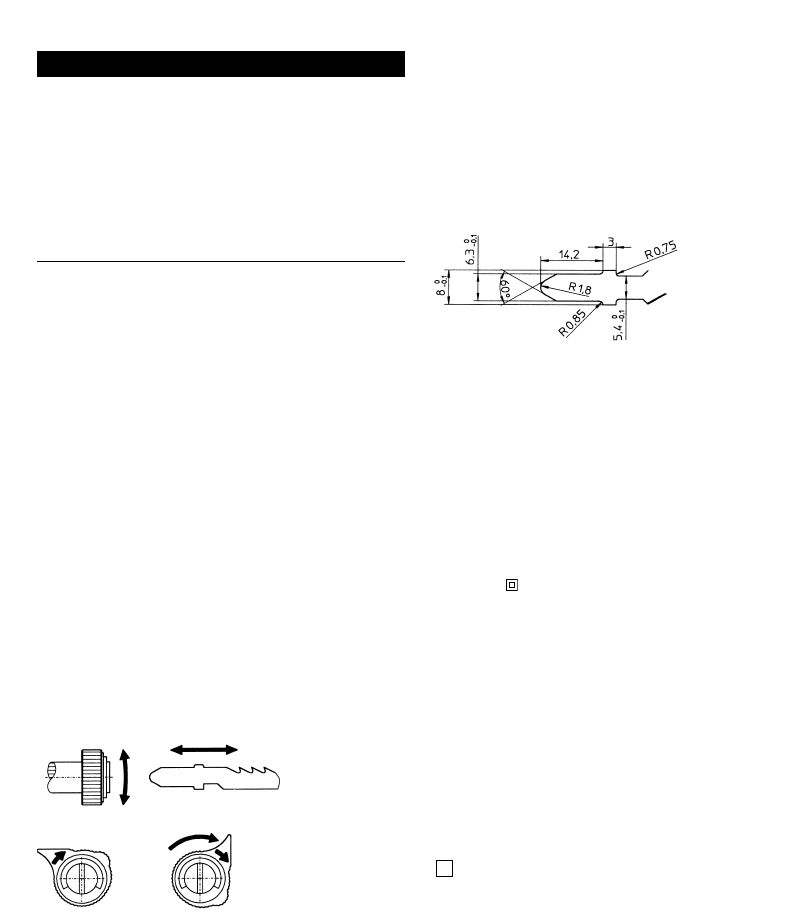
Only original Kress saw blades as listed in the operat-
ing manual or in accordance with the following sketch
with a max. thickness of 1.5 mm may be used. This is
the only way of guaranteeing that the saw blade is
securely mounted and eliminating as far as possible
the risk of accidents due to loose jigsaw blades.
Ⴇ Do not work with materials containing asbestos!
Ⴇ Outside power sockets must be protected with re-
sidual-current-operated circuit-breakers (r.c.c.b.).
Ⴇ Do not drill holes into the housing to label the ma-
chine. The protective insulation will be bridged.
Please use self-adhesive labels.
Ⴇ Always guide the cable away from the machine to
the back.
Double insulation
Our equipment is designed in accordance with European
regulations (EN standards) for the utmost safety of the
user. Machines with double insulation always carry the in-
ternational symbol. The machines do not require earth-
ing. A two-core cable is sufficient.
The machines are interference-suppressed in accordance
with EN 55014.
Initial operation
Before the first operation check that the mains voltage cor-
responds to that given on the machine nameplate.
Motor
At the heart of the jigsaw is a powerful universal motor with
welded collector which can cope with extended use of the
tool. The motor has a great power reserve. Since it is very
important for the motor to be constantly well-ventilated, it
is of particular importance to pay special attention to the
maintenance and servicing instructions for removing dust
and dirt.
Clamping and unclamping the saw blades
The advantage of the clamping system is that saw blades
can be changed without tools.
First push the dust hood (3) up. Open the quick-change
clamping system by turning the clamping lever (8) so that
the saw blade (7) can be inserted. Make sure that it is
pushed back as far as it can go. By releasing the clamping
lever (8) and then pushing in the direction of the tappet, it
is automatically fixed in position, and the clamping lever (8)
returns to its starting position.
When unclamping, the saw blade (7) is released from the
fixed position by turning the clamping lever (8).
Warning
Do not press back turned clamping levers as this mak-
es it very difficult to remove the saw blade.
It can then be taken out of the tappet.
The supporting roller, which prevents the saw blade from
warping and alleviates the stress placed on the mechanics
2
Starting position
(= tense position)
Striking point