110012
28
Zoom out
Zoom in
Vorherige Seite
1/96
Nächste Seite
28
Installation
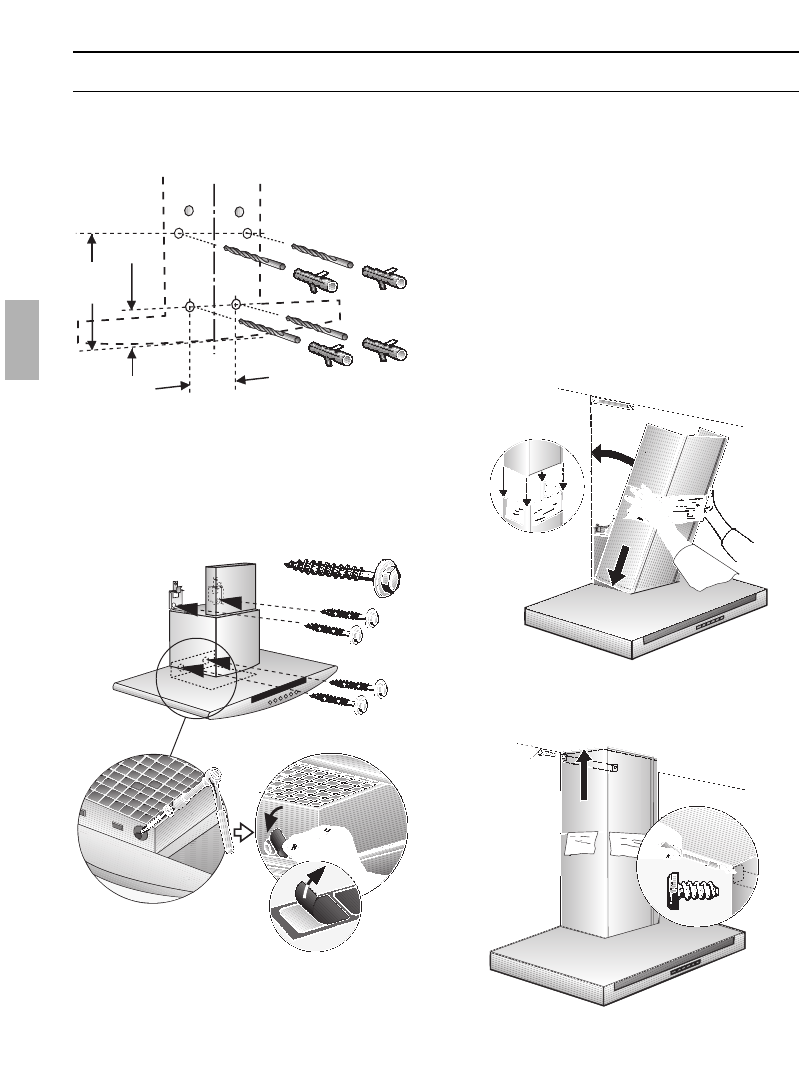
12. Remove the protective film from the
two flue ducts.
Avoid damage to the sensitive
surface.
13. Insert the upper flue duct (slots
downwards) into the lower flue duct.
Protect the cover panels from
scratches, for example by laying the
template used for marking the wall over
the top edge of the lower section.
14. Insert the complete flue duct at an
angle and swivel to the rear.
15. Carefully pull the upper flue duct
upwards and screw the sides to the
fixing bracket with 2 screws.
16. Insert the grease filter (refer to
Operating Instructions).
1.
2.
3.
07. Remove the extractor hood. Drill the
4 lower 8 mm ø fixing holes and press
in the wall plugs flush with the wall.
08. Attach the extractor hood and screw
into position with the remaining
4 screws.
09. Stick protective film over the holes of
the 2 lower mounting bolts in the
protective grid.
376
74
160
10. Connect up the air outlet pipe.
11. Connect the hood to the electricity
supply.
2.
1.
28

Brauchen Sie Hilfe? Stellen Sie Ihre Frage.

Forenregeln

Missbrauch melden von Frage und/oder Antwort

Libble nimmt den Missbrauch seiner Dienste sehr ernst. Wir setzen uns dafür ein, derartige Missbrauchsfälle gemäß den Gesetzen Ihres Heimatlandes zu behandeln. Wenn Sie eine Meldung übermitteln, überprüfen wir Ihre Informationen und ergreifen entsprechende Maßnahmen. Wir melden uns nur dann wieder bei Ihnen, wenn wir weitere Einzelheiten wissen müssen oder weitere Informationen für Sie haben.

Art des Missbrauchs:

Zum Beispiel antisemitische Inhalte, rassistische Inhalte oder Material, das zu einer Gewalttat führen könnte.

Beispielsweise eine Kreditkartennummer, persönliche Identifikationsnummer oder unveröffentlichte Privatadresse. Beachten Sie, dass E-Mail-Adressen und der vollständige Name nicht als private Informationen angesehen werden.

Forenregeln

Um zu sinnvolle Fragen zu kommen halten Sie sich bitte an folgende Spielregeln:

Neu registrieren

Registrieren auf E - Mails für Neff D 99T48 NO wenn:


Sie erhalten eine E-Mail, um sich für eine oder beide Optionen anzumelden.


Das Handbuch wird per E-Mail gesendet. Überprüfen Sie ihre E-Mail.

Wenn Sie innerhalb von 15 Minuten keine E-Mail mit dem Handbuch erhalten haben, kann es sein, dass Sie eine falsche E-Mail-Adresse eingegeben haben oder dass Ihr ISP eine maximale Größe eingestellt hat, um E-Mails zu erhalten, die kleiner als die Größe des Handbuchs sind.

Ihre Frage wurde zu diesem Forum hinzugefügt

Möchten Sie eine E-Mail erhalten, wenn neue Antworten und Fragen veröffentlicht werden? Geben Sie bitte Ihre Email-Adresse ein.


Info