76 77
De
En
Jp
Fr
Es
Pt
Ru
Se
Nl
It
Dk
Pl
Hu
Cz
Fi
No
Ro
De
En
Jp
Fr
Es
Pt
Ru
Se
Nl
It
Dk
Pl
Hu
Cz
Fi
No
Ro
Übersicht über den betrieb
V
oder Justagen oder die Ausführung von ander
als den hierin angegebenen
einer gefährlichen Strahlenbelastung führen.
1.
„
2. Dioptrin-Einstellung
Stellen Sie den Dioptrinwert ein, um ein k
auf dem L
Drehen Sie den Dioptrin-Einstellring zuerst bis
zum vollständigen Anschlag links herum. Schalten
Sie danach das Gerät ein, um das L
zu aktivieren, wenn Sie durch den Nikon Laser-
Entfernungsmesser schauen. Drehen Sie den
Dioptrin-Einstellring im Uhrzeigersinn, bis das
Display scharf dargestellt wird.
Wird der Dioptrinwert nicht entsprechend Ihrem
Sehvermögen eingestellt, sind Sie nicht in der Lage
Ihr Ziel korrekt zu fokussieren.
3. Messen
Stellen Sie vor der Messung sicher
Maßeinheiten eingestellt haben.
Measurement
1. Press the POWER button for power-on.
(Power turns off 8 seconds after the last
operation.)
Immediately after power-on.
(Initializing)
Stand-by. Target focusing.
2. Aim at the target
.
3. Press POWER button once to start
continuous measurement for 8 seconds.
(Single measurement mode is not
available with this laser rangefinder.)
Measuring.
4. For 8 seconds, the internal display shows “distance” and “fail to measure” indicator alternately.
(Laser irradiation mark is blinking.)
Failure to measure or
unable to measure distance.
Displays the measured
figure. (Target 1)
Displays the measured
figure. (Target 2)
5. After continuous measurement, the measured results are displayed for 8 seconds, then power
turns off.
If you press the POWER button during power-on (while the internal display is lit), another
8-second measurement starts.
1. Drücken Sie die POWER-
T
2. V
Ziel an.
Sofort nach dem
Einschalten.
(Initialisierung)
Standby Zielf
3. Drücken Sie die POWER-
für bis zu 8 Sekunden zu aktivieren. (Die einzelne Messung ist bei
diesem Laser-Entfernungsmesser nicht verfügbar
Messung
4. Das interne Display zeigt jeweils für 8 Sekunden die Meldung
Entfernung“ oder
Laserstrahlzeichen blinkt.)
Messung
fehlgeschlagen oder
nicht imstande
Entfernung zu messen.
Zeigt die
gemessene Zahl
an (Ziel 1).
Zeigt die
gemessene Zahl an
(Ziel 2).
Measurement
1. Press the POWER button for power-on.
(Power turns off 8 seconds after the last
operation.)
Immediately after power-on.
(Initializing)
Stand-by. Target focusing.
2. Aim at the target
.
3. Press POWER button once to start
continuous measurement for 8 seconds.
(Single measurement mode is not
available with this laser rangefinder.)
Measuring.
4. For 8 seconds, the internal display shows “distance” and “fail to measure” indicator alternately.
(Laser irradiation mark is blinking.)
Failure to measure or
unable to measure distance.
Displays the measured
figure. (Target 1)
Displays the measured
figure. (Target 2)
5. After continuous measurement, the measured results are displayed for 8 seconds, then power
turns off.
If you press the POWER button during power-on (while the internal display is lit), another
8-second measurement starts.
5. Nach der kontinuierlichen Messung werden die gemessenen
Ergebnisse 8 Sekunden lang angezeigt und dann schaltet sich der
Entfernungsmesser ab.
Anschaltens (während das interne Display aktiv ist) drücken, wir
eine weitere 8-Sekunden-Messung aktiv
Visieren Sie bei der Messung einer Stange auf einem Golfplatz, z.B.,
die Stange an, so wird Ihnen die Messung leicht gelingen. Ohne
Gegenstände zwischen I
Ergebnis die Entfernung zur Stange.
4.W
(Die
1.
ist.
2.
oder länger).
3. Lassen Sie die MODE-
4.
Ergebnisse in die von Ihren ausgewählte Maßeinheit
konvertiert und angezeigt.
Meter [ ]Ya [ ]
6. Batterie niedrig-Anzeige
Blinkend zeigt an, dass die Batterieladung
niedrig ist und die Batterie ersetzt werden sollte
(Siehe
7. Hintergrundbeleuchtung
Nutzen Sie die Hintergrundbeleuchtung
LD-Display im Dunkeln sehen zu können.
Durch kurzes Drücken der MODE-
2 Sekunden) bei eingeschaltetem Gerät kann die
Hintergrundbeleuchtung ein- oder ausgeschaltet
werden. Die Hinterg
sich auch aus, wenn der Entf
ausgeschaltet wird. In diesem F
Hintergrundbeleuchtung aus, w
Entfernungsmesser wieder eingeschaltet wird
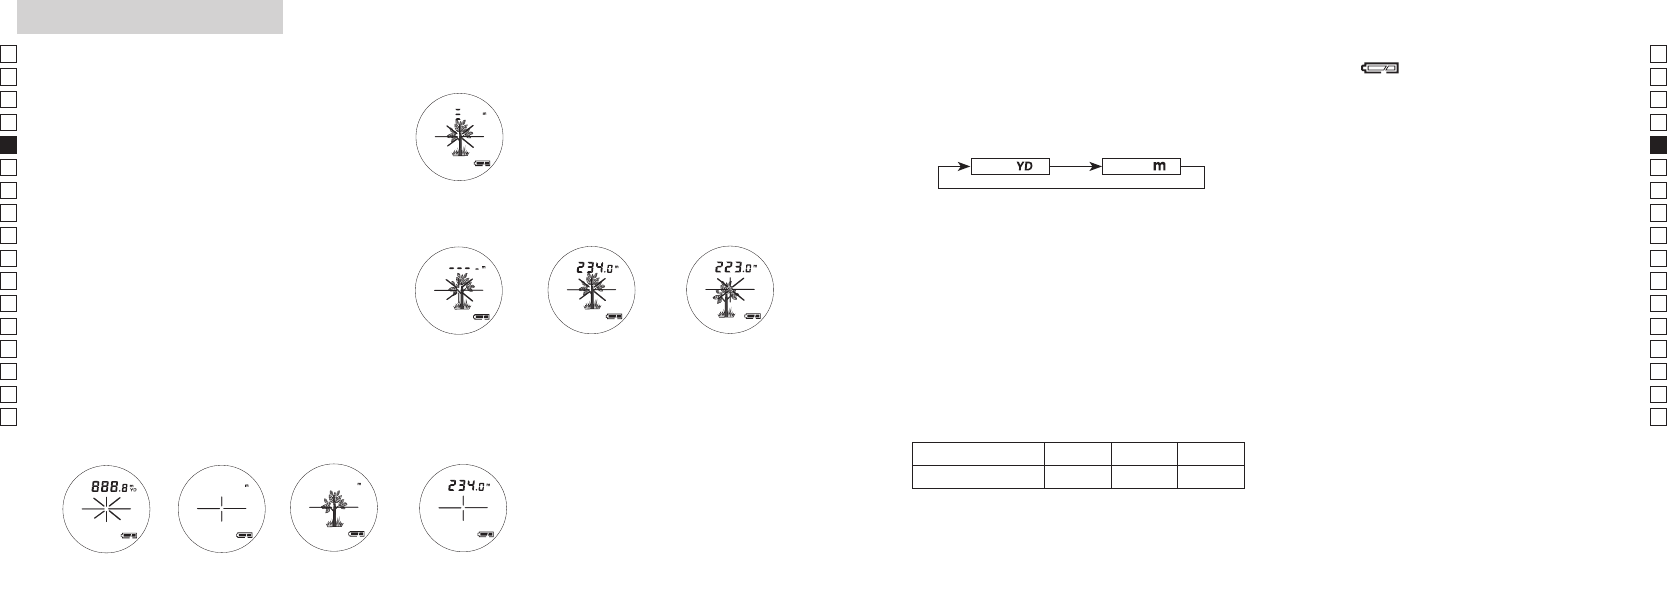
5. Entfernungsanzeige
Der COOLSHO
W
Ergebnisse erzielt werden, zeigt er die Entf
nächsten Ziel auf dem L
z.B.) Beim Messen eines vor einem Haus stehenden Baums
„115 Meter“ (Entfernung zum Baum) wird angezeigt.
Dies ist beim Golfen nützlich.
Baum Zaun Haus
Entfernung zum Ziel 115 m 123 128 m