124 125
Nl
En
Jp
Fr
Es
Pt
Ru
Se
De
It
Dk
Pl
Hu
Cz
Fi
No
Ro
Nl
En
Jp
Fr
Es
Pt
Ru
Se
De
It
Dk
Pl
Hu
Cz
Fi
No
Ro
Gebruiksaanwijzing
V
van het apparaat niet houdt aan de instructies in
dit document, kan dit blootstelling aan
gevaarlijke str
1.
'Batterij vervangen')
2.
Pas de dioptrie aan om een scherp beeld te krijgen
op het L
Draai de dioptriering eerst helemaal naar links. Zet
daarna, terwijl u door de Nafstandsmet
kijkt, het instrument aan om het LCD-venst
activeren. Draai de dipoptriering naar rechts totda
u het venster scherp ziet.
Als de dioptrie niet is afgesteld op uw
gezichtsvermogen, kan het lastig zijn om goed op
het doel te richten.
3. Meten
Controleer of de juiste meeteenheid is ingesteld
voordat u een meting uitvoert.
Measurement
1. Press the POWER button for power-on.
(Power turns off 8 seconds after the last
operation.)
Immediately after power-on.
(Initializing)
Stand-by. Target focusing.
2. Aim at the target
.
3. Press POWER button once to start
continuous measurement for 8 seconds.
(Single measurement mode is not
available with this laser rangefinder.)
Measuring.
4. For 8 seconds, the internal display shows “distance” and “fail to measure” indicator alternately.
(Laser irradiation mark is blinking.)
Failure to measure or
unable to measure distance.
Displays the measured
figure. (Target 1)
Displays the measured
figure. (Target 2)
5. After continuous measurement, the measured results are displayed for 8 seconds, then power
turns off.
If you press the POWER button during power-on (while the internal display is lit), another
8-second measurement starts.
1. Druk op de POWER-
knop om het instrument
aan te zetten.
2. Richt op het doel.
Onmiddellijk na
inschakeling.
Stand-by Richten op het
doel.
3. Druk één keer op de POWER-knop om een continumeting van
8 seconden te starten. (Met deze laserafstandsmeter is een
enkelvoudige meting niet mogelijk.)
Meten.
4. Gedurende 8 seconden toont het interne L
het symbool voor 'afstand' of 'meting is mislukt'
is actief
De meting is mislukt
of de afstand kan niet
worden gemeten.
T
afstand. (Doel 1)
T
afstand. (Doel 2)
Measurement
1. Press the POWER button for power-on.
(Power turns off 8 seconds after the last
operation.)
Immediately after power-on.
(Initializing)
Stand-by. Target focusing.
2. Aim at the target
.
3. Press POWER button once to start
continuous measurement for 8 seconds.
(Single measurement mode is not
available with this laser rangefinder.)
Measuring.
4. For 8 seconds, the internal display shows “distance” and “fail to measure” indicator alternately.
(Laser irradiation mark is blinking.)
Failure to measure or
unable to measure distance.
Displays the measured
figure. (Target 1)
Displays the measured
figure. (Target 2)
5. After continuous measurement, the measured results are displayed for 8 seconds, then power
turns off.
If you press the POWER button during power-on (while the internal display is lit), another
8-second measurement starts.
5. Na een continumeting wordt het gemeten r
8 seconden getoond, daarna schakelt het instrument
automatisch uit. Als u op de POWER-knop drukt terwijl het
instrument is ingeschakeld (en het interne Lverlicht
is), wordt een volgende con
Als u bijvoorbeeld de afstand tot een vlag meet op een golfbaan,
dan zal er gemakkelijker een meting tot stand worden gebracht
als u de vlag scant tijdens het meten. Als er zich geen voorwerpen
bevinden tussen u en de vlag, dan is de kortste meting de afstand
tot de vlag.
4. De weerga
(de standaardinstelling is yard)
1.
2.
3.
weergegeven.
4.
worden de resulta
in de nieuwe eenheid.
Meter [ ]Ya [ ]
6. Batterij bijna leeg
Als het symbool knipper
de batterij bijna leeg is en moet worden v
(Zie 'Batterij vervangen')
7. Achter
Gebruik de achtergrondv
venter te kunnen zien als het donker is
Door kort (kor
knop te drukken als het instrument aan staat, wordt
de achtergr
de achtergr
laserafstandsmeter uit te schakelen. In dat geval
is de achtergr
laserafstandsmeter weer w
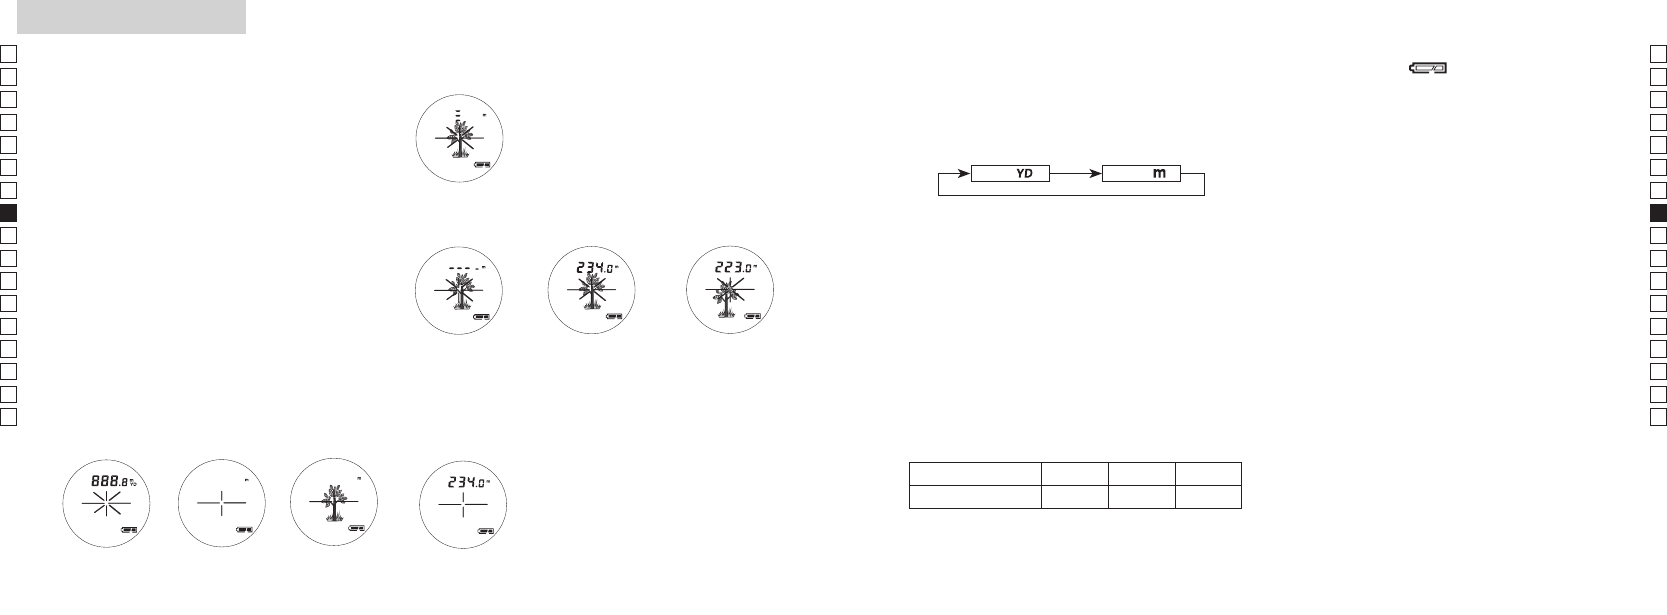
5. Afstandsw
De COOLSHO
doel systeem.
W
worden verkregen, toont het L
naar het doel dat het dichtst bij is.
Bijv
een huis staat.
"115 m" (afstand tot de boom) w
Dit is handig bij het golfen.
Boom Schutting Huis
Afstand tot doel 115 m 123 m 128 m