To set a speci c display timeout for menu screens,
set a value for this option.
Press “” or “” button to select Menu Timeout. Use
“” or “” button to change menu timeout to 15 sec,
30 sec or 60 sec.
TXT (Teletext) Language
Press “” or “” button to select Teletext Language.
Use “” or “” button to change Teletext Language to
West, East, Cyrillic, Turk/Gre, Arabic or Persian.
HDMI PC Full Mode (optional)
If you want to view PC screen in HDMI mode by using
external connection, HDMI PC FULL MODE option
should be On to adjust the screen ratio correctly. This
item might be inactive in some resolutions.
Note: If you connect an HDMI device and switch the TV to
HDMI mode, this feature will be visible (except for 480p/576p
resolution).
Full Mode (optional)
If you connect a device via HDMI or YPbPr connectors
and set 1080i/1080P resolutions, Full Mode item will
be visible.You can set Full Mode as 1:1 or Normal
by using “” or “”.If you select 1:1, screen ratio will
be adjusted correctly. If you set Normal, screen ratio
may expand.
Ext Out
Press “” or “” button to select Ext Out. Use “” or
“” button to set the Ext Out as On or Off.
Note:
For copying from a DVD or VCR device, you should choose
desired source from source menu and turn “On” to EXT Out
from feature menu.
Ext Out should be On in order to use Timers function in the
DTV mode.
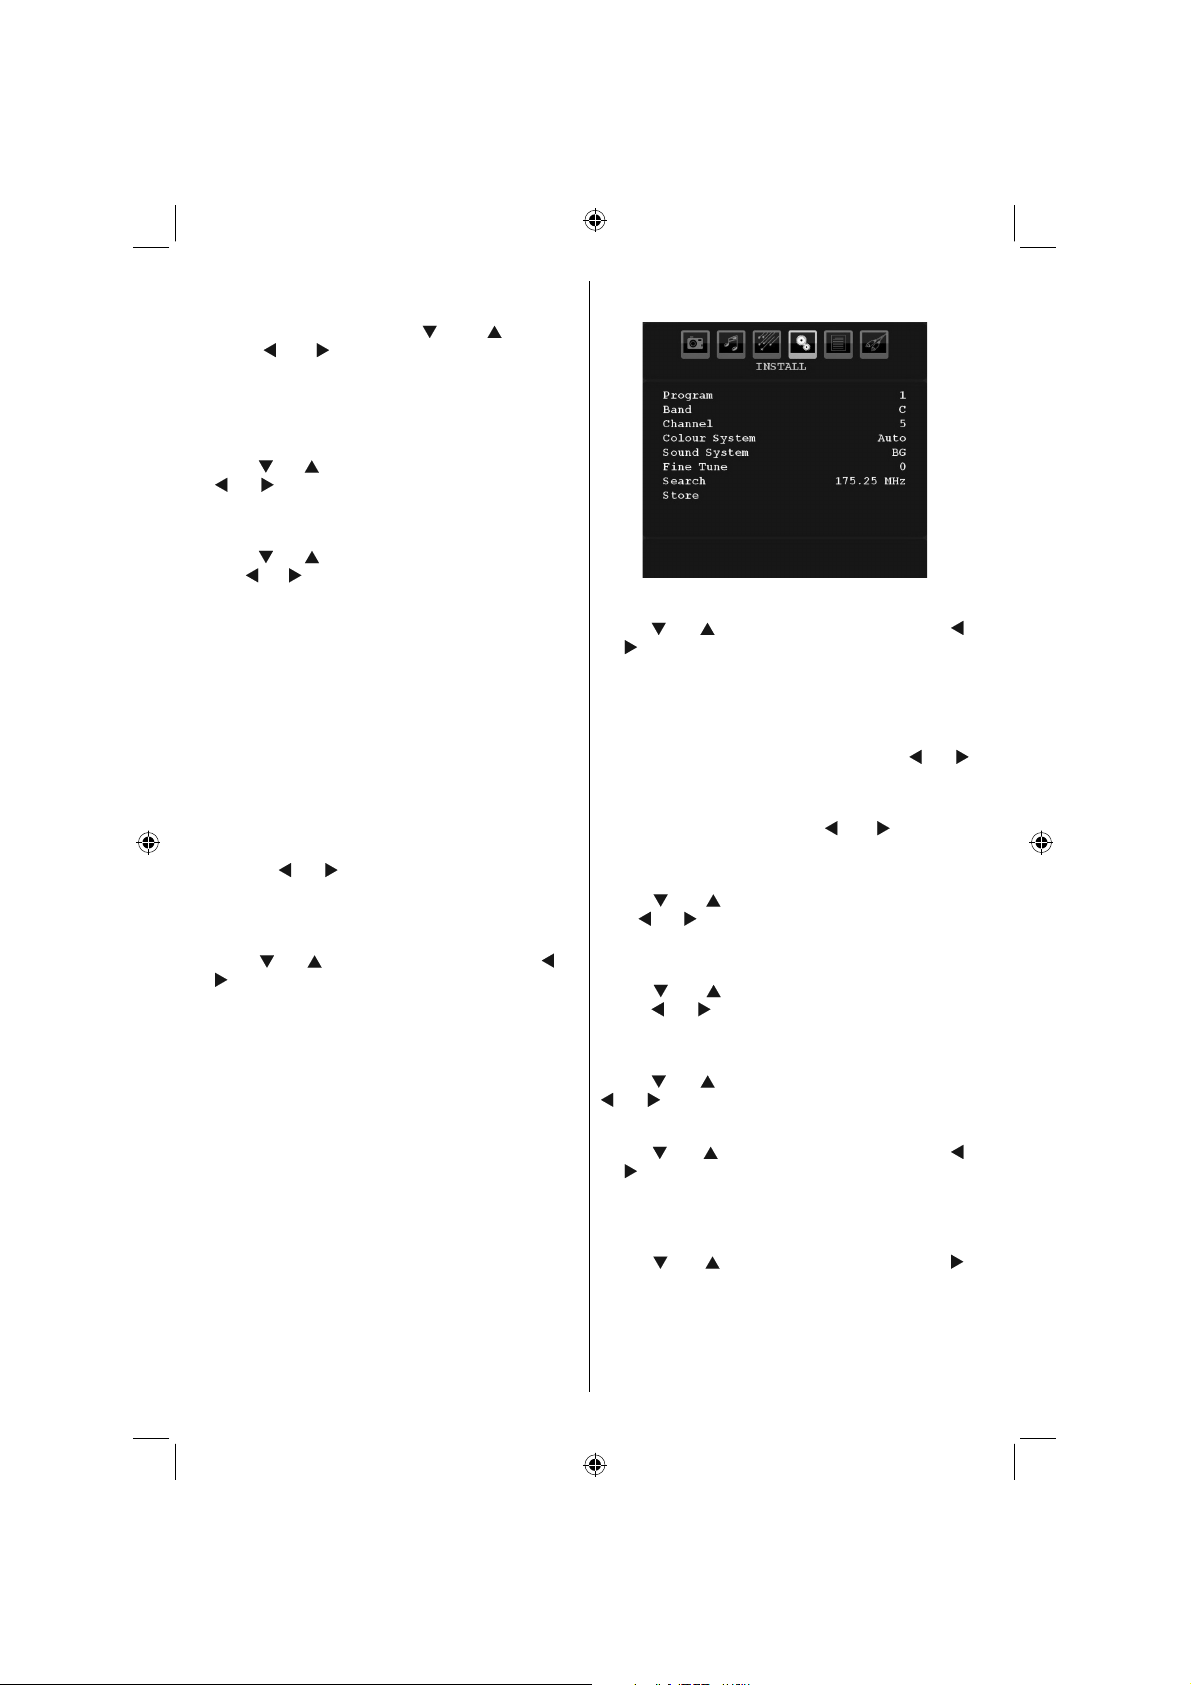
Install Menu
Program
Press “” or “” button to select Program. Use “”
or “” button to select the program number. You can
also enter a number using the numeric buttons on the
remote control. There are 200 programme storage
between 0 and 199.
Band
Band can be selected either C or S. Press “” or “
” button to set Band.
Channel
Channel can be changed by “” or “” button or
numeric buttons.
Colour System
Press “” or “” button to select Colour System.
Use “” or “” button to change the colour system to
AUTO, PAL, SECAM or PAL60.
Sound System
Press “” or “” button to select Sound System.
Press “” or “” button to change the sound system
to BG,DK, I, L or L’.
Fine Tune
Press “” or “” button to select Fine Tune. Press “
” or “” button to adjust the tuning.
Search
Press “” or “” button to select Search. Use “”
or “” button to start programme searching. You can
also enter the desired frequency using the numeric
buttons while Search item is highlighted.
Store
Press “” or “” button to select Store. Press “”
or OK button to store the settings. “Stored...” will be
displayed on the screen.
Install Menu in AV Modes
The following screen appears in the install menu when
the TV is in AV modes. Note that limited options will
MB45_[GB]_3902UK_IDTV_BRONZE11_22920W_LED_POWER SAVE MODE_10068917_50168693.indd 22MB45_[GB]_3902UK_IDTV_BRONZE11_22920W_LED_POWER SAVE MODE_10068917_50168693.indd 2204.06.2010 17:15:0404.06.2010 17:15:04
Libble nimmt den Missbrauch seiner Dienste sehr ernst. Wir setzen uns dafür ein, derartige Missbrauchsfälle gemäß den Gesetzen Ihres Heimatlandes zu behandeln. Wenn Sie eine Meldung übermitteln, überprüfen wir Ihre Informationen und ergreifen entsprechende Maßnahmen. Wir melden uns nur dann wieder bei Ihnen, wenn wir weitere Einzelheiten wissen müssen oder weitere Informationen für Sie haben.
Art des Missbrauchs:
Forenregeln
Um zu sinnvolle Fragen zu kommen halten Sie sich bitte an folgende Spielregeln:
Lesen Sie zuerst die Anleitung;
Schauen Sie nach, ob die Frage bereits gestellt wurde;
Stellen Sie die Frage so deutlich wie nur einigermaßen möglich;
Erwähnen Sie was Sie bereits versucht haben um das Problem zu lösen;
Ist Ihr Problem von einem Besucher gelöst dann lassen Sie ihn / sie wissen in diesem Forum;
Falls Sie reagieren möchten, so verwenden Sie bitte das Antworten- Formular;
Da ihre Frage für alle Besucher sichtbar ist, sollten Sie lieber keine persönliche Daten erwähnen.
Neu registrieren
Registrieren auf E - Mails für Nutech 22920 FHD wenn:
neue Frage gestellt werden
neue Handbücher vorhanden sind
Sie erhalten eine E-Mail, um sich für eine oder beide Optionen anzumelden.
Das Handbuch wird per E-Mail gesendet. Überprüfen Sie ihre E-Mail.
Wenn Sie innerhalb von 15 Minuten keine E-Mail mit dem Handbuch erhalten haben, kann es sein, dass Sie eine falsche E-Mail-Adresse eingegeben haben oder dass Ihr ISP eine maximale Größe eingestellt hat, um E-Mails zu erhalten, die kleiner als die Größe des Handbuchs sind.
Ihre Frage wurde zu diesem Forum hinzugefügt
Möchten Sie eine E-Mail erhalten, wenn neue Antworten und Fragen veröffentlicht werden? Geben Sie bitte Ihre Email-Adresse ein.