Read this manual carefully before using your camera (especially “Care
and Storage” on page 12).
INSTRUCTIONS
EN
4
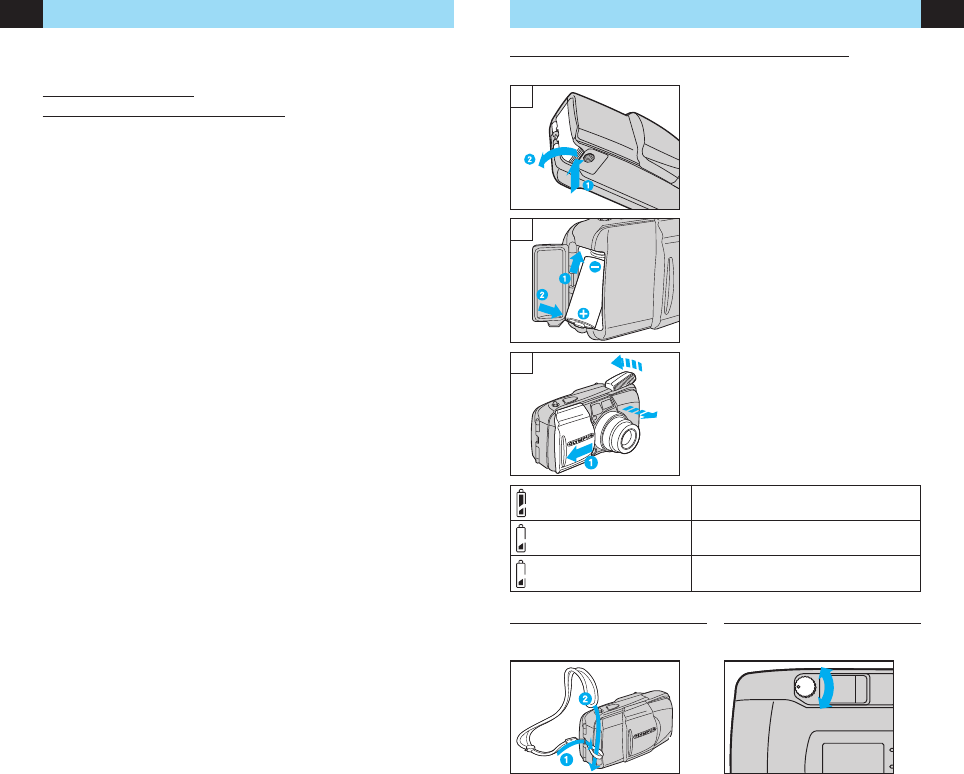
LOADING AND CHECKING THE BATTERY
Use one 3 V lithium battery (CR123A or DL123A).
FIRST STEPS
EN
5
NAMES OF PARTS
(Open the front flap and keep page 3 visible.)
Camera Body
✩
Always try to keep this clean. Dirt and stains can result in pictures that are unclear and out-of-focus.
Wipe off any dirt or stains with a soft cloth.
Viewfinder Indications
1 Zoom lever (p. 7)
2 Shutter release button (p. 7)
3 Selftimer/remote control indicator
4 Light sensor
✩
5 Viewfinder
6 Autofocus window
✩
7 Flash
✩
(pp. 7 – 9)
8 Lens
✩
9 Remote control sensor
10 Lens barrier
11 Battery compartment cover (p. 5)
12 Strap eyelet (pp. 5 & 10)
13 Diopter adjustment dial (p. 5)
14 Film window
15 Tripod socket
16 Date MODE and SET buttons
(Quartzdate model only) (p. 11)
17 Mid-roll rewind button (p. 10)
18 Exposure mode button (p. 9)
19 Flash mode button (p. 8)
20 Selftimer/remote control button
(p. 10)
21 LCD panel
22 Back cover
23 Back cover release (p. 6)
24 Autofocus marks (p. 7)
25 Spot marks (p. 9)
26 Close-up correction marks (p. 6)
27 Green lamp (autofocus indicator)
Lights: Subject is in focus. You can shoot.
Blinks: Subject is not in focus. Shutter is locked.
Blinks rapidly: Subject is difficult to focus on. You can shoot, but subject
may be out of focus.
28 Orange lamp (flash indicator)
Goes out: Flash does not fire. You can shoot.
Lights: Flash will fire. You can shoot.
Blinks: The flash is being recharged. Wait until it lights.
LCD Panel
29 Date/time indicator (Quartzdate model only) (p. 11)
30 Exposure counter
31 Remote Control (optional) (p. 10)
32 Selftimer (p. 10)
33 Red-Eye Reduction Flash (p. 8)
34 Fill-In Flash (p. 8)
35 Flash-Off (p. 8)
36 Night Scene Flash (p. 8)
37 Battery check (p. 5)
38 Spot Metering (p. 9)
39 Infinity (p. 9)
Note: Not all indicators are displayed as shown at the same time.
1
2
3
1. While pressing the bottom of the
battery compartment cover in direction
Q, turn it in direction W to open.
• Make sure the lens barrier is
closed before opening the battery
compartment cover.
2. Insert the battery correctly Q.
Close the battery compartment
cover W.
3. Slide the lens barrier in direction Q
until it clicks. The lens comes out
and the flash flips open. Check the
remaining battery power on the
LCD panel.
• A brand-new battery lasts for about
15 rolls of film.
lights
(turns off automatically).
blinks and other indicators
are displayed normally.
blinks and other indicators
go out.
Battery is OK. You can shoot.
Battery is low and should be replaced
with a new one.
ATTACHING THE STRAP
Attach the strap as shown.
DIOPTER ADJUSTMENT
Turn the diopter adjustment dial until
the autofocus marks are clear.
Battery is dead and should be replaced
with a new one immediately.