Installation
Preparation
Caution
Please follow the laws and regulations of your
province or country for installation of the unit.
We strongly recommended you to wear gloves for
installation work to protect yourself from injuries.
Be sure to grip both sides of this unit securely
before attempting to move it.
Since this unit is quite heavy, the unit may fall down
and this can lead to an accident or injury.
Disconnect the cable from the negative () battery
terminal (see caution below).
Caution
If your car is equipped with air bag and/or anti-
theft systems specifi c procedures may be required
for connection and disconnection of the battery to
install this product.
Before attempting installation of this electronic
component contact your car dealer or manufacturer
to determine the required procedure and strictly
follow their instructions.
FAILURE TO FOLLOW THE PROCEDURE MAY
RESULT IN THE UNINTENDED DEPLOYMENT OF
AIR BAGS OR ACTIVATION OF THE ANTI-THEFT
SYSTEM RESULTING IN DAMAGE TO THE VEHICLE
AND PERSONAL INJURY.
Installation Hardware
(For Installation)
No. Item Diagram Qty.
Tapping Screw
(5 mm20 mm)
4
Plain Washer
(5 mm)
4
Allen wrench 1
Installation Hardware
(For Wiring)
Note:
For power connection, use the optional power cord
specially designed for use with Panasonic car-audio/
AV system.
Use only the supplied screws for installation. If parts
are missing please consult with your Panasonic dealer
for advice.
No. Item Diagram Qty.
Speaker input
connector
2
Terminal cover
for short-circuit
prevention
2
CY-PA4003N: 2 (1 for front speaker, 1 for rear speaker)
CY-PA2003N, CY-PAD1003N: 1 (for left/right speaker)
Mounting the Unit
Caution
Never mount the unit in any of the following locations
to avoid damage due to overheating;
• Near the heater port.
• Places like the dashboard or rear deck, where it may
be exposed to direct sunlight.
Do not mount the unit near the door, where it could
be exposed to rain.
You run the risk of interfering with the mounting or
causing damage by drilling into the gas tank, a wiring
harness, or other component.
Keep a safe distance between the unit and other
electronic equipment.
If this unit is operated at a high output continuously,
the upper side of the unit will get very hot. Do not
touch it nor place anything on top of the unit.
When a short circuit occurs, such as in the speaker
output terminal, etc. the overload protection circuit
will operate. This circuit protects the power amplifi er
from further damage when a short circuit occurs.
Operation will temporarily stop. In this case, check
the cause of the short-circuit and if the problem is
fi xed, normal operation will resume.
Since the power amplifi er has a very large output, the
unit should be installed in the trunk of your car.
Do not install this unit under a carpet, otherwise the
unit may fail because of immature heat dissipation.
Use the spacer included when installing the unit so
that the fan and air hole on the base side of the unit
are not covered. <CY-PAD1003N>
If the fan and air hole on the base side of the unit are
covered, the unit will become extremely hot and may
fail.
<CY-PAD1003N> Installation
Hardware
(For Installation)
No. Item Diagram Qty.
Spacer 4
Tapping Screw
(5 mm40 mm)
4
Before Mounting the Unit
1 Make the temporary connections.
2 Confi rm the proper operation of the unit.
Confi rm the proper connection and setting, and no
blowout of the fuses.
3 Confi rm after the installation of the unit that the spare
tires, the jack, the tools, etc. can be picked up without
obstruction.
Install the unit to a metallic portion of the car
Since the power amplifi er has a very large output, the
unit should be installed in the boot of your car.
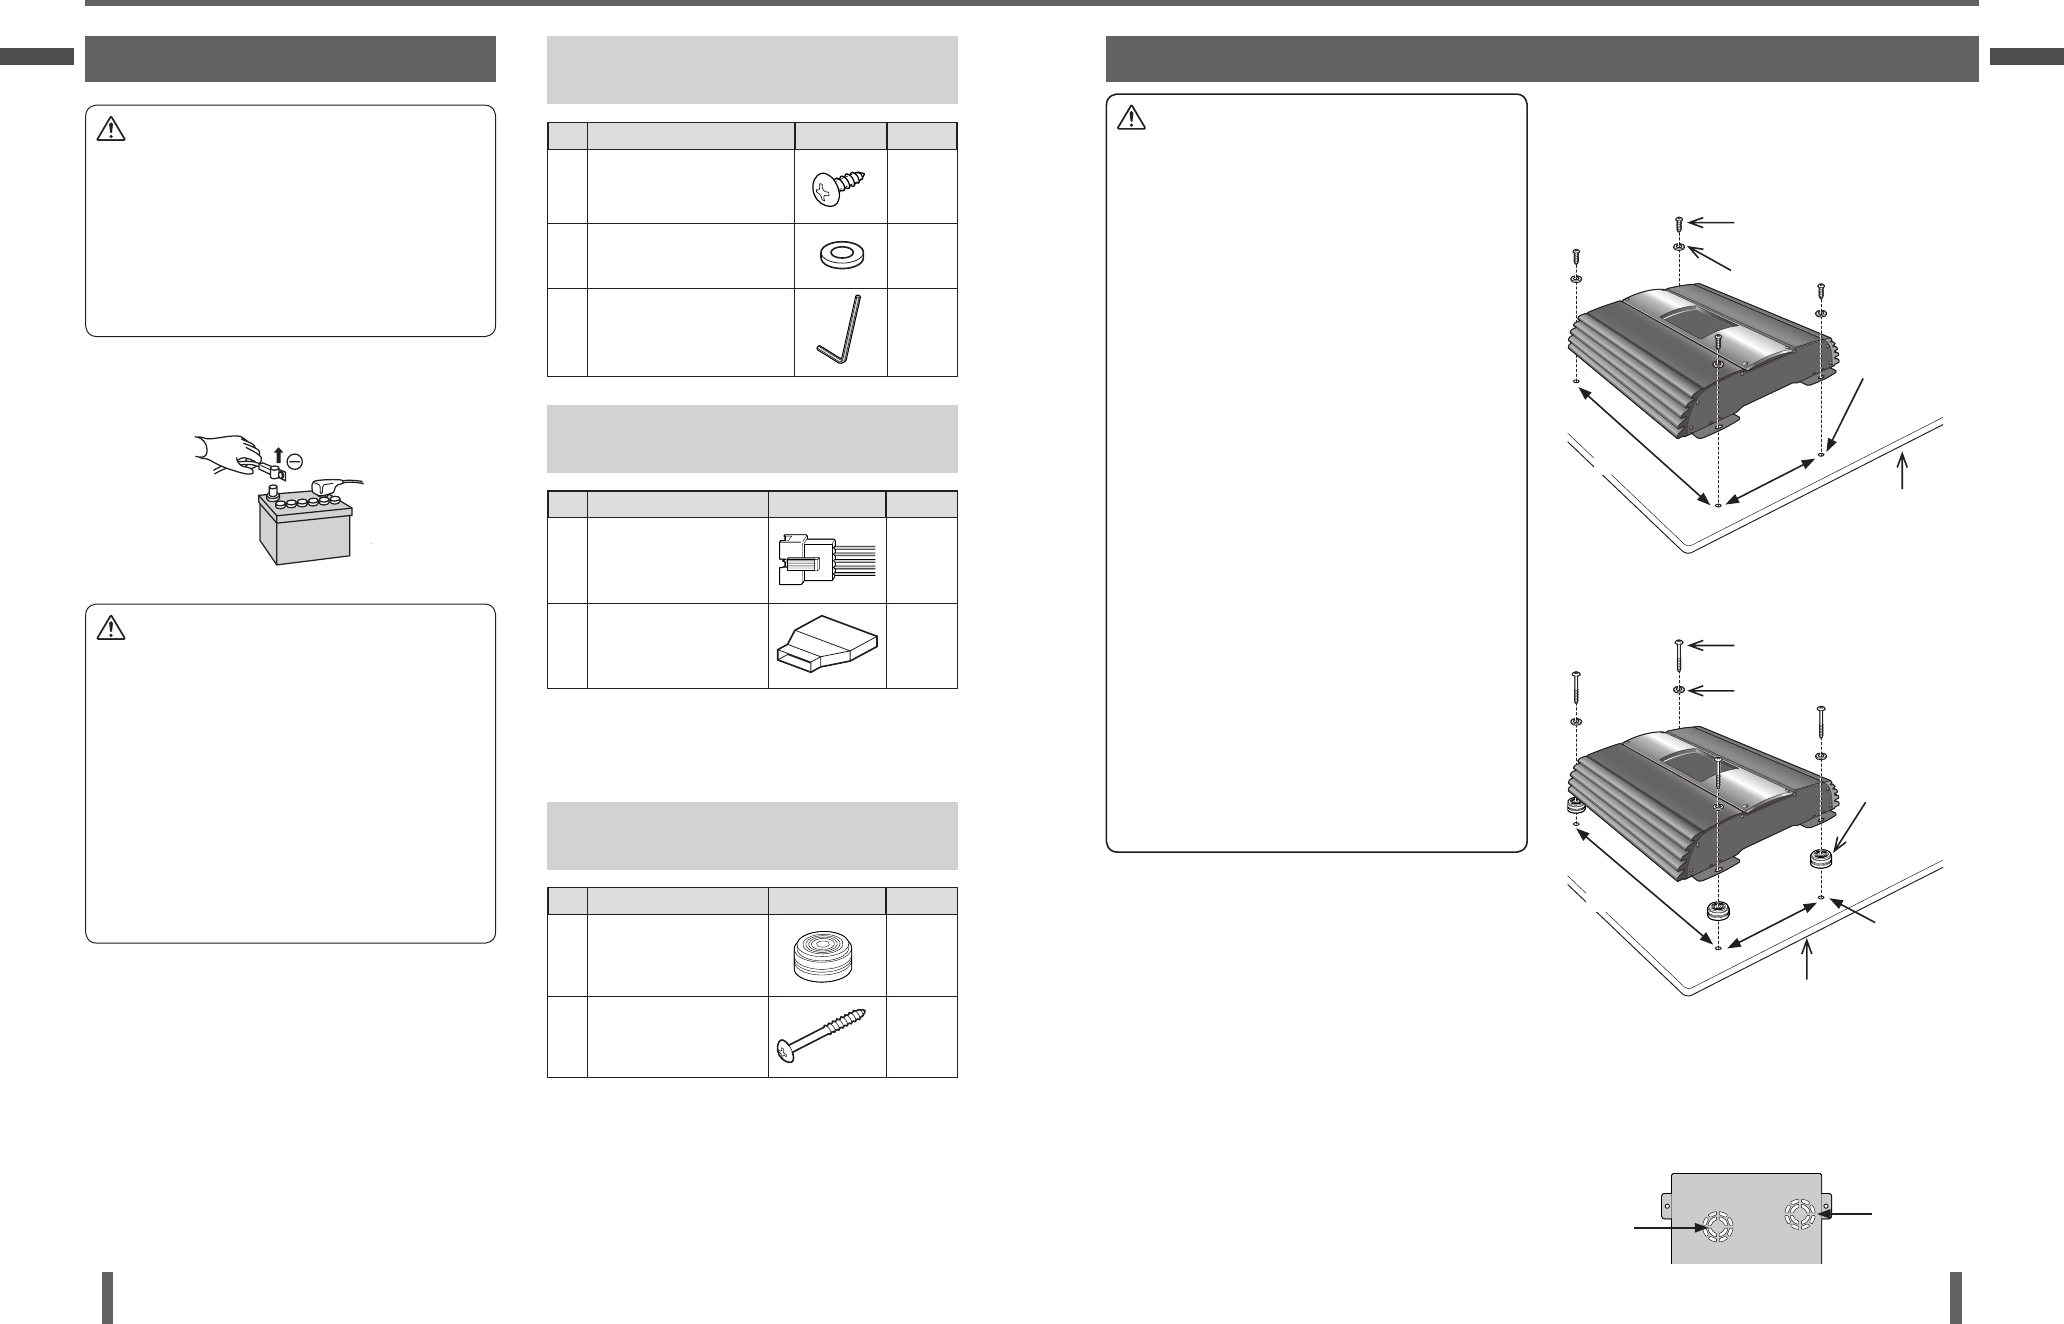
<CY-PA4003N, CY-PA2003N>
Tapping Screw
(5 mm20 mm)
Plain Washer (5 mm)
Drill four holes
3.5 mm
Metallic panel
(thickness: more
than 15 mm)
321 mm
178 mm
<CY-PAD1003N>
Tapping Screw
(5 mm40 mm)
Plain Washer (5 mm)
Drill four holes
3.5 mm
Metallic panel
(thickness: more than 15 mm)
291 mm
178 mm
Spacer
Note:
If you wish to install the unit without using the spacer
included, drill holes in the Metallic panel etc so that the
fan and air holes on the base side of the unit are not
covered.
Base side of CY-PAD1003N:
Fan
Air hole