… / Cleaning and Care / Information about warranty and service processing… / Before use / Start-up / After initial use / Changing spare parts / Maintenance
Ensure not to exceed the maximum pressure
specified on the machine.
Never carry pneumatic tools by the hose.
Before use
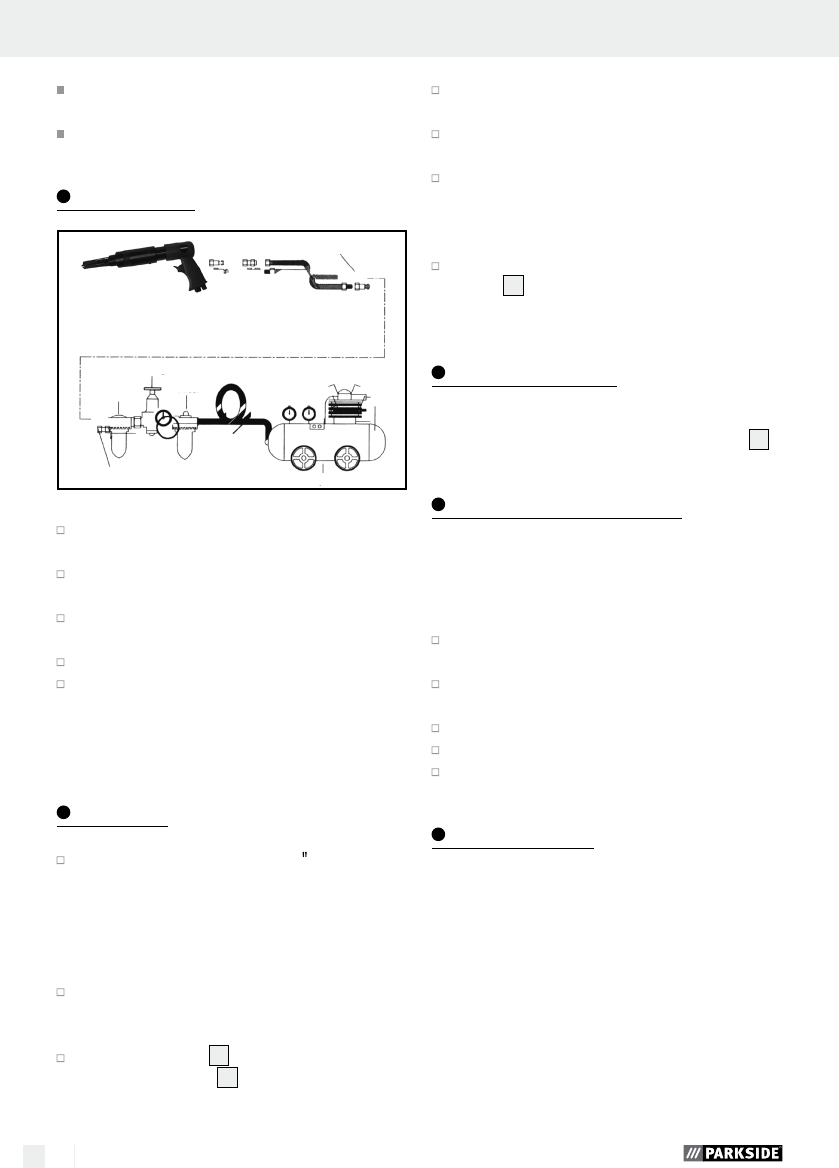
Quick-release socket
Compressed air hose
Quick-release socket
Pressure regulator
Oils
Filter
Quick-opening sleeve
Compressor
ATTENTION! Never start up the air tool with-
out oiling it.
Verify the compressor is positioned on solid
ground.
Check if all hose connections are connected
and secured correctly.
Connect the tool with the air hose.
If no function is detected after switching on de-
spite reaching the maximum pressure, switch the
device back off. Immediately contact the ser-
vice hotline.
Start-up
Screw a threaded plug fitting ¼ (6.35 mm)
into the air tool.
Note: We recommend using Teflon tape to
achieve maximum leak-tightness. Otherwise the
equipment may potentially be unable to produce
its full capacity.
To connect the device to the air hose, never point
the front end (needle head) of the tool at your-
self or others.
Pulling the trigger
6
will start the device.
Release the trigger
6
to stop the device.
Use the needle scaler to remove rust, paint,
lacquier and similar items (see Fig. A).
Never use excess force to push the equipment
onto the tool, as this may cause damage.
Applying the equipment at a slight angle and
sliding it across the surface to be cleaned with
a little pressure across the area to be cleaned
for optimal results.
Regulate the air pressure using the air adjusting
screw
4
(next to the air inlet at the bottom of
the device) for optimal results.
After initial use
Once the task has been finished the equipment must
be disconnect from the compressed air supply
5
.
Changing spare parts
The head of the needle scaler must be replaced if
it shows damage or is severely worn. Proceed as
follows:
Using the included hexagon socket screw, loosen
the 4 screws for the head (see Fig. B).
Unscrew the old head using minimal force (see
Fig. C).
Properly dispose of the old head.
Screw in the new head hand tight (see Fig. F).
tighten the 4 screws on the head (see Fig. G).
Maintenance
Following the maintenance information specified
here will ensure a long service life for the product
Libble nimmt den Missbrauch seiner Dienste sehr ernst. Wir setzen uns dafür ein, derartige Missbrauchsfälle gemäß den Gesetzen Ihres Heimatlandes zu behandeln. Wenn Sie eine Meldung übermitteln, überprüfen wir Ihre Informationen und ergreifen entsprechende Maßnahmen. Wir melden uns nur dann wieder bei Ihnen, wenn wir weitere Einzelheiten wissen müssen oder weitere Informationen für Sie haben.
Art des Missbrauchs:
Forenregeln
Um zu sinnvolle Fragen zu kommen halten Sie sich bitte an folgende Spielregeln:
Lesen Sie zuerst die Anleitung;
Schauen Sie nach, ob die Frage bereits gestellt wurde;
Stellen Sie die Frage so deutlich wie nur einigermaßen möglich;
Erwähnen Sie was Sie bereits versucht haben um das Problem zu lösen;
Ist Ihr Problem von einem Besucher gelöst dann lassen Sie ihn / sie wissen in diesem Forum;
Falls Sie reagieren möchten, so verwenden Sie bitte das Antworten- Formular;
Da ihre Frage für alle Besucher sichtbar ist, sollten Sie lieber keine persönliche Daten erwähnen.
Neu registrieren
Registrieren auf E - Mails für Parkside IAN 275683 PDNE 4000 A1 wenn:
neue Frage gestellt werden
neue Handbücher vorhanden sind
Sie erhalten eine E-Mail, um sich für eine oder beide Optionen anzumelden.
Andere Handbücher von Parkside IAN 275683 PDNE 4000 A1
Das Handbuch wird per E-Mail gesendet. Überprüfen Sie ihre E-Mail.
Wenn Sie innerhalb von 15 Minuten keine E-Mail mit dem Handbuch erhalten haben, kann es sein, dass Sie eine falsche E-Mail-Adresse eingegeben haben oder dass Ihr ISP eine maximale Größe eingestellt hat, um E-Mails zu erhalten, die kleiner als die Größe des Handbuchs sind.
Ihre Frage wurde zu diesem Forum hinzugefügt
Möchten Sie eine E-Mail erhalten, wenn neue Antworten und Fragen veröffentlicht werden? Geben Sie bitte Ihre Email-Adresse ein.