ENGLISH
ESPAÑOL
DEUTSCH
FRANÇAIS
ITALIANO
NEDERLANDS
êìëëäàâ
8
Solderless Terminal Connections
• Do not connect a cord having an exposed core
wire to the power terminals of this amplifier
(Power terminal, GND terminal, System remote
control terminal). Disconnection or breakage of
the core wire can cause a fire or short-circuit.
• Since the wire will become loose over time, it
must be periodically inspected and tightened as
necessary.
• Do not solder or bind the ends of the twisted
wires.
• Fasten while making sure to not to clamp the
insulating sheath of the wire.
• Use the supplied hexagonal wrench to tighten and
loosen the terminal screw of the amplifier.
Securely fasten the wire with the terminal screw.
However, since excessively tightening the termi-
nal screw of the System remote control has the
risk of damaging the wire, be careful not to tight-
en excessively by observing the status of the wire
when tightening.
Connecting the Power Terminal
• We recommend that you use the special red bat-
tery and ground wire [RD-228], which is sold
separately. Connect the battery wire directly to
the car battery positive terminal (+) and the
ground wire to the car body.
• Recommended wires size (AWG: American Wire
Gauge) is as follows. The battery wire and the
ground wire must be same size.
• Use a 10 AWG to 20 AWG wire for the system
remote control wire.
Battery Wire and Ground Wire Size
Wire Length less than less than less than
5.7 m 9.0 m 14.4 m
Wire Size 8 AWG 6 AWG 4 AWG
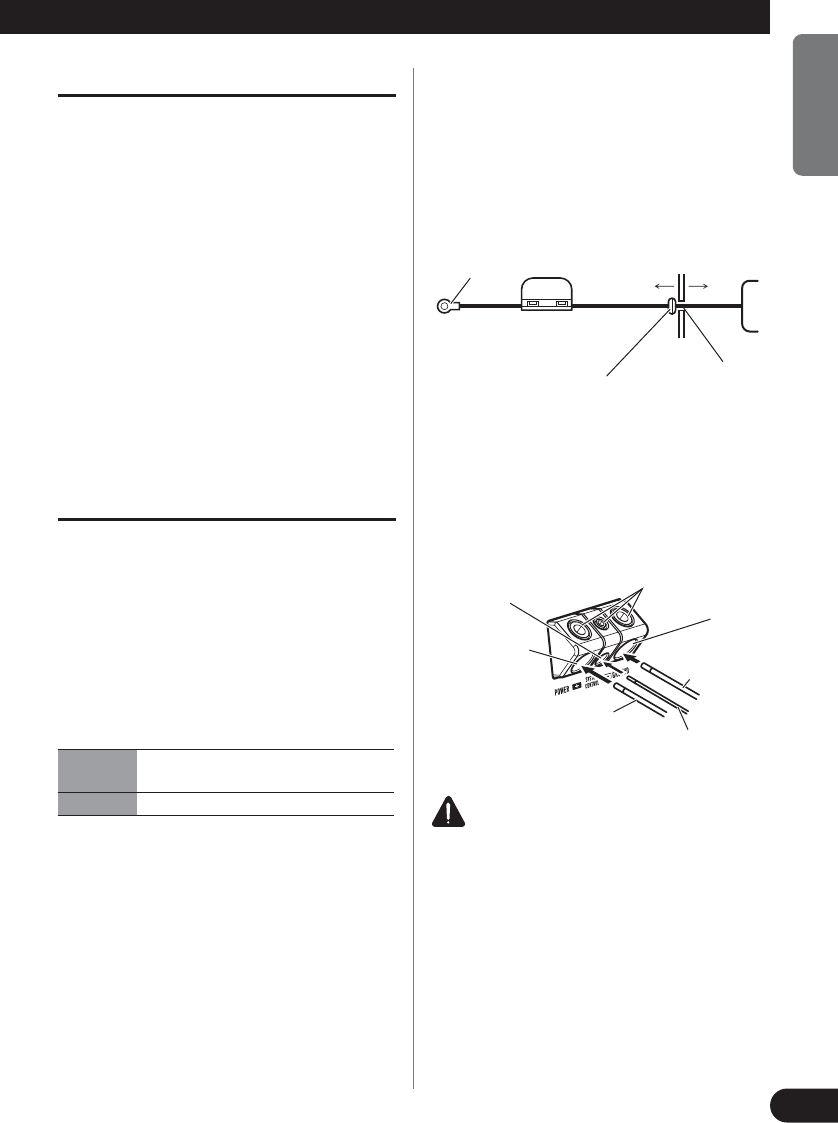
1. Pass the battery wire from the
engine compartment to the interior
of the vehicle.
• After making all other connections to the
amplifier, connect the battery wire terminal
of the amplifier to the positive (+) terminal of
the battery.
2. Connect the wires to the terminal.
• Fix the wires securely with the terminal
screws.
WARNING
Failure to securely fasten the battery wire to the ter-
minal using the terminal screws could cause the ter-
minal area to overheat and could result in damage
and injury including minor burns.
Engine
compartment
Interior of
the vehicle
Drill a 13 mm
hole into the
vehicle body.
Insert the O-ring rubber
grommet into the vehicle
body.
Positive (+)
terminal
Fuse (40 A) × 2
GND terminal
Power terminal
Battery wire
System remote
control terminal
System remote
control wire
Ground wire
Terminal screws