689227
190
Zoom out
Zoom in
Vorherige Seite
1/196
Nächste Seite
2
5
3
4
>
1
9
y
GEBRAUCHSANWEISUNG
INSTRUCCIONES DE USO
MANUEL D’UTILISATION
OPERATING MANUAL
ISTRUZIONI D’USO
GEBRUIKSAANWIJZING
MANUAL DE INSTRUÇÕES
PRIROČNIK ZA UPORABO
2
26
50
74
98
122
146
170
S(C)42xx - S(C)52xx - S(C)-JAxx19
2
2
2
1. LESEN SIE ZUNÄCHST DIE BEDIENUNGSANLEITUNG.
2. WENDEN SIE SICH IN ZWEIFELSFÄLLEN AN IHREN HÄNDLER.
Liebe Käuferin, lieber Käufer,
wir beglückwünschen Sie zum Kauf Ihres Qlima-Klimageräts. Sie haben ein hochwertiges
Produkt erworben, dass Ihnen bei richtiger Benutzung jahrelang Freude machen wird.
Bitte lesen Sie sich vor der Benutzung diese Anleitung durch, damit die maximale
Lebensdauer Ihres Klimageräts gewährleistet ist.
Wir gewähren im Auftrag des Herstellers eine 24-monatige Garantie auf sämtliche Material
und Produktionsfehler und eine 48-monatige Garantie auf den Kompressor.
Wir wünschen Ihnen viel Freude an Ihrem Klimagerät!
Mit freundlichen Grüßen
PVG Holding b.v.
Kundendienstabteilung
3
2
3
INHALT
A. SICHERHEITSANWEISUNGEN
B. BEZEICHNUNG DER TEILE
C. BETRIEBSTEMPERATUR
D. FERNBEDIENUNG
E. MANUELLER BETRIEB (OHNE FERNBEDIENUNG)
F. OPTIMALER BETRIEB
G. EINSTELLEN DER RICHTUNG DES LUFTSTROMS
H. FUNKTIONSWEISE DES KLIMAGERÄTS
I. WARTUNG
J. BEDIENUNG
K. FEHLERSUCHE UND ABHILFE
L. GARANTIEBEDINGUNGEN
M. TECHNISCHE DATEN
WARUM SIE DIESE ANLEITUNG LESEN SOLLTEN
Diese Anleitung enthält viele praktische Tipps zur richtigen Bedienung und
Wartung Ihres Klimageräts. Im Abschnitt Fehlersuche und Abhilfe finden Sie viele
Lösungen zu allgemeinen Problemen. Wenn Sie Abschnitt J „Fehlersuche und
Abhilfe“ gelesen haben, brauchen Sie möglicherweise den Kundendienst gar nicht
erst hinzuzuziehen.
4
A SICHERHEITSANWEISUNGEN
Das Gerät nur dann installieren, wenn die örtlich geltenden bzw.
nationalen Vorschriften, Verordnungen und Normen erfüllt sind.
Dieses Produkt ist für den Gebrauch als Klimagerät in Wohngebäuden
bestimmt, und darf nur in trockener Umgebung, unter normalen
Haushaltsverhältnissen, in Wohnräumen, Küchen und in Garagen
verwendet werden. Kontrollieren Sie die Netzspannung und
Frequenz. Dieses Gerät eignet sich ausschließlich für Steckdosen
mit Schutzkontakt, Anschlussspannung 230 V~ / 50 Hz. Die Modelle
4.8kW müssen direkt mit dem Stromkabel an die Stromquelle ang-
eschlossen werden.
WICHTIG
Das Gerät MUSS immer über einen geerdeten Anschluss
verfügen. Wenn die Stromversorgung nicht geerdet ist, dürfen
Sie das Gerät nicht anschließen. Wenn das Gerät angeschlossen
ist, muss der Stecker immer gut zugänglich sein. Lesen Sie sich
diese Anweisungen gründlich durch und halten Sie sie ein.
Das Klimagerät enthält ein Kältemittel und ist als Druckgerät
einzuordnen. Wenden Sie sich wegen Installation und
Wartung des Klimageräts daher immer an einen offiziellen
Installationsfachmann. Das Klimagerät muss jährlich von einem
offiziell anerkannten Monteur für Klimageräte inspiziert und
gewartet werden. Die Garantie gilt nicht für Schäden, die
durch Nachlässigkeit oder durch Handlungen entstanden sind,
die von den, in dieser Anleitung beschriebenen Handlungen
abweichen.
Vor dem Anschließen des Geräts müssen Sie Folgendes kontrollieren:
Die Anschlussspannung muss mit der auf dem Typenschild angege-
benen Netzspannung übereinstimmen.
Die Steckdose und die Stromversorgung müssen mit dem auf dem
Typenschild angegebenen Strom übereinstimmen.
Der Stecker an der Geräteschnur muss in die Wandsteckdose passen.
Das Gerät muss auf einem festen Untergrund angebracht werden.
2
4
5
2
5
Wenn Sie daran zweifeln, dass das Gerät für die vorhandenen
Einrichtungen geeignet ist, müssen Sie die Stromversorgung zum Gerät
von einem geprüften Elektriker kontrollieren lassen.
• Dieses Gerät wurde gemäß den CE-Sicherheitsnormen hergestellt.
Trotzdem sollten Sie wie bei allen elektrischen Geräten vorsichtig
sein.
Lufteinlass und Auslassgitter dürfen nicht verdeckt werden.
Das Gerät darf niemals mit Chemikalien in Berührung kommen.
Bespritzen Sie das Gerät niemals mit Wasser und tauchen Sie es nie
in Wasser ein. Schalten Sie das Gerät ab und ziehen Sie immer den
Netzstecker wenn Wasser ins Innengerät gelangt.
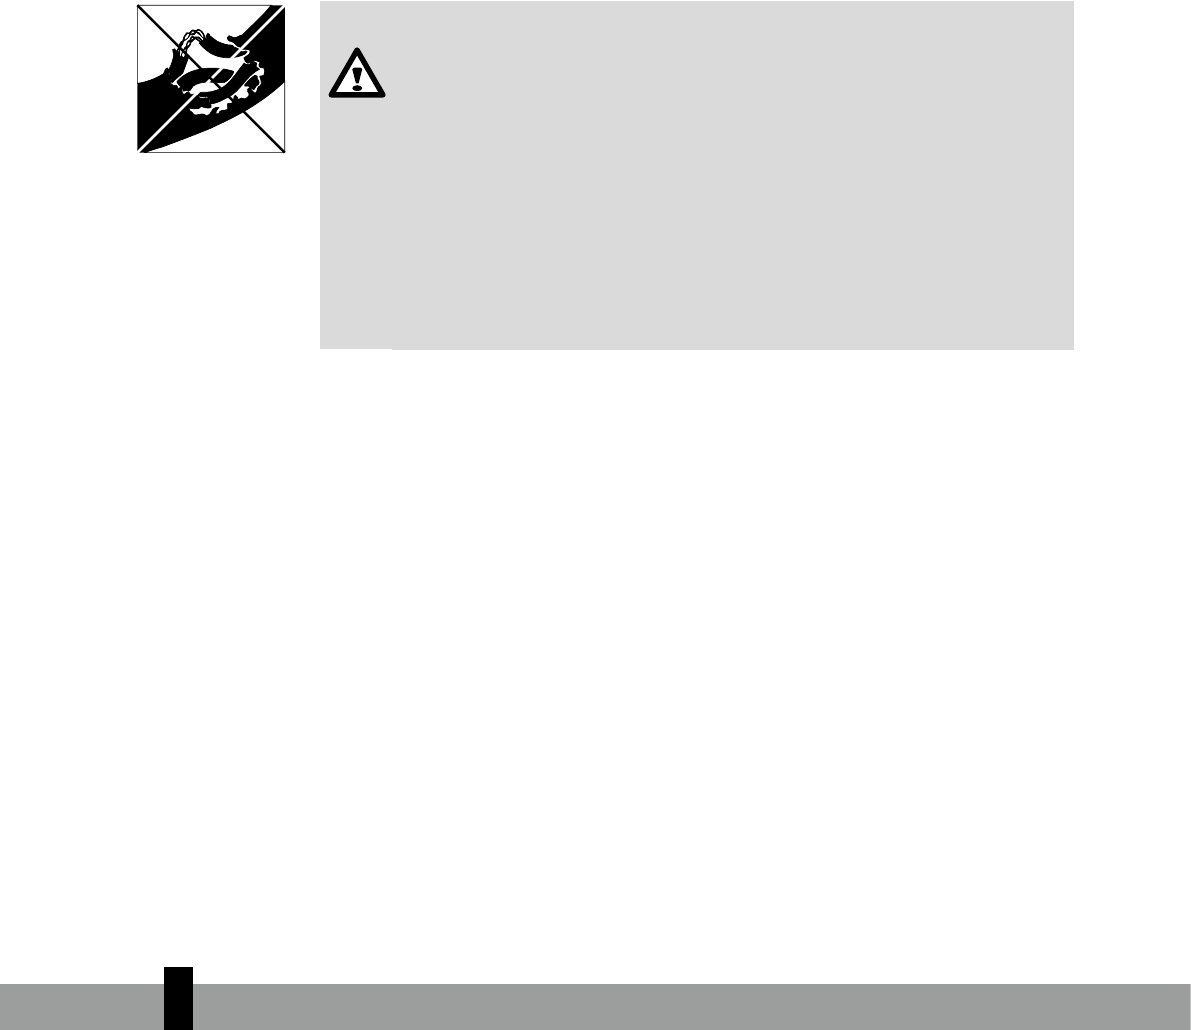
Stecken Sie keine Hände, Finger oder Gegenstände in die Öffnung
des Geräts.
Schließen Sie das Gerät nie über eine Verlängerungsschnur an die
Stromquelle an. Wenn keine geeignete Steckdose mit Schutzkontakt
zur Verfügung steht, müssen Sie von einem Elektrofachmann eine
entsprechende Steckdose installieren lassen.
Reparaturen bzw. Wartungsarbeiten am Gerät dürfen nur von einem
offiziellen Wartungsmonteur oder von Ihrem offiziellen Händler
ausgeführt werden. Halten Sie die in der Bedienungsanleitung
zu diesem Gerät aufgeführten Anweisungen zur Bedienung und
Wartung ein.
Ziehen Sie immer den Stecker des Geräts aus der Steckdose, wenn
das Gerät nicht benutzt wird.
Das Inbetriebsetzen oder Ausschalten des Klimageräts mittels des
Einsteckens oder Herausziehens des Netzsteckers ist nicht zulässig.
Benutzen Sie immer die für diesen Zweck vorgesehenen Schalter am
Gerät oder benutzen Sie die Fernbedienung.
Öffnen Sie das Klimagerät nicht, wenn es in Betrieb ist. Ziehen SIe
immer den Netzstecker, bevor Sie das Gerät öffnen.
Ziehen Sie immer den Netzstecker, bevor Sie das Klimagerät reini-
gen oder warten.
Es darf kein Gasbrenner, Brenn bzw. Wärmeofen im Luftstrom auf-
gestellt werden.
Mit nassen Händen dürfen Sie die Schalter nicht bedienen und das
Klimagerät nicht berühren.
6
Wenn das Außengerät in Betrieb ist, erzeugt es Lärm. Der Benutzer
ist dafür verantwortlich zu kontrollieren, ob dies mit den örtlichen
Vorschriften übereinstimmt und ob das Gerät auch anderweitig den
örtlichen Vorschriften entspricht.
Dieses Gerät darf nicht von körperlich, geistig oder sensorisch ein-
geschränkten Personen (oder Kindern) benutzt werden oder von
Personen, die unzureichende Erfahrung und Kenntnisse haben, es
sei denn dies erfolgt unter Aufsicht und Anleitung zur Verwendung
des Geräts durch jemanden, der für die Sicherheit dieser Personen
zuständig ist.
Kinder sind zu beaufsichtigen, um sicherzugehen, dass sie nicht mit
dem Gerät spielen.
Es empfiehlt sich, sich nicht im direkten Luftstrom aufzuhalten.
Trinken Sie nie Wasser aus dem Klimagerät.
Führen Sie keinerlei Veränderungen am Apparat durch. Entfernen
Sie das Isolationsmaterial nicht.
Sollte das Netzkabel beschädigt sein, so muss es durch den Hersteller,
seinen Kundenservice oder durch eine Person mit vergleichbaren
Qualifikationen ersetzt werden, um Gefahren zu vermeiden.
Dieses Gerät kann von Kindern ab 8 Jahren und Personen mit kör-
perlicher, sensorischer oder geistiger Behinderung oder mangelnder
Erfahrung und Wissen bedient werden, wenn sie beaufsichtigt wer-
den, oder in die sichere Nutzung des Geräts eingewiesen wurden
und die damit verbundenen Gefahren verstehen. Kinder dürfen mit
dem Gerät nicht spielen. Kinder dürfen mit dem Gerät nicht spie-
len. Die Reinigung und die Wartung durch den Benutzer sind von
Kindern nicht ohne Aufsicht durchzuführen.
ACHTUNG!
Wenn die Netzschnur, der Stecker, das
Gehäuse oder das Bedienfeld beschädigt ist,
dürfen Sie das Gerät nie benutzen.
Bei Nichtbeachtung dieser Anweisungen
erlischt möglicherweise die Garantie für
dieses Gerät.
2
6
7
2
7
HINWEIS ZU FLUORGASEN
1. Dieses Klimagerät enthält Fluorgase. Spezifische Informationen zum Gastyp und zur Menge finden Sie
auf dem entsprechenden Aufkleber auf dem Gerät selbst.
2. Aufbau, Service, Wartung und Reparatur des Geräts müssen durch einen zertifizierten Techniker dur-
chgeführt werden.
3. Der Abbau und das Recycling des Produkts müssen von einem zertifizierten Techniker durchgeführt
werden.
4. Sollte das System über ein Leckerkennungssystem verfügen, so ist es mindestens alle 12 Monate auf
Lecks zu überprüfen.
5. Wenn das Gerät auf Lecks überprüft wird, wird eine ordentliche Aufzeichnung alle Prüfungen strengs-
tens empfohlen. 6. Dieses Klimagerät ist luftdicht versiegelt und enthält Fluorgase.
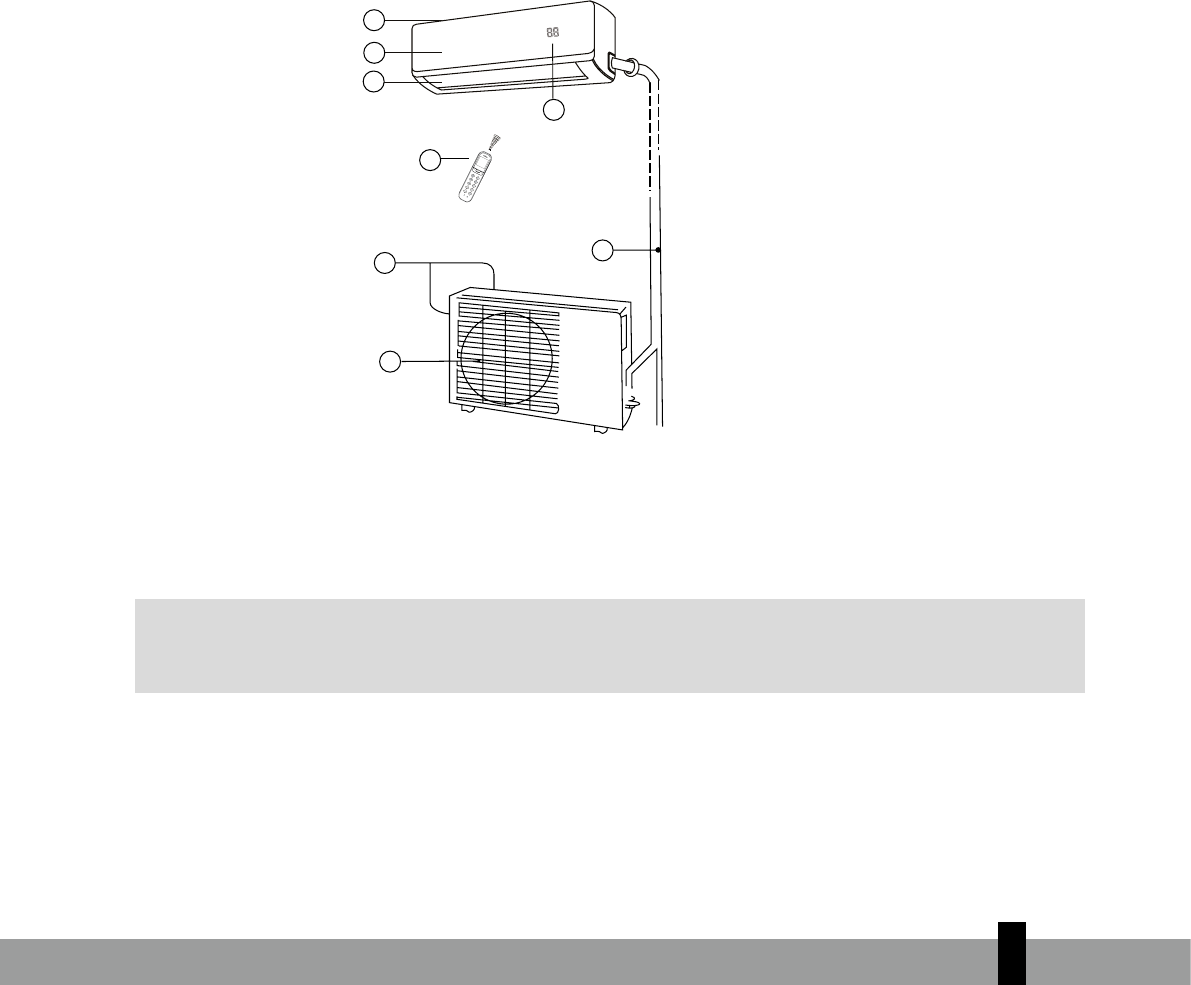
B BEZEICHNUNG DER TEILE
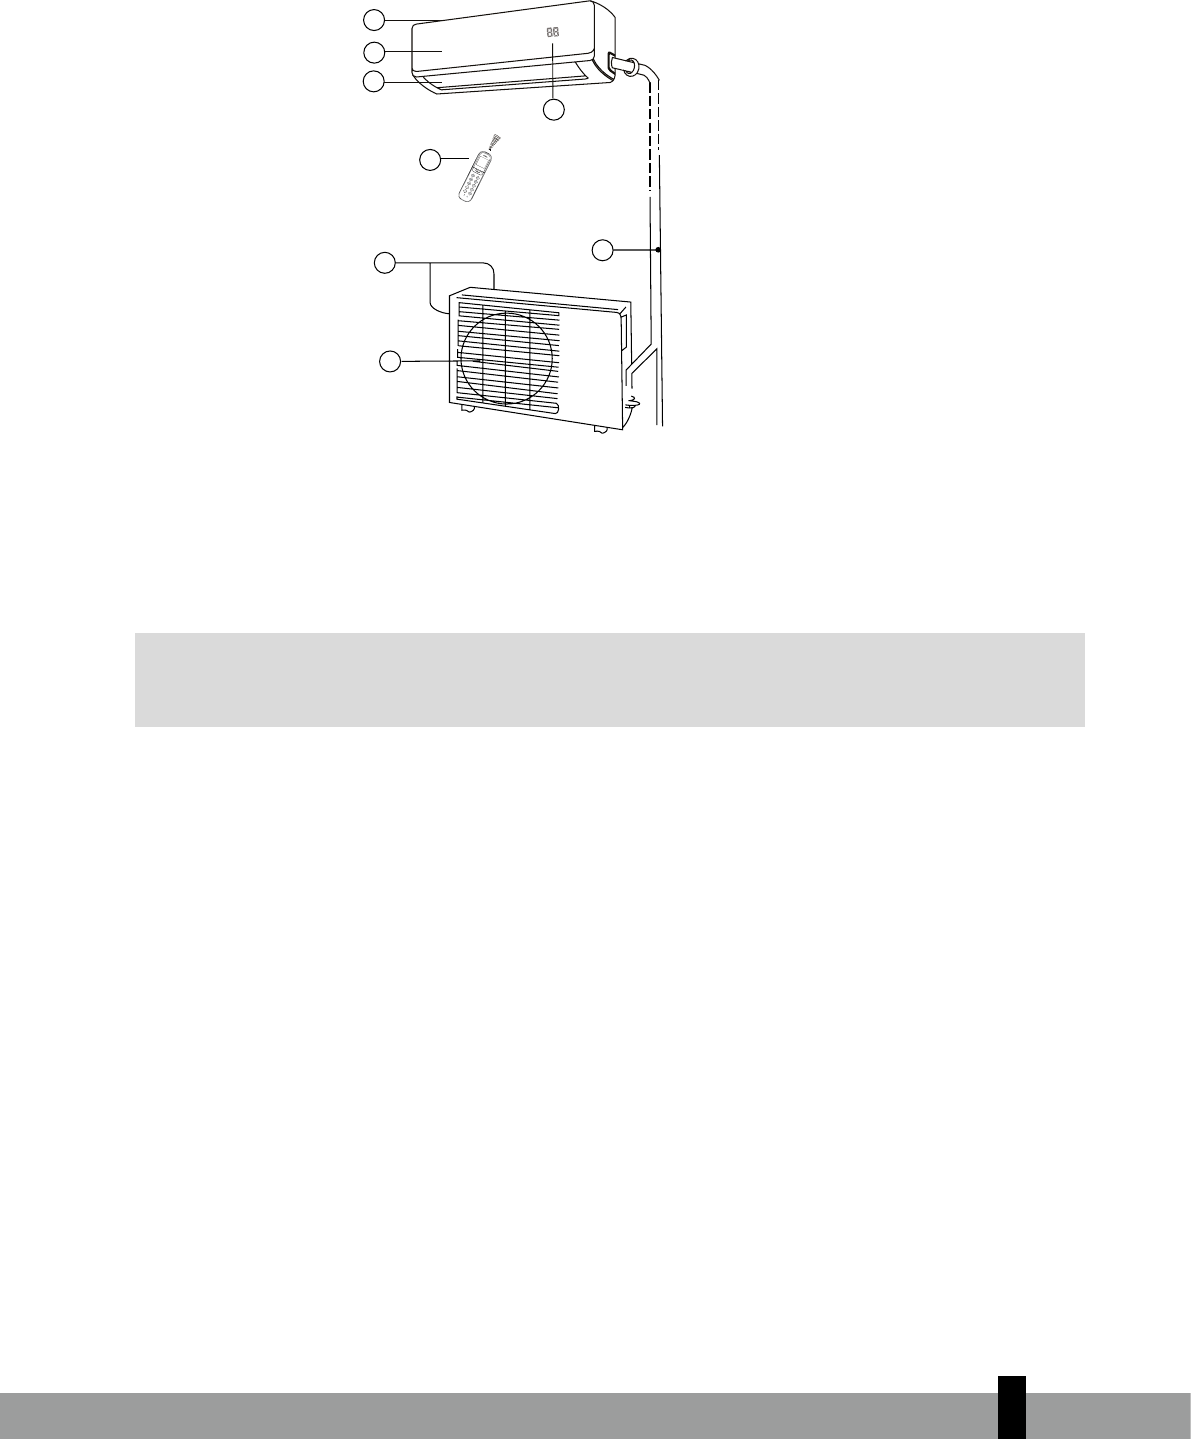
INNENGERÄT Innengerät
Luftfilter (hinter der vorderen
Verkleidung)
Frontplatte
Luftauslass
Anzeigenfeld
Fernbedienung (nähere Einzelheiten
und Bedienung, siehe Abschnitt J)
AUSSENGERÄT Außengerät
Anschlussrohr, Ablassschlauch (Für
S-Modelle Anschlussrohr nicht im
Lieferumfang enthalten)
Lufteinlass (Seite und Rückseite)
Luftauslass
5
6
7
8
1
22
3
4
5
6
2
1
4
3
G
HINWEIS
Alle Abbildungen in dieser Anleitung und auf der Verpackung dienen lediglich zur
Verdeutlichung. Sie können geringfügig von dem Klimagerät, das Sie gekauft haben, abweichen.
Grundsätzlich gilt die wirkliche Form.
8
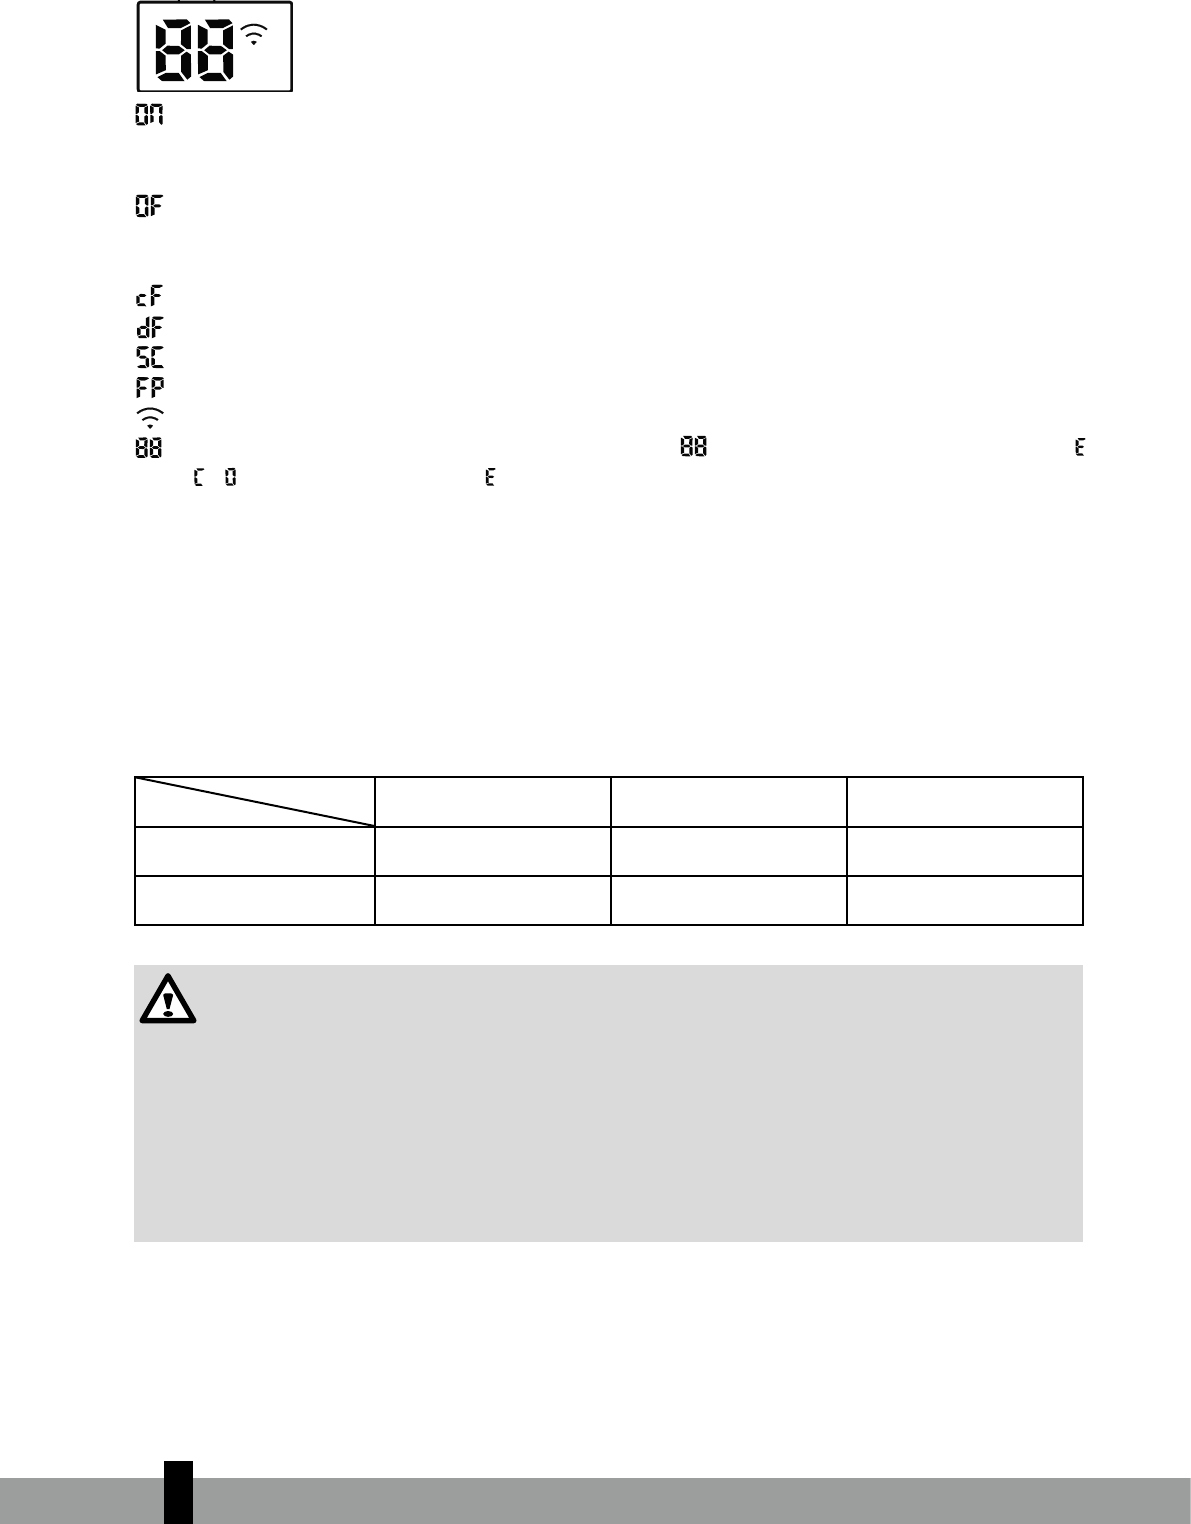
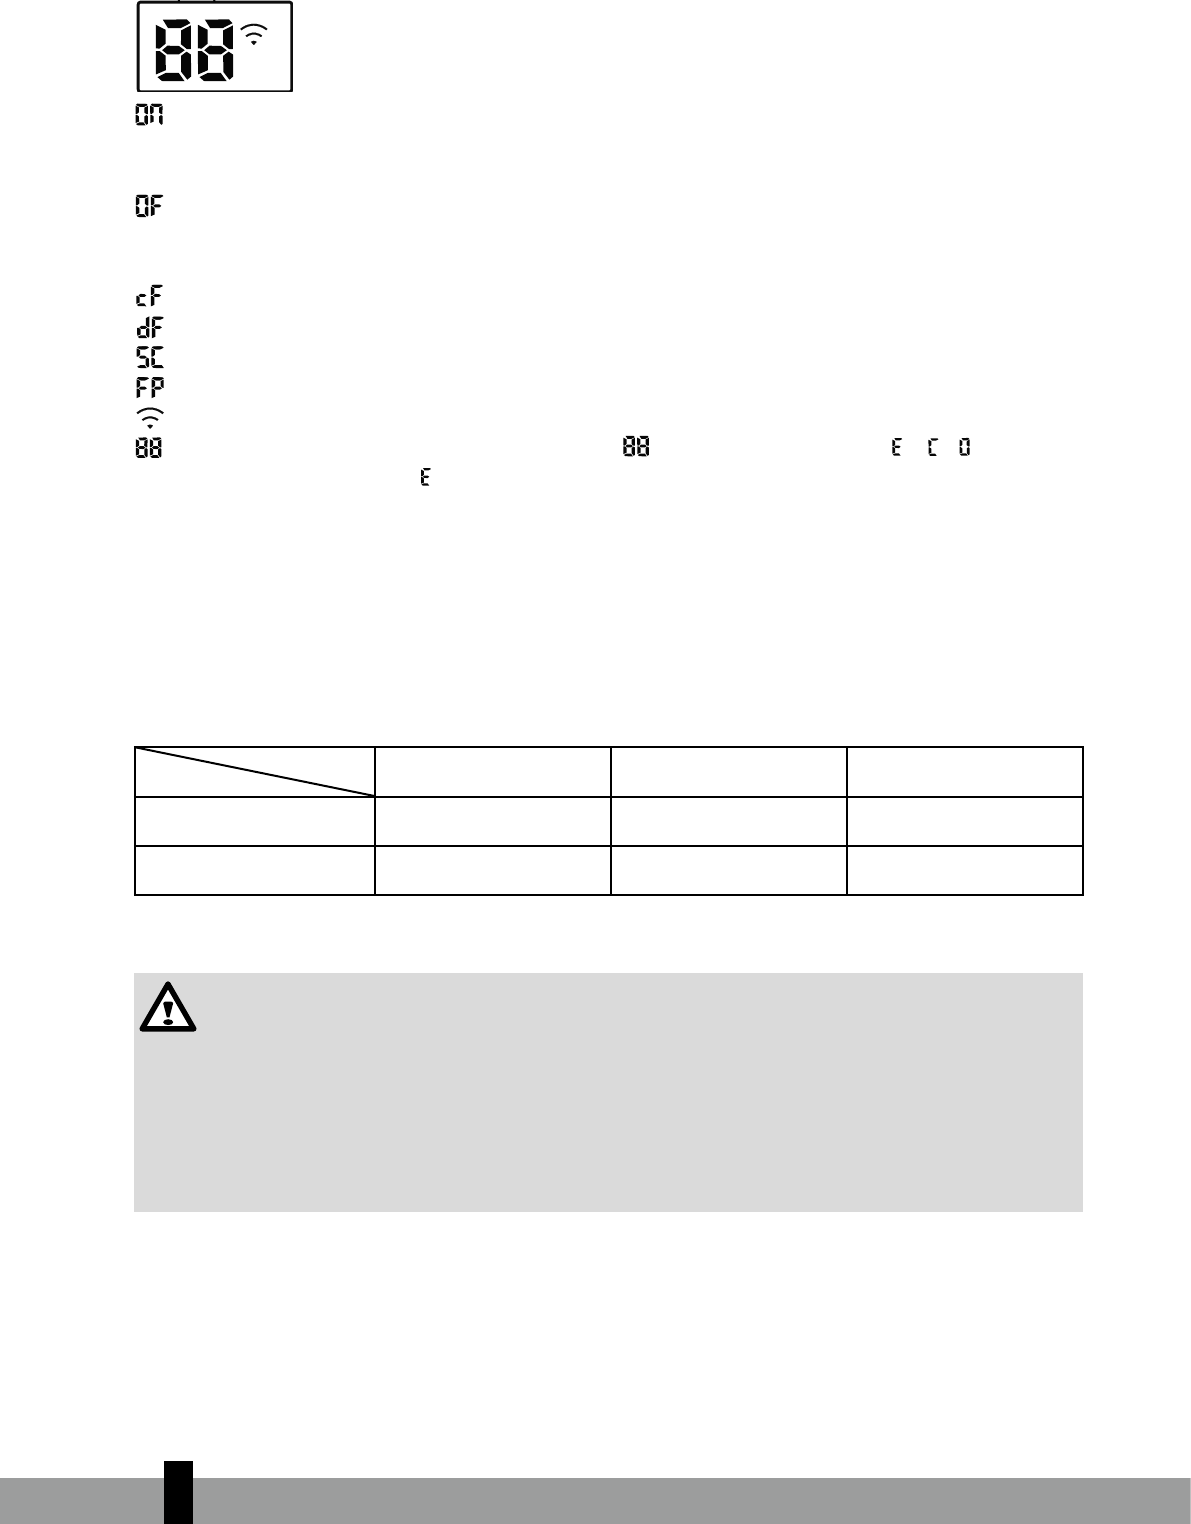
FUNKTIONSANZEIGEN AUF DEM INDOOR-GERÄTEDISPLAY
Page 6
Unit Specifications and Features
1
Unit
Specifications
and Features
NOTE:
A guide on using the infrared remote is not included
in this literature package.
Unit Parts
Power Cable (Some Units)
Remote Control
Remote Control
Holder (Some Units)
Louver
Front Panel
Air Filter
(pull out)
Display window
“ ” for 3 seconds when:
• TIMER ON is set
• FRESH, SWING, TURBO, or SILENCE features are turned on
“ ” for 3 seconds when:
• TIMER OFF is set
• FRESH, SWING, TURBO, or SILENCE features are turned off
“ ” when defrosting(cooling & heating units)
“ ” when anti-cold air feature is turned on(cooling & heating units)
“ ” when unit is self-cleaning(some units)
“ ” when freeze protection is turned on(some units)
“ ” when Wireless Control feature is activated(some units)
Display Code
Meanings
In Fan and Dry mode, the unit will display the room temperature.
In other modes, the unit will display your temperature setting.
,
,
“ ”
When ECO function(some units) is activated, the
illuminates gradually one by one as --
-- --set temperature-- ...... in one second interval.
3 Sekunden lang, wenn:
• Timer ON eingestellt ist
• Funktionen FRESH, SWING, TURBO oder SILENCE sind eingeschaltet
Page 6
Unit Specifications and Features
1
Unit
Specifications
and Features
NOTE:
A guide on using the infrared remote is not included
in this literature package.
Unit Parts
Power Cable (Some Units)
Remote Control
Remote Control
Holder (Some Units)
Louver
Front Panel
Air Filter
(pull out)
Display window
“ ” for 3 seconds when:
• TIMER ON is set
• FRESH, SWING, TURBO, or SILENCE features are turned on
“ ” for 3 seconds when:
• TIMER OFF is set
• FRESH, SWING, TURBO, or SILENCE features are turned off
“ ” when defrosting(cooling & heating units)
“ ” when anti-cold air feature is turned on(cooling & heating units)
“ ” when unit is self-cleaning(some units)
“ ” when freeze protection is turned on(some units)
“ ” when Wireless Control feature is activated(some units)
Display Code
Meanings
In Fan and Dry mode, the unit will display the room temperature.
In other modes, the unit will display your temperature setting.
,
,
“ ”
When ECO function(some units) is activated, the
illuminates gradually one by one as --
-- --set temperature-- ...... in one second interval.
3 Sekunden lang, wenn:
• Timer OFF eingestellt ist
• Funktionen FRESH, SWING, TURBO oder SILENCE sind ausgeschaltet
Page 6
Unit Specifications and Features
1
Unit
Specifications
and Features
NOTE:
A guide on using the infrared remote is not included
in this literature package.
Unit Parts
Power Cable (Some Units)
Remote Control
Remote Control
Holder (Some Units)
Louver
Front Panel
Air Filter
(pull out)
Display window
“ ” for 3 seconds when:
• TIMER ON is set
• FRESH, SWING, TURBO, or SILENCE features are turned on
“ ” for 3 seconds when:
• TIMER OFF is set
• FRESH, SWING, TURBO, or SILENCE features are turned off
“ ” when defrosting(cooling & heating units)
“ ” when anti-cold air feature is turned on(cooling & heating units)
“ ” when unit is self-cleaning(some units)
“ ” when freeze protection is turned on(some units)
“ ” when Wireless Control feature is activated(some units)
Display Code
Meanings
In Fan and Dry mode, the unit will display the room temperature.
In other modes, the unit will display your temperature setting.
,
,
“ ”
When ECO function(some units) is activated, the
illuminates gradually one by one as --
-- --set temperature-- ...... in one second interval.
beim Abtauen (Kühl- und Heizgeräte)
Page 6
Unit Specifications and Features
1
Unit
Specifications
and Features
NOTE:
A guide on using the infrared remote is not included
in this literature package.
Unit Parts
Power Cable (Some Units)
Remote Control
Remote Control
Holder (Some Units)
Louver
Front Panel
Air Filter
(pull out)
Display window
“ ” for 3 seconds when:
• TIMER ON is set
• FRESH, SWING, TURBO, or SILENCE features are turned on
“ ” for 3 seconds when:
• TIMER OFF is set
• FRESH, SWING, TURBO, or SILENCE features are turned off
“ ” when defrosting(cooling & heating units)
“ ” when anti-cold air feature is turned on(cooling & heating units)
“ ” when unit is self-cleaning(some units)
“ ” when freeze protection is turned on(some units)
“ ” when Wireless Control feature is activated(some units)
Display Code
Meanings
In Fan and Dry mode, the unit will display the room temperature.
In other modes, the unit will display your temperature setting.
,
,
“ ”
When ECO function(some units) is activated, the
illuminates gradually one by one as --
-- --set temperature-- ...... in one second interval.
wenn Anti-Kaltluft-Funktion eingeschaltet ist (Kühl- und Heizgeräte)
Page 6
Unit Specifications and Features
1
Unit
Specifications
and Features
NOTE:
A guide on using the infrared remote is not included
in this literature package.
Unit Parts
Power Cable (Some Units)
Remote Control
Remote Control
Holder (Some Units)
Louver
Front Panel
Air Filter
(pull out)
Display window
“ ” for 3 seconds when:
• TIMER ON is set
• FRESH, SWING, TURBO, or SILENCE features are turned on
“ ” for 3 seconds when:
• TIMER OFF is set
• FRESH, SWING, TURBO, or SILENCE features are turned off
“ ” when defrosting(cooling & heating units)
“ ” when anti-cold air feature is turned on(cooling & heating units)
“ ” when unit is self-cleaning(some units)
“ ” when freeze protection is turned on(some units)
“ ” when Wireless Control feature is activated(some units)
Display Code
Meanings
In Fan and Dry mode, the unit will display the room temperature.
In other modes, the unit will display your temperature setting.
,
,
“ ”
When ECO function(some units) is activated, the
illuminates gradually one by one as --
-- --set temperature-- ...... in one second interval.
wenn Einheit Selbstreinigung durchführt (einige Geräte)
Page 6
Unit Specifications and Features
1
Unit
Specifications
and Features
NOTE:
A guide on using the infrared remote is not included
in this literature package.
Unit Parts
Power Cable (Some Units)
Remote Control
Remote Control
Holder (Some Units)
Louver
Front Panel
Air Filter
(pull out)
Display window
“ ” for 3 seconds when:
• TIMER ON is set
• FRESH, SWING, TURBO, or SILENCE features are turned on
“ ” for 3 seconds when:
• TIMER OFF is set
• FRESH, SWING, TURBO, or SILENCE features are turned off
“ ” when defrosting(cooling & heating units)
“ ” when anti-cold air feature is turned on(cooling & heating units)
“ ” when unit is self-cleaning(some units)
“ ” when freeze protection is turned on(some units)
“ ” when Wireless Control feature is activated(some units)
Display Code
Meanings
In Fan and Dry mode, the unit will display the room temperature.
In other modes, the unit will display your temperature setting.
,
,
“ ”
When ECO function(some units) is activated, the
illuminates gradually one by one as --
-- --set temperature-- ...... in one second interval.
, wenn Frostschutz eingeschaltet ist (einige Geräte)
Page 6
Unit Specifications and Features
1
Unit
Specifications
and Features
NOTE:
A guide on using the infrared remote is not included
in this literature package.
Unit Parts
Power Cable (Some Units)
Remote Control
Remote Control
Holder (Some Units)
Louver
Front Panel
Air Filter
(pull out)
Display window
“ ” for 3 seconds when:
• TIMER ON is set
• FRESH, SWING, TURBO, or SILENCE features are turned on
“ ” for 3 seconds when:
• TIMER OFF is set
• FRESH, SWING, TURBO, or SILENCE features are turned off
“ ” when defrosting(cooling & heating units)
“ ” when anti-cold air feature is turned on(cooling & heating units)
“ ” when unit is self-cleaning(some units)
“ ” when freeze protection is turned on(some units)
“ ” when Wireless Control feature is activated(some units)
Display Code
Meanings
In Fan and Dry mode, the unit will display the room temperature.
In other modes, the unit will display your temperature setting.
,
,
“ ”
When ECO function(some units) is activated, the
illuminates gradually one by one as --
-- --set temperature-- ...... in one second interval.
wenn Funksteuerung aktiviert ist (einige Geräte)
Page 6
Unit Specifications and Features
1
Unit
Specifications
and Features
NOTE:
A guide on using the infrared remote is not included
in this literature package.
Unit Parts
Power Cable (Some Units)
Remote Control
Remote Control
Holder (Some Units)
Louver
Front Panel
Air Filter
(pull out)
Display window
“ ” for 3 seconds when:
• TIMER ON is set
• FRESH, SWING, TURBO, or SILENCE features are turned on
“ ” for 3 seconds when:
• TIMER OFF is set
• FRESH, SWING, TURBO, or SILENCE features are turned off
“ ” when defrosting(cooling & heating units)
“ ” when anti-cold air feature is turned on(cooling & heating units)
“ ” when unit is self-cleaning(some units)
“ ” when freeze protection is turned on(some units)
“ ” when Wireless Control feature is activated(some units)
Display Code
Meanings
In Fan and Dry mode, the unit will display the room temperature.
In other modes, the unit will display your temperature setting.
,
,
“ ”
When ECO function(some units) is activated, the
illuminates gradually one by one as --
-- --set temperature-- ...... in one second interval.
wenn ECO-Funktion (einige Geräte) aktiviert ist. Die
Page 6
Unit Specifications and Features
1
Unit
Specifications
and Features
NOTE:
A guide on using the infrared remote is not included
in this literature package.
Unit Parts
Power Cable (Some Units)
Remote Control
Remote Control
Holder (Some Units)
Louver
Front Panel
Air Filter
(pull out)
Display window
“ ” for 3 seconds when:
• TIMER ON is set
• FRESH, SWING, TURBO, or SILENCE features are turned on
“ ” for 3 seconds when:
• TIMER OFF is set
• FRESH, SWING, TURBO, or SILENCE features are turned off
“ ” when defrosting(cooling & heating units)
“ ” when anti-cold air feature is turned on(cooling & heating units)
“ ” when unit is self-cleaning(some units)
“ ” when freeze protection is turned on(some units)
“ ” when Wireless Control feature is activated(some units)
Display Code
Meanings
In Fan and Dry mode, the unit will display the room temperature.
In other modes, the unit will display your temperature setting.
,
,
“ ”
When ECO function(some units) is activated, the
illuminates gradually one by one as --
-- --set temperature-- ...... in one second interval.
leuchtet schrittweise nacheinander wie folgt
auf:
Page 6
Unit Specifications and Features
1
Unit
Specifications
and Features
NOTE:
A guide on using the infrared remote is not included
in this literature package.
Unit Parts
Power Cable (Some Units)
Remote Control
Remote Control
Holder (Some Units)
Louver
Front Panel
Air Filter
(pull out)
Display window
“ ” for 3 seconds when:
• TIMER ON is set
• FRESH, SWING, TURBO, or SILENCE features are turned on
“ ” for 3 seconds when:
• TIMER OFF is set
• FRESH, SWING, TURBO, or SILENCE features are turned off
“ ” when defrosting(cooling & heating units)
“ ” when anti-cold air feature is turned on(cooling & heating units)
“ ” when unit is self-cleaning(some units)
“ ” when freeze protection is turned on(some units)
“ ” when Wireless Control feature is activated(some units)
Display Code
Meanings
In Fan and Dry mode, the unit will display the room temperature.
In other modes, the unit will display your temperature setting.
,
,
“ ”
When ECO function(some units) is activated, the
illuminates gradually one by one as --
-- --set temperature-- ...... in one second interval.
--
Page 6
Unit Specifications and Features
1
Unit
Specifications
and Features
NOTE:
A guide on using the infrared remote is not included
in this literature package.
Unit Parts
Power Cable (Some Units)
Remote Control
Remote Control
Holder (Some Units)
Louver
Front Panel
Air Filter
(pull out)
Display window
“ ” for 3 seconds when:
• TIMER ON is set
• FRESH, SWING, TURBO, or SILENCE features are turned on
“ ” for 3 seconds when:
• TIMER OFF is set
• FRESH, SWING, TURBO, or SILENCE features are turned off
“ ” when defrosting(cooling & heating units)
“ ” when anti-cold air feature is turned on(cooling & heating units)
“ ” when unit is self-cleaning(some units)
“ ” when freeze protection is turned on(some units)
“ ” when Wireless Control feature is activated(some units)
Display Code
Meanings
In Fan and Dry mode, the unit will display the room temperature.
In other modes, the unit will display your temperature setting.
,
,
“ ”
When ECO function(some units) is activated, the
illuminates gradually one by one as --
-- --set temperature-- ...... in one second interval.
-- eingestellte Temperatur --
Page 6
Unit Specifications and Features
1
Unit
Specifications
and Features
NOTE:
A guide on using the infrared remote is not included
in this literature package.
Unit Parts
Power Cable (Some Units)
Remote Control
Remote Control
Holder (Some Units)
Louver
Front Panel
Air Filter
(pull out)
Display window
“ ” for 3 seconds when:
• TIMER ON is set
• FRESH, SWING, TURBO, or SILENCE features are turned on
“ ” for 3 seconds when:
• TIMER OFF is set
• FRESH, SWING, TURBO, or SILENCE features are turned off
“ ” when defrosting(cooling & heating units)
“ ” when anti-cold air feature is turned on(cooling & heating units)
“ ” when unit is self-cleaning(some units)
“ ” when freeze protection is turned on(some units)
“ ” when Wireless Control feature is activated(some units)
Display Code
Meanings
In Fan and Dry mode, the unit will display the room temperature.
In other modes, the unit will display your temperature setting.
,
,
“ ”
When ECO function(some units) is activated, the
illuminates gradually one by one as --
-- --set temperature-- ...... in one second interval.
...... in 1-Sekunden-Intervall
In anderen Modi zeigt das Gerät Ihre Temperatureinstellung an.
Im Fan- und Dry-Modus zeigt das Gerät die Raumtemperatur an.
C BETRIEBSTEMPERATUR
Kühlen, Heizen oder/und Entfeuchten funktionieren bei folgenden Innen und Außentemperaturen:
Temperatur
Betriebsart
Kühlen Heizen Entfeuchten
Raumtemperatur 17ºC - 32ºC 0ºC - 30ºC 10ºC - 32ºC
Außentemperatur -25ºC - 50ºC -15ºC - 30ºC 0ºC - 50ºC
VORSICHT
Wenn das Klimagerät außerhalb der obigen Bedingungen betrieben wird, werden
möglicherweise bestimmte Schutzvorrichtungen ausgelöst, wodurch das Gerät nicht normal
funktioniert.
• Wenn das Klimagerät bei einem relativen Feuchtigkeitsgrad von über 80 % in dem Raum
betrieben wird, kondensiert die Feuchtigkeit möglicherweise auf dem Klimagerät. Stellen Sie in
dem Fall die senkrechten Luftstromlamellen auf den Höchstwinkel (senkrecht zum Boden) und
stellen Sie das Gebläse auf den höchsten Stand.
Damit das Klimagerät die besten Ergebnisse erzielt, sollten Sie beim Kühlen oder Heizen Türen
und Fenster immer geschlossen halten.
2
8
9
2
9
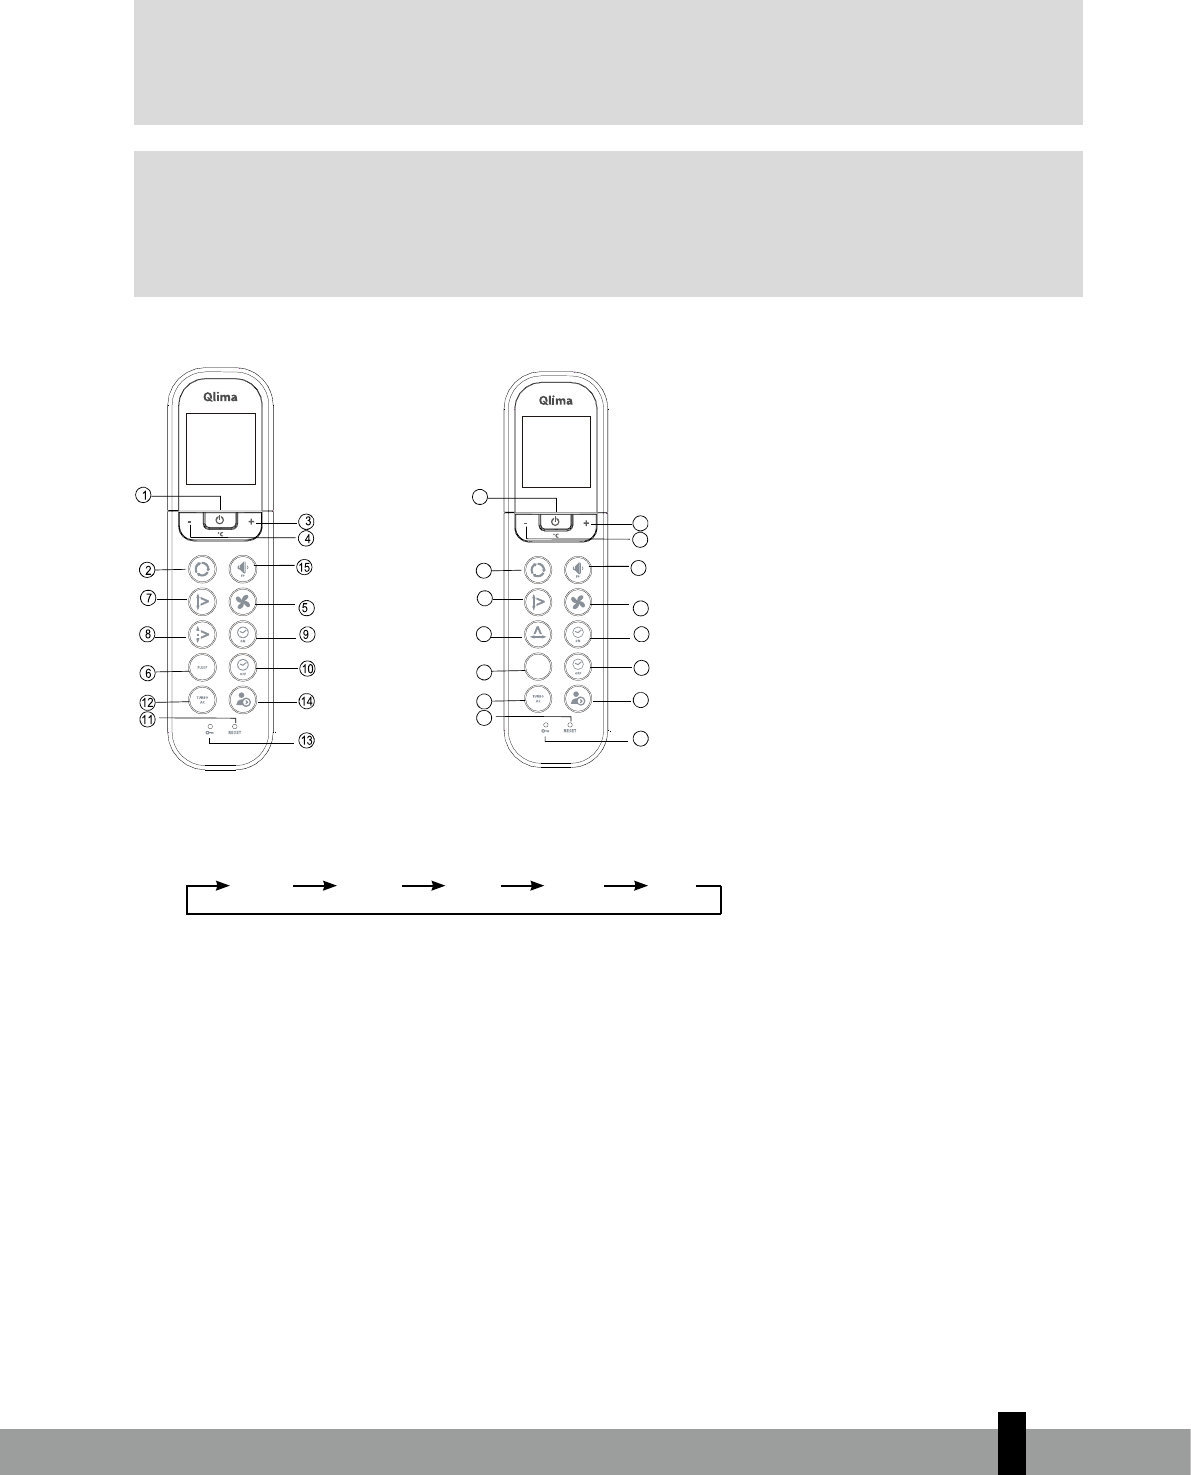
D FERNBEDIENUNG
G
HINWEIS
Richten Sie die Fernbedienung immer auf den Empfänger am Innengerät und achten Sie
darauf, dass sich zwischen der Fernbedienung und dem Empfänger am Innengerät keine
Gegenstände befinden. In dem Fall würde der Empfänger das Signal nämlich nicht erhalten
und dann würde das Klimagerät nicht einwandfrei funktionieren.
Die Fernbedienung funktioniert in einer Entfernung von höchstens 6 bis 7 vom Klimagerät.
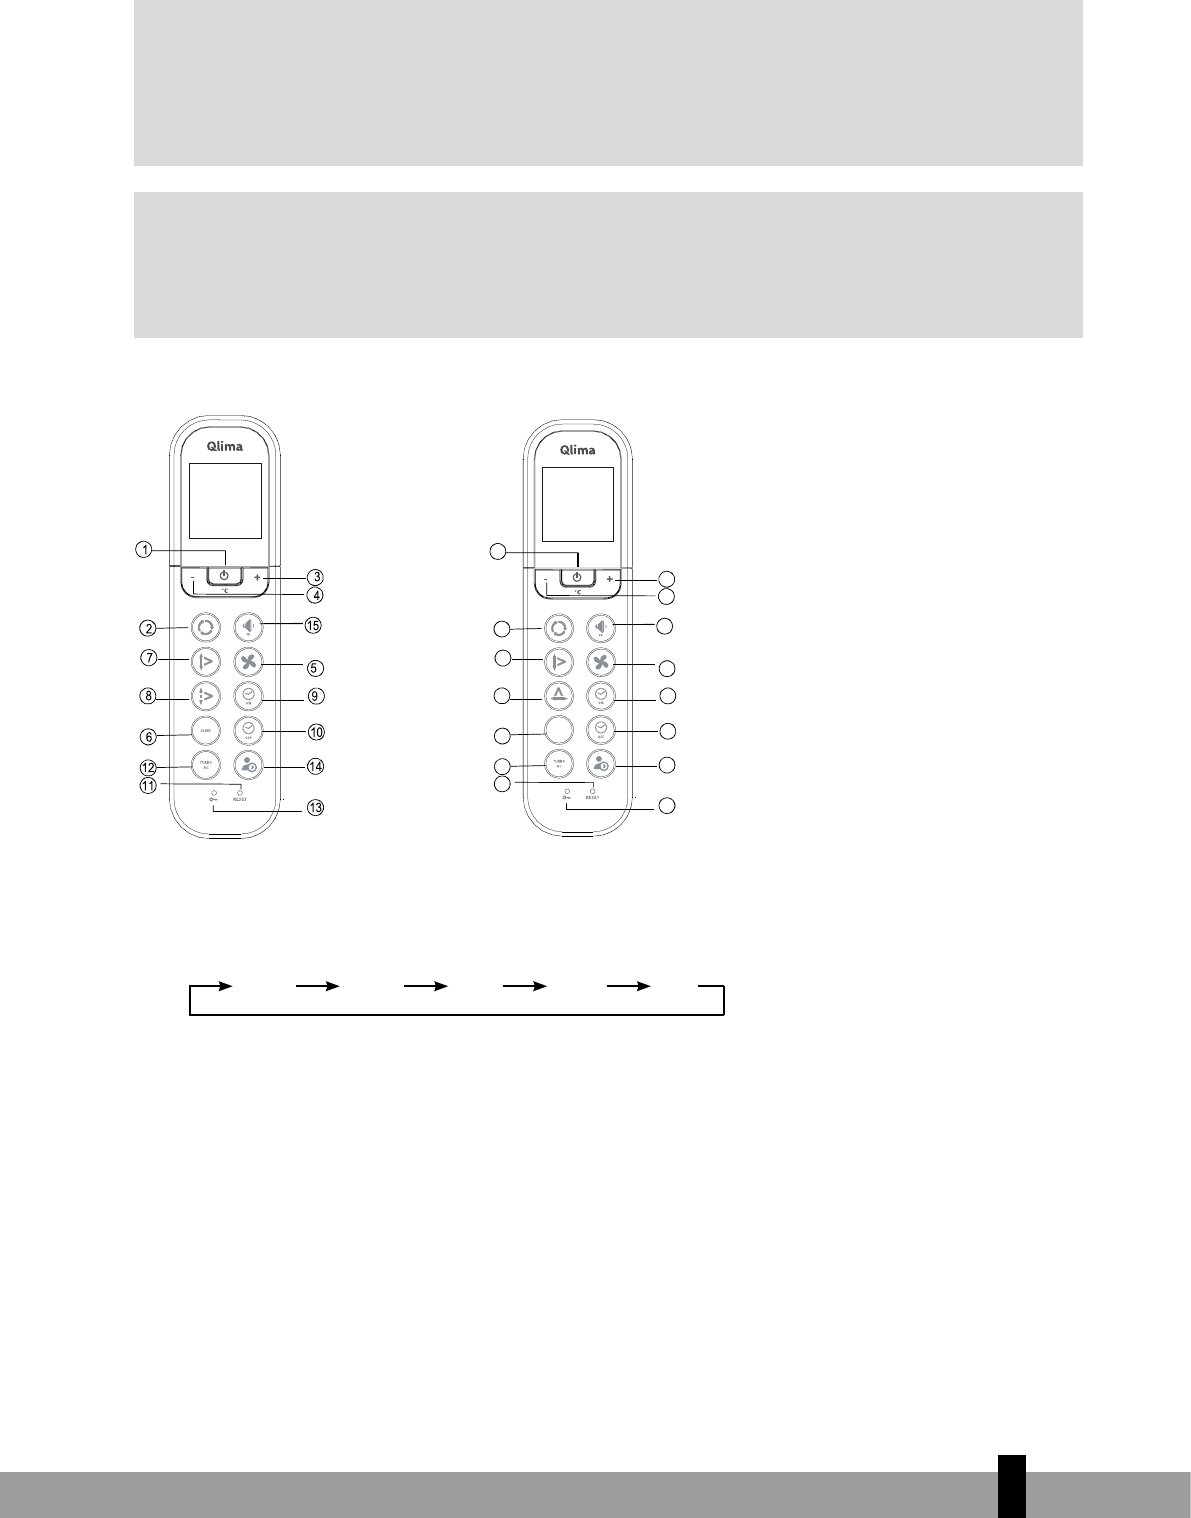
Funktionstasten auf der Fernbedienung
4
3
2
8
6
7
12
11
13
15
5
9
10
14
1
SLEEP
FRESH
Ein/Aus-Taste: Wenn Sie auf diese Taste drücken, wird das Gerät eingeschaltet. Wenn Sie erneut auf
diese Taste drücken, wird das Gerät ausgeschaltet.
Betriebsarttaste: Jedes Mal, wenn Sie diese Taste drücken, wird eine andere Betriebsart aktiviert und
zwar in der Reihenfolge: Automatik, Entfeuchten, Heizen und Nur-Gebläse, siehe das folgende Schema:
AUTOMATIK KÜHLEN ENTFEUCHTEN HEIZEN GEBLÄSE
Taste + : Wenn Sie diese Taste drücken, erhöhen Sie den Innentemperatur-Sollwert auf 30 °C.
Taste - : Wenn Sie diese Taste drücken, senken Sie den Innentemperatur-Sollwert auf 17 °C.
Gebläsetaste: Mit dieser Taste wählen Sie die Gebläsegeschwindigkeit. Jedes Mal, wenn Sie diese Taste
drücken, wird eine andere Gebläsegeschwindigkeit aktiviert und zwar in der Reihenfolge: AUTOMATIK,
NIEDRIG, MITTEL, HOCH und dann wieder Automatik. Wenn Sie Automatik- oder Entfeuchtungsbetrieb
wählen, wird die Gebläsegeschwindigkeit automatisch geregelt, d.h. Sie können sie nicht einstellen.
Schlaftaste: Drücken Sie auf diese Taste, um die Energiesparfunktion einzuschalten. Drücken Sie erneut auf
die Taste, um diese Funktion auszuschalten. Diese Funktion kann nur in Kombination mit Kühl-, Heiz- oder
Automatikbetrieb [COOL, HEAT und AUTO] benutzt werden und sorgt dafür. Diese Funktion kann nur im
COOL-, HEAT- und AUTO-Modus genutzt werden und sorgt für die für Sie angenehmste Temperatur. Das
Gerät erhöht die eingestellte Temperatur automatisch um 1 °C pro Stunde (im Kühlmodus) oder verringert
sie um 1 °C pro Stunde (im Heizmodus) innerhalb der ersten beiden Stunden. Die Klimaanlage bewahrt diese
Temperatur (eingestellte Temperatur – oder +2 °C) während der darauffolgenden fünf Stunden. Danach schal
-
tet sich die Klimaanlage selbst aus. FRESH-Taste: Lange gedrückt halten, um FRESH-Funktion zu aktivieren.
Schrägstellungstaste: Drücken Sie auf die Schrägstellungstaste, um die Schrägstellung zu aktivieren.
Wenn Sie erneut auf diese Taste drücken, wird diese Funktion ausgeschaltet.
Luftrichtungstaste: Wenn Sie auf diese Taste drücken, ändern Sie den Schrägstellungswinkel der
Lamellen. Die Stellung der Lamellen ändert sich bei jedem Drücken um 6°. Wenn die Lamellen auf
einen bestimmten Winkel gestellt werden, der die Kühl und Heizwirkung des Klimageräts beeinflussen
würde, würde sich die Schrägstellung automatisch ändern. Wenn diese Taste gedrückt wird, erscheint
kein Symbol in der Anzeige.
Abb. 1
10
i Taste TIMER ON: Wenn Sie auf diese Taste drücken, aktivieren Sie die Zeitfolge für das automatische
Einschalten. Jeder Tastendruck erhöht die automatische Zeiteinstellung in Schritten von 30 Minuten.
Wenn die Einstellzeit auf 10 Std. steht, erhöht jeder Tastendruck die automatische Zeiteinstellung in
Schritten von 60 Minuten. Wenn Sie das TIMER ON Programm löschen wollen. Drücken Sie weiterhin
auf die Taste, bis 0.0 angezeigt wird.
j Taste TIMER OFF: Wenn Sie auf diese Taste drücken, aktivieren Sie die Zeitfolge für das automatische
Ausschalten. Jeder Tastendruck erhöht die automatische Zeiteinstellung in Schritten von 30 Minuten.
Wenn die Einstellzeit auf 10 Std. steht, erhöht jeder Tastendruck die automatische Zeiteinstellung in
Schritten von 60 Minuten. Wenn Sie das TIMER OFF Programm löschen wollen. Drücken Sie weiterhin
auf die Taste, bis 0.0 angezeigt wird.
k Rückstelltaste: Wenn Sie die eingelassene Rückstelltaste drücken, können Sie alle aktuellen Einstellungen
aufheben und den Regler wieder auf die Ausgangswerte zurückstellen.
l Active Clean/Turbotaste: Wenn Sie diese Taste drücken, während das Klimagerät im Kühlbetrieb ist,
wird die Kühlleistung erhöht. Nachdem diese Taste gedrückt wurde (> 2 Sek.), wechselt das Gerät in den
Active Clean-Modus. Ein vollständiger Prozess wird gestartet, um die Innenseite des Verdampfers zu
reinigen und die Vermehrung von Bakterien zu verringern. Wenn diese Funktion aktiviert ist, werden
alle Timer-Einstellungen abgebrochen. Um den Active Clean-Modus anzuhalten, drücken Sie die Taste
erneut (> 2 Sek.).
m Feststelltaste: Wenn Sie die eingelassene Feststelltaste [LOCK] drücken, können Sie alle aktuellen
Einstellungen festsetzen. Die Fernbedienung reagiert dann nur noch auf die Feststelltaste. Drücken Sie
erneut auf die Taste, um die Feststellfunktion auszuschalten.
n LED-ANZEIGE/FOLLOW ME-Taste: Drücken Sie diese Taste, um die Anzeige der Klimaanlage zu löschen.
Die Anzeige der Klimaanlage wird sich nach 3 Sekunden automatisch selbst wieder einschalten, wenn
in diesem Zeitraum keine Tasten gedrückt werden. Drücken Sie die Taste erneut, um sie einzuschalten
(gilt nicht für Geräte ohne diese Funktion). Wenn Sie die Taste länger als 2 Sekunden gedrückt halten,
wird die FOLLOW ME-Funktion aktiviert. Drücken Sie die Taste erneut länger als 2 Sekunden, um die
Funktion zu deaktivieren.
o Leise-Taste
Drücken Sie diese Taste, um den Schalldruckpegel im Innenbereich auf 21 dB(A) zu senken. Die
Lüftergeschwindigkeit des Geräts im Innenbereich wird maximal verringert. Durch erneutes Drücken
dieser Taste schalten Sie die Turbofunktion wieder aus. Wenn Sie diese Taste drücken (> 2 Sekunden),
schaltet das Gerät auf den Frostvorbeugungsbetrieb um. In dem Fall beachtet das Gerät die
Innentemperatureinstellung nicht, sondern stellt die Innentemperatur auf 8 °C ein. Auf diese Weise wird
während kalten Perioden Frost in Ihrem Heim verhindert, während der Energieverbrauch des Geräts
optimal gering ist. Wenn dieser Betrieb eingestellt wurde, erscheint auf dem Display des Innengeräts
„FP“. Diese Taste kann nur im Heizbetrieb betätigt werden. Wenn Sie den Frostvorbeugungsbetrieb
wieder verlassen möchten, drücken Sie einfach noch einmal auf die Taste.
2
10
11
2
11
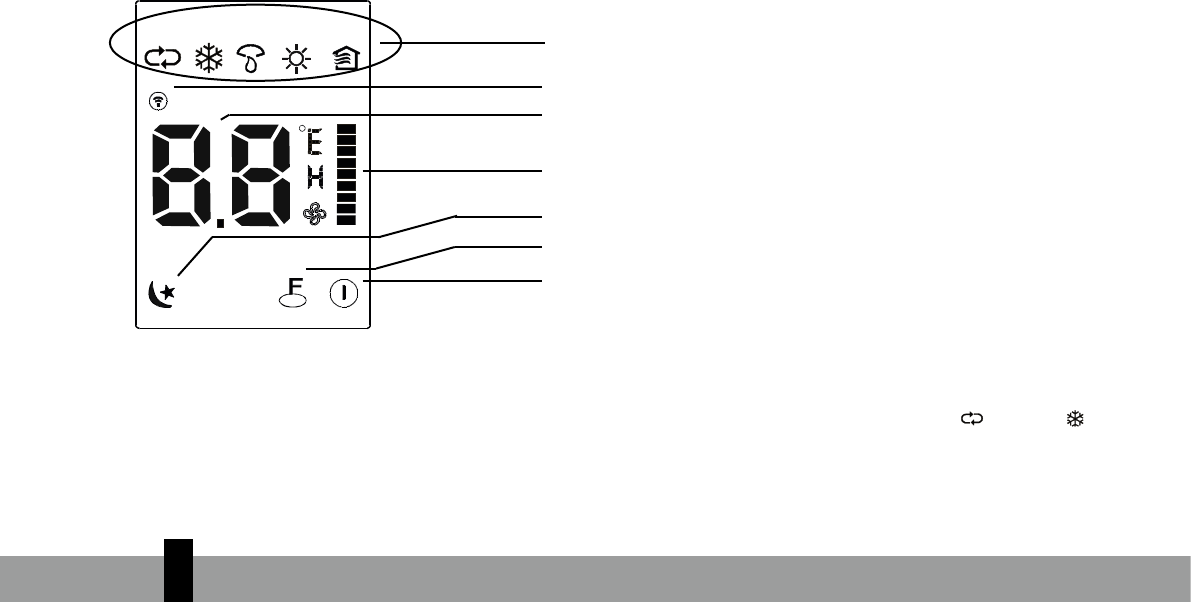
Funktionstasten auf der Fernbedienung
Abb. 2
2
1
3
4
5
6
7
auto cool dryheatfan
sleep lock run
SET TEMP.TIMER ONOFF
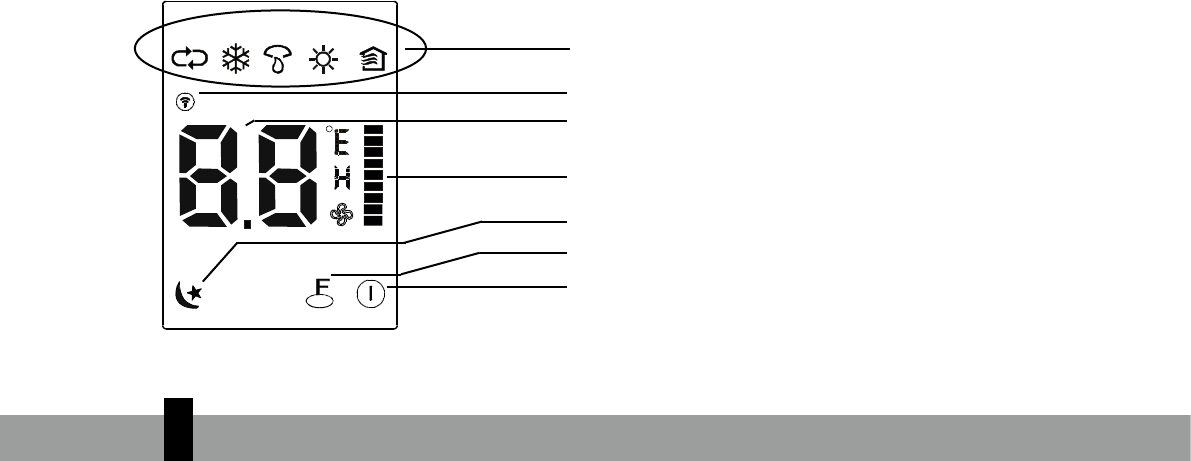
Anzeigenfeld
Sendeleuchte: Diese Leuchte brennt, während die Fernbedienung Signale zum Gerät sendet.
Betriebsstandsanzeige: Sie können die Betriebsarttaste drücken, um die aktuelle Betriebsart aufzuru-
fen: Automatik
, Kühlen , Trocknen , Heizen (nicht für Modelle die nur Kühlen), Gebläse .
Temperatur- / Schaltuhranzeige: Hier wird die eingestellte Temperatur angezeigt (17º C ~ 30ºC). Wenn
das Gerät im Belüftungsbetrieb ist, ist die Anzeige leer. Während des Schaltuhrbetriebs werden hier die
Ein- und Ausschalteinstellungen der Schaltuhr angezeigt.
Bezeichnung der Gebläsegeschwindigkeit: Über die Gebläsegeschwindigkeitstaste [FAN SPEED] kön-
nen Sie die gewünschte Gebläsegeschwindigkeit (Automatik – niedrig
– mittel
– hoch
) einstel-
len. Die gewählte Einstellung wird auf der Flüssigkristallanzeige angezeigt. Dies gilt nicht für den
Automatikbetrieb! Im Betriebsstand Dry oder Fan steht die Gebläsegeschwindigkeit auf Automatik.
Ein/Aus-Anzeige: Dieses Symbol erscheint, wenn das Gerät eingeschaltet ist, und erlischt wieder, wenn
das Gerät ausgeschaltet wird.
Anzeige „LOCK“: Die Meldung „LOCK“ erscheint, wenn die Einstellungen durch das Drücken der
Feststelltaste festgesetzt werden.
Anzeige „SLEEP“: Die Meldung „SLEEP“ erscheint, wenn die Sleep-Taste gedrückt wird, und erlischt
wieder, wenn diese Taste nochmals betätigt wird.
G
HINWEIS
Der Deutlichkeit halber sind in Abb. 2 alle Leuchten abgebildet. Beim tatsächlichen Betrieb
erscheinen jedoch nur die jeweils aktiven Funktionselemente in der Anzeige.
Bedienung der Fernbedienung
Einlegen der Batterien / Batteriewechsel
Verwenden Sie zwei Alkalitrockenbatterien (AAA/LR03).
Benutzen Sie keine aufladbaren Batterien.
1. Entfernen Sie den Deckel des Batteriefachs an der Rückseite der Fernbedienung, indem Sie ihn in
Richtung des Pfeils auf dem Deckel ziehen.
2. Legen Sie neue Batterien ein und achten Sie dabei darauf, dass Plus- und Minuspol (+) und (-) der
Batterien richtig herum liegen.
3 Setzen Sie den Deckel wieder ein, indem Sie ihn wieder in die Ausgangsstellung zurückschieben.
12
G
HINWEIS
Wenn die Batterien entfernt werden, löscht die Fernbedienung alle Einstellungen. Nachdem
die Batterien gewechselt wurden, muss die Fernbedienung neu programmiert werden.
Verwenden Sie beim Batteriewechsel keine alten Batterien oder Batterien eines anderen Typs.
Dies könnte die einwandfreie Funktion der Fernbedienung beeinträchtigen.
Wenn Sie die Fernbedienung mehrere Wochen lang nicht benutzen, müssen Sie die Batterien
herausnehmen. Anderenfalls könnte die Fernbedienung durch auslaufende Batterien
beschädigt werden.
Unter normalen Bedingungen haben Batterien eine durchschnittliche Lebensdauer von etwa 6
Monaten.
Wechseln Sie die Batterien aus, wenn das Innengerät nicht mit einem akustischen Signal
antwortet oder wenn die Übertragungsanzeige nicht aufleuchtet.
Mischen Sie niemals neue und alte Batterien. Verwenden Sie niemals gleichzeitig Batterien
eines unterschiedlichen Typs (z.B. Alkali und Mangandioxid).
AUTOMATIKBETRIEB
Wenn das Klimagerät betriebsbereit ist (kontrollieren Sie, ob das Gerät an einer Stromquelle angeschlos-
sen ist und ob Strom verfügbar ist), schalten Sie den Strom ein. Dann beginnt die Betriebsanzeige auf dem
Anzeigenfeld des Innengeräts zu blinken.
1. Wählen Sie Automatikbetrieb mit Hilfe der Betriebsarttaste.
2. Drücken Sie die Taste + oder -, um die gewünschte Raumtemperatur einzustellen.
3. Wenn Sie auf die Taste EIN/AUS drücken, wird das Gerät eingeschaltet. Die Betriebsleuchte auf dem
Anzeigenfeld des Innengeräts leuchtet dann auf. Die Gebläsegeschwindigkeit wird automatisch geregelt.
4. Wenn Sie erneut auf die Taste EIN/AUS drücken, wird das Gerät ausgeschaltet.
G
HINWEIS
Im Automatikbetrieb kann das Klimagerät logisch zwischen der Betriebsart KÜHLEN, GEBLÄSE,
HEIZEN und ENTFEUCHTEN wählen, indem es den Unterschied zwischen der tatsächlichen
Raumtemperatur und dem auf der Fernbedienung eingestellten Sollwert misst.
Wenn Sie den Automatikbetrieb nicht als angenehm empfinden, können Sie die gewünschte
Betriebsart von Hand wählen.
Betriebsarten KÜHLEN, HEIZEN und NUR GEBLÄSE
1. Wenn Sie den Automatikbetrieb nicht als angenehm empfinden, können Sie die Einstellungen von Hand
ändern, indem Sie die Betriebsart KÜHLEN, ENTFEUCHTEN, HEIZEN (nur für Geräte mit Wärmepumpe)
oder NUR GEBLÄSE wählen. Hierzu drücken Sie Taste .
2. Drücken Sie die Taste + oder - ( und ), um die gewünschte Raumtemperatur einzustellen.
3. Drücken Sie die Gebläsetaste , um den Gebläsebetrieb AUTOMATIK, HOCH, MITTEL oder NIEDRIG zu
wählen.
4. Drücken Sie die Taste EIN/AUS . Die Betriebsleuchte leuchtet auf und das Klimagerät beginnt mit den
von Ihnen gewählten Einstellungen zu laufen. Wenn Sie erneut auf die Taste EIN/AUS drücken, wird
das Gerät ausgeschaltet.
G
HINWEIS
Die Betriebsart NUR GEBLÄSE kann nicht zum Regeln der Temperatur verwendet werden. In
dieser Betriebsart gelten nur die Schritte 1, 3 und 4.
ENTFEUCHTEN
1. Drücken Sie die Betriebsarttaste , um ENTFEUCHTEN zu wählen.
2
12
13
2
13
2. Drücken Sie die Taste + oder - ( und ), um die gewünschte Raumtemperatur einzustellen.
3. Drücken Sie die Taste EIN/AUS . Die Betriebsanzeige leuchtet auf und das Klimagerät nimmt den
Betrieb in der Betriebsart ENTFEUCHTEN auf. Wenn Sie erneut auf die Taste EIN/AUS drücken, wird
das Gerät ausgeschaltet.
G
HINWEIS
Aufgrund des Unterschieds zwischen dem Temperatur-Sollwert des Geräts und der wirklichen
Raumtemperatur, läuft das Klimagerät in der Betriebsart ENTFEUCHTEN oft automatisch ohne die
Betriebsarten KÜHLEN und GEBLÄSE.
SCHALTUHR-BETRIEB
Drücken Sie die Taste Schaltuhr EIN/AUS (i und j), um die Ein und Ausschaltzeiten des Geräts einzustel-
len. Die effektive Betriebszeit, die über die Fernbedienung für die Schaltuhrfunktion eingestellt wird, ist auf
einen Zeitraum zwischen 0,5 und weniger als 24 Stunden begrenzt.
1. Einstellen der Beginnzeit
1.1 Drücken Sie auf die Taste Schaltuhr EIN i, dann zeigt die Anzeige der Fernbedienung ON TIMER (EIN
SCHALTUHR), die zuletzt eingestellte Betriebsbeginnzeit, und das Signal „h“ (Std.) erscheint auf der
Schaltuhranzeige. Sie können jetzt die Zeit für den Betriebsbeginn neu einstellen.
1.2 Drücken Sie erneut auf die Taste Schaltuhr Ein i, um die gewünschte Beginnzeit für das Gerät einzustellen.
1.3 Nach dem Einstellen von Schaltuhr EIN sendet die Fernbedienung das Signal nach einer halben Sekunde
Verzögerung zum Klimagerät.
2. Einstellen der Endzeit
2.1
Drücken Sie auf die Taste Schaltuhr AUS j, dann zeigt die Anzeige der Fernbedienung OFF TIMER (AUS
SCHALTUHR) und die zuletzt eingestellte Betriebsendzeit in Stunden erscheint auf der Schaltuhranzeige.
Sie können jetzt die Zeit für das Betriebsende neu einstellen.
2.2 Wenn Sie erneut auf die Taste Schaltuhr AUS j drücken, wird die Zeit eingestellt, zu der das Gerät
ausgeschaltet werden soll.
2.3 Nach dem Einstellen von Schaltuhr AUS sendet die Fernbedienung das Signal nach einer halben
Sekunde Verzögerung zum Klimagerät.
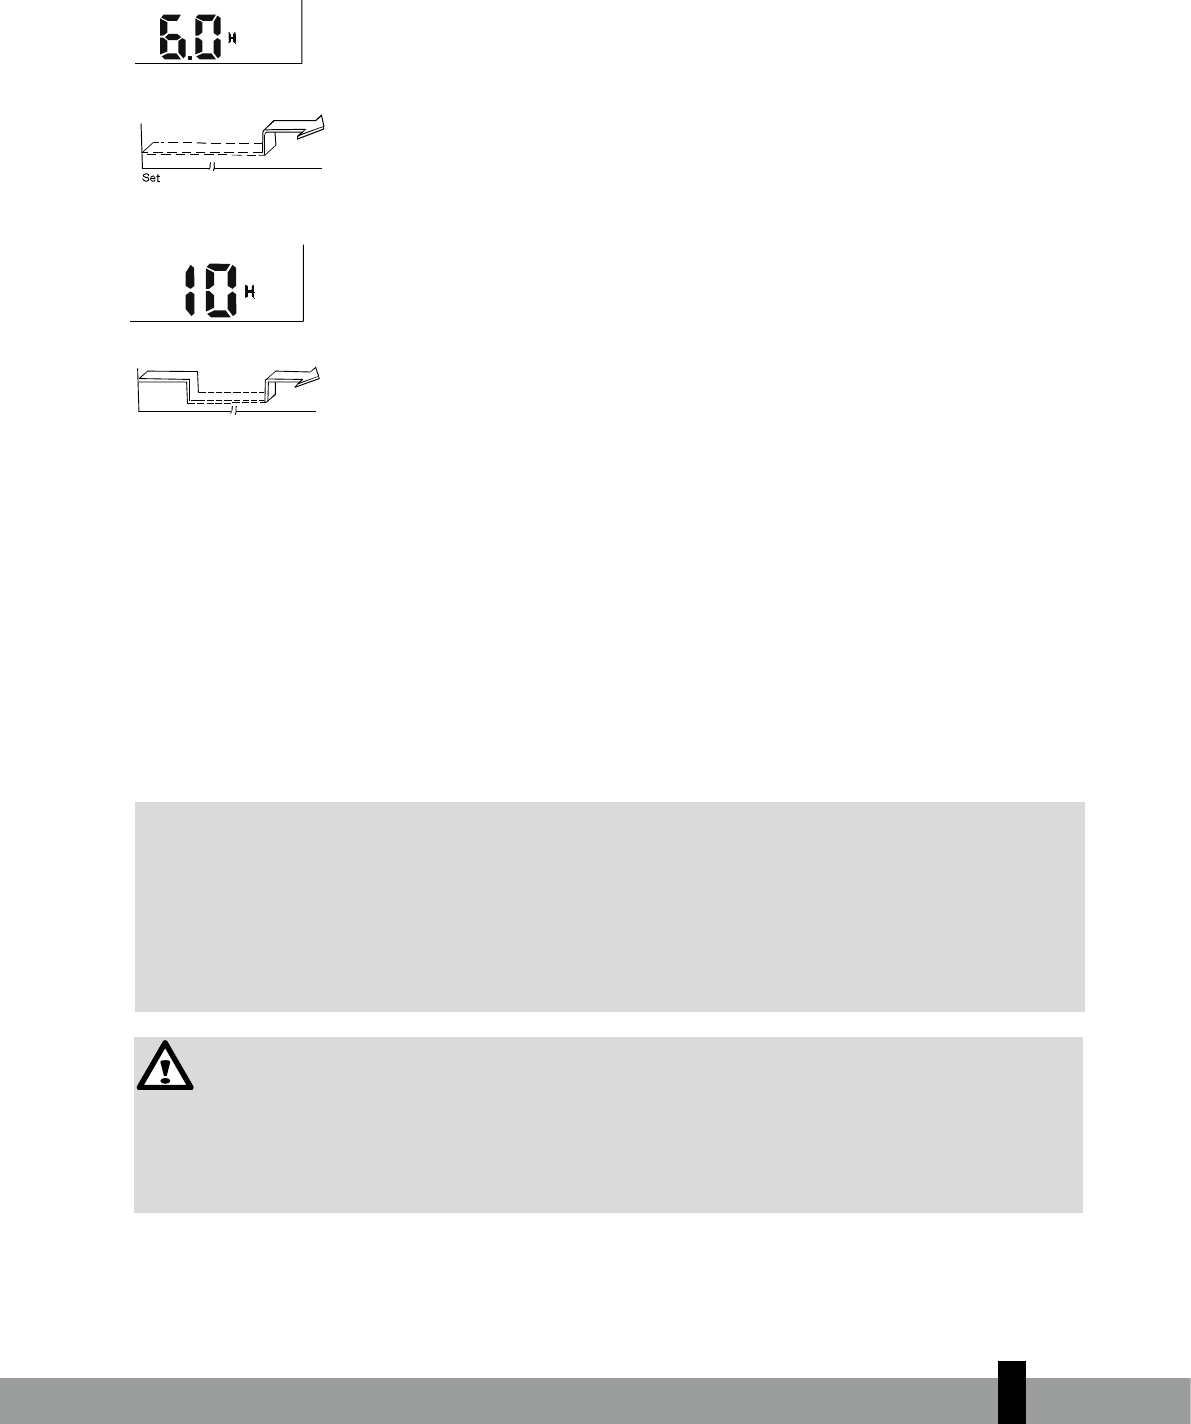
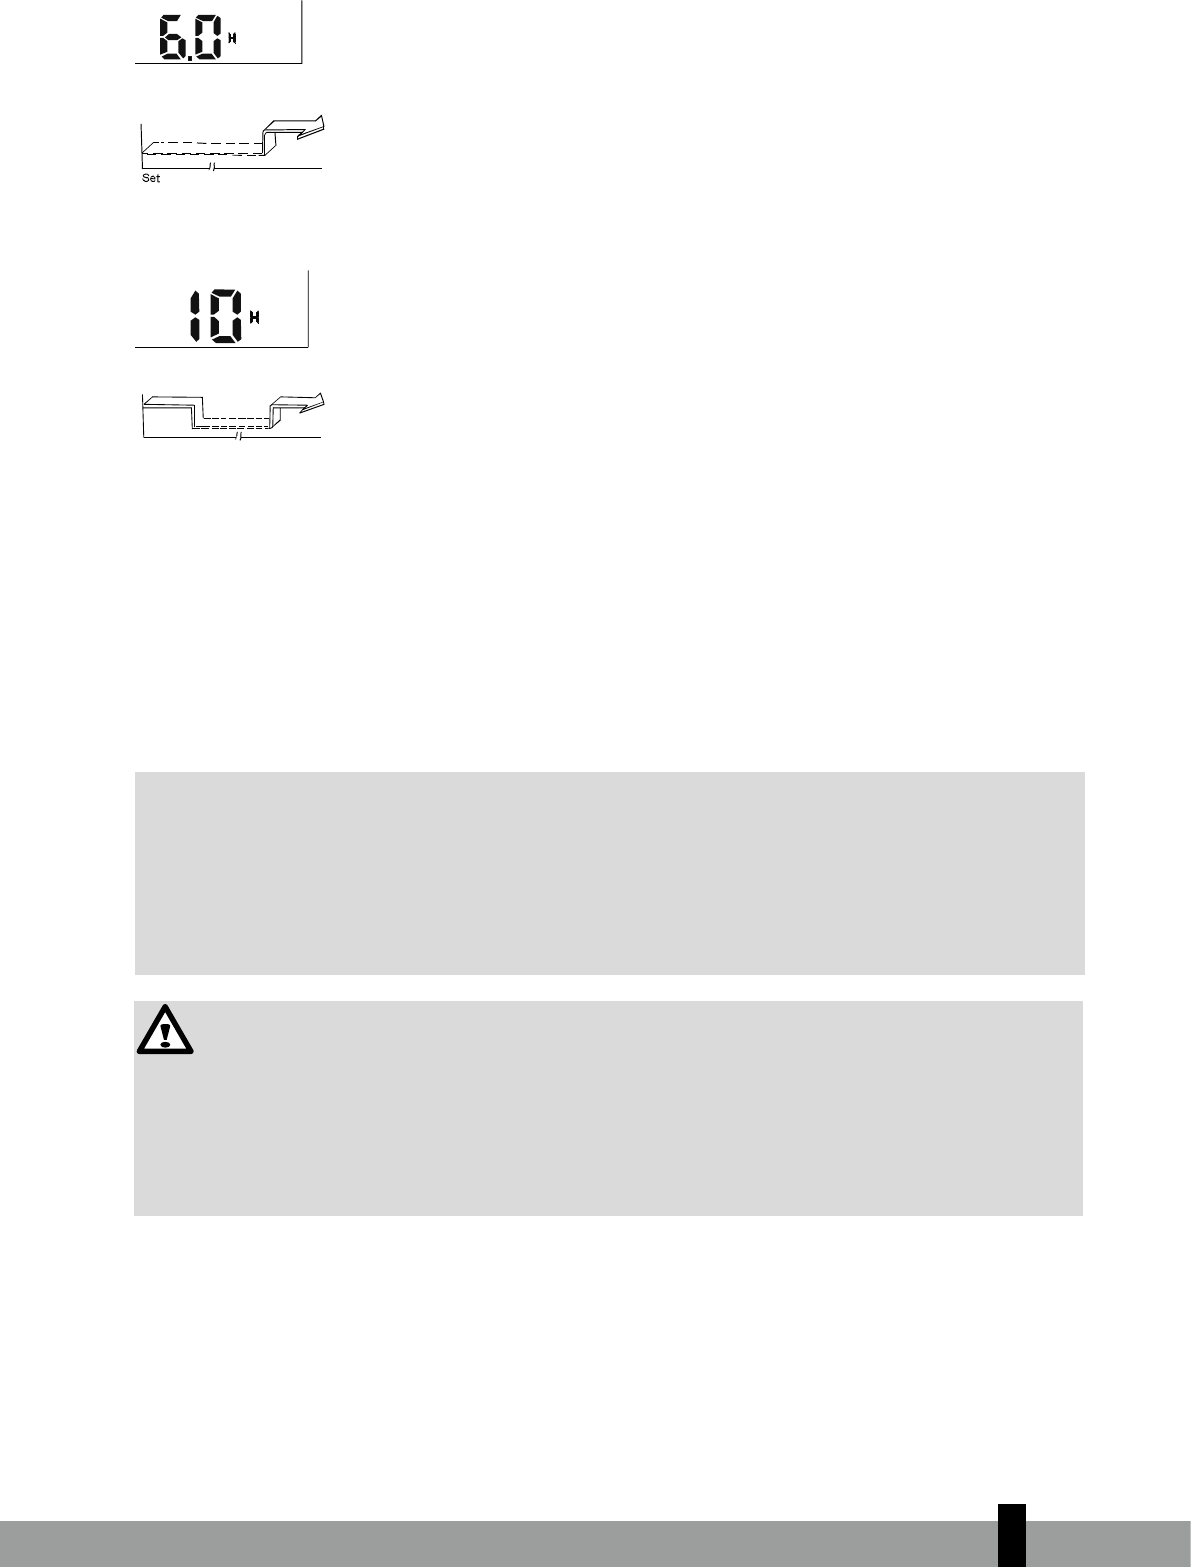
Beispiel von Schaltuhreinstellung
Um das Klimagerät in 6 Stunden anfangen zu lassen:
1. Drücken Sie die Timer-Taste, die letzte Einstellung an dem das Gerat einschalten
sollte und das Signal “h” erscheint im Display.
2. Drücken Sie die Timer-Taste bis “ 6:0h” erscheint
3. Warten Sie eine Sekunde und das digitale Dispaly zeigt die Temperatur wieder an.
Start
Off
6h
TIMERON
Die Timer ON-Anzeige erlischt und die Schaltuhreinstellung ist aktiviert.
Kombinierte Schaltuhreinstellung
(Sowohl On als OFF Schaltuhreinstellung simultan einstellen)
TIMER OFF --> TIMER ON
(Eingeschaltet --> Halt --> Anfang)
Diese Funktion lohnt sich wenn Sie das Klimagerät ausschalten möchten nachdem Sie
ins Bett gegangen sind, und am Morgen wieder einschalten möchten oder wenn Sie
On
Stop
2hSet
On
10 h
TIMERONOFF
zu Hause kommen.
14
Beispiel:
Um das Klimagerät über 2 Stunden auszuschalten und wieder einzustellen nach 10 Stunden.
1. Drücken Sie die TIMER OFF-Taste
2. Drücken Sie erneut die TIMER OFF-Taste bis 2.0h erscheint
3. Drücken Sie die TIMER ON-Taste
4. Drücken Sie erneut die TIMER ON-Taste bis 10.0h erscheint
5. Warten Sie eine Sekunde und das digitale Display zeigt die Temperatur wieder an. Die Timer ON OFF-
Anzeige erlischt und die Schaltuhreinstellung ist aktiviert.
G
HINWEIS
Wenn für die Beginnzeit und die Endzeit die gleiche Zeit eingestellt wird, wird die Endzeit
automatisch um 0,5 Std. erhöht (wenn die eingestellte Zeit weniger als 10 Std. anzeigt) oder
um eine Stunde (wenn die eingestellte Zeit 10 Std. oder mehr anzeigt).
Wenn Sie die EIN/AUS-Zeit der Schaltuhr ändern wollen, drücken Sie einfach auf die
Schaltuhrtaste und stellen die Zeit neu ein.
Die Einstellzeit ist eine relative Zeit, d.h. dies ist die eingestellte Zeit, die von der Verzögerung
der aktuellen Zeit ausgeht.
WARNUNG
Schützen Sie die Fernbedienung vor hohen Temperaturen und der Einwirkung von Strahlung.
Setzen Sie den Innenraumempfänger nie der direkten Sonneneinstrahlung aus, anderenfalls
riskieren Sie, dass das Klimagerät nicht einwandfrei funktioniert.
E MANUELLER BETRIEB (OHNE FERNBEDIENUNG)
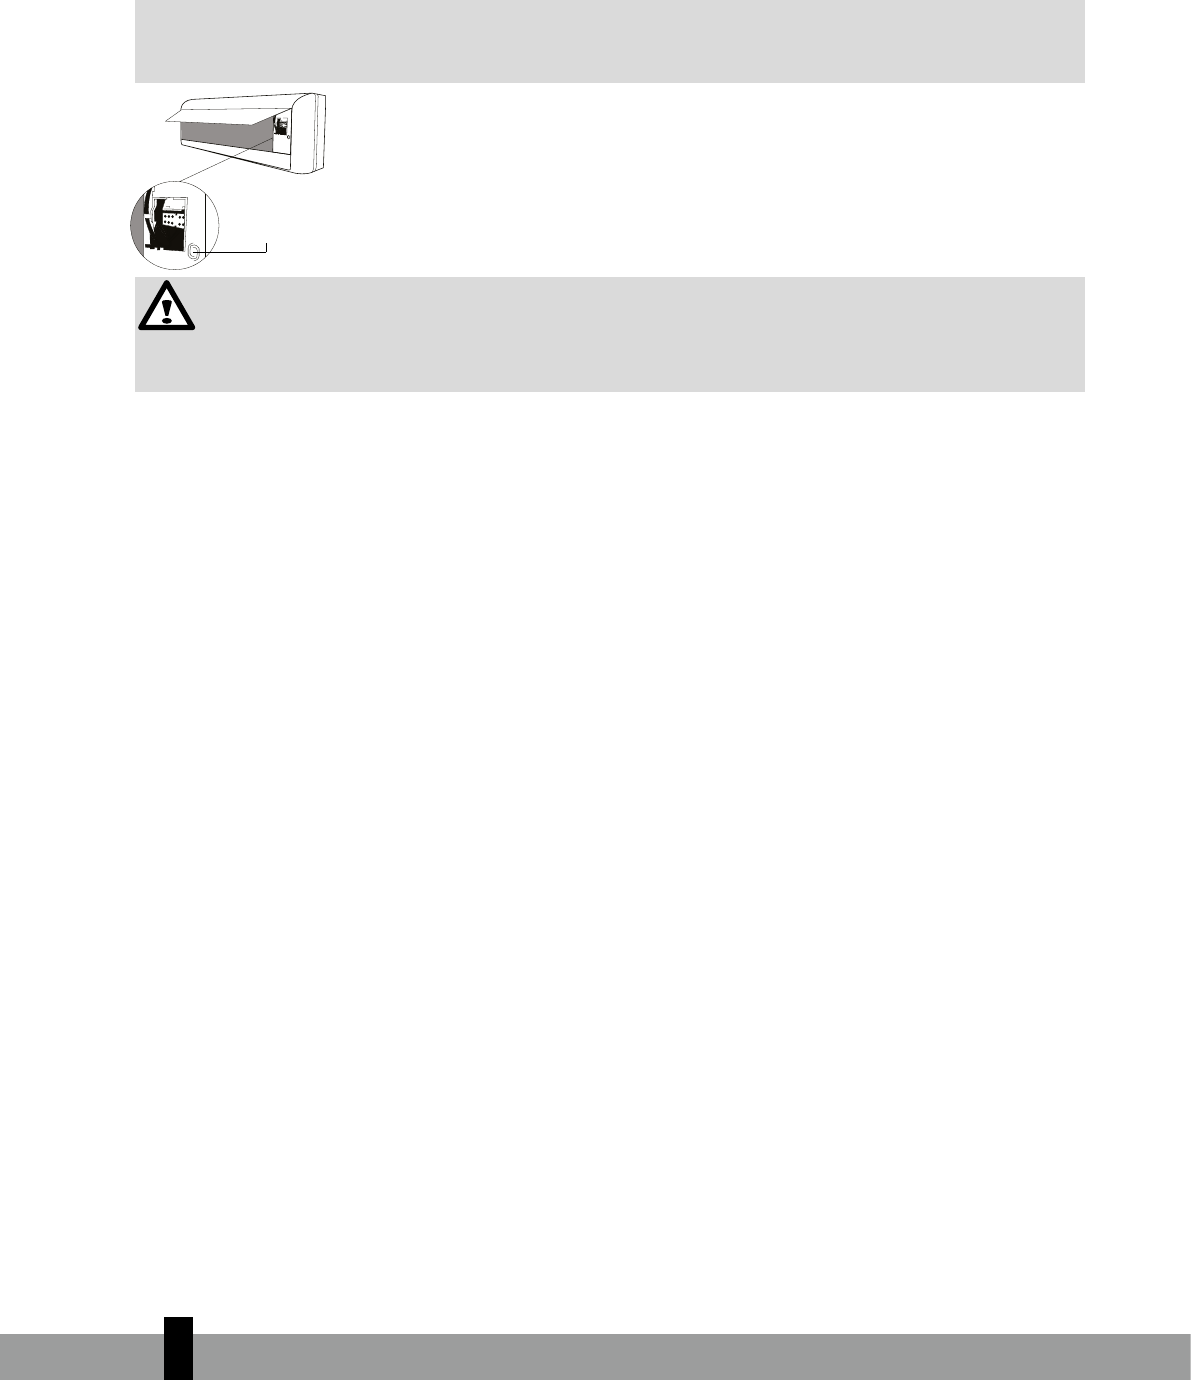
So bedienen Sie Ihr Gerät ohne die Fernbedienung.
Sollte Ihre Fernbedienung nicht funktionieren, können Sie Ihr Gerät manuell über die MANUAL CONTROL-
Taste am Indoor-Gerät steuern. Beachten Sie, dass der manuelle Betrieb keine langfristige Lösung ist und dass
der Betrieb des Geräts über Ihre Fernbedienung strengstens empfohlen wird.
Vor dem manuellen Betrieb
Das Gerät muss vor dem manuellen Betrieb ausgeschaltet werden.
Um Ihr Gerät manuell zu betreiben:
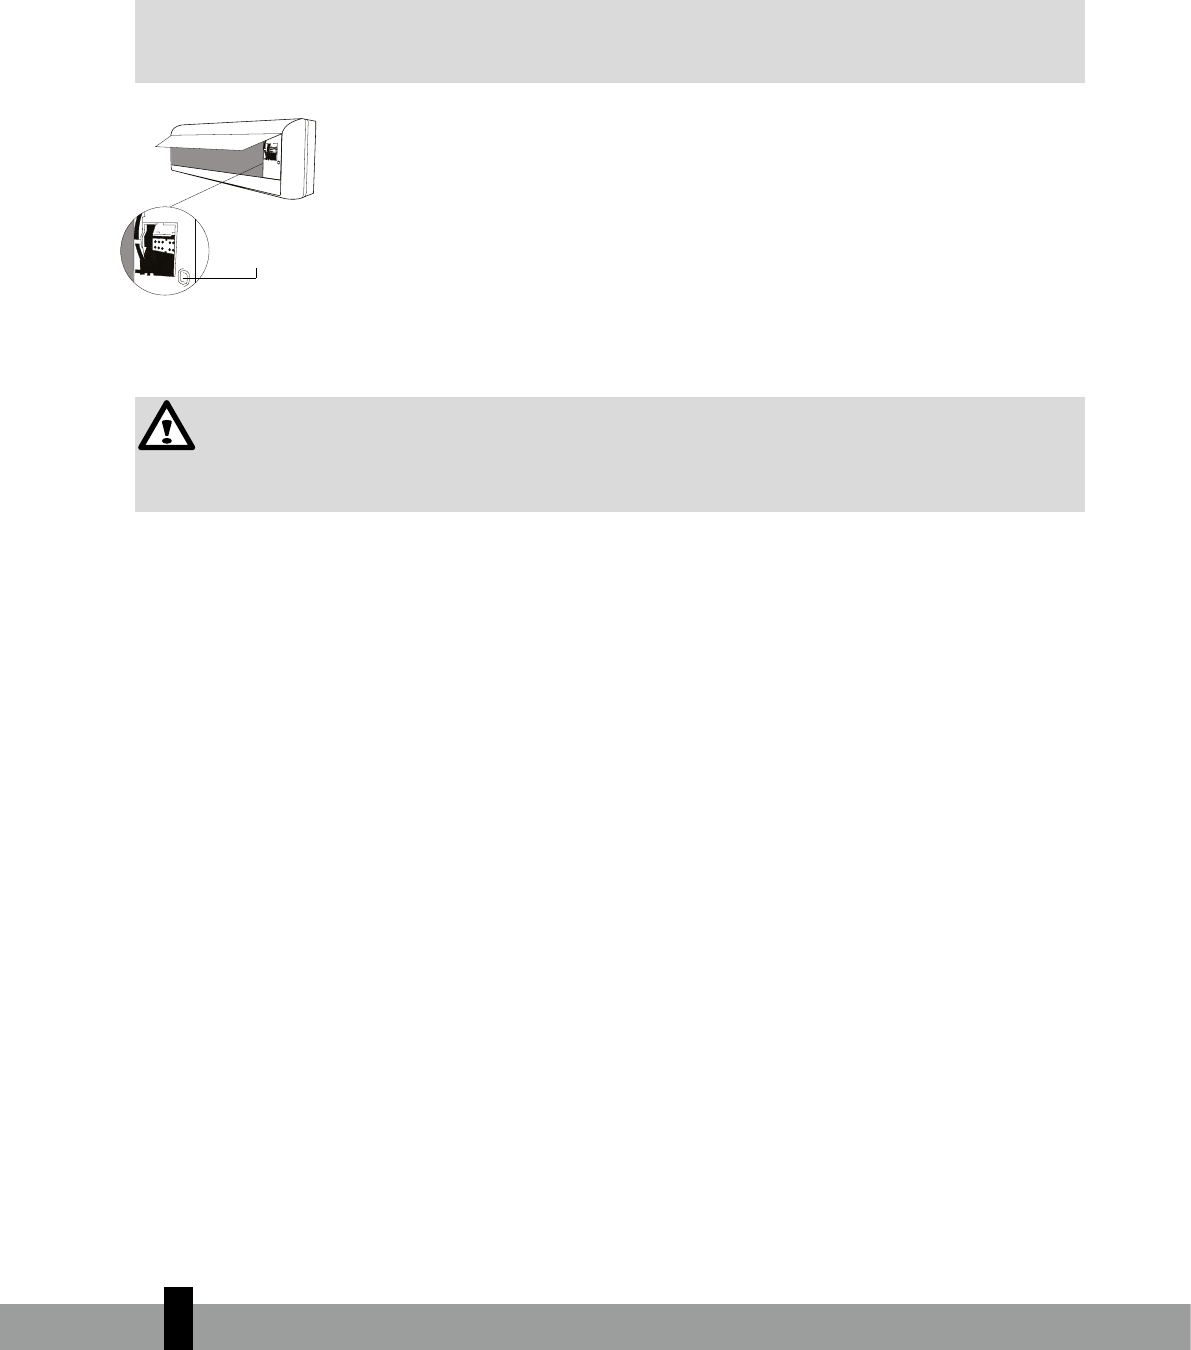
1. Suchen Sie die MANUAL CONTROL-Taste an der rechten Seite des Geräts.
2. Drücken Sie die MANUAL CONTROL-Taste einmal, um den FORCED AUTO-Modus zu aktivieren.
3. Drücken Sie die MANUAL CONTROL-Taste erneut, um den FORCED COOLING-Modus zu
aktivieren.
4. Drücken Sie die MANUAL CONTROL-Taste ein drittes Mal, um das Gerät auszuschalten.
VORSICHT
Die MANUAL CONTROL-Taste ist nur zu Testzwecken und für den Notbetrieb vorgesehen. Bitte
nutzen Sie diese Funktion nicht, sofern die Fernbedienung nicht verloren gegangen und es
nicht absolut notwendig ist. Um den normalen Betrieb wieder aufzunehmen, verwenden Sie die
Fernbedienung, um das Gerät einzuschalten.
2
14
Manual control button
Manual
control
taste
15
2
15
F OPTIMALER BETRIEB
Damit das Gerät optimal funktioniert, sollten Sie folgende Punkte beachten:
Stellen Sie die Richtung des Luftstroms richtig ein und zwar so, dass er nicht direkt auf Personen gerichtet ist.
Stellen Sie die Temperatur so ein, dass sie optimal angenehm ist. Stellen Sie das Gerät nicht auf außergewöh
-
nliche Temperaturen ein.
Schließen Sie Türen und Fenster, denn sonst verringert sich möglicherweise die erwünschte Wirkung.
Stellen Sie keine Gegenstände in die Nähe des Luftein oder Luftauslasses, denn dies könnte die Wirksamkeit
des Klimageräts beeinträchtigen oder es könnte sogar aufhören zu laufen. Überzeugen Sie sich davon, dass
keine Gegenstände den Luftstrom hindern. Der Luftstrom muss den gesamten Raum ungehindert erreichen
können. Der Luftstrom muss auch das Klimagerät ungehindert erreichen können.
Reinigen Sie den Luftfilter regelmäßig, anderenfalls verringert sich möglicherweise die Kühl- oder
Heizleistung. Es empfiehlt sich, die Filter alle zwei Wochen zu reinigen.
Betreiben Sie das Gerät nicht, wenn die waagerechten Lamellen geschlossen sind.
G EINSTELLEN DER RICHTUNG DES LUFTSTROMS
Stellen Sie die Luftstromrichtung ordentlich ein, da es andernfalls unangenehm sein oder zu
ungleichmäßigen Raumtemperaturen führen kann.
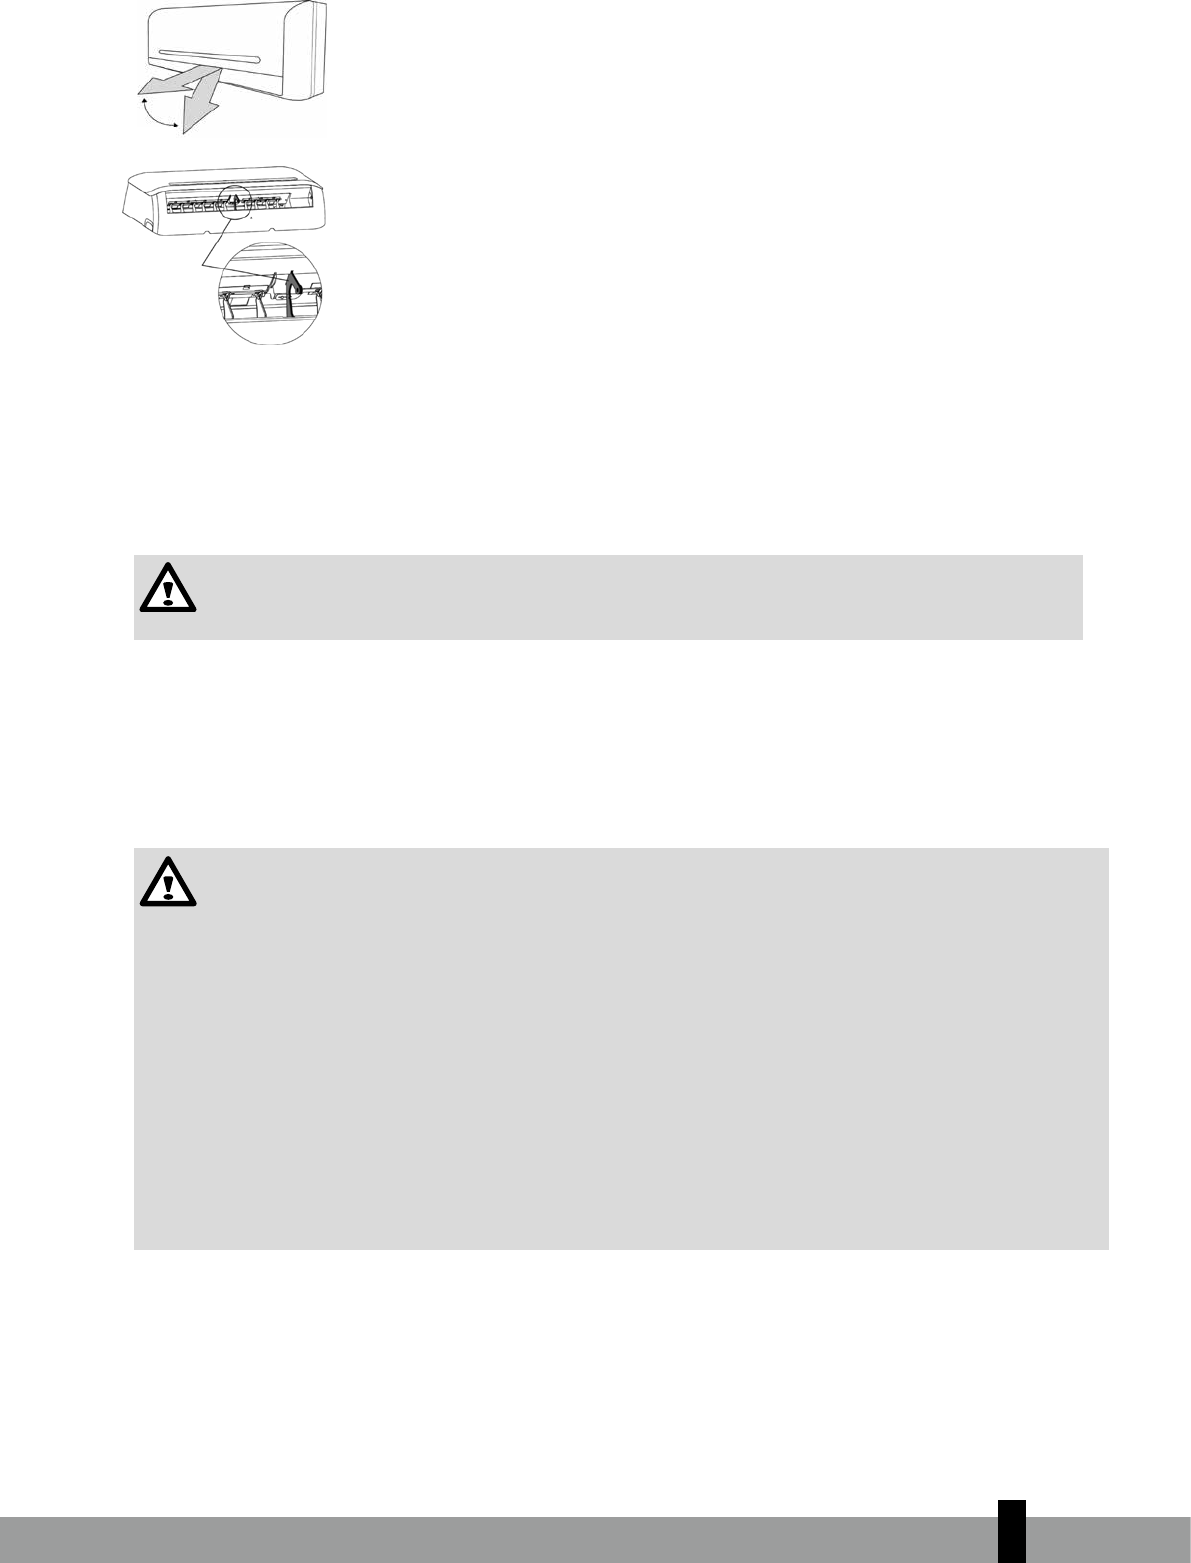
• Passen Sie die horizontale Klappe mithilfe der Taste „h“ auf der Fernbedienung an.
• Passen Sie die vertikale Klappe manuell an.
Anpassen der horizontalen Luftstromrichtung (auf – ab)
Die Klimaanlage passt die horizontale Luftstromrichtung automatisch gemäß dem
Betriebsmodus an.
Um die horizontale Luftstromrichtung einzustellen
Führen Sie diese Funktion aus, während das Gerät in Betrieb ist. Halten Sie die AIR DIRECTION-
Taste „h“ auf der Fernbedienung gedrückt, um die Klappe in die gewünschte Richtung zu
bewegen.
• Passen Sie die horizontale Luftstromrichtung wie gewünscht an.
Im darauffolgenden Betrieb wird der horizontale Luftstrom automatisch jener
Richtung angepasst, in die Sie die Klappe über die AIR DIRECTION-Taste eingestellt haben.
Um die vertikale Luftstromrichtung einzustellen (links – rechts)
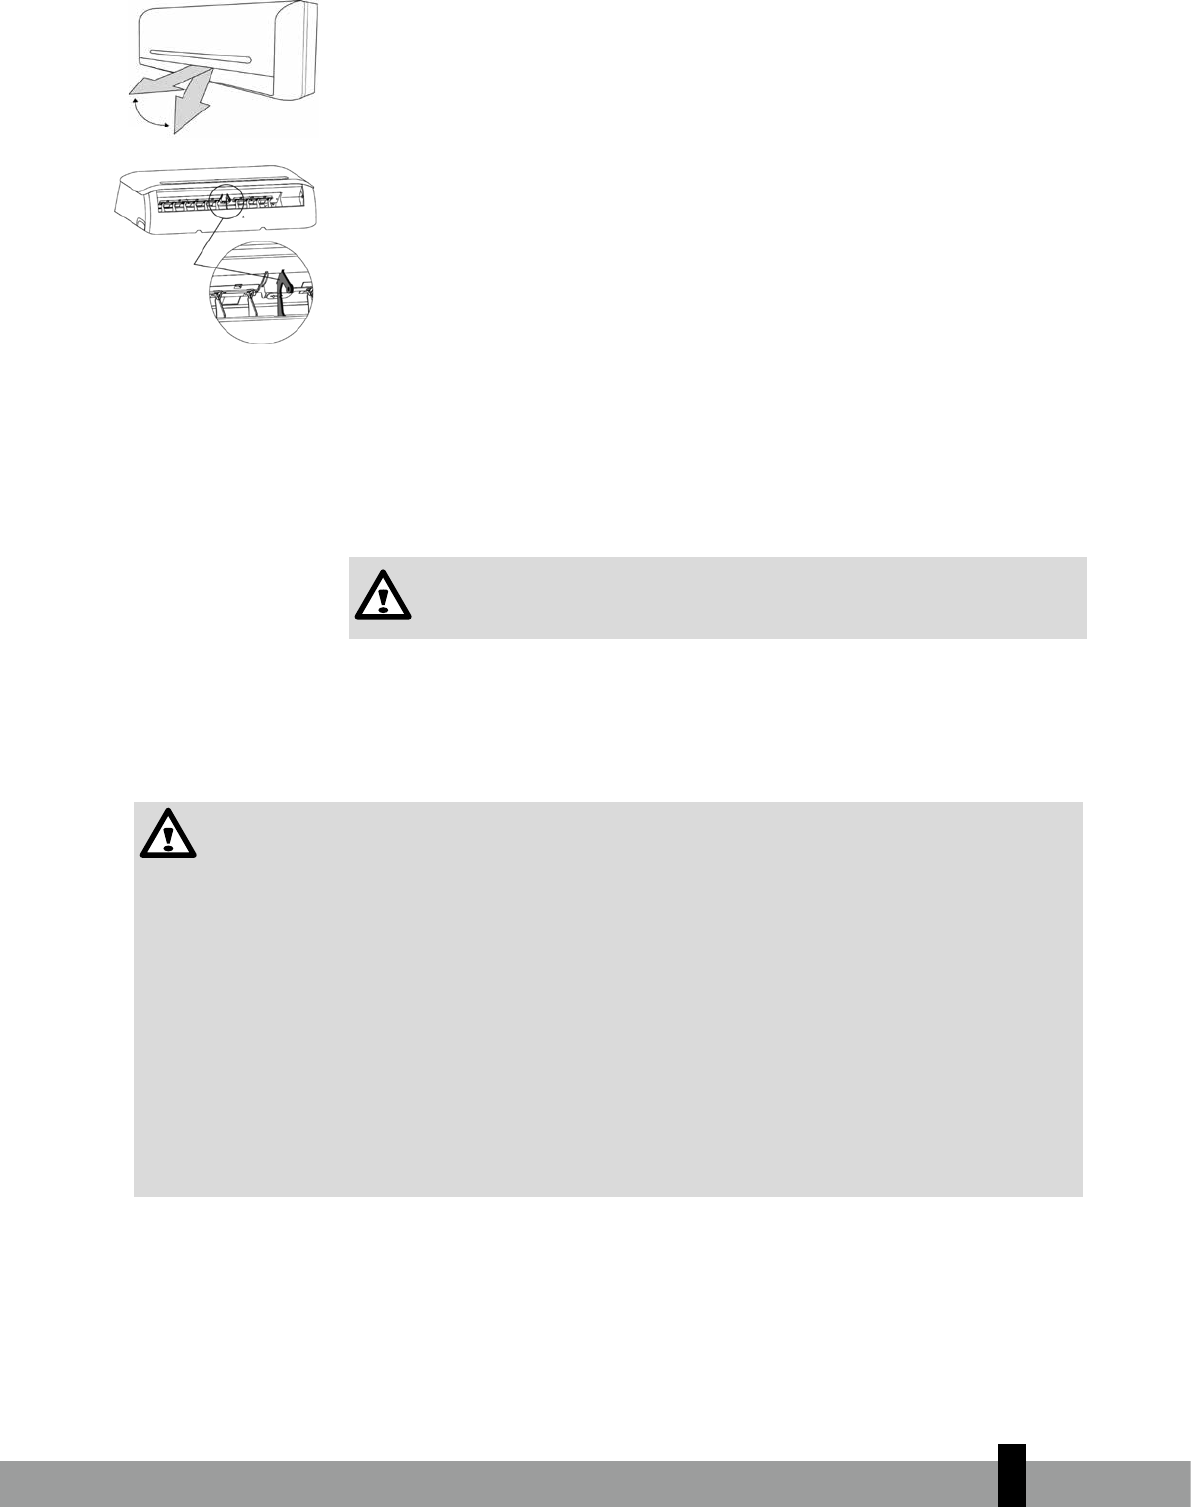
Passen Sie die vertikale Klappe manuell mithilfe des Hebels in der Mitte des vertikalen
Klappenarms an (variiert nach Modell). Wenn die Klimaanlage in Betrieb und die vertikale
Klappe in einer bestimmten Position ist, bewegen Sie den Hebel am linken (oder rechten, je
nach Modell) Ende des Luftauslasses in die gewünschte Position.
VORSICHT
Achten Sie darauf, nicht den Lüfter hinter den vertikalen Klappen zu berühren!
Einstellen der automatischen Schrägstellung der Richtung des Luftstroms (nach oben / unten)
Hierzu muss das Klimagerät in Betrieb sein.
Drücken Sie auf die Schrägstellungstaste auf der Fernbedienung.
Zum Ausschalten der Funktion drücken Sie erneut die Schrägstellungstaste . Drücken sie die
Luftrichtungstaste , um die Lamellen in der gewünschten Position festzusetzen.
Deflektorstange
Reichweite
16
G
VORSICHT
Die Luftrichtungs und Schrägstellungstasten können nicht betätigt werden, wenn das
Klimagerät nicht in Betrieb ist (selbst wenn die Schaltuhr auf EIN steht).
Betreiben Sie das Klimagerät im Kühl oder Entfeuchtungsbetrieb nicht längere Zeit mit nach
unten gerichtetem Luftstrom. Anderenfalls könnte Kondensierung auf den waagerechten
Lamellen auftreten, wodurch Flüssigkeit heruntertropfen würde.
Bewegen Sie die waagerechten Lamellen nicht von Hand. Benutzen Sie immer die
Luftrichtungstaste oder die Schrägstellungstaste . Wenn Sie diese Lamellen von Hand
bewegen, funktionieren sie möglicherweise während des Betriebs nicht mehr richtig. Wenn die
Lamellen nicht einwandfrei funktionieren, müssen Sie das Klimagerät einmal aus und dann
wieder einschalten.
Wenn das Klimagerät sofort nach dem Ausschalten wieder eingeschaltet wird, bewegen sich
die waagerechten Lamellen möglicherweise etwa 10 Sekunden lang nicht.
Betreiben Sie das Gerät nicht, wenn die waagerechten Lamellen geschlossen sind.
H FUNKTIONSWEISE DES KLIMAGERÄTS
AUTOMATIKBETRIEB
Wenn Sie das Klimagerät auf Automatikbetrieb (AUTO) stellen (Taste
auf der Fernbedienung), wählt das Gerät anhand des von Ihnen eingestell-
ten Temperatur-Sollwerts und der aktuellen Raumtemperatur automatisch
KÜHL, HEIZ oder Nur-GEBLÄSE-Betrieb.
Das Klimagerät regelt die Raumtemperatur automatisch etwa auf den von
Ihnen eingestellten Temperatur-Sollwert.
Wenn Sie den Automatikbetrieb (AUTO) nicht als angenehm empfinden,
können Sie die gewünschte Betriebsart von Hand wählen.
SLEEP/SPARBETRIEB
Wenn Sie die SLEEP-Taste „XX“ während des COOLING-, HEATING- oder
AUTO-Betriebs drücken, erhöht (Kühlung) oder verringert (Heizung)
die Klimaanlage die Temperatur automatisch um 1 °C pro Stunde. Die
eingestellte Temperatur wird zwei Stunden später gehalten und fünf
Stunden lang bewahrt. Nach fünf Stunden schaltet sich das Gerät aus. Die
Lüftergeschwindigkeit wird automatisch gesteuert.
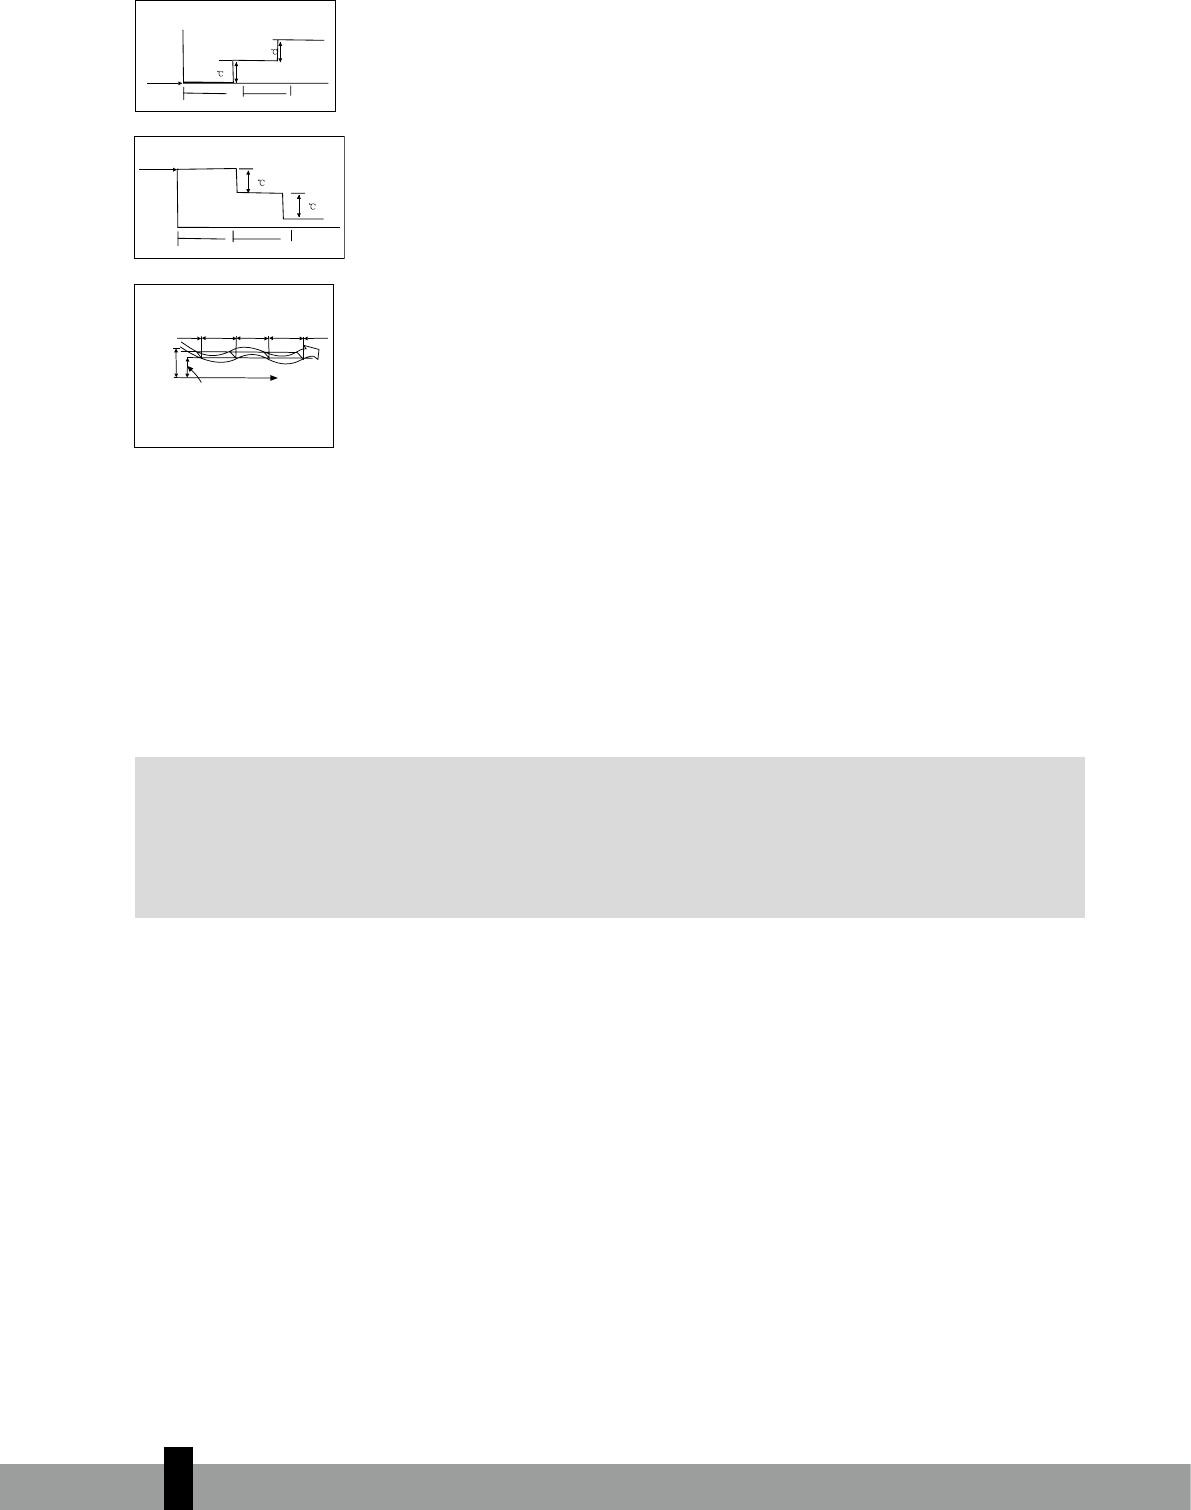
ENTFEUCHTUNGSBETRIEB
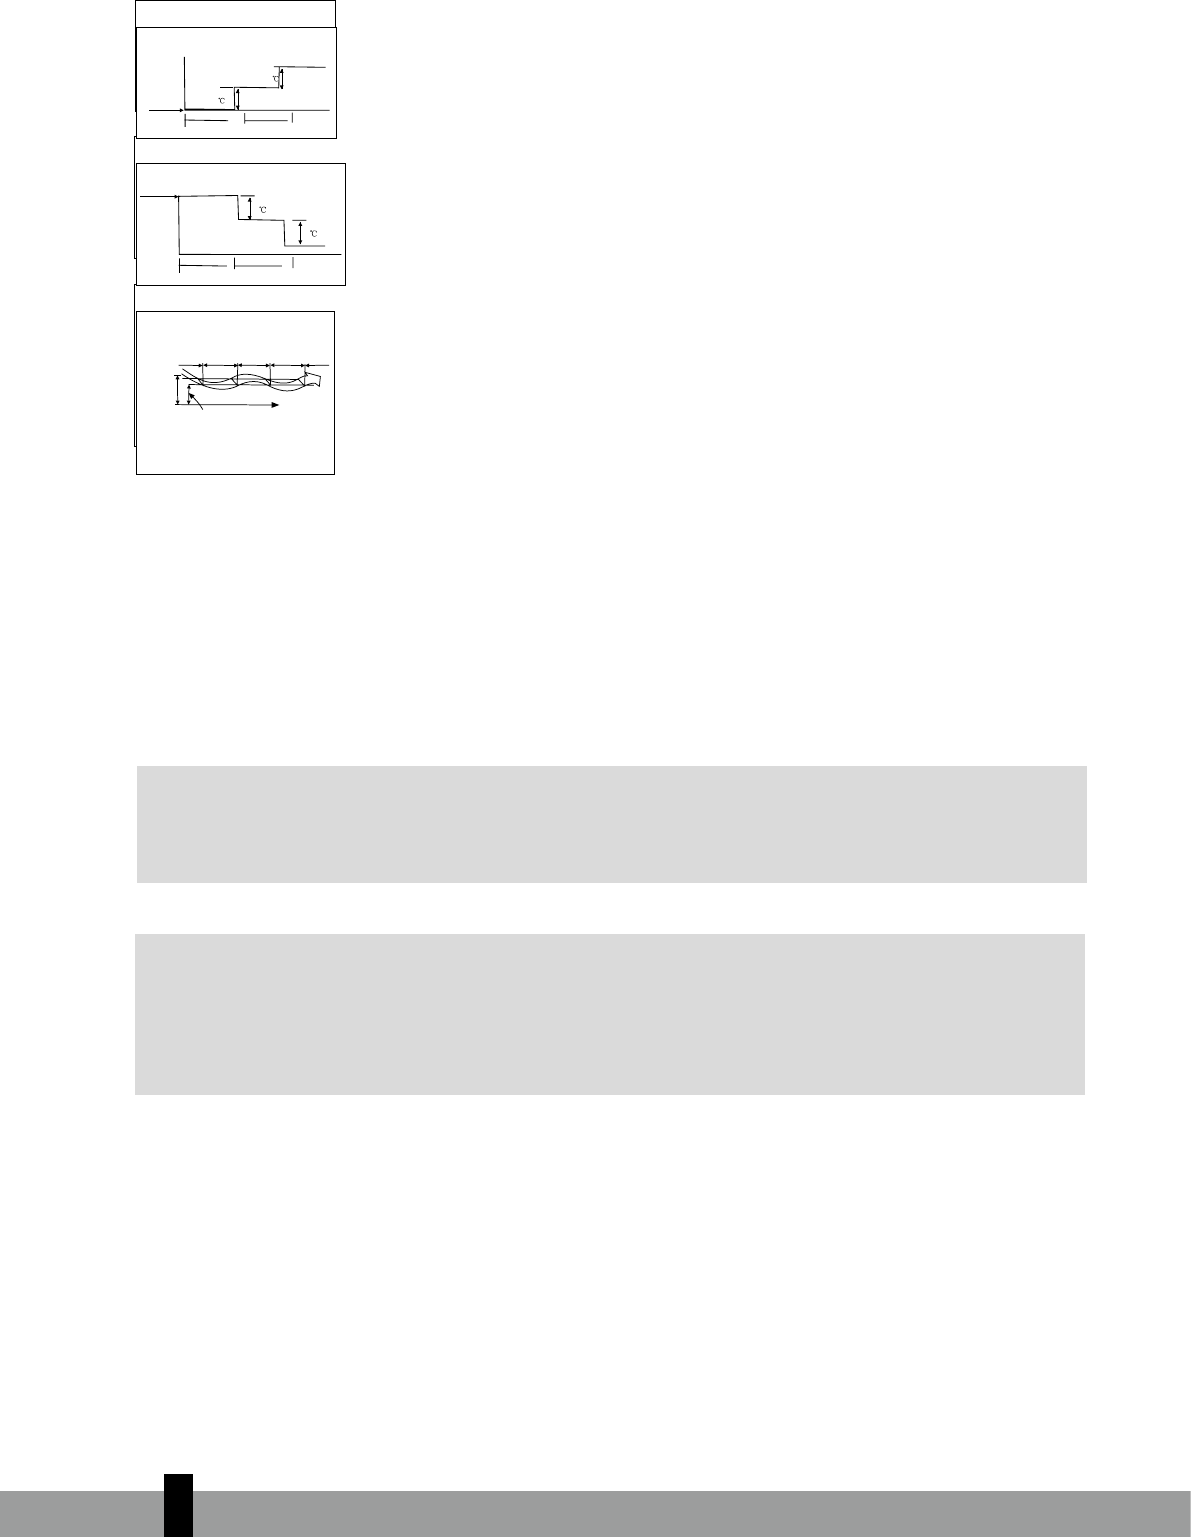
Beim Entfeuchten wird automatisch auf der Grundlage des Unterschieds
zwischen dem Temperatur-Sollwert und der wirklichen Raumtemperatur der
Entfeuchtungsbetrieb gewählt.
Die Temperatur wird während des Entfeuchtens geregelt, indem der Kühlbetrieb oder der Nur-Gebläse-
Betrieb aus und eingeschaltet wird. Das Gebläsegeschwindigkeit wird automatisch eingestellt.
Bei normalem Kühlbetrieb entfeuchtet das Klimagerät gleichzeitig die Luft.
G
HINWEIS
Beim Entfeuchtungsbetrieb des Klimageräts verringert sich höchstwahrscheinlich auch
die Raumtemperatur. Daher ist es normal, dass ein Hygrostat einen höheren relativen
Feuchtigkeitsgrad misst. Der absolute Feuchtigkeitsgrad in dem Raum wird jedoch abhängig von
der Menge der in dem Raum erzeugten Feuchtigkeit (Kochen, anwesende Personen usw.) gesenkt.
2
16
1
1
1
1
Drücken Sie die Schlaftaste
KÜHLEN
HEIZEN
ENTFEUCHTEN
Tem-
peratur-
Sollwert
1 Stunde 1 Stunde
1 Stunde 1 Stunde
Tem-
peratur-
Sollwert
Temperatur-Sollwert
Zeit
Raum-
tempe-
ratur
Kühlen
Kühlen
Kühlen
Nur Gebläse
Nur Gebläse
17
2
17
I WARTUNG
G
WARNUNG
Vor dem Reinigen muss die Klimaanlage gestoppt und die
Stromversorgung unterbrochen werden.
Reinigen des Innengeräts und der Fernbedienung
G
VORSICHT
Reinigen Sie das Innengerät und die Fernbedienung mit einem
trockenen Lappen.
Wenn das Innengerät stark verschmutzt ist, kann ein mit kaltem
Wasser angefeuchteter Lappen verwendet werden.
Die vordere Verkleidung des Innengeräts kann abgenommen und mit
Wasser gereinigt werden. Wischen Sie sie dann mit einem trockenen
Lappen trocken.
Verwenden Sie zum Reinigen des Geräts keinen mit Chemikalien
behandelten Lappen bzw. ein solches Staubtuch.
Verwenden Sie zum Reinigen kein Benzin, Verdünner, Putzmittel
oder ähnliche Lösungsmittel. Diese könnten Risse oder Verformungen
in der Kunststoffoberfläche bewirken.
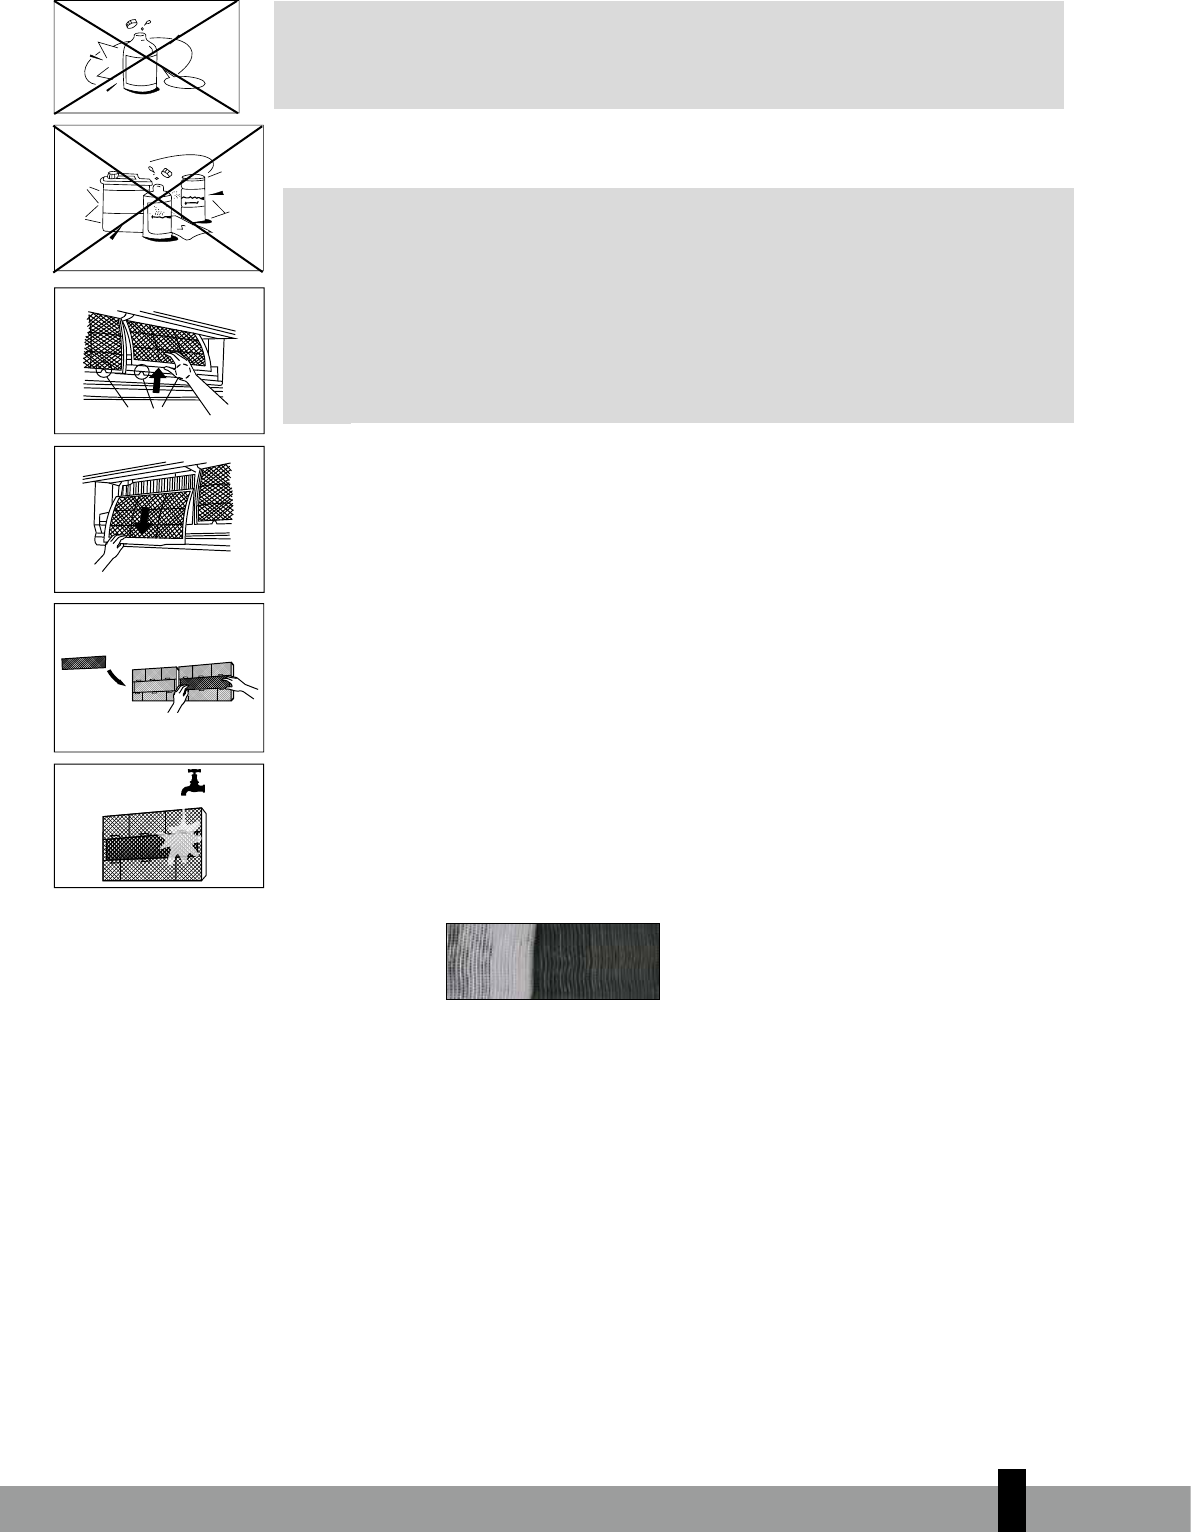
Reinigen des Luftfilters
Ein verstopfter Luftfilter verringert die Kühleffizienz dieses Geräts. Reinigen Sie den Filter alle 2
Wochen.
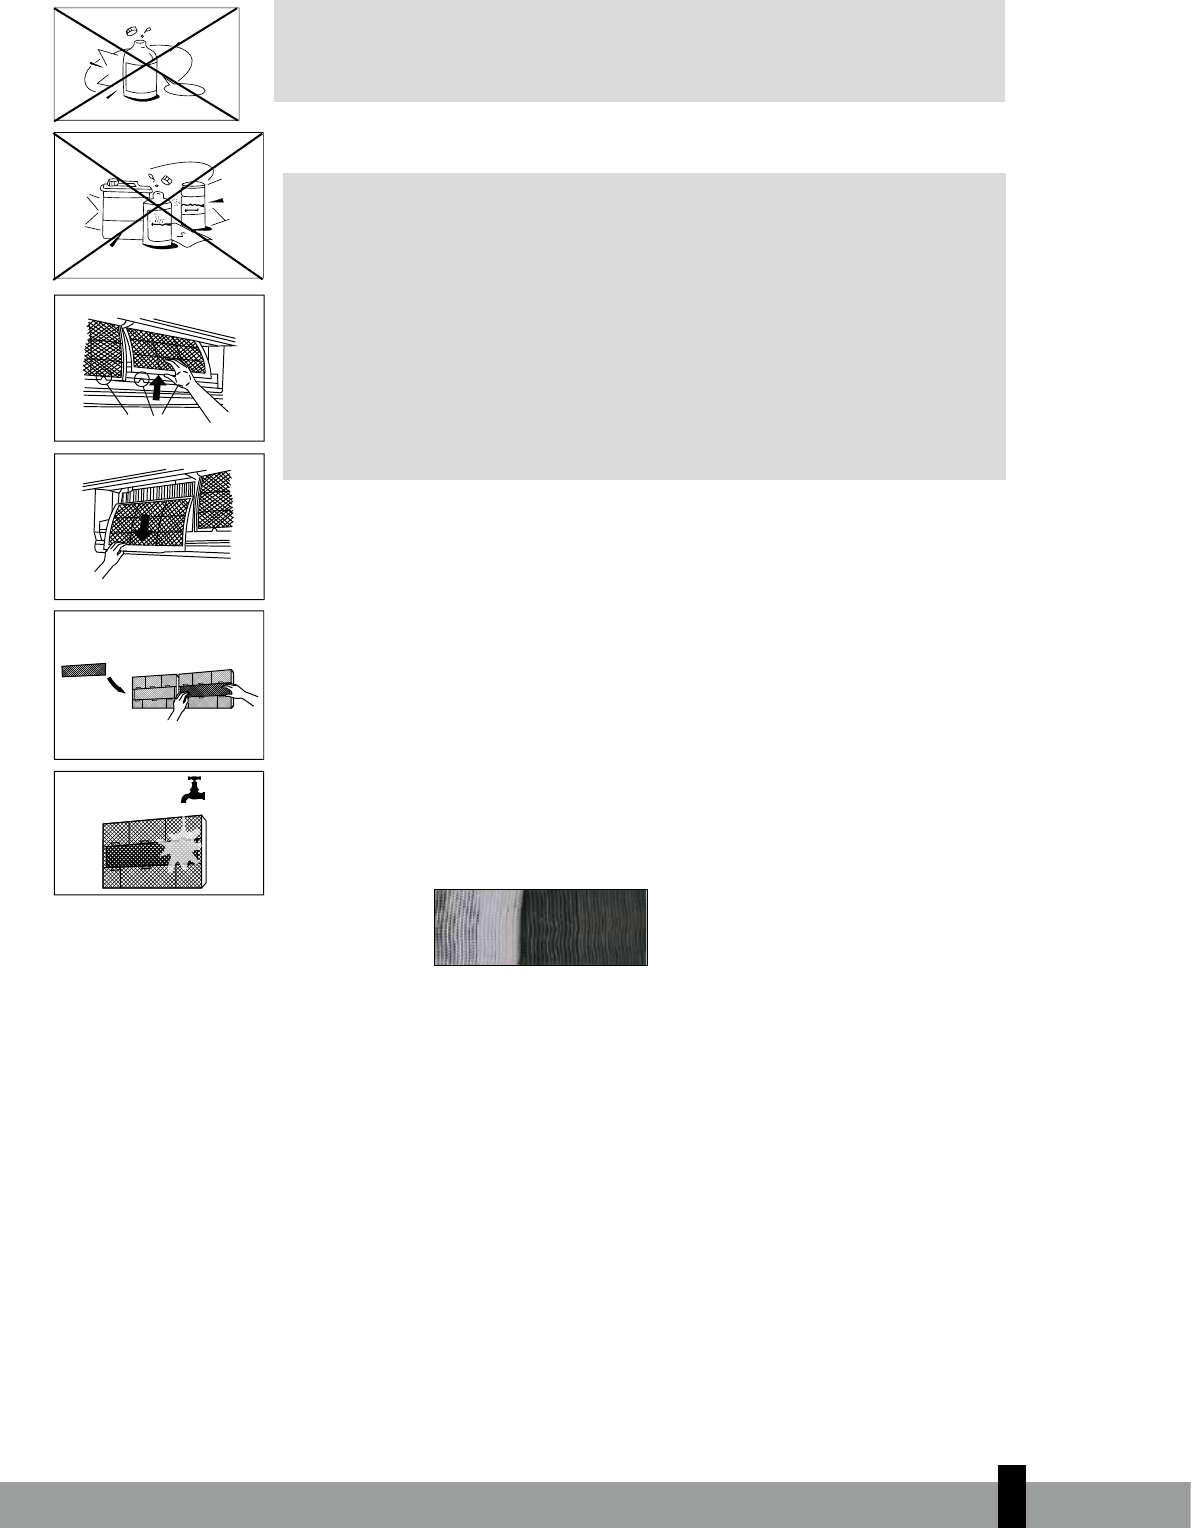
1. Heben Sie die Verkleidung des Innengeräts schräg an, bis sie einrastet.
2. Fassen Sie den Griff des Luftfilters an und heben Sie den Filter leicht an, um ihn aus dem
Filterhalter herauszunehmen. Ziehen Sie ihn dann nach unten.
3. Nehmen Sie den Schirmfilter aus dem Innengerät.
• Reinigen Sie den Schirmfilter alle 2 Wochen.
Reinigen Sie den Schirmfilter mit einem Staubsauger oder unter fließendem
Wasser.
4. Der schwarze Aktivkohlefilter kann nicht gereinigt werden. Sobald der Filter verschmutzt
ist, werden unangenehme Gerüche nicht mehr gefiltert. Der Filter muss dann gewechselt
werden (erhältlich bei Ihrem Qlima-Verkäufer). Die aktiv Kohlefilter sollen 2 Mal pro Saison
gewechselt werden.
5. Der grüne 3M HAF Filter zeigt klare Signale von Verschmutzung in und auf dem Filter. kann
nicht gereinigt werden. Dieser Filter kann nicht gereinigt werden und muss gewechselt
werden (erhältlich bij Ihrem Qlima-Verkäufer). Die Filter solle 2 Mal pro Saison gewechselt
werden.
Neuer Filter
Empfohlenes Auswechseln des Filters
6. Nach dem Wiedereinsetzen des Aktivkohlefilters und 3M HAF Filters im Filterhalter kann
auch der Schirmfilter wieder eingesetzt werden.
7. Überzeugen Sie sich davon, dass der Filter vollständig trocken und in
einwandfreiem Zustand ist, bevor Sie ihn wieder einsetzen.
8. Setzen Sie den Luftfilter wieder ein.
Abfluss-
reiniger
Nein
Verdünner
f
Filtergriff
Entfernen Sie den Lufterfrischungsfilter
von der Rückseite des größeren Filters
(einige Einheiten)
18
9. Setzen Sie den oberen Teil des Luftfilters wieder in das Gerät. Achten
Sie dabei darauf, dass linker und rechter Rand richtig sitzen und bringen Sie den
Filter in die richtige Position.
Wartung
Wenn Sie vorhaben, das Gerät längere Zeit nicht zu benutzen, gehen Sie folgendermaßen vor:
1. Betätigen Sie das Gebläse etwa 6 Stunden lang, damit das Innere des Geräts trocken wird.
2. Schalten Sie das Klimagerät aus und trennen Sie es von der Stromquelle. Wenn es sich um das Modell
S 5048 - SC 5048 handelt, unterbrechen Sie die Stromversorgung. Nehmen Sie die Batterien aus der
Fernbedienung.
3. Das Außengerät muss regelmäßig gewartet und gereinigt werden. Dies muss von einem offiziellen
Monteur für Klimageräte durchgeführt werden.
Kontrollen vor dem Betrieb
Kontrollieren Sie, ob die Kabel nicht gebrochen oder getrennt sind.
Kontrollieren Sie, ob der Luftfilter eingesetzt ist.
Kontrollieren Sie, ob der Luftauslass womöglich blockiert ist, falls das Klimagerät längere Zeit nicht
benutzt wurde.
VORSICHT
Achten Sie darauf, dass Sie die Metallteile des Geräts beim Herausnehmen der Filter nicht
berühren. Sie könnten sich an scharfen Metallkanten verletzen.
Reinigen Sie das Innere des Klimageräts nicht mit Wasser. Wasser kann die Isolierung
zerstören, wodurch die Möglichkeit eines elektrischen Schlags besteht.
Vor dem Reinigen des Geräts, müssen Sie sich davon überzeugen, dass der Strom ausgeschaltet
und der Sicherungsautomat deaktiviert ist.
2
18
19
2
19
J BEDIENUNG
Während des normalen Betriebs kann Folgendes eintreten.
1. Schutzvorrichtung des Klimageräts
Kompressorschutz
Der Kompressor kann nach dem Anhalten 3 Minuten lang nicht anlaufen.
Anti-Kaltluft
Das Gerät ist so ausgelegt, dass es im Heizbetrieb keine Kaltluft abbläst, wenn sich der Wärmetauscher
des Innengeräts in einer der folgenden drei Situationen befindet und der Temperatur-Sollwert noch
nicht erreicht ist.
A. wenn der Heizbetrieb gerade begonnen hat.
B. beim Abtauen.
C. während des Heizens bei niedrigerer Temperatur.
Abtauen
Auf dem Außengerät kann sich während des Heizzyklus bei niedriger Außentemperatur und hoher
Luftfeuchtigkeit Eis bilden, was zu einer verringerten Heizeffizienz des Klimageräts führt.
Während dieses Zustands unterbricht das Klimagerät den Heizbetrieb regelmäßig und beginnt automa-
tisch mit dem Abtauen.
Die Abtauzeit schwankt je nach Außentemperatur und Menge des Eises auf dem Außengerät zwischen
4 und 10 Minuten.
2. Weißer Nebel aus dem Innengerät.
Beim Kühlbetrieb in Innenräumen mit hohem relativen Feuchtigkeitsgrad kann durch einen starken
Temperaturunterschied zwischen dem Lufteinlass und dem Luftauslass weißer Nebel austreten.
Wenn das Klimagerät nach dem Abtauen wieder den Heizbetrieb aufnimmt, kann durch beim Abtauen
entstandene Feuchtigkeit weißer Nebel austreten.
3. Geringfügige Geräusche des Klimageräts.
Wenn der Kompressor läuft oder gerade aufgehört hat zu laufen, hören Sie möglicherweise ein tiefes
Zischen. Dieses Geräusch wird durch das Kältemittel erzeugt, das strömt oder aufhält zu strömen.
Wenn der Kompressor läuft oder gerade aufgehört hat zu laufen, hören Sie möglicherweise ein tiefes
Quietschen. Dies entsteht durch die Wärmeausdehnung und Kältezusammenziehung der Kunststoffteile
im Gerät bei einer Temperaturänderung.
Beim ersten Einschalten des Stroms hört man möglicherweise die Lamellen, die ihre Ausgangsposition
einnehmen.
4. Staub wird aus dem Innengerät herausgeblasen.
Dies ist ganz normal, wenn das Klimagerät längere Zeit nicht benutzt wurde bzw. bei der ersten
Benutzung des Geräts.
5. Merkwürdiger Geruch aus dem Innengerät.
Dies liegt daran, dass das Innengerät von Baumaterial, Möbeln oder Rauch eingedrungene Gerüche
abgibt.
20
6. Das Klimagerät schaltet vom Kühl- oder Heizbetrieb auf den Nur-Gebläse-Betrieb um.
Wenn die Innentemperatur den Temperatur-Sollwert des Klimageräts erreicht, hält der Kompressor
automatisch an und das Klimagerät schaltet auf Nur-Gebläse-Betrieb um. Der Kompressor läuft wieder
an, wenn die Innentemperatur im Kühlbetrieb über den Sollwert ansteigt oder im Heizbetrieb unter
den Sollwert sinkt.
7. Auf dem Innengerät kann sich beim Kühlen bei einem hohen relativen Feuchtigkeitsgrad (relativer
Feuchtigkeitsgrad von über 80 %) Tropfwasser absetzen. Stellen Sie in dem Fall die waagerechten
Lamellen auf die größte Luftauslassöffnung und stellen die Gebläsegeschwindigkeit auf HOCH.
8. Heizbetrieb
Das Klimagerät saugt Wärme vom Außengerät an und lässt sie beim Heizen über das Innengerät austre-
ten. Gleichzeitig erhöht sich die Hitzelast der Klimaanlage aufgrund der größeren Differenz zwischen
der Innen- und der Außentemperatur. Sollte die Klimaanlage nicht in der Lage sein, eine angenehme
Temperatur zu schaffen, empfehlen wir, ein weiteres Heizgerät zu nutzen.
9. Automatische Neustartfunktion
Ein Stromausfall während des Betriebs legt das Gerät vollkommen still.
Das Klimagerät verfügt über die automatische Neustartfunktion. Sobald wieder Spannung anliegt,
sorgt diese Funktion dafür, dass das Gerät automatisch wieder mit allen vorherigen Einstellungen, die
nämlich gespeichert wurden, anläuft.
10. Erkennung eines Kältemittellecks
Die Klimaanlage ist mit einem Kältemittelleck-Erkennungssystem ausgestattet. Wenn das Outdoor-
Gerät ein Mangel an Kältemittel erkennt, schaltet sich die Klimaanlage aus und das Indoor-Gerät zeigt
den Alarm „EC“ auf dem Display an. Wenn dieser Alarm auftritt, schalten Sie die Klimaanlage nicht
erneut ein und wenden Sie sich an Ihren Händler.
2
20
21
2
21
K FEHLERSUCHE UND ABHILFE
Fehlfunktionen und Lösungen
G
STÖRUNG
Wenn eine der folgenden Störungen auftritt, müssen Sie das Klimagerät unverzüglich
ausschalten. Trennen Sie es von der Stromquelle und wenden Sie sich an Ihren Händler.
Die Sicherung brennt häufig durch oder der Sicherungsautomat schaltet das Gerät häufig aus.
Eindringen von Fremdgegenständen oder Wasser in das Klimagerät.
Die Fernbedienung funktioniert nicht oder nicht normal.
Eine andere ungewöhnliche Situation.
Problem Mögliche Ursachen
Das Gerät schaltet sich nicht
ein, wenn die EIN/AUS-Taste
gedrückt wird
Das Gerät verfügt über eine dreiminütige Schutzfunktion, die ein Überhitzen
des Geräts verhindert. Das Gerät kann nicht neu gestartet werden, solange
die drei Minuten nach der Abschaltung nicht vergangen sind.
Das Gerät wechselt vom COOL/
HEAT-Modus in den FAN-Modus
Das Gerät kann seine Einstellung ändern, um zu verhindern, dass sich Frost
auf dem Gerät bildet. Sobald die Temperatur ansteigt, nimmt das Gerät den
Betrieb im zuvor ausgewählten Modus wieder auf.
Die eingestellte Temperatur wurde erreicht. An diesem Punkt schaltet das
Gerät den Kompressor aus. Das Gerät setzt den Betrieb fort, wenn die
Temperatur erneut schwankt.
Das Innengerät sondert weißen
Dunst aus
In feuchten Regionen kann ein großer Temperaturunterschied zwischen der
Raumluft und der klimatisierten Luft zur Bildung von weißem Dunst führen.
Sowohl das Innen- als auch das
Außengerät sondern weißen
Dunst aus.
Wenn das Gerät nach dem Abtauen im HEAT-Modus neu startet, kann auf-
grund von Feuchtigkeit, die sich während des Abtauvorgangs gebildet hat,
weißer Dunst abgesondert werden.
Das Innengerät macht Geräusche
Das Geräusch von rauschender Luft tritt auf, wenn die Klappe wieder in ihre
Position zurückkehrt.
Es kann zu einem Quietschen kommen, nachdem das Gerät im HEAT-Modus
betrieben wurde, da sich die Plastikbauteile des Geräts ausdehnen und
zusammenziehen.
Sowohl das Innen- als auch das
Außengerät machen Geräusche
Leises Zischen während des Betriebs: Dies ist normal und wird durch das
Kältemittel verursacht, das sowohl durch das Innen- als auch durch das
Außengerät fließt.
Leises Zischen, wenn das System startet, den Betrieb eingestellt hat,
oder abtaut: Dieses Geräusch ist normal und wird verursacht, wenn das
Kältemittel nicht mehr fließt oder die Flussrichtung ändert.
Quietschen: Normales Ausdehnen und Zusammenziehen von Plastik- und
Metallbauteilen, die durch Temperaturwechsel während des Betriebs verurs-
acht werden, erzeugen ein Quietschen.
Das Außengerät macht
Geräusche
Das Gerät macht verschiedene Geräusche, je nach aktuellem Betriebsmodus.
Staub kommt entweder aus dem
Innen- oder dem Außengerät
Das Gerät kann über längere Zeiträume der Nichtnutzung Staub ansammeln,
der ausgestoßen wird, sobald das Gerät eingeschaltet wird. Dies kann verrin-
gert werden, indem das Gerät abgedeckt wird, wenn es über einen längeren
Zeitraum nicht genutzt wird.
Das Gerät sondert einen schlech-
ten Geruch aus
Das Gerät kann Gerüche aus der Umgebung absorbieren (wie zum von
Möbeln, Kochen, Zigaretten usw.), die während des Betriebs abgesondert
werden.
Die Filter des Geräts sind angestaubt und sollten gereinigt werden.
Der Lüfter des Außengeräts
funktioniert nicht
Während des Betriebs wird die Lüftergeschwindigkeit gesteuert, um den
Betrieb des Geräts zu optimieren.
Der Betrieb ist fehlerhaft, unvor-
hersehbar, oder das Gerät rea-
giert nicht
Interferenzen von Mobilfunkmasten und Funkverstärkern können zur einer
Fehlfunktion des Geräts führen. Versuchen Sie in diesem Fall Folgendes:
Trennen Sie das Gerät von der Stromversorgung und schließen Sie es
anschließend wieder an.
Drücken Sie die EIN/AUS-Taste auf der Fernbedienung, um den Betrieb neu
zu starten.
22
G
HINWEIS!
Sollte das Problem weiterhin bestehen, so wenden Sie sich an einen Händler vor Ort oder an Ihr
nächstes Kundenservice-Center. Liefern Sie eine detaillierte Beschreibung der Fehlfunktion des
Geräts sowie Ihre Modellnummer.
Problem Mögliche Ursachen Lösung
Schlechte
Kühlleistung
Die Temperatureinstellung ist möglicher-
weise höher als die Raumtemperatur
Verringern Sie die Temperatureinstellung
Der Hitzewandler am Innen- oder
Außengerät ist verschmutzt
Reinigen Sie den betreffenden
Hitzewandler
Der Luftfilter ist verschmutzt
Entnehmen Sie den Filter und reinigen Sie
ihn gemäß den Anweisungen
Der Lufteinlass oder -auslass an einem der
Geräte ist verstopft
Schalten Sie das Gerät aus, beseitigen
Sie die Verstopfung und schalten Sie das
Gerät dann wieder ein
Türen und Fenster sind geöffnet
Achten Sie darauf, dass alle Türen und
Fenster während des Betriebs des Geräts
geschlossen sind
Übermäßige Hitze wird durch Sonnenlicht
verursacht
Schließen Sie Fenster und Vorhänge
während großer Hitze oder starker
Sonneneinstrahlung
Zu viele Wärmequellen im Raum
(Personen, Computer, Elektronik usw.)
Verringern Sie die Anzahl der
Wärmequellen
Geringer Kältemittelstand aufgrund eines
Lecks oder langfristiger Nutzung
Überprüfen Sie das Gerät auf Lecks,
versiegeln sie es neu und füllen Sie das
Kältemittel nach
SILENCE-Funktion aktiviert (optionale
Funktion)
Die SILENCE-Funktion kann die
Produktleistung verringern, indem die
Betriebshäufigkeit verringert wird.
Schalten Sie die SILENCE-Funktion ab.
Das Gerät
funktioniert nicht
Stromausfall
Warten Sie, bis die Stromversorgung wie-
derhergestellt wurde
Der Strom ist abgeschaltet Schalten Sie den Strom ein
Die Sicherung ist durchgebrannt Ersetzen Sie die Sicherung.
Die Batterien in der Fernbedienung sind
verbraucht
Tauschen Sie die Batterien aus
Der dreiminütige Geräteschutz wurde
aktiviert
Warten Sie drei Minuten, nachdem Sie das
Gerät neu gestartet haben
Der Timer ist aktiviert Schalten Sie den Timer aus
Das Gerät schaltet sich
regelmäßig ein und
aus
Es ist zu viel oder zu wenig Kältemittel im
System
Überprüfen Sie das Gerät auf Lecks und
füllen Sie das System mit Kältemittel auf
Inkompressibles Gas oder Feuchtigkeit ist
in das System gedrungen.
Entleeren Sie das Gerät und füllen Sie das
System mit Kältemittel auf
Der Kompressor ist kaputt Tauschen Sie den Kompressor aus
Die Netzspannung ist zu hoch oder zu
niedrig
Installieren Sie ein Manostat, um die
Netzspannung zu regulieren
Schlechte
Heizleistung
Die Außentemperatur ist besonders nie-
drig
Nutzen Sie ein zusätzliches Heizgerät
Kalte Luft dringt durch Türen und Fenster
Achten Sie darauf, dass alle Türen und
Fenster während der Nutzung geschlossen
sind
Geringer Kältemittelstand aufgrund eines
Lecks oder langfristiger Nutzung
Überprüfen Sie das Gerät auf Lecks,
versiegeln sie es neu und füllen Sie das
Kältemittel nach
Anzeigeleuchten blin-
ken durchgehend
Das Gerät kann den Betrieb einstellen oder weiterhin sicher laufen. Wenn die
Anzeigeleuchten weiterhin blinken oder Fehlercodes eingeblendet werden, warten
Sie ca. 10Minuten. Das Problem löst sich möglicherweise selbst. Wenn nicht, trennen
Sie das Gerät vom Stromnetz und schließen Sie es anschließend wieder an. Schalten
Sie das Gerät ein.
Sollte das Problem weiterhin bestehen, so trennen Sie das Gerät vom Stromnetz und
wenden Sie sich an Ihr nächstes Kundenservice-Center.
Fehlercode wird
im Display des
Innengeräts angezeigt:
• E0, E1, E2…
• P1, P2, P3…
• F1, F2, F3…
2
22
23
2
23
Wenn die Störung nicht behoben wurde, wenden Sie sich bitte an Ihren Händler. Nennen Sie ihm das Modell
des Geräts und schildern Sie ihm ausführlich die Störung.
G
HINWEIS
Die Reparatur des Geräts darf nur von einem offiziellen Monteur für Klimageräte ausgeführt
werden.
L GARANTIEBEDINGUNGEN
Wir gewähren im Auftrag des Herstellers eine 24-monatige Garantie auf sämtliche Material und
Produktionsfehler und eine 48-monatige Garantie auf den Kompressor. Hierbei gelten folgende Regeln:
1. Wir weisen ausdrücklich jegliche künftige Ansprüche zurück, einschließlich Ansprüche für
Kollateralschäden.
2. Reparaturen oder das Austauschen von Teilen innerhalb der Garantiefrist bewirkt keine Verlängerung
der Garantie.
3. Die Garantie wird nichtig, wenn Modifizierungen irgendeiner Art vorgenommen, andere als
Originalteile eingesetzt wurden oder Reparaturen von Dritten ausgeführt werden.
4. Teile, die dem normalen Verschleiß unterliegen, wie der Filter, sind von der Garantie ausgenommen.
5. Die Garantie gilt nur bei Vorlage der mit dem Datum versehenen Originalrechnung und vorausgesetzt,
es wurden keine Änderungen vorgenommen.
6. Die Garantie gilt nicht für Schäden, die durch Nachlässigkeit oder durch Handlungen entstanden sind,
die von den in dieser Anleitung beschriebenen Handlungen abweichen.
7. Transportkosten und das Transportrisiko für die Klimaanlage oder deren Teile gehen grundsätzlich zu
Lasten des Käufers.
8. Schäden, die dadurch entstanden sind, dass keine geeigneten Filter verwendet wurden, fallen nicht
unter die Garantie.
9. Verlust von Kältemittel bzw. austretendes Kältemittel durch unsachgemäßes Anschließen bzw. Trennen
der Geräte bzw. durch Anschließen bzw. Trennen der Geräte durch nicht qualifizierte Personen
fällt nicht unter die Garantiebedingungen für dieses Produkt. Schäden an Geräten, die nicht den
örtlichen Vorschriften bzw. Gesetzen und nicht den Vorschriften in dieser Anleitung zufolge ein-
gebaut, angeschlossen bzw. getrennt wurden, fallen nicht unter die für dieses Produkt geltenden
Garantiebestimmungen.
Wenden Sie sich wegen Reparaturen an Ihren Händler, wenn Sie in dieser Anleitung keine Abhilfe finden.
In dem unwahrscheinlichen Fall, dass das Gerät getrennt werden muss, müssen Sie dafür sorgen, dass dies
ausschließlich von einem autorisierten Fachmann gemäß den örtlich geltenden Vorschriften und Gesetzen
erfolgt.
24
M TECHNISCHE DATEN
Modell
S 4225
S 5225
S 5225 B
S-JA 2519
S 4232
S 5232
S 4248
S 5248
SC 4225
SC 5225
SCJA-2519
SC 4232
SC 5232
SC 4248
SC 5248
SCJA-4819
Art des Klimageräts
Klimagerät mit
Wandbefestigung
Klimagerät mit
Wandbefestigung
Klimagerät mit
Wandbefestigung
Klimagerät mit
Wandbefestigung
Klimagerät mit
Wandbefestigung
Klimagerät mit
Wandbefestigung
Kühlleistung nominal (min - max) *
W
2600 (1030 - 3190) 3500 (820 - 4160) 5300 (1730 - 6980) 2500 (1590 - 3000)
3200 (2110 - 4000) 4600 (1820 - 6120)
EE-Klasse Kühlen*
A++ A++ A++ A++
A++ A++
SEER*
7,1 7,0 6,4 6,5
6,2 6,7
Heizleistung*
W
2500 ( 880 - 3660) 2700 ( 850 - 4780) 3900 (1060 - 6980) 2400 (960 - 4890)
2400 (1280 - 4900) 3800 (1380 - 6740)
EE-Klasse Heizen
A+ A+ A+ A+
A+ A+
SCOP*
4,0 4,1 4,0 4,0
4,0 4,0
Entfeuchtungsleistung ** / ***
L / 24 h
24,0 28,8 43,2 26,4
31,2 36,0
Stromverbrauch beim Kühlen
kW
0,70 1,09 1,54 0,71
1,19 1,40
Stromverbrauch beim Heizen
kW
0,67 1,05 1,46 0,84
1,23 1,90
Jährlicher Energieverbrauch
kWh
128 / 875 175 / 922 290 / 1365 137 / 836
187 / 834 245 / 1326
Stromversorgung
V / Hz / Ph
220-240~ / 50 / 1 220-240~ / 50 / 1 220-240~ / 50 / 1 220-240~ / 50 / 1
220-240~ / 50 / 1 220-240~ / 50 / 1
Höchststrom.
A
9,5 10,0 11,5 10,0
10,0 13,0
Luftstrom **
m3/h
416/309/230 539/478/294 750/505/420
545/435/368
545/435/368 770/610/410
Für Räume von bis zu **
m3
60-85 80-100 140-185 60-85 80-100 125-145
Geeignet für Regionen W / A / C
W/A/C W/A/C W/A/C W/A/C W/A/C W/A/C
Kompressorart Kreiskolben Kreiskolben Kreiskolben Kreiskolben Kreiskolben Kreiskolben
Gebläsegeschwindigkeiten
4 4 4 3
3 3
Thermostatbereich
oC
17 - 30 17 - 30 17 - 30 17 - 30
17 - 30 17 - 30
Bedienelemente von Hand / mecha-
nisch / elektronisch
Elektronische
Fernbedienung
Elektronische
Fernbedienung
Elektronische
Fernbedienung
Elektronische
Fernbedienung
Elektronische
Fernbedienung
Elektronische
Fernbedienung
Fernbedienung Ja / Nein
Ja Ja Ja Ja Ja Ja
Luftfilterarten Sieb, Aktivkohle, 3M HAF Sieb, Aktivkohle, 3M HAF Sieb, Aktivkohle, 3M HAF Sieb, Aktivkohle, 3M HAF Sieb, Aktivkohle, 3M HAF Sieb, Aktivkohle, 3M HAF
Art / Menge des Kältemittels
R / g
R32 / 700 R32 / 800 R32 / 1250 R32 / 800 R32 / 800 R32 / 1190
Kältemittelrohrdurchmesser Flüssigkeit
- Gas
675 675 675 675
675 675
CO
2
-
Äquivalent
tonnes
0,473 0,540 0,844 0,540
0,540 0,803
Maße Innengerät (B x H x T)
mm
722x187x290 802x189x297 965x215x319 805x194x285
805x194x285 957x213x302
Maße Außengerät (B x H x T)
mm
770x300x555 770x300x555 800x333x554 770x300x555
770x300x555 800x333x554
Nettogewicht Innengerät
kg
7,3 8,2 10,8 7,8
7,8 10,3
Nettogewicht Außengerät
kg
27,2 27,0 37,0 25,7
25,7 34,6
Bruttogewicht Innengerät
kg
9,7 10,7 14,1 10,4
10,4 13,8
Bruttogewicht Außengerät
kg
29,7 29,4 39,9 31,1
31,1 40,2
Schallpegel Innengerät ****
dB(A)
54 56 58 53
53 55
Schallpegel Außengerät ****
dB(A)
59 60 64 62
62 62
Schalldruckpegel Innengerät ****
dB
20 21 21 25
25 29
Schutzklasse Innengerät
IP
IPX0 IPX0 IPX0 IPX0
IPX0 IPX0
Schutzklasse Außengerät
IP
IPX4 IPX4 IPX4 IPX4
IPX4 IPX4
* EN 14511-2007
** Annäherungswert
*** Entfeuchtung bei 32 °C, 80 % RF
2
25
Entsorgen Sie niemals biologisch nicht abbaubare Produkte in der Umwelt, entsorgen Sie diese jedoch
gemäß den geltenden nationalen Vorschriften. Am Ende seiner Lebensdauer darf das Produkt nicht als
städtischer Abfall entsorgt werden. Es muss zu einem speziellen kommunalen Abfallentsorgungszentrum
oder zu einem Handler gebracht werden, der diesen Service anbietet. Die getrennte Entsorgung eines
Haushaltsgeräts vermeidet mögliche negative Folgen für die Umwelt und die Gesundheit, die sich aus einer
ungeeigneten Entsorgung ergeben, und ermöglicht die Ruckgewinnung der verwendeten Materialien,
um erhebliche Energie- und Ressourceneinsparungen zu erzielen. Zur Erinnerung an die Notwendigkeit,
Haushaltsgerate getrennt zu entsorgen, ist das Produkt mit einem Bild einer durchgestrichenen Mulltonne
gekennzeichnet.
Umweltinformationen: Dieses Gerät enthält im Kyoto-Protokoll abgedeckte fluorierte Treibhausgase. Es
darf nur von geschulten Fachleuten gewartet oder auseinandergenommen werden.
Dieses Gerät enthält die in der obigen Tabelle aufgeführte Menge des Kältemittels R32. Lassen Sie das R32
nicht in die Atmosphäre entweichen. R32 ist ein fluoriertes Treibhausgas mit einem Treibhauspotenzial =
675.
Internet:
Sie können die aktuellste Version der Bedienungsanleitung unter www.Qlima.com herunterladen.
2
26
5
26
1. LEA PRIMERA LAS INSTRUCCIONES DE USO.
2. EN CASO DE DUDA, CONSULTE A SU DISTRIBUIDOR.
Estimada señora, estimado señor:
Le felicitamos por la compra de su aparato de aire acondicionado de Qlima. Usted acaba de
comprar un producto de calidad absoluta, que le dará plena satisfacción durante muchos
años, a condición de que lo utilice debidamente.
Por lo tanto, lea primero este manual del usuario, para una larga vida útil de su aire
acondicionado.
En nombre del fabricante le ofrecemos una garantía de 24 meses para toda clase de faltas
de fabricación y de material y 48 meses para el compresor. Disfrute de su aire
acondicionado.
Reciba un cordial saludo,
PVG Holding b.v.
Departamento Atención al Cliente
27
5
27
ÍNDICE
A. INSTRUCCIONES DE SEGURIDAD
B. COMPONENTES
C. TEMPERATURA DE UTILIZACIÓN
D. FUNCIONAMIENTO DEL MANDO A DISTANCIA
E. OPERACIÓN MANUAL (SIN CONTROL REMOTO)
F. FUNCIONAMIENTO ÓPTIMO
G. AJUSTE DE LA DIRECCIÓN DEL CAUDAL DE AIRE
H. FUNCIONAMIENTO DEL AIRE ACONDICIONADO
I. MANTENIMIENTO
J. INFORMACIÓN SOBRE EL FUNCIONAMIENTO
K. LOCALIZACIÓN DE AVERÍAS
L. CONDICIONES DE GARANTÍA
M. ESPECIFICACIONES TÉCNICAS
LEA ESTE MANUAL
Este manual contiene consejos muy útiles sobre la utilización y el mantenimiento
de su aire acondicionado. El capítulo Localización de averías contiene las soluciones
a los problemas más habituales. Consulte primero este capítulo antes de solicitar
asistencia técnica.
28
A
INSTRUCCIONES DE SEGURIDAD
Instale este dispositivo únicamente si satisface los requisitos de la
legislación, las ordenanzas y las normas locales y nacionales cor-
respondientes. Este producto ha sido diseñado para su uso como
acondicionador de aire en hogares y sólo es apto para el uso en
entornos secos, en condiciones domésticas normales y en interio-
res (salas de estar, cocinas y garajes). El aparato se debe utilizar
exclusivamente en un enchufe con toma de tierra, voltaje 230
V~ / 50 Hz. El modelo 4.8kW deberá conectarlo directamente a la
fuente de alimentación.
IMPORTANTE
El aparato debe estar conectado siempre con
una toma a tierra. En caso de que la corriente
eléctrica no esté provista de una toma a tierra,
está absolutamente prohibido conectar el mismo.
Cuando el aparato esté conectado, el acceso a
la clavija tendrá que poder hacerse sin que haya
obstáculos por medio. Lea estas instrucciones de uso
detenidamente y siga las indicaciones.
• El aire acondicionado contiene un refrigerante y
puede ser clasificado como un artículo de presión.
Por eso, siempre hay que contactar a un técnico
autorizado para la instalación y el mantenimiento
del aparato. El aire acondicionado debe ser revisado
anualmente por un técnico autorizado. La garantía
no cubre los daños causados por manipulaciones
contrarias a las descritas en las instrucciones de uso o
por negligencia.
Antes de conectar el aparato compruebe si:
el voltaje corresponde a la placa de datos;
el enchufe y el suministro de electricidad son los indicados para
el aparato;
la clavija del cable eléctrico es a la medida del enchufe;
el aparato está colocado en posición vertical y sobre una super-
ficie plana.
5
28
29
Haga controlar la instalación eléctrica por un profesional autori-
zado si no está seguro que todo está en orden.
Este aparato está fabricado según las normas de seguridad CE
vigentes. A pesar de ello, y al igual que con todo aparato eléc-
trico, se debe obrar con cautela.
Nunca tapar la rejilla de la entrada y salida de aire.
Procure que el aparato no entre nunca en contacto con produ-
ctos químicos.
No limpie nunca el aparato pulverizándolo ni sumergiéndolo en
agua. Apague la unidad y desconecte la fuente de alimentación
si entra agua en la unidad interior.
No inserte manos, dedos u objetos en las aberturas del aparato.
Nunca use un cable prolongador para conectar el aparato. Si no
se dispone de un enchufe con toma a tierra, deberá ser instala-
do por un electricista cualificado.
Las reparaciones y/o trabajos de mantenimiento deben ser siem-
pre llevados a cabo por un técnico de servicio cualificado o por
su distribuidor. Observe las instrucciones de uso y mantenimi-
ento indicadas en el manual de usuario del aire acondicionado.
Interrumpa siempre el suministro eléctrico mientras el aparato
no esté en uso.
No poner en marcha ni parar el aire acondicionado enchufando
o tirando del cable de alimentación eléctrica. Use solamente
los botones correspondientes en el aire acondicionado o en el
mando a distancia.
No abrir el aparato durante el funcionamiento. Desenchufar
siempre el aparato cuando lo vaya a abrir.
Desenchufar siempre el aire acondicionado antes de realizar
trabajos de mantenimiento o de limpieza.
No colocar quemadores de gas, hornos o estufas en la corriente
de aire.
No manipular los botones ni tocar el aire acondicionado con las
manos mojadas.
La unidad exterior produce un sonido cuando está en funcion-
amiento, esto puede que no sea de conformidad con la legisla-
5
29
30
ción local. Es responsabilidad del usuario comprobar que el apa-
rato cumple con la legislación local.
Este aparato no deberá ser utilizado por personas (incluyendo
niños) con reducida capacidad física, mental o sensorial, o que
carezcan de la experiencia y los conocimientos necesarios, a
menos que sean vigilados e instruidos en el uso del aparato por
otra persona que sea responsable de su seguridad.
Se deberá vigilar a los niños para asegurar que no jueguen con
el aparato.
Se aconseja permanecer fuera de la corriente directa de aire.
Nunca beber el agua evacuada del aire acondicionado.
No haga ninguna modificación al aparato. No retire ningún
material aislante.
En caso de que el cable eléctrico esté dañado, éste deberá ser
cambiado por un técnico de servicio cualificado o su distribui-
dor.
Este aparato puede ser utilizado por niños a partir de 8 años
y por personas con capacidades físicas, psíquicas o sensoriales
reducidas, falta de experiencia y conocimientos, siempre que
sean supervisados o reciban instrucciones acerca del uso del
aparato de una forma segura y comprendan los riesgos que
entraña.
Los niños no deben utilizar el aparato como un juguete.
Las tareas de limpieza y mantenimiento reservadas al usuario no
deben ser realizadas por niños sin supervisión.
¡ATENCIÓN!
Nunca use el aparato en caso de
que el cable eléctrico, el enchufe, el
alojamiento o el panel de mando esté
dañado.
El incumplimiento de las instrucciones
puede dar lugar a la pérdida de la
garantía.
5
31
Nota sobre Gases Fluorados
1. Esta unidad de aire acondicionado contiene gases fluorados. Para información específica sobre el tipo
de gases y las cantidades, por favor consulte la etiqueta correspondiente de la propia unidad.
2. La instalación, servicio, mantenimiento y reparación de esta unidad debe llevarse a cabo por un téc-
nico certificado.
3. La desinstalación y reciclado debe llevarse a cabo por un técnico certificado.
4. Si el sistema tiene instalado un sistema de detección de fugas, debe revisar si hay fugas al menos cada
12 meses.
5. Cuando revise si hay fugas en la unidad, le recomendamos mantener un registro de todas las revisiones.
6. La unidad de aire acondicionado está herméticamente sellada y contiene gases fluorado.
B COMPONENTES
UNIDAD INTERIOR UNIDAD INTERIOR
Filtro de aire (detrás de la placa fron
tal)
Panel frontal
Salida de aire
Panel de visualización
Mando a distancia (vea el capítulo E
para mayores detalles y para su mane
jo)
UNIDAD EXTERIOR Unidad exterior
Tubo de conexión, tubo flexible de
drenaje (Para modelos S, tubo de
conexión no incluido)
Entrada de aire (lateral y trasera)
Salida de aire
5
6
7
8
1
22
3
4
5
6
2
1
4
3
G
¡ATENCIÓN!
Todas las figuras en este manual y en la caja solamente son a título informativo e ilustrativo.
Las figuras mostradas pueden ser diferentes del aire acondicionado que usted ha adquirido.
El modelo real es el que debe considerarse válido.
5
32
PANEL DE INDICADORES LUMINOSOS EN LA UNIDAD INTERIOR
Page 6
Unit Specifications and Features
1
Unit
Specifications
and Features
NOTE:
A guide on using the infrared remote is not included
in this literature package.
Unit Parts
Power Cable (Some Units)
Remote Control
Remote Control
Holder (Some Units)
Louver
Front Panel
Air Filter
(pull out)
Display window
“ ” for 3 seconds when:
• TIMER ON is set
• FRESH, SWING, TURBO, or SILENCE features are turned on
“ ” for 3 seconds when:
• TIMER OFF is set
• FRESH, SWING, TURBO, or SILENCE features are turned off
“ ” when defrosting(cooling & heating units)
“ ” when anti-cold air feature is turned on(cooling & heating units)
“ ” when unit is self-cleaning(some units)
“ ” when freeze protection is turned on(some units)
“ ” when Wireless Control feature is activated(some units)
Display Code
Meanings
In Fan and Dry mode, the unit will display the room temperature.
In other modes, the unit will display your temperature setting.
,
,
“ ”
When ECO function(some units) is activated, the
illuminates gradually one by one as --
-- --set temperature-- ...... in one second interval.
por 3 segundos cuando:
• TIMER ON está configurado
• Las funciones FRESH, SWING, TURBO o SILENCE están activadas
Page 6
Unit Specifications and Features
1
Unit
Specifications
and Features
NOTE:
A guide on using the infrared remote is not included
in this literature package.
Unit Parts
Power Cable (Some Units)
Remote Control
Remote Control
Holder (Some Units)
Louver
Front Panel
Air Filter
(pull out)
Display window
“ ” for 3 seconds when:
• TIMER ON is set
• FRESH, SWING, TURBO, or SILENCE features are turned on
“ ” for 3 seconds when:
• TIMER OFF is set
• FRESH, SWING, TURBO, or SILENCE features are turned off
“ ” when defrosting(cooling & heating units)
“ ” when anti-cold air feature is turned on(cooling & heating units)
“ ” when unit is self-cleaning(some units)
“ ” when freeze protection is turned on(some units)
“ ” when Wireless Control feature is activated(some units)
Display Code
Meanings
In Fan and Dry mode, the unit will display the room temperature.
In other modes, the unit will display your temperature setting.
,
,
“ ”
When ECO function(some units) is activated, the
illuminates gradually one by one as --
-- --set temperature-- ...... in one second interval.
por 3 segundos cuando:
• TIMER OFF está configurado
• Las funciones FRESH, SWING, TURBO o SILENCE están desactivadas
Page 6
Unit Specifications and Features
1
Unit
Specifications
and Features
NOTE:
A guide on using the infrared remote is not included
in this literature package.
Unit Parts
Power Cable (Some Units)
Remote Control
Remote Control
Holder (Some Units)
Louver
Front Panel
Air Filter
(pull out)
Display window
“ ” for 3 seconds when:
• TIMER ON is set
• FRESH, SWING, TURBO, or SILENCE features are turned on
“ ” for 3 seconds when:
• TIMER OFF is set
• FRESH, SWING, TURBO, or SILENCE features are turned off
“ ” when defrosting(cooling & heating units)
“ ” when anti-cold air feature is turned on(cooling & heating units)
“ ” when unit is self-cleaning(some units)
“ ” when freeze protection is turned on(some units)
“ ” when Wireless Control feature is activated(some units)
Display Code
Meanings
In Fan and Dry mode, the unit will display the room temperature.
In other modes, the unit will display your temperature setting.
,
,
“ ”
When ECO function(some units) is activated, the
illuminates gradually one by one as --
-- --set temperature-- ...... in one second interval.
al descongelar (unidades de refrigeración y calefacción)
Page 6
Unit Specifications and Features
1
Unit
Specifications
and Features
NOTE:
A guide on using the infrared remote is not included
in this literature package.
Unit Parts
Power Cable (Some Units)
Remote Control
Remote Control
Holder (Some Units)
Louver
Front Panel
Air Filter
(pull out)
Display window
“ ” for 3 seconds when:
• TIMER ON is set
• FRESH, SWING, TURBO, or SILENCE features are turned on
“ ” for 3 seconds when:
• TIMER OFF is set
• FRESH, SWING, TURBO, or SILENCE features are turned off
“ ” when defrosting(cooling & heating units)
“ ” when anti-cold air feature is turned on(cooling & heating units)
“ ” when unit is self-cleaning(some units)
“ ” when freeze protection is turned on(some units)
“ ” when Wireless Control feature is activated(some units)
Display Code
Meanings
In Fan and Dry mode, the unit will display the room temperature.
In other modes, the unit will display your temperature setting.
,
,
“ ”
When ECO function(some units) is activated, the
illuminates gradually one by one as --
-- --set temperature-- ...... in one second interval.
cuando la función de aire antihielo está activada (unidades de refrigeración y calefacción)
Page 6
Unit Specifications and Features
1
Unit
Specifications
and Features
NOTE:
A guide on using the infrared remote is not included
in this literature package.
Unit Parts
Power Cable (Some Units)
Remote Control
Remote Control
Holder (Some Units)
Louver
Front Panel
Air Filter
(pull out)
Display window
“ ” for 3 seconds when:
• TIMER ON is set
• FRESH, SWING, TURBO, or SILENCE features are turned on
“ ” for 3 seconds when:
• TIMER OFF is set
• FRESH, SWING, TURBO, or SILENCE features are turned off
“ ” when defrosting(cooling & heating units)
“ ” when anti-cold air feature is turned on(cooling & heating units)
“ ” when unit is self-cleaning(some units)
“ ” when freeze protection is turned on(some units)
“ ” when Wireless Control feature is activated(some units)
Display Code
Meanings
In Fan and Dry mode, the unit will display the room temperature.
In other modes, the unit will display your temperature setting.
,
,
“ ”
When ECO function(some units) is activated, the
illuminates gradually one by one as --
-- --set temperature-- ...... in one second interval.
cuando la unidad se autolimpia (algunas unidades)
Page 6
Unit Specifications and Features
1
Unit
Specifications
and Features
NOTE:
A guide on using the infrared remote is not included
in this literature package.
Unit Parts
Power Cable (Some Units)
Remote Control
Remote Control
Holder (Some Units)
Louver
Front Panel
Air Filter
(pull out)
Display window
“ ” for 3 seconds when:
• TIMER ON is set
• FRESH, SWING, TURBO, or SILENCE features are turned on
“ ” for 3 seconds when:
• TIMER OFF is set
• FRESH, SWING, TURBO, or SILENCE features are turned off
“ ” when defrosting(cooling & heating units)
“ ” when anti-cold air feature is turned on(cooling & heating units)
“ ” when unit is self-cleaning(some units)
“ ” when freeze protection is turned on(some units)
“ ” when Wireless Control feature is activated(some units)
Display Code
Meanings
In Fan and Dry mode, the unit will display the room temperature.
In other modes, the unit will display your temperature setting.
,
,
“ ”
When ECO function(some units) is activated, the
illuminates gradually one by one as --
-- --set temperature-- ...... in one second interval.
cuando la protección contra congelación está activada (algunas unidades)
Page 6
Unit Specifications and Features
1
Unit
Specifications
and Features
NOTE:
A guide on using the infrared remote is not included
in this literature package.
Unit Parts
Power Cable (Some Units)
Remote Control
Remote Control
Holder (Some Units)
Louver
Front Panel
Air Filter
(pull out)
Display window
“ ” for 3 seconds when:
• TIMER ON is set
• FRESH, SWING, TURBO, or SILENCE features are turned on
“ ” for 3 seconds when:
• TIMER OFF is set
• FRESH, SWING, TURBO, or SILENCE features are turned off
“ ” when defrosting(cooling & heating units)
“ ” when anti-cold air feature is turned on(cooling & heating units)
“ ” when unit is self-cleaning(some units)
“ ” when freeze protection is turned on(some units)
“ ” when Wireless Control feature is activated(some units)
Display Code
Meanings
In Fan and Dry mode, the unit will display the room temperature.
In other modes, the unit will display your temperature setting.
,
,
“ ”
When ECO function(some units) is activated, the
illuminates gradually one by one as --
-- --set temperature-- ...... in one second interval.
cuando la característica de control inalámbrico está activada (algunas unidades)
Page 6
Unit Specifications and Features
1
Unit
Specifications
and Features
NOTE:
A guide on using the infrared remote is not included
in this literature package.
Unit Parts
Power Cable (Some Units)
Remote Control
Remote Control
Holder (Some Units)
Louver
Front Panel
Air Filter
(pull out)
Display window
“ ” for 3 seconds when:
• TIMER ON is set
• FRESH, SWING, TURBO, or SILENCE features are turned on
“ ” for 3 seconds when:
• TIMER OFF is set
• FRESH, SWING, TURBO, or SILENCE features are turned off
“ ” when defrosting(cooling & heating units)
“ ” when anti-cold air feature is turned on(cooling & heating units)
“ ” when unit is self-cleaning(some units)
“ ” when freeze protection is turned on(some units)
“ ” when Wireless Control feature is activated(some units)
Display Code
Meanings
In Fan and Dry mode, the unit will display the room temperature.
In other modes, the unit will display your temperature setting.
,
,
“ ”
When ECO function(some units) is activated, the
illuminates gradually one by one as --
-- --set temperature-- ...... in one second interval.
cuando se activa la función ECO (algunas unidades), se
Page 6
Unit Specifications and Features
1
Unit
Specifications
and Features
NOTE:
A guide on using the infrared remote is not included
in this literature package.
Unit Parts
Power Cable (Some Units)
Remote Control
Remote Control
Holder (Some Units)
Louver
Front Panel
Air Filter
(pull out)
Display window
“ ” for 3 seconds when:
• TIMER ON is set
• FRESH, SWING, TURBO, or SILENCE features are turned on
“ ” for 3 seconds when:
• TIMER OFF is set
• FRESH, SWING, TURBO, or SILENCE features are turned off
“ ” when defrosting(cooling & heating units)
“ ” when anti-cold air feature is turned on(cooling & heating units)
“ ” when unit is self-cleaning(some units)
“ ” when freeze protection is turned on(some units)
“ ” when Wireless Control feature is activated(some units)
Display Code
Meanings
In Fan and Dry mode, the unit will display the room temperature.
In other modes, the unit will display your temperature setting.
,
,
“ ”
When ECO function(some units) is activated, the
illuminates gradually one by one as --
-- --set temperature-- ...... in one second interval.
ilumina gradualmente una por una como
Page 6
Unit Specifications and Features
1
Unit
Specifications
and Features
NOTE:
A guide on using the infrared remote is not included
in this literature package.
Unit Parts
Power Cable (Some Units)
Remote Control
Remote Control
Holder (Some Units)
Louver
Front Panel
Air Filter
(pull out)
Display window
“ ” for 3 seconds when:
• TIMER ON is set
• FRESH, SWING, TURBO, or SILENCE features are turned on
“ ” for 3 seconds when:
• TIMER OFF is set
• FRESH, SWING, TURBO, or SILENCE features are turned off
“ ” when defrosting(cooling & heating units)
“ ” when anti-cold air feature is turned on(cooling & heating units)
“ ” when unit is self-cleaning(some units)
“ ” when freeze protection is turned on(some units)
“ ” when Wireless Control feature is activated(some units)
Display Code
Meanings
In Fan and Dry mode, the unit will display the room temperature.
In other modes, the unit will display your temperature setting.
,
,
“ ”
When ECO function(some units) is activated, the
illuminates gradually one by one as --
-- --set temperature-- ...... in one second interval.
--
Page 6
Unit Specifications and Features
1
Unit
Specifications
and Features
NOTE:
A guide on using the infrared remote is not included
in this literature package.
Unit Parts
Power Cable (Some Units)
Remote Control
Remote Control
Holder (Some Units)
Louver
Front Panel
Air Filter
(pull out)
Display window
“ ” for 3 seconds when:
• TIMER ON is set
• FRESH, SWING, TURBO, or SILENCE features are turned on
“ ” for 3 seconds when:
• TIMER OFF is set
• FRESH, SWING, TURBO, or SILENCE features are turned off
“ ” when defrosting(cooling & heating units)
“ ” when anti-cold air feature is turned on(cooling & heating units)
“ ” when unit is self-cleaning(some units)
“ ” when freeze protection is turned on(some units)
“ ” when Wireless Control feature is activated(some units)
Display Code
Meanings
In Fan and Dry mode, the unit will display the room temperature.
In other modes, the unit will display your temperature setting.
,
,
“ ”
When ECO function(some units) is activated, the
illuminates gradually one by one as --
-- --set temperature-- ...... in one second interval.
-- ajustar la temperatura --
Page 6
Unit Specifications and Features
1
Unit
Specifications
and Features
NOTE:
A guide on using the infrared remote is not included
in this literature package.
Unit Parts
Power Cable (Some Units)
Remote Control
Remote Control
Holder (Some Units)
Louver
Front Panel
Air Filter
(pull out)
Display window
“ ” for 3 seconds when:
• TIMER ON is set
• FRESH, SWING, TURBO, or SILENCE features are turned on
“ ” for 3 seconds when:
• TIMER OFF is set
• FRESH, SWING, TURBO, or SILENCE features are turned off
“ ” when defrosting(cooling & heating units)
“ ” when anti-cold air feature is turned on(cooling & heating units)
“ ” when unit is self-cleaning(some units)
“ ” when freeze protection is turned on(some units)
“ ” when Wireless Control feature is activated(some units)
Display Code
Meanings
In Fan and Dry mode, the unit will display the room temperature.
In other modes, the unit will display your temperature setting.
,
,
“ ”
When ECO function(some units) is activated, the
illuminates gradually one by one as --
-- --set temperature-- ...... in one second interval.
...... en un segundo intervalo
En otros modos, la unidad mostrará la configuración de temperatura.
En el modo Fan y Dry, la unidad mostrará la temperatura ambiente.
C TEMPERATURA DE UTILIZACIÓN
Refrigeración, calefacción y/o deshumidificación son adecuados para las siguientes temperaturas interiores
y exteriores:
Temperatura
Modo Refrigeración Calefacción Deshumidificación
Temperatura ambiente 17ºC - 32ºC 0ºC - 30ºC 10ºC - 32ºC
Temperatura en el exte-
rior
-25ºC - 50ºC -15ºC - 30ºC 0ºC - 50ºC
G
ATENCIÓN
Si el aparato de aire acondicionado se utiliza en condiciones diferentes a las arriba indicadas,
podrían activarse dispositivos de protección y de seguridad y causar un funcionamiento anormal
de la unidad.
Si el aire acondicionado funciona con una humedad relativa en la habitación superior al 80%,
puede que en la superficie de la unidad se forme condensación. Si este es el caso, mueva la aleta
del flujo vertical hasta la posición de máxima apertura de la salida de aire (verticalmente al
suelo), y ajuste la velocidad del ventilador a HIGH (alta)
Para obtener el mayor rendimiento de su aire acondicionado, mantenga cerradas todas las
puertas y ventanas cuando el aparato refrigere o caliente.
5
33
D FUNCIONAMIENTO DEL MANDO A DISTANCIA
G
¡ATENCIÓN!
Oriente siempre el mando a distancia hacia el receptor en la unidad interior y compruebe que
no se encuentran obstáculos entre el mando a distancia y el receptor de la unidad interior. De
lo contrario, la señal del mando a distancia no llegará al receptor y el aire acondicionado no
funcionará adecuadamente.
La distancia máxima de transmisión entre el mando a distancia y el receptor es de entre los 6 y
7 metros.
Los botones de las funciones del mando a distancia
4
3
2
8
6
7
12
11
13
15
5
9
10
14
1
SLEEP
FRESH
Botón On/off: Pulse este botón para iniciar el funcionamiento y púlselo de nuevo para parar el funcio-
namiento.
Botón Mode: Cada vez que pulse este botón, se seleccionará un modo en la siguiente secuencia: AUTO
COOL [refrigeración] DRY [deshumidificación] HEAT [calefacción] y FAN only [sólo ventilador] tal y
como se indica en la siguiente figura:
AUTO COOL DRY HEAT FAN
Botón + : Pulse este botón para aumentar la temperatura programada hasta 30ºC.
Botón - : Pulse este botón para disminuir la temperatura programada hasta 17ºC.
Botón Fan: Este botón se utiliza para seleccionar la velocidad del ventilador. Cada vez que pulse este
botón, se seleccionará una velocidad del ventilador en la siguiente secuencia: AUTO, LOW, MED a HIGH,
y luego volverá en Auto. Cuando seleccione el modo AUTO o DRY, la velocidad de ventilador será con-
trolada automáticamente y no será posible regular la velocidad.
Botón SLEEP: Pulse este botón para activar la función de ahorro de energía. Pulse de nuevo el botón
para desactivar la función. Esta función, que sólo se puede utilizar en el modo de refrigeración, calen-
tamiento o automático [COOL, HEAT y AUTO], hace que se mantenga la temperatura a un nivel más
agradable. La temperatura programada subirá automáticamente 1°C en 1 hora (modo de refrigeración)
o disminuye (mode calentamiento) automáticamente las siguientes 2 horas. El apparato mantiene la
temperatura programada durante las siguentes 5 horas. Después el aparato se detiene.
Botón FRESH: Mantenga presionado para activar la función FRESH.
Botón Swing: Pulse el botón SWING para activar la función swing. Pulse el botón de nuevo para parar
esta función.
Botón Air direction: Pulse este botón para cambiar el ángulo de la aleta. El ángulo de la aleta cambia 6°
cada vez que se pulse este botón. Cuando la aleta se encuentre en determinado ángulo lo que puede
5
34
afectar el efecto de refrigeración o de calefacción del aire acondicionado, cambiará automáticamente
la dirección de giro. Al apretar este botón, en la pantalla no aparecerá ningún símbolo.
Botón Swing(izquierda y derecha): Pulse el botón SWING para activar la función swing. Pulse el botón
de nuevo para parar esta función.
i Botón Timer on: Pulse este botón para iniciar la secuencia de tiempo de encendido automático. Cada
vez que pulse este botón, la hora del encendido automático avanzará en incrementos de 30 minutos.
Cuando la pantalla muestra 10Hr, con cada pulsación la hora incrementaré en 60 minutos. Para anular
el programa automático, continúe pulsando el botón hasta que se muestre el valor 0.0.
j Botón Timer off: Pulse este botón para iniciar la secuencia de tiempo de apagado automático. Cada
vez que pulse este botón, la hora del encendido automático avanzará en incrementos de 30 minutos.
Cuando la pantalla muestra 10Hr, con cada pulsación la hora incrementaré en 60 minutos. Para anular
el programa automático, continúe pulsando el botón hasta que se muestre el valor 0.0.
k Botón RESET: Pulsando el botón integrado RESET (resetear), puede anular toda la configuración y
reestablecer los valores originales del regulador.
l Turbo Button / Active Clean button: Pulsando este botón mientras funciona el aire acondicionado en
modo de refrigeración [COOL], se aumenta la potencia de refrigeración. Al presionar este botón (> 2
seg.), la unidad pasará al modo Active Clean. Se iniciará un proceso completo para limpiar la cara inte-
rior del evaporador y reducir la proliferación de bacterias. Al activar esta función, se cancelarán todos
los ajustes de temporizador. Para detener el modo Active Clean, presione de nuevo el botón (>2 seg.).
m Botón LOCK: Pulsando el botón integrado de LOCK (cierre), puede bloquear toda la configuración
actual. El mando a distancia reaccionará sólo al botón LOCK. Pulse de nuevo el botón para desactivar
el modo LOCK.
n Botón LED DISPLAY: Pulsando este botón, puede desactivar el display digital del aire acondicionado.
Pulse de nuevo el botón para activar el display (no es válido para aparatos que no disponen de esta
función).
o Low sound button / indoor freezing prevention: Press this button to decrease the indoor sound pres-
sure level to 21 dB(A). The indoor unit fan speed is reduced to its lowest level.
Al pulsarse este botón (> 2 segundos), el equipo entrará en el modo anticongelación. El equipo hará
caso omiso de la temperatura programada para el interior y la ajustará a aprox. 8 °C. De esta forma
evita que su casa quede congelada en los períodos fríos, con el menor consumo de energía posible.
Cuando se selecciona este modo, la unidad interior indicará ”FP”. Este botón sólo funciona en modo de
calefacción. Para desactivar el modo anticongelación: simplemente debe pulsar el botón de nuevo.
Nombres y funciones de los indicadores en el mando a distancia
auto cool dryheatfan
sleep lock run
SET TEMP.TIMER ONOFF
fig. 2
2
1
3
4
5
6
7
5
35
Panel de visualización
Indicador-receptor: Este indicador se enciende cuando el mando a distancia envía una señal al aparato.
Indicador de modo de funcionamiento: Puede pulsar el botón MODE para visualizar el modo de funcionami-
ento actual: AUTO
, COOL [refrigerar], DRY [secar], HEAT [calentar], FAN [ventilador].
Esta indicación no está disponible para aparatos que únicamente refrigeran..
Display de la temperatura del temporizador: Se visualiza la temperatura programada (17º C ~ 30ºC). En esta
parte del display se muestra la programación del temporizador. Si sólo se ha programado el tiempo de inicio
del temporizador, se verá en el display: TIMER ON. Si sólo se ha programado el tiempo de finalización del tem-
porizador, se verá en el display TIMER OFF. Si ambos tiempos están programados, se verá en el display.
Indicación de la velocidad del ventilador: Con el botón FAN SPEED (velocidad de la ventilación) puede
seleccionar la velocidad del ventilador (Auto-Baja
– Media
– Alta
). El modo seleccionado se visualiza
en la pantalla LCD. No es válido para el modo Auto. La velocidad del ventilador será AUTO si el modo
de funcionamiento es AUTO o DRY.
Indicador de (des)activación: Este símbolo aparece cuando se activa el aparato con el mando a distancia
y desaparece cuando se desactiva.
Mensaje LOCK: El mensaje LOCK aparece cuando pulsa el botón LOCK. Pulsando de nuevo el botón LOCK,
se borrará la pantalla.
Pantalla de sueño: Se muestra durante el funcionamiento en el modo de sueño. Pulse de nuevo el botón
SLEEP para desactivarla.
G
¡ATENCIÓN!
Todos los elementos se muestran en la Fig.2 para conseguir una presentación clara, aunque
durante el funcionamiento real sólo los elementos funcionales se mostrarán en la pantalla.
Funcionamiento del mando a distancia
Colocación / Cambio de las pilas
El mando a distancia utiliza dos pilas alcalinas secas (AAA/LR03).
No utilice pilas recargables.
1. Deslice la cubierta del compartimento de las pilas en el mando a distancia en el sentido de la flecha
situada en la cubierta.
2. Coloque las pilas nuevas asegurando de que la polaridad (+) y (-) de las mismas coincide con la del
mando a distancia.
3. Vuelva a colocar la cubierta.
G
¡ATENCIÓN!
El control remoto perderá la programación almacenada al extraer las baterías, por lo que será
preciso volver a programarlo tras insertar las baterías nuevas.
Al cambiar las pilas, no utilice pilas viejas o un tipo de pilas diferentes, ya que puede provocar
el funcionamiento incorrecto del mando.
Si no va a utilizar el mando a distancia durante varias semanas, quite las pilas. De lo contrario,
las fugas de líquido de las pilas pueden dañar el mando a distancia.
La vida media de una pila con uso normal es de unos 6 meses.
Cambie las pilas cuando oiga un sonido de respuesta de la unidad interior o si la luz indicadora
de transmisión no se enciende.
Siempre cambie las dos pilas a la vez. Nunca utilice diferentes tipos de pilas al mismo tiempo
(por ej., alcalina con una de dióxido de manganeso).
5
36
Funcionamiento AUTOMÁTICO
Cuando el aire acondicionado está listo para ser usado (compruebe que la unidad esté enchufada y que el
suministro eléctrico se encuentre disponible), pulse el botón de alimentación y el piloto de FUNCIONAMIENTO
del panel de visualización comenzará a parpadear.
1. Utilice el botón de selección Mode para seleccionar el modo AUTO.
2. Pulse el botón + o - para ajustar la temperatura ambiente deseada.
3. Pulse el botón On/off para iniciar el funcionamiento del aire acondicionado. El piloto de
FUNCIONAMIENTO en el panel de visualización de la unidad interior se encenderá. El modo de funcio-
namiento es AUTO. La velocidad del VENTILADOR es controlado automáticamente.
4. Pulse de nuevo el botón On/off para detener el funcionamiento de la unidad.
G
¡ATENCIÓN!
En el modo AUTO, el aire acondicionado puede elegir de forma lógica el modo COOL,
FAN, HEAT mediante la detección de la diferencia entre la temperatura ambiente real y la
temperatura programada en el mando a distancia.
Si el modo AUTO no le agrada, puede elegir el modo deseado de forma manual.
Funcionamiento COOL, HEAT y FAN ONLY
1. Si el modo AUTO no le resulta agradable, se puede modificar los ajustes manualmente utilizando los
modos COOL, DRY, HEAT (sólo los modelos con bomba de calor), o FAN ONLY pulsando el botón .
2. Pulse el botón + o - ( y ) para ajustar la temperatura ambiente deseada.
3. Pulse el botón Fan para seleccionar el modo AUTO, HIGH, MED o LOW del VENTILADOR.
4. Pulse el botón On/Off. El piloto luminoso se enciende y el aire acondicionado comienza a funcionar
según sus ajustes. Pulse de nuevo el botón On/off para detener el funcionamiento de la unidad.
G
¡ATENCIÓN!
El modo FAN ONLY no puede utilizarse para controlar la temperatura. En este modo, sólo se
puede efectuar los pasos 1, 3 y 4.
Funcionamiento en MODO DRY
1. Pulse el botón Mode para seleccionar el modo DRY.
2. Pulse el botón + o - ( y ) para ajustar la temperatura.
3. Pulse el botón On/Off. El piloto luminoso se enciende y el aire acondicionado comienza a funcionar
en el modo DRY. Pulse de nuevo el botón On/off para detener el funcionamiento de la unidad.
G
¡ATENCIÓN!
Debido a la diferencia entre la temperatura ajustada en la unidad y la temperatura ambiente
real, el aire acondicionado, si se encuentra en el modo DRY, funcionará en muchas ocasiones sin
poner en marcha los modos COOL y FAN.
Funcionamiento TEMPORIZADOR
Pulse el botón Timer on/off (i y j) para programar la hora de encendido y de apagado del aparato. El
rango de tiempo seleccionable es de 0,5 a 24 horas.
1. Programar la hora de INICIO.
1.1 Pulse el botón i Timer on, en el mando a distancia aparecerá ON TIMER y la hora de inicio previamente
programada. La abreviatura ”h” aparecerá en el panel de visualización. Ahora podrá programar de
nuevo la hora de INICIO.
5
37
1.2 Pulse de nuevo el botón i Timer on para programar la hora de inicio deseada.
1.3 Después de haber programado Timer on, habrá un retardo de medio segundo antes de que el mando
a distancia transmita la señal al aire acondicionado.
2. Programar la hora de PARADA.
2.1 Pulse el botón j. Timer off, en el mando a distancia aparecerá OFF TIMER y la hora de parada previa-
mente programada. Ahora podrá programar de nuevo la hora de PARADA.
2.2 Pulse el botón j Timer off de nuevo para programar la hora de parada.
2.3 Después de haber programado Timer off, habrá un retardo de medio segundo antes de que el mando
a distancia transmita la señal al aire acondicionado.
Ejemplo de configuración del temporizador
Para poner en marcha el acondicionador de aire en 6 horas:
1. Pulse el botón TIMER ON. Se mostrarán la última hora de puesta en marcha confi-
gurada y la señal ”h” en el área de pantalla.
2. Pulse el botón TIMER ON y configure el valor ”6:0h”.
3. Espere un segundo; el área de pantalla digital volverá a mostrar la temperatura
de nuevo. El indicador ”TIMER ON” permanecerá encendido y la función quedará
activada.
Start
Off
6h
TIMERON
Temporizador combinado
(configuración simultánea de los temporizadores de ENCENDIDO y APAGADO)
TIMER OFF --> TIMER ON
(Encendido --> Parada --> Puesta en marcha)
Esta función resulta útil si desea que el acondicionador de aire se detenga después
de haberse ido a dormir y vuelva a ponerse en marcha de nuevo al levantarse por la
mañana o al volver a
On
Stop
2hSet
On
10 h
TIMERONOFF
Ejemplo:
Para que el acondicionador de aire se detenga 2 horas después de la configuración y vuelva a ponerse en
march a 10 horas después de la configuración:
1. Pulse el botón TIMER OFF.
2. Pulse de nuevo el botón TIMER OFF y configure el valor 2.0h en la pantalla TIMER OFF.
3. Pulse el botón TIMER ON.
4. Pulse de nuevo el botón TIMER ON y configure el valor 10h en la pantalla TIMER ON.
5. Espere un segundo; el área de pantalla digital volverá a mostrar la temperatura de nuevo. El indicador
TIMER ON OFF permanecerá encendido y la función quedará activada.
G
¡ATENCIÓN!
Si se ha programado la misma hora para el INICIO y para la PARADA, la hora de parada
incrementará en 0,5hr (si la hora programada mostrada es inferior a 10 horas) o en 1 hora (si la
hora programada es 10 horas o más).
Para cambiar la hora Timer on/off, simplemente pulse el botón correspondiente del
TEMPORIZADOR y programe la hora de nuevo.
El tiempo programado es tiempo relativo. Es la hora programada basada en el retardo de la
hora actual.
5
38
ADVERTENCIA
Evite que se derramen líquidos sobre el mando a distancia.
No exponga el mando a distancia a la luz directa del sol o a fuentes de calor.
Si el receptor de la señal de infrarrojos de la unidad interior está expuesto a la luz directa del
sol, puede que el aparato de aire acondicionado no funcione correctamente.
E OPERACIÓN MANUAL (SIN CONTROL REMOTO)
Cómo operar su unidad sin el control remoto.
En caso de que su control remoto no funcione, su unidad puede operarse manualmente con el botón
CONTROL MANUAL ubicado en la unidad interior. Tenga en cuenta que la operación manual no es una
solución a largo plazo, y que se recomienda encarecidamente operar la unidad con su control remoto.
G
ANTES DE LA OPERACIÓN MANUAL
La unidad debe apagarse antes de la operación manual.
Para operar su unidad manualmente:
1. Ubique el botón CONTROL MANUAL en el panel lateral derecho de la unidad.
2. Presione el botón MANUAL CONTROL una vez para activar el modo FORCED
AUTO.
3. Presione el botón MANUAL CONTROL nuevamente para activar el modo FORCED
COOLING.
4. Presione el botón MANUAL CONTROL por tercera vez para apagar la unidad.
¡CUIDADO!
El botón manual está destinado a fines de prueba y operación de emergencia solamente. No
use esta función a menos que se pierda el control remoto y sea absolutamente necesario. Para
restablecer el funcionamiento normal, use el control remoto para activar la unidad.
F FUNCIONAMIENTO ÓPTIMO
Para un rendimiento óptimo, proceda como sigue:
Ajuste correctamente la dirección del caudal de aire de manera que no esté dirigido hacia las personas.
Ajuste la temperatura para conseguir al nivel de confort deseado. Evite poner la unidad a temperaturas
extremadamente altas.
Cierre las puertas y ventanas para alcanzar el efecto deseado.
No coloque ningún objeto cerca de la entrada o salida del aire; ya que la eficacia de la unidad podría
verse reducida y llegar a detenerse. Asegúrese de que no haya obstáculos que bloquean el caudal de
aire. El flujo de aire debe circular libremente por la habitación. El flujo de aire también debe alcanzar
libremente el aire acondicionado.
Limpie el filtro de aire con cierta regularidad. Si el filtro está sucio quedará reducido el rendimiento de
calefacción o de refrigeración. Es aconsejable limpiar el filtro cada dos semanas.
No ponga el aire acondicionado en marcha si la aleta horizontal está cerrada.
Manual control button
Manual
control
botón
5
39
G AJUSTE DE LA DIRECCIÓN DEL CAUDAL DE AIRE
Ajuste la dirección del caudal de aire correctamente, de lo contrario puede sentirse
incómodo y tener una temperatura no homogénea.
Ajuste la aleta horizontal con el botón en el mando a distancia.
Ajuste la aleta vertical manualmente.
Ajuste de la dirección del caudal de aire horizontal (izquierda-derecha)
El aire acondicionado ajusta automáticamente la dirección del caudal de aire hor
zontal en función del modo de funcionamiento activado.
Cómo configurar la dirección del caudal de aire horizontal
Esta operación debe realizarse cuando la unidad está funcionando. Mantenga presio-
nado el botón AIR DIRECTION del mando a distancia para desplazar la aleta en la
dirección deseada.
Ajuste la dirección del caudal de aire horizontal según la posición deseada.
Al encender de nuevo el aire acondicionado, el caudal de aire horizontal quedará
automáticamente en la dirección en la que se ha ajustado la aleta pulsando el botón
AIR DIRECTION.
Cómo configurar la dirección del caudal de aire vertical (arriba-abajo)
Ajuste la aleta vertical manualmente por medio de la palanca situada a la izquierda
o a la derecha del brazo de la aleta (depende del modelo). Cuando el aire acondicionado está funcionando
y la aleta vertical se encuentra en posición, mueva la
palanca hacia la posición deseada.
¡CUIDADO!
No toque el ventilador detrás de la aleta vertical.
Cómo desplazar automáticamente la dirección del caudal de aire (arriba-abajo)
Esta operación debe realizarse cuando la unidad está funcionando.
Pulse el botón SWING del mando a distancia.
Para parar la función, pulse de nuevo el botón SWING. Pulse el botón AIR DIRECTION para det ner
la aleta en la posición deseada.
ATENCIÓN
Los botones AIR DIRECTION y SWING quedan desactivados cuando el aire acondicionado no
está funcionando (también si el TIMER ON está programado).
No dejar el aire acondicionado durante largos períodos de tiempo con el caudal dirigido hacia
abajo en los modos de refrigeración o deshumidificación, ya que de esta forma se puede
formar condensación en la superficie de la aleta horizontal (goteo).
No mueva manualmente la aleta horizontal, sino utilice siempre el botón AIR DIRECTION ó
SWING. Si desplaza esta aleta manualmente, puede que no funcione debidamente. Si la aleta
horizontal no funciona correctamente, pare el aire acondicionado una vez y póngalo de nuevo
en marcha.
Si se vuelve a poner en marcha el aire acondicionado inmediatamente después de una parada,
es posible que la aleta horizontal quede inmóvil durante unos 10 segundos.
No ponga el aire acondicionado en marcha si la aleta horizontal está cerrada.
Varilla
deflectora
Palanca
5
40
H FUNCIONAMIENTO DEL AIRE ACONDICIONADO
1
1
1
1
FUNCIONAMIENTO AUTOMÁTICO
Si se programa el aire acondicionado en el modo AUTO (botón del mando a distan-
cia), seleccionará automáticamente los modos de REFRIGERACIÓN, CALEFACCIÓN o
SÓLO VENTILADOR en función de la temperatura programada y de la temperatura
ambiente.
El aire acondicionado controla automáticamente la temperatura ambiente mante-
niéndola próxima a la temperatura programada por el usuario.
Si el modo AUTO no le agrada, puede elegir el modo deseado de forma manual.
SLEEP/FUNCIONAMIENTO ECONÓMICO
Si mantiene oprimido durante segundos el botón SLEEP en el modo de
REFRIGERACIÓN, CALEFACCIÓN o AUTO, el aire acondicionado aumentará
(refrigeración) o bajará (calefacción) automáticamente 1ºC por hora por
un período de 2 horas. Y permanece en el mismo estado durante 5 horas.
Transcurridas 5 horas, la unidad se detiene. La velocidad del ventilador es con-
trolada automáticamente.
FUNCIONAMIENTO DE DESHUMIDIFICACIÓN
El modo de deshumidificación permite seleccionar automáticamente el funcionamiento en modo de
deshumidificación basada en la diferencia entre la temperatura programada y la temperatura ambi-
ente.
Durante la deshumidificación, la temperatura se regula encendiendo y apagando repetidamente
el aparato en modo de refrigeración o sólo ventilador. El control de la velocidad del ventilador es
automático.
En funcionamiento normal de refrigeración, el aire acondicionado también deshumidificará el aire.
G
ATENCIÓN
Cuando el aire acondicionado está en modo de deshumidificación, la temperatura ambiente
bajará. En estas circunstancias, un higrostato medirá una humedad relativa superior. La humedad
absoluta en la habitación bajará en cualquier caso, en función de la cantidad de humedad
producida en la habitación (cocinando, personas presentes, etc.).
5
Pulse el botón Sleep
REFRIGERACIÓN
CALEFACCIÓN
AFFUGTNING
Tempera
tura pro-
gram-
ada
1 hora 1 hora
1 hora 1 hora
Tempera
tura pro-
gram-
ada
Temperatura programada
Tiempo
Temper
atura
ambien
te
41
I MANTENIMIENTO
G
ADVERTENCIA
Antes de proceder a la limpieza, apagar el aire acondicionado y
desconectarlo de la alimentación eléctrica.
Limpieza de la unidad interior y del mando a distancia
G
ATENCIÓN
Utilice un paño seco para limpiar la unidad interior y el mando a
distancia.
Puede utilizar un paño húmedo con agua fría para la unidad interior
en caso de que esté muy sucia.
El panel frontal de la unidad interior se puede quitar y limpiar con
agua. Después, secar con un paño.
No utilice paños tratados químicamente o plumeros para limpiar la
unidad.
No utilice bencina, disolventes, polvo abrasivo o disolventes similares
para la limpieza de la unidad. Estos productos pueden ocasionar
grietas o deformaciones en la superficie de plástico.
Limpieza del filtro de aire
Un filtro de aire sucio reduce la eficacia de refrigeración. Limpie el filtro cada dos
semanas.
1. Levante el panel de la unidad interior hasta que este quede fijo [sonará un clic
de enganche].
2. Tome el filtro de pantalla por la palanca y levántelo con cuidado para extraerlo
de su portador y tire del filtro hacia abajo.
3. Extraiga el filtro de pantalla de la unidad interior.
Limpie el filtro de pantalla cada dos semanas.
Limpie el filtro de pantalla con una aspiradora o con agua.
4. El filtro de carbón activo de color negro no se puede limpiar. Si el filtro se ensu-
cia, simplemente dejará de filtrar olores desagradables. Será momento entonces
de sustituir el filtro por otro nuevo (puede adquirirlo a través de su distribuidor).
Se aconseja cambiar el filtro dos veces por temporada.
5. El filtro HAF 3M de color verde presentará señas claras de suciedad en su superfi-
cie e interior cuando se encuentre sucio. No es posible limpiar el filtro si se encu-
entra sucio; en tal caso, deberá ser sustituido por otro nuevo (puede adquirirlo a
través de su distribuidor). Se aconseja cambiar el filtro dos veces por temporada.
Filtro nuevo
Se recomienda cambiar el filtro
6. Una vez instalados de nuevo el filtro de carbón activo y el filtro HAF 3M en el
soporte de filtros del filtro de cortina, será posible volver a instalar el filtro de
cortina en el acondicionador de aire.
7. Antes de volver a colocar el filtro, compruebe que está perfectamente seco y que
no tiene defectos.
8. Vuelva a colocar el filtro de aire.
9.
Introduzca la parte superior del filtro en la unidad, procurando que los bordes izqui-
erdo y derecho queden perfectamente alineados y coloque el filtro en posición.
5
Producto
de
limpieza
No
Disolvente
f
Filtrar pestañas
Retire el filtro del ambientador de la
parte posterior del filtro más grande
(algunas unidades)
42
Mantenimiento
Si se va a dejar la unidad inactiva durante un largo período de tiempo, proceda como sigue:
1. Deje el ventilador en funcionamiento durante aproximadamente 6 horas para que la unidad se seque
por la parte interior.
2. Apague el aire acondicionado y desconéctelo de la red eléctrica. Si utiliza el modelo S(C)5148, inter-
rumpa el suministro eléctrico. Saque las pilas del mando a distancia.
3. La unidad exterior debe ser sometida periódicamente a mantenimiento y limpieza. Estos trabajos que-
dan reservados a un técnico cualificado.
Controles a realizar antes de la puesta en servicio
Comprobar que los cables no están dañados o desconectados.
Comprobar que el filtro está instalado.
Comprobar que la salida y entrada de aire no están obstruidas después de un largo período de inacti-
vidad.
ATENCIÓN
Al extraer el filtro, no toque las partes metálicas de la unidad. Los bordes afilados de los
componentes metálicos pueden causar heridas.
No limpie el interior del aire acondicionado con agua, ya que puede afectar el aislamiento
provocando un choque eléctrico.
Previa la limpieza, compruebe que el interruptor de encendido y el interruptor automático
están apagados.
J INFORMACIÓN SOBRE EL FUNCIONAMIENTO
Durante el funcionamiento normal del aparato pueden presentarse las siguientes situaciones:
1. Protección del aire acondicionado.
Protección del compresor
Una vez se ha parado el compresor, tardará 3 minutos para volver a encenderse.
Aire anti-frío
La unidad está protegida de manera que no expulse aire frío en el modo CALEFACCIÓN cuando el inter-
cambiador de calor se encuentra en una de las tres situaciones siguientes y la temperatura programada
no ha sido alcanzada.
A) Cuando la calefacción acaba de activarse.
B) Descongelación.
C) Calefacción a baja temperatura.
Descongelación
El ventilador interior y exterior no funciona durante la descongelación.
Puede formarse escarcha en la unidad exterior durante el ciclo de calefacción, cuando la temperatura
exterior es baja y la humedad relativa es alta, esto ocasiona una reducción del rendimiento calefactor
del aire acondicionado.
En estas condiciones, el aire acondicionado deja de funcionar en modo de calefacción y comienza
automáticamente a descongelar.
5
43
El tiempo de descongelación varía de 4 a 10 minutos según la temperatura exterior y la cantidad de
escarcha acumulada en la unidad exterior.
2. Salida de condensado blanco de la unidad interior.
En el modo de REFRIGERACIÓN, es posible que salga condensado blanco debido a la diferencia de tem-
peratura entre el aire de entrada y de salida en un local con una humedad ambiente elevada.
El vapor blanco se genera debido a la humedad que se genera en el proceso de descongelación y a
partir del momento que la unidad vuelve al modo de CALEFACCIÓN tras descongelarse.
3. El aire acondicionado emite un ligero ruido.
Durante el funcionamiento del compresor o en el momento de parada es posible que se produzca un
silbido. Se trata del sonido del refrigerante que circula o se detiene.
Durante el funcionamiento del compresor o en el momento de parada es posible que se produzca un
chirrido causado por la expansión térmica y por la contracción de las partes de plástico dentro de la
unidad, al variar la temperatura.
Cuando la aleta horizontal vuelve a su posición original después de la nueva puesta en marcha, justo
después de una parada, también se produce un sonido.
4. Expulsión de polvo de la unidad interior.
Esto es normal si el aire acondicionado no ha sido utilizado durante un largo período de tiempo o
cuando utilice la unidad por primera vez.
5. La unidad interior emana un olor peculiar.
La unidad interior emana los olores procedentes del material de construcción, de los muebles o del
humo.
6. El aire acondicionado pasa de los modos de sólo VENTILACIÓN al modo de REFRIGERACIÓN o de
CALEFACCIÓN
Cuando la temperatura interior alcanza los valores de temperatura programados del aire acondi-
cionado, el compresor se parará automáticamente y el aire acondicionado pasará al modo de sólo
VENTILACIÓN. El compresor vuelve a arrancar cuando la temperatura interior sube en el modo de
REFRIGERACIÓN o baja en el modo de CALEFACCIÓN hasta el valor programado.
7. Durante la refrigeración en un ambiente con humedad relativamente alta, es posible que se genere
agua en la superficie de la unidad interior (humedad relativa superior al 80%). En tal caso, sitúe la aleta
horizontal en su posición máxima de apertura y seleccione la velocidad HIGH del ventilador.
8. Modo de calefacción
El aire acondicionado absorbe calor de la unidad exterior y lo libera a través de la unidad interior
durante el funcionamiento en modo de calefacción. Cuando la temperatura exterior desciende, el calor
que absorbe el aire acondicionado baja conformemente.
9. Función de rearranque automático.
Una interrupción de corriente durante el funcionamiento causa la parada inmediata del aire acondicio-
nado. El aire acondicionado está equipado con una función de rearranque automático. Cuando la cor-
riente de alimentación queda restablecida, la unidad vuelve a arrancar automáticamente conservando
todos los valores programados anteriormente en la función de memoria.
5
44
10. Detección de fugas de refrigerante
Este equipo de aire acondicionado incluye un sistema de detección de fugas de refrigerante. Cuando
la unidad exterior detecta la escasez de refrigerante, el equipo de aire acondicionado detiene su fun-
cionamiento y la unidad interior muestra la alarma EC en pantalla. Si su unidad emite esta alarma, no
reinicie el equipo de aire acondicionado y póngase en contacto con su proveedor.
5
45
K LOCALIZACIÓN DE AVERÍAS
Problemas y Soluciones
G
FALLO
Pare el aire acondicionado inmediatamente si se presenta uno de los siguientes fallos. Desconecte
la unidad de la red eléctrica y póngase en contacto con su distribuidor.
El fusible se funde o el interruptor automático salta a menudo.
Ha entrado agua o algún objeto en el interior de la unidad.
El mando a distancia no funciona o no funciona correctamente.
Otras situaciones anormales.
Problema Posibles causas
La unidad no se enciende cuan-
do puso el botón ENCENDIDO/
APAGADO
La unidad tiene una característica de protección de 3 minutos que impide
que la unidad se sobrecargue. La unidad no puede reiniciarse en los tres
minutos después de haberse apagado.
La unidad cambia del
modo FRÍO/CALOR al modo
VENTILADOR
La unidad puede cambiar su configuración para impedir que se forme hielo
en la unidad. Una vez que suba la temperatura, la unidad empezará a funci-
onar de nuevo en el modo seleccionado previamente.
Se ha alcanzado la temperatura fijada, en cuyo punto la unidad apaga el
compresor. La unidad seguirá funcionando cuando la temperatura fluctúe
de nuevo.
La unidad interna emite atomi-
zación blanca
En regiones húmedas, una gran diferencia de temperatura entre el aire de la
sala y el acondicionado puede provocar esa atomización.
Tanto la unidad interior como la
exterior emiten esa atomización
blanca
Cuando la unidad se reinicia en modo CALOR tras la descongelación, puede
emitir atomización blanca por la humedad generada en el proceso de des-
congelación.
La unidad interna hace ruido
Un sonido de aire puede darse cuando la rejilla vuelve a su posición.
Puede que se oiga un crujido tras utilizar la unidad en modo CALOR debido
a la expansión y contracción de las partes plásticas de la unidad.
Tanto la unidad interior como la
exterior hacen ruido
Un ligero sonido de fondo durante el uso: Es normal y se debe a que el gas
refrigerante fluye entre las unidades interna y externa.
Un ligero sonido durante el arranque del sistema, acaba de dejar de funci-
onar o se está descongelando: Este ruido es normal y se debe a que el gas
refrigerante se detiene o cambia de dirección.
Sonido de crujidos: La expansión y contracción normal de partes de plástico
y metal causadas por los cambios de temperatura durante el uso puede pro-
vocar sonido de crujidos.
La unidad externa hace ruido La unidad hará sonidos distintos basándose en el modo de uso actual.
Se emite polvo desde la unidad
interna o externa
La unidad puede acumular polvo durante largos periodos sin uso, que se
expulsará cuando se encienda. Esto puede mitigarse cubriendo la unidad
durante largos periodos de inactividad.
La unidad emite mal olor
La unidad puede absorber olores del entorno (muebles, cocina, tabaco, etc.),
que se emitirán durante el uso.
Los filtros de la unidad se han ensuciado y deben limpiarse.
El ventilador de la unidad exte-
rior no funciona
Durante el uso, la velocidad del ventilador se controla para optimizar el uso
del producto.
Uso errático, impredecible o la
unidad no responde
Las interferencias de los repetidores y pueden hacer que la unidad no funci-
one bien. En este caso, intente lo siguiente:
• Desconecte la unidad de la corriente y vuelva a conectarla.
Pulse el botón ENCENDIDO/APAGADO en el control remoto para reiniciar
el uso.
5
46
G
¡NOTA!
Si le problème persiste, contactez votre revendeur local ou le service client le plus proche de chez
vous. Fournissez une description détaillée des dysfonctionnements liés à l’appareil ainsi que le
numéro de modèle.
Problema Posibles causas Solución
Bajo rendimiento
de refrigeración
La configuración de la temperatura debe
ser superior a la temperatura ambiente de
la sala
Baje la configuración de temperatura
El intercambiador de calor en la unidad
interna o externa está sucio
Limpie el intercambiador de calor afec-
tado
El filtro de aire está sucio
Quite el filtro y límpielo según las instruc-
ciones
La entrada o salida de aire de cualquier
unidad está bloqueado
Apague la unidad, retire la obstrucción y
vuelva a encenderla
Las puertas y ventanas están abiertas
Asegúrese de que todas las puertas y
ventanas están cerradas mientras usa la
unidad
La luz del sol genera un calor excesivo
Cierre ventanas y cortinas durante perio-
dos de mucho calor o mucha luz solar
Demasiadas fuentes de calor en la sala
(personas, ordenadores, electrónica, etc.)
Reduzca la cantidad de fuentes de calor
Bajo refrigerante debido a fuga o uso pro-
longado
Compruebe si hay fugas, reselle si es nece-
sario y rellene el refrigerante
La función SILENCIO está activada (función
opcional)
La función SILENCIO puede bajar el ren-
dimiento del producto reduciendo la
frecuencia de uso. Apague la función
SILENCIO.
La unidad no funciona
Fallo de potencia Espere a que vuelva la corriente
La corriente se ha ido Encienda la corriente
El fusible se ha quemado Reemplace el fusible
Las pilas del control remoto están gastadas Reemplace las pilas
La protección de 3 minutos de la unidad
se ha activado
Espere tres minutos tras reiniciar la unidad
El temporizador se ha activado Apagar el temporizador
La unidad se inicia y se
para frecuentemente
Hay demasiado o demasiado poco refrige-
rante en el sistema
Compruebe si hay fugas y recargue el sis-
tema con refrigerante.
Gas no comprimido o humedad ha acce-
dido al sistema.
Vacíe y recargue el sistema con refrige-
rante
El compresor está roto Reemplace el compresor
El voltaje es demasiado alto o demasiado
bajo
Instale un manóstato para regular el vol-
taje
Bajo rendimiento de
calefacción
La temperatura exterior es extremada-
mente baja
Use un dispositivo de calefacción auxiliar
El aire frío entra a través de puertas y
ventanas
Asegúrese de que todas las puertas y
ventanas están cerradas mientras usa la
unidad
Bajo refrigerante debido a fuga o uso pro-
longado
Compruebe si hay fugas, reselle si es nece-
sario y rellene el refrigerante
Los indicadores siguen
parpadeando
La unidad debe pararse o seguir trabajando de forma segura. Si el piloto sigue parpa-
deando o aparece un código de error, espere unos 10 minutos. El problema se soluci-
onará por sí solo.
Si no, desconecte la unidad de la corriente y vuelva a conectarla. Encienda la unidad.
Si el problema persiste, desconecte la corriente y póngase en contacto con su centro
de atención al cliente más cercano.
Aparece un código de
error en la pantalla de
la unidad interna:
• E0, E1, E2…
• P1, P2, P3…
• F1, F2, F3…
5
47
5
Si el problema persiste, póngase en contacto con el distribuidor. Describa detalladamente el problema e
indique el modelo de la unidad.
G
¡ATENCIÓN!
La reparación queda reservada a un técnico cualificado.
L GARANTÍA
El aire acondicionado tiene una garantía de 48 meses para el compresor y 24 meses de otros componentes
a partir de la fecha de adquisición. A este efecto rigen las siguientes condiciones:
1. Rechazamos expresamente toda responsabilidad por daños, daños indirectos incluidos.
2. La reparación o el reemplazo de componentes no supone una extensión del período de garantía.
3. La garantía no será válida cuando se hayan realizado modificaciones, se hayan usado componentes no
originales o terceros hayan efectuado reparaciones en el aparato.
4. Componentes sujetos a desgaste normal, tales como el filtro, quedan excluidos de la garantía.
5. La garantía se aplica únicamente si se presenta la factura de compra, fechada y sin modificación alguna.
6. La garantía no cubre los daños causados por manipulaciones contrarias a las descritas en las instruccio-
nes de uso o por negligencia.
7. Los gastos de envío y el riesgo que conlleva el envío del aire acondicionado o partes del mismo, correrán
siempre por cuenta del comprador.
8. Los daños, provocados por no usar los filtros adecuados, no están cubiertos por la garantía.
9. Pérdida de refrigerante y/o rotura por causa de una (des)conexión incorrecta de las unidades y/o una
(des)conexión de las unidades por una persona no cualificada no entra en la garantía de este aparato.
Daños a las unidades montadas, conectadas y/o desconectadas sin seguir las normas y legislaciones y/o
no seguir las instrucciones de este manual tampoco entran en garantía.
Consulte a su proveedor para reparaciones si estas instrucciones no le indican la solución. Asegúrense que
en el caso de tener que desconectar el aparato, esto siempre se haga por una persona cualificada y autori-
zada y según las normas y legislaciones de su país.
48
M ESPECIFICACIONES TÉCNICAS
Modelo
S 4225
S 5225
S 5225 B
S-JA 2519
S 4232
S 5232
S 4248
S 5248
SC 4225
SC 5225
SCJA-2519
SC 4232
SC 5232
SC 4248
SC 5248
SCJA-4819
Tipo de aire acondicionado
Aire acondicionado mural Aire acondicionado mural Aire acondicionado mural Aire acondicionado mural Aire acondicionado mural Aire acondicionado mural
Capacidad de refrigeración nom.
(min - máx) *
W
2600 (1030 - 3190) 3500 (820 - 4160) 5300 (1730 - 6980) 2500 (1590 - 3000)
3200 (2110 - 4000) 4600 (1820 - 6120)
Clase EE *
A++ A++ A++ A++
A++ A++
SEER *
7,1 7,0 6,4 6,5
6,2 6,7
Capacidad de calefacción nom. (min
- max) *
W
2500 ( 880 - 3660) 2700 ( 850 - 4780) 3900 (1060 - 6980) 2400 (960 - 4890)
2400 (1280 - 4900) 3800 (1380 - 6740)
Rendimiento calor
A+ A+ A+ A+
A+ A+
SCOP *
4,0 4,1 4,0 4,0
4,0 4,0
Capacidad deshumdificación ** / ***
L / 24 h
24,0 28,8 43,2 26,4
31,2 36,0
Consumo eléctrico refrigeración
kW
0,70 1,09 1,54 0,71
1,19 1,40
Consumo eléctrico calefacción
kW
0,67 1,05 1,46 0,84
1,23 1,90
Consumo anual de energía refrigeración
/ calefacción
kWh
128 / 875 175 / 922 290 / 1365 137 / 836
187 / 834 245 / 1326
Potencia consumida
V / Hz / Ph
220-240~ / 50 / 1 220-240~ / 50 / 1 220-240~ / 50 / 1 220-240~ / 50 / 1
220-240~ / 50 / 1 220-240~ / 50 / 1
Corriente máxima
A
9,5 10,0 11,5 10,0
10,0 13,0
Caudal de aire **
m3/h
416/309/230 539/478/294 750/505/420
545/435/368
545/435/368 770/610/410
Para habitaciones de hasta**
m3
60-85 80-100 140-185 60-85 80-100 125-145
Regiones adecuadas
W/A/C W/A/C W/A/C W/A/C W/A/C W/A/C
Tipo de compresor
Rotary Rotary Rotary Rotary Rotary Rotary
Velocidades del ventilador
4 4 4 3
3 3
Termostato
oC
17 - 30 17 - 30 17 - 30 17 - 30
17 - 30 17 - 30
Mandos manual / mecánico / electrónico
Mando a distancia elec-
trónico
Mando a distancia elec-
trónico
Mando a distancia elec-
trónico
Mando a distancia elec-
trónico
Mando a distancia elec-
trónico
Mando a distancia elec-
trónico
Mando a distancia Sí / No
S S S S S S
Filtro de aire tipo(s)
Malla, Carbono activo,
3M HAF
Malla, Carbono activo,
3M HAF
Malla, Carbono activo,
3M HAF
Malla, Carbono activo,
3M HAF
Malla, Carbono activo,
3M HAF
Malla, Carbono activo,
3M HAF
Tipo de refrigerante / contenido
R / g
R32 / 700 R32 / 800 R32 / 1250 R32 / 800 R32 / 800 R32 / 1190
Refrigerante GWP
675 675 675 675
675 675
CO
2
equivalente tonnes
0,473 0,540 0,844 0,540
0,540 0,803
Dimensiones unidad interior (an x al x p)
mm
722x187x290 802x189x297 965x215x319 805x194x285
805x194x285 957x213x302
Dimensiones unidad exterior (an x al x p)
mm
770x300x555 770x300x555 800x333x554 770x300x555
770x300x555 800x333x554
Peso neto unidad interior
kg
7,3 8,2 10,8 7,8
7,8 10,3
Peso neto unidad exterior
kg
27,2 27,0 37,0 25,7
25,7 34,6
Peso bruto unidad interior
kg
9,7 10,7 14,1 10,4
10,4 13,8
Peso bruto unidad exterior
kg
29,7 29,4 39,9 31,1
31,1 40,2
Nivel sonoro unidad interior ****
dB(A)
54 56 58 53
53 55
Nivel sonoro unidad exterior ****
dB(A)
59 60 64 62
62 62
Unidad interior de presión sonora
(bajo) ****
dB
20 21 21 25
25 29
Clase de protección unidad interior
IP
IPX0 IPX0 IPX0 IPX0
IPX0 IPX0
Clase de protección unidad exterior
IP
IPX4 IPX4 IPX4 IPX4
IPX4 IPX4
* EN 14511/EN 14825
** A título indicativo
*** Deshumidificación con 32°C, HR del 80%
**** EN 12108-2008 No deseche ningún dispositivo electrónico junto a los residuos habituales.
5
49
Utilice los contenedores e instalaciones adecuadas para la recogida de este tipo de materiales.
Consulte la normativa vigente y contacte con la administracion correspondiente para obtener
informacion acerca de las instalaciones de recogida disponibles. Si algun dispositivo electronico
se desecha en un vertedero o basurero no adecuado, alguna sustancia peligrosa podria filtrarse
en la tierra y aparecer posteriormente en la cadena de alimentacion, pudiendo danar su estado
de salud. Al sustituir un electrodomestico o dispositivo electronico por un modelo nuevo, el
establecimiento minorista esta obligado por ley a recoger y desechar adecuadamente dicho
dispositivo sin carga economica alguna para el cliente. No tire las baterías al fuego, podrían
explotar o derramar líquidos peligrosos. Si sustituye o destruye el mando a distancia, saque las
baterías y disponga de ellas según la normativa vigente ya que son dañinas para el medio ambi-
ente.
Información medioambiental: Este equipo contiene gases fluorados de invernadero cubiertos por el
Protocolo de Kioto. Los trabajos de mantenimiento y de desmontaje quedan reservados a personal con
formación al respecto.
Este equipo contiene el refrigerante R32 en la cantidad indicada en la tabla arriba expuesta. No dejar emi-
tir R32 en la atmósfera. R32 es un gas fluorado de invernadero con un potencial de calentamiento global
(GWP) = 675.
Internet:
Para una mayor comodidad se puede bajar la última versión del manual de instrucciones de uso y/o manual
de servicios en www.qlima.com.
5
50
3
1. LISEZ LES INSTRUCTIONS AVANT LA PREMIÈRE UTILISATION.
2. EN CAS DE DOUTE, DEMANDEZ CONSEIL À VOTRE DISTRIBUTEUR.
Madame, Monsieur,
Toutes nos félicitations pour l’achat de votre climatiseur Qlima. Vous venez d’acquérir un
produit de qualité dont vous pourrez profiter pendant de longues années, à condition de
l’utiliser de façon adéquate.
Pour assurer une durée de vie optimale à votre climatiseur, nous vous invitons à lire
d’abord ce manuel d’installation.
Vous bénéficiez de 2 ans de garantie sur le matériel et les défaults de fabrication et 4 ans
de garantie sur le compresseur de l’appareil.
Nous vous souhaitons de bien profiter de votre climatiseur.
Cordiales salutations,
PVG Holding b.v.
Service Clients
51
3
SOMMAIRE
A. CONSIGNES DE SÉCURITÉ
B. DÉSIGNATION DES PIÈCES
C. TEMPÉRATURE DE FONCTIONNEMENT
D. UTILISATION AVEC TÉLÉCOMMANDE
E. FONCTIONNEMENT MANUEL (SANS TÉLÉCOMMANDE)
F. UTILISATION OPTIMALE
G. RÉGLER L’ORIENTATION DU FLUX D’AIR
H. FONCTIONNEMENT DU CLIMATISEUR
I. ENTRETIEN
J. CONSEILS D’UTILISATION
K. RÉSOUDRE LES PANNES
L. CONDITIONS DE GARANTIE
M. SPECIFICATIONS TECHNIQUES
LISEZ CE MANUEL
Ce manuel vous propose de nombreux conseils pour utiliser et entretenir cor-
rectement votre climatiseur. Vous trouverez les réponses aux problèmes les plus
fréquents dans le chapitre ‘Résoudre les pannes’. En cas de problème, consultez
d’abord le chapitre J “ Résoudre les pannes ”. Il vous évitera d’appeler inutilement
le service de réparation.
52
A
CONSIGNES DE SECURITE
Installez cet appareil uniquement s’il est conforme à la
législation, aux ordonnances et aux normes locales et natio-
nales. Ce produit a été conçu pour être utilisé comme clima-
tiseur dans des maisons résidentielles, et il doit être utilisé
uniquement dans des endroits secs, dans des conditions
domestiques normales et en intérieur, dans un séjour, une
cuisine ou un garage. Cet appareil est conçu uniquement
pour une prise de courant avec mise à la terre, avec une ten-
sion de raccordement de 220-240 V~ / 50 Hz. Les modèles
4.8kW doivent être branchés directement sur le réseau élec-
trique par le câble d’alimentation.
IMPORTANT
L’appareil DOIT être branché sur une prise reliée à la
terre. Si la prise électrique n’est pas reliée à la terre, ne
branchez pas l’appareil. La prise doit toujours rester
facile d’accès une fois que l’appareil est branché. Lisez
et respectez soigneusement ces instructions.
Ce climatiseur contient un réfrigérant et peut être
classé comme équipement pressurisé. A ce titre, il est
obligatoire de faire installer et entretenir son appareil
par un professionnel agréé. Le climatiseur doit être
inspecté et entretenu par un professionnel agréé
une fois par an. La garantie ne couvre pas les dégâts
causés par une utilisation ne respectant pas le mode
d’emploi, ou suite à des négligences.
Avant de brancher l’appareil, vérifiez si:
La tension de raccordement est bien la même que celle
indiquée sur la plaque signalétique de l’appa-reil,
La prise et l’approvisionnement en courant sont bien
adaptés à l’appareil,
La fiche électrique rentre bien dans la prise de contact,
L’appareil est bien posé sur une surface plane et stable.
3
53
3
Si vous avez des doutes sur la compatibilité de l’appareil,
faites vérifier l’installation électrique par un professionnel.
Cet appareil est fabriqué selon les normes de sécurité CE.
Soyez cependant prudent lors de son utilisation, comme
avec tout autre appareil électrique.
Ne bouchez jamais l’entrée et la sortie d’air.
Ne mettez jamais l’appareil en contact avec des produits
chimiques.
Ne vaporisez jamais d’eau sur l’appareil. Ne le trempez
jamais dans l’eau. Mettre l’unité hors tension et débran-
cher l’alimentation électrique si de l’eau pénètre dans
l’unité intérieure.
N’enfilez pas les doigts ou un objet dans les ouvertures de
l’appareil.
Ne branchez jamais l’appareil sur une rallonge électrique.
Si vous ne disposez pas de prise de courant avec mise à la
terre, faites assurer l’installation par un électricien agréé.
Toute réparation et/ou maintenance doit être exclusive-
ment effectuée par un technicien agréé ou votre distribu-
teur. Pour l’utilisation et l’entretien de l’appareil, prière
de suivre les instructions indiquées dans le manuel.
Toujours couper l’alimentation lorsque l’appareil est inu-
tilisé.
Pour allumer ou éteindre l’appareil, utilisez le bouton
marche/arrêt sur le climatiseur ou sur la télécommande.
Ne tirez pas sur la prise électrique pour l’éteindre.
N’ouvrez pas le climatiseur lorsqu’il est en marche. Coupez
l’alimentation électrique avant d’ouvrir l’appareil.
Débranchez toujours la fiche de la prise, ou coupez l’ali-
mentation électrique lors du nettoyage du climatiseur ou
lors de son entretien.
Ne placez jamais de brûleur à gaz, fours, cuisinières sur la
trajectoire du flux d’air.
Si vous avez les mains mouillées, n’appuyez pas sur les
boutons de l’appareil et ne le manipulez pas.
54
Notez que l’unité extérieure émet un bruit de fonctionne-
ment. L’utilisateur a la responsabilité de vérifier si l’appa-
reil est en parfaite conformité avec la législation locale.
Cet appareil n’est pas conçu pour des utilisateurs (y com-
pris les enfants) qui présentent un handicap moteur,
mental ou sensoriel, ou qui manquent d’expérience et de
connaissances, sauf s’ils sont surveillés par une personne
responsable de leur sécurité.
Surveillez les enfants présents, ils ne doivent en aucun cas
jouer avec l’appareil.
Il est recommandé de ne pas rester dans la trajectoire du
flux d’air.
Ne buvez jamais l’eau de condensation du climatiseur.
N’apporter aucune modification à l’appareil.
Si le câble d’alimentation est endommagé, il doit être rem-
placé par le fabricant, son service après vente ou des per-
sonnes de qualification similaire afin d’éviter un danger.
Cet appareil peut être utilisé par des enfants de plus de
8 ans et des personnes aux capacités physiques, senso-
rielles ou mentales réduites, ou manquant d’expérience
et de connaissances ; il faut pour cela leur avoir fourni un
encadrement ou des consignes à propos de l’utilisation
sécurisée de l’appareil et leur avoir expliqué clairement
les dangers potentiels. Ne pas laisser les enfants jouer
avec l’appareil. Les enfants ne doivent pas être chargés
du nettoyage et de l’entretien de l’appareil sauf s’ils sont
encadrés.
ATTENTION!
N’utilisez jamais l’appareil si le cordon
électrique, la fiche électrique, le
caisson ou le tableau de contrôle sont
endommagés.
Le non respect des instructions peut
mener à une annulation de la garantie
de l’appareil.
3
55
3
Remarque concernant les Gaz Fluorés
1. Cet appareil de climatisation contient des gaz fluorés. Pour plus d’informations sur le type de gaz et
la quantité, veuillez vous reporter à l’étiquette correspondante sur l’appareil.
2. L’installation, le service, l’entretien et la réparation de cet appareil doivent être effectués par un
technicien certifié.
3. La désinstallation du produit et le recyclage doivent être effectués par un technicien certifié.
4. Si le système possède un système de détection des fuites, il doit vérifier qu’il n’y a pas de fuites au
moins tous les 12 mois.
5. Lorsque l’unité est vérifiée contre les fuites, la conservation des enregistrements de tous les contrôles
est fortement recommandée.
6. Cet appareil de climatisation est une unité hermétique qui contient des gaz fluorés.
B DESIGNATION DES PIECES
UNITÉ INTÉRIEURE Unité intérieure
Filtre à air (derrière le panneau frontal)
Panneau frontal
Sortie d’air
Écran
Télécommande (pour plus de détails
sur l’utilisation, voir chapitre D)
UNITÉ EXTÉRIEURE Unité extérieure
Liaisons frigorifiques, tuyau d’évacuation
(Liaisons frigorifiques non fournis pour
modèles S)
Entrée d’air (latérale et arrière)
Sortie d’air
5
6
7
8
1
22
3
4
5
6
2
1
4
3
G
NOTE!
Toutes les images de ce manuel et sur l’emballage ne sont pas contractuelles, elles ont
uniquement une fonction d’illustration. Votre climatiseur peut être différent de celui des
illustrations.
56
INDICATEURS DE FONCTIONS SUR L’ÉCRAN DE L’UNITÉ INTÉRIEURE
Page 6
Unit Specifications and Features
1
Unit
Specifications
and Features
NOTE:
A guide on using the infrared remote is not included
in this literature package.
Unit Parts
Power Cable (Some Units)
Remote Control
Remote Control
Holder (Some Units)
Louver
Front Panel
Air Filter
(pull out)
Display window
“ ” for 3 seconds when:
• TIMER ON is set
• FRESH, SWING, TURBO, or SILENCE features are turned on
“ ” for 3 seconds when:
• TIMER OFF is set
• FRESH, SWING, TURBO, or SILENCE features are turned off
“ ” when defrosting(cooling & heating units)
“ ” when anti-cold air feature is turned on(cooling & heating units)
“ ” when unit is self-cleaning(some units)
“ ” when freeze protection is turned on(some units)
“ ” when Wireless Control feature is activated(some units)
Display Code
Meanings
In Fan and Dry mode, the unit will display the room temperature.
In other modes, the unit will display your temperature setting.
,
,
“ ”
When ECO function(some units) is activated, the
illuminates gradually one by one as --
-- --set temperature-- ...... in one second interval.
pendant 3 secondes quand:
• TIMER ON est réglé
• Les fonctions FRESH, SWING, TURBO ou SILENCE sont activées
Page 6
Unit Specifications and Features
1
Unit
Specifications
and Features
NOTE:
A guide on using the infrared remote is not included
in this literature package.
Unit Parts
Power Cable (Some Units)
Remote Control
Remote Control
Holder (Some Units)
Louver
Front Panel
Air Filter
(pull out)
Display window
“ ” for 3 seconds when:
• TIMER ON is set
• FRESH, SWING, TURBO, or SILENCE features are turned on
“ ” for 3 seconds when:
• TIMER OFF is set
• FRESH, SWING, TURBO, or SILENCE features are turned off
“ ” when defrosting(cooling & heating units)
“ ” when anti-cold air feature is turned on(cooling & heating units)
“ ” when unit is self-cleaning(some units)
“ ” when freeze protection is turned on(some units)
“ ” when Wireless Control feature is activated(some units)
Display Code
Meanings
In Fan and Dry mode, the unit will display the room temperature.
In other modes, the unit will display your temperature setting.
,
,
“ ”
When ECO function(some units) is activated, the
illuminates gradually one by one as --
-- --set temperature-- ...... in one second interval.
pendant 3 secondes quand:
• TIMER OFF est réglé
• Les fonctions FRESH, SWING, TURBO ou SILENCE sont désactivées
Page 6
Unit Specifications and Features
1
Unit
Specifications
and Features
NOTE:
A guide on using the infrared remote is not included
in this literature package.
Unit Parts
Power Cable (Some Units)
Remote Control
Remote Control
Holder (Some Units)
Louver
Front Panel
Air Filter
(pull out)
Display window
“ ” for 3 seconds when:
• TIMER ON is set
• FRESH, SWING, TURBO, or SILENCE features are turned on
“ ” for 3 seconds when:
• TIMER OFF is set
• FRESH, SWING, TURBO, or SILENCE features are turned off
“ ” when defrosting(cooling & heating units)
“ ” when anti-cold air feature is turned on(cooling & heating units)
“ ” when unit is self-cleaning(some units)
“ ” when freeze protection is turned on(some units)
“ ” when Wireless Control feature is activated(some units)
Display Code
Meanings
In Fan and Dry mode, the unit will display the room temperature.
In other modes, the unit will display your temperature setting.
,
,
“ ”
When ECO function(some units) is activated, the
illuminates gradually one by one as --
-- --set temperature-- ...... in one second interval.
lors de la décongélation (unités de refroidissement et de chauffage)
Page 6
Unit Specifications and Features
1
Unit
Specifications
and Features
NOTE:
A guide on using the infrared remote is not included
in this literature package.
Unit Parts
Power Cable (Some Units)
Remote Control
Remote Control
Holder (Some Units)
Louver
Front Panel
Air Filter
(pull out)
Display window
“ ” for 3 seconds when:
• TIMER ON is set
• FRESH, SWING, TURBO, or SILENCE features are turned on
“ ” for 3 seconds when:
• TIMER OFF is set
• FRESH, SWING, TURBO, or SILENCE features are turned off
“ ” when defrosting(cooling & heating units)
“ ” when anti-cold air feature is turned on(cooling & heating units)
“ ” when unit is self-cleaning(some units)
“ ” when freeze protection is turned on(some units)
“ ” when Wireless Control feature is activated(some units)
Display Code
Meanings
In Fan and Dry mode, the unit will display the room temperature.
In other modes, the unit will display your temperature setting.
,
,
“ ”
When ECO function(some units) is activated, the
illuminates gradually one by one as --
-- --set temperature-- ...... in one second interval.
lorsque la fonction anti-air froid est activée (unités de refroidissement et de chauffage)
Page 6
Unit Specifications and Features
1
Unit
Specifications
and Features
NOTE:
A guide on using the infrared remote is not included
in this literature package.
Unit Parts
Power Cable (Some Units)
Remote Control
Remote Control
Holder (Some Units)
Louver
Front Panel
Air Filter
(pull out)
Display window
“ ” for 3 seconds when:
• TIMER ON is set
• FRESH, SWING, TURBO, or SILENCE features are turned on
“ ” for 3 seconds when:
• TIMER OFF is set
• FRESH, SWING, TURBO, or SILENCE features are turned off
“ ” when defrosting(cooling & heating units)
“ ” when anti-cold air feature is turned on(cooling & heating units)
“ ” when unit is self-cleaning(some units)
“ ” when freeze protection is turned on(some units)
“ ” when Wireless Control feature is activated(some units)
Display Code
Meanings
In Fan and Dry mode, the unit will display the room temperature.
In other modes, the unit will display your temperature setting.
,
,
“ ”
When ECO function(some units) is activated, the
illuminates gradually one by one as --
-- --set temperature-- ...... in one second interval.
lorsque l’unité est autonettoyante (certaines unités)
Page 6
Unit Specifications and Features
1
Unit
Specifications
and Features
NOTE:
A guide on using the infrared remote is not included
in this literature package.
Unit Parts
Power Cable (Some Units)
Remote Control
Remote Control
Holder (Some Units)
Louver
Front Panel
Air Filter
(pull out)
Display window
“ ” for 3 seconds when:
• TIMER ON is set
• FRESH, SWING, TURBO, or SILENCE features are turned on
“ ” for 3 seconds when:
• TIMER OFF is set
• FRESH, SWING, TURBO, or SILENCE features are turned off
“ ” when defrosting(cooling & heating units)
“ ” when anti-cold air feature is turned on(cooling & heating units)
“ ” when unit is self-cleaning(some units)
“ ” when freeze protection is turned on(some units)
“ ” when Wireless Control feature is activated(some units)
Display Code
Meanings
In Fan and Dry mode, the unit will display the room temperature.
In other modes, the unit will display your temperature setting.
,
,
“ ”
When ECO function(some units) is activated, the
illuminates gradually one by one as --
-- --set temperature-- ...... in one second interval.
lorsque la protection contre le gel est activée (certaines unités)
Page 6
Unit Specifications and Features
1
Unit
Specifications
and Features
NOTE:
A guide on using the infrared remote is not included
in this literature package.
Unit Parts
Power Cable (Some Units)
Remote Control
Remote Control
Holder (Some Units)
Louver
Front Panel
Air Filter
(pull out)
Display window
“ ” for 3 seconds when:
• TIMER ON is set
• FRESH, SWING, TURBO, or SILENCE features are turned on
“ ” for 3 seconds when:
• TIMER OFF is set
• FRESH, SWING, TURBO, or SILENCE features are turned off
“ ” when defrosting(cooling & heating units)
“ ” when anti-cold air feature is turned on(cooling & heating units)
“ ” when unit is self-cleaning(some units)
“ ” when freeze protection is turned on(some units)
“ ” when Wireless Control feature is activated(some units)
Display Code
Meanings
In Fan and Dry mode, the unit will display the room temperature.
In other modes, the unit will display your temperature setting.
,
,
“ ”
When ECO function(some units) is activated, the
illuminates gradually one by one as --
-- --set temperature-- ...... in one second interval.
lorsque la fonction de contrôle sans fil est activée (certaines unités)
Page 6
Unit Specifications and Features
1
Unit
Specifications
and Features
NOTE:
A guide on using the infrared remote is not included
in this literature package.
Unit Parts
Power Cable (Some Units)
Remote Control
Remote Control
Holder (Some Units)
Louver
Front Panel
Air Filter
(pull out)
Display window
“ ” for 3 seconds when:
• TIMER ON is set
• FRESH, SWING, TURBO, or SILENCE features are turned on
“ ” for 3 seconds when:
• TIMER OFF is set
• FRESH, SWING, TURBO, or SILENCE features are turned off
“ ” when defrosting(cooling & heating units)
“ ” when anti-cold air feature is turned on(cooling & heating units)
“ ” when unit is self-cleaning(some units)
“ ” when freeze protection is turned on(some units)
“ ” when Wireless Control feature is activated(some units)
Display Code
Meanings
In Fan and Dry mode, the unit will display the room temperature.
In other modes, the unit will display your temperature setting.
,
,
“ ”
When ECO function(some units) is activated, the
illuminates gradually one by one as --
-- --set temperature-- ...... in one second interval.
lorsque la fonction ECO (certaines unités) est activée, l’éclairage
Page 6
Unit Specifications and Features
1
Unit
Specifications
and Features
NOTE:
A guide on using the infrared remote is not included
in this literature package.
Unit Parts
Power Cable (Some Units)
Remote Control
Remote Control
Holder (Some Units)
Louver
Front Panel
Air Filter
(pull out)
Display window
“ ” for 3 seconds when:
• TIMER ON is set
• FRESH, SWING, TURBO, or SILENCE features are turned on
“ ” for 3 seconds when:
• TIMER OFF is set
• FRESH, SWING, TURBO, or SILENCE features are turned off
“ ” when defrosting(cooling & heating units)
“ ” when anti-cold air feature is turned on(cooling & heating units)
“ ” when unit is self-cleaning(some units)
“ ” when freeze protection is turned on(some units)
“ ” when Wireless Control feature is activated(some units)
Display Code
Meanings
In Fan and Dry mode, the unit will display the room temperature.
In other modes, the unit will display your temperature setting.
,
,
“ ”
When ECO function(some units) is activated, the
illuminates gradually one by one as --
-- --set temperature-- ...... in one second interval.
s’allume progressivement un par
un comme
Page 6
Unit Specifications and Features
1
Unit
Specifications
and Features
NOTE:
A guide on using the infrared remote is not included
in this literature package.
Unit Parts
Power Cable (Some Units)
Remote Control
Remote Control
Holder (Some Units)
Louver
Front Panel
Air Filter
(pull out)
Display window
“ ” for 3 seconds when:
• TIMER ON is set
• FRESH, SWING, TURBO, or SILENCE features are turned on
“ ” for 3 seconds when:
• TIMER OFF is set
• FRESH, SWING, TURBO, or SILENCE features are turned off
“ ” when defrosting(cooling & heating units)
“ ” when anti-cold air feature is turned on(cooling & heating units)
“ ” when unit is self-cleaning(some units)
“ ” when freeze protection is turned on(some units)
“ ” when Wireless Control feature is activated(some units)
Display Code
Meanings
In Fan and Dry mode, the unit will display the room temperature.
In other modes, the unit will display your temperature setting.
,
,
“ ”
When ECO function(some units) is activated, the
illuminates gradually one by one as --
-- --set temperature-- ...... in one second interval.
--
Page 6
Unit Specifications and Features
1
Unit
Specifications
and Features
NOTE:
A guide on using the infrared remote is not included
in this literature package.
Unit Parts
Power Cable (Some Units)
Remote Control
Remote Control
Holder (Some Units)
Louver
Front Panel
Air Filter
(pull out)
Display window
“ ” for 3 seconds when:
• TIMER ON is set
• FRESH, SWING, TURBO, or SILENCE features are turned on
“ ” for 3 seconds when:
• TIMER OFF is set
• FRESH, SWING, TURBO, or SILENCE features are turned off
“ ” when defrosting(cooling & heating units)
“ ” when anti-cold air feature is turned on(cooling & heating units)
“ ” when unit is self-cleaning(some units)
“ ” when freeze protection is turned on(some units)
“ ” when Wireless Control feature is activated(some units)
Display Code
Meanings
In Fan and Dry mode, the unit will display the room temperature.
In other modes, the unit will display your temperature setting.
,
,
“ ”
When ECO function(some units) is activated, the
illuminates gradually one by one as --
-- --set temperature-- ...... in one second interval.
-- régler la température --
Page 6
Unit Specifications and Features
1
Unit
Specifications
and Features
NOTE:
A guide on using the infrared remote is not included
in this literature package.
Unit Parts
Power Cable (Some Units)
Remote Control
Remote Control
Holder (Some Units)
Louver
Front Panel
Air Filter
(pull out)
Display window
“ ” for 3 seconds when:
• TIMER ON is set
• FRESH, SWING, TURBO, or SILENCE features are turned on
“ ” for 3 seconds when:
• TIMER OFF is set
• FRESH, SWING, TURBO, or SILENCE features are turned off
“ ” when defrosting(cooling & heating units)
“ ” when anti-cold air feature is turned on(cooling & heating units)
“ ” when unit is self-cleaning(some units)
“ ” when freeze protection is turned on(some units)
“ ” when Wireless Control feature is activated(some units)
Display Code
Meanings
In Fan and Dry mode, the unit will display the room temperature.
In other modes, the unit will display your temperature setting.
,
,
“ ”
When ECO function(some units) is activated, the
illuminates gradually one by one as --
-- --set temperature-- ...... in one second interval.
...... dans un intervalle d’une seconde
Dans les autres modes, l’appareil affichera votre réglage de température.
En mode Ventilateur et Sec, l’appareil affichera la température ambiante.
C TEMPERATURE DE FONCTIONNEMENT
Les fonctions de climatisation, chauffage et déshumidification sont optimales lorsqu’elles sont utilisées aux
températures extérieures et intérieures suivantes:
Température
Mode Climatisation Chauffage Déshumidification
Temp. de la pièce 17ºC - 32ºC 0ºC - 30ºC 10ºC - 32ºC
Temp. extérieure -25ºC - 50ºC -15ºC - 30ºC 0ºC - 50ºC
ATTENTION
Lorsque le climatiseur est utilisé à des températures différentes que celles indiquées ci-dessus,
certains dispositifs de sécurité peuvent s’enclencher, gênant le bon fonctionnement de
l’appareil.
Si le climatiseur fonctionne dans une pièce dont le taux d’humidité relative est supérieur à
80%, de la condensation peut se former sur la surface de l’appareil. Ouvrez la lamelle verticale
au maximum et mettez le ventilateur en route à la vitesse maximum.
Pour une efficacité maximum, maintenez portes et fenêtres fermées lorsque votre appareil est
en mode climatisation ou chauffage.
3
57
3
D UTILISATION AVEC TELECOMMANDE
G
NOTE!
Orientez toujours la télécommande vers le récepteur de signal de l’unité intérieure. Aucun
obstacle ne doit se trouver entre la télécommande et le récepteur, sinon le signal émis
par la télécommande ne sera pas reçu par le récepteur et l’appareil ne fonctionnera pas
correctement.
La distance maximum à respecter entre la télécommande et le récepteur est de 6 à 7 mètres.
Présentation des fonctions de la télécommande
4
3
2
8
6
7
12
11
13
15
5
9
10
14
1
SLEEP
FRESH
fig. 1
Bouton On/off: Appuyez sur ce bouton pour mettre l’appareil en marche. Appuyez
à nouveau sur le bouton pour éteindre l’appareil.
Bouton Mode: À chaque pression sur ce bouton, les modes d’utilisation de l’appareil défilent dans
l’ordre suivant. AUTO (Automatique), COOL (Climatisation) DRY (Déshumidification) HEAT
(Chauffage) et FAN (Circulation d’air), comme indiqué ci-dessous:
AUTO COOL DRY HEAT FAN
Bouton + : Appuyez sur ce bouton pour augmenter la température intérieure jusqu’à max. 30ºC.
Bouton - : Appuyez sur ce bouton pour baisser la température intérieure jusqu’à min. 17ºC.
Bouton Fan (Circulation d’air): Ce bouton permet de sélectionner la vitesse de ventilation. À chaque
pression sur ce bouton, les vitesses du ventilateur défilent dans l’ordre suivant: AUTO, LOW (basse),
MED (moyenne) et HIGH (haute). Si vous sélectionnez le mode AUTO ou DRY (Déshumidification), la
vitesse du ventilateur est gérée automatiquement et n’est pas modifiable.
Bouton SLEEP: Appuyez sur ce bouton pour activer l’économiseur d’énergie. Appuyez à nouveau pour le
désactiver. Cette fonction, qui s’utilise seulement en combinaison avec le mode de refroidissement, de chauf-
fage ou automatique (FROID, CHAUD et AUTO), assure l’augmentation de la température paramétrée du
climatiseur de 1°C par heure (en mode FROID) ou baissée (en mode chauffage) pendant les deux premières
heures. Le climatiseur maintiendra ensuite cette température (température paramétrée + ou - 2 degrés) pen-
dant 5 heures. Ensuite l’appareil s’arrêtera automatiquement.
Bouton FRESH: Appuyez longuement pour activer la fonction FRESH.
Bouton Swing (Pivotement des lamelles): Appuyez sur ce bouton pour activer le
mode SWING. Appuyez à nouveau sur le bouton pour désactiver la fonction.
Bouton Air direction: Appuyez sur ce bouton pour modifier l’angle de la lamelle directionnelle. À
chaque pression sur le bouton, l’angle de la lamelle sera modifié de 6 degrés. Si la lamelle se retrouve
58
dans une position qui affecte le fonctionnement du mode climatisation ou chauffage, l’appareil change
automatiquement sa position. Lorsque vous appuyez sur ce bouton, aucun symbole n’apparaît sur
l’écran de l’appareil.
Bouton Swing(gauche et droite): Appuyez sur ce bouton pour activer le mode SWING. Appuyez à
nouveau sur le bouton pour désactiver la fonction.
i Bouton Timer on (Mise en marche minuterie): Appuyez sur ce bouton pour régler l’heure de mise en
route automatique de l’appareil. À chaque pression sur le bouton, vous avancez l’heure par intervalles
de 30 minutes. Lorsque l’écran affiche 10Hr, chaque pression sur le bouton permet d’avancer l’heure
par intervalles de 60 minutes. Pour annuler la fonction, maintenir la pression sur le bouton jusqu’à ce
que 0.0 s’affiche.
j Bouton Timer off (Arrêt minuterie): Appuyez sur ce bouton pour régler l’heure d’arrêt automatique de
l’appareil. À chaque pression sur le bouton, vous avancez l’heure par intervalles de 30 minutes. Lorsque
l’écran affiche 10Hr, chaque pression sur le bouton permet d’avancer l’heure par intervalles de 60
minutes. Pour annuler la fonction, maintenir la pression sur le bouton jusqu’à ce que 0.0 s’affiche.
k Bouton Reset: En appuyant sur ce bouton, vous pouvez annuler tous les réglages et revenir aux réglages
d’origine.
l Bouton TURBO / Bouton Active Clean: En appuyant sur ce bouton alors que l’appareil est en mode
climatisation [COOL], la puissance du climatiseur augmente. Pour désactiver le TURBO, appuyez à nou-
veau sur le bouton. En maintenant ce bouton (au min. 2 sec) l’unité se met en mode entretien du clima-
tiseur. Un processus complet commence pour nettoyer la face interne de l’évaporateur et pour réduire
la multiplication des bactéries. Quand cette fonction est activée tous les réglages de la minuterie sont
annulés. Pour arrêter le mode entretien du climatiseur presser à nouveau ce bouton (au min. 2 sec).
m Bouton LOCK: En appuyant sur le bouton LOCK, vous pouvez verrouiller tous les réglages actuels. La
télécommande ne réagit alors qu’au bouton LOCK. Pour désactiver la fonction LOCK, appuyez à nou-
veau sur le bouton.
n Bouton LED DISPLAY: En appuyant sur ce bouton, vous pouvez activer l’éclairage de l’écran de la télécom-
mande. L’éclairage s’éteint aut omatiquement si aucune touche n’est enfoncée dans les trente secondes
(ne s’applique pas aux appareils qui ne disposent pas de cette fonction).
o Bouton sonore minimum/ prévention anti gel intérieure: Pressez ce bouton pour diminuer le niveau de
pression du son à l’intérieur à 21 dB(A). La vitesse du ventilateur de l’unité intérieure est réduite à son
plus bas niveau. Lorsque vous appuyez sur ce bouton (> 2 secondes), vous activez la fonction « Home
Freezing Prevention ». Dans ce cas, l’unité ignore la température intérieure programmée et la règle
automatiquement sur environ 8 °C. Ceci permet d’éviter la formation de gel dans votre intérieur pen-
dant les périodes froides, à un niveau de consommation le plus bas. Lorsque cette fonction est activée,
le code « FP » s’affiche sur l’écran. Ce bouton peut seulement s’utiliser lorsque le climatiseur est en
mode chauffage. Pour désactiver la fonction « Home Freezing Prevention » : rappuyez sur le bouton.
Nom et fonction des indicateurs sur la télécommande
auto cool dryheatfan
sleep lock run
SET TEMP.TIMER ONOFF
fig. 2
2
1
3
4
5
6
7
3
59
3
Écran
Indicateur émission de signaux : Ce voyant lumineux s’allume lorsque la télécommande envoie des
signaux au récepteur de l’appareil.
Indication mode de fonctionnement : Vous pouvez utiliser le bouton MODE pour afficher la fonction
qui est activée: AUTO
, COOL [climatisation], DRY [déshumidification], HEAT [chauffage]
(Cette indication n’apparaît pas sur les appareils qui ont uniquement la fonction de climatisation), FAN
[circulation d’air].
Écran digital/ minuterie : Cet écran affiche la température programmée (17º C ~ 30ºC). Lorsque la
minuterie est activée (TIMER) les horaires de mise en route/arrêt automatiques [ON/OFF] s’affichent
également. L’écran n’affiche rien lorsque l’appareil est en mode circulation d’air [FAN].
Indication vitesse de ventilation : Avec le bouton FAN SPEED vous pouvez sélectionner la vitesse du
ventilateur (Auto-Basse
- Moyenne - Haute ). La vitesse choisie s’affiche alors sur l’écran. Attention
ceci n’est pas valable en mode AUTO! La vitesse du ventilateur est AUTO lorsque le mode de fonction-
nement est AUTO ou DRY (sec).
Indication marche/arrêt : Ce symbole s’allume quelques instants lorsque l’appareil est mis en route avec la
télécommande.
Affichage LOCK : La mention LOCK s’affiche lorsque vous appuyez sur le bouton LOCK. Appuyez à nou-
veau sur le bouton pour l’éteindre.
Affichage veille : Affiché lors du fonctionnement en veille. Appuyer à nouveau sur le bouton SLEEP
(veille) pour annuler.
G
NOTE!
La figure 2 montre toutes les fonctions qui peuvent s’afficher. Dans la pratique, seules les
fonctions concernées s’affichent sur l’écran.
Utiliser la télécommande
Installer / Changer les piles
Utilisez deux piles alcalines sèches (AAA/LR03).
N’utilisez pas de piles rechargeables.
1. Au dos de la télécommande, ouvrez le couvercle en le faisant coulisser dans le sens de la flèche.
2. Installez les nouvelles piles en veillant à placer les pôles positifs (+) et négatifs (-) dans le bon sens.
3. Remettez le couvercle en place en le faisant coulisser dans sa position d’origine.
G
NOTE!
Si les piles sont retirées, toute la programmation sera effacée de la télécommande. Après avoir
introduit de nouvelles piles, la télécommande doit être reprogrammée.
Lorsque vous changez les piles, utilisez des piles du même type. Pour éviter tout
dysfonctionnement de la télécommande utilisez uniquement des piles neuves.
Retirez les piles de la télécommande si vous ne l’utilisez pas pendant plusieurs semaines. Vous
éviterez ainsi toute fuite des piles qui pourrait endommager la télécommande.
Dans des conditions normales d’utilisation, une pile a une durée moyenne d’utilisation de 6 mois.
Changez les piles lorsque l’unité intérieure n’émet plus de bip ou lorsque l’indicateur de
transmission ne s’allume plus.
N’utilisez jamais simultanément des piles usagées avec des piles neuves. Ne mélangez pas non
plus différents types de piles (par exemple, alcalines et dioxyde de manganèse).
60
MODE AUTOMATIQUE
Une fois le climatiseur prêt à l’emploi (vérifier si l’unité est branchée et si l’alimentation électrique est disponible),
mettez-le en marche en appuyant sur le bouton. L’indicateur de fonctionnement clignote sur l’écran de l’unité
intérieure.
1. Pour sélectionner le mode AUTO, appuyez sur le bouton Mode.
2. Pour régler la température désirée dans la pièce, appuyez ensuite sur le bouton + ou -.
3. Pour mettre le climatiseur en marche, appuyez sur le bouton On/off. L’indicateur lumineux de fonctionnement
s’allume sur l’écran de l’unité intérieure. La vitesse de ventilation est gérée automatiquement par l’appareil.
4. Pour arrêter le climatiseur, appuyez à nouveau sur le bouton On/off.
G
NOTE!
En mode AUTO, le climatiseur sélectionnera automatiquement le mode de fonctionnement
COOL, HEAT ou FAN en fonction de la différence mesurée entre la température ambiante réelle
dans la pièce et la température réglée sur la télécommande.
Si vous trouvez le mode AUTO inconfortable, vous pouvez sélectionner un autre mode de
fonctionnement manuellement.
Modes COOL (Climatisation), HEAT (Chauffage), et FAN (Circulation d’air)
1. Si vous trouvez le mode AUTO inconfortable, vous pouvez sélectionner manuellement les fonctions
COOL (Climatisation), DRY (Déshumidification), HEAT (Chauffage), ou FAN (Circulation d’air). Pour cela,
appuyez sur le bouton .
2. Pour régler la température souhaitée dans la pièce, appuyez sur les boutons + ou - ( et ).
3. Appuyez sur le bouton pour sélectionner le mode FAN (Circulation d’air) ou le mode AUTO, HIGH,
MED ou LOW.
4. Appuyez sur le bouton On/off. L’indicateur de fonctionnement s’allume et le climatiseur se met en
marche. Pour arrêter le climatiseur, appuyez à nouveau sur le bouton On/off.
G
NOTE!
Le mode FAN (Circulation d’air) ne peut pas être utilisé pour contrôler la température. Dans ce
mode de fonctionnement seuls les points 1, 3 et 4 sont applicables.
MODE DRY (Déshumidification)
1. Pour sélectionner le mode DRY (Déshumidification), appuyez sur le bouton Mode.
2. Pour régler la température, appuyez sur les boutons + ou - ( et ).
3. Appuyez sur le bouton On/off. L’indicateur de fonctionnement s’allume et le climatiseur se met en
marche en mode DRY (Déshumidification). Pour arrêter le climatiseur, appuyez à nouveau sur le bouton
On/off.
G
NOTE!
Suite à la différence entre la température programmée et la température ambiante, le climatiseur
en mode DRY (Déshumidification) s’activera plusieurs fois automatiquement, sans enclencher les
fonctions COOL (Climatisation) et FAN (Circulation d’air).
MINUTERIE
Pour programmer l’horaire de mise en route et d’arrêt du climatiseur, appuyez sur les boutons Timer on/
off (i et j). L’horaire programmé sur la télécommande est limité à une période comprise entre une demi-
heure et 24 heures.
3
61
3
1. Pour régler l’heure de MISE EN ROUTE .
1.1 Appuyez sur le bouton i Timer on, l’écran de la télécommande affiche ON TIMER, le dernier horaire
de mise en route programmé et le signal “h”. Vous pouvez maintenant programmer le nouvel horaire
de mise en route.
1.2 Appuyez à nouveau sur le bouton i Timer on pour saisir l’horaire de mise en route.
1.3 Une fois l’horaire saisi, la télécommande transmet le signal au climatiseur. L’opération prend une demie
seconde.
2. Pour régler l’heure d’ARRÊT.
2.1 Appuyez sur le bouton j Timer off, l’écran de la télécommande affiche OFF TIMER, le dernier horaire
d’arrêt programmé et le signal “h”. Vous pouvez maintenant programmer le nouvel horaire d’arrêt.
2.2 Appuyez à nouveau sur le bouton j Timer off pour saisir l’horaire d’arrêt.
2.3 Une fois l’horaire saisi, la télécommande transmet le signal au climatiseur. L’opération prend une demie
seconde.
Exemple de réglage de la minuterie
Mise en marche du climatiseur dans 6 heures.
1. Appuyer sur le bouton TIMER ON (minuterie marche), le dernier réglage de l’heure
de début de fonctionnement et le symbole « h » s’affichent à l’écran.
2. Appuyer sur le bouton TIMER ON (minuterie marche) pour afficher « 6:0h ».
3. Attendre une seconde et l’écran numérique affichera à nouveau la température.
Start
Off
6h
TIMERON
Le voyant « TIMER ON » (minuterie marche) reste allumé et cette fonction est activée.
Minuterie combinée
(réglage minuteries ON (marche) et OFF (arrêt) simultanément).
TIMER OFF --> TIMER ON
(On --> Stop --> Start operation) (marche --> arrêt --> opération de démarrage)
Cette fonctionnalité est utile si l’on veut arrêter le climatiseur une fois que l’on
On
Stop
2h
Set
On
10 h
TIMERONOFF
s’est couché et le remettre en marche au réveil ou lorsque l’on rentre à son domicile.
Exemple:
Pour arrêter le climatiseur 2 heures après le réglage et le remettre en marche 10 heures après le réglage.
1. Appuyer sur le bouton TIMER OFF (minuterie arrêt).
2. Appuyer à nouveau sur le bouton TIMER OFF (minuterie arrêt) pour afficher 2.0 h sur l’écran TIMER OFF
(minuterie arrêt).
3. Appuyer sur le bouton TIMER ON (minuterie marche).
4. Appuyer à nouveau sur le bouton TIMER ON (minuterie marche) pour afficher 10 h sur l’écran TIMER ON
(minuterie marche).
5. Attendre une seconde et l’écran numérique affichera à nouveau la température. Le voyant TIMER ON OFF
(minuterie marche arrêt) reste allumé et cette fonction est activée.
G
NOTE!
Si les horaires de mise en route et d’arrêt sont identiques, l’heure d’arrêt sera
automatiquement décalée d’une demie heure (période inférieure à 10Hr) ou d’une heure
(période supérieure à 10Hr).
Pour modifier l’horaire de la minuterie appuyez sur le bouton TIMER correspondant et
programmez un nouvel horaire.
La durée de réglage est une durée relative, c.-à-d. cette durée est basée sur un écart de durée
entre la durée réelle et la durée réglée.
62
AVERTISSEMENT
Ne mouillez jamais la télécommande.
Protégez la télécommande des hautes températures et des radiations.
Pour éviter tout dysfonctionnement, n’exposez pas le récepteur intérieur aux rayons directs du
soleil.
E FONCTIONNEMENT MANUEL (SANS TÉLÉCOMMANDE)
Comment utiliser votre appareil sans la télécommande.
Si votre télécommande ne fonctionne pas, vous pouvez utiliser votre appareil manuellement à l’aide du
bouton MANUAL CONTROL situé sur l’unité intérieure. Notez que le fonctionnement manuel n’est pas une
solution à long terme et qu’il est fortement recommandé d’utiliser l’unité avec votre télécommande.
G
AVANT UTILISATION MANUELLE
L’unité doit être éteinte avant l’utilisation manuelle.
Pour utiliser votre appareil manuellement:
1. Localisez le bouton MANUAL CONTROL sur le panneau latéral droit de l’appareil.
2. Appuyez une fois sur le bouton MANUAL CONTROL pour activer le mode FORCED
AUTO.
3. Appuyez à nouveau sur la touche MANUAL CONTROL pour activer le mode de
refroidissement forcé.
4. Appuyez une troisième fois sur le bouton MANUAL CONTROL pour éteindre l’ap-
pareil.
AVERTISSEMENT
Le bouton manuel est destiné à des fins de test et de fonctionnement d’urgence uniquement.
Veuillez ne pas utiliser cette fonction à moins que la télécommande soit perdue et que cela soit
absolument nécessaire. Pour rétablir un fonctionnement normal, utilisez la télécommande pour
activer l’appareil.
F UTILISATION OPTIMALE
Pour utiliser votre climatiseur de façon optimale, prenez en compte les consignes suivantes:
Dirigez correctement le flux d’air, en évitant de l’orienter directement vers les gens.
Réglez la température pour créer le niveau de confort le mieux adapté. Ne réglez pas des températures
trop extrêmes.
Fermez portes et fenêtres pour assurer l’efficacité de l’appareil.
Ne posez aucun objet près de l’entrée d’air ou de la sortie d’air, le climatiseur pourrait mal fonctionner
et même s’arrêter. Vérifiez qu’aucun obstacle ne gène le flux d’air. L’air pulsé par l’appareil doit pouvoir
être diffusé dans toute la pièce sans rencontrer d’obstacle. Et inversement, l’air doit pouvoir entrer dans
l’appareil sans être gêné.
Pour garantir de bonnes performances en mode climatisation et chauffage, nettoyez régulièrement le
filtre à air. Nous recommandons un nettoyage des filtres toutes les deux semaines.
Ne faites pas fonctionner l’appareil avec la lamelle horizontale en position fermée.
3
Manual control button
Manual
control
bouton
63
3
G REGLER L’ORIENTATION DU FLUX D’AIR
La direction du flux d’air sortant du climatiseur peut être orientée par un
réglage des lames horizontales et verticales.
Orientez le sens des lames de manière à ne pas souffler directement sur des
personnes présentes.
Assurez-vous que le flux d’air sortant atteigne toute la pièce afin d’éviter les
différences de température dans la pièce.
Les lames verticales peuvent être réglées à l’aide de la télécommande.
Les lames horizontales doivent être réglées à la main.
Réglage du sens du flux d’air vertical (haut-bas)
Effectuez ce réglage avec le climatiseur en fonctionnement.
Utilisez la télécommande pour orienter les lames verticales. Appuyez sur le bouton
AIR DIRECTION de la télécommande. La lame se déplacera de 6° à chaque pres-
sion sur le bouton.
Activer le balancement automatique de la lamelle horizontale (haut - bas)
Cette fonction doit être activée lorsque le climatiseur est en marche.
• Appuyez sur le bouton de la télécommande.
Pour arrêter la fonction, appuyez à nouveau sur le bouton . Pour bloquer la
lamelle dans la position souhaitée, appuyez sur le bouton .
Réglage de la direction du flux d’air horizontal (gauche-droite)
Déplacez manuellement les petits leviers des lames horizontales pour régler le flux
d’air souhaité.
AVERTISSEMENT
Veillez à ne pas toucher le ventilateur derrière les lamelles verticales!
AVERTISSEMENT
Les boutons «AIR DIRECTION» et «SWING» ne fonctionnent pas lorsque le climatiseur est
éteint (aussi lorsque le minuteur est réglé sur «ON»).
Ne laissez jamais le climatiseur fonctionner en position frais ou sec avec le flux d’air dirigé
vers le bas. Si tel est le cas, de la condensation peut se former sur la lame verticale, qui peut
goutter.
Ne déplacez pas la lame verticale à la main. Utilisez toujours le bouton «AIR DIRECTION»
ou le bouton «SWING» . En bougeant cette grille d’air à la main, vous pourriez perturber
son fonctionnement. Si la lame verticale ne fonctionne pas convenablement, éteignez le
climatiseur, puis rallumez-le.
Lorsqu’on rallume le climatiseur immédiatement après l’avoir éteint, la lame verticale peut ne
pas bouger pendant environ 10 secondes.
Ne laissez pas l’appareil fonctionner avec la lame horizontale en position fermée.
Tige de
déflecteur
Levier
64
H FONCTIONNEMENT DU CLIMATISEUR
1
1
1
1
MODE AUTOMATIQUE
Lorsque vous mettez le climatiseur en mode AUTO (bouton sur la télécom-
mande), il sélectionne automatiquement la fonction COOL (Climatisation),
HEAT (Chauffage) ou FAN (Circulation d’air) en fonction de la température
que vous avez sélectionnée et de la température ambiante.
Le climatiseur compare automatiquement la température de la pièce avec
celle que vous avez programmée.
Si vous trouvez le mode AUTO inconfortable, vous pouvez sélectionner un
autre mode de fonctionnement manuellement.
VEILLE/MODE ÉCONOMIQUE
Cette fonction, qui s’utilise seulement en combinaison avec le mode de
refroidissement, de chauffage ou automatique (FROID, CHAUD et AUTO),
assure l’augmentation de la température paramétrée du climatiseur de 1°C
par heure (en mode FROID) ou baissée (en mode chauffage) pendant les
deux premières heures. Le climatiseur maintiendra ensuite cette tempéra-
ture (température paramétrée + ou - 2 degrés) pendant 5 heures. Ensuite
l’appareil s’arrêtera automatiquement.
MODE DÉSHUMIDIFICATION
Le mode déshumidification sélectionne automatiquement son régime de fonctionnement en
mesurant la différence entre la température programmée et la température de la pièce.
En mode déshumidification, l’appareil régule la température en allumant et éteignant successivement
sa fonction de climatisation ou de ventilation. La vitesse du ventilateur est régulée automatiquement.
Lorsque l’appareil est en mode climatisation, il déshumidifie également l’air ambiant.
G
NOTE
Lorsque le climatiseur est en mode déshumidification, la température de la pièce peut baisser.
Il est possible qu’un hygrostat mesure alors un taux d’humidité relative plus important, mais
l’humidité absolue de la pièce est cependant en baisse, en fonction du volume d’humidité dans la
pièce (cuisine, personnes, etc.)
3
Appuyez sur le bouton Sleep (Veille)
COOLING/CLIMATISATION
DRY/DÉSHUMIDIFICATION
HEAT/CHAUFFAGE
Réglez la
tempé-
rature
1 heure 1 heure
1 heure 1 heure
Réglez la
tempé-
rature
Réglez la température
Horaire
Tempé-
rature
ambi-
ante
Climatisation-Circulation d’air-Climatisation-Circulation d’air-Climatisation
65
3
I ENTRETIEN
G
AVERTISSEMENT
• Éteignez puis débranchez toujours le climatiseur avant de le nettoyer.
Nettoyer l’unité intérieure et la télécommande
G
ATTENTION
Pour essuyer l’unité intérieure et la télécommande utilisez un chiffon
propre.
Si l’unité intérieure est très sale, utilisez un chiffon légèrement
humide.
Le panneau frontal de l’unité intérieure peut être démonté et
nettoyé à l’eau. Veillez à bien l’essuyer avec un chiffon avant de le
remettre en place.
N’utilisez pas de lingettes imbibées de nettoyants chimiques pour le
nettoyage de l’appareil.
N’utilisez pas d’essence, diluants, poudres à récurer ou autre produit
solvants de ce type. Ils peuvent craqueler ou déformer la surface en
plastique de l’appareil.
Nettoyer le filtre à air
Un filtre à air bouché réduit l’efficacité du climatiseur. Nettoyez le filtre toutes les deux
semaines.
1. Soulevez le panneau de l’unité intérieure jusqu’à entendre un ‘clic’.
2. Saisissez la poignée du filtre à air et soulevez doucement pour retirer le
filtre de son support. Rabaissez-le ensuite.
3. Retirez le filtre écran de l’unité intérieure.
• Nettoyez le filtre écran toutes les deux semaines.
• Nettoyez le filtre écran à l’eau ou avec un aspirateur.
4. Le filtre à charbon actif à l’arrière ne peut pas être nettoyé. Une fois sale, ce filtre ne
pourra tout simplement pas filtrer les odeurs désagréables. Ce filtre devra alors être
remplacé par un nouveau filtre, (disponible chez votre fournisseur). Il est recommandé
de remplacer le filtre à charbon actif 2 fois par saison.
5. Une fois sale, le filtre 3M HAF de couleur verte présentera des signes visibles de sale-
té, sur et dans le filtre. Lorsque ce filtre est sale, il ne peut pas être nettoyé et doit
être remplacé par un filtre neuf (disponible chez votre fournisseur). Il est recomman-
de remplacer ce filtre 2 fois par saison.
Nouveau filtre
Le remplacement du filtre est recommandé
6. Après le remplacement du filtre à charbon actif et du filtre 3M HAF dans le support de
filtre sur le filtre écran, celui-ci peut être replacé dans le climatiseur.
7. Avant d’être remis en place, le filtre doit être parfaitement sec et ne présenter aucun
défaut.
8. Remettez le filtre d’air en place.
9. Insérez le haut du filtre à air dans l’unité en alignant bien les bordures gauche et
droite.
Nettoyant
tuyaux
Non
Diluant
f
Onglets de filtre
Retirez le filtre de rafraîchissement de
l’arrière du filtre plus grand (certaines
unités)
66
ENTRETIEN
Si vous n’utilisez pas le climatiseur pendant une longue période, effectuez les opérations suivantes avant de
le ranger:
Mettez la ventilation en route pendant 6 heures pour sécher l’intérieur de l’unité.
Éteignez ensuite le climatiseur puis débranchez-le. Si vous utilisez le modèle S(C)5148, coupez l’alimen-
tation. Retirez les piles de la télécommande.
L’unité extérieure nécessite un entretien et un nettoyage périodiques à faire effectuer par un techni-
cien spécialisé et agréé.
Vérifications avant usage
Soyez sûr que les fils électriques de l’appareil ne sont pas endommagés ni débranchés.
Vérifiez si les filtres à air ont été mis en place.
Soyez sûr que l’entrée et la sortie d’air ne sont pas entravés ni bloqués, surtout lorsque le climatiseur
n’a pas été utilisé pendant longtemps.
ATTENTION
Pour éviter tout risque de coupure, ne touchez pas les parties métalliques de l’unité lorsque
vous retirez le filtre.
N’utilisez jamais d’eau pour nettoyer l’intérieur du climatiseur. Exposer l’appareil à de l’eau
peut détruire l’isolation et provoquer des chocs électriques.
Avant de le nettoyer, l’appareil doit toujours être éteint et débranché.
J CONSEILS D’UTILISATION
Les fonctions suivantes peuvent s’activer automatiquement lorsque le climatiseur est en marche.
1. Protection du climatiseur.
Protection du compresseur
Une fois arrêté, le compresseur de l’appareil ne se remet en marche qu’au bout de 3 minutes.
Anti air froid
L’appareil est conçu pour ne pas souffler d’air froid en mode HEAT (Chauffage), lorsque l’échangeur de
chaleur se trouve dans une des situations suivantes et quand la température programmée n’a pas été
atteinte.
A. Quand la fonction chauffage se met en route.
B. Dégel.
C. Chauffage à basse température.
Dégel
Lorsque l’appareil dégèle, les ventilateurs intérieur et extérieur ne tournent pas.
Un climat extérieur froid et humide réduit les performances de chauffage de l’appareil, c’est pourquoi
l’unité extérieure peut se mettre à geler pendant le cycle de chauffage.
Dans ce cas, l’appareil stoppe périodiquement le mode chauffage et passe automatiquement en mode dégel.
La durée de la fonction de dégel varie de 4 à 10 minutes selon la température extérieure et la quantité
de gel sur l’unité extérieure
3
67
3
2. L’unité intérieure diffuse de la vapeur.
L’appareil peut diffuser de la vapeur. Ceci est dû à une grande différence de température entre l’entrée
et la sortie d’air en mode COOL (Climatisation) dans une pièce à fort taux d’humidité relative.
Lorsque le climatiseur redémarre en mode Chauffage, l’humidité qui se dépose sur la surface du satu-
rateur de l’unité d’intérieur pendant le refroidissement ou le séchage peut créer une brume blanche.
3. Le climatiseur émet un léger bruit.
Le compresseur peut émettre un léger sifflement lorsqu’il est en route ou qu’il vient de s’arrêter. Ce
bruit est émis par le gaz réfrigérant contenu dans l’appareil.
Le compresseur peut également émettre un léger grincement lorsqu’il est en route ou qu’il vient de
s’arrêter. Ce bruit est normal, il s’explique par l’expansion et la contraction des pièces en plastique de
l’appareil dues aux changements de températures.
Un bruit peut également être émis lorsque la lamelle se remet dans sa position d’origine.
4. L’unité intérieure diffuse de la poussière.
Ceci est normal si le climatiseur n’a pas été utilisé pendant longtemps ou lors de sa toute première
utilisation.
5. L’unité intérieure diffuse une mauvaise odeur.
L’unité intérieure peut diffuser les mauvaises odeurs qu’elle a aspirées. Ces odeurs peuvent être géné-
rées par les matériaux de construction de la pièce, les meubles ou la fumée.
6. Le climatiseur passe uniquement en mode FAN (Circulation d’air) depuis le mode COOL (Climatisation)
ou HEAT (Chauffage).
Lorsque la température intérieure atteint la température programmée, le compresseur s’arrête automati-
quement et le climatiseur passe en mode FAN (Circulation d’air). Le compresseur se remet en route lorsque
la température intérieure augmente en mode COOL (Climatisation) ou descend en mode HEAT (Chauffage).
7. Lorsque le climatiseur est en marche dans une pièce à fort taux d’humidité relative (supérieure à 80%)
de la condensation peut se former sur l’unité intérieure. Positionnez la lamelle horizontale en ouver-
ture maximum et mettez le ventilateur en route à la vitesse maximum.
8. Mode Chauffage.
En mode chauffage, l’air est aspiré par l’unité extérieure, chauffé puis diffusé par l’unité intérieure.
Lorsque la température d’extérieur baisse, la chaleur absorbée par le climatiseur baissera également,
réduisant la capacité de chauffage de l’unité d’intérieur.
9. Remise en route automatique.
En cas de coupure de courant, l’appareil s’éteint complètement.
L’appareil est équipé d’un dispositif de remise en route automatique. Lorsque le courant se rétablit, le
climatiseur se remet donc automatiquement en marche. Les données précédemment saisies par l’utili-
sateur restent mémorisées.
10. Détection de fuite de réfrigérant.
Le climatiseur est équipé d’un système de détection de fuite de réfrigérant.
Lorsque l’unité extérieure détecte un manque de réfrigérant, le climatiseur s’arrête et l’unité intérieure
affiche l’alarme EC à l’écran.
Lorsque cette alarme se déclenche, ne pas redémarrer le climatiseur et contacter votre fournisseur.
68
K RESOUDRE LES PANNES
Pannes et Solutions
G
PANNE
Si une des situations suivantes se présente, débranchez immédiatement le climatiseur et contactez
votre distributeur:
Les fusibles sautent ou le coupe-circuit s’enclenche fréquemment.
De l’eau ou un autre objet a pénétré dans le climatiseur.
La télécommande fonctionne mal ou pas du tout.
Autres situations anormales.
Erreurs Causes possibles
L’appareil ne s’allume pas lors-
que vous appuyez sur le bouton
ON/OFF (« MARCHE/ARRÊT »)
L’appareil dispose d’une fonctionnalité de protection anti-surcharges, d’une
durée de 3 minutes. L’appareil ne peut être redémarré au cours des trois
premières minutes, après son arrêt.
L’appareil bascule du mode
COOL/HEAT (« FROID/CHAUD »)
au mode FAN.
L’appareil peut changer de mode pour prévenir la formation de gel en
interne. Lorsque la température augmente, l’appareil démarre avec le mode
préalablement sélectionné.
Lorsque la température programmée est atteinte, l’appareil éteint automati-
quement le compresseur. L’appareil continue à fonctionner même en cas de
variation de température.
La partie interne de l’appareil
émet une fumée blanche
Dans les régions humides, une différence élevée de température entre l’air
intérieur d’une pièce et l’air conditionnée peut provoquer une fumée blanche.
Les appareils d’intérieur ou
d’extérieur émettent une fumée
blanche
Lorsque l’appareil redémarre en mode HEAT (« CHAUFFAGE ») après dégi-
vrage, de la fumée blanche peut se former à cause de l’humidité dégagée
par le processus de dégivrage.
L’appareil d’intérieur émet des
bruits
Un bruit assourdissant peut se produire lorsque le volet d’air retourne à sa
position initiale.
Un grincement peut se produire lorsque l’appareil est utilisé en mode HEAT
(« CHAUFFAGE »), à cause de l’expansion et de la contraction des parties
plastiques de l’appareil.
Les appareils d’intérieur ou
d’extérieur émettent des bruits
Faible sifflement en cours d’exploitation : Ce phénomène est normal et est provo-
qué par le gaz réfrigérant circulant dans les appareils d’intérieur et d’extérieur.
Un faible sifflement est perceptible au démarrage de l’appareil, à l’arrêt de
l’appareil, ou en cas de dégivrage. Ce bruit est normal et est provoqué par l’arrêt
du gaz réfrigérant ou en cas de changement du sens d’écoulement du liquide.
Grincement : Ce phénomène est normal et correspond à l’expansion et à
la contraction du plastique ainsi que des éléments métalliques, suivant les
changements de température en cours d’exploitation.
Les appareils d’extérieur font du
bruit
L’appareil émet différents bruits selon son mode de fonctionnement.
Les appareils d’intérieur ou
d’extérieur émettent de la pous-
sière
En cas de non-utilisation prolongée, l’appareil peut accumuler de la poussière,
qui sera alors émise en cours de fonctionnement. Ce risque peut être minimisé
en recouvrant l’appareil durant des périodes d’inactivité prolongées.
L’appareil émet une odeur nau-
séabonde
L’appareil peut capter et émettre des odeurs liés à l’environnement (mobi-
lier, cuissons, cigarettes, etc.) en cours d’exploitation.
Les filtres de l’appareil révèlent la présence de moisissures et doivent être
nettoyés.
Le ventilateur de l’unité extéri-
eur ne fonctionne pas
En cours d’exploitation, la vitesse du ventilateur est ajustée automatique-
ment pour un fonctionnement optimal.
Le fonctionnement est instable,
imprévisible, ou bien l’appareil
ne répond pas
Les interférences des relais de transmission téléphoniques et des relais dis-
tants peuvent provoquer le dysfonctionnement de l’appareil. Dans ce cas,
essayez les méthodes suivantes:
• Débranchez le cordon d’alimentation, puis rebranchez-le.
Appuyez sur le bouton ON/OFF (« MARCHE/ARRÊT ») de la télécommande
pour redémarrer l’appareil.
3
69
3
G
NOTE!
Si le problème persiste, contactez votre revendeur local ou le service client le plus proche de chez
vous. Fournissez une description détaillée des dysfonctionnements liés à l’appareil ainsi que le
numéro de modèle.
Problème Causes possibles Solution
Capacité de refroidis-
sement insuffisante
Le réglage de la température peut être supé-
rieur à la température ambiante de la pièce
Réduisez la température préréglée
L’échangeur thermique de l’appareil
d’intérieur ou d’extérieur est encrassé
Nettoyez l’échangeur thermique concerné
Le filtre à air est encrassé.
Remplacez le filtre et nettoyez-le confor-
mément aux instructions
L’entrée ou la sortie d’air d’un des appa-
reils est obstrué
Éteignez l’appareil, nettoyez la zone
obstruée et redémarrez l’appareil
Les portes et les fenêtres sont laissées
ouvertes.
Assurez-vous que les portes et les fenêtres
soient fermées en cours d’utilisation de
l’appareil
La chaleur excessive dégagée par les ray-
ons du soleil peut impacter votre appareil
Fermez les fenêtres et les rideaux en péri-
ode de canicule ou de forte luminosité
Sources de chaleur excessives dans une
même pièce (personnes, ordinateurs,
appareils électroniques, etc.)
Diminuez les sources de chaleur excessives
Faible niveau de liquide réfrigérant, en
raison d’une fuite ou d’une utilisation
prolongée
Vérifiez l’absence de fuites, resserrez si
nécessaire et réajustez le niveau de liqui-
de réfrigérant
La fonction SILENCE est activée (fonction
optionnelle)
La fonction SILENCE peut diminier les per-
formances de l’appareil en réduisant la
fréquence de fonctionnement. Désactivez
la fonction SILENCE.
L’appareil ne foncti-
onne pas
Panne de courant Patientez jusqu’au rétablissement du courant
L’alimentation est coupée Mettez l’appareil en marche
Le fusible a sauté Remplacer le fusible
Les piles de la télécommande sont épuisées Remplacez les piles
La protection 3-minute de l’appareil est
activée
Patientez trois minutes après redémarrage
de l’appareil
La minuterie est activée Arrêtez la minuterie
L’appareil démarre et
s’arrête fréquemment
Il y a trop ou trop peu de liquide réfrigé-
rant dans le circuit
Vérifiez l’absence de fuites et rajoutez du
liquide réfrigérant dans le circuit.
Présence d’humidite ou de gaz incompres-
sible dans le système.
Évacuez le trop plein et rechargez le sys-
tème avec du liquide réfrigérant
Le compresseur est endommagé Remplacez le compresseur
Le voltage est trop élevé ou trop faible
Installez un manomètre pour ajuster le
voltage
Capacité de chauffage
insuffisante
La température extérieure est extrême-
ment basse
Utilisez un système de chauffage auxiliaire
L’air froid extérieur passe à travers les por-
tes et les fenêtres
Vérifiez que toutes les portes et fenêtres
soient fermées en cours d’exploitation de
l’appareil
Faible niveau de liquide réfrigérant, en
raison d’une fuite ou d’une utilisation
prolongée
Vérifiez l’absence de fuites, resserrez si
nécessaire et réajustez le niveau de liqui-
de réfrigérant
Les témoins lumineux
clignotent de manière
ininterrompue
L’appareil peut cesser de fonctionner ou continuer à fonctionner normalement. Si les
voyants continuent à clignoter ou des codes d’erreur s’affichent, patientez environ 10
minutes. Cette méthode peut remédier au problème.
Dans le cas contraire, débranchez la prise d’alimentation, puis rebranchez-la. Allumez
l’appareil.
Si le problème persiste, débranchez la prise d’alimentation et contactez votre service
client le plus proche.
Un code d’erreur
s’affiche sur l’écran de
l’appareil d’intérieur:
• E0, E1, E2…
• P1, P2, P3…
• F1, F2, F3…
70
Si la panne n’a pas pu être résolue, prière de contacter votre distributeur. Expliquez-lui la panne observée
et indiquez-lui la référence du modèle de votre climatiseur.
G
NOTE!
Toute réparation de l’appareil doit être exclusivement effectuée par un technicien agréé.
L CONDITIONS DE GARANTIE
Le climatiseur a une garantie de 48 mois sur le compresseur de l’appareil et 24 mois sur les autres pièces, à
partir de la date d’achat. Le règlement est le suivant:
1. Toutes autres revendications de dommages et intérêts, dommages consécutifs inclus, seront expressé-
ment refusées.
2. La réparation ou le changement de pièces durant la période de garantie ne provoque pas un prolon-
gement de cette même garantie.
3. La garantie n’est pas valable en cas de modification de l’appareil, d’utilisation de pièces non d’origine,
ou de réparation effectuée par des tierces personnes.
4. Les pièces subissant une usure normale, comme le filtre, ne sont pas garanties.
5. La garantie n’est valable que sur présentation de la preuve d’achat originale et datée sur laquelle
aucune modification n’a été apportée.
6. La garantie ne couvre pas les dégâts causés par une utilisation ne respectant pas le mode d’emploi, ou
suite à des négligences.
7. Les frais d’expédition et les risques liés à l’envoi du climatiseur ou de ses pièces sont toujours à la charge
de l’acheteur.
8. La garantie ne couvre pas les dégâts causés par l’utilisation de filtres non conformes.
9. La garantie ne couvre pas la perte et/ou fuite de gaz réfrigérant causée par une installation effec-
tuée par une personne non agréée. La garantie ne couvre pas les dommages liés à une installation,
connexion ou déconnexion ne répondant pas aux prescriptions législatives en vigueur et/ou aux indica-
tions contenues dans ce manuel.
Contacter votre réparateur si ces instructions ne suffisent pas à résoudre la panne. Si l’appareil doit être
démonté, seul un technicien agréé et possédant les qualifications requises peut effectuer les opérations de
déconnexion/reconnexion.
3
71
3
M SPECIFICATIONS TECHNIQUES
Modèle
S 4225
S 5225
S 5225 B
S-JA 2519
S 4232
S 5232
S 4248
S 5248
SC 4225
SC 5225
SCJA-2519
SC 4232
SC 5232
SC 4248
SC 5248
SCJA-4819
Type climatiseur
Climatiseur monté
sur mur
Climatiseur monté
sur mur
Climatiseur monté
sur mur
Climatiseur monté
sur mur
Climatiseur monté
sur mur
Climatiseur monté
sur mur
Capacité de refroidissement * W
2600 (1030 - 3190) 3500 (820 - 4160) 5300 (1730 - 6980) 2500 (1590 - 3000)
3200 (2110 - 4000) 4600 (1820 - 6120)
Classe EE refroidissement*
A++ A++ A++ A++
A++ A++
SEER*
7,1 7,0 6,4 6,5
6,2 6,7
Capacité de chauffage * W
2500 ( 880 - 3660) 2700 ( 850 - 4780) 3900 (1060 - 6980) 2400 (960 - 4890)
2400 (1280 - 4900) 3800 (1380 - 6740)
Classe EE mode chauffage *
A+ A+ A+ A+
A+ A+
SCOP*
4,0 4,1 4,0 4,0
4,0 4,0
Capacité de déshumidification
** / ***
L / 24 h
24,0 28,8 43,2 26,4
31,2 36,0
Conso. énergie mode refroidis
-
sement
kW
0,70 1,09 1,54 0,71
1,19 1,40
Conso. énergie mode chauffage kW
0,67 1,05 1,46 0,84
1,23 1,90
Consommation annuelle d’énergie
mode refroidissement / chauffage
kWh
128 / 875 175 / 922 290 / 1365 137 / 836
187 / 834 245 / 1326
Alimentation électrique V / Hz / Ph
220-240~ / 50 / 1 220-240~ / 50 / 1 220-240~ / 50 / 1 220-240~ / 50 / 1
220-240~ / 50 / 1 220-240~ / 50 / 1
Courant max. A
9,5 10,0 11,5 10,0
10,0 13,0
Flux d’air ** m3/h
416/309/230 539/478/294 750/505/420
545/435/368
545/435/368 770/610/410
Pour les locaux de - jusqu’à** m3
60-85 80-100 140-185 60-85 80-100 125-145
Régions appropriées W/A/C W/A/C W/A/C W/A/C W/A/C W/A/C
Type compresseur Roterende Roterende Roterende Roterende Roterende Roterende
Vitesses ventilateur
4 4 4 3
3 3
Amplitude thermostatique oC
17 - 30 17 - 30 17 - 30 17 - 30
17 - 30 17 - 30
Commandes manuelle/mécanique/
électronique
Télécommande élec
-
tronique
Télécommande élec-
tronique
Télécommande élec-
tronique
Télécommande élec-
tronique
Télécommande élec-
tronique
Télécommande élec-
tronique
Télécommande Oui / Non Oui Oui Oui Oui Oui Oui
Types filtres à air
Écran, Charbon actif,
3M HAF
Écran, Charbon actif,
3M HAF
Écran, Charbon actif,
3M HAF
Écran, Charbon actif,
3M HAF
Écran, Charbon actif,
3M HAF
Écran, Charbon actif,
3M HAF
Type / charge réfrigérant R / g
R32 / 700 R32 / 800 R32 / 1250 R32 / 800 R32 / 800 R32 / 1190
Réfrigérant GWP
675 675 675 675
675 675
Équivalent CO
2
tonnes
0,473 0,540 0,844 0,540
0,540 0,803
Dimensions unité intérieure (L
x h x p)
mm
722x187x290 802x189x297 965x215x319 805x194x285
805x194x285 957x213x302
Dimensions unité extérieure (L
x h x p)
mm
770x300x555 770x300x555 800x333x554 770x300x555
770x300x555 800x333x554
Poids net unité intérieure kg
7,3 8,2 10,8 7,8
7,8 10,3
Poids net unité extérieure kg
27,2 27,0 37,0 25,7
25,7 34,6
Poids brut unité intérieure kg
9,7 10,7 14,1 10,4
10,4 13,8
Poids brut unité extérieure kg
29,7 29,4 39,9 31,1
31,1 40,2
Niveau sonore unité intérieure**** dB(A)
54 56 58 53
53 55
Niveau sonore unité extérieure**** dB(A)
59 60 64 62
62 62
Niveau sonore unité intérieure
(low)****
dB
20 21 21 25
25 29
Classe protection unité intérieure IP
IPX0 IPX0 IPX0 IPX0
IPX0 IPX0
Classe protection unité extérieure IP
IPX4 IPX4 IPX4 IPX4
IPX4 IPX4
* EN 14511/EN 14825
** Information à titre indicatif
*** Suppression de l’humidité à 32°C, 80% HR
**** EN 12108-2008
72
Ne pas jeter des appareils électriques avec les déchets managers munici-
paux non triés. Utiliser des équipements de collecte séparés. Contacter
votre gouvernement local pour toute information concernant les systèmes
de collecte disponibles. Si les appareils électriques sont jetés sur des sites
d’enfouissement des déchets ou dans déchetteries, des substances dange-
reuses risquent de pénétrer dans les nappes phréatiques et entrer dans la
chaîne alimentaire et peuvent poser des risques à votre santé et bien-être.
Lors du remplacement d’appareils électriques usagés par des appareils
neufs, le revendeur est tenu de reprendre votre vieil appareil pour recy-
clage au moins gratuitement. Ne jetez pas les piles dans le feu car elles
pourraient exploser ou rejeter des liquides dangereux. Si vous remplacez
ou si vous détruisez la télécommande, retirez les piles et jetez-les confor-
mément aux lois en vigueur car elles nuisent à l’environnement.
Environnement: Cet appareil contient un gaz fluoré à effet de serre dont l’utilisa-
tion est régie par le protocole de Kyoto. Toute réparation ou démontage de cet
appareil doit exclusivement être effectué par un personnel qualifié.
Cet appareil contient du gaz réfrigérant R32. Voir quantité dans le tableau ci-des-
sus. Ne diffusez pas de gaz R32 dans l’atmosphère: R32 est un gaz fluoré à effet de
serre à potentiel de réchauffement global (Global Warming Potential - GWP) = 675.
Internet:
Nous vous informons que les notices d’utilisation et/ou d’installation sont dispo-
nibles sur notre site www.qlima.com.
3
73
3
74
4
1. READ THE DIRECTIONS FOR USE FIRST.
2. IN CASE OF ANY DOUBT, CONTACT YOUR DEALER.
Dear Sir, Madam,
Congratulations on the purchase of your Qlima air conditioner. You have acquired a high
quality product that, if used responsibly, will give you many years of pleasure.
Please read these instructions for use first in order to ensure the maximum life span of your
air conditioner.
On behalf of the manufacturer, we provide a 24-month guarantee on all material and
production defects and a 48-month guarantee on the compressor of the air conditioner.
Please enjoy your air conditioner.
Yours sincerely,
PVG Holding b.v.
Customer service department
75
4
CONTENTS
A SAFETY INSTRUCTIONS
B. PARTS NAMES
C. OPERATING TEMPERATURE
D. OPERATION WITH REMOTE CONTROL
E. MANUAL OPERATION (WITHOUT REMOTE)
F. OPTIMAL OPERATION
G. ADJUSTING AIR FLOW DIRECTION
H. HOW THE AIR CONDITIONER WORKS
I. MAINTENANCE
J. OPERATION TIPS
K. TROUBLE SHOOTING TIPS
L. GUARANTEE CONDITIONS
M. TECHNICAL DATA
READ THIS MANUAL
Inside you will find many helpful hints on how to use and maintain your air con-
ditioner properly. You will find many answers to common problems in the chapter
Troubleshooting Tips. If you review chapter K “Troubleshooting Tips” first, you
may not need to call for service.
76
A
SAFETY INSTRUCTIONS
Install this device only when it complies with local/nation-
al legislation, ordinances and standards. This product is
intended to be used as an air conditioner in residential
houses and is only suitable for use in dry locations, in nor-
mal household conditions, indoors in living room, kitchen
and garage. Check the mains voltage and frequency. This
unit is only suitable for earthed sockets, connection voltage
220-240 V~ / 50 Hz. The 4.8kW models must be connected
directly to the supply source.
IMPORTANT
The device MUST always have an earthed
connection. If the power supply is not earthed, you
may not connect the unit. The plug must always
be easily accessible when the unit is connected.
Read these instructions carefully and follow the
instructions.
The air conditioner contains a refrigerant and can
be classified as pressurized equipment. Therefore
always use an authorized air conditioning engineer
for installation and maintenance of the air
conditioner. The air conditioner must be inspected
and serviced on an annual base by an authorized air
conditioning engineer. Or the warranty might be
void.
Before connecting the unit, check the following:
The voltage supply must correspond with the mains volt-
age stated on the rating label.
The socket and power supply must be suitable for the cur-
rent stated on the rating label.
The plug on the cable of the device must fit into the wall
socket.
• The device must be placed and mounted on a stable sur-
face.
4
77
4
The electricity supply to the device must be checked by a
recognised professional if you have any doubts regarding
the compatibility.
This device is manufactured according to CE safety stand-
ards. Nevertheless, you must take care, as with any other
electrical device.
Do not cover the air inlet and outlet grill.
• Never allow the device to come into contact with chemi-
cals.
Never spray the unit with or submerge in water. Turn off
the unit and disconnect the power supply if water enters
the indoor unit.
• Do not insert hands, fingers or objects into the openings
of the unit.
Never use an extension cable to connect the device to the
electric power supply. If there is no suitable, earthed wall
socket available, have one installed by a recognised elec-
trician.
Have any repairs and/or maintenance only carried out by
a recognised service engineer or your recognised supplier.
Follow the instructions for use and maintenance as indicated
in the user manual of this device.
Always remove the plug of the unit from the wall socket
when it is not in use.
Do not operate or stop the air conditioner by inserting or
pulling out the power plug. Only use the dedicated but-
tons on the air conditioner or on the remote control.
Do not open the air conditioner when it is in operation.
Always pull out the electrical plug when opening the
device.
Always pull out the electrical plug when cleaning or ser-
vicing the air conditioner.
Do not place gas burners, ovens and/or stoves in the air-
stream.
Do not operate the buttons or touch the air conditioner
with wet hands.
78
Note that the outdoor unit produces sound when in
use, this could interfere with local legislation, it is the
responsibility of the user to check and to make sure the
equipment is in full compliance with local legislation.
This appliance is not intended for use by persons (includ-
ing children) with reduced physical, sensory or men-
tal capabilities, or lack of experience and knowledge,
unless they have been given supervision or instruction
concerning use of the appliance by a person responsible
for their safety.
Children should be supervised to ensure that they do not
play with the appliance.
It is advised to stay out of the direct air stream.
Never drink the drain water from the air conditioner.
Do not make any modifications to the unit.
If the power cable is damaged it must be replaced by
the manufacturer, its customer service department or
persons with comparable qualifications in order to
prevent danger.
This appliance can be used by children aged from 8 years
and above and persons with reduced physical, sensory
or mental capabilities or lack of experience and knowl-
edge if they have been given supervision or instruction
concerning use of the appliance in a safe way and under-
stand the hazards involved. Children shall not play with
the appliance. Cleaning and user maintenance shall not
be made by children without supervision.
ATTENTION!
Never use the device with a damaged
power cord, plug, cabinet or control
panel.
Failing to follow the instructions may
lead to nullification of the guarantee on
this device.
4
79
4
Note about Fluorinated Gasses
1. This air-conditioning unit contains fluorinated gasses. For specific information on the type of gas and
the amount, please refer to the relevant label on the unit itself.
2. Installation, service, maintenance and repair of this unit must be performed by a certified technician.
3. Product uninstallation and recycling must be performed by a certified technician.
4. If the system has a leak-detection system installed, it must be checked for leaks at least every 12
months.
5. When the unit is checked for leaks, proper record-keeping of all checks is strongly recommended.
6. This air-conditioning unit is a hermetically sealed unit that contains fluorinated gasses.
B PART NAMES
INDOOR UNIT Indoor unit
Air filter (pull out)
Front panel
Louver
Display window
Remote controller
OUTDOOR UNIT Outdoor unit
Connecting pipe, drain hose (For
S-models connecting pipe not included)
Air inlet (side and rear)
Air outlet
5
6
7
8
1
22
3
4
5
6
2
1
4
3
G
NOTE!
All the pictures in this manual and on the gift box are for explanation and indication purpose only.
They may be slightly different from the air conditioner you purchased. The actual shape shall prevail.
80
FUNCTION INDICATORS ON INDOOR UNIT DISPLAY PANEL
Page 6
Unit Specifications and Features
1
Unit
Specifications
and Features
NOTE:
A guide on using the infrared remote is not included
in this literature package.
Unit Parts
Power Cable (Some Units)
Remote Control
Remote Control
Holder (Some Units)
Louver
Front Panel
Air Filter
(pull out)
Display window
“ ” for 3 seconds when:
• TIMER ON is set
• FRESH, SWING, TURBO, or SILENCE features are turned on
“ ” for 3 seconds when:
• TIMER OFF is set
• FRESH, SWING, TURBO, or SILENCE features are turned off
“ ” when defrosting(cooling & heating units)
“ ” when anti-cold air feature is turned on(cooling & heating units)
“ ” when unit is self-cleaning(some units)
“ ” when freeze protection is turned on(some units)
“ ” when Wireless Control feature is activated(some units)
Display Code
Meanings
In Fan and Dry mode, the unit will display the room temperature.
In other modes, the unit will display your temperature setting.
,
,
“ ”
When ECO function(some units) is activated, the
illuminates gradually one by one as --
-- --set temperature-- ...... in one second interval.
for 3 seconds when:
• TIMER ON is set
• FRESH, SWING, TURBO, or SILENCE features are turned on
Page 6
Unit Specifications and Features
1
Unit
Specifications
and Features
NOTE:
A guide on using the infrared remote is not included
in this literature package.
Unit Parts
Power Cable (Some Units)
Remote Control
Remote Control
Holder (Some Units)
Louver
Front Panel
Air Filter
(pull out)
Display window
“ ” for 3 seconds when:
• TIMER ON is set
• FRESH, SWING, TURBO, or SILENCE features are turned on
“ ” for 3 seconds when:
• TIMER OFF is set
• FRESH, SWING, TURBO, or SILENCE features are turned off
“ ” when defrosting(cooling & heating units)
“ ” when anti-cold air feature is turned on(cooling & heating units)
“ ” when unit is self-cleaning(some units)
“ ” when freeze protection is turned on(some units)
“ ” when Wireless Control feature is activated(some units)
Display Code
Meanings
In Fan and Dry mode, the unit will display the room temperature.
In other modes, the unit will display your temperature setting.
,
,
“ ”
When ECO function(some units) is activated, the
illuminates gradually one by one as --
-- --set temperature-- ...... in one second interval.
for 3 seconds when:
• TIMER OFF is set
• FRESH, SWING, TURBO, or SILENCE features are turned off
Page 6
Unit Specifications and Features
1
Unit
Specifications
and Features
NOTE:
A guide on using the infrared remote is not included
in this literature package.
Unit Parts
Power Cable (Some Units)
Remote Control
Remote Control
Holder (Some Units)
Louver
Front Panel
Air Filter
(pull out)
Display window
“ ” for 3 seconds when:
• TIMER ON is set
• FRESH, SWING, TURBO, or SILENCE features are turned on
“ ” for 3 seconds when:
• TIMER OFF is set
• FRESH, SWING, TURBO, or SILENCE features are turned off
“ ” when defrosting(cooling & heating units)
“ ” when anti-cold air feature is turned on(cooling & heating units)
“ ” when unit is self-cleaning(some units)
“ ” when freeze protection is turned on(some units)
“ ” when Wireless Control feature is activated(some units)
Display Code
Meanings
In Fan and Dry mode, the unit will display the room temperature.
In other modes, the unit will display your temperature setting.
,
,
“ ”
When ECO function(some units) is activated, the
illuminates gradually one by one as --
-- --set temperature-- ...... in one second interval.
when defrosting(cooling & heating units)
Page 6
Unit Specifications and Features
1
Unit
Specifications
and Features
NOTE:
A guide on using the infrared remote is not included
in this literature package.
Unit Parts
Power Cable (Some Units)
Remote Control
Remote Control
Holder (Some Units)
Louver
Front Panel
Air Filter
(pull out)
Display window
“ ” for 3 seconds when:
• TIMER ON is set
• FRESH, SWING, TURBO, or SILENCE features are turned on
“ ” for 3 seconds when:
• TIMER OFF is set
• FRESH, SWING, TURBO, or SILENCE features are turned off
“ ” when defrosting(cooling & heating units)
“ ” when anti-cold air feature is turned on(cooling & heating units)
“ ” when unit is self-cleaning(some units)
“ ” when freeze protection is turned on(some units)
“ ” when Wireless Control feature is activated(some units)
Display Code
Meanings
In Fan and Dry mode, the unit will display the room temperature.
In other modes, the unit will display your temperature setting.
,
,
“ ”
When ECO function(some units) is activated, the
illuminates gradually one by one as --
-- --set temperature-- ...... in one second interval.
when anti-cold air feature is turned on (cooling & heating units)
Page 6
Unit Specifications and Features
1
Unit
Specifications
and Features
NOTE:
A guide on using the infrared remote is not included
in this literature package.
Unit Parts
Power Cable (Some Units)
Remote Control
Remote Control
Holder (Some Units)
Louver
Front Panel
Air Filter
(pull out)
Display window
“ ” for 3 seconds when:
• TIMER ON is set
• FRESH, SWING, TURBO, or SILENCE features are turned on
“ ” for 3 seconds when:
• TIMER OFF is set
• FRESH, SWING, TURBO, or SILENCE features are turned off
“ ” when defrosting(cooling & heating units)
“ ” when anti-cold air feature is turned on(cooling & heating units)
“ ” when unit is self-cleaning(some units)
“ ” when freeze protection is turned on(some units)
“ ” when Wireless Control feature is activated(some units)
Display Code
Meanings
In Fan and Dry mode, the unit will display the room temperature.
In other modes, the unit will display your temperature setting.
,
,
“ ”
When ECO function(some units) is activated, the
illuminates gradually one by one as --
-- --set temperature-- ...... in one second interval.
when unit is self-cleaning (some units)
Page 6
Unit Specifications and Features
1
Unit
Specifications
and Features
NOTE:
A guide on using the infrared remote is not included
in this literature package.
Unit Parts
Power Cable (Some Units)
Remote Control
Remote Control
Holder (Some Units)
Louver
Front Panel
Air Filter
(pull out)
Display window
“ ” for 3 seconds when:
• TIMER ON is set
• FRESH, SWING, TURBO, or SILENCE features are turned on
“ ” for 3 seconds when:
• TIMER OFF is set
• FRESH, SWING, TURBO, or SILENCE features are turned off
“ ” when defrosting(cooling & heating units)
“ ” when anti-cold air feature is turned on(cooling & heating units)
“ ” when unit is self-cleaning(some units)
“ ” when freeze protection is turned on(some units)
“ ” when Wireless Control feature is activated(some units)
Display Code
Meanings
In Fan and Dry mode, the unit will display the room temperature.
In other modes, the unit will display your temperature setting.
,
,
“ ”
When ECO function(some units) is activated, the
illuminates gradually one by one as --
-- --set temperature-- ...... in one second interval.
when freeze protection is turned on (some units)
Page 6
Unit Specifications and Features
1
Unit
Specifications
and Features
NOTE:
A guide on using the infrared remote is not included
in this literature package.
Unit Parts
Power Cable (Some Units)
Remote Control
Remote Control
Holder (Some Units)
Louver
Front Panel
Air Filter
(pull out)
Display window
“ ” for 3 seconds when:
• TIMER ON is set
• FRESH, SWING, TURBO, or SILENCE features are turned on
“ ” for 3 seconds when:
• TIMER OFF is set
• FRESH, SWING, TURBO, or SILENCE features are turned off
“ ” when defrosting(cooling & heating units)
“ ” when anti-cold air feature is turned on(cooling & heating units)
“ ” when unit is self-cleaning(some units)
“ ” when freeze protection is turned on(some units)
“ ” when Wireless Control feature is activated(some units)
Display Code
Meanings
In Fan and Dry mode, the unit will display the room temperature.
In other modes, the unit will display your temperature setting.
,
,
“ ”
When ECO function(some units) is activated, the
illuminates gradually one by one as --
-- --set temperature-- ...... in one second interval.
when Wireless Control feature is activated (some units)
Page 6
Unit Specifications and Features
1
Unit
Specifications
and Features
NOTE:
A guide on using the infrared remote is not included
in this literature package.
Unit Parts
Power Cable (Some Units)
Remote Control
Remote Control
Holder (Some Units)
Louver
Front Panel
Air Filter
(pull out)
Display window
“ ” for 3 seconds when:
• TIMER ON is set
• FRESH, SWING, TURBO, or SILENCE features are turned on
“ ” for 3 seconds when:
• TIMER OFF is set
• FRESH, SWING, TURBO, or SILENCE features are turned off
“ ” when defrosting(cooling & heating units)
“ ” when anti-cold air feature is turned on(cooling & heating units)
“ ” when unit is self-cleaning(some units)
“ ” when freeze protection is turned on(some units)
“ ” when Wireless Control feature is activated(some units)
Display Code
Meanings
In Fan and Dry mode, the unit will display the room temperature.
In other modes, the unit will display your temperature setting.
,
,
“ ”
When ECO function(some units) is activated, the
illuminates gradually one by one as --
-- --set temperature-- ...... in one second interval.
when ECO function(some units) is activated, the
Page 6
Unit Specifications and Features
1
Unit
Specifications
and Features
NOTE:
A guide on using the infrared remote is not included
in this literature package.
Unit Parts
Power Cable (Some Units)
Remote Control
Remote Control
Holder (Some Units)
Louver
Front Panel
Air Filter
(pull out)
Display window
“ ” for 3 seconds when:
• TIMER ON is set
• FRESH, SWING, TURBO, or SILENCE features are turned on
“ ” for 3 seconds when:
• TIMER OFF is set
• FRESH, SWING, TURBO, or SILENCE features are turned off
“ ” when defrosting(cooling & heating units)
“ ” when anti-cold air feature is turned on(cooling & heating units)
“ ” when unit is self-cleaning(some units)
“ ” when freeze protection is turned on(some units)
“ ” when Wireless Control feature is activated(some units)
Display Code
Meanings
In Fan and Dry mode, the unit will display the room temperature.
In other modes, the unit will display your temperature setting.
,
,
“ ”
When ECO function(some units) is activated, the
illuminates gradually one by one as --
-- --set temperature-- ...... in one second interval.
illuminates gradually one by one as
Page 6
Unit Specifications and Features
1
Unit
Specifications
and Features
NOTE:
A guide on using the infrared remote is not included
in this literature package.
Unit Parts
Power Cable (Some Units)
Remote Control
Remote Control
Holder (Some Units)
Louver
Front Panel
Air Filter
(pull out)
Display window
“ ” for 3 seconds when:
• TIMER ON is set
• FRESH, SWING, TURBO, or SILENCE features are turned on
“ ” for 3 seconds when:
• TIMER OFF is set
• FRESH, SWING, TURBO, or SILENCE features are turned off
“ ” when defrosting(cooling & heating units)
“ ” when anti-cold air feature is turned on(cooling & heating units)
“ ” when unit is self-cleaning(some units)
“ ” when freeze protection is turned on(some units)
“ ” when Wireless Control feature is activated(some units)
Display Code
Meanings
In Fan and Dry mode, the unit will display the room temperature.
In other modes, the unit will display your temperature setting.
,
,
“ ”
When ECO function(some units) is activated, the
illuminates gradually one by one as --
-- --set temperature-- ...... in one second interval.
--
--
Page 6
Unit Specifications and Features
1
Unit
Specifications
and Features
NOTE:
A guide on using the infrared remote is not included
in this literature package.
Unit Parts
Power Cable (Some Units)
Remote Control
Remote Control
Holder (Some Units)
Louver
Front Panel
Air Filter
(pull out)
Display window
“ ” for 3 seconds when:
• TIMER ON is set
• FRESH, SWING, TURBO, or SILENCE features are turned on
“ ” for 3 seconds when:
• TIMER OFF is set
• FRESH, SWING, TURBO, or SILENCE features are turned off
“ ” when defrosting(cooling & heating units)
“ ” when anti-cold air feature is turned on(cooling & heating units)
“ ” when unit is self-cleaning(some units)
“ ” when freeze protection is turned on(some units)
“ ” when Wireless Control feature is activated(some units)
Display Code
Meanings
In Fan and Dry mode, the unit will display the room temperature.
In other modes, the unit will display your temperature setting.
,
,
“ ”
When ECO function(some units) is activated, the
illuminates gradually one by one as --
-- --set temperature-- ...... in one second interval.
--
set temperature --
Page 6
Unit Specifications and Features
1
Unit
Specifications
and Features
NOTE:
A guide on using the infrared remote is not included
in this literature package.
Unit Parts
Power Cable (Some Units)
Remote Control
Remote Control
Holder (Some Units)
Louver
Front Panel
Air Filter
(pull out)
Display window
“ ” for 3 seconds when:
• TIMER ON is set
• FRESH, SWING, TURBO, or SILENCE features are turned on
“ ” for 3 seconds when:
• TIMER OFF is set
• FRESH, SWING, TURBO, or SILENCE features are turned off
“ ” when defrosting(cooling & heating units)
“ ” when anti-cold air feature is turned on(cooling & heating units)
“ ” when unit is self-cleaning(some units)
“ ” when freeze protection is turned on(some units)
“ ” when Wireless Control feature is activated(some units)
Display Code
Meanings
In Fan and Dry mode, the unit will display the room temperature.
In other modes, the unit will display your temperature setting.
,
,
“ ”
When ECO function(some units) is activated, the
illuminates gradually one by one as --
-- --set temperature-- ...... in one second interval.
...... in one second interval
In other modes, the unit will display your temperature setting.
In Fan and Dry mode, the unit will display the room temperature.
C OPERATING TEMPERATURE
Cooling, heating and / or dehumidifying are effective at the following indoor and outdoor temperatures:
Temperature
Mode Cooling operation Heating operation Dehumidifying operation
Room temperature 17ºC - 32ºC 0ºC - 30ºC 10ºC - 32ºC
Outdoor temperature -25ºC - 50ºC -25ºC - 30ºC 0ºC - 50ºC
CAUTION
If air conditioner is used outside of the above conditions, certain safety protection features may
come into operation and cause the unit to function abnormally.
If the air conditioner operates in excess of a relative humidity of 80% in the room, the surface
of the air conditioner may attract condensation. Please set the vertical air flow louver to its
maximum angle (vertically to the floor), and set HIGH fan mode.
For maximum effect of your air conditioner always close doors and windows when cooling or
heating.
4
81
4
D OPERATION WITH REMOTE CONTROL
G
NOTE!
Always aim the remote controller towards the receiver on the indoor unit and make sure there
are no obstacles in between the remote control and the receiver on the indoor unit. Otherwise
the remote control signal will not be picked up by the receiver and the air conditioner will not
work properly.
The maximum distance at which the remote control will work is approximately 6 to 7 meters.
G
NOTE!
Keep the remote controller where its signal can reach the receiver of the unit. When you select
the timer operation, the remote controller automatically transmits a signal to the indoor unit
at the specified time. If you keep the remote controller in a position that hinders proper signal
transmissions, a time lag of up to 15 minutes may occur.
Introduction of Function Buttons on the Remote Controller
4
3
2
8
6
7
12
11
13
15
5
9
10
14
1
SLEEP
FRESH
On/off Button: Push this button to start the unit operation. Push the button again to stop the unit
operation.
Mode Button: Each time you press the button, a mode is selected in a sequence that goes from AUTO
COOL DRY HEAT and FAN only as the following figure indicates:
AUTO COOL DRY HEAT FAN
+ Button: Push the button to increase the indoor temperature setting to 30ºC.
- Button: Push the button to decrease the indoor temperature setting to 17ºC.
Fan Button: This button is used for selecting Fan Speed. Each time you press the button, a fan speed is
selected in a sequence that goes from AUTO, LOW, MED to HIGH, then back to Auto. When you select the
AUTO or DRY mode, the fan speed will be automatically controlled and you can not set the fan speed.
SLEEP Button: Press this button to go into the Energy-Saving operation mode. Press it again to cancel.
This function can only be used on COOL, HEAT and AUTO mode and maintain the most comfortable
temperature for you. The unit automatically increases the set temperature by 1ºC per hour (in cooling
mode) or decreases the set temperature by 1ºC per hour (heating mode) during the first 2 hours. The air
conditioner will maintain this temperature (set temperature – or + 2 degrees) during the next 5 hours.
After this period, the air conditioner will shut itself down.
FRESH Button: Long press to active the FRESH function
82
Swing Button: Press the SWING button to activate the swing feature. Push the button again to stop.
Air direction Button: Press this button to change the swing angle of the louver. The swing angle of the
louver is 6
o
for each press. When the louver swings at a certain angle which would affect the cooling and
heating effect of the air conditioner, it would automatically change the swing direction. No symbol will
appear in the display area when press this button.
Swing Button(left and right): Press the SWING button to activate the swing feature. Push the button
again to stop.
i Timer on Button: Press this button to initiate the auto-on time sequence. Each press will increase the
auto-timed setting in 30 minutes increments. When the setting time displays 10Hr, each press will increase
the auto-timed setting 60 minutes increments. To cancel the auto-timed program, continue pressing the
button until 0.0 is displayed.
j Timer off Button: Press this button to initiate the auto-off time sequence. Each press will increase the
auto-timed setting in 30 minutes increments. When the setting time displays 10Hr, each press will increase
the auto-timed setting 60 minutes increments. To cancel the auto-timed program, continue pressing the
button until 0.0 is displayed.
k RESET Button: When you press the recessed RESET button, all current settings are cancelled and the con-
trol will return to the initial settings.
l Turbo Button / Active Clean button: Push this button on COOL mode, the air conditioner goes into
powerful cooling operation. Push again to cancel the TURBO function. Upon pressing this button (> 2
sec) the unit will go into the Active Clean mode. A complete process will be started to clean the internal
side of the evaporator and to reduce the breeding of bacteria. When this function is activated all timer
settings will be cancelled. To stop the Active Clean mode press the button (> 2 sec) again.
m LOCK Button: When you press the recessed LOCK button, all current settings are locked in and the remote
controller does not accept any operation except that of the LOCK. Press again to cancel the LOCK mode.
n LED DISPLAY / FOLLOW ME Button: Press this button to clear the digit display in the air conditioner. The
digit display in the air conditioner will reactivate itself automatically after 3 seconds, when no buttons are
being pressed in this period. Press it again to activate it (Not applicable to units without this function).
When pushing more than 2 seconds, the FOLLOW ME function will be activated, pushing more than 2
seconds again to disable.
o Low sound button / indoor freezing prevention: Press this button to decrease the indoor sound pres-
sure level to 21 dB(A). The indoor unit fan speed is reduced to its lowest level. Upon pressing this button
(> 2 seconds) the unit will go into the freezing prevention mode. The unit will overrule the indoor tem-
perature setting and will set it to approx 8 °C. In this way preventing your home from freezing during
cold periods at the lowest possible energy consumption. When this mode is selected the indoor unit
display will show “FP”. This button can only be operated in heating mode. To leave the Home Freezing
Prevention Mode: simply press the button once again.
Names and Functions of indicators on Remote Controller
auto cool dryheatfan
sleep lock run
SET TEMP.TIMER ONOFF
2
1
3
4
5
6
7
4
83
4
Transmission indicator: This transmission indicator lights when remote controller transmits signals to
the indoor unit.
Mode display: Displays the current opeartion mode. Including Auto
, Cool , Dry , Heat (Not
applicable to cooling only models), Fan
.
Temp. / Timer display: Displays the temperature setting (17º C ~ 30ºC). When you set the operating
mode to FAN, no temperature setting is displayed. And if in the TIMER mode, shows the ON and OFF
settings of the TIMER.
Fan speed display: Displays the selected fan speed, AUTO (no display), LOW
, MED and HIGH . The
fan speed is AUTO when the operating mode is either AUTO or DRY.
ON / OFF display: Displayed by pressing the ON / OFF button. Press the ON / OFF button again to remove.
Lock display: Displayed when LOCK mode is activated.
Sleep display: Displayed under sleeping operation. Press the SLEEP button again to remove.
G
NOTE!
All items are shown in the Fig. 2 for the purpose of clear presentation. But during the actual
operation only the relative functional items are shown on the display panel.
Operating the Remote Controller
Install / Replace Batteries
Use two dry alkaline batteries (AAA/LR03).
Do not use rechargeable batteries.
1. Remove the battery cover on the back of the Remote Control by pulling it according to the arrow
direction shown on the cover.
2. Insert new batteries making sure that the (+) and (-) of battery are installed correctly.
3. Reattach the cover by sliding it back into position.
G
NOTE!
When the batteries are removed, the remote controller erases all programming. After inserting
new batteries, the remote controller must be reprogrammed.
When replacing batteries, do not use old batteries or a different type battery. This may cause
the remote controller to malfunction.
If you do not use the remote controller for several weeks remove the batteries. Otherwise
battery leakage may damage the remote controller.
The average battery life under normal use is about 6 months.
Replace the batteries when there is no answering beep from the indoor unit or if the
Transmission Indicator light fails to appear.
Never mix new and old batteries. Never use different battery types (e.g. alkaline and
manganese dioxide) simultaneously.
AUTOMATIC Operation
When the air conditioner is ready for use (check if unit is plugged in and whether electrical power is availa-
ble), switch on the power and the OPERATION indicator lamp on the display panel of the indoor unit starts
flashing.
1. Use the Mode select button to select AUTO.
2. Push the + or - button to set the desired room temperature.
3. Push the On/off button to start the air conditioner. The OPERATION lamp on the display panel of the
indoor unit lights. The FAN SPEED is automatically controlled.
4. Push the On/off button again to stop the unit operation.
84
G
NOTE!
In the AUTO mode, the air conditioner can logically choose the mode COOL, FAN and HEAT by
sensing the difference between the actual ambient room temperature and the set temperature
on the remote controller.
If the AUTO mode is not comfortable for you , the desired mode can be selected manually.
COOL, HEAT, and FAN ONLY Operation
1. If the AUTO mode is not comfortable, you may manually override the settings by using COOL, DRY,
HEAT (HEAT PUMP units only), or FAN ONLY modes by pressing button .
2. Push the + or - button ( and ) to set the desired room temperature.
3. Push the Fan button to select the FAN mode of AUTO, HIGH, MED or LOW.
4. Push the On/off button . The operation lamp lights and the air conditioner starts to operate per your
settings. Push the On/off button again to stop this unit operation.
G
NOTE!
The FAN ONLY mode cannot be used to control the temperature. In this mode, only steps 1, 3 and
4 are applicable.
DRY Operation
1. Push the Mode button to select DRY.
2. Push the + or - button ( and ) to set the desired temperature.
3. Push the On/off button . The operation lamp lights and the air conditioner starts to operate in the DRY
mode. Push the On/off button again to stop this unit operation.
G
NOTE!
Due to the difference of the set temperature of the unit and the actual indoor temperature, the
air conditioner when in DRY mode will automatically operate many times without running the
COOL and FAN mode.
TIMER Operation
Push Timer on/off button (i and j) to set the on and off times of the unit. The effective operation time set
by the remote controller for the timer function is limited to a period of between 0.5 and less than 24 hours.
1. To set the STARTING time.
1.1
Push the Timer on button i, then the remote controller display shows ON TIMER, the last set time for
the starting operation and the signal “h” will be shown on the Timer display area. You are now ready
to reset the time to START the operation.
1.2
Push the Timer on button i again to set desired unit start time.
1.3
After setting the Timer on ,there will be half a second delay before the remote controller transmits the
signal to the air conditioner.
2. To set the STOPPING time.
2.1
Push the Timer off button j and the remote controller display will show OFF TIMER and the last set
time for the timer off operation in hours will be shown on the Timer display area. You are now ready
to reset the time of the STOP operation.
2.2
Push the Timer off button j again to set the time you want to stop the operation.
2.3
After setting the Timer off, there will be half a second delay before the remote controller transmits the
signal to the air conditioner.
4
85
4
Example of timer setting
To start the air conditioner in 6 hours.
1. Press the TIMER ON button, the last setting of starting operation time and the
signal “h” will show on the display area.
2. Press the TIMER ON button to display “6:0h” .
3. Wait for one second and the digital display area will show the temperature again.
Start
Off
6h
TIMERON
The “TIMER ON” indicator remains on and this function is activated.
Combined timer
(setting both ON and OFF timers simultaneously)
TIMER OFF --> TIMER ON
(On --> Stop --> Start operation)
This feature is useful when you want to stop the air conditioner after you go to bed,
On
Stop
2hSet
On
10 h
TIMERONOFF
and start it again in the morning when you wake up or when you return home.
Example:
To stop the air conditioner 2 hours after setting and start it again 10 hours after setting.
1. Press the TIMER OFF button.
2. Press the TIMER OFF button again to display 2.0h on the TIMER OFF display
3. Press the TIMER ON button
4. Press the TIMER ON button again to display 10h on the TIMER ON display
5. Wait for one second and the digital display area will show the temperature again. The TIMER ON OFF
indicator remains on and this function is activated.
G
NOTE!
If the same time is set for both START and STOPPING settings, the stopping time will
automatically increase 0.5hr (the set time displays less than 10hr) or one hour (the set time
displays 10hr or more).
To change the Timer on/off time, just press the corresponding TIMER button and reset the
time.
The setting time is relative time. That is the time set is based on the delay of the current time.
WARNING
Keep the remote controller away from all liquids.
Protect the remote controller from high temperatures and exposure to radiation.
Keep the indoor receiver out of direct sunlight or the air conditioner may malfunction.
86
E MANUAL OPERATION (WITHOUT REMOTE)
How to operate your unit without the remote control.
In the event that your remote control fails to work, your unit can be operated manually with the MANUAL
CONTROL button located on the indoor unit. Note that manual operation is not a long-term solution, and
that operating the unit with your remote control is strongly recommended.
G
BEFORE MANUAL OPERATION
Unit must be turned off before manual operation.
To operate your unit manually:
1 . Locate the MANUAL CONTROL button on the right-hand side panel of the unit.
2 . Press the MANUAL CONTROL button one time to activate FORCED AUTO mode.
3 . Press the MANUAL CONTROL button again to activate FORCED COOLING mode.
4. Press the MANUAL CONTROL button a third time to turn the unit off.
CAUTION
The manual button is intended for testing purposes and emergency operation only. Please do not
use this function unless the remote control is lost and it is absolutely necessary. To restore regular
operation, use the remote control to activate the unit.
F OPTIMAL OPERATION
To achieve optimal performance, please note the following:
Adjust the air flow direction correctly so that it is not directly directed to people.
Adjust the temperature to achieve the highest comfort level. Do not adjust the unit to excessive tem-
perature levels.
Close doors and windows otherwise the desired effect may be reduced.
Do not put any object near air inlet or air outlet, as the efficiency of the air conditioner may be
reduced and the air conditioner may stop running. Make sure there are no obstacles blocking the air
flow. The air stream must be allowed to reach the entire room unhindered. Also the air stream must
be allowed to reach the air conditioner unhindered.
Clean the air filter periodically, otherwise cooling or heating performance may be reduced. It is
advised to clean the filters every two weeks.
Do not operate unit with horizontal louvre in closed position.
Manual control button
Manual
control
button
4
87
4
G ADJUSTING AIR FLOW DIRECTION
Adjust the air flow direction properly otherwise, it might cause discomfort
or cause uneven room temperatures.
Adjust the horizontal louver using button on the remote controller.
Adjust the vertical louver manually.
Adjusting the horizontal Air Flow Direction (up - down)
The air conditioner automatically adjusts the horizontal air flow direction in accord-
ance with the operating mode.
To set the horizontal air flow direction
Perform this function while the unit is in operation. Keep pressing the AIR DIRECTION
button on the remote controller to move the louver to the desired direction.
Adjust the horizontal air flow direction to the desired direction.
In subsequent operations, the horizontal air flow is automatically set in the
direction to which you adjusted the louver by pressing the AIR DIRECTION
button.
To set the vertical air flow direction (left - right)
Adjust the vertical louver manually using the lever in the middle of the vertical
louver arm (depending on model). When the air conditioner is in operation and the
vertical louver is in a specific position, move the lever at left (or right, depending
on model) end of the air outlet to the desired position.
CAUTION!
Take care, do not touch the fan behind the vertical louvers!
To automatically swing the air flow direction (up - down)
Perform this function while the air conditioner is in operation.
Press the SWING button on the remote controller.
To stop the function, press the SWING button again. Press AIR DIRECTION button to lock louver in
desired position.
CAUTION
The AIR DIRECTION and SWING buttons will be disabled when the air conditioner is not in
operation (including when the TIMER ON is set).
Do not operate the air conditioner for long periods with the air flow direction set downward
in cooling or dry mode. Otherwise, condensation may occur on the surface of the horizontal
louver causing moisture to drop.
Do not move the horizontal louver manually. Always use the AIR DIRECTION or SWING
button . If you move this louver manually, it may malfunction during operation. If the louver
malfunctions, stop the air conditioner once and restart it.
When the air conditioner is started immediately after it was stopped, the horizontal louver
might not move for approximately 10 seconds.
Do not operate unit with horizontal louver in closed position.
Deflector rod
Range
88
H HOW THE AIR CONDITIONER WORKS
AUTOMATIC OPERATION
When you set the air conditioner in AUTO mode (button 2 on the remote
controller), it will automatically select COOLING, HEATING or FAN only
operation depending on what temperature you have selected and the room
temperature.
The air conditioner will control room temperature automatically round the
temperature point set by you.
If the AUTO mode is uncomfortable, you can select desired conditions man-
ually.
SLEEP/ECONOMIC OPERATION
When you push SLEEP button during COOLING, HEATING or AUTO oper-
ation, the air conditioner will automatically increase (cooling) or decrease
(heating) 1ºC per hour. The set temperature will be steady 2 hours later and
remains steady for 5 hours. After 5 hours the unit will stop. The fan speed
will be automatically controlled.
DEHUMIDIFYING OPERATION
The dehumidifying mode will automatically select the dehumidifying operation based on the difference
between the set temperature and the actual room temperature.
The temperature is regulated while dehumidifying by repeatingly turning on and off of the cooling
operation or fan only. The fan speed is controlled automatically.
In normal cooling operation the air conditioner will also dehumidify the air.
G
NOTE
When the air conditioner is dehumidifying it is likely that the room temperature will decrease.
It is therefore normal that a hygrostat will measure a higher relative humidity. The absolute
humidity in the room will however be lowered, depending on the amount of moisture produced
in the room (cooking, people etc).
1
1
1
1
Press Sleep button
Press Sleep button
COOLING
HEATING
DEHUMIDIFYING
Set
Tempe-
rature
1 hour 1 hour
1 hour 1 hour
Set
Tempe-
rature
Set temperature
Time
Room
tempe-
rature
Cooling Fan only Cooling Fan only Cooling
4
89
4
I MAINTENANCE
G
WARNING
It is necessary to stop the air conditioner and disconnect the power
supply before cleaning.
Cleaning the indoor unit and remote controller
G
CAUTION
Use a dry cloth to wipe the indoor unit and remote controller.
A cloth dampened with cold water may be used on the indoor unit if
it is very dirty.
The front panel of the indoor unit can be removed and cleaned with
water. Then wipe it with a dry cloth.
Do not use a chemically treated cloth or duster to clean the unit.
Do not use benzine, thinner, polishing powder, or similar solvents for
cleaning. These may cause the plastic surface to crack or deform.
Cleaning the filter
A clogged air filter reduces the cooling efficiency of this unit. Clean the filter once every 2
weeks.
1. The air filter is under the top air inlet grill.
2. Grip the tab on the end of the filter, lift it up, then pull it towards yourself.
3. Remove the screen filter from the indoor unit.
• Clean the screen filter once every two weeks.
• Clean screen filter with a vacuum cleaner or water.
4. The black active carbon filter cannot be cleaned. This filter will simply not filter
unpleasant odours anymore once dirty. At that moment this filter needs to be
replaced by a new filter. (available at your dealer). It is advised to exchange this filter
twice every season.
5. The green coloured 3M HAF filter will show clear signs of dirt on and in the filter
once dirty. When dirty this filter cannot be cleaned and needs to be replaced by a
new filter (available at your dealer). It is advised to exchange this filter twice every
season.
New filter
Recommended change of filter
6. After replacing the active carbon filter and the 3M HAF filter in the filter holder on
the screen filter, the screen filter can be replaced into the air conditioner.
7. Ensure before replacing that the filter is completely dry and has no defects.
8. Install the air freshening filter back into position.
9. Insert the upper portion of air filter back into the unit taking care that the left and
right edges line up correctly and place filter into position.
House-
hold
Drain
Cleaner
No
Thinner
f
Filter Tabs
Remove air freshening filter from back
of larger filter (some units)
90
Maintenance
If you plan to idle the unit for a long time, perform the following:
1. Operate the fan for about 6 hours to dry the inside of the unit.
2. Stop the air conditioner and disconnect power. If a 4.8kW model is used, interrupt the power supply.
Remove the batteries from the remote controller.
3. The outdoor unit requires periodic maintenance and cleaning. This should only be done by an author-
ized airconditioning engineer.
Checks before operation
Check that the wiring is not broken or disconnected.
Check that the air filter is installed.
Check if the air outlet or inlet is not blocked after the air conditioner has not been used for a long time.
CAUTION
Do not touch the metal parts of the unit when removing the filter. Injuries can occur when
handling sharp metal edges.
Do not use water to clean inside the air conditioner. Exposure to water can destroy the
insulation, leading to possible electric shock.
When cleaning the unit, first make sure that the power and circuit breaker are turned off.
J OPERATION TIPS
The following events may occur during normal operation.
1. Protection of the air conditioner.
Compressor protection
The compressor cannot restart for 3 minutes after it stops.
Anti-cold air
The unit is designed not to blow cold air on HEAT mode, when the indoor heat exchanger is in one
of the following three situations and the set temperature has not been reached.
A. When heating has just started.
B. Defrosting.
C. Low temperature heating.
Defrosting
The indoor or outdoor fan stops running when defrosting.
Frost may be generated on the outdoor unit during heat cycle when outdoor temperature is low and
humidity is high resulting in lower heating efficiency of the air conditioner.
During this condition air conditioner will stop heating operation periodically and start defrosting
automatically.
The time to defrost may vary from 4 to 10 minutes according to the outdoor temperature and the
amount of frost buildup on the outdoor unit.
2. A white mist coming out from the indoor unit.
A white mist may generate due to a large temperature difference between air inlet and air outlet on
COOL mode in an indoor environment that has a high relative humidity.
A white mist may generate due to moisture generated from defrosting process when the air condi-
tioner restarts in HEAT mode operation after defrosting.
4
91
4
3. Low noise of the air conditioner.
You may hear a low hissing sound when the compressor is running or has just stopped running. This
sound is the sound of the refrigerant flowing or coming to a stop.
You can also hear a low “squeak” sound when the compressor is running or has just stopped run-
ning. This is caused by heat expansion and cold contraction of the plastic parts in the unit when the
temperature is changing.
A sound may be heard due to louver restoring to its original position when power is first turned on.
4. Dust is blown out from the indoor unit.
This is a normal condition when the air conditioner has not been used for a long time or during first
use of the unit.
5. A peculiar smell comes out from the indoor unit.
This is caused by the indoor unit giving off smells permeated from building material, from furniture,
or smoke.
6. The air conditioner turns to FAN only mode from COOL or HEAT mode.
When indoor temperature reaches the temperature setting on air conditioner, the compressor will
stop automatically, and the air conditioner turns to FAN only mode. The compressor will start again
when the indoor temperature rises on COOL mode or falls on HEAT mode to the set point.
7. Dripping water may generate on the surface of the indoor unit when cooling in a high relatively
humidity (relative humidity higher than 80%). Adjust the horizontal louver to the maximum air out-
let position and select HIGH fan speed.
8. Heating mode.
The air conditioner draws in heat from the outdoor unit and releases it via the indoor unit dur-
ing heating operation. When the outdoor temperature falls, heat drawn in by the air conditioner
decreases accordingly and the heating capacity will decrease. At the same time, heat loading of the
air conditioner increases due to larger difference between indoor and outdoor temperature. If a com-
fortable temperature cannot be achieved by the air conditioner, it is advised to use a supplementary
heating device.
9. Auto-restart function.
Power failure during operation will stop the unit completely.
The air conditioner is equipped with Auto-restart feature, when the power restores, the unit restarts
automatically with all the previous settings preserved by the memory function.
10. Refrigerant leak detection.
The air conditioner is provided with a Refrigerant leak detection system.
When the outdoor unit detects a shortage of refrigerant, the air conditioner will stop and the indoor
unit shows the alarm EC on the display.
When this alarm occurs, do not restart the air conditioner and contact your supplier.
92
4
K TROUBLE SHOOTING TIPS
Malfunctions and Solutions
G
TROUBLE
Stop the air conditioner immediately if one of the following faults occur. Disconnect the power
and contact your supplier.
Fuse blows frequently or circuit breaker trips frequently.
Other objects or water penetrate the air conditioner.
The remote controller won’t work or works abnormally.
Other abnormal situations.
Issue Possible Causes
Unit does not turn on when
pressing ON/OFF button
The Unit has a 3-minute protection feature that prevents the unit from over-
loading. The unit cannot be restarted within three minutes of being turned
off.
The unit changes from COOL/
HEAT mode to FAN mode
The unit may change its setting to prevent frost from forming on the unit.
Once the temperature increases, the unit will start operating in the previ-
ously selected mode again.
The set temperature has been reached, at which point the unit turns off the
compressor. The unit will continue operating when the temperature fluctu-
ates again.
The indoor unit emits white mist
In humid regions, a large temperature difference between the room’s air
and the conditioned air can cause white mist.
Both the indoor and outdoor
units emit white mist
When the unit restarts in HEAT mode after defrosting, white mist may be
emitted due to moisture generated from the defrosting process.
The indoor unit makes noises
A rushing air sound may occur when the louver resets its position.
A squeaking sound may occur after running the unit in HEAT mode due to
expansion and contraction of the unit’s plastic parts.
Both the indoor unit and out-
door unit make noises
Low hissing sound during operation: This is normal and is caused by refrige-
rant gas flowing through both indoor and outdoor units.
Low hissing sound when the system starts, has just stopped running, or is
defrosting: This noise is normal and is caused by the refrigerant gas stopping
or changing direction.
Squeaking sound: Normal expansion and contraction of plastic and metal
parts caused by temperature changes during operation can cause squeaking
noises.
The outdoor unit makes noises The unit will make different sounds based on its current operating mode.
Dust is emitted from either the
indoor or outdoor unit
The unit may accumulate dust during extended periods of non-use, which
will be emitted when the unit is turned on. This can be mitigated by cove-
ring the unit during long periods of inactivity.
The unit emits a bad odor
The unit may absorb odors from the environment (such as furniture, cook-
ing, cigarettes, etc.) which will be emitted during operations.
The unit’s filters have become moldy and should be cleaned.
The fan of the outdoor unit does
not operate
During operation, the fan speed is controlled to optimize product operation.
Operation is erratic, unpredicta-
ble, or unit is unresponsive
Interference from cell phone towers and remote boosters may cause the unit
to malfunction. In this case, try the following:
• Disconnect the power, then reconnect.
• Press ON/OFF button on remote control to restart operation.
93
4
G
NOTE!
If problem persists, contact a local dealer or your nearest customer service center. Provide them
with a detailed description of the unit malfunction as well as your model number.
Problem Cause Solution
Poor Cooling
Performance
Temperature setting may be higher than
ambient room temperature
Lower the temperature setting
The heat exchanger on the indoor or out-
door unit is dirty
Clean the affected heat exchanger
The air filter is dirty
Remove the filter and clean it according
to instructions
The air inlet or outlet of
either unit is blocked
Turn the unit off, remove the obstruction
and turn it back on
Doors and windows are open
Make sure that all doors and windows are
closed while operating the unit
Excessive heat is generated by sunlight
Close windows and curtains during peri-
ods of high heat or bright sunshine
Too many sources of heat in the room
(people, computers, electronics, etc.)
Reduce amount of heat sources
Low refrigerant due to leak or long-term
use
Check for leaks, re-seal if necessary and
top off refrigerant
SILENCE function is activated(optional
function)
SILENCE function can lower product per-
formance by reducing operating frequen-
cy. Turn off SILENCE function.
The unit is not
working
Power failure Wait for the power to be restored
The power is turned off Turn on the power
The fuse is burned out Replace the fuse
Remote control batteries are dead Replace batteries
The Unit’s 3-minute protection has been
activated
Wait three minutes after restarting the
unit
Timer is activated Turn timer off
The unit starts and
stops frequently
There’s too much or too little refrigerant
in the system
Check for leaks and recharge the system
with refrigerant.
Incompressible gas or moisture has ente-
red the system.
Evacuate and recharge the system with
refrigerant
The compressor is broken Replace the compressor
The voltage is too high or too low Install a manostat to regulate the voltage
Poor heating
performance
The outdoor temperature is exetremtly
low
Use auxiliary heating device
Cold air is entering through doors and
windows
Make sure that all doors and windows are
closed during use
Low refrigerant due to leak or long-term
use
Check for leaks, re-seal if necessary and
top off refrigerant
Indicator lamps
continue flashing
The unit may stop operation or continue to run safely. If the indicator lamps continue
to flash or error codes appear, wait for about 10 minutes. The problem may resolve
itself.
If not, disconnect the power, then connect it again. Turn the unit on.
If the problem persists, disconnect the power and contact your nearest customer ser-
vice center.
Error code appears in
the window display
of indoor unit:
• E0, E1, E2…
• P1, P2, P3…
• F1, F2, F3…
94
4
If the trouble has not been corrected, please contact your supplier. Be sure to inform them of the detailed
malfunctions and unit model.
G
NOTE!
Reparation of the device should only be done by an authorized air conditioning engineer.
L GUARANTEE CONDITIONS
The air conditioner is supplied with a 48-month guarantee on the compressor and a 24-month guarantee on
other components, commencing on the date of purchase. The following rules apply:
1. We expressly refuse all further damage claims, including claims for collateral damage.
2. Repairs to or replacement of components within the guarantee period will not result in an extension of
the guarantee.
3. The guarantee is invalidated if any modifications have been made, non genuine parts are fitted or
repairs are carried out by third parties.
4. Components subject to normal wear, such as the filter, are not covered by the guarantee.
5. The guarantee is valid only when you present the original, dated purchase invoice and if no modifica-
tions have been made.
6. The guarantee is invalid for damage caused by neglect or by actions that deviate from those in this
instruction booklet.
7. Transportation costs and the risks involved during the transportation of the air conditioner or air con-
ditioner components shall always be for the account of the purchaser.
8. Damage caused by not using suitable filters is not covered by the guarantee.
9. Refrigerant loss and/or leakage because of incompetent (dis)connecting of the units and/or (dis-) con-
nection of the units by not qualified personnel is not covered by the guarantee conditions applicable to
this product. Damage to units which are mounted, connected and/or disconnected not following local
law and/or legislation and/or not following the guidelines in this manual is not covered by the guaran-
tee conditions applicable to this product.
Consult your dealer for repairs if these instructions do not provide a solution. Make sure that in the unlikely
case of needed disconnection, that disconnection is always done by qualified, authorized personnel and
according to your local laws and legislation.
95
M TECHNICAL DATA
Model
S 4225
S 5225
S 5225 B
S-JA 2519
S 4232
S 5232
S 4248
S 5248
SC 4225
SC 5225
SCJA-2519
SC 4232
SC 5232
SC 4248
SC 5248
SCJA-4819
Type air-conditioner
Wall mounted split Wall mounted split Wall mounted split Wall mounted split Wall mounted split Wall mounted split
Cooling capacity nominal (min-
max) *
W
2600 (1030 - 3190) 3500 (820 - 4160) 5300 (1730 - 6980) 2500 (1590 - 3000)
3200 (2110 - 4000) 4600 (1820 - 6120)
EE Class cooling *
A++ A++ A++ A++
A++ A++
SEER*
7.1 7.0 6.4 6.5
6.2 6.7
Heating capacity nominal (min-
max) *
W
2500 ( 880 - 3660) 2700 ( 850 - 4780) 3900 (1060 - 6980) 2400 (960 - 4890)
2400 (1280 - 4900) 3800 (1380 - 6740)
EE Class heating *
A+ A+ A+ A+
A+ A+
SCOP*
4.0 4.1 4.0 4.0
4.0 4.0
Dehumidifying capacity (at
32°C/80%) ** / ***
L / 24 h
24.0 28.8 43.2 26.4
31.2 36.0
Power consumption cooling
kW
0.70 1.09 1.54 0.71
1.19 1.40
Power consumption heating
kW
0.67 1.05 1.46 0.84
1.23 1.90
Annual energy consumption *
kWh
128 / 875 175 / 922 290 / 1365 137 / 836
187 / 834 245 / 1326
Power supply
V / Hz / Ph
220-240~ / 50 / 1 220-240~ / 50 / 1 220-240~ / 50 / 1 220-240~ / 50 / 1
220-240~ / 50 / 1 220-240~ / 50 / 1
Max. Current
A
9.5 10.0 11.5 10.0
10.0 13.0
Air flow **
m3/h
416/309/230 539/478/294 750/505/420
545/435/368
545/435/368 770/610/410
For rooms up to**
m3
60-85 80-100 140-185 60-85 80-100 125-145
Suited for regions W / A / C
W/A/C W/A/C W/A/C W/A/C W/A/C W/A/C
Compressor type
Rotary Rotary Rotary Rotary Rotary Rotary
Fan speeds
4 4 4 3
3 3
Thermostatic range
oC
17 - 30 17 - 30 17 - 30 17 - 30
17 - 30 17 - 30
Controls manual / mechanic /
electronic
Electronic remote Electronic remote Electronic remote Electronic remote Electronic remote Electronic remote
Remote control Yes / No
Y Y Y Y Y Y
Air filter type(s)
Screen. Active carbon.
3M HAF
Screen. Active carbon.
3M HAF
Screen. Active carbon.
3M HAF
Screen. Active carbon.
3M HAF
Screen. Active carbon.
3M HAF
Screen. Active carbon.
3M HAF
Refrigerant type / charge
R / g
R32 / 700 R32 / 800 R32 / 1250 R32 / 800 R32 / 800 R32 / 1190
Refrigerant GWP
675 675 675 675
675 675
CO2 equivalent tonnes
0.473 0.540 0.844 0.540
0.540 0.803
Dimensions indoor unit (w x h x d)
mm
722x187x290 802x189x297 965x215x319 805x194x285
805x194x285 957x213x302
Dimensions outdoor unit (w x
h x d)
mm
770x300x555 770x300x555 800x333x554 770x300x555
770x300x555 800x333x554
Net weight indoor unit
kg
7.3 8.2 10.8 7.8
7.8 10.3
Net weight outdoor unit
kg
27.2 27.0 37.0 25.7
25.7 34.6
Gross weight indoor unit
kg
9.7 10.7 14.1 10.4
10.4 13.8
Gross weight outdoor unit
kg
29.7 29.4 39.9 31.1
31.1 40.2
Sound pressure level indoor
unit ****
dB(A)
54 56 58 53
53 55
Sound pressure level outdoor
unit ****
dB(A)
59 60 64 62
62 62
Sound pressure level indoor unit
(low) ****
dB
20 21 21 25
25 29
Unit protection indoor
IP
IPX0 IPX0 IPX0 IPX0
IPX0 IPX0
Unit protection outdoor
IP
IPX4 IPX4 IPX4 IPX4
IPX4 IPX4
* EN 14511 / EN14825
** To be used as indication
*** Moisture removal at 32°C, 80% RH
**** EN12102-2008
4
96
4
Do not dispose of electrical appliances as unsorted municipal waste, use separate collection
facilities. Contact your local government for information regarding the collection systems
available. If electrical appliances are disposed of in landfills or dumps, hazardous substanc-
es can leak into the groundwater and get into the food chain, damaging your health and
well-being. When replacing old appliances with new once, the retailer is legally obligated to
take back your old appliance for disposal at least for free of charge. Do not throw batteries
into the fire, where they can explode or release dangerous liquids. If you replace or destroy
the remote control, remove the batteries and throw them away in accordance with the
applicable regulations because they are harmful to the environment.
Environmental information: This equipment contains fluorinated greenhouse gases covered by the Kyoto
Protocol. It should only be serviced or dismantled by professional trained personnel.
This equipment contains R32 refrigerant in the amount as stated in the table above. Do not vent R32 into
atmosphere: R32, is a fluorinated greenhouse gas with a Global Warming Potential (GWP) = 675
Internet:
For your convenience you can download the latest version of the user-, installation- and/or service manual
on www.Qlima.com
97
4
98
Gentile signora, egregio signore,
Ci congratuliamo con voi per aver acquistato il climatizzatore Qlima. Con l’acquisto siete
entrati in possesso di un prodotto rispondente ad elevati standard qualitativi, che se usato
oculatamente, offrirà per anni prestazioni gratificanti. Vi preghiamo di leggere le presenti
istruzioni prima di utilizzare l’apparecchio: una precauzione che contribuirà ad assicurare la
lunga durata del climatizzatore.
A nome del fabbricante concediamo una garanzia di 24 mesi a copertura di tutti i difetti
del materiale e di produzione e 48 mesi per i compressore.
Vi auguriamo di trarre la massima soddisfazione dall’uso del climatizzatore.
Cordiali saluti,
PVG Holding b.v.
Ufficio assistenza clienti
>
1. LEGGERE DAPPRIMA LE ISTRUZIONI D’USO.
2. IN CASO DI DUBBIO, RIVOLGERSI AL RIVENDITORE.
99
>
INDICE
A ISTRUZIONI PER LA SICUREZZA
B. NOMENCLATURA DEI COMPONENTI
C. TEMPERATURA D’ESERCIZIO
D. FUNZIONAMENTO MEDIANTE IL TELECOMANDO
E. FUNZIONAMENTO MANUALE (SENZA TELECOMANDO)
F. ACCORGIMENTI PER UN FUNZIONAMENTO OTTIMALE
G. ORIENTAMENTO DEL FLUSSO DI ARIA
H. GUIDA ALL’USO DEL CLIMATIZZATORE
I. MANUTENZIONE
J. INFORMAZIONI UTILI
K. INDIVIDUAZIONE E RISOLUZIONE DEI PROBLEMI
L. CONDIZIONI DI GARANZIA
M. SCHEDA TECNICA
SI PREGA DI LEGGERE QUESTO MANUALE
Nel suo interno troverete molti consigli utili per usare correttamente e mante-
nere in efficienza il vostro climatizzatore. Nella sezione relativa all’Individuazione
delle Anomalie sono riportati numerosi suggerimenti per risolvere i problemi più
comuni. Consultare in precedenza la sezione J “Individuazione delle anomalie”, e
molto probabilmente eviterete di dover ricorrere al servizio di assistenza tecnica.
100
A
ISTRUZIONI PER LA SICUREZZA
Installare questo dispositivo soltanto quando è conforme con
la legislazione, le ordinanze e gli standard locali/nazionali.
Questo prodotto è destinato a essere usato come condiziona-
tore d’aria nelle case ad uso residenziale ed è idoneo esclusiva-
mente all’uso in luoghi asciutti, in normali condizioni domesti-
che, all’interno di soggiorni, cucine e garage. Per l’allacciamen-
to dell’apparecchio utilizzare esclusivamente prese elettriche
dotate di messa a terra, eroganti corrente a 220-240 V~ / 50 Hz.
I modelli 4,8kW vanno allacciati alla fonte di corrente diretta-
mente con il cavo di alimentazione.
IMPORTANTE
L’apparecchio DEVE essere sempre collegato ad una
presa dotata di messa a terra. Se l’alimentazione di
rete disponibile non ha la messa a terra, è vietato
connettere l’apparecchio alla rete. Assicurarsi che
sia sempre possibile accedere liberamente alla spina,
dopo aver collegato l’apparecchio alla rete elettrica.
Leggere accuratamente le presenti istruzioni ed
osservarle scrupolosamente.
Il condizionatore contiene un refrigerante ed
è classificato come impianto pressurizzato. Si
consiglia pertanto di contattare sempre un tecnico
autorizzato per le installazioni e le manutenzioni
del condizionatore. E’ necessario revisionare e
provvedere alla manutenzione dell’apparecchio
annualmente, affidandosi esclusivamente a tecnici
specializzati. La garanzia non si applica ai danni
causati da negligenza o da interventi diversi da
quelli previsti nelle presente istruzioni per l’uso.
>
101
>
Prima di collegare l’apparecchio alla rete elettrica, controllare i
seguenti punti:
La tensione (voltaggio) di alimentazione deve essere corri-
spondente al valore di tensione riportato nella targhetta di
identificazione.
La corrente prelevata tramite la presa a muro ed erogata
dall’impianto di alimentazione di rete deve corrispondere ai
valori indicati nella targhetta di identificazione dell’apparec-
chio.
La spina sita all’estremità del cavetto di alimentazione dell’ap-
parecchio deve essere utilizzabile con il tipo di presa a muro
disponibile.
L’apparecchio deve essere collocato e montato su una superfi-
cie stabile.
Far controllare la rispondenza dell’impianto elettrico domestico
da un elettricista qualificato se sorgono dubbi rispetto all’utiliz-
zabilità dell’apparecchio con l’impianto esistente.
• Questo apparecchio è stato prodotto in conformità alla nor-
mativa CE sulla sicurezza. Ciò nonostante è necessaria la mas-
sima cautela nell’uso, come è d’obbligo per tutte le apparec-
chiature elettriche
Non coprire mai l’ingresso e l’uscita d’aria.
Evitare il contatto fra l’apparecchio e le sostanze chimiche.
Evitare in ogni caso di spruzzare o nebulizzare acqua sull’ap-
parecchio o di immergere il climatizzatore in acqua. Spegnere
l’unità e scollegare l’alimentazione se l’acqua penetra nell’uni-
tà interna.
Non inserire le mani, le dita oppure oggetti nelle fessure e/o
nelle altre aperture dell’apparecchio.
E’ fatto assoluto divieto di utilizzo di cavi di prolunga per allac-
ciare l’apparecchio all’impianto elettrico. Se non è disponibile
una presa di corrente dotata di messa a terra, fare installare
una presa a norma da un impiantista qualificato.
102
Tutti gli interventi di riparazione e/o manutenzione devono
essere effettuati esclusivamente da un tecnico manutentore
qualificato o dal centro di vendita autorizzato. Attenersi alle
istruzioni per l’uso e la manutenzione riportate nel manuale
uso del presente apparecchio.
Quando l’apparecchio è posto fuori servizio o lo si lascia inuti-
lizzato, staccare sempre la spina dalla presa di corrente.
Non attivare o disattivare il climatizzatore inserendo o stac-
cando la spina del collegamento elettrico. Usare esclusivamen-
te gli appositi tasti siti sul climatizzatore o sul telecomando.
Non aprire l’apparecchio mentre è in funzione. Staccare la cor-
rente prima di aprire il dispositivo.
Estrarre sempre la spina dalla presa o staccare la corrente
quando il condizionatore viene pulito o quando viene effet-
tuata manutenzione.
Non collocare bruciatori, forni e/o fornaci a gas nella zona in
cui circola il flusso d’aria prodotto dall’apparecchio.
Non premere i tasti né toccare l’apparecchio se si hanno le
mani bagnate.
Tenere presente che, durante l’uso del climatizzatore, l’unità
esterna è rumorosa, la qualcosa potrebbe interferire con le
norme sulle emissioni acustiche localmente vigenti. E’ compi-
to e responsabilità dell’utilizzatore verificare la rispondenza
dell’apparecchio e renderlo idoneo ai requisiti di legge.
L’utilizzo del presente apparecchio non è previsto per persone
(bambini inclusi) con ridotte capacità psicomotorie, mentali o
sensoriali, tanto meno deve essere utilizzato da persone ine-
sperte o non dotate di sufficienti cognizioni in materia, tranne
nei casi in cui vi è sorveglianza e sono impartite istruzioni per
l’uso dell’apparecchio da parte di persone responsabili della
sicurezza degli utenti.
Occorre sorvegliare costantemente i bambini per essere sicuri
che non giochino con l’apparecchio.
Si consiglia di tenersi fuori dal getto d’aria prodotto dall’appa-
recchio.
>
103
>
Non bere mai l’acqua di condensa del condizionatore.
Non modificare l’apparecchio.
Qualora il cavo di alimentazione fosse danneggiato è neces-
sario farlo sostituire dal fabbricante, dal servizio clienti o da
personale con qualifiche adeguate in modo da non correre
alcun rischio.
Il dispositivo può essere usato da bambini a partire dagli 8
anni di età e da persone con capacità fisiche, sensoriali o
mentali ridotte o con mancanza di esperienza e conoscenze
a condizione che siano state fornite istruzioni e supervisione
in merito a un uso sicuro del dispositivo accertandosi del fatto
che siano stati compresi i rischi associati all’uso del dispositivo
stesso. I bambini non dovrebbero giocare col dispositivo. Le
operazioni di pulizia e manutenzione da parte dell’utente non
vanno eseguite dai bambini senza supervisione.
ATTENZIONE!
Non utilizzare mai un apparecchio
se il cordone elettrico, la spina, il
rivestimento esterno o il quadro di
controllo risultano danneggiati.
Il non rispettare le istruzioni può
condurre alla perdita della garanzia
sull’apparecchio.
Nota sui Gas Fluorurati
1. Questo condizionatore d’aria contiene gas fluorurati. Per informazioni specifiche circa il tipo e la
quantità di gas, si prega di consultare l’etichetta apposta sull’apparecchio stesso.
2. Installazione, riparazione, manutenzione e interventi sull’unità devono essere eseguiti da un tecnico
certificato.
3. La disinstallazione del prodotto e il riciclaggio devono essere eseguiti da un tecnico certificato.
4. Se l’apparecchio ha un sistema di rilevamento delle perdite installato, occorre che venga verificato
almeno ogni 12 mesi.
5. Quando l’apparecchio viene verificato per perdite, si raccomanda vivamente di registrare accurata-
mente tutti i controlli effettuati.
6. Questo condizionatore d’aria consiste di un’unità ermeticamente sigillata contenente gas fluorurati.
104
5
6
7
8
1
22
3
4
5
6
2
1
4
3
B NOMENCLATURA DEI COMPONENTI
UNITÀ INTERNA Unità interna
Filtro aria (dietro il pannello anteriore)
Pannello anteriore
Uscita dell’aria
Quadro con display
Telecomando (consultare la sezione D
per ulteriori dettagli e la descrizione
del funzionamento)
UNITÀ ESTERNA Unità esterna
Tubo di collegamento, tubo di dre-
naggio (Per tubo di collegamento dei
modelli S non incluso)
Presa aria (laterale e posteriore)
Uscita dell’aria
G
NOTA!
Tutte le illustrazioni riportate nel manuale e sul cartone hanno un mero scopo esplicativo ed
indicativo e potrebbero pertanto differire leggermente dal climatizzatore in vostro possesso.
L’apparecchio di riferimento è quello che avete acquistato.
INDICATORI DI FUNZIONE SUL DISPLAY DELL’UNITÀ INTERNA
Page 6
Unit Specifications and Features
1
Unit
Specifications
and Features
NOTE:
A guide on using the infrared remote is not included
in this literature package.
Unit Parts
Power Cable (Some Units)
Remote Control
Remote Control
Holder (Some Units)
Louver
Front Panel
Air Filter
(pull out)
Display window
“ ” for 3 seconds when:
• TIMER ON is set
• FRESH, SWING, TURBO, or SILENCE features are turned on
“ ” for 3 seconds when:
• TIMER OFF is set
• FRESH, SWING, TURBO, or SILENCE features are turned off
“ ” when defrosting(cooling & heating units)
“ ” when anti-cold air feature is turned on(cooling & heating units)
“ ” when unit is self-cleaning(some units)
“ ” when freeze protection is turned on(some units)
“ ” when Wireless Control feature is activated(some units)
Display Code
Meanings
In Fan and Dry mode, the unit will display the room temperature.
In other modes, the unit will display your temperature setting.
,
,
“ ”
When ECO function(some units) is activated, the
illuminates gradually one by one as --
-- --set temperature-- ...... in one second interval.
per 3 secondi quando:
• TIMER ON è impostato
• Le funzioni FRESH, SWING, TURBO o SILENCE sono attivate
Page 6
Unit Specifications and Features
1
Unit
Specifications
and Features
NOTE:
A guide on using the infrared remote is not included
in this literature package.
Unit Parts
Power Cable (Some Units)
Remote Control
Remote Control
Holder (Some Units)
Louver
Front Panel
Air Filter
(pull out)
Display window
“ ” for 3 seconds when:
• TIMER ON is set
• FRESH, SWING, TURBO, or SILENCE features are turned on
“ ” for 3 seconds when:
• TIMER OFF is set
• FRESH, SWING, TURBO, or SILENCE features are turned off
“ ” when defrosting(cooling & heating units)
“ ” when anti-cold air feature is turned on(cooling & heating units)
“ ” when unit is self-cleaning(some units)
“ ” when freeze protection is turned on(some units)
“ ” when Wireless Control feature is activated(some units)
Display Code
Meanings
In Fan and Dry mode, the unit will display the room temperature.
In other modes, the unit will display your temperature setting.
,
,
“ ”
When ECO function(some units) is activated, the
illuminates gradually one by one as --
-- --set temperature-- ...... in one second interval.
per 3 secondi quando:
• TIMER OFF è impostato
• Le funzioni FRESH, SWING, TURBO o SILENCE sono disattivate
Page 6
Unit Specifications and Features
1
Unit
Specifications
and Features
NOTE:
A guide on using the infrared remote is not included
in this literature package.
Unit Parts
Power Cable (Some Units)
Remote Control
Remote Control
Holder (Some Units)
Louver
Front Panel
Air Filter
(pull out)
Display window
“ ” for 3 seconds when:
• TIMER ON is set
• FRESH, SWING, TURBO, or SILENCE features are turned on
“ ” for 3 seconds when:
• TIMER OFF is set
• FRESH, SWING, TURBO, or SILENCE features are turned off
“ ” when defrosting(cooling & heating units)
“ ” when anti-cold air feature is turned on(cooling & heating units)
“ ” when unit is self-cleaning(some units)
“ ” when freeze protection is turned on(some units)
“ ” when Wireless Control feature is activated(some units)
Display Code
Meanings
In Fan and Dry mode, the unit will display the room temperature.
In other modes, the unit will display your temperature setting.
,
,
“ ”
When ECO function(some units) is activated, the
illuminates gradually one by one as --
-- --set temperature-- ...... in one second interval.
durante lo sbrinamento (unità di raffreddamento e riscaldamento)
Page 6
Unit Specifications and Features
1
Unit
Specifications
and Features
NOTE:
A guide on using the infrared remote is not included
in this literature package.
Unit Parts
Power Cable (Some Units)
Remote Control
Remote Control
Holder (Some Units)
Louver
Front Panel
Air Filter
(pull out)
Display window
“ ” for 3 seconds when:
• TIMER ON is set
• FRESH, SWING, TURBO, or SILENCE features are turned on
“ ” for 3 seconds when:
• TIMER OFF is set
• FRESH, SWING, TURBO, or SILENCE features are turned off
“ ” when defrosting(cooling & heating units)
“ ” when anti-cold air feature is turned on(cooling & heating units)
“ ” when unit is self-cleaning(some units)
“ ” when freeze protection is turned on(some units)
“ ” when Wireless Control feature is activated(some units)
Display Code
Meanings
In Fan and Dry mode, the unit will display the room temperature.
In other modes, the unit will display your temperature setting.
,
,
“ ”
When ECO function(some units) is activated, the
illuminates gradually one by one as --
-- --set temperature-- ...... in one second interval.
quando è attivata la funzione anti-freddo (unità di raffreddamento e riscaldamento)
Page 6
Unit Specifications and Features
1
Unit
Specifications
and Features
NOTE:
A guide on using the infrared remote is not included
in this literature package.
Unit Parts
Power Cable (Some Units)
Remote Control
Remote Control
Holder (Some Units)
Louver
Front Panel
Air Filter
(pull out)
Display window
“ ” for 3 seconds when:
• TIMER ON is set
• FRESH, SWING, TURBO, or SILENCE features are turned on
“ ” for 3 seconds when:
• TIMER OFF is set
• FRESH, SWING, TURBO, or SILENCE features are turned off
“ ” when defrosting(cooling & heating units)
“ ” when anti-cold air feature is turned on(cooling & heating units)
“ ” when unit is self-cleaning(some units)
“ ” when freeze protection is turned on(some units)
“ ” when Wireless Control feature is activated(some units)
Display Code
Meanings
In Fan and Dry mode, the unit will display the room temperature.
In other modes, the unit will display your temperature setting.
,
,
“ ”
When ECO function(some units) is activated, the
illuminates gradually one by one as --
-- --set temperature-- ...... in one second interval.
quando l’unità è autopulente (alcune unità)
Page 6
Unit Specifications and Features
1
Unit
Specifications
and Features
NOTE:
A guide on using the infrared remote is not included
in this literature package.
Unit Parts
Power Cable (Some Units)
Remote Control
Remote Control
Holder (Some Units)
Louver
Front Panel
Air Filter
(pull out)
Display window
“ ” for 3 seconds when:
• TIMER ON is set
• FRESH, SWING, TURBO, or SILENCE features are turned on
“ ” for 3 seconds when:
• TIMER OFF is set
• FRESH, SWING, TURBO, or SILENCE features are turned off
“ ” when defrosting(cooling & heating units)
“ ” when anti-cold air feature is turned on(cooling & heating units)
“ ” when unit is self-cleaning(some units)
“ ” when freeze protection is turned on(some units)
“ ” when Wireless Control feature is activated(some units)
Display Code
Meanings
In Fan and Dry mode, the unit will display the room temperature.
In other modes, the unit will display your temperature setting.
,
,
“ ”
When ECO function(some units) is activated, the
illuminates gradually one by one as --
-- --set temperature-- ...... in one second interval.
quando la protezione antigelo è attivata (alcune unità)
Page 6
Unit Specifications and Features
1
Unit
Specifications
and Features
NOTE:
A guide on using the infrared remote is not included
in this literature package.
Unit Parts
Power Cable (Some Units)
Remote Control
Remote Control
Holder (Some Units)
Louver
Front Panel
Air Filter
(pull out)
Display window
“ ” for 3 seconds when:
• TIMER ON is set
• FRESH, SWING, TURBO, or SILENCE features are turned on
“ ” for 3 seconds when:
• TIMER OFF is set
• FRESH, SWING, TURBO, or SILENCE features are turned off
“ ” when defrosting(cooling & heating units)
“ ” when anti-cold air feature is turned on(cooling & heating units)
“ ” when unit is self-cleaning(some units)
“ ” when freeze protection is turned on(some units)
“ ” when Wireless Control feature is activated(some units)
Display Code
Meanings
In Fan and Dry mode, the unit will display the room temperature.
In other modes, the unit will display your temperature setting.
,
,
“ ”
When ECO function(some units) is activated, the
illuminates gradually one by one as --
-- --set temperature-- ...... in one second interval.
quando la funzione di controllo wireless è attivata (alcune unità)
Page 6
Unit Specifications and Features
1
Unit
Specifications
and Features
NOTE:
A guide on using the infrared remote is not included
in this literature package.
Unit Parts
Power Cable (Some Units)
Remote Control
Remote Control
Holder (Some Units)
Louver
Front Panel
Air Filter
(pull out)
Display window
“ ” for 3 seconds when:
• TIMER ON is set
• FRESH, SWING, TURBO, or SILENCE features are turned on
“ ” for 3 seconds when:
• TIMER OFF is set
• FRESH, SWING, TURBO, or SILENCE features are turned off
“ ” when defrosting(cooling & heating units)
“ ” when anti-cold air feature is turned on(cooling & heating units)
“ ” when unit is self-cleaning(some units)
“ ” when freeze protection is turned on(some units)
“ ” when Wireless Control feature is activated(some units)
Display Code
Meanings
In Fan and Dry mode, the unit will display the room temperature.
In other modes, the unit will display your temperature setting.
,
,
“ ”
When ECO function(some units) is activated, the
illuminates gradually one by one as --
-- --set temperature-- ...... in one second interval.
quando la funzione ECO (alcune unità) è attivata, si
Page 6
Unit Specifications and Features
1
Unit
Specifications
and Features
NOTE:
A guide on using the infrared remote is not included
in this literature package.
Unit Parts
Power Cable (Some Units)
Remote Control
Remote Control
Holder (Some Units)
Louver
Front Panel
Air Filter
(pull out)
Display window
“ ” for 3 seconds when:
• TIMER ON is set
• FRESH, SWING, TURBO, or SILENCE features are turned on
“ ” for 3 seconds when:
• TIMER OFF is set
• FRESH, SWING, TURBO, or SILENCE features are turned off
“ ” when defrosting(cooling & heating units)
“ ” when anti-cold air feature is turned on(cooling & heating units)
“ ” when unit is self-cleaning(some units)
“ ” when freeze protection is turned on(some units)
“ ” when Wireless Control feature is activated(some units)
Display Code
Meanings
In Fan and Dry mode, the unit will display the room temperature.
In other modes, the unit will display your temperature setting.
,
,
“ ”
When ECO function(some units) is activated, the
illuminates gradually one by one as --
-- --set temperature-- ...... in one second interval.
llumina gradualmente una alla volta come
Page 6
Unit Specifications and Features
1
Unit
Specifications
and Features
NOTE:
A guide on using the infrared remote is not included
in this literature package.
Unit Parts
Power Cable (Some Units)
Remote Control
Remote Control
Holder (Some Units)
Louver
Front Panel
Air Filter
(pull out)
Display window
“ ” for 3 seconds when:
• TIMER ON is set
• FRESH, SWING, TURBO, or SILENCE features are turned on
“ ” for 3 seconds when:
• TIMER OFF is set
• FRESH, SWING, TURBO, or SILENCE features are turned off
“ ” when defrosting(cooling & heating units)
“ ” when anti-cold air feature is turned on(cooling & heating units)
“ ” when unit is self-cleaning(some units)
“ ” when freeze protection is turned on(some units)
“ ” when Wireless Control feature is activated(some units)
Display Code
Meanings
In Fan and Dry mode, the unit will display the room temperature.
In other modes, the unit will display your temperature setting.
,
,
“ ”
When ECO function(some units) is activated, the
illuminates gradually one by one as --
-- --set temperature-- ...... in one second interval.
--
Page 6
Unit Specifications and Features
1
Unit
Specifications
and Features
NOTE:
A guide on using the infrared remote is not included
in this literature package.
Unit Parts
Power Cable (Some Units)
Remote Control
Remote Control
Holder (Some Units)
Louver
Front Panel
Air Filter
(pull out)
Display window
“ ” for 3 seconds when:
• TIMER ON is set
• FRESH, SWING, TURBO, or SILENCE features are turned on
“ ” for 3 seconds when:
• TIMER OFF is set
• FRESH, SWING, TURBO, or SILENCE features are turned off
“ ” when defrosting(cooling & heating units)
“ ” when anti-cold air feature is turned on(cooling & heating units)
“ ” when unit is self-cleaning(some units)
“ ” when freeze protection is turned on(some units)
“ ” when Wireless Control feature is activated(some units)
Display Code
Meanings
In Fan and Dry mode, the unit will display the room temperature.
In other modes, the unit will display your temperature setting.
,
,
“ ”
When ECO function(some units) is activated, the
illuminates gradually one by one as --
-- --set temperature-- ...... in one second interval.
-- impostare la temperatura --
Page 6
Unit Specifications and Features
1
Unit
Specifications
and Features
NOTE:
A guide on using the infrared remote is not included
in this literature package.
Unit Parts
Power Cable (Some Units)
Remote Control
Remote Control
Holder (Some Units)
Louver
Front Panel
Air Filter
(pull out)
Display window
“ ” for 3 seconds when:
• TIMER ON is set
• FRESH, SWING, TURBO, or SILENCE features are turned on
“ ” for 3 seconds when:
• TIMER OFF is set
• FRESH, SWING, TURBO, or SILENCE features are turned off
“ ” when defrosting(cooling & heating units)
“ ” when anti-cold air feature is turned on(cooling & heating units)
“ ” when unit is self-cleaning(some units)
“ ” when freeze protection is turned on(some units)
“ ” when Wireless Control feature is activated(some units)
Display Code
Meanings
In Fan and Dry mode, the unit will display the room temperature.
In other modes, the unit will display your temperature setting.
,
,
“ ”
When ECO function(some units) is activated, the
illuminates gradually one by one as --
-- --set temperature-- ...... in one second interval.
...... in un secondo intervallo
In altre modalità, l’unità visualizzerà le impostazioni della temperatura.
In modalità Ventilatore e Secco, l’unità visualizzerà la temperatura della stanza.
>
105
>
C TEMPERATURA D’ESERCIZIO
Condizionamento, riscaldamento e/o deumidificazione sono adatti alle seguenti temperature interne e esterne:
Temperatura
Modalità Refrigerazione Riscaldamento Deumidificazione
Temperatura ambiente 17ºC - 32ºC 0ºC - 30ºC 10ºC - 32ºC
Temperatura esterna -25ºC - 50ºC -15ºC - 30ºC 0ºC - 50ºC
PRECAUZIONE
Se il condizionatore viene utilizzato a temperature diverse da quelle indicate sopra, possono
entrare in funzionamento determinate misure di sicurezza a causa della quali l’unità non
funzionerà più in modo ottimale.
Se l’aria nell’ambiente in cui opera il climatizzatore ha un tenore di umidità superiore all’80%,
sulla superficie dell’apparecchio potrebbe formarsi della condensa. In questa eventualità
regolare il diffusore verticale dell’aria al grado massimo di angolazione (verticale rispetto al
pavimento) ed impostare la modalità ventilazione su HIGH (alta).
Per conseguire le migliori prestazioni possibili dell’apparecchio tenere sempre porte e finestre
chiuse durante la refrigerazione o il riscaldamento.
D FUNZIONAMENTO MEDIANTE IL TELECOMANDO
G
NOTA!
Puntare sempre il telecomando verso il ricevitore sito sull’unità interna ed assicurarsi che non vi
siano ostacoli fra il telecomando ed il ricevitore dell’unità interna. In caso contrario il segnale
trasmesso dal telecomando non verrà captato dal ricevitore ed il climatizzatore non funzionerà
correttamente.
La distanza massima utile per utilizzare il telecomando è di circa 6 – 7 metri.
G
NOTA!
Tenere il telecomando in un punto in cui il segnale può raggiungere il ricevitore dell’unità. Quando
si seleziona il funzionamento con timer, il telecomando trasmette automaticamente un segnale
all’unità interna all’orario specificato. Se si tiene il telecomando in una posizione che impedisce la
trasmissione corretta dei segnali, può verificarsi un ritardo di tempo di fino a 15 minuti.
106
Guida all’uso dei tasti funzione del telecomando
4
3
2
8
6
7
12
11
13
15
5
9
10
14
1
SLEEP
FRESH
fig. 1
Tasto On/Off: : Premere il tasto per avviare la funzione. Ripremere il tasto per disattivare la funzione.
Tasto Modalità: Ogni qualvolta che si preme il tasto, si passa da una modalità operativa all’altra secon-
do la sequenza: AUTO, REFRIGERAZIONE, DEUMIDIFICAZIONE, RISCALDAMENTO e Solo VENTILAZIONE
come indicato nella figura sottostante:
AUTO REFRIGERAZIONE DEUMIDIFICAZIONE RISCALDAMENTO VENTILAZIONE
Tasto + : Premere il tasto per aumentare il valore della temperatura interna fino a max. 30ºC.
Tasto - : Premere il tasto per diminuire il valore della temperatura interna fino a min. 17ºC.
Tasto Ventola: Il tasto è utilizzato per selezionare la velocità della ventola. Ogni qualvolta che si preme il
tasto, sarà selezionata in successione la velocità della ventola nel seguente ordine: AUTO, BASSA, MEDIA,
ALTA, ritorno ad Auto. Se si seleziona la modalità AUTO o DEUMIDIFICAZIONE, la velocità della ventola è
regolata automaticamente e l’utilizzatore non può impostare nessun altro regime del ventilatore.
Tasto NOTTE: Premere questo tasto per commutare in modalità economy (risparmio energetico).
Ripremere il tasto per disattivare la condizione. Questa funzione, che può essere utilizzata solo in com-
binazione con la modalità di raffreddamento, di riscaldamento o automatica [RAFFREDDA, RISCALDA
e AUTO], fa in modo che il condizionatore alzi automaticamente la temperatura impostata di 1ºC ogni
ora (in modalità raffreddamento) o la abbassi (in modalità riscaldamento) durante le prime 2 ore. In
seguito, il condizionatore utilizzerà durante 5 ore questa temperatura (temperatura impostata + o - 2
gradi). Successivamente, il dispositivo si spegnerà automaticamente.
Tasto FRESCO: Appuyez longuement pour la fonction FRESCO active.
Tasto Oscillazione: Premere il tasto Oscillazione per attivare la relativa funzione: Ripremere il tasto per
disattivare la funzione.
Tasto orientamento aria: Premere il tasto per modificare l’angolazione del diffusore. L’angolo di oscil-
lazione del diffusore varia di 6
o
con ogni pressione del tasto. Se il diffusore oscilla raggiungendo un’an-
golazione tale da influire negativamente sulle prestazioni della refrigerazione e del riscaldamento del
climatizzatore, l’orientamento del diffusore sarà modificato automaticamente. Il display non visualizza
nessuna indicazione luminosa relativa all’utilizzo del tasto.
Tasto Oscillazione(sinistra e destra): Premere il tasto Oscillazione per attivare la relativa funzione:
Ripremere il tasto per disattivare la funzione.
i Tasto attivazione timer: : Premere il tasto per avviare la sequenza automatica di funzionamento del
timer. Ogni qualvolta che si preme il tasto, la temporizzazione automatica aumenta con incrementi di
30 minuti. Se il valore del settaggio ha raggiunto le 10 ore, qualsiasi ulteriore attivazione del pulsante
determina incrementi di 60 minuti. Per cancellare la programmazione automatica impostata, tenere
premuto il pulsante finché non viene visualizzato 0.0
j Tasto disattivazione timer: Premere il tasto per avviare la sequenza automatica di disattivazione del
timer. Ogni qualvolta che si preme il tasto, la temporizzazione automatica aumenta con incrementi di
>
107
>
30 minuti. Se il valore del settaggio ha raggiunto le 10 h, qualsiasi ulteriore attivazione del pulsante
determina incrementi di 60 minuti. Per cancellare la programmazione automatica impostata, tenere
premuto il pulsante finché non viene visualizzato 0.0
k Tasto reset: Se si preme il tasto incassato di reset (azzeramento), si potranno annullare tutte le impo-
stazioni esistenti e ripristinare le impostazioni originali (settaggi di fabbrica) del regolatore.
l Tasto TURBO/Tasto Active Clean: Se l’utilizzatore preme questo tasto mentre il climatizzatore funziona
in modalità refrigerazione [COOL], la capacità di refrigerazione aumenta. La funzione di potenzia-
mento della refrigerazione può essere disattivata premendo ancora una volta il tasto TURBO. Premendo
questo pulsante (> 2 sec) l’unità entrerà in modalità di cura del condizionatore d’aria. Si avvierà un pro-
cesso completo per la pulizia del fianco interno dell’evaporatore e la diminuzione della proliferazione
di batteri. Quando si attiva questa funzione si cancelleranno tutte le impostazioni del timer. Per uscire
dalla modalità di cura del condizionatore premere nuovamente il pulsante (> 2 sec).
m Tasto LOCK (BLOCCO): Premere il tasto incassato della funzione di LOCK per mantenere fissi i settaggi
attualmente impostati, evitandone modifiche accidentali. Tutte le funzioni del telecomando sono disa-
bilitate e l’unico tasto funzionante è quello di LOCK. Premere nuovamente il tasto per disattivare la
funzione di LOCK.
n Tasto LED DISPLAY: Premendo questo pulsante è possibile accendere la luce dello schermo del teleco-
mando. La luce di spegne automaticamente se non vengono premuti altri tasti entro 3 secondi (non
vale per dispositivi che non sono provvisti di questa funzione).
o Pulsante di suono basso/prevenzione di congelamento all’interno: Premere questo pulsante per fare
diminuire a 21 dB(A) il livello di pressione sonora all’interno. La velocità di ventola dell’unità all’interno
diminuisce fino al suo livello minimo. L’azionamento di questo tasto )> 2 secondi) attiva la funzione
antigelo integrata nell’apparecchio. L’apparecchio ignora le impostazioni della temperatura preesi-
stenti e regola la temperatura a circa 8 °C. L’accorgimento consenti di evitare che l’aria dell’ambiente
domestico scenda sottozero, col minimo consumo energetico possibile. Se la suddetta modalità è stata
attivata, compare “FP” sul display dell’unità interna. Il tasto funziona solo in modalità riscaldamento.
Per uscire dalla modalità antigelo: basta solo premere il tasto una seconda volta.
Denominazione e funzioni degli indicatori del telecomando
fig. 2
2
1
3
4
5
6
7
auto cool dryheatfan
sleep lock run
SET TEMP.TIMER ONOFF
Quadro display
Spia luminosa invio:
La spia si accende mentre il telecomando trasmette il segnale al climatizzatore.
Indicazione modalità operativa:
Utilizzare il tasto modalità operativa [MODE] per evidenziare la modalità operativa in cui si trova l’ap-
parecchio in quel momento: AUTO
, COOL [refrigerazione], DRY [deumidificazione], HEAT
[riscaldamento]. Questa indicazione non è disponibile in quegli apparecchi dotati solo della funzione di
refrigerazione], FAN
[ventilazione].
Indicazione temperatura - timer:
Il dispositivo consente di visualizzare la temperatura impostata (17º C - 30ºC). Durante i cicli di abilita-
108
zione del TIMER, il display effettua la segnalazione [ON/OFF] che indica l’attivazione o disattivazione
del timer. Se l’apparecchio è in funzione in modalità ventilazione [FAN] il display non effettua alcuna
visualizzazione.
Indicazione velocità ventola:
Con il tasto FAN SPEED (velocità ventola) è possibile selezionare la velocità del ventilatore desiderata
dall’utilizzatore, scegliendo fra: Auto, Bassa
, Media , Alta . La velocità prescelta è visualizzata sullo
schermo LCD. La visualizzazione non è disponibile nella con- dizione Auto! La velocità della ventola è
AUTO quando la modalità di funzionamento è AUTO o DRY.
Indicazione on /off:
Il simbolo compare se l’apparecchio è attivato/gestito mediante il telecomando e scompare se l’appa-
recchio è disattivato.
Visualizzazione LOCK:
L’indicazione LOCK compare se si preme il tasto LOCK. Premere una seconda volta il tasto LOCK per
cancellare la segnalazione dallo schermo.
Display in modalità sleep:
Il display si trova in modalità sleep. Premere nuovamente il pulsante SLEEP per abbandonare questa modalità.
G
NOTA!
Nella Fig. 2 sono riportati tutti gli elementi disponibili allo scopo di offrire un quadro chiaro ed
esauriente. Ma durante il funzionamento dell’apparecchio saranno visualizzati solo gli elementi
relativi alle funzioni effettivamente attive.
Funzionamento del telecomando
Installazione/Sostituzione delle batterie
Utilizzare due batterie alcaline a secco (AAA/LR03)
Non usare pile di tipo ricaricabile.
1. Togliere il coperchio del vano portabatterie del telecomando spingendo nel verso indicato dalla freccia
stampata sul coperchio.
2. Inserire le nuove batterie facendo attenzione a rispettare la corretta polarità (+) positivo e (-) negativo.
3. Rimettere a posto il coperchio.
G
NOTA!
Quando vengono rimosse le batterie, il telecomando cancella tutte le impostazioni
programmate. Dopo avere inserito batterie nuove, è necessario riprogrammare il telecomando.
Nel sostituire le batterie, non utilizzare batterie esaurite o di tipo differente. Ciò potrebbe
pregiudicare l’efficienza del telecomando.
Se il telecomando rimane inutilizzato per alcune settimane, rimuovere le batterie dal suo
interno. In caso contrario eventuali perdite di liquido elettrolitico potrebbero causare danni al
telecomando.
La durata media di una batteria in condizioni normali d’impiego è di circa 6 mesi.
Sostituire le batterie se l’unità interna non emette il segnale acustico o se l’indicatore del
segnale non si accende.
Non mischiare mai una batteria esaurita con una nuova. Non usare mai congiuntamente tipi
diversi di batterie (per esempio batterie alcaline con batterie al biossido di manganese)
FUNZIONAMENTO AUTOMATICO
Se il climatizzatore è pronto per entrare in funzione (controllare che l’unità sia collegata e che l’alimenta-
zione elettrica sia disponibile), accendere l’apparecchio e la spia luminosa di FUNZIONAMENTO sul display
inizia a lampeggiare.
1. Utilizzare il selettore della Modalità per selezionare AUTO.
2. Premere il tasto + o - per impostare la temperatura desiderata.
>
109
>
3. Premere il tasto On/off (accensione/spegnimento) per avviare il climatizzatore. Sul display si accende la
spia luminosa di FUNZIONAMENTO. La modalità operativa attiva è AUTO. La VELOCITÀ della ventola è
regolata automaticamente.
4. Ripremere il tasto On/off (accensione/spegnimento) per disattivare l’apparecchio.
G
NOTA!
Nella modalità AUTO il condizionatore selezionerà automaticamente la modalità di
funzionamento Raffreddare, Ventilare o Riscaldare, a seconda della differenza rilevata tra la
temperatura ambiente reale nella stanza e la temperatura impostata sul telecomando.
Se la modalità AUTO non offre il comfort desiderato, vi è sempre la possibilità di scegliere
manualmente un’altra modalità.
Funzionamento in modalità REFRIGERAZIONE, RISCALDAMENTO e Solo VENTILAZIONE
1. Nel caso in cui la modalità AUTO non sia rispondente alla esigenze di comfort è possibile ignorare le
impostazioni automatiche e selezionare manualmente le altre modalità disponibili: REFRIGERAZIONE,
DEUMIDIFICAZIONE, RISCALDAMENTO o Solo VENTILAZIONE, agendo sul tasto .
2. Premere il tasto + o - ( e ) per impostare la temperatura ambiente desiderata.
3. Premere il tasto Ventola per selezionare la modalità VENTILAZIONE alle velocità AUTO, ALTA, MEDIA
o BASSA.
4. Premere il tasto On/off (accensione/spegnimento) . La spia luminosa del funzionamento si accende
ed il climatizzatore inizia a funzionare secondo la modalità prescelta. Ripremere il tasto On/off (accen-
sione/spegnimento) per disattivare la funzione.
G
NOTA!
Nella modalità Solo VENTILAZIONE non è possibile regolare la temperatura. In tale condizione
operativa sono ammesse solo le fasi 1, 3 e 4.
Modalità DEUMIDIFICAZIONE
1. Premere il tasto Modalità per selezionare la funzione di DEUMIDIFICAZIONE.
2. Premere il tasto + o - ( e ) per impostare la temperatura.
3. Premere il tasto On/off (accensione/spegnimento) . La spia luminosa del funzionamento si accende ed
il climatizzatore inizia a funzionare in modalità DEUMIDIFICAZIONE. Ripremere il tasto On/off (accen-
sione/spegnimento) per disattivare la funzione.
G
NOTA!
In conseguenza della differenza esistente fra la temperatura impostata nell’apparecchio e la
temperatura dell’ambiente, spesso il climatizzatore predisposto in modalità DEUMIDIFICAZIONE
funzionerà automaticamente senza attivare le funzioni REFRIGERAZIONE e VENTILAZIONE.
Modalità TIMER
Premere il tasto Timer on/off (accensione/spegnimento) i e j per impostare i tempi di attivazione e disat-
tivazione dell’unità. Il tempo effettivo di funzionamento che può essere impostato grazie al telecomando,
relativamente alla funzione di timer, è limitato ad un periodo compreso fra un minimo di 0,5 ore ed un
massimo inferiore a 24 ore.
1. Per impostare l’orario di ATTIVAZIONE.
1.1 Premere il tasto i di inserimento del timer (Timer on), a questo punto il display del telecomando
visualizza ON TIMER: l’ultimo orario impostato per l’attivazione ed il segnale “h” saranno visualizzati
nell’aria del timer. È adesso possibile azzerare l’orario per impostare l’ ATTIVAZIONE.
110
1.2 Premere ancora una volta il tasto i di inserimento del timer (Timer on) per impostare l’orario di atti-
vazione desiderato.
1.3 Dopo il settaggio del timer (Timer on) intercorre un ritardo di circa mezzo secondo prima che il teleco-
mando trasmetta il segnale al climatizzatore.
2. Per impostare l’orario di DISATTIVAZIONE.
2.1 Premere il tasto j di spegnimento del timer (Timer off), a questo punto il display del telecomando
visualizza OFF TIMER: l’ultimo orario impostato per la disattivazione sarà visualizzato nell’aria del timer.
È adesso possibile azzerare l’orario in cui avviene la DISATTIVAZIONE.
2.2 Premere nuovamente il tasto j (Timer off), disattivazione timer, per impostare l’orario prescelto per
far terminare il funzionamento.
2.3 Dopo il settaggio del timer (Timer off) intercorre un ritardo di circa mezzo secondo prima che il teleco-
mando trasmetta il segnale al climatizzatore.
Esempio di impostazione del timer
Per avviare il condizionatore d’aria dopo 6 ore.
1. Premere il pulsante TIMER ON, l’ultima impostazione dell’ora di avvio e il segnale
“h” saranno visualizzati sull’area del display
2. Premere il pulsante TIMER ON per visualizzare “6:0h”
3. Attendere un secondo e l’area del display digitale mostrerà nuovamente la tem-
Start
Off
6h
TIMERON
peratura. L’indicatore “TIMER ON” rimane acceso e la funzione è attivata.
Timer combinato
(impostazione contemporanea dei timer ON e OFF)
TIMER OFF --> TIMER ON
(On --> Stop --> Start)
Questa caratteristica è utile se si desidera spegnere il condizionatore d’aria quando
On
Stop
2hSet
On
10 h
TIMERONOFF
si va a dormire e riavviarlo di mattina quando ci si sveglia o quando si ritorna a casa.
Esempio:
Per spegnere il condizionatore d’aria 2 ore dopo l’impostazione e riavviarlo 10 ore dopo l’impostazione.
1. Premere il pulsante TIMER OFF.
2. Premere nuovamente il pulsante TIMER OFF per visualizzare 2.0h sul display TIMER OFF
3. Premere il pulsante TIMER ON
4. Premere nuovamente il pulsante TIMER ON per visualizzare 10h sul display TIMER ON
5. Attendere un secondo e l’area del display digitale mostrerà nuovamente la temperatura. L’indicatore
TIMER ON/OFF rimane acceso e la funzione è attivata.
G
NOTE!
Se è stato impostato lo stesso orario per ATTIVAZIONE e DISATTIVAZIONE, l’orario di
disattivazione sarà prolungato automaticamente di mezz’ora (0,5 h) (il tempo impostato è
inferiore alle 10 ore) o di un ora (il tempo impostato è di almeno 10 ore o oltre).
Per cambiare gli orari impostati nelle funzioni Timer on/off premere il tasto di TIMER
corrispondente ed effettuare il reset.
Il tempo di impostazione è relativo, ovvero è basato su una differenza di tempo tra il tempo
reale e quello impostato.
>
111
>
ATTENZIONE
Tenere il telecomando alla lontana da tutti i tipi di liquidi.
Proteggere il telecomando dalle temperature elevate e non esporlo a radiazioni.
Mantenere il ricevitore dell’unità interna al riparo dai raggi solari diretti per evitare il rischio di
un cattivo funzionamento del climatizzatore
E
FUNZIONAMENTO MANUALE (SENZA TELECOMANDO)
Come utilizzare l’unità senza il telecomando.
Nel caso in cui il telecomando non funzioni, l’unità può essere azionata manualmente con il pulsante
CONTROLLO MANUALE situato sull’unità interna. Si noti che il funzionamento manuale non è una soluzione
a lungo termine e si consiglia vivamente di utilizzare l’unità con il telecomando.
G
PRIMA DEL FUNZIONAMENTO MANUALE
Unit must be turned off before manual operation.
Per utilizzare l’unità manualmente:
1. Individuare il pulsante CONTROLLO MANUALE sul pannello laterale destro
dell’unità.
2. Premere una volta il pulsante MANUAL CONTROL per attivare la modalità AUTO
FORZATA.
3. Premere di nuovo il pulsante CONTROLLO MANUALE per attivare la modalità
RAFFREDDAMENTO FORZATO.
4. Premere il pulsante CONTROLLO MANUALE una terza volta per spegnere l’unità.
AVVERTENZA
Il pulsante manuale è destinato solo a scopi di test e funzionamento di emergenza. Si prega di
non utilizzare questa funzione a meno che il telecomando non venga perso ed è assolutamente
necessario. Per ripristinare il normale funzionamento, utilizzare il telecomando per attivare
l’unità.
F ACCORGIMENTI PER UN FUNZIONAMENTO OTTIMALE
Per ottenere prestazioni ottimali, tenere presente le seguenti considerazioni:
Regolare correttamente l’orientamento del flusso di aria evitando che sia diretto contro le persone.
Regolare la temperatura per ottenere il Massimo livello di comfort. Evitare di impostare temperature ecces-
sive.
Chiudere porte e finestre per evitare dispersioni che riducono le prestazioni.
Non collocare nessun oggetto in prossimità delle aperture di ingresso e di uscita dell’aria predisposte
sull’apparecchio, ciò pregiudica l’efficienza del climatizzatore e può causarne l’arresto. Assicurarsi che non
vi siano ostacoli che impediscono la fuoriuscita del flusso di aria. La corrente di aria generata dall’appa-
recchio deve poter espandersi liberamente nel vano. Inoltre l’aria in circolazione deve poter raggiungere
l’apparecchio senza incontrare ostacoli.
Pulire ad intervalli regolari il filtro dell’aria, per evitare intasamenti che possono influire sui livelli di presta-
zione della funzione di refrigerazione o di riscaldamento. È consigliabile pulire i filtri ogni due settimane.
Non mettere in funzione l’apparecchio se il diffusore orizzontale è chiuso.
Manual control button
Manual
control
pulsante
112
G ORIENTAMENTO DEL FLUSSO DI ARIA
La direzione di emissione dell’aria del condizionatore può essere impostata rego-
lando le lamelle orizzontali e verticali.
Regolare la direzione delle lamelle in modo che la corrente d’aria non soffi diret-
tamente sulle persone.
Assicurarsi che la corrente d’aria in uscita possa raggiungere tutto l’ambiente per
evitare differenze di temperatura nell’ambiente.
• Le lamelle verticali possono essere regolate con il telecomando.
• Le lamelle orizzontali devono essere regolate manualmente.
Impostazione della corrente d’aria verticale (su - giù)
Eseguire questa azione mentre il condizionatore è in funzione.
Utilizzare il telecomando per impostare le lamelle verticali. Premere il pulsante DIREZIONE DELL’ARIA
del
telecomando. Ogni volta che si premerà il pulsante, la lamella tornerà sul pulsante 6º.
Impostazione della corrente d’aria orizzontale (sinistra - destra)
Muovere le maniglie delle lamelle orizzontali con la mano verso sinistra o verso destra, per impostare la
corrente d’aria desiderata.
Modalità di attivazione dell’oscillazione automatica del flusso di aria (in su – in giù)
Effettuare questa regolazione con l’apparecchio in funzione.
Premere il tasto . OSCILLAZIONE sito sul telecomando.
Per disattivare la funzione, ripremere il tasto . OSCILLAZIONE. Premere il tasto ORIENTAMENTO ARIA
per bloccare il diffusore nella posizione desiderata.
PRECAUZIONE!
Usare prudenza, non toccare la ventola dietro la griglia de diffusore verticale!
AVVERTENZA
I pulsanti “DIREZIONE DELL’ARIA” e “SWING” non funzionano quando il condizionatore è
spento (anche se è impostato su “TIMER ON”).
Non far funzionare mai a lungo il condizionatore in posizione raffredda o asciuga, con l’aria
rivolta verso il basso. Se ciò avviene, è possibile che si formi condensa sulla lamella verticale,
provocando una perdita d’acqua.
Non spostare a mano la lamella verticale. Usare sempre il pulsante “DIREZIONE DELL’ARIA”
o il pulsante “SWING” . Se si muovere questa griglia con la mano, si rischia di disturbarne il
funzionamento. Se la lamella verticale non funziona come dovrebbe, spegnere il condizionatore
e poi riaccenderlo.
Se il condizionatore viene riacceso subito dopo averlo spento, può capitare che la lamella
verticale non si muova per circa 10 secondi.
Non far funzionare l’unità con la lamella orizzontale in posizione chiusa.
Asta del
deflettore
Leva
>
113
>
H GUIDA ALL’USO DEL CLIMATIZZATORE
FUNZIONAMENTO AUTOMATICO
Se il climatizzatore è stato predisposto in modalità AUTO (tasto 2 del telecoman-
do), il funzionamento prevede la selezione automatica delle modalità operative di
REFRIGERAZIONE, RISCALDAMENTO o Solo VENTILAZIONE, a seconda della tempera-
tura ambiente che l’utilizzatore avrà impostato.
Il climatizzatore provvede automaticamente al controllo della temperatura ambiente
e la mantiene intorno al valore impostato dall’utilizzatore.
Se il funzionamento in modalità AUTO si rivela fastidioso o non offre comfort, è sempre
possibile selezionare con operazione manuale le condizioni desiderate.
SNOTTO/USO ECONOMICO
Questa funzione, che può essere utilizzata solo in combinazione con la modalità di
raffreddamento, di riscaldamento o automatica [RAFFREDDA, RISCALDA e AUTO],
fa in modo che il condizionatore alzi automaticamente la temperatura impostata di
1ºC ogni ora (in modalità raffreddamento) o la abbassi (in modalità riscaldamento)
durante le prime 2 ore. In seguito, il condizionatore utilizzerà durante 5 ore questa
temperatura (temperatura impostata + o - 2 gradi). Successivamente, il dispositivo si
spegnerà automaticamente.
DEUMIDIFICAZIONE
La modalità di deumidificazione è selezionata automaticamente ed entra in funzione per effetto della
differenza fra la temperatura impostata e quella effettivamente registrata nell’ambiente.
La temperatura in fase di deumidificazione viene regolata mediante la ripetuta attivazione e disatti-
vazione della funzione di refrigerazione o di solo ventilazione. La velocità della ventola è controllata
automaticamente.
Anche in normali condizioni di refrigerazione il climatizzatore procede alla deumidificazione dell’aria.
G
NOTA
In fase di deumidificazione è ovvio che vi sia un abbassamento della temperatura dell’ambiente.
È quindi un fatto normale che l’igrostato registri un tasso più elevato di umidità relativa. Ciò
nonostante l’umidità assoluta presente nel vano verrà in ogni caso ridotta, sempre in relazione alla
quantità di umidità prodotta nell’ambiente (per esempio da vapori di cottura, respirazione, ecc.).
1
1
1
1
Premere il tasto Notte
REFRIGERAZIONE
RISCALDAMENTO
DEUMIDIFICAZIONE
Impostare
la tempe-
ratura
1 ora 1 ora
1 ora 1 ora
Impostare
la tempe-
ratura
Impostare la temperatura
Orario
Tempe-
ratura
ambien-
te
Refrigerazione
Refrigerazione
Refrigerazione
Solo ventilazione
Solo ventilazione
114
I MANUTENZIONE
G
ATTENZIONE
È necessario disattivare il climatizzatore e scollegarlo
dall’alimentazione prima di procedere alla pulizia.
Pulizia dell’unità interna e del telecomando
G
PRECAUZIONE
Utilizzare un panno asciutto e passarlo, strofinando leggermente,
sull’unità interna e sul telecomando.
Un panno inumidito con acqua fredda può essere utilizzato per
pulire l’unità interna se è molto sporca.
Il pannello anteriore dell’unità interna può essere staccato e pulito
con acqua. Asciugarlo quindi con un panno asciutto.
Non usare strofinacci contenenti sostanze chimiche o aspiratori per
pulire l’unità.
Non utilizzare, benzina, solventi, polveri abrasive o sostanze simili
a scopo di pulizia. Tali sostanze aggressive possono danneggiare o
deformare le superfici di plastica.
Pulizia del filtro dell’aria
L’intasamento del filtro dell’aria diminuisce la capacità di refrigerazione dell’apparecchio.
Pulire il filtro ogni 2 settimane.
1. Sollevare il pannello dell’unità interna fino al punto in cui si blocca con un clic.
2. Afferrare la maniglia del filtro di garza e sollevare leggermente per sganciare
il filtro dal portafiltro, quindi tirare verso il basso.
3. Estrarre il filtro di garza dall’unità.
• Pulire il filtro di garza ogni due settimane.
• Pulire il filtro di garza con un aspiratore o dell’acqua.
4. Il filtro al carbone attivo non può essere pulito. Questo filtro non sarà più in
grado di filtrare odori sgradevoli se sporco. In quel caso il filtro dovrà essere
sostituito con un filtro nuovo (disponibile presso il rivenditore). Si consiglia di
sostituire il filtro al carbone attivo due volte ogni stagione.
5. Il filtro HAF (High Air Flow) 3M di colore verde mostrerà chiari segni di spor-
co al suo esterno ed interno. Quando è sporco, questo filtro non può essere
pulito e deve essere sostituito con un filtro nuovo (disponibile presso il riven-
ditore). Si consiglia di sostituire il filtro due volte ogni stagione.
Nuovo filtro
Sostituzione del filtro consigliata
6. Dopo avere reinserito il filtro al carbone attivo e il filtro HAF 3M nel porta
iltri sul filtro a rete, quest’ultimo può essere ricollocato all’interno del condi-
zionatore d’aria.
7. Prima di rimettere a posto il filtro assicurarsi che sia perfettamente asciutto
ed indenne.
8. Posizionare il filtro dell’aria come richiesto.
9. Rimettere la parte superiore del filtro dell’a ria nell’apparecchio e assicurarsi
che i margini sinistro e destro siano correttamente allineati, quindi inserire
il
filtro a fondo nella sua sede.
>
Disotturante
per uso
domestico
No
Diluente
f
Schede filtro
Rimuovere il filtro per rinfrescare l’aria
dal retro del filtro più grande (alcune
unità)
115
>
Manutenzione
Se si intende lasciare il climatizzatore inutilizzato per un lungo periodo, procedere come segue:
1. Attivare la ventola per circa 6 ore in modo da asciugare l’interno dell’apparecchio.
2. Spegnere l’apparecchio e scollegarlo dalla rete di alimentazione. Nel caso in cui venga usato il modello
S(C)5148, interrompere l’alimentazione. Togliere le batterie dal telecomando.
3. L’unità esterna necessita di manutenzione e di puliture da effettuare con regolarità. Gli interventi
vanno effettuati solo presso un centro di assistenza autorizzato.
Verifiche preliminari
Controllare che il cordone elettrico sia integro e non sia scollegato.
Controllare che i filtri dell’aria siano stati posizionati.
Verificare che non vi siano ostruzioni all’uscita e all’ingresso dell’aria se il climatizzatore è stato tenuto
fuori uso per molto tempo.
PRECAUZIONE
Non toccare le parti metalliche dell’apparecchio nel rimuovere il filtro. Le parti metalliche
taglienti possono causare lesioni.
All’interno dell’apparecchio non utilizzare acqua per la pulizia. La presenza di acqua
pregiudica l’isolamento elettrico con il conseguente rischio di scariche elettriche.
Prima di pulire l’unità, assicurarsi che l’alimentazione sia stata scollegata e che l’interruttore di
circuito sia disinserito.
J INFORMAZIONI UTILI
Durante il funzionamento normale dell’apparecchio potrebbe verificarsi quanto segue:
1. Protezione del climatizzatore.
Protezione del compressore
Dopo ogni arresto il compressore richiede 3 minuti prima di riattivarsi.
Inibizione aria fredda
L’apparecchio è stato programmato in modo da impedire di emanare aria fredda nella modalità
RISCALDAMENTO, se lo scambiatore di calore interno si trova in una delle tre condizioni seguenti e se
la temperatura programmata non è stata ancora raggiunta.
A. Subito dopo l’avvio del riscaldamento.
B. Durante lo sbrinamento
C. Durante il riscaldamento ad una bassa temperatura.
Sbrinamento
La ventola interna o quella esterna si arrestano durante lo sbrinamento.
Sull’unità esterna può formarsi della brina o del ghiaccio durante il ciclo di riscaldamento quando la
temperatura esterna è bassa e l’umidità relativa è alta, la qualcosa causa una minore efficienza opera-
tiva del climatizzatore.
In questa eventualità il climatizzatore interrompe di volta in volta la funzione di riscaldamento ed avvia
lo sbrinamento automatico.
La durata dello sbrinamento può variare dai 4 ai 10 minuti, a seconda della temperatura esterna e dello
spessore dello strato di ghiaccio che si è accumulato sull’unità esterna.
116
2. Vapore bianco che fuoriesce dall’unità interna.
La fuoriuscita di vapore bianco dall’apparecchio è indice di una notevole differenza di temperatura fra
l’aria aspirata e l’aria emessa, ciò si verifica nella modalità REFRIGERAZIONE ed in un ambiente ove è
presente un tasso elevato di umidità relativa.
Quando il condizionatore viene riavviato in modalità di funzionamento Riscaldare, può formarsi una
foschia biancastra causata dall’umidità che sorge sulla superficie dell’umidificatore dell’unità interna
quando si raffredda o si asciuga.
3. Lieve rumorosità del climatizzatore.
L’apparecchio può generare un basso sibilo se il compressore è in funzione o subito dopo il suo arresto.
Si tratta del suono prodotto dal refrigerante in circolazione o dall’arresto del flusso.
L’apparecchio può generare un flebile scricchiolio se il compressore è in funzione o subito dopo il suo
arresto. Ciò è causato dal fenomeno di dilatazione termica e successiva ritrazione delle parti di plastica
all’interno dell’apparecchio, durante i cambiamenti di temperatura.
Subito dopo l’attivazione dell’apparecchio è possibile udire un suono prodotto dal rientro del diffusore
nella sua posizione originaria.
4. Dall’unità interna fuoriesce aria contenente polvere.
Si tratta di un fenomeno normale se l’apparecchio non è stato utilizzato da tempo o se lo si usa per la prima volta.
5. Un odore caratteristico è esalato dall’unità interna.
La causa è il rilascio di area frammista ad odori provenienti dal materiale contenuto nell’apparecchio,
o raccolto dai mobili presenti nell’ambiente o dal fumo.
6. Il climatizzatore passa in modalità Solo VENTILAZIONE dalla modalità REFRIGERAZIONE o RISCALDAMENTO.
Non appena la temperatura interna ha raggiunto il valore impostato nel climatizzatore, il compressore
si ferma automaticamente e l’apparecchio cambia modalità operativa passando a Solo VENTILAZIONE. Il
compressore riprende a funzionare quando la temperatura interna raggiunge il valore impostato, ossia
aumenta nella modalità REFRIGERAZIONE o si abbassa in modalità RISCALDAMENTO.
7. Uno sgocciolamento di acqua dalla superficie dell’unità interna può presentarsi durante la fase di
refrigerazione in un ambiente ad elevata umidità relativa (superiore all’80%). Regolare il diffusore
orizzontale alla posizione di massima uscita dell’aria e selezionare la velocità ALTA della ventola.
8. Modalità di riscaldamento
Il climatizzatore aspira il calore dall’unità esterna e lo rilascia attraverso l’unità interna durante il ciclo di
riscaldamento. Quando la temperatura esterna diminuisce, diminuisce anche il calore prodotto dal condi-
zionatore, facendo calare la capacità di riscaldamento della parte interna.
9. Funzione di avviamento automatico.
La caduta di corrente durante il funzionamento dell’unità causa la completa disattivazione dell’apparecchio.
Il climatizzatore è dotato di un dispositivo di avviamento automatico che interviene nel momento in
cui è ripristinata l’alimentazione elettrica. L’apparecchio riprende a funzionare come prima dell’inter-
ruzione, avendo immagazzinati in memoria tutti i settaggi preesistenti.
10. Rilevamento perdite del refrigerante.
Il condizionatore è dotato di un sistema di rilevamento delle perdite del refrigerante. Quando l’unità
esterna rileva una perdita di refrigerante, il condizionatore smetterà di funzionare e l’unità interna
visualizza un allarme EC sul display.
Quando si verifica questo allarme, non riavviare il condizionatore e contattare il proprio fornitore.
>
117
>
K INDIVIDUAZIONE E RISOLUZIONE DEI PROBLEMI
Anomalie e rimedi
G
PROBLEMA
Arrestare immediatamente il climatizzatore se si verifica una delle seguenti condizioni: Scollegare
l’alimentazione e contattare il fornitore dell’apparecchio.
Il fusibile si brucia frequentemente o l’interruttore di circuito scatta frequentemente.
Corpi estranei o acqua all’interno del climatizzatore.
Il telecomando non funziona o funziona male.
Altre situazioni anomale.
Problema Cause possibili
L’unità non si accende quando
si preme il pulsante ON/OFF
L’unità dispone di una funzionalità di protezione di 3 minuti che impedisce
che l’unità si sovraccarichi. L’unità non può essere riavviata entro tre minuti
dallo spegnimento.
L’unità cambia dalla modalità
COOL/HEAT alla modalità FAN
L'unità può cambiare la sua impostazione per impedire la formazione
di ghiaccio sull'unità. Quando la temperatura aumenta, l'unità entrerà
nuovamente in funzione nella modalità precedentemente selezionata.
Raggiunta la temperatura impostata, a quel punto l’unità spegne il com-
pressore. L'unità continuerà a funzionare quando la temperatura oscilla di
nuovo.
L’unità interna emette nebbia
bianca
Nelle regioni umide, una differenza di temperatura tra l’aria della stanza e
l’aria condizionata può causare nebbia bianca.
Entrambe le unità interna ed
esterna emettono nebbia bianca
Quando l’unità viene riavviato in modalità HEAT dopo lo sbrinamento,
nebbia bianca può essere emessa a causa dell’umidità generata dal processo
di scongelamento.
L’unità interna produce rumori
Un suono impetuoso di aria può essere udito quando la feritoia reimposta la
sua posizione.
Un cigolio può essere udito, dopo aver fatto funzionare l'unità in modalità
HEAT, dovuto alla dilatazione e contrazione di parti in plastica dell'unità.
Sia l’unità interna che l’unità
esterna fanno rumore
Sibilo basso durante il funzionamento: Questo è normale ed è causato da
gas refrigerante che scorre attraverso le unità interna ed esterna.
Sibilo basso all'avvio del sistema, ha appena smesso di funzionare, o è in
sbrinamento: Questo rumore è normale ed è causato dall’arresto o dal cam-
bio di direzione del gas refrigerante.
Cigolio: La normale espansione e contrazione delle parti in plastica e in
metallo, causata dai cambiamenti di temperatura durante il funzionamento,
può causare cigolii.
L’unità esterna produce rumori L’unità emette suoni diversi in base alla sua modalità di funzionamento attuale.
Polvere è emessa da entrambe le
unità interna o esterna
L’unità può accumulare polvere durante lunghi periodi di non utilizzo,
che sarà emessa quando l’unità viene accesa. Questo può essere mitigato
coprendo l’unità durante i lunghi periodi di inattività.
L’unità emette un cattivo odore
L'unità può assorbire odori dall'ambiente (ad esempio mobili, cucina,
sigarette, ecc.) che verrà emesso durante il funzionamento.
I filtri dell'apparecchio sono ammuffiti e devono essere puliti.
La ventola dell’unità esterna non
funziona
Durante il funzionamento, la velocità della ventola è controllata per
ottimizzare il funzionamento del prodotto.
Il funzionamento è irregolare,
imprevedibile o l’unità non
risponde
L’interferenza da torri di telefonia cellulare e potenziatori remoti può
causare malfunzionamenti dell’unità. In questo caso, provare quanto segue:
• Scollegare e ricollegare l’alimentazione.
• Premere ON/OFF sul telecomando per riavviare il funzionamento.
118
G
NOTA!
Se il problema persiste, contattare il proprio rivenditore o il centro assistenza clienti più vicino. Fornire
una descrizione dettagliata del malfunzionamento dell’unità, nonché il numero del modello.
Problema Cause possibili Soluzione
Scarse prestazioni di
raffreddamento
L’impostazione della temperatura può
essere superiore alla temperatura ambiente
Abbassare l'impostazione della tempera-
tura
Lo scambiatore di calore dell'unità interna
o esterna è sporco
Pulire lo scambiatore di calore interessato
Il filtro dell’aria è intasato.
Rimuovere il filtro e pulirlo seguendo le
istruzioni
L'ingresso o l'uscita dell’aria di ogni unità
è bloccato
Spegnere l'unità, rimuovere l'ostruzione e
riaccenderla
Porte e le finestre sono aperte
Assicurarsi che tutte le porte e le finestre siano
chiuse durante il funzionamento dell'unità
Un eccessivo calore è generato dalla luce
solare
Chiudere le finestre e le tende durante i
periodi di elevato calore o luce del sole
Troppe fonti di calore nella stanza (per-
sone, computer, dispositivi elettronici, ecc.)
Ridurre la quantità di fonti di calore
Refrigerante insufficiente a causa di per-
dite o di un uso a lungo termine
Controllare eventuali perdite, richiudere e
sigillare se necessario e chiudere il refrigerante
La funzione SILENCE è attivata (funzione
opzionale)
La funzione SILENCE può ridurre le pres-
tazioni del prodotto riducendo la fre-
quenza operativa. Disattivare la funzione
SILENCE.
L’unità non funziona
Guasto all'alimentazione elettrica Attendere che l'alimentazione si ripristini
L'alimentazione è spenta. Accendere l’unità
Il fusibile è bruciato Sostituire il fusibile
Le batterie del telecomando sono scariche Sostituire le batterie
La protezione di 3 minuti dell'unità è stata
attivata
Attendere tre minuti dopo il riavvio del-
l'unità
Il timer è attivato Disattivare il timer
L’unità si avvia
e si arresta
frequentemente
C'è troppo o troppo poco refrigerante nel
sistema
Verificare la presenza di perdite e ricaricare
il sistema con il refrigerante.
Gas incomprimibile o umidità sono pene-
trati nel sistema.
Evacuare e ricaricare il sistema con refri-
gerante
Il compressore è guasto Sostituire il compressore
La tensione è troppo alta o troppo bassa
Installare un pressostato per regolare la
tensione
Scarse prestazioni di
riscaldamento
La temperatura esterna è estremamente
bassa
Utilizzare un dispositivo di riscaldamento
ausiliario
Aria fredda sta entrando attraverso porte
e finestre
Assicurarsi che tutte le porte e le finestre
siano chiuse durante l’uso
Refrigerante insufficiente a causa di per-
dite o di un uso a lungo termine
Controllare eventuali perdite, richiudere e
sigillare se necessario e chiudere il refrigerante
Le spie continuano a
lampeggiare
“L’unità può interrompere il funzionamento o continuare a funzionare in modo sicuro.
Se le spie continuano a lampeggiare o vengono visualizzati codici di errore, attendere
circa 10 minuti. Il problema può risolversi automaticamente.
In caso contrario, scollegare il cavo di alimentazione, quindi ricollegarlo. Accendere il
dispositivo.
Se il problema persiste, scollegare l’alimentazione e contattare il centro assistenza cli-
enti più vicino.”
“Il codice di errore
viene visualizzato nella
finestra di visualizzazi-
one dell’unità interna:
• E0, E1, E2…
• P1, P2, P3…
• F1, F2, F3…”
>
119
>
Se il problema non è stato risolto, pregasi rivolgersi al rivenditore dell’apparecchio. Assicurarsi di fornire
tutte le informazioni relative al difetto ed al modello.
G
NOTA!
Gli interventi di riparazione vanno effettuati solo presso un centro di assistenza autorizzato.
L CONDIZIONI DI GARANZIA
Il climatizzatore è coperto da una garanzia di 48 mesi per i compressore e 24 mesi per altri componenti , che
decorre a partire dalla data di acquisto. La garanzia è concessa alle seguenti condizioni:
1. Rifiutiamo espressamente qualsiasi richiesta di risarcimento per danni derivati, ad inclusione delle
richieste di risarcimento per danni collaterali.
2. Riparazioni o sostituzioni dei componenti non danno diritto ad una proroga del periodo di garanzia.
3. La garanzia non è valida se sono state apportate modifiche, se sono state utilizzati ricambi non originali
o se le riparazioni sono state effettuate da terzi.
4. I componenti soggetti alla normale usura, quali i filtri, non sono coperti dalla garanzia.
5. La garanzia è valida solo se si esibisce una prova d’acquisto datata e originale, non alterata da modifi-
che.
6. La garanzia non si applica ai danni causati da negligenza o da interventi diversi da quelli previsti nelle
presente istruzioni per l’uso.
7. Le spese di spedizione ed i rischi connessi al trasporto del climatizzatore o dei suoi componenti sono
sempre a carico dell’acquirente.
8. I danni causati dall’uso di filtri non originali sono esclusi dalla garanzia.
9. La perdita di refrigerante e/o la fuoriuscita dovute ad una connessione e/o disconnessione eseguite da
personale non qualificato, non sono coperte dalle condizioni di garanzia riservate a questo prodotto.
Eventuali danni agli apparecchi che risultano montati, connessi e/o disconnessi non seguendo le vigenti
leggi locali, né le istruzioni fornite dal presente manuale, non sono coperti dalle condizioni di garanzia
riservate a questo prodotto.
Si consiglia di rivolgersi al rivenditore per eventuali riparazioni, qualora le istruzioni contenute nel presente
manuale non siano risultate risolutive. Laddove si renda necessario disconnettere l’apparecchio, assicuratevi
che tale operazione sia sempre eseguita da personale qualificato e autorizzato, secondo le leggi vigenti nel
proprio Stato.
120
>
M SCHEDA TECNICA
Modello
S 4225
S 5225
S 5225 B
S-JA 2519
S 4232
S 5232
S 4248
S 5248
SC 4225
SC 5225
SCJA-2519
SC 4232
SC 5232
SC 4248
SC 5248
SCJA-4819
Tipo di climatizzatore
Climatizzatore montato
a parete
Climatizzatore montato
a parete
Climatizzatore montato
a parete
Climatizzatore montato
a parete
Climatizzatore montato
a parete
Climatizzatore montato
a parete
Capacita’ di raffreddamento nom.
(min - max) *
W
2600 (1030 - 3190) 3500 (820 - 4160) 5300 (1730 - 6980) 2500 (1590 - 3000)
3200 (2110 - 4000) 4600 (1820 - 6120)
Classe energetica EE refrigera
-
zione *
A++ A++ A++ A++
A++ A++
Indice di efficienza energetica
(SEER)*
7,1 7,0 6,4 6,5
6,2 6,7
Capacita’ di riscaldamento nom.
(min - max) *
W
2500 ( 880 - 3660) 2700 ( 850 - 4780) 3900 (1060 - 6980) 2400 (960 - 4890)
2400 (1280 - 4900) 3800 (1380 - 6740)
Classe energetica EE riscalda
-
mento *
A+ A+ A+ A+
A+ A+
Coefficiente di rendimento (SCOP)*
4,0 4,1 4,0 4,0
4,0 4,0
Capacita’ di deumidificazione ** / *** L / 24 h
24,0 28,8 43,2 26,4
31,2 36,0
Potenza assorbita refrigerazione kW
0,70 1,09 1,54 0,71
1,19 1,40
Potenza assorbita riscaldamento kW
0,67 1,05 1,46 0,84
1,23 1,90
Consumo annuo energia refrigerazi
-
one / riscaldamento
kWh
128 / 875 175 / 922 290 / 1365 137 / 836
187 / 834 245 / 1326
Alimentazione V / Hz / Ph
220-240~ / 50 / 1 220-240~ / 50 / 1 220-240~ / 50 / 1 220-240~ / 50 / 1
220-240~ / 50 / 1 220-240~ / 50 / 1
Corrente max. A
9,5 10,0 11,5 10,0
10,0 13,0
Flusso aria ** m3/h
416/309/230 539/478/294 750/505/420
545/435/368
545/435/368 770/610/410
Per vani da - a** m3
60-85 80-100 140-185 60-85 80-100 125-145
Regioni adatte W/A/C W/A/C W/A/C W/A/C W/A/C W/A/C
Tipo di compressore Giratorio Giratorio Giratorio Giratorio Giratorio Giratorio
Velocita’ della ventola
4 4 4 3
3 3
Gamma termica oC
17 - 30 17 - 30 17 - 30 17 - 30
17 - 30 17 - 30
Controllo manuale / meccanico /
elettronico
Elettronico a distanza Elettronico a distanza Elettronico a distanza Elettronico a distanza Elettronico a distanza Elettronico a distanza
Telecomando si / no si si si si si si
Tipo di filtri aria
Crivello, Carbone attivo,
3M HAF
Crivello, Carbone attivo,
3M HAF
Crivello, Carbone attivo,
3M HAF
Crivello, Carbone attivo,
3M HAF
Crivello, Carbone attivo,
3M HAF
Crivello, Carbone attivo,
3M HAF
Tipo e carica di refrigerante R / g
R32 / 700 R32 / 800 R32 / 1250 R32 / 800 R32 / 800 R32 / 1190
Refrigerante GWP
675 675 675 675
675 675
CO
2
equivalente tonnes
0,473 0,540 0,844 0,540
0,540 0,803
Dimensioni unita’ interna (l x a x p) mm
722x187x290 802x189x297 965x215x319 805x194x285
805x194x285 957x213x302
Dimensioni unita’ esterna (l x a x p) mm
770x300x555 770x300x555 800x333x554 770x300x555
770x300x555 800x333x554
Peso netto unita’ interna kg
7,3 8,2 10,8 7,8
7,8 10,3
Peso netto unita’ esterna kg
27,2 27,0 37,0 25,7
25,7 34,6
Peso lordo unita’ interna kg
9,7 10,7 14,1 10,4
10,4 13,8
Peso lordo unita’ esterna kg
29,7 29,4 39,9 31,1
31,1 40,2
Livello di rumorosita’ unita’
interna****
dB(A)
54 56 58 53
53 55
Livello di rumorosita’ unita’
esterna****
dB(A)
59 60 64 62
62 62
Livello di rumorosita’ unita’ interna
(low)****
dB
20 21 21 25
25 29
Grado di protezione unita’ interna IP
IPX0 IPX0 IPX0 IPX0
IPX0 IPX0
Grado di protezione unita’ esterna IP
IPX4 IPX4 IPX4 IPX4
IPX4 IPX4
* EN 14511/EN 14825
** Da usare indicativamente
*** Estrazione del liquido a 32°C, 80% UR
**** EN 12108-2008
121
>
Non smaltire le apparecchiature elettriche insieme ai rifiuti generici; utilizzare la raccolta separata.
Mettersi in contatto con l’amministrazione pubblica per sapere se è disponibile un sistema di rac-
colta adeguato. Se le apparecchiature elettriche vengono disperse in discariche o depositi di rifiuti,
potrebbe verificarsi una perdita di sostanze pericolose nelle acque sotterranee e terminare nella
catena alimentare producendo un effetto dannoso per la salute ed il benessere. Non gettare le bat-
terie nel fuoco, ciò potrebbe provocare un’esplosione o la fuoriuscita di liquidi pericolosi. Qualora
il telecomando venga sostituito o eliminato, rimuovere le batterie e smaltirle secondo le norme
vigenti, in quanto queste contengono materiali dannosi per l’ambiente.
Informazioni sulla tutela ambientale: In questo apparecchio sono contenuti gas fluorinati ad effetto serra in
base al Protocollo di Kyoto. L’apparecchio deve essere manutenzionato o smantellato solo da persone esperte.
L’apparecchio contiene refrigerante R32 nella quantità indicata nella precedente tabella. Non scaricare il gas
R32 nell’atmosfera: R32 è un gas fluorinato ad effetto serra con potenziale di riscaldamento globale GWP pari
a 675.
Internet:
Per vostra comodità, potete scaricare la versione più aggiornata del manuale d’uso, installazione e/o tecnico
su www.qlima.com
122
1
1. LEES EERST DE GEBRUIKSAANWIJZING.
2. RAADPLEEG BIJ TWIJFEL UW DEALER.
Geachte mevrouw, mijnheer,
Van harte gefeliciteerd met de aankoop van uw Qlima airconditioner. U heeft een
kwaliteitsproduct aangeschaft waar u nog vele jaren plezier van zult hebben, mits u
het apparaat verantwoord gebruikt. Lees daarom eerst deze gebruiksaanwijzing voor
een optimale levensduur van uw airconditioner. Wij geven u namens de fabrikant twee
jaar garantie op mogelijke materiaal- of fabricagefouten en vier jaar garantie op de
compressor.
Wij wensen u veel comfort met uw airconditioner.
Met vriendelijke groet,
PVG Holding B.V.
Afdeling Klantenservice
123
1
INHOUD
A. VEILIGHEIDSVOORSCHRIFTEN
B. ONDERDELEN EN FUNCTIES
C. BEDRIJFSTEMPERATUUR
D. WERKEN MET AFSTANDSBEDIENING
E. HANDMATIGE BEDIENING (ZONDER AFSTANDSBEDIENING)
F. OPTIMALE WERKING
G. INSTELLEN RICHTING LUCHTSTROOM
H. HOE DE AIRCONDITIONER WERKT
I ONDERHOUD
J. BEDIENINGSTIPS
K. STORINGEN VERHELPEN
L. GARANTIEBEPALINGEN
M. TECHNISCHE GEGEVENS
LEES DEZE HANDLEIDING
In de handleiding vindt u vele nuttige tips over hoe u de airconditioner op de
juiste manier gebruikt en onderhoudt. In het hoofdstuk Storingen Verhelpen
vindt u oplossingen voor algemene problemen. Als u eerst hoofdstuk J “Storingen
Verhelpen” doorleest hoeft u misschien geen contact op te nemen met de service-
afdeling.
124
A
VEILIGHEIDSVOORSCHRIFTEN
Installeer dit toestel enkel wanneer het voldoet aan de
lokale/nationale wetgeving, regelgeving en normen. Dit
product is bedoeld om gebruikt te worden als een aircon-
ditioner in woningen en is alleen geschikt voor gebruik
binnenshuis in woonkamers, keukens en garages op droge
plaatsen, in normale huishoudelijke omstandigheden. Dit
apparaat is uitsluitend geschikt voor een geaard stopcon-
tact, aansluitspanning 220-240 V~/ 50 Hz. De 4,8kW model-
len moeten direct met de voedingskabel op de spannings-
bron worden aangesloten.
BELANGRIJK
Het apparaat MOET altijd geaard worden
aangesloten. Als de stroomvoorziening niet geaard
is, mag u het apparaat niet aansluiten. De stekker
moet altijd makkelijk toegankelijk zijn als het
apparaat is aangesloten. Lees deze gebruiksinstructie
zorgvuldig en volg de aanwijzingen.
• De airco bevat een koudemiddel en kan worden
aangemerkt als apparatuur onder druk. Schakel
daarom altijd een bevoegde aircomonteur in voor
installatie van en onderhoud aan de airco. De
airco dient jaarlijks te worden gecontroleerd en
onderhouden door een bevoegde aircomonteur of
anders vervalt de garantie.
Controleer vóór het aansluiten van het apparaat of:
De voedingsspanning overeenkomt met de netspanning
op het typeplaatje;
Stopcontact en stroomvoorziening geschikt zijn voor de
elektrische spanning vermeld op het typeplaatje;
De stekker van het snoer in het stopcontact past;
Het apparaat op een stabiele ondergrond staat.
Laat de elektrische installatie controleren door een erkend vak-
man als u er niet zeker van bent dat alles in orde is.
1
125
1
Dit apparaat is volgens de CE veiligheidsnormen gefabri-
ceerd. Toch dient u, zoals bij ieder elektrisch apparaat, voor-
zichtig te zijn.
Dek de luchtinlaat en luchtuitlaat nooit af.
Breng het apparaat nooit in contact met chemicaliën.
Het apparaat nooit in contact brengen met water, met
water besproeien of in water onderdompelen. Schakel het
apparaat uit en onderbreek de energievoorziening wan-
neer water de binnenunit inloopt.
Steek niet uw handen, vingers of voorwerpen in de openin-
gen van het apparaat.
Sluit het apparaat nooit aan met behulp van een verleng-
snoer. Als er geen geschikt geaard stopcontact voorhanden
is, laat dit dan installeren door een erkend elektricien.
Laat eventuele reparaties en/of onderhoud alleen uitvoeren
door een bevoegd monteur of door uw erkende leverancier.
Volg de gebruiks- en onderhoudsinstructies vermeld in deze
handleiding.
Onderbreek altijd de stroomtoevoer als het apparaat niet
gebruikt wordt.
Zet nooit de airconditioner aan of uit door de stekker in het
stopcontact te steken of eruit te halen. Gebruik daarvoor
alleen de speciale bedieningsknoppen op de airconditioner
of op de afstandsbediening.
Open de airconditioner nooit als deze in werking is. Verbreek
de stroomtoevoer alvorens het apparaat te openen.
Haal altijd de stekker uit het stopcontact of verbreek de
stroomtoevoer wanneer de airconditioner wordt gereinigd
of wanneer er onderhoud wordt gepleegd.
Plaats nooit gasbranders, ovens of kooktoestellen in de
luchtstroom.
Bedien nooit de knoppen en raak de airconditioner nooit
aan met natte handen.
De buitenunit produceert geluid wanneer het apparaat
aanstaat. Dit kan in strijd zijn met plaatselijke wettelijke
regelingen. Het is de verantwoordelijkheid van de gebruiker
126
om na te gaan of de apparatuur volledig voldoet aan de
plaatselijke wettelijke regelingen.
Dit apparaat is niet bedoeld voor gebruik door personen
(inclusief kinderen) met verminderde lichamelijke, geeste-
lijke of zintuiglijke vermogens, of gebrek aan ervaring en
kennis, tenzij er toezicht wordt gehouden op en instructies
worden gegeven voor het gebruik van het apparaat door
iemand die verantwoordelijk is voor hun veiligheid.
Er dient toezicht te worden gehouden op kinderen om er
zeker van te zijn dat zij niet met het apparaat spelen.
Ga nooit in de directe luchtstroom staan.
Drink nooit het condenswater uit de airconditioner
Breng geen wijzigingen aan het product aan.
Indien de voedingskabel beschadigd is, dient deze vervan-
gen te worden door de fabrikant, zijn klantenservice of
personen met vergelijkbare kwalificaties om gevaren te
voorkomen.
Dit apparaat kan worden gebruikt door kinderen vanaf 8
jaar en mensen met een lichamelijke, zintuiglijke of verstan-
delijke beperking en door mensen die geen ervaring met
of kennis over het apparaat hebben als er toezicht op hen
wordt gehouden of ze instructies hebben gekregen over
veilig gebruik van het apparaat en op de hoogte zijn van
de risico’s. Zorg ervoor dat kinderen niet met het apparaat
spelen. Reiniging en onderhoud dient niet te worden uitge-
voerd door kinderen waarop geen toezicht wordt gehou-
den.
LET OP!
Gebruik het apparaat nooit met een
beschadigd snoer, stekker, behuizing of
bedieningspaneel.
Niet volgen van de aanwijzingen kan
leiden tot het vervallen van de garantie
op dit apparaat.
1
127
5
6
7
8
1
22
3
4
5
6
2
1
4
3
1
Opmerking over gefluoreerde gassen
1. Deze air-conditioning unit bevat gefluoreerde gassen. Voor specifieke informatie over het type gas
en de hoeveelheid, verwijzen wij u naar het relevante label op het apparaat zelf.
2. Installatie, service, onderhoud en reparatie van dit toestel moet worden uitgevoerd door een gecer-
tificeerd technicus.
3. Product demonteren en recycling moet worden uitgevoerd door een erkend vakman.
4. Indien er een lekdetectiesysteem geïnstalleerd is op het systeem, moet er minstens elke 12 maanden
op lekken gecontroleerd worden.
5. Het is ten zeerste aanbevolen om de gegevens van alle controles van de eenheid op lekken nauwkeurig
te noteren en te bewaren.
6. Deze airco-unit is een hermetisch gesloten eenheid die gefluoreerde gassen bevat.
B ONDERDELEN EN FUNCTIES
BINNENUNIT Binnenunit
Luchtfilter (achter voorpaneel)
Voorpaneel
Luchtuitlaat
Schermpje
Afstandsbediening (zie hoofdstuk D voor
meer bijzonderheden en bediening)
BUITENUNIT Buitenunit
Aansluitleiding, afvoerslang (Voor
S-modellen is de aansluitleiding niet
inbegrepen)
Luchtinlaat (zij- en achterkant)
Luchtuitlaat
G
LET OP!
Alle afbeeldingen in deze handleiding en op de verpakking zijn alleen bedoeld als toelichting
en indicatie en kunnen enigszins afwijken van de airconditioner die u heeft gekocht. Alleen de
werkelijke vorm is belangrijk.
128
FUNCTIE VAN DE INDICATIELAMPJES OP HET SCHERMPJE VAN DE BINNENUNIT
Page 6
Unit Specifications and Features
1
Unit
Specifications
and Features
NOTE:
A guide on using the infrared remote is not included
in this literature package.
Unit Parts
Power Cable (Some Units)
Remote Control
Remote Control
Holder (Some Units)
Louver
Front Panel
Air Filter
(pull out)
Display window
“ ” for 3 seconds when:
• TIMER ON is set
• FRESH, SWING, TURBO, or SILENCE features are turned on
“ ” for 3 seconds when:
• TIMER OFF is set
• FRESH, SWING, TURBO, or SILENCE features are turned off
“ ” when defrosting(cooling & heating units)
“ ” when anti-cold air feature is turned on(cooling & heating units)
“ ” when unit is self-cleaning(some units)
“ ” when freeze protection is turned on(some units)
“ ” when Wireless Control feature is activated(some units)
Display Code
Meanings
In Fan and Dry mode, the unit will display the room temperature.
In other modes, the unit will display your temperature setting.
,
,
“ ”
When ECO function(some units) is activated, the
illuminates gradually one by one as --
-- --set temperature-- ...... in one second interval.
voor 3 seconden:
• TIMER ON is ingesteld
• FRESH, SWING, TURBO, of SILENCE instellingen staan aan
Page 6
Unit Specifications and Features
1
Unit
Specifications
and Features
NOTE:
A guide on using the infrared remote is not included
in this literature package.
Unit Parts
Power Cable (Some Units)
Remote Control
Remote Control
Holder (Some Units)
Louver
Front Panel
Air Filter
(pull out)
Display window
“ ” for 3 seconds when:
• TIMER ON is set
• FRESH, SWING, TURBO, or SILENCE features are turned on
“ ” for 3 seconds when:
• TIMER OFF is set
• FRESH, SWING, TURBO, or SILENCE features are turned off
“ ” when defrosting(cooling & heating units)
“ ” when anti-cold air feature is turned on(cooling & heating units)
“ ” when unit is self-cleaning(some units)
“ ” when freeze protection is turned on(some units)
“ ” when Wireless Control feature is activated(some units)
Display Code
Meanings
In Fan and Dry mode, the unit will display the room temperature.
In other modes, the unit will display your temperature setting.
,
,
“ ”
When ECO function(some units) is activated, the
illuminates gradually one by one as --
-- --set temperature-- ...... in one second interval.
voor 3 seconden:
• TIMER OFF is ingesteld
• FRESH, SWING, TURBO, or SILENCE instellingen staan uit
Page 6
Unit Specifications and Features
1
Unit
Specifications
and Features
NOTE:
A guide on using the infrared remote is not included
in this literature package.
Unit Parts
Power Cable (Some Units)
Remote Control
Remote Control
Holder (Some Units)
Louver
Front Panel
Air Filter
(pull out)
Display window
“ ” for 3 seconds when:
• TIMER ON is set
• FRESH, SWING, TURBO, or SILENCE features are turned on
“ ” for 3 seconds when:
• TIMER OFF is set
• FRESH, SWING, TURBO, or SILENCE features are turned off
“ ” when defrosting(cooling & heating units)
“ ” when anti-cold air feature is turned on(cooling & heating units)
“ ” when unit is self-cleaning(some units)
“ ” when freeze protection is turned on(some units)
“ ” when Wireless Control feature is activated(some units)
Display Code
Meanings
In Fan and Dry mode, the unit will display the room temperature.
In other modes, the unit will display your temperature setting.
,
,
“ ”
When ECO function(some units) is activated, the
illuminates gradually one by one as --
-- --set temperature-- ...... in one second interval.
bij ontdooien (koel & verwarmen versies)
Page 6
Unit Specifications and Features
1
Unit
Specifications
and Features
NOTE:
A guide on using the infrared remote is not included
in this literature package.
Unit Parts
Power Cable (Some Units)
Remote Control
Remote Control
Holder (Some Units)
Louver
Front Panel
Air Filter
(pull out)
Display window
“ ” for 3 seconds when:
• TIMER ON is set
• FRESH, SWING, TURBO, or SILENCE features are turned on
“ ” for 3 seconds when:
• TIMER OFF is set
• FRESH, SWING, TURBO, or SILENCE features are turned off
“ ” when defrosting(cooling & heating units)
“ ” when anti-cold air feature is turned on(cooling & heating units)
“ ” when unit is self-cleaning(some units)
“ ” when freeze protection is turned on(some units)
“ ” when Wireless Control feature is activated(some units)
Display Code
Meanings
In Fan and Dry mode, the unit will display the room temperature.
In other modes, the unit will display your temperature setting.
,
,
“ ”
When ECO function(some units) is activated, the
illuminates gradually one by one as --
-- --set temperature-- ...... in one second interval.
als de anti-koude lucht functie aan staat (koel & verwarmen versies)
Page 6
Unit Specifications and Features
1
Unit
Specifications
and Features
NOTE:
A guide on using the infrared remote is not included
in this literature package.
Unit Parts
Power Cable (Some Units)
Remote Control
Remote Control
Holder (Some Units)
Louver
Front Panel
Air Filter
(pull out)
Display window
“ ” for 3 seconds when:
• TIMER ON is set
• FRESH, SWING, TURBO, or SILENCE features are turned on
“ ” for 3 seconds when:
• TIMER OFF is set
• FRESH, SWING, TURBO, or SILENCE features are turned off
“ ” when defrosting(cooling & heating units)
“ ” when anti-cold air feature is turned on(cooling & heating units)
“ ” when unit is self-cleaning(some units)
“ ” when freeze protection is turned on(some units)
“ ” when Wireless Control feature is activated(some units)
Display Code
Meanings
In Fan and Dry mode, the unit will display the room temperature.
In other modes, the unit will display your temperature setting.
,
,
“ ”
When ECO function(some units) is activated, the
illuminates gradually one by one as --
-- --set temperature-- ...... in one second interval.
als de unit zichzelf aan het reinigen is (sommige versies)
Page 6
Unit Specifications and Features
1
Unit
Specifications
and Features
NOTE:
A guide on using the infrared remote is not included
in this literature package.
Unit Parts
Power Cable (Some Units)
Remote Control
Remote Control
Holder (Some Units)
Louver
Front Panel
Air Filter
(pull out)
Display window
“ ” for 3 seconds when:
• TIMER ON is set
• FRESH, SWING, TURBO, or SILENCE features are turned on
“ ” for 3 seconds when:
• TIMER OFF is set
• FRESH, SWING, TURBO, or SILENCE features are turned off
“ ” when defrosting(cooling & heating units)
“ ” when anti-cold air feature is turned on(cooling & heating units)
“ ” when unit is self-cleaning(some units)
“ ” when freeze protection is turned on(some units)
“ ” when Wireless Control feature is activated(some units)
Display Code
Meanings
In Fan and Dry mode, the unit will display the room temperature.
In other modes, the unit will display your temperature setting.
,
,
“ ”
When ECO function(some units) is activated, the
illuminates gradually one by one as --
-- --set temperature-- ...... in one second interval.
als de vorst bescherming aan staat (sommige versies)
Page 6
Unit Specifications and Features
1
Unit
Specifications
and Features
NOTE:
A guide on using the infrared remote is not included
in this literature package.
Unit Parts
Power Cable (Some Units)
Remote Control
Remote Control
Holder (Some Units)
Louver
Front Panel
Air Filter
(pull out)
Display window
“ ” for 3 seconds when:
• TIMER ON is set
• FRESH, SWING, TURBO, or SILENCE features are turned on
“ ” for 3 seconds when:
• TIMER OFF is set
• FRESH, SWING, TURBO, or SILENCE features are turned off
“ ” when defrosting(cooling & heating units)
“ ” when anti-cold air feature is turned on(cooling & heating units)
“ ” when unit is self-cleaning(some units)
“ ” when freeze protection is turned on(some units)
“ ” when Wireless Control feature is activated(some units)
Display Code
Meanings
In Fan and Dry mode, the unit will display the room temperature.
In other modes, the unit will display your temperature setting.
,
,
“ ”
When ECO function(some units) is activated, the
illuminates gradually one by one as --
-- --set temperature-- ...... in one second interval.
als de draadloze bediening aan staat (sommige versies)
Page 6
Unit Specifications and Features
1
Unit
Specifications
and Features
NOTE:
A guide on using the infrared remote is not included
in this literature package.
Unit Parts
Power Cable (Some Units)
Remote Control
Remote Control
Holder (Some Units)
Louver
Front Panel
Air Filter
(pull out)
Display window
“ ” for 3 seconds when:
• TIMER ON is set
• FRESH, SWING, TURBO, or SILENCE features are turned on
“ ” for 3 seconds when:
• TIMER OFF is set
• FRESH, SWING, TURBO, or SILENCE features are turned off
“ ” when defrosting(cooling & heating units)
“ ” when anti-cold air feature is turned on(cooling & heating units)
“ ” when unit is self-cleaning(some units)
“ ” when freeze protection is turned on(some units)
“ ” when Wireless Control feature is activated(some units)
Display Code
Meanings
In Fan and Dry mode, the unit will display the room temperature.
In other modes, the unit will display your temperature setting.
,
,
“ ”
When ECO function(some units) is activated, the
illuminates gradually one by one as --
-- --set temperature-- ...... in one second interval.
als ECO functie (sommige versies) aan staat,
Page 6
Unit Specifications and Features
1
Unit
Specifications
and Features
NOTE:
A guide on using the infrared remote is not included
in this literature package.
Unit Parts
Power Cable (Some Units)
Remote Control
Remote Control
Holder (Some Units)
Louver
Front Panel
Air Filter
(pull out)
Display window
“ ” for 3 seconds when:
• TIMER ON is set
• FRESH, SWING, TURBO, or SILENCE features are turned on
“ ” for 3 seconds when:
• TIMER OFF is set
• FRESH, SWING, TURBO, or SILENCE features are turned off
“ ” when defrosting(cooling & heating units)
“ ” when anti-cold air feature is turned on(cooling & heating units)
“ ” when unit is self-cleaning(some units)
“ ” when freeze protection is turned on(some units)
“ ” when Wireless Control feature is activated(some units)
Display Code
Meanings
In Fan and Dry mode, the unit will display the room temperature.
In other modes, the unit will display your temperature setting.
,
,
“ ”
When ECO function(some units) is activated, the
illuminates gradually one by one as --
-- --set temperature-- ...... in one second interval.
licht langzaam een voor een op als volgt
Page 6
Unit Specifications and Features
1
Unit
Specifications
and Features
NOTE:
A guide on using the infrared remote is not included
in this literature package.
Unit Parts
Power Cable (Some Units)
Remote Control
Remote Control
Holder (Some Units)
Louver
Front Panel
Air Filter
(pull out)
Display window
“ ” for 3 seconds when:
• TIMER ON is set
• FRESH, SWING, TURBO, or SILENCE features are turned on
“ ” for 3 seconds when:
• TIMER OFF is set
• FRESH, SWING, TURBO, or SILENCE features are turned off
“ ” when defrosting(cooling & heating units)
“ ” when anti-cold air feature is turned on(cooling & heating units)
“ ” when unit is self-cleaning(some units)
“ ” when freeze protection is turned on(some units)
“ ” when Wireless Control feature is activated(some units)
Display Code
Meanings
In Fan and Dry mode, the unit will display the room temperature.
In other modes, the unit will display your temperature setting.
,
,
“ ”
When ECO function(some units) is activated, the
illuminates gradually one by one as --
-- --set temperature-- ...... in one second interval.
--
--
--
stel temperatuur in --
Page 6
Unit Specifications and Features
1
Unit
Specifications
and Features
NOTE:
A guide on using the infrared remote is not included
in this literature package.
Unit Parts
Power Cable (Some Units)
Remote Control
Remote Control
Holder (Some Units)
Louver
Front Panel
Air Filter
(pull out)
Display window
“ ” for 3 seconds when:
• TIMER ON is set
• FRESH, SWING, TURBO, or SILENCE features are turned on
“ ” for 3 seconds when:
• TIMER OFF is set
• FRESH, SWING, TURBO, or SILENCE features are turned off
“ ” when defrosting(cooling & heating units)
“ ” when anti-cold air feature is turned on(cooling & heating units)
“ ” when unit is self-cleaning(some units)
“ ” when freeze protection is turned on(some units)
“ ” when Wireless Control feature is activated(some units)
Display Code
Meanings
In Fan and Dry mode, the unit will display the room temperature.
In other modes, the unit will display your temperature setting.
,
,
“ ”
When ECO function(some units) is activated, the
illuminates gradually one by one as --
-- --set temperature-- ...... in one second interval.
...... in een seconde intervallen
In overige modes zal het scherm de temperatuur instelling weergeven.
In Ventilator en Droog mode zal het scherm de kamer temperatuur weergeven.
C BEDRIJFSTEMPERATUUR
Koelen, verwarmen en / of ontvochtigen zijn mogelijk bij de volgende binnen- en buitentemperatuur:
Temperatuur
Modus Koelen Verwarmen Ontvochtigen
Kamertemperatuur 17ºC - 32ºC 0ºC - 30ºC 10ºC - 32ºC
Buitentemperatuur -25ºC - 50ºC -15ºC - 30ºC 0ºC - 50ºC
WAARSCHUWING
Wanneer de airconditioner wordt gebruikt bij temperaturen anders dan hierboven
aangegeven, kunnen bepaalde beveiligingsvoorzieningen gaan werken, waardoor de unit niet
meer goed functioneert.
Wanneer de airconditioner in bedrijf is bij een relatieve luchtvochtigheid van meer dan 80% in
de ruimte kan er op de oppervlakte van de airconditioner condens ontstaan. In dat geval dient
u de verticale luchtstroom lamel in de uiterste stand (verticaal naar de vloer gericht) en de
ventilator op Hoog (“HIGH”) te zetten.
Sluit, voor een maximaal effect van uw airconditioner, altijd deuren en ramen wanneer wordt
gekoeld of verwarmd.
1
129
1
D WERKEN MET AFSTANDSBEDIENING
G
LET OP
Richt de afstandsbediening altijd op de signaalontvanger van de binnenunit en zorg ervoor
dat zich geen obstakels bevinden tussen de afstandsbediening en de ontvanger. Als dat wel
het geval is kan het signaal van de afstandsbediening niet worden opgevangen en werkt de
airconditioner niet goed.
De afstandsbediening werkt tot op een maximale afstand van ongeveer 6 tot 7 meter.
Introductie van functieknoppen op de afstandsbediening
4
3
2
8
6
7
12
11
13
15
5
9
10
14
1
SLEEP
FRESH
Aan/uit “ON/OFF” knop: Druk deze knop in om de werking van de unit te starten. Druk deze knop weer
in om de werking van de unit te beëindigen.
Modus knop: Iedere keer dat u de knop indrukt wordt een modus geselecteerd in de volgorde:
Automatisch “AUTO”, Koelen “COOL”, Drogen “DRY””, Verwarmen “HEAT” en Alleen Ventileren
““FAN ONLY”. Zie de volgende figuur:
AUTO COOL DRY HEAT FAN
+ Knop: Druk de knop in om de binnentemperatuur instelling te verhogen tot max. 30ºC.
- Knop: Druk de knop in om de binnentemperatuur instelling te verlagen tot min. 17ºC.
Ventilator “FAN” Knop: Deze knop wordt gebruikt om de ventilatorsnelheid te selecteren. Steeds
wanneer u de knop indrukt, wordt een ventilatorsnelheid geselecteerd die verspringt van “AUTO”
naar Laag “LOW” naar Medium “MED” naar Hoog “HIGH” en dan terug naar “Auto”. Wanneer u de
“AUTO” of “DRY”modus selecteert wordt de ventilatorsnelheid automatisch geregeld en kunt u deze
snelheid niet instellen.
SLEEP-knop: Druk deze knop in om de energiebesparingstand in te schakelen. Druk de knop nogmaals
in om deze stand uit te schakelen. Deze functie, die alleen kan worden gebruikt in combinatie met
koel-, verwarmings- of automatisch bedrijf [COOL, HEAT en AUTO], zorgt ervoor dat de airconditio-
ner automatisch de ingestelde temperatuur met 1ºC per uur verhoogt (in koelmodus) of verlaagt (in
verwarmmodus) gedurende de eerste 2 uur. De airconditioner zal vervolgens gedurende 5 uur deze
temperatuur (ingestelde temperatuur + of - 2 graden) handhaven. Vervolgens schakelt het apparaat
zich automatisch uitschakelen.
FRESH-knop: Lang indrukken om de FRESH-functie te activeren.
Zwenk “SWING” Knop: Druk op de “SWING” knop om de Zwenkfunctie te activeren. Druk nogmaals op
de knop om deze functie te stoppen.
fig. 1
130
Luchtrichting “AIR DIRECTION” Knop: Druk op deze knop om de stand van de lamel te wijzigen. De
lamel verandert 6 graden van positie bij iedere druk op de knop. Als de lamel in een bepaalde stand
staat, waarbij deze het koelings- of verwarmingseffect van de airconditioner zou beïnvloeden, wordt
de positie van de lamel automatisch veranderd. Er verschijnt geen symbool op het schermpje wanneer
op deze knop wordt gedrukt.
Zwenk “SWING” Knop (links en rechts): Druk op de “SWING” knop om de Zwenkfunctie te activeren.
Druk nogmaals op de knop om deze functie te stoppen.
i “TIMER ON” Knop: Druk op deze knop om de Automatische inschakeltijd functie te activeren. Bij iedere
druk op de knop verspringt de automatisch ingestelde tijd met 30 minuten. Als de insteltijd 10 uur
aangeeft verspringt de automatisch ingestelde tijd met iedere druk op de knop met 60 minuten. Om
het programma Timer On op te heffen dient u op de knop te blijven drukken tot er niets meer op het
schermpje wordt weergegeven.
j “TIMER OFF” Knop: Druk op deze knop om de Automatische uitschakeltijd functie te activeren. Bij
iedere druk op de knop verspringt de automatisch ingestelde tijd met 30 minuten. Als de insteltijd 10
uur aangeeft verspringt de automatisch ingestelde tijd met iedere druk op de knop met 60 minuten.
Om het programma Timer Off op te heffen dient u op de knop te blijven drukken tot er niets meer op
het schermpje wordt weergegeven.
k Resetknop: Door op de verzonken resetknop te drukken, kunt u alle bestaande instellingen annuleren
en de afstandsbediening weer terugstellen op de oorspronkelijke waarden.
l TURBO-knop/Active Clean-knop: Als u deze knop indrukt terwijl de airconditioner in koelbedrijf [COOL]
werkt, wordt het koelvermogen verhoogd. Door deze knop nogmaals in te drukken schakelt u de
TURBO-functie weer uit. Door deze knop ingedrukt te houden (> 2 sec) gaat het toestel over in de
Active Clean-modus. Er zal een proces gestart worden om de binnenkant van de verdamper schoon te
maken en de vermenigvuldiging van bacteriën te verminderen. Als deze functie geactiveerd is, worden
alle timer-instellingen geannuleerd. Om de airco Active Clean-modus te beëindigen, houdt u de knop
nogmaals (> 2 sec) ingedrukt.
m LOCK-knop: Door de verzonken LOCK-knop in te drukken kunt u alle actuele instellingen vastzetten. De
afstandsbediening reageert nu alleen nog op de LOCK-knop. Druk de knop nogmaals in om de LOCK-
modus uit te schakelen.
n LED DISPLAY-knop: Door deze knop in te drukken, kunt u de verlichting van het display van de
afstandsbediening inschakelen. De verlichting schakelt autmoatisch weer uit wanneer er binnen 3
seconden geen toetsen meer worden ingedrukt (geldt niet voor apparaten welke niet voorzien zijn van
deze functie).
o Gereduceerd geluidsknop / bevriezingspreventie: Druk op deze knop om het geluidsniveau aan de
binnenkant terug te brengen tot 21 dB(A). De ventilator van het binnentoestel wordt tot het laagste
niveau gebracht. Door deze knop in te drukken (> 2 seconden), wordt de vorstpreventiestand van het
apparaat ingeschakeld. Het apparaat negeert de bestaande binnentemperatuurinstelling dan en stelt de
binnentemperatuur in op ca. 8 °C. Zo wordt vorst in uw huis voorkomen tijdens koude periodes terwijl
het apparaat met het laagst mogelijke energieverbruik draait. Als deze stand geselecteerd is, verschijnt
op het binnendisplay van het apparaat “FP”. Deze knop kan alleen worden bediend in de verwarmings-
modus. U kunt de vorstpreventiestand weer uitschakelen door de knop opnieuw in te drukken.
1
131
1
Namen en functies van indicatielampjes op de afstandsbediening
auto cool dryheatfan
sleep lock run
SET TEMP.TIMER ONOFF
Schermpje
Verzendingslampje: Dit lampje brandt terwijl de afstandsbediening signalen stuurt naar het apparaat.
Indicatie van bedrijfsstand: Toont de actuele bedrijfsstand: AUTO
, COOL [koelen] , DRY [drogen]
, HEAT [verwarmen] , Fan [ventileren] .
Temp. / Timer aanduiding: Toont de temperatuurinstelling (17º C ~ 30ºC). Wanneer u de bedrijfsstand
op FAN staat, wordt er geen temperatuur getoond. Wanneer de timerfunctie is ingeschakeld, toont het
display de stand ON of OFF van de timer.
Aanduiding ventilatorsnelheid: Toont de geselecteerde ventilatorsnelheid, Auto (geen aanduiding),
Laag
, Midden of Hoog . Bij de bedrijfsstand AUTO of DRY staat de ventilatorsnelheid op Auto.
Aan/uit-indcatie: Wordt getoond door het drukken op de On / Off knop. Druk opnieuw op de On / Off
knop om te verwijderen.
Lock-weergave: De melding LOCK verschijnt wanneer de LOCK-bedrijfsstand is ingeschakeld. Druk
opnieuw op LOCK om te verwijderen.
Sleep-weergave: De melding Sleep verschijnt wanneer de Sleep-bedrijfsstand is ingeschakeld. Druk
opnieuw op SLEEP om te verwijderen.
G
LET OP
In Fig. 2 worden voor alle duidelijkheid alle functies getoond. Tijdens de werkelijke werking
worden echter alleen de van toepassing zijnde functies op het schermpje getoond.
Werken met de afstandsbediening
Plaatsen / vervangen van batterijen
Gebruik twee droge cel alkaline batterijen (AAA/LR03).
Gebruik geen oplaadbare batterijen.
1. Verwijder het batterijklepje aan de achterkant van de afstandsbediening in de richting van de pijl.
2. Plaats nieuwe batterijen en let op dat de positieve (+) en negatieve (-) polen van de batterijen in de
juiste richting geplaatst zijn.
3. Schuif het klepje weer terug.
fig. 2
2
1
3
4
5
6
7
132
G
LET OP
Wanneer de batterijen verwijderd zijn, wist de afstandsbediening alle programma’s. Na het
vervangen van de batterijen, moet de afstandsbediening opnieuw geprogrammeerd worden.
Wanneer u batterijen vervangt dient u geen oude batterijen of batterijen van een ander type
te gebruiken. Hierdoor kan de afstandsbediening slecht gaan functioneren.
Als u de afstandsbediening gedurende enkele weken niet gaat gebruiken kunt u beter
de batterijen verwijderen. Op deze manier voorkomt u dat lekkende batterijen de
afstandsbediening beschadigen.
De gemiddelde levensduur van batterijen is bij normaal gebruik ongeveer een half jaar.
Vervang de batterijen wanneer er geen antwoordtoon komt van de binnenunit of wanneer het
Transmissie indicatielampje niet oplicht.
Gebruik nooit oude en nieuwe batterijen tegelijkertijd. Gebruik nooit verschillende types (bijv.
alkaline en manganese dioxide) tegelijkertijd.
AUTOMATISCHE BEDIENING
Als de airconditioner gebruiksklaar is (controleer of het apparaat aan stroomnet aangesloten is en of er
stroom beschikbaar is), schakel de stroom dan in en het Bedrijfsmodus indicatielampje op het schermpje
van de binnenunit gaat knipperen.
1. Druk op de “MODE” selecteerknop om AUTO te selecteren.
2. Druk op de + of - knop om de gewenste kamertemperatuur in te stellen.
3. Druk op de “On/off” knop om de airconditioner te starten. Het Bedrijfsmodus indicatielampje op het
schermpje van de binnenunit gaat branden. De Ventilatorsnelheid wordt automatisch geregeld.
4. Druk weer op de “On/off” knop om de werking van de unit te stoppen.
G
LET OP
In de AUTO modus zal de airconditioner automatisch de bedrijfsmodus Koelen, Ventileren
of Verwarmen selecteren aan de hand van het gemeten verschil tussen de werkelijke
omgevingstemperatuur in de ruimte en de ingestelde temperatuur op de afstandsbediening.
Als de AUTO modus u niet bevalt kan de gewenste modus handmatig worden geselecteerd.
KOELEN, VERWARMEN en ALLEEN VENTILEREN regelen
1. Als de AUTO modus u niet bevalt kunt u handmatig de instellingen tijdelijk opheffen. U drukt hiervoor
knop in om de Koelen, Drogen, Verwarmen of de Alleen Ventileren modus te gebruiken.
2. Druk de knop + of - in ( en ) om de gewenste kampertemperatuur in te stellen.
3. Druk op Ventileren “FAN” knop om AUTO, HIGH, MED of LOW in de Ventileren modus te selecteren.
4. Druk op “ON/OFF” knop . Het bedrijfsmodus indicatielampje brandt en de airconditioner begint te wer-
ken volgens uw instellingen. Druk nogmaals op “ON/OFF” knop om deze functie van de unit te stoppen.
G
LET OP!
De modus Alleen Ventileren kan niet worden gebruikt om de temperatuur te regelen. In deze
modus zijn alleen stap 1, 3 en 4 mogelijk.
ONTVOCHTIGEN
1. Druk op Modus knop om Drogen, “DRY” te selecteren.
2. Druk op knop + of - ( en ) om de gewenste temperatuur in te stellen.
3. Druk op “On/off” knop . Het bedrijfsmodus indicatielampje brandt en de airconditioner begint te wer-
ken in de modus Drogen. Druk nogmaals op “On/off” knop om deze functie van de unit te stoppen.
1
133
1
G
LET OP!
Vanwege het verschil tussen de ingestelde temperatuur van de unit en de werkelijke
binnentemperatuur zal de airconditioner in de modus Drogen regelmatig automatisch
inschakelen, zonder de modus Koelen en Ventileren te laten werken.
Regeling van de TIMER
Druk op de “TIMER ON/OFF” knop (i en j) om de “aan” en “uit” tijd van de unit in te stellen. De effec-
tieve, met de afstandsbediening ingestelde werkingstijd voor de timer functie is beperkt tot een periode
van 0,5 tot minder dan 24 uur.
1. De START tijd instellen.
1.1 Druk op “TIMER ON” knop i. Op het schermpje van de afstandsbediening verschijnt ON TIMER, de
laatst ingestelde tijd voor het inschakelen van de unit, en het symbool “h” wordt getoond in het Timer
gedeelte van het schermpje. U kunt nu de START tijd van de unit opnieuw instellen.
1.2 Druk weer op “TIMER ON” knop i om de gewenste inschakeltijd van de unit in te stellen.
1.3 Na de instelling van de “TIMER ON” duurt het een halve seconde voor de afstandsbediening het signaal
naar de airconditioner verzendt.
2. De STOP tijd instellen.
2.1 Druk op “TIMER OFF” knop j. Op het schermpje van de afstandsbediening verschijnt OFF TIMER en de
laatst ingestelde tijd voor het uitschakelen van de unit in uren wordt getoond in het Timer gedeelte
van het schermpje. U kunt nu de STOP tijd van de unit opnieuw instellen.
2.2 Druk weer op “TIMER OFF” knop j om de tijd in te stellen waarop u de unit wilt laten uitschakelen.
2.3 Na de instelling van de “TIMER OFF” duurt het een halve seconde voor de afstandsbediening het sig-
naal naar de airconditioner verzendt.
Voorbeeld van timer instelling
Om de airco over 6 uur aan te laten slaan.
1. Druk op de TIMER ON knop, de laatste ingestelde starttijd en het signaal „h“
wordt getoond op het display
2. Druk op de TIMER ON knop tot „6.0h“ verschijnt
3. Wacht een seconde en het digitale display zal de temperatuur weer tonen. De
Start
Off
6h
TIMERON
TIMER ON indicator zal blijven branden en de functie is ingeschakeld.
Gecombineerde timer
(Instellen van zowel TIMER ON als TIMER OFF simultaan)
TIMER OFF --> TIMER ON
(Aan --> Stop --> Start)
Deze functie is bruikbaar wanneer u de airo bijvoorbeeld uit wilt schakelen nadat u
On
Stop
2hSet
On
10 h
TIMERONOFF
bent gaan slapen, en het apparaat in de ochtend in te schakelen wanneer u wakker
wordt of wanneer u thuiskomt.
Voorbeeld:
Om de airconditioner 2 uur na de instelling uit te schakelen en opnieuw in te laten schakelen na 10 uur.
1. Druk op de TIMER OFF knop
2. Druk opnieuw op de TIMER OFF knop tot 2.0h verschijnt op het TIMER OFF display
3. DRUK op de TIMER ON knop
134
4. Druk opnieuw op de TIMER ON knop tot 10.h verschijnt op het TIMER ON display
5. Wacht een seconde en het digitale display zal de temperatuur weer tonen. De TIMER ON OFF indicator
zal blijven branden en de functie is ingeschakeld.
G
LET OP!
Als de ingestelde tijd voor STARTEN en STOPPEN hetzelfde is, wordt de stoptijd automatisch
een half uur (de ingestelde tijd geeft minder dan 10 uur aan) of een uur (de ingestelde tijd
geeft 10 uur of meer aan) later.
Om de “TIMER ON/OFF” tijd in te stellen drukt u op de desbetreffende TIMER knop en stelt de
tijd opnieuw in.
De insteltijd is een relatieve tijd, d.w.z. dat deze tijd is gebaseerd op een tijdsverschil tussen de
werkelijke tijd en de ingestelde tijd.
WAARSCHUWING
Bescherm de afstandsbediening tegen hoge temperaturen en blootstelling aan straling.
Bescherm de ontvanger van het binnendeel tegen direct zonlicht om te voorkomen dat de
airconditioner niet goed functioneert.
E
HANDMATIGE BEDIENING (ZONDER AFSTANDSBEDIENING)
Hoe uw apparaat te bedienen zonder de afstandsbediening.
In het geval dat uw afstandsbediening niet werkt, kan uw apparaat handmatig worden bediend met de
MANUAL CONTROL-knop op de binnenunit. Merk op dat handmatige bediening geen langetermijnoploss-
ing is en dat het sterk wordt aanbevolen de unit te bedienen met uw afstandsbediening.
G
VOOR MANUELE BEDIENING
Unit must be turned off before manual operation.
Om uw apparaat handmatig te bedienen:
1. Zoek de knop MANUAL CONTROL op het rechter zijpaneel van het apparaat.
2. Druk één keer op de MANUAL CONTROL-knop om de modus FORCED AUTO te
activeren.
3. Druk nogmaals op de knop MANUAL CONTROL om de modus GEFORCEERDE
KOELING te activeren.
4. Druk een derde keer op de MANUAL CONTROL-knop om het apparaat uit te
schakelen.
LET OP!
De handmatige knop is alleen bedoeld voor testdoeleinden en voor noodbediening. Gebruik
deze functie alleen als de afstandsbediening verloren is en het absoluut noodzakelijk is. Om de
normale werking te herstellen, gebruikt u de afstandsbediening om het apparaat te activeren.
Manual control button
Manual
control
knop
1
135
1
F OPTIMALE WERKING
Om uw apparaat optimaal te laten functioneren dient u op het volgende te letten:
Stel de richting van de luchtstroom zo in dat deze niet rechtstreeks op personen is gericht.
Stel de temperatuur in die voor u het meest comfortabel is. Stel de unit niet in op overdreven hoge of
lage temperaturen.
Sluit deuren en ramen omdat anders het gewenste effect misschien niet wordt bereikt.
Zet niets vlakbij de luchtinlaat of -uitlaat omdat anders de werking van de airconditioner kan worden
verstoord of de airconditioner misschien helemaal niet meer functioneert. Zorg ervoor dat er geen
obstakels zijn die de luchtstroom blokkeren. De luchtstroom moet ongehinderd de hele kamer kunnen
bereiken. De luchtstroom moet bovendien ongehinderd de airconditioner kunnen bereiken.
Het luchtfilter dient regelmatig schoongemaakt te worden omdat anders het apparaat niet voldoende
koelt of verwarmt. U wordt geadviseerd om de filters eens in de twee weken schoon te maken.
Laat de unit niet werken met de horizontale lamellen in gesloten positie.
G INSTELLEN RICHTING LUCHTSTROOM
De uitgaande luchtstroomrichting van de airconditioner kan worden ingesteld door
het instellen van de horizontale lamellen en de vertikale lamellen.
Stel de richting van de lamellen zodanig in dat de luchtstroom niet direct op perso-
nen blaast.
Zorg ervoor dat de uitgaande luchtstroom de gehele ruimte kan bereiken om tem-
peratuurverschillen in de ruimte te voorkomen.
De vertikale lamellen kunnen met de afstandsbediening worden ingesteld.
De horizontale lamellen moeten met de hand worden ingesteld.
Instellen van de verticale luchtstroomrichting (op - neer)
Verricht deze handeling wanneer de airconditioner in bedrijs is.
Gebruik de afstandsbediening om de verticale lamellen in te stellen. Druk op de knop
AIR DIRECTION van de afstandsbediening. De lamel zal bij iedere druk op de knop
6º versteld worden.
De luchtstroom automatisch laten zwenken (op - neer)
Verricht deze handeling terwijl de airconditioner in werking is.
Druk op Zwenkrichting “SWING” knop op de afstandsbediening.
Druk weer op “SWING”, knop om de functie te beëindigen. Druk op Luchtrichting “AIR DIRECTION”,
knop om de lamel in de gewenste stand vast te zetten.
Instellen van de horizontale luchtstroomrichting (links - rechts)
Beweeg de hendels van de horizontale lamellen met de hand naar links of naar rechts om de gewenste
luchtstroom in te stellen.
WAARSCHUWING
Zorg ervoor dat u de ventilator achter de verticale lamellen niet aanraakt!
Deflector
staaf
Bereik
136
WAARSCHUWING
• De knoppen “AIR DIRECTION” en “SWING” werken niet wanneer de airconditioner af staat
(ook wanneer de “TIMER ON” is ingesteld).
• Laat de airconditioner nooit lange tijd in de koel- of droogstand werken met de luchtstroom
naar omlaag gericht. Als u dit toch doet kan er condensvorming ontstaan op de vericale lamel,
waardoor er water kan lekken.
• Beweeg de verticale lamel niet met de hand. Gebruik altijd de “AIR DIRECTION” knop of
de “SWING” knop . Als u dit blaasrooster met de hand beweegt kan de werking worden
verstoord. Wanneer het verticale lamel niet naar behoren functioneert, zet dan de airconditioner
af en weer aan.
• Wanneer de airconditioner meteen na het afzetten weer wordt aangezet, zal de verticale lamel
gedurende ongeveer 10 seconden mogelijk niet bewegen.
• Laat de unit niet werken met de horizontale lamel in gesloten positie.
H HOE DE AIRCONDITIONER WERKT
AUTOMATISCHE WERKING
Wanneer u de airconditioner in de Automatische stand “AUTO” zet, (knop
op de afstandsbediening), worden KOELEN, VERWARMEN of Alleen
VENTILEREN automatisch geselecteerd, afhankelijk van de temperatuur die
u heeft ingesteld en de kamertemperatuur.
De airconditioner regelt de kamertemperatuur automatisch volgens de door
u ingestelde temperatuur.
Wanneer de “AUTO” stand u niet bevalt, kunt u de instellingen ook hand-
matig aanpassen.
SLEEP/ZUINIGE WERKING
Deze functie, die alleen kan worden gebruikt in combinatie met koel-, verwar-
mings- of automatisch bedrijf [COOL, HEAT en AUTO], zorgt ervoor dat de air-
conditioner automatisch de ingestelde temperatuur met 1ºC per uur verhoogt
(in koelmodus) of verlaagt (in verwarmmodus) gedurende de eerste 2 uur. De
airconditioner zal vervolgens gedurende 5 uur deze temperatuur (ingestelde
temperatuur + of - 2 graden) handhaven. Vervolgens schakelt het apparaat zich
automatisch uitschakelen.
1
1
1
1
ONTVOCHTIGEN
De stand Ontvochtigen selecteert automatisch de bedrijfsmodus Ontvochtigen op basis van het verschil tus-
sen de ingestelde temperatuur en de werkelijke temperatuur in de ruimte.
Tijdens het ontvochtigen wordt de functie Koelen of Alleen Ventileren regelmatig in- en uitgeschakeld om de
temperatuur te regelen. De ventilatorsnelheid wordt automatisch ingesteld.
In de normale stand Koelen wordt de lucht ook door de airconditioner ontvochtigd.
G
LET OP
Wanneer de airconditioner bezig is met ontvochtigen zal de kamertemperatuur waarschijnlijk
dalen. Het is daarom normaal dat een vochtigheidsgraadmeter een verhoogde relatieve
luchtvochtigheid aangeeft. De absolute luchtvochtigheid in de ruimte daalt echter, afhankelijk
van de hoeveelheid vocht welke in de ruimte wordt geproduceerd (koken, mensen enz.).
1
Druk op de Slaapstand “SLEEP” knop
KOELEN
VERWARMEN
ONTVOCHTIGEN
Stel de
tempera-
tuur in
1 uur 1 uur
1 uur 1 uur
Stel de
tempera-
tuur in
Temperatuur instellen
Tijd
Kamer-
temperatuur
Koelen
Koelen
Koelen
Alleen Ventileren
“FAN ONLY”
Alleen Ventileren
“FAN ONLY”
137
1
I ONDERHOUD
G
WAARSCHUWING
Schakel eerst de airconditioner uit en trek de stekker uit het stopcontact
vóór u het apparaat gaat schoonmaken.
Binnenunit en afstandsbediening schoonmaken
G
WAARSCHUWING
Gebruik een droge doek om de binnenunit en de afstandsbediening
schoon te maken.
U kunt een doek en wat koud water gebruiken als de binnenunit erg
vuil is.
Het voorpaneel van de unit kan worden verwijderd en met water
worden schoongemaakt. Droog het paneel met een droge doek.
Gebruik geen chemisch behandeld doekje of stofdoek om de unit
schoon te maken.
Gebruik nooit benzine, verdunningsmiddel (thinner), schuurmiddel
of een oplosmiddel om het apparaat schoon te maken. Het plastic
kan er van gaan breken of vervormen.
Luchtfilter schoonmaken
Verstopte luchtfilters verminderen het effect van koeling van dit apparaat. Maak het filter
eens in de twee weken schoon.
1. Til het voorpaneel van de binnenunit omhoog tot het vastklikt.
2. Pak de hendel van het gaasfilter vast en druk het filter voorzichtig omhoog uit de hou-
der en trek het daarna omlaag.
3. Haal HET Gaasfilter uit de binnenunit.
• Maak HET Gaasfilter eens in de twee weken schoon.
• Maak HET Gaasfilter schoon met een stofzuiger of met water.
4. Het zwarte actief koolfilter kan niet gereinigd worden. Wanneer dit filter vies is zal het
simpelweg de onaangename luchtjes niet meer filteren. Het filter moet dan vervangen
worden door een nieuw filter (verkrijgbaar bij uw dealer). Wij raden aan het actief kool-
filter tweemaal per seizoen te vervangen.
5. Het groen gekleurde 3M HAF filter toont zichtbare sporen van vuil op en in het filter
wanneer deze vervangen dient te worden. Dit filter kan niet gereinigd worden en moet
vervangen worden door een nieuw filter (verkrijgbaar bij uw dealer). Wij raden aan het
filter tweemaal per seizoen te vervangen.
nieuw filter
vernieuwing van filter aanbevolen
6. Na vervanging van het actief koolfilter en het 3M HAF filter in de filterhouder op het
gaasfilter, kan het gaasfilter teruggeplaatst worden in de airconditioner.
7. Zorg ervoor dat het filter helemaal droog is en niet beschadigd, voor u het
weer terugplaatst.
8. Installeer het luchtfilter weer in de unit.
9. Zet het bovenste gedeelte van het luchtfilter terug in de unit. Let er daarbij
op dat de linker en rechter zijkant recht in de unit komen. Plaats het filter in de
oorspronkelijke positie terug.
Huishoudelijk
ontstoppings
middel
Nee
Verdunnings-
middel
(thinner)
f
Filter Tabs
Verwijder de luchtverversfilter aan de
achterkant van de grotere filter (som-
mige units)
138
Onderhoud
Wanneer de unit gedurende langere tijd niet gebruikt wordt dient u de volgende handelingen te verrichten:
1. Laat de Ventilator ongeveer 6 uur aan staan om de binnenkant van de unit te drogen.
2. Schakel de unit uit en haal de stekker uit het stopcontact. In geval van model S(C)5148 , onderbreek de
stroomtoevoer. Haal de batterijen uit de afstandsbediening.
3. De buitenunit moet regelmatig worden onderhouden en worden schoongemaakt. Dit mag alleen wor-
den uitgevoerd door een erkend airconditioning monteur.
Controle vóór ingebruikname
Controleer of de bedrading niet beschadigd of los is.
Controleer of de luchtfilters geplaatst zijn.
Controleer of de luchtuitlaat of –inlaat niet geblokkeerd zijn wanneer de airconditioner gedurende
langere tijd niet in gebruik is.
WAARSCHUWING
Raak de metalen delen van het apparaat niet aan wanneer u het filter verwijdert. Scherpe
metalen randen kunnen verwondingen voorzaken.
Gebruik geen water om de binnenzijde van de unit te reinigen. Water kan de isolatie
beschadigen, hetgeen kan leiden tot elektrische schokken.
Controleer altijd voordat u de unit gaat schoonmaken of de stroom en de stroomonderbreker
zijn uitgeschakeld.
J BEDIENINGSTIPS
De volgende problemen kunnen voorkomen tijdens normale werking.
1. Beveiliging van de airconditioner.
Beveiliging van de compressor
De compressor kan niet starten binnen 3 minuten nadat hij is uitgeschakeld.
Anti-tocht
De unit is zo ontworpen dat hij in de stand Verwarmen “HEAT” geen koude lucht uitblaast wanneer de
binnen warmtewisselaar zich in een van de volgende drie situaties bevindt en de ingestelde tempera-
tuur nog niet is bereikt.
A. Wanneer de unit net begint te verwarmen.
B. Tijdens ontdooien.
C. Bij verwarmen bij lage temperatuur.
Ontdooien
De binnen- of buitenventilator stopt tijdens het ontdooien.
Tijdens de verwarmingscyclus kan zich ijs op de buitenunit vormen wanneer de buitentemperatuur laag
is en de luchtvochtigheid hoog. Hierdoor heeft de airconditioner minder verwarmingscapaciteit.
In dit geval zal de airconditioner regelmatig stoppen met verwarmen en wordt de ontdooicyclus auto-
matisch gestart.
De ontdooitijd kan variëren van 4 tot 10 minuten, afhankelijk van de buitentemperatuur en de hoe-
veelheid gevormd ijs op de buitenunit.
1
139
1
2. Er komt een witte nevel uit de binnenunit.
In een ruimte met een hoge relatieve luchtvochtigheid kan een witte nevel ontstaan door een groot verschil
tussen luchtinlaat- en luchtuitlaattemperatuur tijdens het Koelen.
Wanneer de airconditioner weer start in de bedrijfsmodus Verwarmen kan er een witte nevel ontstaan door
vocht dat tijdens het koelen of drogen neerslaat op het oppervlak van de verdamper van de binnenunit.
3. De airconditioner maakt vreemde geluiden.
U kunt een zacht sissend geluid horen wanneer de compressor loopt of direct na het stoppen van de compressor.
Dit geluid wordt veroorzaakt doordat het koelmiddel gaat circuleren of de circulatie van het koelmiddel stopt.
U kunt ook een piepgeluid horen wanneer de compressor loopt of direct na het stoppen van de compressor. Dit
wordt veroorzaakt door het effect van temperatuurwisseling, uitzetten en inkrimpen, van de kunststof delen.
U kunt ook een geluid horen wanneer de stroom wordt ingeschakeld en het luchtuitblaasrooster naar zijn oor
-
spronkelijke stand gaat.
4. Er komt stof uit de binnenunit.
Dit is normaal en doet zich voor wanneer de airconditioner lange tijd niet is gebruikt of wanneer deze voor het
eerst wordt gebruikt.
5. Er komt een vreemde geur uit de binnenunit.
Dit wordt veroorzaakt doordat de geuren van bouwmaterialen, meubilair of rook door de binnenunit worden
aangezogen en worden verspreid.
6. De airconditioner gaat vanuit Koelen of Verwarmen in Alleen Ventileren werken.
Wanneer de temperatuur in de ruimte de op de airconditioner ingestelde temperatuur heeft bereikt, stopt de
compressor automatisch en gaat de airconditioner over op Alleen Ventileren. De compressor start weer wanneer
de temperatuur in de ruimte stijgt (bij Koelen) of daalt (bij Verwarmen) tot de vooraf ingestelde waarde.
7.
Tijdens Koelen kan zich bij een hoge relatieve luchtvochtigheid (hoger dan 80%) condens vormen op het opper-
vlak van de binnenunit. Stel de horizontale lamel in op de maximum geopende stand en selecteer de hoge
“HIGH“ ventilatorsnelheid.
8. Verwarmen.
De airconditioner neemt warmte op van de buitenunit en leidt deze tijdens de bedrijfsmodus Verwarmen naar
de binnenunit. Wanneer de buitentemperatuur daalt, zal ook de warmte die door de airconditioner wordt
opgenomen verminderen, waardoor de verwarmingscapaciteit van het binnendeel zal dalen.
9. Automatische herstart.
Bij een spanningsonderbreking tijdens de werking van de unit wordt deze volledig uitgeschakeld.
De airconditioner is voorzien van een Automatische herstartfunctie. Hierdoor blijven bij een spanningsonderbre
-
king alle ingestelde waarden bewaard in het geheugen en start de unit automatisch wanneer de stroomvoor-
ziening weer is hersteld.
10. Detectiesysteem voor lekkage koudemiddel.
De airconditioner is uitgerust met een detectiesysteem voor eventuele lekkage van koudemiddel. Wanneer de
buitenunit een tekort aan koudemiddel signaleert, stopt het apparaat en de binnenunit toont het alarm EC op
het display. Herstart het apparaat niet en neem contact op met uw leverancier.
140
K STORINGEN VERHELPEN
Storingen en Oplossingen
G
PROBLEEM
Zet bij een van de volgende problemen de airconditioner onmiddellijk uit en schakel de stroom
uit. Neem contact op met uw leverancier.
Zekering slaat steeds door of de hoofdschakelaar springt regelmatig op “uit”.
Er is water of een andere vloeistof in de airconditioner gelopen.
De afstandsbediening werkt niet of niet goed.
Andere abnormale situaties.
Probleem Mogelijke oorzaken
Eenheid schakelt niet aan na het
drukken op de AAN/UIT-knop
De eenheid kan pas
na 3 minuten wachten aangezet worden om overbelas-
ting t
e voorkomen. De eenheid kan na uitzetten pas 3 minuten later opnieuw
aangezet worden.
De eenheid schakelt over van de
modus KOELEN/VERWARMEN naar
de modus VENTILATOR
De eenheid kan de instelling wijzigen om te voorkomen dat er vorst op de een
-
heid gevormd wordt. Zodra de temperatuur stijgt, zal de eenheid opnieuw wer-
ken in de voordien geselecteerde modus.
De insteltemperatuur werd bereikt. Op dit punt zal de eenheid de compressor
uitschakelen. De eenheid zal verder werken als de temperatuur opnieuw schom
-
melt.
De binneneenheid verspreidt een
witte mist.
In voch
tige regio’s zal een groot temperatuurverschil tussen de lucht in de kamer
en de behandelde lucht een witte mist veroorzaken.
Zowel de binnen- als buiteneen
-
heid verspreiden een witte mist
Als de eenheid na ontdooien opnieuw opstart in de modus VERWARMEN kan er
een witte mist verspreid worden door het vocht dat gevormd werd tijdens het
ontdooien.
De binneneenheid maakt geluiden
Er is mogelijk een geluid van stromende lucht hoorbaar wanneer de luchtklep
naar een andere plaats beweegt.
Er kan een krakend geluid hoorbaar zijn na het werken in de modus
VERWARMEN vanwege het uitzetten en krimpen van de plastic onderdelen van
de eenheid.
Zowel de binnen- als buiteneenhe
-
den maken geluiden
Een laag sissend geluid tijdens werking: Dit is normaal en wordt veroorzaakt
door het koelmiddel dat door zowel de binnen- als de buiteneenheden stroomt.
Laag sissend geluid wanneer het systeem opstart, net stopte met draaien of aan
het ontdooien is: Dit geluid is normaal en wordt veroorzaakt door het koelmid
-
del dat stop of van richting verandert.
Krakend geluid: Het normaal uitzetten en krimpen van plastic en metalen onder
-
delen veroorzaakt door temperatuurwijzigingen tijdens werking kan krakende
geluiden veroorzaken.
De buiteneenheid maakt geluiden
De eenheid zal verschillende geluiden maken, gebaseerd op de huidige bedrijfs
-
modus.
Er wordt stof verspreid door de
binnen- of buiteneenheid
Er kan zich tijdens langere periodes van inactiviteit stof ophopen op de eenheid.
Dit stof zal verspreid worden als de eenheid aangezet wordt. Dit kan voorkomen
worden door de eenheid tijdens langere periodes van inactiviteit te bedekken.
De eenheid verspreidt een vieze
geur
De eenheid kan geuren absorberen vanuit de omgeving (zoals van meubilair,
koken, sigaretten, enz.) Deze geuren zullen tijdens de werking verspreid worden.
De filters van de eenheid zijn beschimmeld en moeten gereinigd worden.
De ventilator van de buiteneen
-
heid werkt niet
Tijdens werking wordt de snelheid van de ventilator geregeld voor een optimale
werking.
De werking is onregelmatig,
onvoorspelbaar of de eenheid
rea-
geert niet
Storingen van masten voor mobiele telefonie en versterkers kunnen ervoor zor-
gen dat de eenheid niet naar behoren werkt. Probeer in dit geval het volgende:
• Schakel de voeding uit en daarna weer in.
Druk op de AAN/UIT-knop op de afstandsbediening om het apparaat opnieuw
in werking te zetten.
1
141
1
G
OPMERKING!
Neem als het probleem aanhoudt contact op met een plaatselijke verdeler of uw dichtstbijzijnde
servicecentrum. Geef ze een gedetailleerde beschrijving van de fout en het modelnummer.
Probleem Mogelijke oorzaken Oplossing
Slechte koeling
De temperatuur is mogelijk hoger inge-
steld dan de kamertemperatuur
Stel de temperatuur lager in
De warmtewisselaar op de binnen- of bui-
teneenheid is vuil
Reinig de vuile warmtewisselaar
Het luchtfilter is vuil
Verwijder het filter en reinig het volgens
de instructies
De luchtinlaat, -uitlaat of beide zijn
geblokkeerd
Zet de eenheid uit, verwijder de obstruc-
tie en zet de eenheid terug aan
Deuren en ramen staan open
Zorg ervoor dat alle deuren en ramen tij-
dens gebruik gesloten zijn
Er wordt overmatige warmte opgewekt
door zonlicht
Sluit vensters en gordijnen bij periodes
van grote warmte of heldere zonneschijn
Er bevinden zich te veel warmtebronnen
in de kamer (mensen, computers, elektro-
nische apparatuur, enz.)
Verminder het aantal warmtebronnen
Laag peil van het koelmiddel vanwege
een lek of langdurig gebruik
Controleer op lekken, dicht het koelcircuit
opnieuw af en vul koelmiddel bij
De functie STIL is geactiveerd (optionele
functie)
De functie STIL kan de prestaties vermin-
deren door de werkingsfrequentie te ver-
lagen. Schakel de functie STIL uit.
De eenheid werkt niet
Stroomonderbreking Wacht tot de stroomtoevoer hersteld is
De eenheid is uitgeschakeld. Zet de eenheid aan
De zekering is doorgebrand Vervang de zekering
De batterijen van de afstandsbediening
zijn leeg
Vervang de batterijen
De 3-minuten veiligheidsfunctie van de
eenheid is geactiveerd
Wacht drie minuten na het opnieuw aan-
zetten van de eenheid
Timer is geactiveerd Zet de timer uit
De eenheid start en
stopt regelmatig
Er bevindt zich te veel of te weinig koel-
middel in het systeem
Controleer op lekken en vul koelmiddel
bij.
Er is niet samendrukbaar gas of vloeistof
in het systeem terechtgekomen.
Verwijder het gas of de vloeistof en vul
het systeem opnieuw met koelmiddel.
De compressor is defect Vervang de compressor
De spanning is te hoog of te laag
Installeer een manostaat om de spanning
te regelen
Slechte verwarming
Het is buiten extreem koud
Gebruik een bijkomend verwarmingstoe-
stel
De koude lucht komt binnen door deuren
en vensters
Zorg ervoor dat alle deuren en ramen tij-
dens gebruik gesloten zijn
Laag peil van het koelmiddel vanwege
een lek of langdurig gebruik
Controleer op lekken, dicht het koelcircuit
opnieuw af en vul koelmiddel bij
Indicatielampje knip-
pert voortdurend
De eenheid kan stoppen of veilig verder werken Wacht ongeveer 10 minuten als het
indicatielampje blijft knipperen of als er een foutcode verschijnt. Het probleem lost
zichzelf mogelijk op.
Schakel, als dit niet het geval is, de voeding uit en daarna opnieuw in. Zet de eenheid
aan.
Schakel als het probleem aanhoudt de voeding uit en neem contact op met uw
dichtstbijzijnde servicecentrum.
Volgende foutcode
verschijnt in het weer-
gavevenster van de
binneneenheid:
• E0, E1, E2…
• P1, P2, P3…
• F1, F2, F3…
142
Wanneer het probleem blijft bestaan, neem dan contact op met uw leverancier. Geef een goede omschrij-
ving van het probleem en vermeld het typenummer van de unit.
G
LET OP!
Laat eventuele reparaties aan het apparaat alleen uitvoeren door een bevoegd airconditioning
monteur.
L GARANTIEBEPALINGEN
U krijgt op de airconditioner 48 maanden garantie op de compressor en 24 maanden garantie op overige
onderdelen, vanaf de aankoopdatum. Hierbij gelden de volgende regels:
1. Alle verdere aanspraken op schadevergoeding, inclusief gevolgschade wijzen wij uitdrukkelijk af.
2. Reparatie of vervanging van onderdelen binnen de garantietermijn leidt niet tot verlenging van de
garantie.
3. De garantie geldt niet wanneer veranderingen zijn aangebracht, niet-originele onderdelen zijn gemon-
teerd of reparaties zijn verricht door derden.
4. Onderdelen die aan normale slijtage onderhevig zijn, zoals het filter, vallen buiten de garantie.
5. De garantie geldt uitsluitend als u de originele, gedateerde aankoopbon overlegt en als daarop geen
veranderingen zijn aangebracht.
6. De garantie geldt niet bij schade ontstaan door handelingen die afwijken van die in de gebruiksaan-
wijzing of door verwaarlozing.
7. De verzendkosten en het risico van het opsturen van de airconditioner of onderdelen daarvan, komen
altijd voor rekening van de koper.
8. Schade, veroorzaakt door het niet gebruiken van de geschikte filters, valt buiten de garantie.
9. Het verlies van koelmiddel en/of lekkage ten gevolge van ondeskundig aansluiten / het ontkoppelen
van de units door niet gekwalificeerde personen valt niet onder de garantiebepalingen die op dit pro-
duct van toepassing zijn. Schade aan apparaten die geïnstalleerd, gekoppeld en / of ontkoppeld niet
conform lokale regels en wetgeving en / of conform deze installatiehandleiding vallen niet onder de
garantiebepalingen die op dit product van toepassing zijn.
In het geval van reparaties, raadpleeg uw dealer indien deze instructies geen oplossing bieden. Zorg ervoor
dat in het uitzonderlijke geval van een noodzakelijke ontkoppeling dit te allen tijde door een gekwalifi-
ceerde en geautoriseerde professional gedaan wordt volgens uw lokale wetten en regelgeving.
1
143
1
M TECHNISCHE GEGEVENS
Model
S 4225
S 5225
S 5225 B
S-JA 2519
S 4232
S 5232
S 4248
S 5248
SC 4225
SC 5225
SCJA-2519
SC 4232
SC 5232
SC 4248
SC 5248
SCJA-4819
Type airconditioner
Wandmodel aircon
-
ditioner
Wandmodel aircon
-
ditioner
Wandmodel aircon
-
ditioner
Wandmodel aircon
-
ditioner
Wandmodel aircon
-
ditioner
Wandmodel aircon
-
ditioner
Koelcapaciteit * W
2600 (1030 - 3190) 3500 (820 - 4160) 5300 (1730 - 6980) 2500 (1590 - 3000)
3200 (2110 - 4000) 4600 (1820 - 6120)
EE Klasse koelen*
A++ A++ A++ A++
A++ A++
SEER*
7,1 7,0 6,4 6,5
6,2 6,7
Verwarmingscapaciteit * W
2500 ( 880 - 3660) 2700 ( 850 - 4780) 3900 (1060 - 6980) 2400 (960 - 4890)
2400 (1280 - 4900) 3800 (1380 - 6740)
EE Klasse verwarmen*
A+ A+ A+ A+
A+ A+
SCOP*
4,0 4,1 4,0 4,0
4,0 4,0
Ontvochtigingscapaciteit ** / *** L / 24 h
24,0 28,8 43,2 26,4
31,2 36,0
Energieverbruik koelen kW
0,70 1,09 1,54 0,71
1,19 1,40
Energieverbruik verwarmen kW
0,67 1,05 1,46 0,84
1,23 1,90
Jaarlijks energieverbruik koelen /
verwarmen
kWh
128 / 875 175 / 922 290 / 1365 137 / 836
187 / 834 245 / 1326
Stroomvoorziening V / Hz / Ph
220-240~ / 50 / 1 220-240~ / 50 / 1 220-240~ / 50 / 1 220-240~ / 50 / 1
220-240~ / 50 / 1 220-240~ / 50 / 1
Max. stroom A
9,5 10,0 11,5 10,0
10,0 13,0
Luchtstroom ** m3/h
416/309/230 539/478/294 750/505/420
545/435/368
545/435/368 770/610/410
Voor ruimtes van - tot** m3
60-85 80-100 140-185 60-85 80-100 125-145
Geschikt voor de regionen W / A / C W/A/C W/A/C W/A/C W/A/C W/A/C W/A/C
Compressor type Roterende Roterende Roterende Roterende Roterende Roterende
Ventilatorsnelheden
4 4 4 3
3 3
Thermostatisch bereik oC
17 - 30 17 - 30 17 - 30 17 - 30
17 - 30 17 - 30
Handmatige / mechanische / elek
-
tronische regeling
Elektronische afstands-
bediening
Elektronische afstands-
bediening
Elektronische afstands-
bediening
Elektronische afstands-
bediening
Elektronische afstands-
bediening
Elektronische afstands-
bediening
Afstandsbediening Ja / Nee Ja Ja Ja Ja Ja Ja
Luchtfilter type(s)
Scherm, actief koolfilter,
3M HAF
Scherm, actief koolfilter,
3M HAF
Scherm, actief koolfilter,
3M HAF
Scherm, actief koolfilter,
3M HAF
Scherm, actief koolfilter,
3M HAF
Scherm, actief koolfilter,
3M HAF
Koudemiddel type / vulling R / g
R32 / 700 R32 / 800 R32 / 1250 R32 / 800 R32 / 800 R32 / 1190
Koudemiddel GWP
675 675 675 675
675 675
CO
2
equivalent tonnes
0,473 0,540 0,844 0,540
0,540 0,803
Afmetingen binnenunit (BxHxD) mm
722x187x290 802x189x297 965x215x319 805x194x285
805x194x285 957x213x302
Afmetingen buitenunit (BxHxD) mm
770x300x555 770x300x555 800x333x554 770x300x555
770x300x555 800x333x554
Nettogewicht binnenunit kg
7,3 8,2 10,8 7,8
7,8 10,3
Nettogewicht buitenunit kg
27,2 27,0 37,0 25,7
25,7 34,6
Brutogewicht binnenunit kg
9,7 10,7 14,1 10,4
10,4 13,8
Brutogewicht buitenunit kg
29,7 29,4 39,9 31,1
31,1 40,2
Geluidsvermogen binnenunit**** dB(A)
54 56 58 53
53 55
Geluidsvermogen buitenunit**** dB(A)
59 60 64 62
62 62
Geluidsdrukniveau binnenunit
(low)****
dB
20 21 21 25
25 29
Unit bescherming binnen IP
IPX0 IPX0 IPX0 IPX0
IPX0 IPX0
Unit bescherming buiten IP
IPX4 IPX4 IPX4 IPX4
IPX4 IPX4
* EN 14511/EN 14825
** Indicatief gebruiken
*** Vocht verwijderen bij 32°C, 80% RL
**** EN 12108-2008
144
Werp elektrische apparatuur niet weg bij het huisvuil; lever het in op de daarvoor aangewezen
plaats. Neem contact op met de plaatselijke autoriteiten voor informatie waar apparatuur kan
worden ingeleverd. Wanneer elektrische apparaten worden weggegooid op de vuilstort of in
de dump, kunnen gevaarlijke stoffen in het grondwater en in de voedselketen terecht komen
met alle gevolgen voor de gezondheid. Bij de vervanging van oude apparaten door nieuwe is de
leverancier wettelijk verplicht zonder kosten het oude apparaat voor vernietiging in te nemen.
Batterijen niet in het vuur werpen, daar deze kunnen exploderen of gevaarlijke vloeistoffen kun-
nen uitstoten. Indien u de afstandsbediening vervangt of vernietigt, de batterijen uitnemen en
deze conform de geldende wetgeving·weggooien daar deze schadelijk zijn voor het milieu.
Milieu-informatie: Deze apparatuur bevat gefluoreerde broeikasgassen zoals opgenomen in het Protocol
van Kyoto. De apparatuur mag alleen worden gerepareerd of gedemonteerd door professioneel, geschoold
personeel.
Deze apparatuur bevat koelmiddel R32 in de hoeveelheid als aangegeven in bovenstaande tabel. Laat R32
niet ontsnappen in de atmosfeer: R32 is een gefluoreerd broeikasgas met een broeikasgaseffect (GWP) =
675.
Internet:
Om u nog beter van dienst te zijn kunt u de meest recente versie van de gebruikers-, installatie- en/of service
handleiding downloaden op www.qlima.com.
1
145
1
146
9
1. LEIA AS INSTRUÇÕES DE UTILIZAÇÃO PRIMEIRO.
2. EM CASO DE DÚVIDA, ENTRE EM CONTACTO COM O REVENDEDOR.
Caro utilizador,
Parabéns pela aquisição do seu ar-condicionado Qlima. Adquiriu um produto de alta
qualidade que lhe proporcionará muitos anos de prazer.
Leia estas instruções de utilização primeiro para garantir a vida útil máxima do seu ar
condicionado.
Em nome do fabricante, oferecemos uma garantia de 24 meses sobre os defeitos de
material e
de produção e uma garantia de 48 meses no compressor do ar condicionado.
Desfrute do seu ar condicionado.
Atentamente,
PVG Holding b.v.
Departamento de atendimento ao cliente
147
9
CONTEÚDO
A INSTRUÇÕES DE SEGURANÇA
B. NOME DAS PEÇAS
C. TEMPERATURA DE FUNCIONAMENTO
D. FUNCIONAMENTO COM CONTROLO REMOTO
E. FUNCIONAMENTO MANUAL (SEM COMANDO)
F. FUNCIONAMENTO IDEAL
G. AJUSTE DA DIREÇÃO DO FLUXO DE AR
H. HOW COMO O AR CONDICIONADO FUNCIONA
I. MANUTENÇÃO
J. DICAS DE FUNCIONAMENTO
K. DICAS DE RESOLUÇÃO DE PROBLEMAS
L. CONDIÇÕES DA GARANTIA
M. DADOS TÉCNICOS
LEIA ESTE MANUAL
No interior, irá encontrar muitas dicas úteis sobre como utilizar e manter o seu ar
condicionado corretamente. Encontrará muitas respostas para problemas comuns
no capítulo Dicas de resolução de problemas. Se rever o capítulo K "Dicas de reso-
lução de problemas" primeiro, poderá não ter necessidade de telefonar para a
assistência.
148
A
INSTRUÇÕES DE SEGURANÇA
Instale este dispositivo apenas quando estiver em confor-
midade com a legislação, normas e normas locais/nacionais.
Este produto destina-se a ser utilizado como um ar-condi-
cionado em casas residenciais e adequado apenas para ser
utilizado em locais secos, em condições domésticas normais,
no interior na sala de estar, cozinha e garagem. Verifique
a tensão e a frequência da rede. Este dispositivo adequa-se
exclusivamente a tomadas com ligação à terra, tensão de
ligação de 220-240 V~ / 50 Hz. Os modelos de 4,8 kW devem
estar ligados diretamente à fonte de alimentação.
IMPORTANTE
O dispositivo TEM de ter sempre uma ligação à
terra. Não pode ligar o dispositivo se a fonte de
alimentação não estiver ligada à terra. A ficha tem
de ser sempre de fácil acesso quando o dispositivo
está ligado. Leia estas instruções atentamente e siga
as indicações.
O ar condicionado contém um fluido refrigerante
e pode ser classificado como equipamento
pressurizado. Portanto, contacte sempre um
engenheiro de ar condicionado autorizado para
instalação e manutenção do ar condicionado. O
ar condicionado deve ser inspecionado e mantido
anualmente por um engenheiro de ar condicionado
autorizado. Ou a garantia pode ser anulada.
Antes de ligar a unidade, verifique o seguinte:
A alimentação de tensão deve corresponder com a tensão
de alimentação referida na placa de classificação.
A tomada e a fonte de alimentação devem ser adequadas
para a corrente indicada na placa de classificação.
A ficha no cabo do dispositivo deve encaixar na tomada
de parede.
O dispositivo deve ser colocado e montado numa superfí-
cie estável.
9
149
9
O fornecimento de eletricidade ao dispositivo deve ser veri-
ficado por um profissional reconhecido se possuir quaisquer
dúvidas quanto à compatibilidade.
Este dispositivo é fabricado de acordo com os padrões de
segurança CE. No entanto, deve ter cuidado, como com
qualquer outro dispositivo elétrico.
Não cubra a grelha de entrada e saída de ar.
Nunca deixe o dispositivo entrar em contacto com produ-
tos químicos.
Nunca pulverize ou submerja a unidade com água.
Desligue a unidade e a fonte de alimentação se entrar
água na unidade interna.
Não coloque as mãos, dedos ou objetos nas aberturas da
unidade.
Nunca utilize uma extensão para ligar o dispositivo à
fonte de alimentação elétrica. Se não estiver disponível
uma tomada de parede adequada com ligação à terra,
peça que um eletricista reconhecido instale uma.
Quaisquer reparações e/ou manutenções devem apenas
ser realizadas apenas por um engenheiro de serviço reco-
nhecido ou pelo seu fornecedor oficial. Siga as instru-
ções de utilização e manutenção, conforme indicado no
manual do utilizador deste dispositivo.
Retire sempre a ficha da unidade da tomada de parede
quando não estiver em utilização.
Não opere ou pare o ar condicionado inserindo ou puxan-
do a ficha de alimentação. Utilize apenas os botões dedi-
cados no ar condicionado ou no controlo remoto.
Não abra o ar condicionado quando estiver em funcio-
namento. Retire sempre a ficha elétrica quando abrir o
dispositivo.
Retire sempre a ficha elétrica quando limpar ou reparar o
ar condicionado.
Não coloque queimadores a gás, fornos e/ou fogões no
fluxo de ar.
150
9
Não opere os botões nem toque no ar condicionado com
as mãos molhadas.
Note que a unidade exterior produz som quando em utili-
zação, isso pode interferir com a legislação local, sendo da
responsabilidade do utilizador verificar e garantir que o equi-
pamento está em total conformidade com a legislação local.
Este aparelho não se destina a ser utilizado por pessoas (incluin-
do crianças) com capacidades físicas, sensoriais ou mentais
reduzidas ou falta de experiência e conhecimento, a menos
que sejam supervisionadas ou instruídas sobre a utilização do
aparelho por uma pessoa responsável pela sua segurança.
As crianças devem ser supervisionadas para garantir que
não brincam com o aparelho.
É aconselhável ficar fora do fluxo de ar direto.
Nunca beba da água de drenagem do ar condicionado.
Não efetue quaisquer modificações na unidade.
Se o cabo de alimentação estiver danificado, tem de ser
substituído pelo fabricante, o respetivo departamento
de atendimento ao cliente ou pessoas com qualificações
equivalentes para evitar perigos.
Este aparelho pode ser utilizado por crianças com idade
igual ou superior a 8 anos e pessoas com capacidades
físicas, sensoriais ou mentais reduzidas ou falta de expe-
riência e conhecimento se forem supervisionadas ou ins-
truídas sobre a utilização do aparelho de forma segura
e compreendendo os perigos envolvidos. As crianças não
devem brincar com o aparelho. A limpeza e a manuten-
ção do utilizador não devem ser feitas por crianças sem
supervisão.
ATENÇÃO!
Nunca utilize o dispositivo com um cabo
de alimentação, ficha, quadro ou painel
de controlo danificado.
O incumprimento das instruções pode
causar a anulação da garantia deste
dispositivo.
151
9
Nota sobre os gases fluorados
1. Esta unidade de ar condicionado contém gases fluorados. Para informações específicas sobre o tipo
e quantidade de gás, consulte a placa relevante na própria unidade.
2. A instalação, o serviço, a manutenção e a reparação desta unidade devem ser realizados por um téc-
nico certificado.
3. A desinstalação e reciclagem do produto deve ser realizada por um técnico certificado.
4. Se o sistema tiver um sistema de deteção de fugas instalado, verifique se existem fugas, pelo menos,
a cada 12 meses.
5. Quando a unidade for verificada quanto a fugas, recomenda-se vivamente a manter um registo de
todas as verificações.
6. Esta unidade de ar condicionado é uma unidade hermeticamente fechada que contém gases fluora-
dos.
B NOME DAS PEÇAS
UNIDADE INTERIOR Unidade interior
Filtro do ar (de remoção)
Painel frontal
Grelha de ventilação
Janela de exibição
Controlo remoto
UNIDADE EXTERIOR Unidade exterior
Tubo de ligação, tubo flexível de
drenagem (Para o tubo de conexão
S-models não incluído)
Entrada de ar (lateral e traseira)
Saída do ar
5
6
7
8
1
22
3
4
5
6
2
1
4
3
G
NOTA!
Todas as imagens neste manual e na caixa são apenas para explicação e indicação. Podem ser
ligeiramente diferentes do ar condicionado que adquiriu. A forma real deverá prevalecer.
152
INDICADORES DE FUNÇÃO NO PAINEL DO VISOR DA UNIDADE INTERIOR
Page 6
Unit Specifications and Features
1
Unit
Specifications
and Features
NOTE:
A guide on using the infrared remote is not included
in this literature package.
Unit Parts
Power Cable (Some Units)
Remote Control
Remote Control
Holder (Some Units)
Louver
Front Panel
Air Filter
(pull out)
Display window
“ ” for 3 seconds when:
• TIMER ON is set
• FRESH, SWING, TURBO, or SILENCE features are turned on
“ ” for 3 seconds when:
• TIMER OFF is set
• FRESH, SWING, TURBO, or SILENCE features are turned off
“ ” when defrosting(cooling & heating units)
“ ” when anti-cold air feature is turned on(cooling & heating units)
“ ” when unit is self-cleaning(some units)
“ ” when freeze protection is turned on(some units)
“ ” when Wireless Control feature is activated(some units)
Display Code
Meanings
In Fan and Dry mode, the unit will display the room temperature.
In other modes, the unit will display your temperature setting.
,
,
“ ”
When ECO function(some units) is activated, the
illuminates gradually one by one as --
-- --set temperature-- ...... in one second interval.
durante 3 segundos quando:
• TIMER ON (Ligar temporizador) está definido
• as funcionalidades FRESH (Fresco), SWING (Oscilação), TURBO ou SILENCE (Silêncio) estão ligadas
Page 6
Unit Specifications and Features
1
Unit
Specifications
and Features
NOTE:
A guide on using the infrared remote is not included
in this literature package.
Unit Parts
Power Cable (Some Units)
Remote Control
Remote Control
Holder (Some Units)
Louver
Front Panel
Air Filter
(pull out)
Display window
“ ” for 3 seconds when:
• TIMER ON is set
• FRESH, SWING, TURBO, or SILENCE features are turned on
“ ” for 3 seconds when:
• TIMER OFF is set
• FRESH, SWING, TURBO, or SILENCE features are turned off
“ ” when defrosting(cooling & heating units)
“ ” when anti-cold air feature is turned on(cooling & heating units)
“ ” when unit is self-cleaning(some units)
“ ” when freeze protection is turned on(some units)
“ ” when Wireless Control feature is activated(some units)
Display Code
Meanings
In Fan and Dry mode, the unit will display the room temperature.
In other modes, the unit will display your temperature setting.
,
,
“ ”
When ECO function(some units) is activated, the
illuminates gradually one by one as --
-- --set temperature-- ...... in one second interval.
durante 3 segundos quando:
• TIMER OFF (Desligar temporizador) está definido
• as funcionalidades FRESH (Fresco), SWING (Oscilação), TURBO ou SILENCE (Silêncio) estão desligadas
Page 6
Unit Specifications and Features
1
Unit
Specifications
and Features
NOTE:
A guide on using the infrared remote is not included
in this literature package.
Unit Parts
Power Cable (Some Units)
Remote Control
Remote Control
Holder (Some Units)
Louver
Front Panel
Air Filter
(pull out)
Display window
“ ” for 3 seconds when:
• TIMER ON is set
• FRESH, SWING, TURBO, or SILENCE features are turned on
“ ” for 3 seconds when:
• TIMER OFF is set
• FRESH, SWING, TURBO, or SILENCE features are turned off
“ ” when defrosting(cooling & heating units)
“ ” when anti-cold air feature is turned on(cooling & heating units)
“ ” when unit is self-cleaning(some units)
“ ” when freeze protection is turned on(some units)
“ ” when Wireless Control feature is activated(some units)
Display Code
Meanings
In Fan and Dry mode, the unit will display the room temperature.
In other modes, the unit will display your temperature setting.
,
,
“ ”
When ECO function(some units) is activated, the
illuminates gradually one by one as --
-- --set temperature-- ...... in one second interval.
quando a descongelar (unidades de refrigeração e aquecimento)
Page 6
Unit Specifications and Features
1
Unit
Specifications
and Features
NOTE:
A guide on using the infrared remote is not included
in this literature package.
Unit Parts
Power Cable (Some Units)
Remote Control
Remote Control
Holder (Some Units)
Louver
Front Panel
Air Filter
(pull out)
Display window
“ ” for 3 seconds when:
• TIMER ON is set
• FRESH, SWING, TURBO, or SILENCE features are turned on
“ ” for 3 seconds when:
• TIMER OFF is set
• FRESH, SWING, TURBO, or SILENCE features are turned off
“ ” when defrosting(cooling & heating units)
“ ” when anti-cold air feature is turned on(cooling & heating units)
“ ” when unit is self-cleaning(some units)
“ ” when freeze protection is turned on(some units)
“ ” when Wireless Control feature is activated(some units)
Display Code
Meanings
In Fan and Dry mode, the unit will display the room temperature.
In other modes, the unit will display your temperature setting.
,
,
“ ”
When ECO function(some units) is activated, the
illuminates gradually one by one as --
-- --set temperature-- ...... in one second interval.
quando a funcionalidades de ar anti-frio está ligada (unidades de refrigeração e aquecimento)
Page 6
Unit Specifications and Features
1
Unit
Specifications
and Features
NOTE:
A guide on using the infrared remote is not included
in this literature package.
Unit Parts
Power Cable (Some Units)
Remote Control
Remote Control
Holder (Some Units)
Louver
Front Panel
Air Filter
(pull out)
Display window
“ ” for 3 seconds when:
• TIMER ON is set
• FRESH, SWING, TURBO, or SILENCE features are turned on
“ ” for 3 seconds when:
• TIMER OFF is set
• FRESH, SWING, TURBO, or SILENCE features are turned off
“ ” when defrosting(cooling & heating units)
“ ” when anti-cold air feature is turned on(cooling & heating units)
“ ” when unit is self-cleaning(some units)
“ ” when freeze protection is turned on(some units)
“ ” when Wireless Control feature is activated(some units)
Display Code
Meanings
In Fan and Dry mode, the unit will display the room temperature.
In other modes, the unit will display your temperature setting.
,
,
“ ”
When ECO function(some units) is activated, the
illuminates gradually one by one as --
-- --set temperature-- ...... in one second interval.
quando a unidade está a limpar automaticamente (algumas unidades)
Page 6
Unit Specifications and Features
1
Unit
Specifications
and Features
NOTE:
A guide on using the infrared remote is not included
in this literature package.
Unit Parts
Power Cable (Some Units)
Remote Control
Remote Control
Holder (Some Units)
Louver
Front Panel
Air Filter
(pull out)
Display window
“ ” for 3 seconds when:
• TIMER ON is set
• FRESH, SWING, TURBO, or SILENCE features are turned on
“ ” for 3 seconds when:
• TIMER OFF is set
• FRESH, SWING, TURBO, or SILENCE features are turned off
“ ” when defrosting(cooling & heating units)
“ ” when anti-cold air feature is turned on(cooling & heating units)
“ ” when unit is self-cleaning(some units)
“ ” when freeze protection is turned on(some units)
“ ” when Wireless Control feature is activated(some units)
Display Code
Meanings
In Fan and Dry mode, the unit will display the room temperature.
In other modes, the unit will display your temperature setting.
,
,
“ ”
When ECO function(some units) is activated, the
illuminates gradually one by one as --
-- --set temperature-- ...... in one second interval.
quando a proteção contra congelamento está ligada (algumas unidades)
Page 6
Unit Specifications and Features
1
Unit
Specifications
and Features
NOTE:
A guide on using the infrared remote is not included
in this literature package.
Unit Parts
Power Cable (Some Units)
Remote Control
Remote Control
Holder (Some Units)
Louver
Front Panel
Air Filter
(pull out)
Display window
“ ” for 3 seconds when:
• TIMER ON is set
• FRESH, SWING, TURBO, or SILENCE features are turned on
“ ” for 3 seconds when:
• TIMER OFF is set
• FRESH, SWING, TURBO, or SILENCE features are turned off
“ ” when defrosting(cooling & heating units)
“ ” when anti-cold air feature is turned on(cooling & heating units)
“ ” when unit is self-cleaning(some units)
“ ” when freeze protection is turned on(some units)
“ ” when Wireless Control feature is activated(some units)
Display Code
Meanings
In Fan and Dry mode, the unit will display the room temperature.
In other modes, the unit will display your temperature setting.
,
,
“ ”
When ECO function(some units) is activated, the
illuminates gradually one by one as --
-- --set temperature-- ...... in one second interval.
quando a funcionalidade Controlo sem fios está ativada (algumas unidades)
Page 6
Unit Specifications and Features
1
Unit
Specifications
and Features
NOTE:
A guide on using the infrared remote is not included
in this literature package.
Unit Parts
Power Cable (Some Units)
Remote Control
Remote Control
Holder (Some Units)
Louver
Front Panel
Air Filter
(pull out)
Display window
“ ” for 3 seconds when:
• TIMER ON is set
• FRESH, SWING, TURBO, or SILENCE features are turned on
“ ” for 3 seconds when:
• TIMER OFF is set
• FRESH, SWING, TURBO, or SILENCE features are turned off
“ ” when defrosting(cooling & heating units)
“ ” when anti-cold air feature is turned on(cooling & heating units)
“ ” when unit is self-cleaning(some units)
“ ” when freeze protection is turned on(some units)
“ ” when Wireless Control feature is activated(some units)
Display Code
Meanings
In Fan and Dry mode, the unit will display the room temperature.
In other modes, the unit will display your temperature setting.
,
,
“ ”
When ECO function(some units) is activated, the
illuminates gradually one by one as --
-- --set temperature-- ...... in one second interval.
quando a função ECO (algumas unidades) está ativada,
Page 6
Unit Specifications and Features
1
Unit
Specifications
and Features
NOTE:
A guide on using the infrared remote is not included
in this literature package.
Unit Parts
Power Cable (Some Units)
Remote Control
Remote Control
Holder (Some Units)
Louver
Front Panel
Air Filter
(pull out)
Display window
“ ” for 3 seconds when:
• TIMER ON is set
• FRESH, SWING, TURBO, or SILENCE features are turned on
“ ” for 3 seconds when:
• TIMER OFF is set
• FRESH, SWING, TURBO, or SILENCE features are turned off
“ ” when defrosting(cooling & heating units)
“ ” when anti-cold air feature is turned on(cooling & heating units)
“ ” when unit is self-cleaning(some units)
“ ” when freeze protection is turned on(some units)
“ ” when Wireless Control feature is activated(some units)
Display Code
Meanings
In Fan and Dry mode, the unit will display the room temperature.
In other modes, the unit will display your temperature setting.
,
,
“ ”
When ECO function(some units) is activated, the
illuminates gradually one by one as --
-- --set temperature-- ...... in one second interval.
acende gradualmente uma a um como
Page 6
Unit Specifications and Features
1
Unit
Specifications
and Features
NOTE:
A guide on using the infrared remote is not included
in this literature package.
Unit Parts
Power Cable (Some Units)
Remote Control
Remote Control
Holder (Some Units)
Louver
Front Panel
Air Filter
(pull out)
Display window
“ ” for 3 seconds when:
• TIMER ON is set
• FRESH, SWING, TURBO, or SILENCE features are turned on
“ ” for 3 seconds when:
• TIMER OFF is set
• FRESH, SWING, TURBO, or SILENCE features are turned off
“ ” when defrosting(cooling & heating units)
“ ” when anti-cold air feature is turned on(cooling & heating units)
“ ” when unit is self-cleaning(some units)
“ ” when freeze protection is turned on(some units)
“ ” when Wireless Control feature is activated(some units)
Display Code
Meanings
In Fan and Dry mode, the unit will display the room temperature.
In other modes, the unit will display your temperature setting.
,
,
“ ”
When ECO function(some units) is activated, the
illuminates gradually one by one as --
-- --set temperature-- ...... in one second interval.
--
Page 6
Unit Specifications and Features
1
Unit
Specifications
and Features
NOTE:
A guide on using the infrared remote is not included
in this literature package.
Unit Parts
Power Cable (Some Units)
Remote Control
Remote Control
Holder (Some Units)
Louver
Front Panel
Air Filter
(pull out)
Display window
“ ” for 3 seconds when:
• TIMER ON is set
• FRESH, SWING, TURBO, or SILENCE features are turned on
“ ” for 3 seconds when:
• TIMER OFF is set
• FRESH, SWING, TURBO, or SILENCE features are turned off
“ ” when defrosting(cooling & heating units)
“ ” when anti-cold air feature is turned on(cooling & heating units)
“ ” when unit is self-cleaning(some units)
“ ” when freeze protection is turned on(some units)
“ ” when Wireless Control feature is activated(some units)
Display Code
Meanings
In Fan and Dry mode, the unit will display the room temperature.
In other modes, the unit will display your temperature setting.
,
,
“ ”
When ECO function(some units) is activated, the
illuminates gradually one by one as --
-- --set temperature-- ...... in one second interval.
-- temperatura definida --
Page 6
Unit Specifications and Features
1
Unit
Specifications
and Features
NOTE:
A guide on using the infrared remote is not included
in this literature package.
Unit Parts
Power Cable (Some Units)
Remote Control
Remote Control
Holder (Some Units)
Louver
Front Panel
Air Filter
(pull out)
Display window
“ ” for 3 seconds when:
• TIMER ON is set
• FRESH, SWING, TURBO, or SILENCE features are turned on
“ ” for 3 seconds when:
• TIMER OFF is set
• FRESH, SWING, TURBO, or SILENCE features are turned off
“ ” when defrosting(cooling & heating units)
“ ” when anti-cold air feature is turned on(cooling & heating units)
“ ” when unit is self-cleaning(some units)
“ ” when freeze protection is turned on(some units)
“ ” when Wireless Control feature is activated(some units)
Display Code
Meanings
In Fan and Dry mode, the unit will display the room temperature.
In other modes, the unit will display your temperature setting.
,
,
“ ”
When ECO function(some units) is activated, the
illuminates gradually one by one as --
-- --set temperature-- ...... in one second interval.
...... num intervalo de um segundo
Noutros modos, a unidade irá exibir a sua definição de temperatura.
No modo Fan (Ventoinha) e Dry (Secagem), a unidade irá exibir a temperatura ambiente.
C TEMPERATURA DE FUNCIONAMENTO
A refrigeração, o aquecimento e/ou a desumidificação são eficazes nas seguintes temperaturas interiores e
exteriores:
Temperatura
Modo Operação de refrigeração
Operação de
aquecimento
Operação de
desumidificação
Temperatura ambiente 17 °C - 32 °C 0 °C - 30 °C 10 °C - 32 °C
Temperatura exterior -25 °C - 50 °C -25 °C - 30 °C 0 °C - 50 °C
CUIDADO
Se o ar condicionado for utilizado fora das condições supramencionadas, certos recursos de
segurança podem ativar e provocar um funcionamento anormal da unidade.
Se o ar condicionado funcionar com uma humidade relativa excessiva de 80% na divisão, a
superfície do ar condicionado poderá atrair condensação. Coloque a grelha de ventilação
do fluxo de ar vertical no seu ângulo máximo (verticalmente ao solo) e defina o modo de
ventilação HIGH (Alto).
Para o efeito máximo do seu ar condicionado, feche sempre as portas e as janelas durante a
refrigeração ou o aquecimento.
9
153
9
D FUNCIONAMENTO COM CONTROLO REMOTO
G
NOTA!
Aponte sempre o controlo remoto no sentido do recetor da unidade interior e certifique-se
de que não existem obstáculos entre o controlo remoto e o recetor da unidade interior. Caso
contrário, o sinal do controlo remoto não será apanhado pelo recetor e o ar condicionado não
irá funcionar corretamente.
A distância máxima a que o controlo remoto funcionará é de, aproximadamente, 6 a 7 metros.
G
NOTA!
Mantenha o controlo remoto onde o respetivo sinal possa alcançar o recetor da unidade. Quando
selecionar o funcionamento do temporizador, o controlo remoto transmite automaticamente um
sinal para a unidade interior no horário especificado. Se manter o controlo remoto numa posição
que impeça transmissões de sinal adequadas, pode ocorrer um atraso de até 15 minutos.
Introdução aos botões de função no controlo remoto
4
3
2
8
6
7
12
11
13
15
5
9
10
14
1
SLEEP
FRESH
Botão on/off (ligar/desligar): prima este botão para iniciar o funcionamento da unidade. Prima o botão
novamente para parar o funcionamento da unidade.
Botão de modo: sempre que premir o botão, um modo é selecionado numa sequência AUTO, COOL
(Frio), DRY (Secagem), HEAT (Quente) e FAN (Ventoinha) apenas como a figura seguinte indica:
AUTO COOL DRY HEAT FAN
Botão +: prima o botão para aumentar a definição da temperatura interior para 30 °C.
Botão -: prima o botão para diminuir a definição da temperatura interior para 17 °C.
Botão da ventoinha: este botão é utilizado para selecionar a velocidade da ventoinha. Sempre que premir o botão,
uma velocidade da ventoinha é selecionada numa sequência que vai de AUTO, LOW (Baixa), MED (Média) até
HIGH (Alta) e, em seguida, de volta para AUTO. Quando seleciona o modo AUTO ou DRY (Secagem), a velocidade
da ventoinha será controlada automaticamente e não será possível personalizar a velocidade da ventoinha.
Botão SLEEP (Inativo): prima este botão para entrar no modo de funcionamento de poupança de energia.
Prima novamente para cancelar. Esta função só pode ser utilizada no modo COOL (Frio), HEAT (Quente) e AUTO
e manter a temperatura mais confortável para si. A unidade aumenta automaticamente a temperatura defi
-
nida em 1 °C por hora (no modo de refrigeração) ou diminui a temperatura definida em 1 °C por hora (modo
de aquecimento) durante as 2 primeiras horas. O ar condicionado manterá esta temperatura (temperatura
definida – ou + 2 graus) durante as próximas 5 horas. Após este período, o ar condicionado irá desligar-se.
Botão FRESH: Pressione prolongadamente para ativar a função FRESH.
fig 1
154
Botão Swing (Oscilação): prima o botão SWING para ativar a funcionalidade de oscilação. Prima o botão
novamente para parar.
Botão de direção do ar: prima este botão para alterar o ângulo de oscilação da grelha de ventilação. O ângulo
de oscilação da grelha de ventilação é de 6
o
por cada seleção. Quando a grelha de ventilação oscila num certo
ângulo, o que irá afetar o efeito de refrigeração e aquecimento do ar condicionado, altera automaticamente
a direção da oscilação. Não irá aparecer nenhum símbolo na área do visor quando premir este botão.
Botão Swing (esquerda e direita): Pressione o botão SWING para ativar o recurso swing. Aperte o botão
novamente para parar.
i
Botão Ligar temporizador: prima este botão para iniciar a sequência de ativação automática do temporizador.
Cada seleção irá aumentar a definição de ativação automática em incrementos de 30 minutos. Quando a defini
-
ção de tempo exibir 10 H, cada seleção irá aumentar a definição de temporização automática em incrementos de
60 minutos. Para cancelar o programa de temporização automática, continue a premir o botão até aparecer 0.0.
j
Botão Desligar temporizador: prima este botão para iniciar a sequência de desativação automática do tempori-
zador. Cada seleção irá aumentar a definição de ativação automática em incrementos de 30 minutos. Quando a
definição de tempo exibir 10 H, cada seleção irá aumentar a definição de temporização automática em incrementos
de 60 minutos. Para cancelar o programa de temporização automática, continue a premir o botão até aparecer 0.0.
k Botão RESET (Reiniciar): quando premir o botão RESET (Reiniciar) embutido, todas as definições atuais
são canceladas e o controlo irá voltar às definições iniciais.
l
Botão Turbo/Limpeza ativa: prima este botão no modo COOL (Frio) e o ar condicionado entra no modo de
operação de refrigeração poderosa. Prima novamente para cancelar a função TURBO. Ao premir este botão (>
2 seg.), a unidade irá entrar no modo Limpeza ativa. Será iniciado um processo completo para limpar o lado
interno do evaporador e reduzir a criação de bactérias. Quando esta função é ativada, todas as definições do
temporizador serão canceladas. Para parar o modo Limpeza ativa, pressione o botão (> 2 seg.) novamente.
m Botão LOCK (Bloquear): quando premir o botão LOCK (Bloquear) embutido, todas as definições atuais
são bloqueadas e o controlo remoto não aceita nenhuma operação, salvo do LOCK (Bloquear). Prima
novamente para cancelar o modo LOCK (Bloquear).
n Botão VISOR LED/FOLLOW ME: prima este botão para limpar o visor de dígitos no ar condicionado. O
visor de dígitos no ar condicionado irá reativar-se automaticamente após 3 segundos, quando nenhum
botão estiver a ser premido durante este período. Prima novamente para ativá-lo (não aplicável a uni-
dades sem esta função). Ao premir durante mais do que 2 segundos, a função FOLLOW ME será ativada,
prima novamente durante mais do que 2 segundos para desativar.
o
Botão de som baixo/prevenção contra congelamento interior: prima este botão para diminuir o nível de pressão
sonora interior para 21 dB(A). A velocidade da ventoinha da unidade interna é reduzida ao seu nível mais baixo. Ao
premir este botão (> 2 segundos), a unidade irá entrar no modo de prevenção contra congelamento. A unidade irá
anular a definição da temperatura interior e irá definir para aproximadamente 8 °C. Desta forma, impede a sua casa
de congelar durante períodos frios com o menor consumo de energia possível. Quando este modo é selecionado, o
visor da unidade interior irá mostrar "FP". Este botão só pode ser operado no modo de aquecimento. Para sair do
modo de prevenção contra congelamento doméstico: basta premir o botão mais uma vez.
Nomes e funções dos indicadores no controlo remoto
auto cool dryheatfan
sleep lock run
SET TEMP.TIMER ONOFF
2
1
3
4
5
6
7
9
155
9
Indicador de transmissão: este indicador de transmissão acende quando o controlo remoto transmite
sinais para a unidade interior.
Visor do modo: exibe o modo de funcionamento atual. Incluindo Auto
, Cool (Frio) , Dry (Secagem)
, Heat (Quente) (não aplicável a modelos apenas de refrigeração), Fan (Ventoinha) .
Visor de temp./temporizador: exibe a definição de temperatura (17 °C ~ 30 °C). Quando define o modo de
funcionamento para FAN (Ventoinha), não é exibida nenhuma definição de temperatura. E, se no modo
TIMER (Temporizador), mostra as definições ON (Ligar) e OFF (Desligar) do TIMER (Temporizador).
Visor da velocidade da ventoinha: exibe a velocidade da ventoinha selecionada, AUTO (não exibe), LOW
(Baixa)
, MED (Média) e HIGH (Alta) . A velocidade da ventoinha é AUTO quando o modo de funcio-
namento é AUTO ou DRY (Secagem).
Visor ON/OFF (Ligar/Desligar): exibido premindo o botão ON/OFF (Ligar/Desligar). Prima o botão ON/OFF
(Ligar/Desligar) novamente para remover.
Visor de bloqueio: exibido quando o modo LOCK (Bloquear) é ativado.
Visor Inativo: exibido em funcionamento inativo. Prima o botão SLEEP (Inativo) novamente para remover.
G
NOTA!
Todos os itens estão exibidos na Fig. 2 para efeitos de esclarecimento. Mas durante o
funcionamento real, apenas os itens funcionais relativos são exibidos no painel do visor.
Funcionamento do controlo remoto
Instalar/substituir pilhas
Utilize duas pilhas alcalinas secas (AAA/LR03).
Não utilize pilhas recarregáveis.
1. Retire a tampa das pilhas na parte de trás do controlo remoto puxando de acordo com a direção da
seta exibida na tampa.
2. Introduza as pilhas novas certificando-se de que o (+) e (-) das pilhas estão instalados corretamente.
3. Volte a encaixar a tampa deslizando-a de volta à posição.
G
NOTA!
Quando as pilhas forem removidas, o controlo remoto apaga toda a programação. Após
introduzir pilhas novas, o controlo remoto deve ser reprogramado.
Quando substituir as pilhas, não utilize pilhas velhas ou de tipo diferente. Tal pode provocar
um mau funcionamento do controlo remoto.
Se não utilizar o controlo remoto durante várias semanas, retire as pilhas. Caso contrário, os
derrames das pilhas podem danificar o controlo remoto.
A duração média das pilhas em utilização normal é de cerca de 6 meses.
Substitua as pilhas quando não houver sinal de retorno da unidade interior ou se a luz do
indicador de transmissão não aparecer.
Nunca misture pilhas novas com antigas. Nunca utilize tipos diferentes de pilhas (por exemplo,
alcalinas e de dióxido de manganês).
FUNCIONAMENTO automático
Quando o ar condicionado estiver pronto para utilização (verifique se a unidade está ligada e a alimentação
elétrica disponível), ligue a alimentação e a lâmpada indicadora OPERATION (Funcionamento) no painel do
visor da unidade interior começa a piscar.
1. Utilize o botão de seleção Mode (Modo) para selecionar AUTO.
2. Prima o botão + ou - para definir a temperatura ambiente pretendida.
3. Prima o botão On/off (Ligar/desligar) para iniciar o ar condicionado. A lâmpada OPERATION
(Funcionamento) no painel do visor da unidade interior acende. A FAN SPEED (Velocidade da ventoi-
nha) é controlada automaticamente.
4. Prima o botão On/off (Ligar/desligar) novamente para parar o funcionamento da unidade.
156
G
NOTA!
No modo AUTO, é possível o ar condicionado escolher logicamente o modo COOL (Frio), FAN
(Ventoinha) e HEAT (Quente) detetando a diferença entre a temperatura ambiente real na
divisão e a temperatura definida no controlo remoto.
Se o modo AUTO não for confortável para si, é possível selecionar o modo pretendido manualmente.
Funcionamento COOL (Frio), HEAT (Quente) e FAN ONLY (Ventoinha apenas)
1. Se o modo AUTO não for confortável, poderá anular manualmente as definições utilizando os modos
COOL (Frio), DRY (Secagem), HEAT (Quente) (apenas unidades com bomba de aquecimento) ou FAN
ONLY (Ventoinha apenas) premindo o botão .
2. Prima o botão + ou - ( e ) para definir a temperatura ambiente pretendida.
3. Prima o botão Fan (Ventoinha) para selecionar o modo (Ventoinha) de AUTO, HIGH (Alto), MED
(Médio) ou LOW (Baixo).
4. Prima o botão On/off (Ligar/desligar) . A lâmpada de funcionamento acende e o ar condicionado
começa a funcionar de acordo com as suas definições. Prima o botão On/off (Ligar/desligar) nova-
mente para parar o funcionamento da unidade.
G
NOTA!
O modo FAN ONLY (Ventoinha apenas) não pode ser utilizado para controlar a temperatura.
Neste modo, apenas as etapas 1, 3 e 4 são aplicáveis.
Funcionamento DRY (Secagem)
1. Prima o botão Mode (Modo) para selecionar DRY (Secagem).
2. Prima o botão + ou - ( e ) para definir a temperatura pretendida.
3.
Prima o botão On/off . A lâmpada de funcionamento acende e o ar condicionado começa a funcionar no modo
DRY (Secagem). Prima o botão On/off (Ligar/desligar) novamente para parar o funcionamento da unidade.
G
NOTA!
Devido à diferença entre a temperatura ajustada da unidade e a temperatura interior real, o ar
condicionado no modo DRY (Secagem) irá funcionar automaticamente muitas vezes sem executar
o modo COOL (Frio) e FAN (Ventoinha).
Funcionamento TIMER (Temporizador)
Prima o botão Timer on/off (Ligar/Desligar temporizador) (i e j) para definir os tempos de ativação e desa-
tivação da unidade. O funcionamento eficaz definido pelo controlo remoto para a função do temporizador
está limitado para um período entre 0,5 e menos de 24 horas.
1. Para definir o tempo de arranque.
1.1
Prima o botão Timer on (Ligar temporizador) i, então o visor do controlo remoto mostra ON TIMER
(Temporizador ligado), o último período definido para o arranque e o sinal “h” serão exibidos na área
do visor de temporização. Agora está pronto para reiniciar o tempo para INICIAR o funcionamento.
1.2
Prima o botão Timer on (Ligar temporizador) i novamente para definir o tempo pretendido de arranque
da unidade.
1.3
Após configurar Timer on (Ligar temporizador), haverá um atraso de meio segundo antes do controlo
remoto transmitir o sinal para o ar condicionado.
2. Para definir o tempo de paragem.
2.1
Prima o botão Timer off (Desligar temporizador) j e o visor do controlo remoto irá exibir OFF TIMER (Desligar
temporizador) e o último período definido para a desativação do temporizador será exibido, em horas, na área
do visor de temporização. Agora está pronto para reiniciar o tempo para PARAR o funcionamento.
9
157
9
2.2
Prima o botão Timer off (Desligar temporizador) j novamente para definir o tempo que pretende
parar o funcionamento.
2.3
Após configurar Timer off (Desligar temporizador), haverá um atraso de meio segundo antes do con-
trolo remoto transmitir o sinal para o ar condicionado.
Exemplo de definição do temporizador
Para iniciar o ar condicionado em 6 horas.
1. Prima o botão TIMER ON (Ligar temporizador), a última definição do tempo de
funcionamento inicial e o sinal "h" serão exibido na área do visor.
2. Prima o botão TIMER ON (Ligar temporizador) para exibir "6:0h".
3. Aguarde um segundo e a área do visor digital irá mostrar novamente a temperatura.
Start
Off
6h
TIMERON
O indicador "TIMER ON" (Ligar temporizador) permanece aceso e esta função é ativada.
Temporizador combinado
(definição em simultâneo de ambos os temporizadores ON (Ligar) e OFF (Desligar))
TIMER OFF (Desligar temporizador) --> TIMER ON (Ligar temporizador)
(On (Ligar) --> Stop (Parar) --> Start (Iniciar) funcionamento)
Esta funcionalidade é útil quando pretender parar o ar condicionado depois de ir
para a
cama, e iniciar novamente pela manhã quando acordar ou quando voltar para casa.
Exemplo:
Para parar o ar condicionado 2 horas após a configuração e iniciá-lo novamente 10 horas após a configu-
ração.
1. Prima o botão TIMER OFF (Desligar temporizador).
2. Prima o botão TIMER OFF (Desligar temporizador) novamente para exibir 2.0h no visor TIMER OFF
(Desligar temporizador).
3. Prima o botão TIMER ON (Ligar temporizador).
4. Prima o botão TIMER ON (Ligar temporizador) novamente para exibir 10h no visor TIMER ON (Ligar tem-
porizador).
5. Aguarde um segundo e a área do visor digital irá mostrar novamente a temperatura. O indicador TIMER
ON OFF (Ligar/desligar temporizador) permanece aceso e esta função é ativada.
G
NOTA!
Se for definido o mesmo período para as definições START (Iniciar) e STOPPING (Parar), o
período de paragem irá aumentar automaticamente 0,5 h (o tempo definido exibe menos de
10 h) ou uma hora (o tempo definido exibe 10 h ou mais).
Para alterar o período de ativação/desativação do temporizador, basta premir o botão TIMER
(Temporizador) correspondente e reiniciar o tempo.
O tempo de ajuste é o tempo relativo. Este é o período definido com base no atraso do período atual.
AVISO
Mantenha o controlo remoto longe de todos os líquidos.
Proteja o controlo remoto contra temperaturas elevadas e da exposição à radiação.
Mantenha o recetor interior fora da luz solar direta ou o ar condicionado poderá avariar.
On
Stop
2h
Set
On
10 h
TIMERONOFF
158
E FUNCIONAMENTO MANUAL (SEM COMANDO)
Como operar a sua unidade sem controlo remoto.
Caso o seu controlo remoto deixe de funcionar, é possível operar a sua unidade manualmente com o botão
MANUAL CONTROL (Controlo manual) localizado na unidade interior. Note que o funcionamento manual
não é uma solução a longo prazo e que o funcionamento da unidade com o controlo remoto é altamente
recomendado.
G
ANTES DO FUNCIONAMENTO MANUAL
A unidade deve ser desligada antes do funcionamento manual.
Para operar a sua unidade manualmente:
1. Localize o botão MANUAL CONTROL (Controlo manual) no painel lateral direito
da unidade.
2. Prima o botão MANUAL CONTROL (Controlo manual) uma vez para ativar o modo
FORCED AUTO (Auto forçado).
3. Prima o botão MANUAL CONTROL (Controlo manual) novamente para ativar o
modo FORCED COOLING (Refrigeração forçada).
4. Prima o botão MANUAL CONTROL (Controlo manual) uma terceira vez para desli-
gar a unidade.
CUIDADO
O botão manual destina-se apenas a fins de teste e funcionamento de emergência. Não utilize
esta função, a menos que o controlo remoto esteja perdido e seja estritamente necessário. Para
restaurar o funcionamento regular, utilize o controlo remoto para ativar a unidade.
F FUNCIONAMENTO IDEAL
FUNCIONAMENTO IDEAL
Para alcançar o melhor desempenho, observe o seguinte:
Ajuste a direção do fluxo de ar corretamente para que não seja direcionado diretamente às pessoas.
Ajuste a temperatura para obter o maior nível de conforto.
Feche as portas e janelas, caso contrário, o efeito desejado pode ser reduzido.
Não coloque nenhum objeto perto da entrada ou da saída de ar, pois a eficiência do ar condicionado
pode ser reduzida e o ar condicionado pode parar de funcionar. Certifique-se de que não existem
obstáculos que bloqueiem o fluxo de ar. O fluxo de ar deve alcançar a sala inteira sem impedimentos.
Além disso, o fluxo de ar deve alcançar o ar condicionado sem impedimentos.
Limpe o filtro de ar periodicamente, caso contrário, o desempenho de refrigeração ou aquecimento
poderá ser reduzido. É aconselhável limpar os filtros a cada duas semanas.
Não opere a unidade com a grelha de ventilação horizontal na posição fechada.
G AJUSTE DA DIREÇÃO DO FLUXO DE AR
Ajuste a direção do fluxo de ar corretamente, caso contrário, tal pode causar
desconforto ou criar temperaturas ambiente desequilibradas.
Ajuste a grelha de ventilação horizontal utilizando o botão no controlo remoto.
Ajuste a grelha de ventilação vertical manualmente.
Manual control button
Manual
control
botão
Haste do
defletor
Alcance
9
159
9
Ajuste da direção do fluxo de ar horizontal (para cima - para baixo)
O ar condicionado ajusta automaticamente a direção do fluxo de ar horizontal de
acordo com o modo de funcionamento.
Para definir a direção do fluxo de ar horizontal
Execute esta função enquanto a unidade estiver em funcionamento. Mantenha
premido o botão AIR DIRECTION (Direção do ar) no controlo remoto para mover
a grelha de ventilação para a direção desejada.
Ajuste a direção do fluxo de ar horizontal para a direção desejada.
Nas operações subsequentes, o fluxo de ar horizontal é ajustado automaticamente
na direção em que ajustou premindo o botão AIR DIRECTION (Direção do ar).
Para definir a direção do fluxo de ar vertical (para a esquerda - para a direita)
Ajuste a grelha de ventilação vertical manualmente utilizando a alavanca no meio
do braço da grelha de ventilação vertical (dependendo do modelo). Quando o ar
condicionado estiver em funcionamento e a grelha de ventilação estiver numa posi-
ção específica, mova a alavanca na extremidade esquerda (ou direita, dependendo
do modelo) da saída do ar para a posição desejada.
CUIDADO!
Tenha cuidado, não toque na ventoinha por trás das grelhas de ventilação verticais!
Para oscilar automaticamente a direção do fluxo de ar (para cima - para baixo)
Execute esta função enquanto o ar condicionado estiver em funcionamento.
Prima o botão SWING (Oscilação) no controlo remoto.
Para parar a função, prima o botão SWING (Oscilação) novamente. Prima o botão AIR DIRECTION
(Direção do ar) para bloquear a grelha de ventilação na posição desejada.
CUIDADO
Os botões AIR DIRECTION (Direção do ar) e SWING (Oscilação) serão desativados quando o ar
condicionado não estiver em funcionamento (incluindo quando o TIMER ON (Ligar temporizador)
estiver configurado).
Não utilize o ar condicionado durante longos períodos de tempo com a direção do fluxo de
ar ajustada para baixo no modo de refrigeração ou de secagem. Caso contrário, pode ocorrer
condensação na superfície da grelha de ventilação horizontal, criando humidade.
Não mova a grelha de ventilação horizontal manualmente. Utilize sempre o botão AIR DIRECTION
(Direção do ar) ou SWING (Oscilação) . Se mover esta grelha de ventilação <>manualmente,
poderá avariar durante o funcionamento. Se a grelha de ventilação avariar, desligue
imediatamente o ar condicionado e reinicie-o.
Quando o ar condicionado é iniciado imediatamente após estar parado, a grelha de ventilação
horizontal poderá não mover durante, aproximadamente, 10 segundos.
Não opere a unidade com a grelha de ventilação horizontal na posição fechada.
E FUNCIONAMENTO MANUAL (SEM COMANDO)
Como operar a sua unidade sem controlo remoto.
Caso o seu controlo remoto deixe de funcionar, é possível operar a sua unidade manualmente com o botão
MANUAL CONTROL (Controlo manual) localizado na unidade interior. Note que o funcionamento manual
não é uma solução a longo prazo e que o funcionamento da unidade com o controlo remoto é altamente
recomendado.
G
ANTES DO FUNCIONAMENTO MANUAL
A unidade deve ser desligada antes do funcionamento manual.
Para operar a sua unidade manualmente:
1. Localize o botão MANUAL CONTROL (Controlo manual) no painel lateral direito
da unidade.
2. Prima o botão MANUAL CONTROL (Controlo manual) uma vez para ativar o modo
FORCED AUTO (Auto forçado).
3. Prima o botão MANUAL CONTROL (Controlo manual) novamente para ativar o
modo FORCED COOLING (Refrigeração forçada).
4. Prima o botão MANUAL CONTROL (Controlo manual) uma terceira vez para desli-
gar a unidade.
CUIDADO
O botão manual destina-se apenas a fins de teste e funcionamento de emergência. Não utilize
esta função, a menos que o controlo remoto esteja perdido e seja estritamente necessário. Para
restaurar o funcionamento regular, utilize o controlo remoto para ativar a unidade.
F FUNCIONAMENTO IDEAL
FUNCIONAMENTO IDEAL
Para alcançar o melhor desempenho, observe o seguinte:
Ajuste a direção do fluxo de ar corretamente para que não seja direcionado diretamente às pessoas.
Ajuste a temperatura para obter o maior nível de conforto.
Feche as portas e janelas, caso contrário, o efeito desejado pode ser reduzido.
Não coloque nenhum objeto perto da entrada ou da saída de ar, pois a eficiência do ar condicionado
pode ser reduzida e o ar condicionado pode parar de funcionar. Certifique-se de que não existem
obstáculos que bloqueiem o fluxo de ar. O fluxo de ar deve alcançar a sala inteira sem impedimentos.
Além disso, o fluxo de ar deve alcançar o ar condicionado sem impedimentos.
Limpe o filtro de ar periodicamente, caso contrário, o desempenho de refrigeração ou aquecimento
poderá ser reduzido. É aconselhável limpar os filtros a cada duas semanas.
Não opere a unidade com a grelha de ventilação horizontal na posição fechada.
G AJUSTE DA DIREÇÃO DO FLUXO DE AR
Ajuste a direção do fluxo de ar corretamente, caso contrário, tal pode causar
desconforto ou criar temperaturas ambiente desequilibradas.
Ajuste a grelha de ventilação horizontal utilizando o botão no controlo remoto.
Ajuste a grelha de ventilação vertical manualmente.
Manual control button
Manual
control
botão
Haste do
defletor
Alcance
160
H COMO O AR CONDICIONADO FUNCIONA
FUNCIONAMENTO AUTOMÁTICO
Quando define o modo de funcionamento para AUTO (botão 2 no controlo
remoto), irá selecionar automaticamente COOLING(Refrigeração), HEATING
(Aquecimento) ou FAN only (Ventoinha apenas) dependendo da temperatu-
ra que selecionar e da temperatura ambiente.
O ar condicionado irá controlar a temperatura ambiente automaticamente
em torno do ponto de temperatura ajustado por si.
Se o modo AUTO for desconfortável, é possível selecionar as condições
manualmente.
FUNCIONAMENTO ECONÓMICO/INATIVO
Ao premir o botão SLEEP (Inativo) durante COOLING (REFRIGERAÇÃO),
HEATING (AQUECIMENTO) ou AUTO, o ar condicionado irá aumentar auto-
maticamente (refrigeração) ou diminuir (aquecimento), 1 °C por hora. A
temperatura ajustada estará constante 2 horas depois e permanecerá cons-
tante durante 5 horas. Após 5 horas, a unidade irá parar. Velocidade da
ventoinha
1
1
1
1
Premir botão Sleep
(Inativo)
Premir botão Sleep
(Inativo)
REFRIGERAÇÃO
AQUECIMENTO
DESUMIDIFICAÇÃO
Tempe-
ratura
definida
1 hora 1 hora
1 hora 1 hora
Tempe-
ratura
definida
Temperatura
definida
Tempo
Tempe-
ratura
interior
Refrigeração Refrigeração
Refrigeração
Ventilador
apenas
Ventilador
apenas
será automaticamente controlado.
OPERAÇÃO DE DESUMIDIFICAÇÃO
O modo de desumidificação irá selecionar automaticamente a operação de desumidificação com base
na diferença entre a temperatura ajustada e a temperatura ambiente real.
A temperatura é regulada durante a desumidificação ao ligar e desligar repetidamente a função de
refrigeração ou de apenas ventilação. A velocidade da ventoinha é controlada automaticamente.
No funcionamento normal de refrigeração, o ar condicionado irá também desumidificar o ar.
G
NOTA
Quando o ar condicionado estiver a desumidificar, é provável que a temperatura ambiente
diminua. Por conseguinte, é normal que um higróstato meça uma humidade relativa superior. No
entanto, a humidade absoluta na divisão irá descer, dependendo da quantidade de humidade
produzida na divisão (confeção, pessoas, etc.).
9
161
9
I MANUTENÇÃO
G
AVISO
É necessário parar o ar condicionado e retirar a fonte de alimentação antes de
limpar.
Limpeza da unidade interior e do controlo remoto
G
CUIDADO!
Utilize um pano seco para limpar a unidade interior e o controlo remoto.
Um pano humedecido com água fria pode ser utilizado na unidade interior
se esta estiver muito suja.
É possível retirar e limpar o painel frontal da unidade interior com água. Em
seguida, limpe com um pano seco.
Não utilize um pano ou espanador tratado quimicamente para limpar a unidade.
Não use benzina, diluente, pó de polimento ou solventes semelhantes para
limpeza. Isto pode fazer com que a superfície de plástico quebre ou deforme.
Limpeza do filtro
Um filtro de ar entupido reduz a eficiência de refrigeração desta unidade. Limpe o filtro
uma vez a cada 2 semanas.
1. O filtro de ar está sob a grelha de entrada de ar superior.
2. Agarre a aba na extremidade do filtro, levante-a e, em seguida, puxe-a para si.
3. Retire o filtro de rede da unidade interior.
• Limpe o filtro de rede uma vez a cada 2 semanas.
• Limpe o filtro de rede com um aspirador ou com água.
4. O filtro de carbono ativo preto não pode ser limpo. Este filtro deixará simplesmente
de filtrar os odores desagradáveis assim que ficar sujo. Nessa situação, este filtro
necessita de ser substituído por um novo filtro (disponível no seu revendedor).
Aconselha-se substituir este filtro duas vezes por ano.
5. O filtro 3M HAF de cor verde irá mostrar sinais claros de sujidade e no filtro assim
que estiver sujo. Quando estiver sujo, este filtro não pode ser limpo e necessita de ser
substituído por um novo filtro (disponível no seu revendedor). Aconselha-se substituir
este filtro duas vezes por ano. Aconselhase substituir este filtro duas vezes por ano.
Novo filtro
Substituição recomendada do filtro
6. Depois de substituir o filtro de carbono ativo e o filtro 3M HAF no suporte do filtro
no filtro de rede, este pode ser substituído no ar condicionado.
7.
Certifique-se antes de substituir o filtro que está completamente seco e não tem defeitos.
8. Instale novamente o filtro purificador de ar no lugar.
9. Introduza a parte superior do filtro do ar de volta na unidade tendo cuidado para as
extremidades esquerda e direita alinharem corretamente e coloque o filtro na posição.
Manutenção
Se planeia desativar a unidade durante um longo período de tempo, faça o seguinte:
1. Opere a ventoinha durante cerca de 6 horas para secar o interior da unidade.
2. Desligue o ar condicionado e a alimentação Se for utilizado um modelo de 4,8 kW,
interrompa a fonte de alimentação. Retire as pilhas do controlo remoto.
3. A unidade exterior requer manutenção e limpeza periódicas. Isto apenas deve ser
feito por um engenheiro de ar condicionado autorizado.
Limpador
de
drenagem
doméstico
No
Mais
fino
f
Filtrar guias
Remova o filtro refrescante de ar da
parte de trás do filtro maior (algumas
unidades)
162
Verificações antes do funcionamento
Verifique se a cablagem não está partida ou desconectada.
Verifique se o filtro de ar está instalado.
Verifique se a saída ou a entrada de ar não estão bloqueados após o ar condicionado não ter sido uti-
lizado durante um longo período de tempo.
CUIDADO
Não toque nas partes metálicas da unidade ao remover o filtro. Podem ocorrer lesões ao
manusear as extremidades metálicas afiadas.
Não utilize água para limpar o interior do ar condicionado. A exposição à água pode destruir o
isolamento, levando a possíveis choques elétricos.
Ao limpar a unidade, em primeiro, certifique-se de que a alimentação e o disjuntor estão
desligados.
J DICAS DE FUNCIONAMENTO
Os seguintes eventos podem ocorrer durante o funcionamento normal.
1. Proteção do ar condicionado.
Proteção do compressor
Não é possível reiniciar o compressor durante 3 minutos após parar.
Ar anti-frio
A unidade foi concebida para não projetar ar quente no modo HEAT (Quente), quando o permutador
de calor interior está numa das três situações a seguir e a temperatura ajustada não foi alcançada.
A. Quando o aquecimento acabou de começar
B. Descongelamento
C. Aquecimento a baixa temperatura
Descongelamento
A unidade interior ou exterior para de funcionar durante o descongelamento.
Pode ser gerado gelo na unidade exterior durante o ciclo de aquecimento quando a temperatura
exterior é baixa e a humidade alta, resultando numa menor eficiência de aquecimento do ar condi-
cionado.
Durante esta condição, o ar condicionado irá parar a operação de aquecimento periodicamente e
iniciar o descongelamento automaticamente.
O tempo de descongelamento pode variar entre 4 a 10 minutos de acordo com a temperatura exte-
rior e a quantidade de acumulação de gelo na unidade exterior.
2. Sai uma névoa branca da unidade interior.
É possível que gere uma névoa devido a uma grande diferença de temperatura entre a entrada de ar
e a saída de ar no modo COOL (Frio) num ambiente interior com elevada humidade relativa.
Uma névoa branca pode gerar devido à humidade gerada pelo processo de descongelamento quan-
do o ar condicionado reinicia na operação do modo HEAT (Quente) após o descongelamento.
9
163
9
3. Ruído baixo do ar condicionado.
Poderá ouvir um assobiar baixo quando o compressor estiver a funcionar ou simplesmente parar de
funcionar. Este som é o som do fluido refrigerante a fluir ou a parar.
Poderá ouvir também um "chiar" baixo quando o compressor estiver a funcionar ou simplesmente
parar de funcionar. Isto é provocado pela expansão do calor e contração do frio das peças de plástico
na unidade quando a temperatura está a mudar.
Pode-se ouvir um som devido à grelha de ventilação a restabelecer na sua posição original quando
a alimentação é ligada pela primeira vez.
4. Sai poeira da unidade interior.
Isto é uma condição normal quando o ar condicionado não é utilizado durante um longo período de
tempo ou durante a primeira utilização da unidade.
5. Sai um cheiro peculiar da unidade interior.
Isto é devido aos cheiros permeados do material de construção, da mobília ou do fumo provenientes
da unidade inferior.
6. O ar condicionado entra no modo FAN only (Ventoinha apenas) do modo COOL (Frio) ou HEAT (Quente).
Quando a temperatura interior atingir a definição de temperatura no ar condicionado, o compressor
irá parar automaticamente e o ar condicionado liga o modo FAN only (Ventoinha apenas). O com-
pressor irá arrancar novamente quando a temperatura interior subir no modo COOL (Frio) ou cair no
modo HEAT (Calor) para o ponto de ajuste.
7. Poderá gerar gotas de água na superfície da unidade interior durante o arrefecimento em humidade
relativa elevada (humidade relativa superior a 80%). Ajuste a grelha de ventilação horizontal para a
posição máxima de saída de ar e selecione a velocidade da ventoinha HIGH (Alta).
8. Modo de aquecimento.
O ar condicionado atrai para o interior calor da unidade exterior e liberta via a unidade interior
durante a operação de aquecimento. Quando a temperatura exterior cai, o calor extraído pelo ar
condicionado diminui de acordo e a capacidade de aquecimento diminui. Ao mesmo tempo, a carga
de aquecimento do ar condicionado aumenta devido à diferença maior entre a temperatura interior
e exterior. Se não for possível obter uma temperatura confortável pelo ar condicionado, é aconselhá-
vel utilizar um dispositivo de aquecimento suplementar.
9. Função de reinício automático.
Uma falha de energia durante o funcionamento irá parar completamente a unidade.
O ar condicionado está equipado com a funcionalidade de reinício automático, quando a energia é
restaurada, a unidade reinicia automaticamente com todas as definições anteriores preservadas pela
função de memória.
10. Deteção de fugas de fluido refrigerante.
O ar condicionado é fornecido com um sistema de fugas de fluido refrigerante.
Quando a unidade exterior deteta falta de fluido refrigerante, o ar condicionado irá parar e a unidade
interior mostra o alarme EC no visor.
Quando este alarme ocorrer, não reinicie o ar condicionado e entre em contacto com o seu fornecedor.
164
9
K DICAS DE RESOLUÇÃO DE PROBLEMAS
Avarias e soluções
G
PROBLEMA
Desligue o ar condicionado imediatamente se ocorrer uma das seguintes falhas. Desligue a fonte
de alimentação e entre em contacto com o seu fornecedor.
O fusível sopra frequentemente ou o disjuntor dispara com frequência.
Outros objetos ou água entraram no ar condicionado.
O controlo remoto não funciona ou funciona de forma anormal.
Outras situações anormais.
Problema Causas possíveis
A unidade não liga ao premir o
botão ON/OFF (Ligar/Desligar)
A unidade possui um recurso de proteção de 3 minutos que impede a sobre-
carga da unidade. A unidade não pode ser reiniciada dentro de três minutos
após ser desligada.
A unidade muda do modo COOL/
HEAT (Frio/Quente) para o modo
FAN (Ventoinha)
A unidade pode alterar a sua definição para evitar a formação de gelo na
unidade. Assim que a temperatura subir, a unidade começa a funcionar
novamente no modo anteriormente selecionado.
A temperatura definida foi alcançada, momento em que a unidade desliga o
compressor. A unidade continuará a funcionar quando a temperatura mudar
de novo.
A unidade interior emite uma
névoa branca
Em regiões húmidas, uma grande diferença de temperatura entre o ar da
divisão e o ar condicionado pode causar névoa branca.
As unidades interiores e exterio-
res emitem névoa branca
Quando a unidade reinicia no modo HEAT (Quente) após o descongelamen-
to, a névoa branca pode ser emitida devido à humidade gerada pelo proces-
so de descongelamento.
A unidade interior faz ruídos
Poderá ocorrer um som de sopro de ar quando a grelha de ventilação volta
á sua posição.
Poderá ocorrer um chiar após o funcionamento da unidade no modo HEAT
(Quente) devido à expansão e contração das peças de plástico da unidade.
A unidade interior e exterior
fazem barulhos
Assobiar baixo durante o funcionamento: isto é normal e é devido ao gás do
fluido refrigerante que flui através de unidades interior e exterior.
Assobiar baixo quando o sistema arranca, acaba de desligar ou durante o
descongelamento: este ruído é normal e é causado pela paragem do gás do
fluido refrigerante ou pela mudança de direção.
Chiar: a expansão e contração normais das peças de plástico e metal causa-
das por mudanças de temperatura durante o funcionamento podem causar
ruídos de chiar.
A unidade exterior faz ruídos
A unidade irá criar sons diferentes com base no seu modo de funcionamento
atual.
Poeira emitida pela unidade
interior ou exterior
A unidade pode acumular poeira durante períodos prolongados de não uti-
lização, que serão emitidos quando a unidade for ligada. Isto pode ser ate-
nuado cobrindo a unidade durante os longos períodos de inatividade.
A unidade emite um mau cheiro
A unidade pode absorver odores do ambiente (como dos móveis, da confe-
ção, cigarros, etc.) que serão emitidos durante o funcionamento.
Os filtros da unidade tornaram-se bolorentos e devem ser limpos.
A ventoinha da unidade exterior
não funciona
Durante o funcionamento, a velocidade da ventoinha é controlada para oti-
mizar o funcionamento do produto.
O funcionamento é errático,
imprevisível ou a unidade não
responde
A interferência das antenas de rede móvel e dos amplificadores remotos
pode causar avarias na unidade. Nesse caso, tente o seguinte:
• Desligar a alimentação e, em seguida, voltar a ligar.
• Premir o botão ON/OFF (Ligar/desligar) no controlo remoto para reiniciar.
165
9
G
NOTA!
Se o problema persistir, entre em contacto com um revendedor local ou com o centro de
atendimento ao cliente mais próximo. Forneça uma descrição detalhada da avaria na unidade,
bem como o número do seu modelo.
Problema Causa Solução
Mau desempenho de
refrigeração
A definição de temperatura poderá estar
superior à da temperatura ambiente
Baixar a definição de temperatura
O permutador de calor na unidade
interior ou exterior está sujo
Limpar o permutador de calor afetado
O filtro de ar está sujo
Retirar o filtro e limpá-lo de acordo com
as instruções
A entrada de ar ou saída de uma
das unidades está bloqueada
Desligar a unidade, retirar a obstrução e
voltar a ligar
Portas e janelas abertas
Garantir de que todas as portas e janelas
estão fechadas durante o funcionamento
da unidade
Calor excessivo gerado pela luz solar
Fechar as janelas e as cortinas durante os
períodos de alto calor ou luz do sol
brilhante
Muitas fontes de calor na divisão (pessoas,
computadores, eletrónicas, etc.)
Reduzir a quantidade de fontes de calor
Fluido refrigerante baixo devido a fuga
ou utilização a longo prazo
Verificar quanto a fugas, voltar a vedar, se
necessário, e atestar com fluido
refrigerante
A função SILENCE (Silêncio) está ativada
(função opcional)
A função SILENCE (Silêncio) pode reduzir
o desempenho do produto reduzindo a
frequência de operação. Desligar a função
SILENCE (Silêncio).
A unidade não
funciona
Falha de energia
Aguardar que a alimentação seja
restabelecida
A alimentação está desligada Ligar a alimentação
O fusível queimou Substitua o fusível.
As pilhas do controlo remoto estão
esgotadas
Substitua as pilhas.
A proteção de 3 minutos da unidade foi
ativada
Aguardar três minutos após o reinício da
unidade
O temporizador está ativado Desligar o temporizador
A unidade arranca e
para com frequência
Há muito ou pouco fluido refrigerante no
sistema
Verificar se existem fugas e recarregar o
sistema com fluido refrigerante.
Gás incompressível ou humidade entrou
no sistema.
Despejar e recarregar o sistema com
fluido refrigerante
O compressor está avariado Substituir o compressor
A tensão é muito alta ou muito baixa
Instalar um manóstato para regular a
tensão
Mau desempenho de
aquecimento
A temperatura exterior é extremamente
baixa
Utilizar o dispositivo de aquecimento
auxiliar
O ar frio entra pelas portas e janelas
Garantir de que todas as portas e janelas
estão fechadas durante a utilização
Fluido refrigerante baixo devido a fuga
ou utilização a longo prazo
Verificar quanto a fugas, voltar a vedar,
se necessário, e atestar com fluido
refrigerante
Lâmpadas indicadoras
continuam a piscar
A unidade pode parar de funcionar ou continuar a funcionar com segurança. Se as
lâmpadas indicadoras continuarem a piscar ou aparecem códigos de erro, aguarde
cerca de 10 minutos. O problema poderá solucionar-se.
Caso contrário, desligar a alimentação e ligá-la novamente. Ligar a unidade
Se o problema persistir, desligar a alimentação e contactar o centro de atendimento
ao cliente mais próximo.
Aparece um código
de erro na janela de
exibição da unidade
interior:
• E0, E1, E2…
• P1, P2, P3…
• F1, F2, F3…
166
9
Se o problema não foi solucionado, entre em contacto com o seu fornecedor. Certifique-se de que informa-
os detalhadamente sobre as avarias e o modelo da unidade.
G
NOTA!
A reparação do dispositivo deve apenas ser realizada por um engenheiro de ar condicionado
autorizado.
L CONDIÇÕES DA GARANTIA
O ar condicionado é fornecido com uma garantia de 48 meses no compressor e de 24 meses nos outros com-
ponentes, a partir da data de compra. Aplicam-se as seguintes regras:
1. Recusamos expressamente todas as reclamações de danos adicionais, incluindo reclamações de danos
colaterais.
2. A reparação ou substituição de componentes dentro do período de garantia não resultará numa exten-
são da garantia.
3. A garantia é anulada se tiver sido realizada alguma modificação, peças não originais instaladas ou repa-
rações realizadas por terceiros.
4. Os componentes sujeitos a desgaste normal, como o filtro, não são abrangidos pela garantia.
5. A garantia é válida apenas quando apresenta a fatura de compra original e datada e se não tiver sido
realizada nenhuma modificação.
6. A garantia é inválida para danos causados por negligência ou por ações que se desviam daquelas con-
tidas neste manual de instruções.
7. Os custos de transporte e os riscos envolvidos durante o transporte do ar-condicionado ou os compo-
nentes do ar-condicionado devem ser sempre suportados pelo comprador.
8. Os danos causados pela não utilização de filtros adequados não são abrangidos pela garantia.
9. A perda de fluido refrigerante e/ou fuga devido a (des)conexão incompetente das unidades e/ou (des)
conexão das unidades por pessoal não qualificado não é coberto pelas condições de garantia aplicáveis
a este produto. Os danos nas unidades que estão montadas, ligadas e/ou desligadas que não cumpram
com a lei local e/ou legislação atuais e/ou não cumpram com as diretrizes neste manual não são cobertos
pelas condições da garantia aplicáveis a este produto.
Consulte o seu revendedor para realizar as reparações se estas instruções não fornecerem uma solução.
Certifique-se de que, em caso improvável de desativação obrigatória, que essa desativação é realizada por
pessoal qualificado, autorizado de acordo com as suas leis e legislação locais.
167
M DADOS TÉCNICOS
Modelo
S 4225
S 5225
S 5225 B
S-JA 2519
S 4232
S 5232
S 4248
S 5248
SC 4225
SC 5225
SCJA-2519
SC 4232
SC 5232
SC 4248
SC 5248
SCJA-4819
Tipo de ar condicionado
Repartido para monta
-
gem na parede
Repartido para monta-
gem na parede
Repartido para monta-
gem na parede
Repartido para monta-
gem na parede
Repartido para monta-
gem na parede
Repartido para monta-
gem na parede
Capacidade nominal de refrigera
-
ção (mín.-máx) *
W
2600 (1030 - 3190) 3500 (820 - 4160) 5300 (1730 - 6980) 2500 (1590 - 3000)
3200 (2110 - 4000) 4600 (1820 - 6120)
Refrigeração de classe EE*
A++ A++ A++ A++
A++ A++
SEER*
7,1 7,0 6,4 6,5
6,2 6,7
Capacidade nominal de aqueci
-
mento (mín.-máx.) *
W
2500 ( 880 - 3660) 2700 ( 850 - 4780) 3900 (1060 - 6980) 2400 (960 - 4890)
2400 (1280 - 4900) 3800 (1380 - 6740)
Aquecimento de classe EE*
A+ A+ A+ A+
A+ A+
SCOP*
4,0 4,1 4,0 4,0
4,0 4,0
Capacidade de desumidificação (a
32°C / 80%) ** / ***
L / 24 h
24,0 28,8 43,2 26,4
31,2 36,0
Consumo energético em refri
-
geração
kW
0,70 1,09 1,54 0,71
1,19 1,40
Consumo energético em aque
-
cimento
kW
0,67 1,05 1,46 0,84
1,23 1,90
Consumo anual de energia *
kWh
128 / 875 175 / 922 290 / 1365 137 / 836
187 / 834 245 / 1326
Fonte de alimentação
V / Hz / Ph
220-240~ / 50 / 1 220-240~ / 50 / 1 220-240~ / 50 / 1 220-240~ / 50 / 1
220-240~ / 50 / 1 220-240~ / 50 / 1
Corrente máx.
A
9,5 10,0 11,5 10,0
10,0 13,0
Fluxo de ar **
m3/h
416/309/230 539/478/294 750/505/420
545/435/368
545/435/368 770/610/410
Para divisões até**
m3
60-85 80-100 140-185 60-85 80-100 125-145
Adequado para regiões W / A / C
W/A/C W/A/C W/A/C W/A/C W/A/C W/A/C
Tipo de compressor
Rotativo Rotativo Rotativo Rotativo Rotativo Rotativo
Velocidades da ventoinha
4 4 4 3
3 3
Intervalo termostático
oC
17 - 30 17 - 30 17 - 30 17 - 30
17 - 30 17 - 30
Controlos (manual/mecãnico/
eletrónico)
Remoto eletrónico Remoto eletrónico Remoto eletrónico Remoto eletrónico Remoto eletrónico Remoto eletrónico
Controlo remoto (Sim/Não)
S S S S S S
Tipo(s) de filtro do ar
Rede, carbono ativo,
3M HAF
Rede, carbono ativo,
3M HAF
Rede, carbono ativo,
3M HAF
Rede, carbono ativo,
3M HAF
Rede, carbono ativo,
3M HAF
Rede, carbono ativo,
3M HAF
Tipo/carga de fluido refrigerante
R / g
R32 / 700 R32 / 800 R32 / 1250 R32 / 800 R32 / 800 R32 / 1190
Fluido refrigerante GWP
675 675 675 675
675 675
CO2 equivalente tonnes
0,473 0,540 0,844 0,540
0,540 0,803
Dimensões da unidade interior
(l x a x p)
mm
722x187x290 802x189x297 965x215x319 805x194x285
805x194x285 957x213x302
Dimensões da unidade exterior
(l x a x p)
mm
770x300x555 770x300x555 800x333x554 770x300x555
770x300x555 800x333x554
Peso líquido da unidade interior
kg
7,3 8,2 10,8 7,8
7,8 10,3
Peso líquido da unidade exterior
kg
27,2 27,0 37,0 25,7
25,7 34,6
Peso bruto da unidade interior
kg
9,7 10,7 14,1 10,4
10,4 13,8
Peso bruto da unidade exterior
kg
29,7 29,4 39,9 31,1
31,1 40,2
Nível de pressão sonora da uni
-
dade interior ****
dB(A)
54 56 58 53
53 55
Nível de pressão sonora da uni
-
dade exterior ****
dB(A)
59 60 64 62
62 62
Nível de pressão sonora da uni
-
dade interior (baixo) ****
dB
20 21 21 25
25 29
Proteção da unidade interior
IP
IPX0 IPX0 IPX0 IPX0
IPX0 IPX0
Proteção da unidade exterior
IP
IPX4 IPX4 IPX4 IPX4
IPX4 IPX4
* EN 14511 / EN14825
** para serem utilizados como indicação
*** Remoção de humidade a 32 °C, 80% HR
**** EN12102-2008
9
168
9
Não elimine aparelhos elétricos como resíduos municipais não triados, utilize instalações de
recolha separada. Entre em contacto com o governo local para obter informações sobre os sis-
temas de recolha disponíveis. Se os aparelhos elétricos forem eliminados em aterros ou lixeiras,
pode haver fuga de substâncias perigosas para as águas subterrâneas e a entrada destas na
cadeia alimentar, prejudicando a sua saúde e bem-estar. Ao substituir aparelhos antigos por
novos, o distribuidor é legalmente obrigado a devolver o aparelho antigo para eliminação gra-
tuitamente. Não atire as pilhas para o fogo pois podem explodir ou libertar líquidos perigosos.
Se substituir ou destruir o controlo remoto, retire as pilhas e elimine-as de acordo com os regu-
lamentos aplicáveis pois são prejudiciais para o meio ambiente.
Informações ambientais: Este equipamento contém gases fluorados com efeito de estufa abrangidos pelo
protocolo de Quioto. Só deve ser mantido ou desmontado por pessoal qualificado profissional.
Este equipamento contém fluido refrigerante R32 na quantidade indicada na tabela acima. Não ventile R32
para a atmosfera: R32 é um gás fluorado com efeito de estufa com um potencial de aquecimento global
(GWP) = 675.
Internet:
Para sua conveniência, é possível transferir a versão mais recente do manual do utilizador, instalação e/ou
de serviço em www.Qlima.com
169
9
170
y
1. NAJPREJ PREBERITE TA NAVODILA
2. V PRIMERU DVOMA SE POSVETUJTE S PRODAJALCEM
Spoštovani,
Čestitamo Vam ob nakupu Vaše Qlima klimatske naprave. Kupili ste kvaliteten izdelek, s
katerim boste zadovoljni dolgo vrsto let, če ga boste uporabljali v skladu z navodili za
uporabo. Preberite jih pred prvo uporabo Qlima klime.
V imenu proizvajalca zagotavljamo 24 mesečno garancijo za napake v materialu in izdelavi,
ter 48 mesečno garancijo na kompresor klimatske naprave. Želimo Vam prijeten
hlad in ugodno počutje z Vašo Qlima klimo.
PVG Holding b.v.
171
y
VSEBINA
A VARNOSTNA NAVODILA
B. IMENA DELOV
C. TEMPERATURNO OBMOČJE DELOVANJA
D. UPRAVLJANJE Z DALJINSKIM UPRAVLJALCEM
E. ROČNO DELOVANJE (BREZ DALJINSKEGA UPRAVLJALNIKA)
F. IDEALNO DELOVANJE
G. NASTAVLJANJE KOTA IZPUHA ZRAKA
H. KAKO NAPRAVA DELUJE
I. VZDRŽEVANJE
J. NASVETI ZA UPRAVLJANJE
K. ODPRAVLJANJE TEŽAV
L. GARANCIJSKA IZJAVA
M. TEHNIČNE KARAKTERISTIKE
PREBERITE TA NAVODILA ZA UPORABO
V njih boste našli veliko uporabnih nasvetov kako pravilno upravljati z napravo in
jo vzdrževati. V poglavju J »Odpravljanje težav« boste našli odgovore na vprašanja
pri pogostih težavah z napravo. Če boste ob težavi poglavje prebrali, Vam morda
ne bo potrebno klicati servisa.
172
A VARNOSTNA NAVODILA
Izdelek uporabljajte le, če je skladen z lokalno/nacionalno
zakonodajo, predpisi in standardi. Ta izdelek je namenjen
izključno uporabi kot klimatska naprava zraka v stanovanjih
in stanovanjskih hišah in je primeren za uporabo izključno
v suhih, notranjih prostorih kot so dnevna soba, kuhinja ali
garaža in v normalnih bivalnih pogojih. Naprava mora biti
priključena na 230 V~ / 50 Hz ozemljeno vtičnico. Če upora
-
bljate model 4,8kW, ga morate priključiti neposredno na vir
električne energije.
POMEMBNO
Naprava MORA biti vedno priključena v ozemljeno
vtičnico. Če vtičnica ni ozemljena, naprave nanjo ne
smete priključiti. Kadar je naprava vključena, mora
biti vtič enostavno dostopen. Pozorno preberite ta
navodila in sledite opisanim postopkom.
Klimatska naprava vsebuje hladilno sredstvo in
je lahko klasificirana kot naprava pod pritiskom.
Za montažo in vzdrževanje le-te zato vedno
kontaktirajte pooblaščeni servis. Pooblaščeni servis
mora klimatsko napravo pregledati in servisirati
enkrat letno. Za napake, ki nastanejo zaradi
zunanjih vplivov (mehanske poškodbe po krivdi
kupca ali tretje osebe, poseg v aparate brez našega
pooblastila, nepravilna uporaba, malomarno
ravnanje, prenapetosti v omrežju, zaradi izcedka iz
baterije, višja sila), garancija ne velja.
Preden napravo priključite, preverite sledeče:
Napetost izvora mora ustrezati napetosti varovalk nave
-
deni na etiketi razreda na sami napravi.
Vtičnica in električno omrežje morata ustrezati toku nave
-
denem na etiketi razreda na napravi.
Vtič na kablu naprave mora ustrezati vtičnici.
Napravo postavite na ravno in trdno površino.
y
173
Če ste glede električne instalacije v dvomu, naj jo najprej
preveri in po potrebi priredi kvalificiran električar.
Naprava je izdelana glede na CE varnostne standarde.
Kljub temu z njo ravnajte previdno, kot z vsako drugo
napravo.
Ne prekrivajte vhodnih ali izhodnih odprtin za zrak
Naprava ne sme priti v stik s kemikalijami
Naprave ne škropite in ne potapljajte v vodo. Če v enoto
vdre voda, napravo ugasnite in jo izključite iz električne
-
ga omrežja.
V odprtine naprave ne vstavljajte rok, prstov ali pred
-
metov.
Nikoli je ne priključite na električno omrežje s pomočjo
električnega podaljška. Če vtičnica ni na voljo, naj jo vgra
-
di kvalificiran
električar.
Vsako popravilo ali vzdrževanje naprave naj opravi servis.
Držite se postopkov opisanih v teh navodilih za uporabo.
Kadar naprave ne uporabljate, vedno prekinite električno
napajanje.
Poškodovan kabel ali vtičnico naj takoj zamenja serviser.
Naprave ne prižigajte ali ugašajte tako, da bi izvlekli ali
vstavili vtič v električno vtičnico. Vedno uporabite za to
namenjeni
gumb na napravi ali daljinskem upravljalcu.
Naprave ne razstavljajte kadar deluje. Pred tem vedno
izvlecite vtič iz električne vtičnice.
Pred čiščenjem ali popravilom naprave jo vedno izklopite
iz električnega omrežja.
V tok zraka ne postavljajte plinskih grelcev, peči ali pečic.
Naprave se ne dotikajte z mokrimi rokami.
Ob uporabi naprave lahko zunanja enota proizvaja
zvok, katerega nivo lahko preseže določenega z lokalno
zakonodajo.
Dolžnost uporabnika je, da preveri ali je naprava v skladu
z lokalnimi predpisi.
y
174
Naprave naj ne uporabljajo osebe (tudi otroci) z zman-
jšanimi fizičnimi, čutnimi ali duševnimi sposobnostmi, ali
osebe s premalo izkušnjami in znanja, razen če jih nad
-
zoruje ali jim daje navodila za uporabo naprave oseba, ki
je odgovorna za njihovo varnost.
Otroke imejte pod nadzorom, da se z napravo ne bi igrali.
Ne stojte v direktnem toku zraka.
Nikoli ne pijte iz naprave izločene vode.
Naprave nikoli ne spreminjajte. Ne odstranjujte izolacijs
-
kega materiala.
Če je napajalni kabel poškodovan, ga mora zamenjati
pooblaščeni servis ali druge usposobljene osebe, da bi se
izognili morebitnim nevarnostim.
OPOZORILO
Ne uporabljajte naprave, kadar so
poškodovani kabel, vtič, ohišje ali
kontrolna plošča naprave. Pazite, da se
kabel ne zatakne in da ne pride v stik z
ostrimi robovi.
Ob neupoštevanju teh navodil,
veljavnost garancije preneha.
Opomba o fluoriranih plinih
1. Ta klimatska naprava vsebuje fluorirane pline. Več informacij o tipu in količini vsebovanega plina
najdete na etiketi na sami napravi.
2. Montaža, servis, vzdrževanje in popravilo enote morajo biti izvedeni s strani pooblaščenega servi-
serja.
3. Montaža in reciklaža izdelka morata biti izvršena s strani pooblaščenega serviserja.
4. Če ima naprava vgrajen sistem detekcije uhajanja plina, je potrebno preizkus morebitnega puščanja
plina izvesti vsaj enkrat letno.
5. Priporočljivo je voditi dnevnik vseh izvedenih preizkusov morebitnega puščanja plina.
6. Ta klimatska naprava je hermetično zaprta enota, ki vsebuje fluorirane pline.
y
175
B IMENA DELOV
Notranja enota
NOTRANJA ENOTA
ZUNANJA ENOTA Zunanja enota
5
6
7
8
1
22
3
4
5
6
2
1
4
3
G
VEDITE
Dejanska naprava se lahko razlikuje od slik na embalaži ali v navodilih. Slike so namenjene le
obrazložitvi in prikazu funkcij naprave.
Zračni filter (za čelno ploščo)
Čelna plošča
Odprtine za izpuh zraka
Prikazovalnik
Daljinski upravljalec (za podrobnosti
glej poglavje D)
Cevi hladilne tekočine in cevi za odvod
kondenzirane vode (Za priključne cevi
S-model ni priložen)
Odprtine za vstop zraka (stranske in
prednje)
Odprtine za izpuh zraka
y
176
PRIKAZ FUNKCIJ NA PRIKAZOVALNIKU NOTRANJE ENOTE
Page 6
Unit Specifications and Features
1
Unit
Specifications
and Features
NOTE:
A guide on using the infrared remote is not included
in this literature package.
Unit Parts
Power Cable (Some Units)
Remote Control
Remote Control
Holder (Some Units)
Louver
Front Panel
Air Filter
(pull out)
Display window
“ ” for 3 seconds when:
• TIMER ON is set
• FRESH, SWING, TURBO, or SILENCE features are turned on
“ ” for 3 seconds when:
• TIMER OFF is set
• FRESH, SWING, TURBO, or SILENCE features are turned off
“ ” when defrosting(cooling & heating units)
“ ” when anti-cold air feature is turned on(cooling & heating units)
“ ” when unit is self-cleaning(some units)
“ ” when freeze protection is turned on(some units)
“ ” when Wireless Control feature is activated(some units)
Display Code
Meanings
In Fan and Dry mode, the unit will display the room temperature.
In other modes, the unit will display your temperature setting.
,
,
“ ”
When ECO function(some units) is activated, the
illuminates gradually one by one as --
-- --set temperature-- ...... in one second interval.
za 3 sekunde, ko:
TIMER ON je nastavljen
Funkcije FRESH, SWING, TURBO ali SILENCE so vklopljene
Page 6
Unit Specifications and Features
1
Unit
Specifications
and Features
NOTE:
A guide on using the infrared remote is not included
in this literature package.
Unit Parts
Power Cable (Some Units)
Remote Control
Remote Control
Holder (Some Units)
Louver
Front Panel
Air Filter
(pull out)
Display window
“ ” for 3 seconds when:
• TIMER ON is set
• FRESH, SWING, TURBO, or SILENCE features are turned on
“ ” for 3 seconds when:
• TIMER OFF is set
• FRESH, SWING, TURBO, or SILENCE features are turned off
“ ” when defrosting(cooling & heating units)
“ ” when anti-cold air feature is turned on(cooling & heating units)
“ ” when unit is self-cleaning(some units)
“ ” when freeze protection is turned on(some units)
“ ” when Wireless Control feature is activated(some units)
Display Code
Meanings
In Fan and Dry mode, the unit will display the room temperature.
In other modes, the unit will display your temperature setting.
,
,
“ ”
When ECO function(some units) is activated, the
illuminates gradually one by one as --
-- --set temperature-- ...... in one second interval.
za 3 sekunde, ko:
TIMER OFF je nastavljen
Funkcije FRESH, SWING, TURBO ali SILENCE so izključene
Page 6
Unit Specifications and Features
1
Unit
Specifications
and Features
NOTE:
A guide on using the infrared remote is not included
in this literature package.
Unit Parts
Power Cable (Some Units)
Remote Control
Remote Control
Holder (Some Units)
Louver
Front Panel
Air Filter
(pull out)
Display window
“ ” for 3 seconds when:
• TIMER ON is set
• FRESH, SWING, TURBO, or SILENCE features are turned on
“ ” for 3 seconds when:
• TIMER OFF is set
• FRESH, SWING, TURBO, or SILENCE features are turned off
“ ” when defrosting(cooling & heating units)
“ ” when anti-cold air feature is turned on(cooling & heating units)
“ ” when unit is self-cleaning(some units)
“ ” when freeze protection is turned on(some units)
“ ” when Wireless Control feature is activated(some units)
Display Code
Meanings
In Fan and Dry mode, the unit will display the room temperature.
In other modes, the unit will display your temperature setting.
,
,
“ ”
When ECO function(some units) is activated, the
illuminates gradually one by one as --
-- --set temperature-- ...... in one second interval.
pri odtaljevanju (enote za hlajenje in ogrevanje)
Page 6
Unit Specifications and Features
1
Unit
Specifications
and Features
NOTE:
A guide on using the infrared remote is not included
in this literature package.
Unit Parts
Power Cable (Some Units)
Remote Control
Remote Control
Holder (Some Units)
Louver
Front Panel
Air Filter
(pull out)
Display window
“ ” for 3 seconds when:
• TIMER ON is set
• FRESH, SWING, TURBO, or SILENCE features are turned on
“ ” for 3 seconds when:
• TIMER OFF is set
• FRESH, SWING, TURBO, or SILENCE features are turned off
“ ” when defrosting(cooling & heating units)
“ ” when anti-cold air feature is turned on(cooling & heating units)
“ ” when unit is self-cleaning(some units)
“ ” when freeze protection is turned on(some units)
“ ” when Wireless Control feature is activated(some units)
Display Code
Meanings
In Fan and Dry mode, the unit will display the room temperature.
In other modes, the unit will display your temperature setting.
,
,
“ ”
When ECO function(some units) is activated, the
illuminates gradually one by one as --
-- --set temperature-- ...... in one second interval.
ko je vklopljena funkcija proti hladnemu zraku (enote za hlajenje in ogrevanje)
Page 6
Unit Specifications and Features
1
Unit
Specifications
and Features
NOTE:
A guide on using the infrared remote is not included
in this literature package.
Unit Parts
Power Cable (Some Units)
Remote Control
Remote Control
Holder (Some Units)
Louver
Front Panel
Air Filter
(pull out)
Display window
“ ” for 3 seconds when:
• TIMER ON is set
• FRESH, SWING, TURBO, or SILENCE features are turned on
“ ” for 3 seconds when:
• TIMER OFF is set
• FRESH, SWING, TURBO, or SILENCE features are turned off
“ ” when defrosting(cooling & heating units)
“ ” when anti-cold air feature is turned on(cooling & heating units)
“ ” when unit is self-cleaning(some units)
“ ” when freeze protection is turned on(some units)
“ ” when Wireless Control feature is activated(some units)
Display Code
Meanings
In Fan and Dry mode, the unit will display the room temperature.
In other modes, the unit will display your temperature setting.
,
,
“ ”
When ECO function(some units) is activated, the
illuminates gradually one by one as --
-- --set temperature-- ...... in one second interval.
če je enota samočistilna (nekatera enota)
Page 6
Unit Specifications and Features
1
Unit
Specifications
and Features
NOTE:
A guide on using the infrared remote is not included
in this literature package.
Unit Parts
Power Cable (Some Units)
Remote Control
Remote Control
Holder (Some Units)
Louver
Front Panel
Air Filter
(pull out)
Display window
“ ” for 3 seconds when:
• TIMER ON is set
• FRESH, SWING, TURBO, or SILENCE features are turned on
“ ” for 3 seconds when:
• TIMER OFF is set
• FRESH, SWING, TURBO, or SILENCE features are turned off
“ ” when defrosting(cooling & heating units)
“ ” when anti-cold air feature is turned on(cooling & heating units)
“ ” when unit is self-cleaning(some units)
“ ” when freeze protection is turned on(some units)
“ ” when Wireless Control feature is activated(some units)
Display Code
Meanings
In Fan and Dry mode, the unit will display the room temperature.
In other modes, the unit will display your temperature setting.
,
,
“ ”
When ECO function(some units) is activated, the
illuminates gradually one by one as --
-- --set temperature-- ...... in one second interval.
ko je vklopljena zaščita pred zamrznitvijo (nekatere enote)
Page 6
Unit Specifications and Features
1
Unit
Specifications
and Features
NOTE:
A guide on using the infrared remote is not included
in this literature package.
Unit Parts
Power Cable (Some Units)
Remote Control
Remote Control
Holder (Some Units)
Louver
Front Panel
Air Filter
(pull out)
Display window
“ ” for 3 seconds when:
• TIMER ON is set
• FRESH, SWING, TURBO, or SILENCE features are turned on
“ ” for 3 seconds when:
• TIMER OFF is set
• FRESH, SWING, TURBO, or SILENCE features are turned off
“ ” when defrosting(cooling & heating units)
“ ” when anti-cold air feature is turned on(cooling & heating units)
“ ” when unit is self-cleaning(some units)
“ ” when freeze protection is turned on(some units)
“ ” when Wireless Control feature is activated(some units)
Display Code
Meanings
In Fan and Dry mode, the unit will display the room temperature.
In other modes, the unit will display your temperature setting.
,
,
“ ”
When ECO function(some units) is activated, the
illuminates gradually one by one as --
-- --set temperature-- ...... in one second interval.
ko je aktivirana funkcija Wireless Control (nekatere enote)
Page 6
Unit Specifications and Features
1
Unit
Specifications
and Features
NOTE:
A guide on using the infrared remote is not included
in this literature package.
Unit Parts
Power Cable (Some Units)
Remote Control
Remote Control
Holder (Some Units)
Louver
Front Panel
Air Filter
(pull out)
Display window
“ ” for 3 seconds when:
• TIMER ON is set
• FRESH, SWING, TURBO, or SILENCE features are turned on
“ ” for 3 seconds when:
• TIMER OFF is set
• FRESH, SWING, TURBO, or SILENCE features are turned off
“ ” when defrosting(cooling & heating units)
“ ” when anti-cold air feature is turned on(cooling & heating units)
“ ” when unit is self-cleaning(some units)
“ ” when freeze protection is turned on(some units)
“ ” when Wireless Control feature is activated(some units)
Display Code
Meanings
In Fan and Dry mode, the unit will display the room temperature.
In other modes, the unit will display your temperature setting.
,
,
“ ”
When ECO function(some units) is activated, the
illuminates gradually one by one as --
-- --set temperature-- ...... in one second interval.
ko je aktivirana ECO funkcija (nekatere enote), se
Page 6
Unit Specifications and Features
1
Unit
Specifications
and Features
NOTE:
A guide on using the infrared remote is not included
in this literature package.
Unit Parts
Power Cable (Some Units)
Remote Control
Remote Control
Holder (Some Units)
Louver
Front Panel
Air Filter
(pull out)
Display window
“ ” for 3 seconds when:
• TIMER ON is set
• FRESH, SWING, TURBO, or SILENCE features are turned on
“ ” for 3 seconds when:
• TIMER OFF is set
• FRESH, SWING, TURBO, or SILENCE features are turned off
“ ” when defrosting(cooling & heating units)
“ ” when anti-cold air feature is turned on(cooling & heating units)
“ ” when unit is self-cleaning(some units)
“ ” when freeze protection is turned on(some units)
“ ” when Wireless Control feature is activated(some units)
Display Code
Meanings
In Fan and Dry mode, the unit will display the room temperature.
In other modes, the unit will display your temperature setting.
,
,
“ ”
When ECO function(some units) is activated, the
illuminates gradually one by one as --
-- --set temperature-- ...... in one second interval.
postopoma osvetljuje kot
Page 6
Unit Specifications and Features
1
Unit
Specifications
and Features
NOTE:
A guide on using the infrared remote is not included
in this literature package.
Unit Parts
Power Cable (Some Units)
Remote Control
Remote Control
Holder (Some Units)
Louver
Front Panel
Air Filter
(pull out)
Display window
“ ” for 3 seconds when:
• TIMER ON is set
• FRESH, SWING, TURBO, or SILENCE features are turned on
“ ” for 3 seconds when:
• TIMER OFF is set
• FRESH, SWING, TURBO, or SILENCE features are turned off
“ ” when defrosting(cooling & heating units)
“ ” when anti-cold air feature is turned on(cooling & heating units)
“ ” when unit is self-cleaning(some units)
“ ” when freeze protection is turned on(some units)
“ ” when Wireless Control feature is activated(some units)
Display Code
Meanings
In Fan and Dry mode, the unit will display the room temperature.
In other modes, the unit will display your temperature setting.
,
,
“ ”
When ECO function(some units) is activated, the
illuminates gradually one by one as --
-- --set temperature-- ...... in one second interval.
--
Page 6
Unit Specifications and Features
1
Unit
Specifications
and Features
NOTE:
A guide on using the infrared remote is not included
in this literature package.
Unit Parts
Power Cable (Some Units)
Remote Control
Remote Control
Holder (Some Units)
Louver
Front Panel
Air Filter
(pull out)
Display window
“ ” for 3 seconds when:
• TIMER ON is set
• FRESH, SWING, TURBO, or SILENCE features are turned on
“ ” for 3 seconds when:
• TIMER OFF is set
• FRESH, SWING, TURBO, or SILENCE features are turned off
“ ” when defrosting(cooling & heating units)
“ ” when anti-cold air feature is turned on(cooling & heating units)
“ ” when unit is self-cleaning(some units)
“ ” when freeze protection is turned on(some units)
“ ” when Wireless Control feature is activated(some units)
Display Code
Meanings
In Fan and Dry mode, the unit will display the room temperature.
In other modes, the unit will display your temperature setting.
,
,
“ ”
When ECO function(some units) is activated, the
illuminates gradually one by one as --
-- --set temperature-- ...... in one second interval.
--
nastavljena temperatura --
Page 6
Unit Specifications and Features
1
Unit
Specifications
and Features
NOTE:
A guide on using the infrared remote is not included
in this literature package.
Unit Parts
Power Cable (Some Units)
Remote Control
Remote Control
Holder (Some Units)
Louver
Front Panel
Air Filter
(pull out)
Display window
“ ” for 3 seconds when:
• TIMER ON is set
• FRESH, SWING, TURBO, or SILENCE features are turned on
“ ” for 3 seconds when:
• TIMER OFF is set
• FRESH, SWING, TURBO, or SILENCE features are turned off
“ ” when defrosting(cooling & heating units)
“ ” when anti-cold air feature is turned on(cooling & heating units)
“ ” when unit is self-cleaning(some units)
“ ” when freeze protection is turned on(some units)
“ ” when Wireless Control feature is activated(some units)
Display Code
Meanings
In Fan and Dry mode, the unit will display the room temperature.
In other modes, the unit will display your temperature setting.
,
,
“ ”
When ECO function(some units) is activated, the
illuminates gradually one by one as --
-- --set temperature-- ...... in one second interval.
...... enem sekundnem intervalu
V drugih načinih bo naprava prikazala nastavitev temperature.
V načinu ventilatorja in suha bo naprava prikazala sobno temperaturo.
C TEMPERATURNO OBMOČJE DELOVANJA
Hlajenje, gretje in/ali razvlaževanje je primerno uporabljati pri naslednjih notranjih in zunanjih temper-
aturah:
hlajenje gretje razvlaževanje
Sobna temperatura 17ºC - 32ºC 0ºC - 30ºC 10ºC - 32ºC
Zunanja temperatura -25ºC - 50ºC -15ºC - 30ºC 0ºC - 50ºC
POZOR
Če je naprava uporabljana zunaj teh temperaturnih območij, se lahko vklopi varnostna funkcija
in povzroči nenormalno delovanje naprave.
• Če naprava deluje v prostoru z rel. vlago višjo kot 80%, se na ohišju naprave lahko pojavi
kondenz. Vzvod vertikalnega toka zraka postavite v največji stranski odmik in nastavite
najhitrejšo stopnjo vrtenja ventilatorja.
• Za najboljše rezultate hlajenja in gretja zaprite vrata in okna.
y
177
D UPRAVLJANJE Z DALJINSKIM UPRAVLJALCEM
G
VEDITE!
Z daljinskim upravljalcem vedno merite v sprejemnik na ohišju notranje enote. Med njima ne
sme biti ovir, ker drugače sprejemnik ne bo zaznal signala daljinskega upravljalca. Za
nemoteno delovanje je največja razdalja med obema lahko 6 – 7 m.
G
VEDITE
Daljinski upravljalec hranite na mestu kjer njegov signal še lahko doseže sprejemnik na notranji
enoti. Kadar uporabljate časovnik, daljinski upravljalec namreč ob določenem času samodejno
začne oddajati signal notranji enoti. Kadar signal ne doseže nemoteno notranje enote, lahko
pride do tudi do 15 minut dolgega časovnega zamika.
Opis funkcij na daljinskem upravljalcu
4
3
2
8
6
7
12
11
13
15
5
9
10
14
1
SLEEP
FRESH
Gumb za vklop in izklop. S pritiskom na gumb napravo prižgete oz. ugasnete.
Gumb izbire načinov delovanja. Z vsakim pritiskom na gumb se spremeni način delovanja. Vrstni red je
sledeč: samodejno – hlajenje razvlaževanje – gretje ventiliranje
AUTO COOL DRY HEAT FAN
+ Gumb: s pritiski na gumb lahko povečujete nastavljeno temperaturo do 30ºC.
- Gumb: s pritiski na gumb lahko zmanjšujete nastavljeno temperaturo do 17ºC.
Gumb ventilatorja: namenjen je nastavitvi hitrosti vrtenja ventilatorja. S pritiski na gumb izbirate med
samodejnimi – nizkimi – srednjimi – hitrimi vrtljaji v tem vrstnem redu. Kadar naprava deluje v samode-
jnem načinu ali v načinu razvlaževanja, hitrosti vrtenja ventilatorja ne morete nastavljati. Hitrost
vrtenja bo naprav krmilila samodejno.
Gumb nočnega delovanja SLEEP: S pritiskom na ta gumb aktivirate funkcijo ekonomičnega načina
delovanja. S ponovnim pritiskom funkcijo deaktivirate. Funkcija je lahko vključena le v načinih delovan-
ja hlajenje COOL, gretje HEAT in v samodejnem načinu delovanja AUTO. Ohranja najbolj udobno
temperaturo. Naprava takrat v prvih dveh urah delovanja vsako uro samodejno poviša nastavljeno
temperaturo za 1ºC (v načinu hlajenja) oz. jo zniža za 1ºC (v načinu gretja).
Naprava to prilagojeno temperaturo (nastavljena temperatura + ali - 2ºC) vzdržuje naslednjih 5 ur.
Nato se naprava samodejno izklopi.
Gumb nočnega delovanja FRESH: Dlhým stlačením aktivujete funkciu FRESH.
fig. 1
y
178
»SWING« funkcija: s pritiskom na gumb vklopite in nato izklopite funkcijo nihanja rešetk za izpuh
zraka.
Gumb za usmerjanje zraka: Z njim spreminjate kot rešetk za izpuh zraka. Z vsakim pritiskom na gumb
spremenite kot nihanja rešetk za 6 stopinj. Če bi kot nihanja rešetk lahko vplival na hlajenje ali gretje
same naprave, naprava kot nihanja rešetk samodejno prilagodi. Ob pritisku na ta gumb se na prika-
zovalniku ne izpiše noben znak.
»SWING« funkcija (leva in desna): s pritiskom na gumb vklopite in nato izklopite funkcijo nihanja
rešetk za izpuh zraka.
i Gumb za vklop časovnika: S pritiskom na gumb nastavite čas samodejnega vklopa naprave. Vsak pritisk
na gumb podaljša časovni interval do samodejnega vklopa za 30 minut. Če nastavljeni interval preseže
10 ur, vsak ponovni pritisk na gumb interval podaljša za 60 min. Za deaktiviranje funkcije pritiskajte
gumb toliko časa, pritiskajte gumb dokler se na zaslonu ne izpiše 0.0
j Gumb za izklop časovnika: S pritiskom na gumb nastavite čas samodejnega izklopa naprave. Vsak pritisk
na gumb podaljša časovni interval do samodejnega vklopa za 30 minut. Če nastavljeni interval preseže
10 ur, vsak ponovni pritisk na gumb interval podaljša za 60 min. Za deaktiviranje funkcije pritiskajte
gumb toliko časa, pritiskajte gumb dokler se na zaslonu ne izpiše 0.0
k Z gumbom RESET izbrišete vse nastavitve. Naprava se vrne v osnovne nastavitve.
l Turbo tipka / Tipka funkcije aktivnega čiščenja: Kadar naprava deluje v načinu hlajenja (COOL) ob pritis-
ku te tipke le-ta prične hladiti z največjo možno močjo. Za izklop te TURBO funkcije ponovno pritisnite
tipko. Če tipko držite pritisnjeno (več kot 2 sekundi) aktivirate funkcijo aktivnega čiščenja. Naprava takrat
prične s procesom čiščenja notranjosti uparjalnika in tako zmanjšuje možnost razmnoževanja bakterij. Z
aktiviranjem te funkcije se hkrati prekličejo tudi vse nastavitve časovnika. Za izklop funkcije aktivnega
čiščenja tipko ponovno pridržite pritisnjeno (več kot 2 sekundi).
m LOCK funkcija zaklene trenutne nastavitve naprave. Upravljalec ne reagira na pritiske na tipke, razen na
tipko LOCK. S ponovnim pritiskom na gumb funkcijo LOCK izključite.
n S tem gumbom ugašate in prižigate LED prikazovalnik na ohišju naprave.
o Gumb za tiho delovanje/preprečevanje zmrzali: S pritiskom na ta gumb naprava deluje z tiho z nivojem
hrupa le 21 dB(A). Vrtljaji ventilatorja se znižajo na najnižji nivo.
S pritiskom na gum daljšim od 2 sekund naprava preklopi na način delovanja za preprečevanje zmrzovan-
ja. Naprava prekliče nastavitve za temperaturo v domu in temperaturo nastavi na približno 8 °C. Na ta
način preprečite zmrzovanje v vašem domu med hladnimi obdobji ob najmanjši možni porabi energije.
Pri izboru tega načina se na zaslonu naprave prikaže »FP«. Ta gumb deluje samo v načinu za gretje. Za
izhod iz načina za preprečevanje zmrzovanja v vašem domu: še enkrat pritisnite gumb.
Nazivi in funkcije simbolov na zaslonu daljinskega upravljalca
auto cool dryheatfan
sleep lock run
SET TEMP.TIMER ONOFF
Simbol sprejemanja signala: simbol se prikazuje, kadar sprejemnik na ohišju notranje enote lovi signal
iz daljinskega upravljalca.
Simbol nacina delovanja naprave. Izpisuje se trenutni nacin delovanja naprave: AUTO
COOL
fig. 2
2
1
3
4
5
6
7
y
179
DRY – HEAT FAN (Samodejno – hlajenje razvlaževanje – gretje ventiliranje).
Zaslon upravljalca prikazuje nastavljeno temperature (17ºC ~ 30ºC) in nastavitve vklopa oz. izklopa
casovnika. V nacinu ventiliranja na zaslonu ni prikaza.
S pritiski na gumb FAN SPEED prehajate med hitrostmi vrtenja ventilatorja (AUTO LOW
MED
HIGH
). Izbrana nastavitev, z izjemo nastavitve AUTO se izpiše na zaslonu. Kadar naprava deluje v
načinu AUTO ali DRY, tudi vrtljaje ventilatorja krmili samodejno v načinu delovanja AUTO
Prikaz vklopa naprave. Simbol je viden, ko napravo s pomocjo daljinskega upravljalca prižgete.
LOCK simbol sveti ob aktivni LOCK funkcji.
Prikaže se pod znakom za nočno delovanje. Za izbris izpisa ponovno pritisnite gumb SLEEP.
G
POZOR
na sliki fig.2 so prikazani vsi simboli. Med dejanskim upravljanjem naprave pa so osvetljeni le
simboli aktivnih funkcij.
Upravljanje z daljinskim upravljalcem
Vstavljanje baterij
Vedite: uporabljajte 2 LR03 AAA (1,5V) baterije. Ne uporabljajte baterij, ki jih je možno polniti.
1. Odstranite pokrovček baterij v smeri puščice.
2. Vstavite baterije kot je označeno. Pazite na pravilno pozicijo glede na pozitivni (+) in negativni (-) pol.
3. Zaprite pokrovček.
G
VEDITE
Ko odstranite baterije, se iz spomina daljinskega upravljalca izbrišejo vse nastavitve. Po vstavitvi
novih baterij morate daljinski upravljalec ponovno programirati.
Ko menjate baterije, ne uporabite starih baterij ali baterij napačnega tipa. To lahko povzroči
nepravilno delovanje daljinskega upravljalca.
Če daljinskega upravljalca dalj časa ne uporabljate, izvlecite baterije. Če baterije stečejo, bi ga
lahko poškodovale.
Povprečna življenska doba baterij pri normalni uporabi je 6 mesecev.
Baterije zamenjajte kadar notranja enota ne odda več zvoka ali se simbol signala več ne izpiše na
prikazovalniku.
Ne uporabljajte starih in novih baterij hkrati. Nikoli ne uporabljajte različnih tipov baterij
(npr. alkalne in mangan dioksidne).
SAMODEJNO DELOVANJE
Ko je naprava pripravljena za uporabo (preverite, če je enota priključena v električno omrežje in če je v
omrežju napetost), vključite napajanje. Lučka delovanja na prikazovalniku notranje enote takrat prične
utripati.
1. Uporabite gumb za način delovanja MODE in določite samodejni način AUTO.
2. S pritiski na gumba + in - nastavite želeno sobno temperaturo.
3. S pritiskom na gumb za vklop/izklop napravo prižgete. Lučka delovanja na prikazovalniku notranje
enote sveti. Naprava deluje v samodejnem načinu AUTO, vrtenje ventilatorja samodejno kontrolira
naprava.
Kadar je aktiven časovnik so na zaslonu prikazuje nastavitve samodejnega vklopa in izklopa naprave.
4. S ponovnim pritiskom na gumb za vklop/izklop napravo ugasnete.
y
180
G
VEDITE
V načinu AUTO naprava sama izbira med gretjem, hlajenjem, razvlaževanjem in ventiliranjem.
Če Vam samodejni način delovanja ne ustreza, lahko ročno izberete poljuben način delovanja
naprave.
Hlajenje, gretje in ventiliranje
1. Če Vam samodejni način delovanja ne ustreza, lahko s pritiskom na gumb ročno izberete poljuben
način delovanja naprave: le hlajenje, gretje, ali ventiliranje.
2. S pritiski na gumba + in - in nastavite želeno sobno temperaturo.
3. S pritiski na gumb ventilatorja izberite hitrost njegovih vrtljajev samodejno, nizko, srednje ali visoko.
4. Pritisnite gumb za vklop/izklop . Lučka delovanja na prikazovalniku notranje enote sveti. Naprava
deluje v nastavljenem načinu. S ponovnim pritiskom na gumb za vklop/izklop napravo ugasnete.
G
VEDITE
V načinu ventiliranja temperature ne morete nastavljati. Takrat je možno slediti le zgornjim
korakom 1, 3 in 4.
Razvlaževanje
1. Pritisnite gumb MODE in izberite »DRY«
2. S pritiski na gumba + in - in nastavite želeno sobno temperaturo.
3. Pritisnite gumb za vklop/izklop . Lučka delovanja na prikazovalniku notranje enote sveti. Naprava
deluje v načinu razvlaževanja. S ponovnim pritiskom na gumb za vklop/izklop napravo ugasnete.
G
VEDITE
Zaradi razlike me nastavljeno temperaturo in dejansko temperaturo prostora, bo naprava v
načinu DRY – razvlaževanje dostikrat delovala samodejno, ne da bi se vključila načina COOL -
hlajenje ali FAN – ventiliranje.
Nastavitev časovnika
Za nastavitev časa samodejnega vklopa oz. izklopa pritiskajte gumba za vklop in izklop časovnika i in j.
Časovni interval je lahko nastavljen na vrednosti med 0,5 in 24 ur.
1. Nastavitev časa samodejnega vklopa naprave.
1.1
Pritisnite gumb za vklop časovnika i, Na zaslonu daljinskega upravljalca se izpiše »ON TIMER«, zadnji
nastavljeni časovni interval vklopa in simbol »h«. Sedaj lahko nastavite novi časovni interval, ki naj
poteče pred samodejnim vklopom naprave.
1.2
Pritiskajte gumb za vklop časovnika i in tako ponastavite interval.
1.3
Po nastavitvi časovnika poteče pol sekunde preden daljinski upravljalec napravi pošlje signal.
2. Nastavitev časa samodejnega izklopa naprave.
2.1
Pritisnite gumb za izklop časovnika j Na zaslonu daljinskega upravljalca se izpiše »OFF TIMER« , ter v
urah izraženi zadnji nastavljeni časovni interval izklopa. Sedaj lahko nastavite novi časovni interval, ki
naj poteče pred samodejnim vklopom naprave.
2.2
Pritiskajte gumb za izklop časovnika j in tako ponastavite interval.
2.3
Po nastavitvi časovnika poteče pol sekunde preden daljinski upravljalec napravi pošlje signal.
y
181
Primer nastavitve časovnika
Zagon klimatske naprave čez 6 ur.
1. Pritisnite gumb TIMER ON. Na zaslonu se prikaže zadnja nastavitev časa vklopa in
znak „h“.
2. Pritisnite gumb TIMER ON, da se na zaslonu prikaže izpis „6:0h“.
3. Po eni sekundi zaslon ponovno prične prikazovati temperaturo. Na zaslonu sveti
Start
Off
6h
TIMERON
izpis „TIMER ON“ in časovnik je aktiven.
Kombinirana uporaba časovnika
(hkratna nastavitev časa vklopa in izklopa)
TIMER OFF --> TIMER ON
(On --> Stop --> Start operation)
Ta funkcija je uporabna v primeru, kadar želite napravo ugasniti ob odhodu na span
On
Stop
2hSet
On
10 h
TIMERONOFF
je in jo ponovno vključiti naslednje jutro, ali ko se vrnete domov.
Primer:
Izklop naprave po dveh urah delovanja in njen ponoven zagon čez 10 ur.
1. Pritisnite gumb TIMER OFF
2. Ponovno pritisnite gumb TIMER OFF, da se na zaslonu TIMER OFF izpiše 2.0h
3. Pritisnite gumb TIMER ON
4. Ponovno pritisnite gumb TIMER ON, da se na zaslonu TIMER ON izpiše 10h
5. Po eni sekundi zaslon ponovno prične prikazovati temperaturo. Na zaslonu sveti izpis „TIMER ON OFF“
in časovnik je aktiven.
G
VEDITE
Če za vklop in izklop nastavite isti čas, se čas izklopa samodejno poveča za 0,5 ure (kadar je
nastavljeni interval krajši od 10 ur) oz 1 uro (kadar je nastavljeni interval daljši od 10 ur).
Čas vklopa oz. izklopa spremenite tako, da pritisnete odgovarjajoči gumb časovnika in
ponovno nastavite čas.
Nastavljeni čas je relativen glede na dejanski čas. Časovni interval govori o zakasnitvi glede na
trenutni čas.
POZOR
Daljinski upravljalec ne sme priti v stik s tekočinami.
Ne sme biti podvržen visokim temperaturam in sevanju.
Sprejemnik signala na notranji enoti ne sme biti izpostavljen direktni sončni svetlobi. V
nasprotnem primeru lahko pride do napačnega delovanja naprave.
Ne uporabljajte starih in novih baterij hkrati. Nikoli ne uporabljajte različnih tipov baterij (npr.
alkalne in mangan dioksidne).
y
182
E ROČNO DELOVANJE (BREZ DALJINSKEGA UPRAVLJALNIKA)
Kako upravljati svojo enoto brez daljinskega upravljalnika.
Če vaš daljinski upravljalnik ne deluje, lahko svojo enoto upravljate ročno s tipko MANUAL CONTROL, ki se
nahaja na notranji enoti. Upoštevajte, da ročno upravljanje ni dolgoročna rešitev, in da je močno priporočl-
jivo upravljanje enote z daljinskim upravljalnikom.
G
PRED UPORABO
Pred ročnim upravljanjem mora biti enota izklopljena.
Ročno upravljate svojo enoto:
1. Poiščite gumb MANUAL CONTROL na desni strani plošče naprave.
2. Enkrat pritisnite tipko MANUAL CONTROL, da aktivirate način FORCED AUTO.
3. Znova pritisnite tipko MANUAL CONTROL, da aktivirate način FORCED COOLING.
4. Pritisnite gumb MANUAL CONTROL tretjič, da izklopite enoto.
POZOR
The manual button is intended for testing purposes and emergency operation only. Please do not
use this function unless the remote control is lost and it is absolutely necessary. To restore regular
operation, use the remote control to activate the unit.
F IDEALNO DELOVANJE
Za idealno delovanje naprave upoštevajte sledeče nasvete:
Nastavite izpuh zraka tako, da ne piha direktno v ljudi.
Temperaturo nastavite tako, da dosežete območje ugodja. Temperature ne nastavljate do mejnih
vrednosti.
Zaprite vrata in okna.
Z uporabo časovnika nastavite želen čas vklopa naprave.
V bližino odprtin za vstop in izstop zraka ne postavljajte predmetov. Tako lahko zmanjšate učinkov
tost naprave, ali pa naprava lahko celo preneha delovati. Prepričajte se, da tok zraka ni oviran. Zrak
mora neovirano doseči vse dele prostora in neovirano vstopati v napravo.
Zračni filter redno čistite, da ne pride do zmanjšanja moči delovanja naprave. Priporočljivo je, da
filtre očistite vsakih 14 dni.
Naprava naj ne deluje z zaprtimi horizontalnimi rešetkami.
Manual control button
Manual
control
gumb
y
183
G NASTAVLJANJE KOTA IZPUHA ZRAKA
Kot izpuha zraka pravilno nastavite, drugače lahko pride do neenakomerno
porazdeljene temperature v prostoru in občutka neugodja. Položaj horizon-
talnih rešetk lahko nastavite s pomočjo gumba na daljinskem upravljalcu.
Položaj vertikalnih rešetk nastavite ročno.
Nastavljanje izpuha zraka horizontalno (gor dol)
Naprava izpuh zraka horizontalno samodejno nastavi glede na način delovanja v
katerem se naprava nahaja.
Ročno nastavljanje izpuha zraka horizontalno (gor dol)
Ko naprava deluje pritisnite gumb »AIR DIRECTION« na daljinskem upravljalcu.
Tako horizontalne rešetke postavite v poljuben položaj. Naprava bo pri nadaljnjem
delovanju samodejno nastavljala horizontalen izpuh zraka glede na nastavitve , ki
ste jih določili z gumbom »AIR DIRECTION«.
Nastavitev vertikalnega izpuha zraka (levo desno)
Med delovanjem naprave vertikalne rešetke poljubno ročno nastavite s pomočjo
držala na rešetkah.
Samodejno nihanje horizontalnih rešetk (gor dol)
Ko naprava deluje pritisnite gumb »SWING« na daljinskem upravljalcu.
ZA izklop funkcije gumb pritisnite ponovno. S pritiskom na gumb »AIR DIRECTION« rešetke »zak-
lenete « v želenem položaju.
POZOR
Funkcij »AIR DIRECTION« in »SWING« ni možno uporabljati kadar naprava ne deluje (tudi ne
kadar je časovnik aktiviran za samodejni vklop – ON TIMER).
Naprave naj ne deluje (gretje ali hlajenje) daljši čas z navzdol obrnjenimi rešetkami za
usmerjanje toka zraka. V nasprotnem primeru se lahko na horizontalnih rešetkah pojavi
kondenz, ki bo kapljal na tla.
Horizontalnih rešetk nikoli ne premikajte ročno. Premikate ju lahko le z gumboma »AIR
DIRECTION« ali »SWING« . Z ročnim pomikanjem horizontalnih rešetk lahko povzročite
napačno delovanje funkcije njihovega samodejnega pomika. Če pomik rešetk ne deluje
pravilno, napravo ugasnite in ponovno vklopite.
Če napravo prižgete takoj po izklopu le-te, lahko horizontalne rešetke mirujejo še 10 sekund
po vklopu naprave.
Naprave ne uporabljajte z zaprtimi horizontalnimi rešetkami.
Palica za
deflektor
Območje
POZOR
Ne dotikajte se ventilatorja za rešetkami!
y
184
H KAKO NAPRAVA DELUJE
SAMODEJNO DELOVA NJE
Kadar naprava deluje v samodejnem načinu AUTO, (gumb 2 na daljin-
skem upravljalcu), glede na nastavljeno in dejansko temperaturo prostora
samodejno izbira med hlajenjem, gretjem ali le ventiliranjem.
Naprava tako samodejno vzdržuje temperaturo prostora približno na nastav-
ljeni vrednosti.
Če Vam samodejni način delovanja ne ustreza, lahko ročno sami izberete
poljubni način delovanja.
SLEEP/EKONOMIČNO DELOVANJE
S pritiskom na gumb »SLEEP« medtem ko naprava hladi ali greje, ter med
samodejnim delovanjem AUTO vklopite nočno delovanje. Naprava samodej
no zvišuje temperaturo za 1oC na uro pri hlajenju in znižuje temperaturo za
1oC na uro pri gretju. Temperatura se ustali na novi vrednosti po 2 urah in
1
1
1
1
ostane nespremenjena naslednjih 5 ur. Po 5 urah se naprava izključi. Hitrost
vrtenja ventila torja krmili naprava samodejno.
1
1
1
1
Pritisnite gumb za spanje
HLAJENJE
OGREVANJE
DEHUMIDIFIRANJE
Nastavite
Tempe-
ratura
1 uro 1 uro
1 uro 1 uro
Nastavite
Tempe-
ratura
Nastavite temperaturo
Čas
Soba
tempe-
ratura
Hlajenje Samo ventilator Hlajenje Samo ventilator Hlajenje
RAZVLAŽEVANJE
Kadar naprava deluje v načinu razvlaževanja, takrat glede na razliko med
dejansko in nastavljeno temperaturo prostora po potrebi samodejno prične
razvlaževati zrak.
V načinu razvlaževanja, naprava nastavljeno temperaturo prostora vzdržuje
s pomočjo stalnega vklapljanja in izklapljanja funkcije hlajenja oz. le ventili-
ranja. Vrtljaji ventilatorja so krmiljeni samodejno.
Naprava zrak razvlažuje tudi takrat, ko deluje v načinu hlajenja.
G
VEDITE
Možno je, da bo sobna temperatura padla tudi takrat, kadar naprava le razvlažuje. Zato je
normalno, da hidrostat takrat kaže večjo relativno vlažnost. Kljub temu pa bo absolutna vlažnost
v prostoru nižja. Seveda glede na povzročano vlago (ljudje, kuhanje itd).
G
VEDITE
Dejanska naprava se lahko razlikuje od slik na embalaži ali v navodilih. Slike so namenjene le
obrazložitvi in prikazu funkcij naprave.
y
185
I VZDRŽEVANJE
G
POZOR
Pred čiščenjem napravo ugasnite in jo izklopite iz električnega
napajanja.
Čiščenje notranje enote in daljinskega upravljalca
G
POZOR
Notranjo enoto in daljinski upravljalec očistite s suho krpo.
Kadar je enota zelo umazana, za čiščenje lahko uporabite s hladno
vodo navlaženo krpo.
Čelna plošča enote se lahko sname in očisti z vodo. Nato jo obrišite s
suho krpo.
Za čiščenje ne uporabljajte kemično obdelanih krp ali metlice za
prah.
Za čiščenje ne uporabljajte bencina, razredčil, polirnih past ali
podobnih kemikalij. Zaradi teh snovi lahko plastika razpoka ali se
deformira.
Čiščenje zračnega filtra
Zamašen filter zmanjšuje moč naprave. Filter redno čistite vsakih 14 dni.
1. Dvignite pokrov čelne plošče notranje enote dokler se ta ne zaskoči.
2. Filter primite za držalo, ga rahlo privzdignite, da ga lahko izvlečete iz
njegovega ležišča in ga nato potegnite navzdol.
3. Filter potegnite iz notranje enote naprave.
Filter očistite vsakih 14 dni.
Filter čistite s sesalcem ali vodo.
4. Filtra iz aktivnega oglja ni mogoče čistiti. Ko je umazan ne more več filtrirati
neprijetnih vonjav. Takrat je potrebno ta filter zamenjati (pokličite servis).
Filter je pripročljivo menjati dvakrat na sezono.
5. Zeleni 3M HAF filter je potrebno zamenjati kadar je njegova površina umazana in
pore zamašene. Filter je pripročljivo menjati dvakrat na sezono.
Nov filter
Priporočljiva menjava filtra
6. Po menjavi filtra iz aktivnega oglja in 3M HAF filtra krovni protiprašni filter
vstavite nazaj v ležišče na ohišju naprave.
7. Preden ga vstavite nazaj v enoto se prepričajte, da je filter popolnoma suh
in brez fizičnih okvar.
8. Vstavite filter nazaj v njegovo ležišče.
9. Zgornji del zračnega filtra vstavite v enoto. Pri tem pazite, da sta levi in desni
rob pravilno poravnana in nato filter potisnite v enoto.
y
House-
hold
Drain
Cleaner
No
Thinner
f
Filtrirni zavihki
Odstranite filter za osvežitev zraka iz
hrbta večjega filtra (nekatere enote)
186
Vzdrževanje
Če naprave ne nameravate uporabljati daljši čas, sledite sledečim korakom:
1. Naprava naj 6 ure deluje v načinu ventiliranja. Tako boste posušili notranjost naprave.
2. Napravo ugasnite in izklopite iz električnega napajanja. Če uporabljate model modele S(C)5148 , pre-
kinite električno napajanje. Iz daljinskega upravljalca izvlecite baterije.
3. Zunanjo enoto je potrebno redno čistiti in vzdrževati. To naj naredi servis.
Kaj preveriti pred delovanjem
Preverite, da električne žice niso poškodovane ali izklopljene.
Preverite ali je vstavljen zračni filter.
Če naprave dalj časa niste uporabljali preverite, ali odprtine za vhod ali izpuh zraka niso blokirane.
POZOR
Ko iz naprave odstranjujete filtre, se ne dotikajte kovinskih delov naprave. Na ostrih kovinskih
delih bi se lahko poškodovali.
Notranjosti enote ne čistite z vodo. To lahko poškoduje izolacijo in povzroči električni udar.
Pred čiščenjem naprave jo ugasnite in izklopite varovalko.
J NASVETI ZA UPRAVLJANJE
Med delovanjem naprave se lahko zgodi sledeče:
1. Varovanje naprave
Varovalo kompresorja
Kompresorja ni možno vklopiti 3 minut po tem, ko preneha delovati.
Varovalo hladnega zraka
Naprava ne omogoča izpuha hladnega zraka v načinu gretja, kadar je izmenjevalec toplote v notranji
enoti na eni od sledečih nastavitev, nastavljena temperatura prostora pa še ni dosežena:
a.) naprava je pravkar pričela greti
b.) vklopljeno je odtaljevanje
c.) gretje na nizko temperaturo
Odtaljevanje
Notranji ali zunanji ventilator se ustavita, ko se naprava odtaljuje
Na zunanji napravi se lahko ob ciklu gretja in nizki zunanji temperaturi ter visoki vlažnosti pojavi ivje,
ki zmanjša moč delovanja naprave.
Takrat naprava samodejno prekine z gretjem in se odtaja.
Proces samodejnega odtaljevanja traja med 4 in 10 minutami, glede na zunanjo temperaturo in
količino nabranega ivja.
2. Iz notranje enote izhaja bela meglica
Ob visoki notranji vlagi in veliki temperaturni razliki zraka pri vstopni in izstopni odprtini zraka, se
lahko v načinu hlajenja pojavi bela meglica.
Bela meglica se lahko pojavi tudi takrat, ko naprava po končanem procesu samodejnega odtaljevanja
prične delovati v načinu gretja.
y
187
y
3. Naprava oddaja šibak zvok
Ko kompresor deluje ali takoj ko preneha delovati, lahko zaslišite šibak sikajoč zvok. Povzroča ga
hladilna tekočina, ki se pretaka po ceveh.
Ko kompresor deluje ali takoj ko preneha delovati lahko zaslišite rahlo cviljenje. Povzroča ga širjenje
oz. krčenje plastike v enoti zaradi spremembe temperature.
Ko napravo prvič prižgete lahko zaslišite zvok,ki ga oddajajo rešetke, ko se postavijo v nevtralni
položaj.
4. Iz notranje enote izhaja prah
To je normalen pojav, kadar naprava dalj časa ni bila v uporabi ali ob prvi uporabi naprave.
5. Iz notranje enote se širi vonj
Naprava oddaja vonj (po pohištvu, cigaretni dim, gradbeni material …), ki ga vsrka ob samem
delovanju.
6. Naprava iz gretja ali hlajenja preklopi na le ventiliranje
Ko temperatura prostora doseže nastavljeno, se kompresor izklopi, deluje le ventilator. Kompresor se
zopet vklopi, ko se temperatura dvigne nad nastavljeno pri hlajenju oz. pade pod nastavljeno pri
gretju.
7. Ko naprava hladi v prostoru z visoko relativno vlago (več kot 80%), z nje lahko kaplja voda.
Horizontalne rešetke kar najbolj odprite in nastavite največje HIGH vrtljaje ventilatorja.
8. Gretje
Med gretjem naprava toploto iz zunanje enote vleče v notranjo enoto in izpiha vroč zrak. Kadar
zunanja temperatura pade, se primerno zmanjša tudi pretok toplote v notranjo enoto. Hkrati se
zaradi povečane razlike med zunanjo in notranjo temperaturo poveča temperaturna obremenjenost
naprave . Če želene temperature takrat ne morete doseči le z klimatsko napravo, uporabite dodatno
grelno telo.
9. Samodejni ponovni vklop
Naprava se zaradi izpada električne energije izklopi. Ker ima naprava možnost samodejnega vklopa,
se ob ponovni vzpostavitvi napajanja samodejno vklopi in pri tem ohrani vse programirane nas
tavitve.
10. Zaznavanje puščanja hladilnega sredstva
Klimatska naprava ima vgrajen sistem za zaznavanje puščanja hladilnega sredstva.
Ko zunanja enota zazna pomanjkanje hladilnega sredstva, se klimatska naprava ustavi in notranja
enota na zaslonu prikaže alarm EC.
Če se ta alarm vključi, ne zaganjajte več klimatske naprave in stopite v stik s svojim dobaviteljem.
188
K ODPRAVLJANJE TEŽAV
TEŽAVE IN NJIHOVO ODPRAVLJANJE
G
TEŽAVA
Napravo takoj izklopite, kadar pride do ene od sledečih nepravilnosti v delovanju. Takrat
napravo izklopite iz omrežja in pokličite servis.
Varovalka naprave ali glavna varovalka večkrat pregori.
Voda ali drugi predmeti prodrejo v napravo.
Daljinski upravljalec ne dela ali deluje nepravilno.
Drugi nenormalni pojavi.
Težava Morebitni vzroki
Po pritisku gumba ON/OFF se
enota ne vklopi.
Enota ima funkcijo 3-minutne zaščite, ki preprečuje preobremenitev enote.
Enote ni mogoče zagnati tri minute po njenem izklopu.
Enota se preklopi iz načina
COOL/HEAT v način FAN.
Enota lahko samodejno spremeni svoje nastavitve, da prepreči nastajanje
zmrzali na enoti. Ko se temperatura poviša, začne enota znova delovati v
prej izbranem načinu.
Doseglo se je nastavljeno temperaturo, zato enota izklopi kompresor. Ko
temperatura spet zaniha, bo enota delovala še naprej.
Notranja enota oddaja belo
meglo
V vlažnih regijah lahko velika razlika med zrakom v sobi in klimatiziranim
zrakom povzroči belo meglico.
Belo meglico ustvarjata notranja
in zunanja enota.
Če se enota ponovno zažene v načinu HEAT po tem, ko se odtaja, lahko pride
do ustvarjanja bele meglice zaradi vlage, ki nastaja pri postopku odtajanja.
Notranja enota je hrupna
Kadar lina za prezračevanje ponastavi svoj položaj, se lahko zasliši zvok
navala zraka.
Pri uporabi enote v načinu HEAT se lahko sliši škripanje zaradi širjenja in
krčenja plastičnih delov enote.
Hrup povzročata notranja in
zunanja enota.
Nizek sikajoči zvok med delovanjem: Zvok je normalen in ga povzroča
pretok hladilnega plina skozi notranjo in zunanjo enoto.
Nizek sikajoči zvok pri zagonu sistema, zaustavitvi sistema ali med
odmrzovanjem: Ta zvok je normalen in ga povzroča zaustavljanje hladilnega
plina ali sprememba smeri.
Škripajoči zvok: Škripajoči hrup povzročajo običajno širjenje in krčenje
plastike in kovine, do česar pride zaradi sprememb v temperaturi med
delovanjem.
Zunanja enota je hrupna
Zunanja enota ustvarja različne zvoke na osnovi svojega trenutnega
delovnega načina.
Iz notranje ali zunanje enote se
sprošča prah
V enoti se je morda nabral prah zaradi daljšega obdobja neuporabe, ki se ga
sprosti pri vklopu enote. To se lahko ublaži tako, da se enoto med daljšim
obdobjem neuporabe prekrije.
Enota oddaja slab vonj
Enota lahko vsrka vonjave iz okolice (kot vonj pohištva, kuhanja, cigaret,
itd.), ki ga bo sproščala med delovanjem.
Na filtrih enote je nastala plesen in jih je treba očistiti.
Ventilator zunanje enote ne
deluje.
Med delovanjem se nadzoruje hitrost ventilatorja, da se optimizira
delovanje izdelka.
Delovanje je naključno, ga ni
mogoče napovedati ali pa je
enota neodzivna
Motnje zaradi stolpov za mobilno telefonijo in oddaljeni spodbujevalci
lahko povzročijo napačno delovanje enote. V tem primeru poskusite
naslednje:
• Napajanje odklopite in ga znova priklopite.
Za ponovni zagon delovanja pritisnite gumb ON/OFF na daljinskem
upravljalniku.
y
189
y
G
OPOMBA
Če ostane težava prisotna, stopite v stik z lokalnim trgovcem ali najbližjim servisnim centrom za
stranke. Sporočite jim podroben opis okvar enote in številko svojega modela.
Težava Morebitni vzroki Rešitev
Slabo hlajenje
Nastavitev temperature je višja od
temperature v prostoru.
Zmanjšajte nastavitev temperature.
Izmenjevalnik toplote na notranji ali
zunanji enoti je umazan.
Očistite zadevni izmenjevalnik toplote.
Zračni filter je zamašen.
Filter odstranite in ga očistite v skladu z
navodili.
Zračni vhod ali izhod katere koli enote je
zamašen.
Enoto izklopite, odstranite blokado in
enoto znova vklopite.
Vrata in okna so odprta.
Poskrbite, da bodo med uporabo enote
zaprta vsa vrata in okna.
Sončna svetloba ustvarja preveč toplote.
Med časom močne vročine ali bleščeče sončne
svetlobe zaprite okna in zagrnite zavese.
V sobi je preveč virov toplote (ljudje,
računalniki, elektronika, itd.).
Zmanjšajte število virov toplote.
Malo hladilnega sredstva zaradi puščanja
ali dolgoročne uporabe.
Preverite, ali je prišlo do puščanja in
mesto po potrebi ponovno zatesnite ter
dolijte hladilno sredstvo.
Aktivirana je funkcija SILENCE (Tišina)
(izbirna funkcija).
Funkcija SILENCE lahko zmanjša
zmogljivost izdelka, ker zmanjša frekvenco
delovanja. Izklopite funkcijo SILENCE.
Enota ne deluje
Odpoved napajanja.
Počakajte, da se napajanje znova
vzpostavi.
Napajanje je izklopljeno. Vklopite napajanje.
Varovalka je pregorela. Zamenjajte varovalko.
Baterije daljinskega upravljalnika so
prazne.
Zamenjajte baterije.
3-minutna zaščita enote je bila sprožena.
Po ponovnem zagonu enote počakajte tri
minute.
Časovnik je aktiviran. Izklopite časovnik.
Enota se pogosto
zažene in zaustavi.
V sistemu je preveč hladilnega sredstva
oziroma ga ni dovolj.
Preverite, ali sistem pušča in vanj dolijte
hladilno sredstvo.
V sistem je vstopil nestisljiv plin ali vlaga.
Sistem izpraznite in vanj dolijte hladilno
sredstvo.
Kompresor je okvarjen Zamenjajte kompresor.
Napetost je previsoka ali prenizka
Namestite manostat za regulacijo
napetosti
Slabo ogrevanje
Zunanja temperatura je izjemno nizka. Uporabite pomožno grelno napravo.
Skozi vrata in okna vstopa hladen zrak.
Poskrbite, da bodo med uporabo zaprta
vsa vrata in okna.
Malo hladilnega sredstva zaradi puščanja
ali dolgoročne uporabe.
Preverite, ali je prišlo do puščanja in
mesto po potrebi ponovno zatesnite ter
dolijte hladilno sredstvo.
Indikatorske lučke
utripajo še naprej.
Enota lahko preneha delovati ali pa nadaljuje z varnim delovanjem. Če indikatorska
lučka utripa še naprej ali se pojavi koda napake, počakajte približno 10 minut. Težava
se bo morda rešila sama.
V nasprotnem primeru odklopite napajanje in ga znova vklopite. Vklopite enoto.
Če ostane težava prisotna, odklopite napajanje in stopite v stik z najbližjim servisnim
centrom za stranke.
V oknu na zaslonu
notranje enote se
pojavi koda napake:
• E0, E1, E2…
• P1, P2, P3…
• F1, F2, F3…
190
Če težave ni moč odpraviti s pomočjo zgornjih nasvetov, pokličite servis.
G
POZOR
Popravilo naprave lahko izvrši le pooblaščen servis.
L GARANCIJSKA IZJAVA
Klimatska naprava ima 48 mesečno garancijo na kompresor in 24 mesečno garancijo na ostale komponente,
šteto od datuma nakupa.
1. V imenu proizvajalca servis garantira, da bo proizvod pravilno deloval, če ga boste uporabljali v skladu
z njegovim namenom in navodili za uporabo;
2. V kolikor je potrebno proizvod poslati pooblaščenemu serviserju ali uvozniku, Vas prosimo da priložite
garancijski lit, račun in kratek opis napake. Stroške prevoza do najbližjega servisa, priznamo samo v pri-
meru ko je prevoz izvršen z javnim prevozom (pošta,vlak) in dokazilom o plačilu. V primeru poškodbe
proizvoda pri prevozu je rizik na kupčevi strani.
3. Servis bo v garancijskem roku na svoje stroške poskrbel za odpravo okvare ali pomanjkljivosti na proiz-
vodu, zaradi katere aparat ne deluje, če je bil proizvod uporabljan v skladu s prvo točko te izjave;
4. V primeru, da aparat v garancijski dobi ne bo popravljen v 45 dneh od datuma dostave aparata v ser-
visno enoto, bomo aparat na vašo zahtevo zamenjali z novim;
5. Garancijski rok bo podaljšan za čas popravila;
6. Za napake, ki nastanejo zaradi zunanjih vplivov (mehanske poškodbe po krivdi kupca ali tretje osebe,
poseg v aparate brez našega pooblastila, nepravilna uporaba, malomarno ravnanje, prenapetosti v
omrežju, zaradi izcedka iz baterije, višja sila), garancija ne velja;
7. Ta garancija se tudi ne nanaša na dele podvržene obrabi (filtri, baterije itd);
8. Garancijski zahtevki se sprejmejo le ob sočasni predložitvi potrjenega garancijskega lista in originalnega
računa;
9. Rok zagotovljenega servisiranja je 7 let;
10. Izgube ali puščanja hladilnega sredstva zaradi nestrokovnega priklopa ali odklopa enot naprave s strani
uporabnika naprave ali nepooblaščenega osebja garancija, ki velja za to napravo ne krije. Prav tako so
iz garancije izvzete vse okvare enot naprave, ki so posledica montaže, priklopa ali odklopa, ki niso v
skladu z lokalnimi zakoni in predpisi in/ali s temi navodili za uporabo.
Če v teh navodilih ne najdete rešitve problema, se glede popravila naprave posvetujte s serviserjem. Če bi
bilo napravo potrebno odklopiti iz električne napeljave, naj to v skladu z lokalnimi zakoni in predpisi naredi
kvalificiran električar.
y
191
y
M TEHNIČNE KARAKTERITIKE
Model
S 4225
S 5225
S 5225 B
S-JA 2519
S 4232
S 5232
S 4248
S 5248
SC 4225
SC 5225
SCJA-2519
SC 4232
SC 5232
SC 4248
SC 5248
SCJA-4819
Type klimaanlegg
Vgradna klimatska
naprava
Vgradna klimatska
naprava
Vgradna klimatska
naprava
Vgradna klimatska
naprava
Vgradna klimatska
naprava
Vgradna klimatska
naprava
Moč hlajenja nom. (min - maks) * W
2600 (1030 - 3190) 3500 (820 - 4160) 5300 (1730 - 6980) 2500 (1590 - 3000)
3200 (2110 - 4000) 4600 (1820 - 6120)
Energijski razred hlajenje*
A++ A++ A++ A++
A++ A++
SEER*
7,1 7,0 6,4 6,5
6,2 6,7
Moč gretja nom. (min - maks) * W
2500 ( 880 - 3660) 2700 ( 850 - 4780) 3900 (1060 - 6980) 2400 (960 - 4890)
2400 (1280 - 4900) 3800 (1380 - 6740)
COP*
A+ A+ A+ A+
A+ A+
SCOP*
4,0 4,1 4,0 4,0
4,0 4,0
Maks. razvlaževanje ** / *** L / 24 h
24,0 28,8 43,2 26,4
31,2 36,0
poraba energije hlajenje kW
0,70 1,09 1,54 0,71
1,19 1,40
poraba energije gretje kW
0,67 1,05 1,46 0,84
1,23 1,90
Letna poraba energije kWh
128 / 875 175 / 922 290 / 1365 137 / 836
187 / 834 245 / 1326
Napajanje V / Hz / Ph
220-240~ / 50 / 1 220-240~ / 50 / 1 220-240~ / 50 / 1 220-240~ / 50 / 1
220-240~ / 50 / 1 220-240~ / 50 / 1
Maks. tok nominalno A
9,5 10,0 11,5 10,0
10,0 13,0
Maks. pretok zraka** m3/h
416/309/230 539/478/294 750/505/420
545/435/368
545/435/368 770/610/410
Za prostor** m3
60-85 80-100 140-185 60-85 80-100 125-145
Suited for regions W / A / C W/A/C W/A/C W/A/C W/A/C W/A/C W/A/C
Kompresor Rotary Rotary Rotary Rotary Rotary Rotary
Hitrosti ventilatorja
4 4 4 3
3 3
Razpon nastavitve temp. oC
17 - 30 17 - 30 17 - 30 17 - 30
17 - 30 17 - 30
Upravljanje
Elektronsko z
dalj.upravljalcem
Elektronsko z
dalj.upravljalcem
Elektronsko z
dalj.upravljalcem
Elektronsko z
dalj.upravljalcem
Elektronsko z
dalj.upravljalcem
Elektronsko z
dalj.upravljalcem
Daljinsko upravljanje DA DA DA DA DA DA
Filtri
Aktiv.oglje,protiprašni
filter,3M HAF
Aktiv.oglje,protiprašni
filter,3M HAF
Aktiv.oglje,protiprašni
filter,3M HAF
Aktiv.oglje,protiprašni
filter,3M HAF
Aktiv.oglje,protiprašni
filter,3M HAF
Aktiv.oglje,protiprašni
filter,3M HAF
Hladilno sredstvo R / g
R32 / 700 R32 / 800 R32 / 1250 R32 / 800 R32 / 800 R32 / 1190
Hladilno sredstvo GWP
675 675 675 675
675 675
Ekvivalent CO
2
tonnes
0,473 0,540 0,844 0,540
0,540 0,803
Dimenz. notranja enota (š x g x v) mm
722x187x290 802x189x297 965x215x319 805x194x285
805x194x285 957x213x302
Dimenz. zunanja enota (š x g x v) mm
770x300x555 770x300x555 800x333x554 770x300x555
770x300x555 800x333x554
Teža notranja enota kg
7,3 8,2 10,8 7,8
7,8 10,3
Teža zunanja enota kg
27,2 27,0 37,0 25,7
25,7 34,6
Bruto teža notranja enota kg
9,7 10,7 14,1 10,4
10,4 13,8
Bruto teža zunanja enota kg
29,7 29,4 39,9 31,1
31,1 40,2
Jakost hrupa notranja enota (maks) dB(A)
54 56 58 53
53 55
Jakost hrupa zunanja enota (nom) dB(A)
59 60 64 62
62 62
Jakost hrupa notranja enota (min.) dB
20 21 21 25
25 29
Varovalka notranja enota IP
IPX0 IPX0 IPX0 IPX0
IPX0 IPX0
Varovalka zunanja enota IP
IPX4 IPX4 IPX4 IPX4
IPX4 IPX4
* EN 14511-2011 / EN14825
** Le za indikacijo
*** Razvlaževanje pri 32 C, 80% rel. vlagi.
**** EN12102-2008
192
y
Odpadne hišne električne naprave se ne smejo odvreči skupaj s hišnimi odpadki. Prosimo
reciklirajte, kjer je to mogoče. Povprašajte lokalne oblasti ali prodajalca za nasvet o možnostih
recikliranja.
Če se električne naprave odlagajo na zemeljskih smetiščih lahko iz njih v podtalnico odteka-
jo nevarne snovi, ki tako vstopijo v prehranjevalno verigo in ogrozijo vaše zdravje in dobro
počutje. Ob nakupu nove naprave mora prodajalec po določbah zakona brezplačno prevzeti
vašo staro napravo.
Baterij ne mečite v ogenj, ker lahko eksplodirajo ali izpustijo nevarne snovi.
Kadar menjate daljinski upravljalec ali je ta uničen izvlecite baterije in jih odložite skladno s
predpisi saj so nevarne za okolje.
Okoljevarstveni zaznamek:
Naprava vsebuje fuorirane toplogredne pline opisane v Kjotskem protokolu. Servisira ali razstavi jo lahko le
šolana oseba.
Naprava vsebuje plin R32, ki je fluoriran toplogredni plin, s potencialno možnostjo segrevanja ozračja
(GWP) = 675. Zato ga ne spuščajte v ozračje.
Internet:
Zadnjo verzijo navodil za montažo in/ali servisnih navodil lahko najdete na naši spletni strani, na povezav i
www.qlima.com.
193
y
Generalni servis
SERVIS VAKO d.o.o.
Kolodvorska c. 56b
8340 Črnomelj
tel: 07 / 3061 - 536, e-pošta: mvk@vako.si
GARANCIJSKI LIST
GARANCIJSKA IZJAVA:
V imenu proizvajalca servis garantira, da bo proizvod pravilno deloval, če ga boste uporabljali v skladu z
njegovim namenom in navodili za uporabo;
V kolikor je potrebno proizvod poslati pooblaščenemu serviserju ali uvozniku, Vas prosimo da priložite
garancijski list, račun in kratek opis napake. Stroške prevoza do najbližjega servisa, priznamo samo v primeru
ko je prevoz izvršen z javnim prevozom (pošta,vlak) in dokazilom o plačilu. V primeru poškodbe proizvoda pri
prevozu je rizik na kupčevi strani.
servis bo v garancijskem roku na svoje stroške poskrbel za odpravo okvare ali pomanjkljivosti na proizvodu,
zaradi katere aparat ne deluje, če je bil proizvod uporabljan v skladu s prvo točko te izjave;
v primeru, da aparat v garancijski dobi ne bo popravljen v 45 dneh od datuma dostave aparata v servisno enoto,
bomo aparat na vašo zahtevo zamenjali z novim;
garancijski rok bo podaljšan za čas popravila;
za napake, ki nastanejo zaradi zunanjih uplivov (mehanske poškodbe ali izguba hladilnega sredstva po krivdi
kupca ali tretje osebe, poseg v aparate brez našega pooblastila, montaža naprave s strani nepooblaščene osebe,
nepravilna uporaba, malomarno ravnanje, prenapetosti v omrežju, zaradi izcedka iz baterije, višja sila ...),
garancija ne velja;
ta garancija se tudi ne nanaša na dele podvržene obrabi in potrošni material (filtri, baterije, hladilno sredstvo …
itd);
garancijski zahtevki se sprejmejo le ob sočasni predložitvi potrjenega garancijskega lista in originalnega računa;
rok zagotovljenega servisiranja in nudenja rezervnih delov je najmanj 3 leta po izteku garancije;
Garancijski rok začne teči z dnem prodaje končnemu kupcu, kar dokažete s potrjenim
garancijskim listom in originalnim računom podjetja, ki je proizvod prodalo.
Garancija velja na geografskem območju republike Slovenije.
Garancija ne izključuje pravic potrošnika, ki izhajajo iz odgovornosti prodajalca za napake na blagu.
GARANCIJSKIROK
modeldoba
klimatskenaprave Qli ma 2leti
kompresorjiinverterklimanapravQlima4leta
klimatskenaprave dru gi hznamk 1leto

Proizvajalec: PVG International b.v., Kanaalstraat 12C – 5347 AB Oss, Nizozemska
Proizvod:
Tip:
Seri
j
ska št.:
Ime in sedež podjetja, ki je proizvod prodalo:
Podpis prodajalca:
Pečat podjetja:
Datum
p
roda
j
e:
194
195
D
Benötigen Sie weitere Informationen oder treten Probleme auf, besuchen Sie bitte unsere Website www.qlima.com, oder setzen Sie sich mit
unserem Kundendienst in Verbindung (Telefonnummer auf www.qlima.com).
For alle yderligere oplysninger eller ved eventuelle problemer med apparatet henvises til www.qlima.com eller det lokale Kundecenter (telefon-
numre findes i www.qlima.com).
Si necesita información o si tiene algún problema, visite nuestra página Web www.qlima.com, o póngase en contacto con el servicio cliente
(hallará el número de teléfono en www.qlima.com).
F
Si vous souhaitez obtenir des informations supplémentaires ou si vous rencontrez un problème, rendez-vous sur notre site Web (www.qlima.com)
ou contactez notre service client (vous trouverez l’adresse et numéro de téléphone sur www.qlima.com).
Jos haluat huoltoapua, lisätietoja tai laitteen kanssa tulee ongelmia, tutustu verkkosivustoon osoitteessa www.qlima.com tai kysy neuvoa PVG
kuluttajapalvelukeskuksesta (www.qlima.com).
If you need information or if you have a problem, please visit the our website (www.qlima.com) or contact our sales support (you find its phone
number on www.qlima.com)
I
Per informazioni e in caso di problemi, visitate il sito Web www.qlima.com oppure contattate il Centro Assistenza Clienti (per conoscere il
numero di telefono, consultate www.qlima.com).
N
Hvis du trenger informasjon, eller hvis du har et problem med produktet, kan du gå til nettsidene www.qlima.com. Alternativt kan du kontakte
med PVG’ forbrukertjeneste (telefonnummeret i www.qlima.com).
Als u informatie nodig hebt of als u een probleem hebt, bezoek dan de onze website (www.qlima.com) of neem contact op met de afdeling
sales support (adres en telefoon op www.qlima.com).
P
Se necessitar de informações ou se tiver problemas, visite o Web site www.qlima.com ou contacte o Centro de Assistência (número de telefone
o www.qlima.com)
W przypadku problemów i w celu uzyskania szczegółowych informacji odwiedź stronę internetową Qlima dostępną pod adresem www.qlima.com
lub skontaktuj się z Centrum kontaktów Qlima (www.qlima.com)
S
Om du behöver service eller information eller har problem med apparaten kan du besöka www.qlima.com eller kontakta Qlima kundtjänst (du
hittar telefonnumret på www.qlima.com).
Če želite dodatne informacije, obiščite spletno mesto podjetja na naslovu www.qlima.com ali pokličite na telefonsko (www.qlima.com).
Daha fazla bilgiye ihtiyaç duyarsanız veya bir sorunla karşılaşırsanız, www.qlima.com adresindeki Qlima Internet sitesini ziyaret edin veya
ülkenizde bulunan Qlima müşteri merkeziyle iletişim kurun (telefon numarasını: www.qlima.com).
--- --- -- ----
-- -- --- -----
-- -- --- -----
-- ---- -- ----
-- -- --- -----
-- -- --- -----
--- --- -- ----
-- ---- -- ----
www.Qlima.com
Distributed in Europe by PVG Holding B.V.
achterkant_manuals_Qlima.indd 1 02-07-14 16:45
MarCom avg©190214 Q_man_S(C)42xx_S(C)52xx_S(C)JAxx19 (‘19) EU V1
190

Brauchen Sie Hilfe? Stellen Sie Ihre Frage.

Forenregeln

Missbrauch melden von Frage und/oder Antwort

Libble nimmt den Missbrauch seiner Dienste sehr ernst. Wir setzen uns dafür ein, derartige Missbrauchsfälle gemäß den Gesetzen Ihres Heimatlandes zu behandeln. Wenn Sie eine Meldung übermitteln, überprüfen wir Ihre Informationen und ergreifen entsprechende Maßnahmen. Wir melden uns nur dann wieder bei Ihnen, wenn wir weitere Einzelheiten wissen müssen oder weitere Informationen für Sie haben.

Art des Missbrauchs:

Zum Beispiel antisemitische Inhalte, rassistische Inhalte oder Material, das zu einer Gewalttat führen könnte.

Beispielsweise eine Kreditkartennummer, persönliche Identifikationsnummer oder unveröffentlichte Privatadresse. Beachten Sie, dass E-Mail-Adressen und der vollständige Name nicht als private Informationen angesehen werden.

Forenregeln

Um zu sinnvolle Fragen zu kommen halten Sie sich bitte an folgende Spielregeln:

Neu registrieren

Registrieren auf E - Mails für Qlima S 5225 wenn:


Sie erhalten eine E-Mail, um sich für eine oder beide Optionen anzumelden.


Das Handbuch wird per E-Mail gesendet. Überprüfen Sie ihre E-Mail.

Wenn Sie innerhalb von 15 Minuten keine E-Mail mit dem Handbuch erhalten haben, kann es sein, dass Sie eine falsche E-Mail-Adresse eingegeben haben oder dass Ihr ISP eine maximale Größe eingestellt hat, um E-Mails zu erhalten, die kleiner als die Größe des Handbuchs sind.

Ihre Frage wurde zu diesem Forum hinzugefügt

Möchten Sie eine E-Mail erhalten, wenn neue Antworten und Fragen veröffentlicht werden? Geben Sie bitte Ihre Email-Adresse ein.


Info