EN
9.2.3-PC Setting
Enter into the SETUP menu from the Main
Menu by pressing the MENU button in the
PC mode. In order to make the necessary
settings in this menu, you can use the right-
left, up-down movement buttons on your
remote control. You can make the following
settings for your monitor in this menu.
9.2.4-HORIZONTAL POSITION:
Horizontal position setting
9.2.5-VERTICAL POSITION: Vertical
position setting
9.2.6-CLOCK
This is the pixel clock frequency. User can
narrow down or enlarge the display by
selecting a desired value.
9.2.7-PHASE
Using the right/left movement buttons, you
can ensure that the colors and shapes are
exactly consolidated on the PC image.
9.2.8-AUTOCONFIGURATION
The most suitable geometric settings
in accordance with the entry mode
are configured by this function.
For this operation, select the
AUTOCONFIGURATION tab and press
OK button. You can adjust the volume level
of the source you have connected to the
Audio-In input at the back of your TV by
using the VOL+/VOL- buttons.
9.2.9-PICTURE FORMAT
You can select the PC image to be displayed
in 16:9, 14:9 or 4:3 formats.
Note 1: 4:3, 16:9 and 14:9 picture formats
are supported in 16:9 panels. Only 4:3
picture format is supported in 4:3 panels.
Note 2: In the Monitor mode, you can make
the Brightness, Contrast, Sharpness, Red,
Green and Blue Settings from the PICTURE
menu.
Switching to the HDMI mode
Connect to the HDMI input at the back of
your TV by using the connector located on
your PC or your digital video-transmission
device with a suitable cable (not supplied
with the TV).
Note 1: To be able to watch an image in
the HDMI mode, your computer must be
equipped with a HDMI graphic card.
You may display the resolution information
by pressing the INFO button.
HDCP (Optional)
Your TV supports HDCP feature. To use
this feature, you must set up a connection
to your TV set’s HDMI video port and select
HDMI by pressing the AV key on your
remote control.
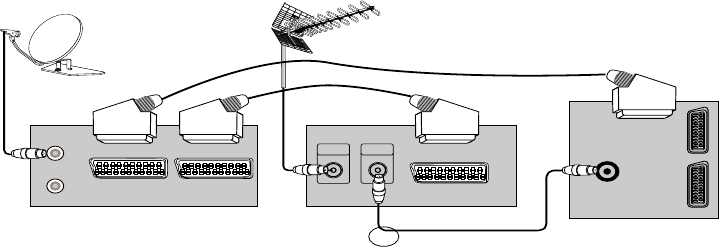
9.3-Connecting a video recorder device and a digital satellite
receiver
Digital Satellite Receiver
Video Recorder
Rear of the Television
Scart 1 TV In/Out
Scart 2 AUX In
Ant In
Ant Out
Ant In
Ant Out
Ant In
SCART Socket
SCART socket
27 I