xHalten Sie das Spritzrohr in den Spritzmitteltank
oder in einen geeigneten Auffangbehälter für
Spritzmittel und betätigen Sie das Handventil so
lange, bis keine Flüssigkeit mehr gefördert wird,
um den Behälter drucklos zu machen.
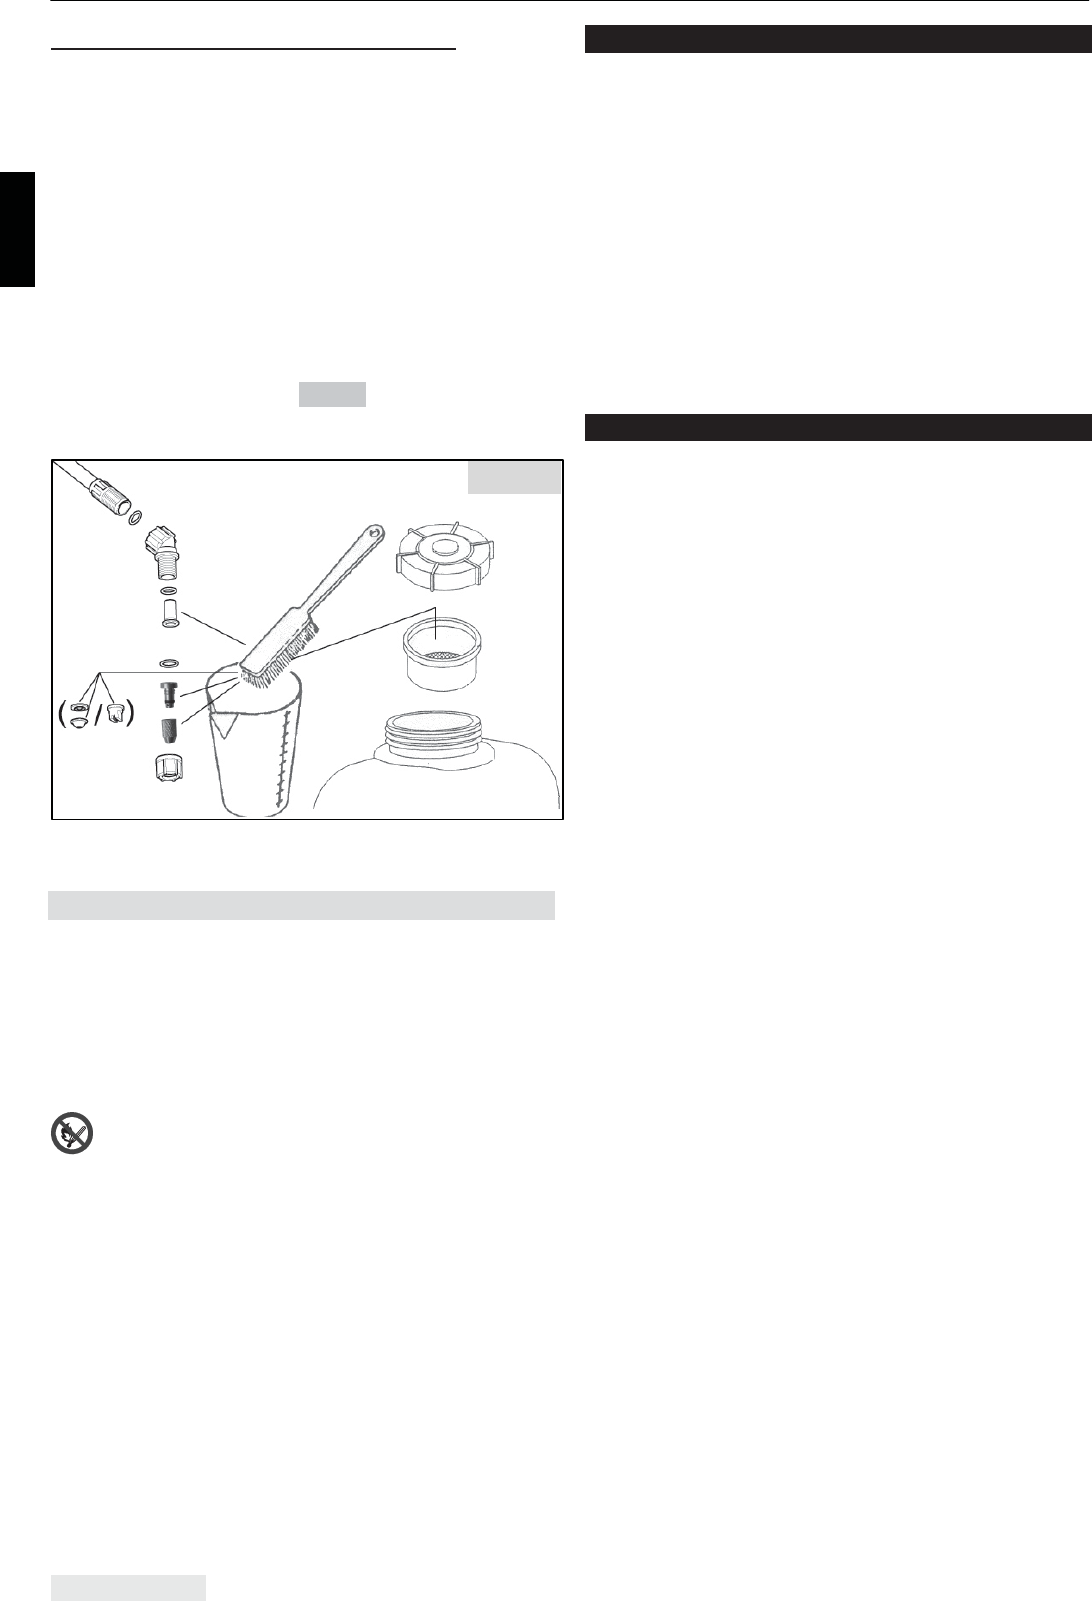
xDüsenaufsatz mit sauberem Wasser abspülen.
x Düsenaufsatz auseinanderschrauben.
xO-Ringe, Filter, Spritzdüse und Einfüllsieb mit
sauberem Wasser und weicher Bürste reinigen.
Spritzdüse nicht mit dem Mund ausblasen!
Düsen nicht mit harten Gegenständen reinigen!
xEinzelteile des Düsenaufsatzes wieder
zusammenschrauben (Fig. 22).
6.8 Stilllegung und Aufbewahrung
Das Gerät gemäß Kap. 6.7 zur Lagerung
vorbereiten.
Bewahren Sie das Gerät geschützt vor Sonnenlicht
an einem trockenen, frostfreien und sicheren Ort
bei einer Umgebungstemperatur bis max. 35 °C
auf.
Es dürfen keine offenen Feuerstellen oder
dergleichen in der Nähe sein.
Unbefugte Benutzung – besonders durch Kinder –
ausschließen.
7 Verschleißteile
Verschiedene Bauteile unterliegen gebrauchs-
bedingtem Verschleiß bzw. einer normalen
Abnutzung und müssen ggf. rechtzeitig ersetzt
werden.
Nachstehende Verschleißteile unterliegen nicht der
Herstellergarantie:
xAlle mit Spritzmittel in Berührung kommenden
Gummiteile
x Spritzdüse
x Filter
x Dichtungen
8 Garantie
Wir garantieren eine einwandfreie Qualität und
übernehmen die Kosten für eine Nachbesserung
durch Auswechseln der schadhaften Teile im Falle
von Material- oder Herstellungsfehlern, die
innerhalb der Garantiezeit nach dem Verkaufstag
auftreten.
Bitte beachten Sie, dass in einigen Ländern
spezifische Garantiebedingungen gültig sind.
Fragen Sie im Zweifelsfall Ihren Verkäufer. Er ist
als Verkäufer des Produktes für die Garantie
verantwortlich.
Wir bitten um Ihr Verständnis, dass für folgende
Schadensursachen keine Garantie übernommen
werden kann:
xNichtbeachtung der Gebrauchsanweisung.
xUnterlassung von notwendigen Wartungs- und
Reinigungsarbeiten.
xVerschleiß durch normale Abnutzung
(insbesondere: Dichtungen, Membranen,
Manschetten, Düsen und Filter).
xVerwendung nicht zugelassener
Arbeitswerkzeuge.
xGewaltanwendung, unsachgemäße Behandlung,
Missbrauch oder Unglücksfall.
xEingriffe nicht sachkundiger Personen oder
unsachgemäße Instandsetzungsversuche.
xEigenmächtige Veränderungen am Gerät.
xVerwendung ungeeigneter Ersatzteile bzw.
Nichtoriginalteile, soweit diese den Schaden
verursachten.
xVerwendung nicht zugelassener Mittel im
Spritzmitteltank.
xSchäden, die auf Einsatzbedingungen aus dem
Vermietgeschäft zurückzuführen sind.
Reinigungs-, Pflege- und Einstellarbeiten werden
nicht als Garantieleistung anerkannt.
Jegliche Garantiearbeiten sind von einem unserer
autorisierten Fachhändler auszuführen.
Fig. 27
9 Düsenübersicht
DEUTSCH 13
9 Düsenübersicht
Bezeichnung Best.-Nr.
Ausbring-
menge
l/min
Spritz-
druck
bar
Spritz-
winkel Verwendungszweck
Hohlkegeldüse
1 mm Ø, grau,
Material POM
40 74 758
+ 40 74 756
0,40
0,55
1,0
2,0
50–70° Behandlung von Sträuchern,
Büschen und Bäumen
Hohlkegeldüse
1,4 mm Ø, schwarz,
Material POM
40 74 755
+ 40 74 756
0,64
0,91
1,11
1,0
2,0
3,0
50–70°
Hohlkegeldüse
1,8 mm Ø, blau,
Material POM
40 74 726
+ 40 74 756
0,88
1,25
1,53
1,0
2,0
3,0
50–70°
Pralldüse DT 1,0
gelb
40 74 385 0,46
0,65
0,80
0,93
1,0
2,0
3,0
4,0
105° Hauptsächlich für Herbizide
mit geringem Spritzdruck
Pralldüse DT 2,0
rot
40 74 386 0,91
1,29
1,60
1,85
1,0
2,0
3,0
4,0
105°
Pralldüse DT 2,5
braun
40 74 514 1,14
1,61
2,01
2,32
1,0
2,0
3,0
4,0
110°
Hochstrahldüse,
regulierbar
49 00 206
(Messing)
49 00 525
(Kunststoff)
0,44–1,10
0,55–1,45
0,66–1,75
0,75–1,85
1,0
2,0
3,0
4,0
Flachstrahldüse
015-F80, grün
40 74 504 0,35
0,49
0,60
0,69
1,0
2,0
3,0
4,0
80° Flächen- und
Reihenspritzungen
Flachstrahldüse
02-F80, gelb
49 00 504
(Messing)
40 74 501
(Kunststoff)
0,46
0,65
0,80
0,92
1,0
2,0
3,0
4,0
80°
Flachstrahldüse
03-F80, blau
40 74 506 0,69
0,98
1,20
1,39
1,0
2,0
3,0
4,0
80°
Flachstrahldüse
04-F110, rot
40 74 263 0,92
1,31
1,60
1,85
1,0
2,0
3,0
4,0
110°
10 Technische Daten / 11 Typenschild
DEUTSCH 14
10 Technische Daten
Modell
435
Comfort
425
Comfort
425
Pro
475
Comfort
475
Pro
Spritzmitteltank: Volumen ("Total Vol."
1
) l
Max. Füllmenge ("max. Vol."
1
) l
22
20
16
15
Restmenge, ml
die das Gerät nicht mehr ordnungsgemäß ausbringt
< 200
Pumpsystem Kolbenpumpe Membranpumpe
Maximal zulässiger Betriebsdruck ("P max."
1
) 4 bar;
mit Verschlussstopfen bis
6 bar
4 bar
Windkesselinhalt l 1,3
Hubvolumen cm
3
80
Zulässige Betriebstemperatur (T max."
1
) °C 0–40
Druckschlauch: Länge mm 1.300
Maximale Ausbringmenge ("max."
1
) l/min
(mit Standard-Spritzdüse bei 4 bar)
1,85
Filtereinsatz: Maschenweite mm
Bestell-Nr.
0,8
407492225
Einfüllsieb: Maschenweite mm
Bestell-Nr.
2,0
420016625
Gewicht:
Betriebsfertig, ohne Spritzmittel ("m net."
1
) kg
Betriebsfertig, mit max. Füllmenge ("m max."
1
) kg
5,1
25,1
4,5
19,5
5,2
20,2
4,7
19,7
5,4
20,4
Abmessungen (ohne Spritzrohr, Höhe mm
Pumphebel und Druckschlauch): Breite mm
Tiefe mm
590
400
250
520
370
240
1
Angaben auf dem Typenschild
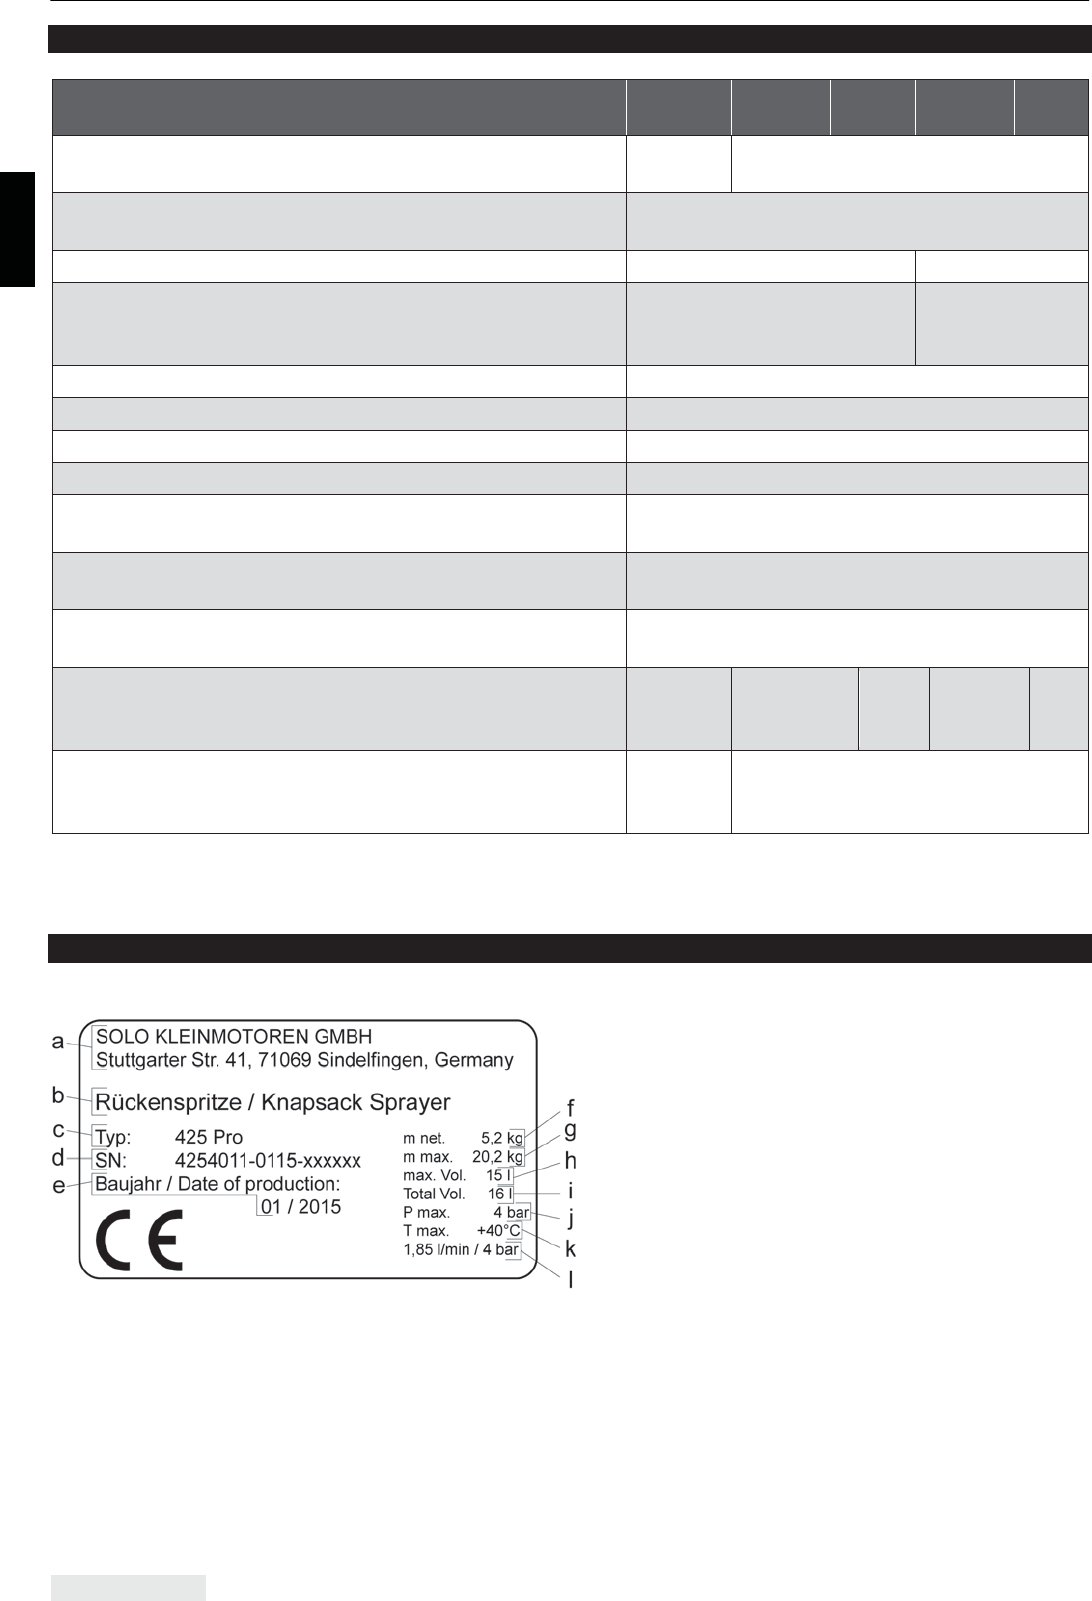
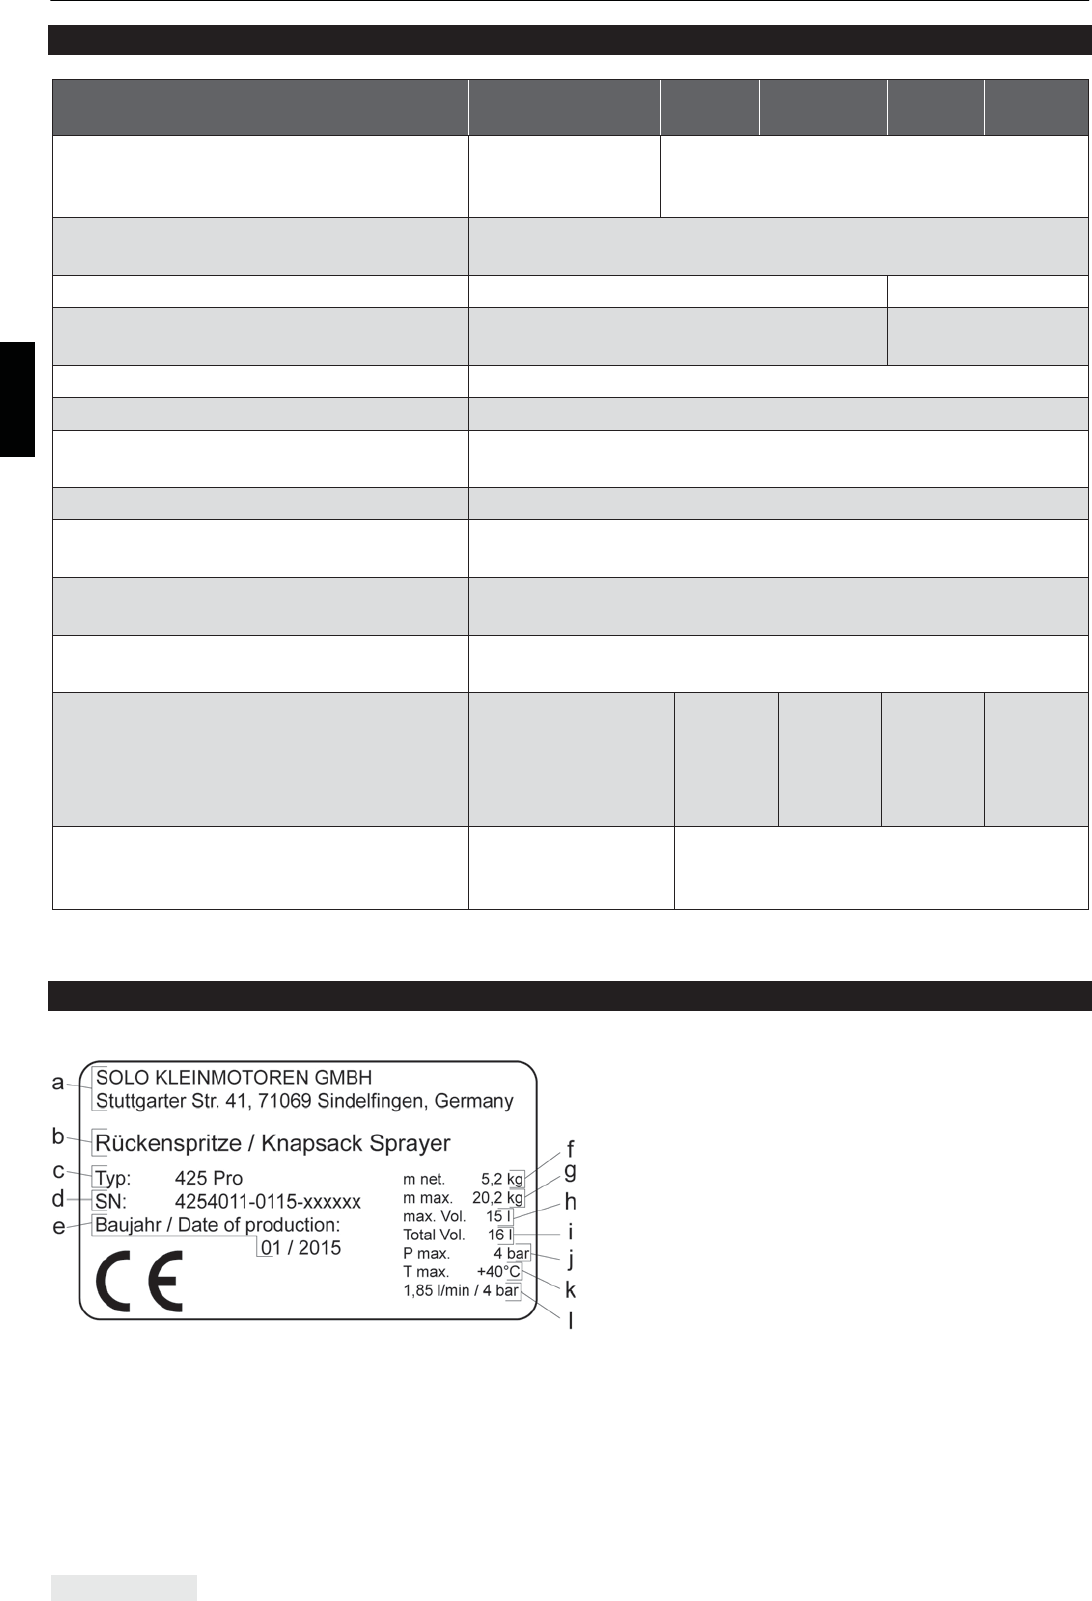
11 Typenschild
a: Name und Anschrift des Herstellers
b: Produktbezeichnung
c: Typbezeichnung
d: Seriennummer
e: Herstellungsmonat / jahr
f:Gewicht (betriebsfertig, ohne Spritzmittel)
g: Gewicht (betriebsfertig, mit max. Füllmenge)
h: Maximale Füllmenge des Spritzmitteltanks
i:Volumen des Spritzmitteltanks
j:Maximal zulässiger Betriebsdruck
k: Maximal zulässige Betriebstemperatur
l:Maximale Ausbringmenge (mit Standard-
Spritzdüse bei max. Betriebsdruck)
- ENGLISH - Backpack sprayer 425 Comfort / 435 Comfort / 475 Comfort // 425 Pro / 475 Pro
ENGLISH 1
Instruction manual
Translation of the original instructions
Caution!
Prior to operating the unit, please read
this instruction manual carefully, and most
importantly, observe all safety rules.
To ensure that your device will continue to work
properly and deliver optimum performance for
many years to come, ensure that you follow all
operating and maintenance instructions.
Your authorised SOLO dealer will be glad to assist
you with any questions.
EC declaration of conformity
The EC declaration of conformity on a separate
piece of paper forms part of these operating
instructions.
National requirements
The backpack sprayer may be subject to national
requirements for regular inspection by designated
bodies, as provided for in Directive 2009/128/EC
1
.
Packaging and disposal
Please keep the original packaging in order to
protect the equipment against transport damage in
case you ever need to ship it or transport it.
If the packaging materials are no longer required
then they must be disposed of properly in
accordance with applicable local regulations.
Cardboard packaging materials are raw materials
which can be recycled or reused.
At the end of the equipment’s service life, please
make sure that you dispose of it properly in
accordance with the official directives and
regulations that apply in your area.
1
Directive 2009/128/EC of the European Parlia-
ment and of the Council of 21 October 2009
establishing a framework for Community action
to achieve the sustainable use of pesticides
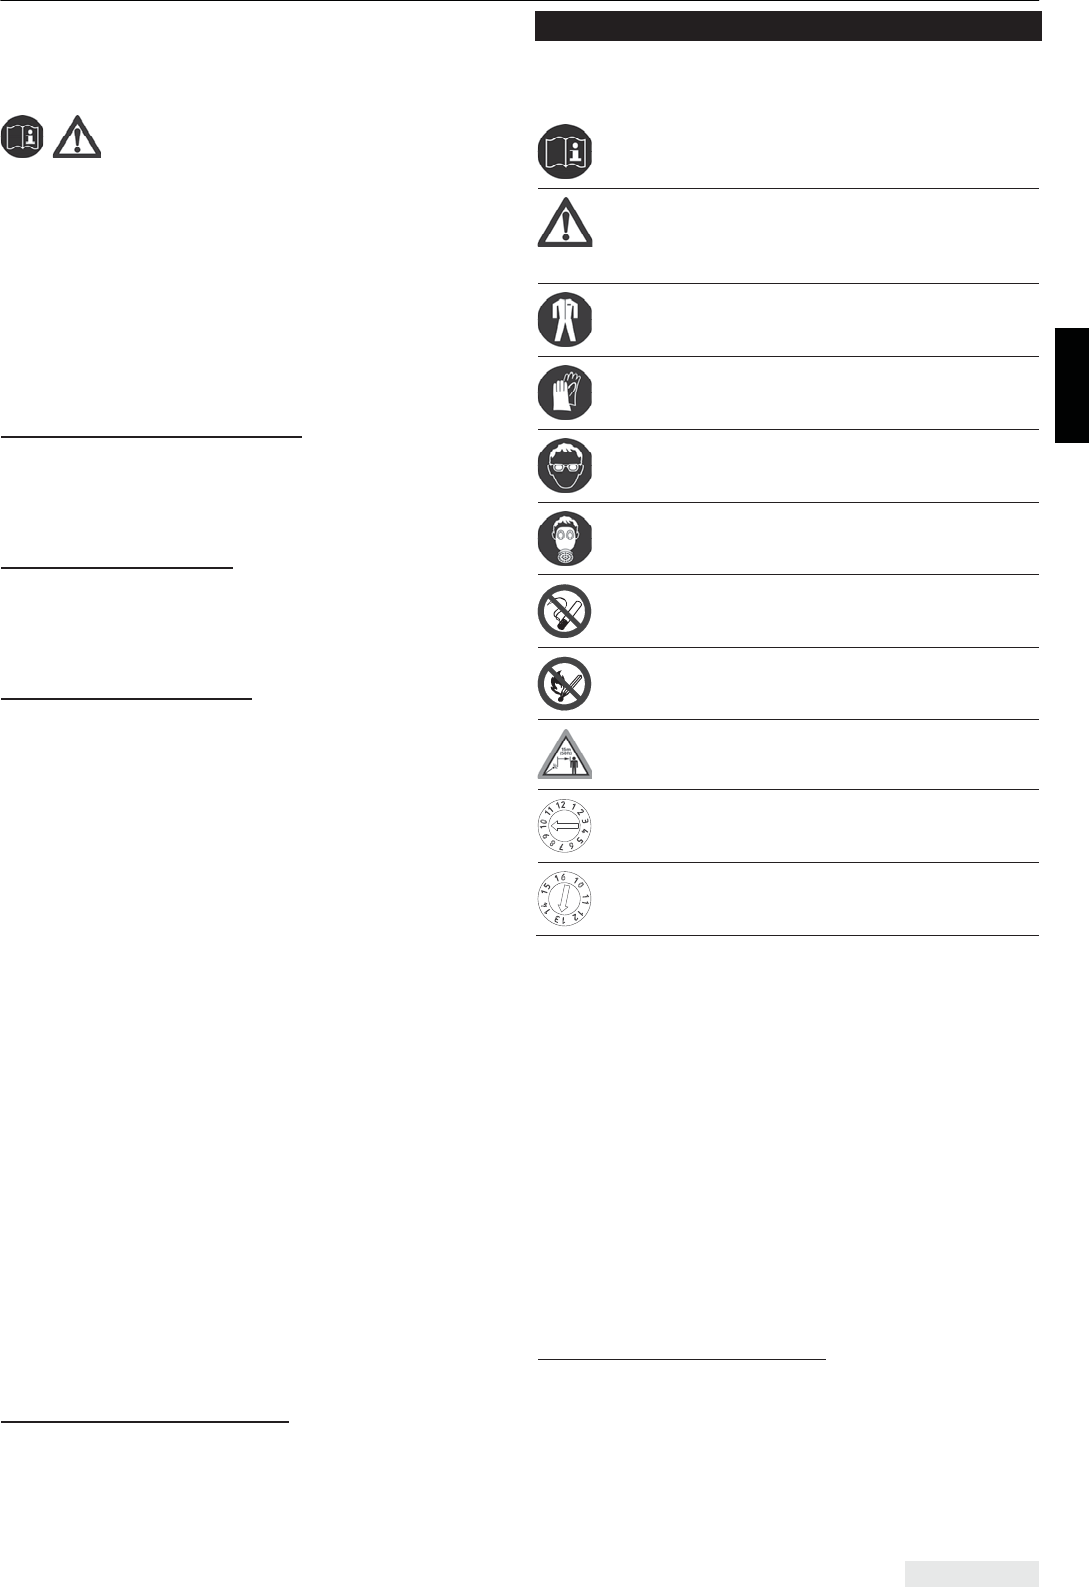
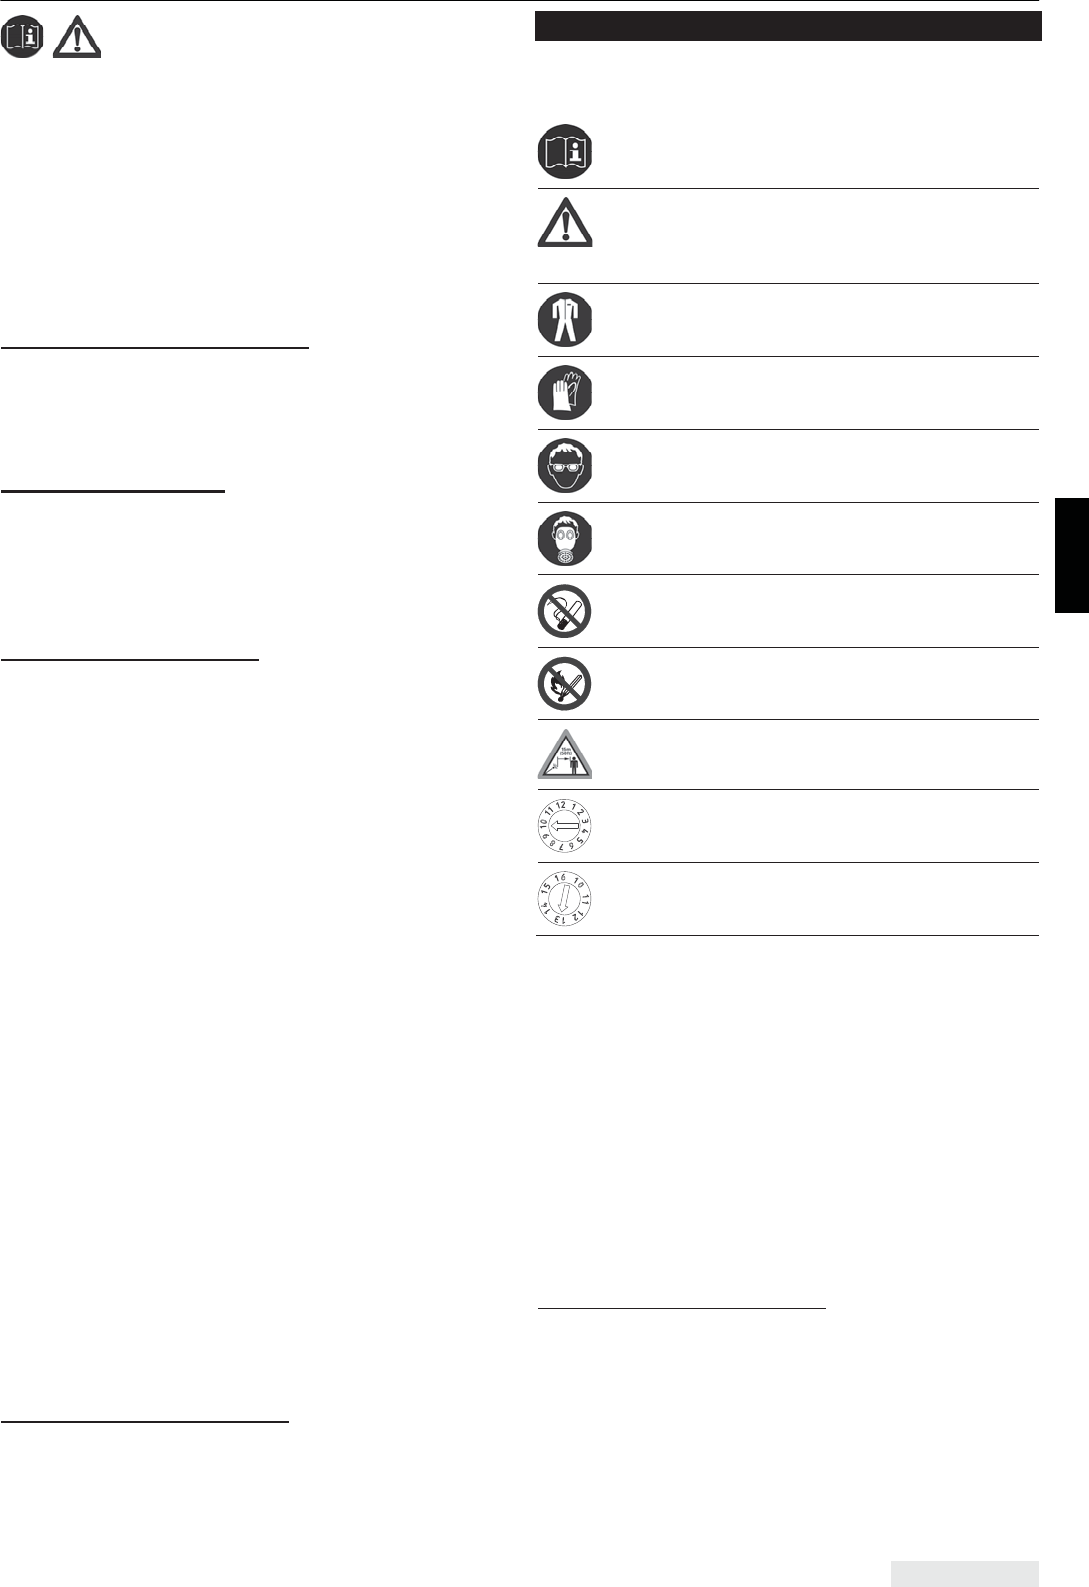
Symbols
The following symbols are used in this instruction
manual and on the device itself:
Read the manual carefully.
DANGER! Failure to comply with the
instructions could cause accidents with
potentially life-threatening injuries.
Wear the prescribed protective clothing.
Wear protective gloves.
Wear face protection
(e.g., safety goggles).
Wear breathing mask.
Smoking prohibited.
No naked flames.
Minimum distance to bystanders:
15 m (approx. 16 yards)
Month of production
Year of production
In the best interest of continued technological
progress we reserve the right to change the design
and configuration of any product without prior
notice.
For that reason, no claims can be accepted with
reference to text and illustrations in this manual.
Table of contents / 1 Standard delivery
ENGLISH 2
Table of contents
1 Standard delivery ..................................................................................................................................... 2
6 Maintenance, cleaning and storage ..................................................................................................... 10
6.1Maintenance plan 10
6.2Trial run 11
6.3Checking the spray nozzles and the filter element 11
6.4Changing the spray nozzle and the filter element 11
6.5Greasing the cap gasket 11
6.6Greasing the piston collar and the pump piston pump
(only 425Comfort,435Comfort,425Pro) 11
6.7Draining the spraying agent tank and cleaning all other spraying agent carrying parts 11
6.8Taking the sprayer out of service and putting it into storage 12
7 Wearing parts ......................................................................................................................................... 12
11 Type plate ............................................................................................................................................. 14
1 Standard delivery
xStandard device with shut-off valve pre-assembled on the high-pressure hose
x Spray tube
xNozzle attachment including nozzle
x Tank lid
xModel 425 Comfort, 435 Comfort, 425 Pro: Pressure tank plug with O-ring 16 x 3 mm
xPump lever with all assembly parts
xModel 425 Pro , 475 Pro: Carrying system
x Alternative nozzle
xSticker for the spraying agent tank: herbicide, fungicide and insecticide
xThese operating instructions, the EC declaration of conformity on a separate piece of paper
2 Safety regulations
ENGLISH 3
2 Safety regulations
2.1 Correct use / areas of application
Intended use of the back spray is application of
exclusively the spraying agents described below,
which generally have been released for application
via pressure sprays by the spraying agent
manufacturer.
Handling of spraying agents poses hazards
to health and also dangers to the
environment.
The notes on the spraying agent manufacturers
must be observed.
Plant protection:
xThis backpack sprayer can be used for the
purpose of applying approved liquid plant
protection agents, pesticides, insecticides, weed
killer (herbicides) and liquid fertilizers available
from authorised specialist dealers as well as for
the purpose of applying clean water.
xWe recommend using only spraying agents that
have been approved for use as spraying agent
for the above mentioned areas of application by
the relevant authorities in your country.
xThe back spray is used in plant protection in
agriculture, tree nurseries and forestry, orchards,
vineyards and vegetable gardens, household
and garden areas as well as for under-glass-
cultures at sufficient ventilation and venting.
Crafts and industry:
xThe back spray can also be used to apply
cleaning and disinfection agents, construction
chemicals (e.g. formwork oil, wallpaper remover,
deep primer), alkaline cleaning and care agents
and acid containing media at low concentrations.
xNitric, acetic and propionic acids must only be
used at concentrations up to 10%, phosphoric
and sulphuric acids up to 30%, potash and
caustic soda up to 20%.
xWhen using health-hazardous media, the back
spray must only be used in the outdoor area and
using personal protection equipment, as well as
under compliance with the information provided
by the spraying agent manufacturer.
General:
xThe backpack sprayer must not be used for any
other purposes, e.g., for the spraying of liquid
paint or applying any other media than the
above mentioned liquids!
xNever use fluids with a temperature in excess of
40 °C [104 °F].
xTo enable the operator in connection with the
spraying agent manufacturer to check the
material resistance to certain chemicals, we will
provide details of the type of materials used for
the backpack sprayer.
2.2 General safety instructions
Please take the time to carefully read
through these operating instructions
before using the device for the first time and keep
them in a safe place thereafter. Always take great
care when using the device.
You can put your life at risk by failing to follow the
safety instructions.
It is also important to follow any relevant health and
safety regulations that apply to your place of work.
Anyone who fails to follow the safety instructions,
operating instructions or maintenance instructions
will make themselves liable for any damage and
consequential damage caused as a result.
The operating instructions must be kept available
at all times wherever the device is used or stored.
They must be read by anyone instructed to use the
equipment or perform work with or on the device
(including servicing, maintenance and repairs).
xA first time operator should obtain practical
instruction by an authorised SOLO dealer before
using the equipment.
xPersons under the age of 18 are only permitted
to use this plant protection device under
supervision.
xKeep persons and animals away from areas in
which you are working. Never spray in the
direction of other persons, animals or objects
that could be damaged as a result. Bear in mind
that the liquid emerges at high speed from the
spray nozzle. Objects could be kicked up as a
result, and this could in some cases represent a
risk. The user is responsible for any hazards or
accidents involving other persons and/or their
property.
xThis equipment must only be hired out, lent or
passed on to persons who are familiar with this
type of equipment and its operation and who
have read the operating instructions. Always
ensure that you hand over the operating
instructions together with the device.
xEnsure that you are in good shape, well rested
and healthy when using this device.
Do not use this device, if you are tired or sick.
xNever use this device under the influence of
alcohol, drugs or medication that could impair
your reaction speed.
xNever alter, change or modify any safety
equipment or operating controls.
2 Safety regulations
ENGLISH 4
xNever use the device if any part of it is unsafe or
if it is not in an overall condition that makes it
safe to use. Before using the device always
check whether it is safe to use according to
section 6.1.
xImmediately replace damaged parts. Only use
genuine SOLO replacement parts.
xOnly use accessories and add-on parts that
have been supplied and specifically approved for
installation on the device by us.
xThe quality of any spare parts used is also an
important factor in ensuring that your device is
reliable and safe to use. Always use genuine
SOLO replacement parts, as these are the only
parts that have been manufactured with the
same equipment and under the same conditions
as the parts originally fitted to the device. This
ensures the highest possible level of quality and
accuracy of fit – vital factors in ensuring the
safety, reliability and proper functioning of your
device. Genuine SOLO replacement parts and
accessories are available from your authorised
SOLO dealer.
xHe also has access to the necessary spare parts
lists, from which the required part numbers can
be taken, and he will also be kept up to date
about any minor improvements and changes to
the range of parts on offer. Please note that the
use of non-genuine replacement parts will
invalidate your warranty.
xWhen the device is not being used it should be
safely stored in a place where it will not
endanger the health and safety of others.
Prepare the device for storage according to
section 6.7. Ensure that the device is stored in a
safe place where unauthorised persons cannot
access it.
2.3 Safe handling of spraying agents
xAvoid contaminating the environment, the mains
water supply and/or public sewer systems with
spraying agent or cleaner!
Ensure to avoid contamination when mixing,
filling, using, draining, cleaning, servicing and
transporting by using adequate procedures and
suitable containers.
xSpraying agents and cleaners must never be
allowed to enter the mains water supply – not
even by back-suction when filling, public sewer
systems, sprayed onto wastelands, allowed to
drain into natural bodies of water or disposed of
together with normal domestic waste. This also
means that appropriate care must be taken
during filling to ensure that none of the spraying
agent is drawn back into water pipes. Spraying
agents and cleaners and any unused leftovers of
spraying agents and cleaners must always be
collected in a suitable container and disposed of
via approved facilities for household chemical
waste. Please contact your local authorities for
information about your nearest disposal facilities.
xAvoid any direct contact with spraying agents.
In case of contact with health hazardous spray-
ing agents, immediately rinse the affected body
parts with plenty of clean water, immediately
change the clothing soaked with spraying agents
and immediately seek medical advice.
xNever eat or drink when handling spraying
agents.
xStop working immediately if you start to feel
unwell while working, or if you become unusually
tired. Seek medical advice if the condition
persists.
xNever allow children or anybody who is not
familiar with handling this type of spraying agent
to handle the spraying agent.
xClean the spraying agent tank and all other
spraying agent carrying parts whenever the
spraying agent is changed. To flush out any
residue from the pump and the hose, run the
backpack sprayer with clean water after cleaning
the spraying agent tank and before the next
spraying agent is filled in. This will prevent the
risk of any chemical reactions taking place
between the different substances.
xNever spray in narrow or enclosed spaces –
spraying agents are toxic and there is a risk of
poisoning. Spraying equipment must for
example only be used in greenhouses if
adequate ventilation is provided. Signs must be
put up in greenhouses that have been treated.
Nobody should enter the greenhouse again until
it has been thoroughly ventilated.
xWhen you have finished spraying, prepare the
device for storage according to section 6.7,
thoroughly wash your face and hands with soap,
take off your work clothing and ensure that it is
washed regularly.
Any unused spraying agent that is left over in the
device could cause corrosion and hence
damage the device. Special attention must be
paid to wearing parts like spray nozzles, filters
and seals.
2.4 Transportation of the device
xTo prevent damage and to eliminate potential
hazards for other road users, use secure lashing
equipment to secure the device and prevent it
from tipping over and falling when transporting it
on a vehicle.
xTake appropriate measures to ensure that the
spraying agent cannot leak or spill. Check the
spraying agent tank and all hoses and pipes that
carry the spraying agent for leaks.
Before transporting the device you should ideally
prepare the device for transportation according
to section 6.7.
2 Safety regulations
ENGLISH 5
2.5 Work clothing /
personal protection equipment (PPE)
Always wear suitable protective clothing in
accordance with the relevant regulations. The
clothing must protect all parts of your body against
contact with spraying agents and against objects
that are kicked up – i.e., protective gloves, face
protection (e.g., protective goggles), protective
footwear, body protection (e.g., rubber apron), if
required breathing protection.
xClothing should be appropriate – i.e., tight-fitting,
but not obstructive.
xWear protective shoes with good grip, preferably
safety shoes.
xWear protective gloves with non-slip
palms.
xWear face protection (e.g., safety goggles)
against the spraying agents.
xAlways wear a breathing mask when
working in dense and tall plants, in
greenhouses, in dips in the ground or in
trenches and when using dangerous
spraying agents.
xImmediately change any clothing that becomes
soaked with the spraying agent.
xWash the work clothing regularly.
xNever wear a scarf, tie, loose jewellery or other
items of clothing that could be caught in a bush
or on a branch.
2.6 Before and during work
xEvery time before you start using the device,
check the entire device to ensure it is safe to use
according to section 6.1.
xCheck the spraying agent tank and all hoses and
pipes that carry the spraying agent for leaks.
xNever start working if there are any irregularities
or leaks, if you can see any damage to the
equipment or if the equipment is not working
properly in any way.
In this event, immediately have the device
checked by a specialist workshop.
xThe device must only be operated by one
person at a time. Nobody else must be
within a radius of 15 metres [approx.
16 yards] at the same time.
xWhen starting to pump, ensure that the shut-off
valve is closed. Point the spray tube towards a
free area.
xAlways ensure that there is an adequate air
change when working in restricted conditions, in
tight, tall plant growth, in greenhouses, in dips in
the ground or in trenches.
xAlways remain within calling distance of other
persons who could help in the event of an
emergency.
xTake breaks at regular intervals.
xNever eat or drink when using spraying agents.
xNever smoke in areas where you are
working.
xWhen removing the spray tube, do not point to
yourself or other persons with the end of the
tube.
2.7 Maintenance and repairs
Only perform maintenance work and repairs by
yourself if they are covered in these operating
instructions. All other work must be carried out by
required training, experience, and equipment at his
disposal to provide you with the most cost-effective
solution and can help you in many ways with
advice and service.
xThe device must not be serviced, repaired
or kept in the vicinity of naked flames.
xAlways depressurise the device before doing
any maintenance work or repairs.
To depressurise the device, hold the spray tube
in the spraying agent tank or in a suitable
container for the spraying agent and operate the
shut-off valve until no more fluid is sprayed.
xAlways depressurise the device before
unscrewing the high-pressure hose, the shut-off
valve, the spray tube and the nozzle attachment.
xAll repairs must only be performed using
genuine SOLO replacement parts.
xThe device must not be altered in any way, as
this could adversely affect the safety of the
device and potentially cause an accident or
injury.
3 Preparing the device for use
ENGLISH 6
3 Preparing the device for use
3.1 Assembly
The backpack sprayer is dismantled before it is
dispatched. It must be fully reassembled again
before it is used.
Mounting of carrying system
(Model 425 Pro, 475 Pro), See Fig. 1 – Fig. 14
Installation of the pump lever:
See "Assembly Instruction of the pump lever"
Fig. 15 – Fig. 19
Fig. 15 ÎModel 475 Comfort, 475 Pro:
The backpack sprayer is prepared at the factory for
left-hand side installation of the pump lever (facing
towards the tank inscription).
If you prefer the pump lever to be mounted on the
other side, reposition the safety clips (a) on the
opposite side.
The pump lever can be attached to either side of
the device. The figures show mounting on the left
(on the right, mounting is performed accordingly).
Fig. 16:
When fitting the pump lever, the retaining tube (b)
of the pump lever should be facing upwards and
back (facing towards the tank inscription).
Fig. 17 , Fig. 18:
1. Push washer onto the shaft
2. Push pump lever onto the shaft
3. Screw the pump lever to the shaft with screw
and washer, secure with nut.
Fig. 19:
The pump lever length can be adjusted in three
lengths. For this, depress the pin (i), move the
pump handle (c) and latch the pin (i) in one of the
three bores (j).
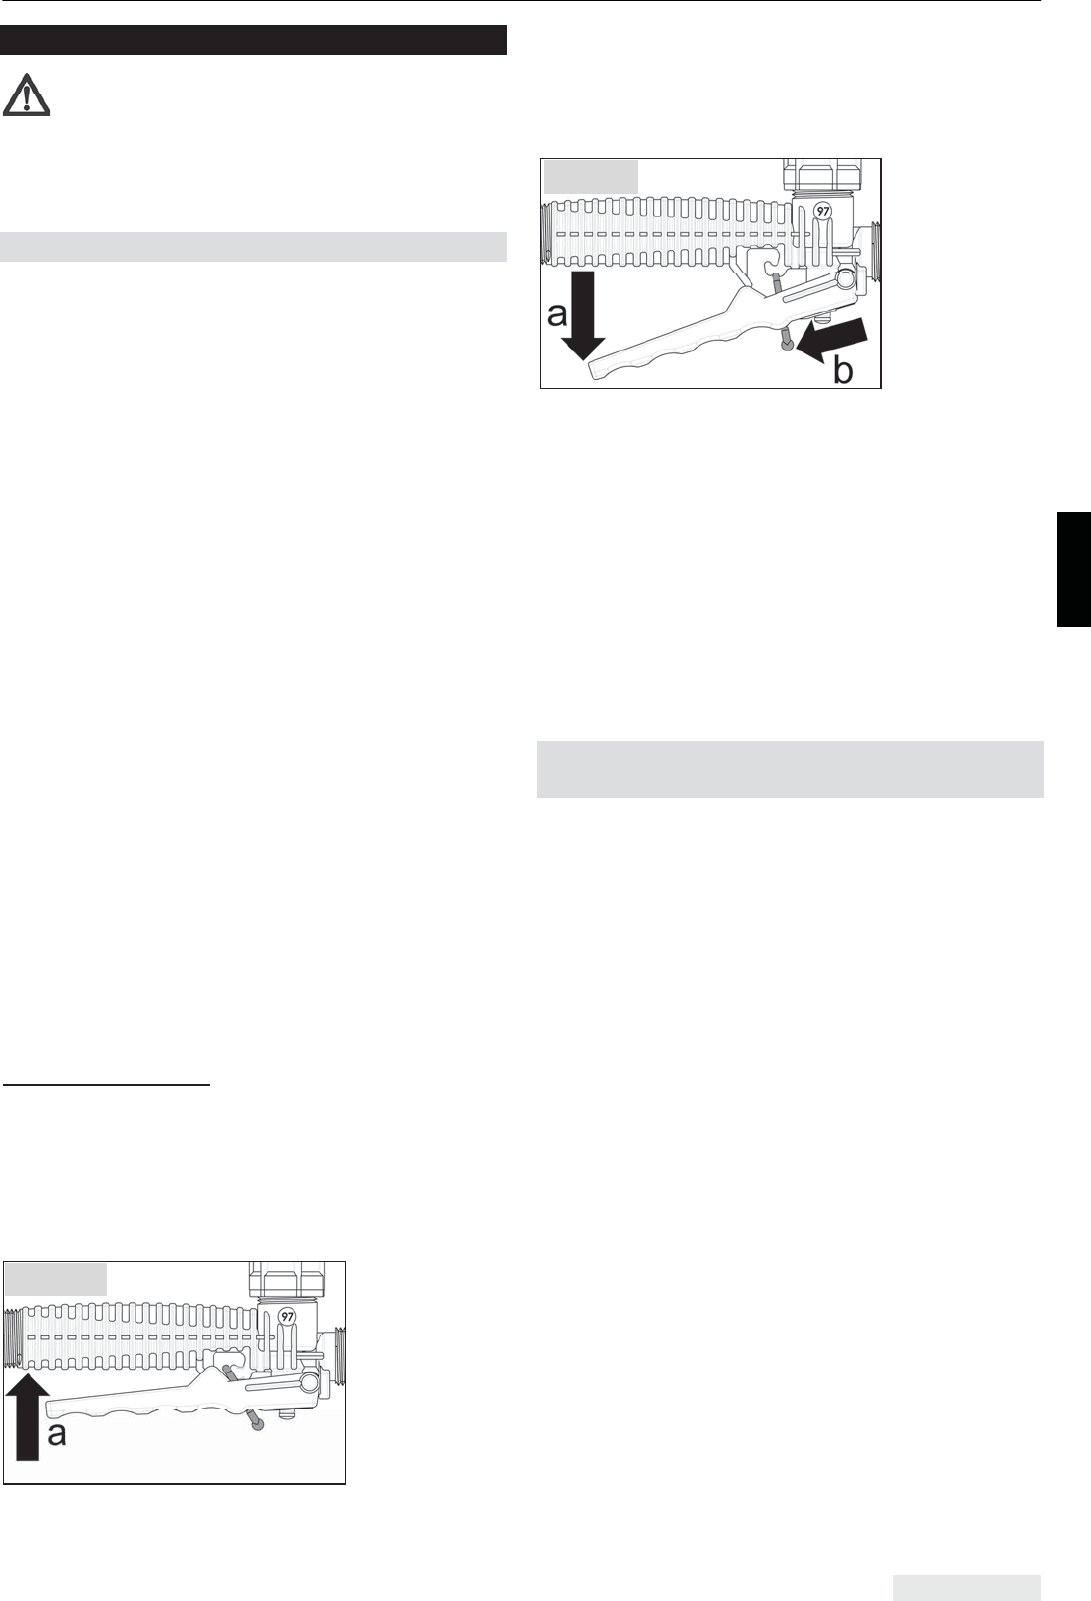
Fig. 20:
To put down the device, the pump lever can be
turned up with the pump handle (c) in the holder
pipe (b).
For work, turn the pump lever down again with the
pump handle (c) in the holder pipe (b).
Modell 425 Comfort, 475 Comfort, 425 Pro,
475 Pro:
Outside of work, the spraying tube (e) is attached
to the red carry handle (d).
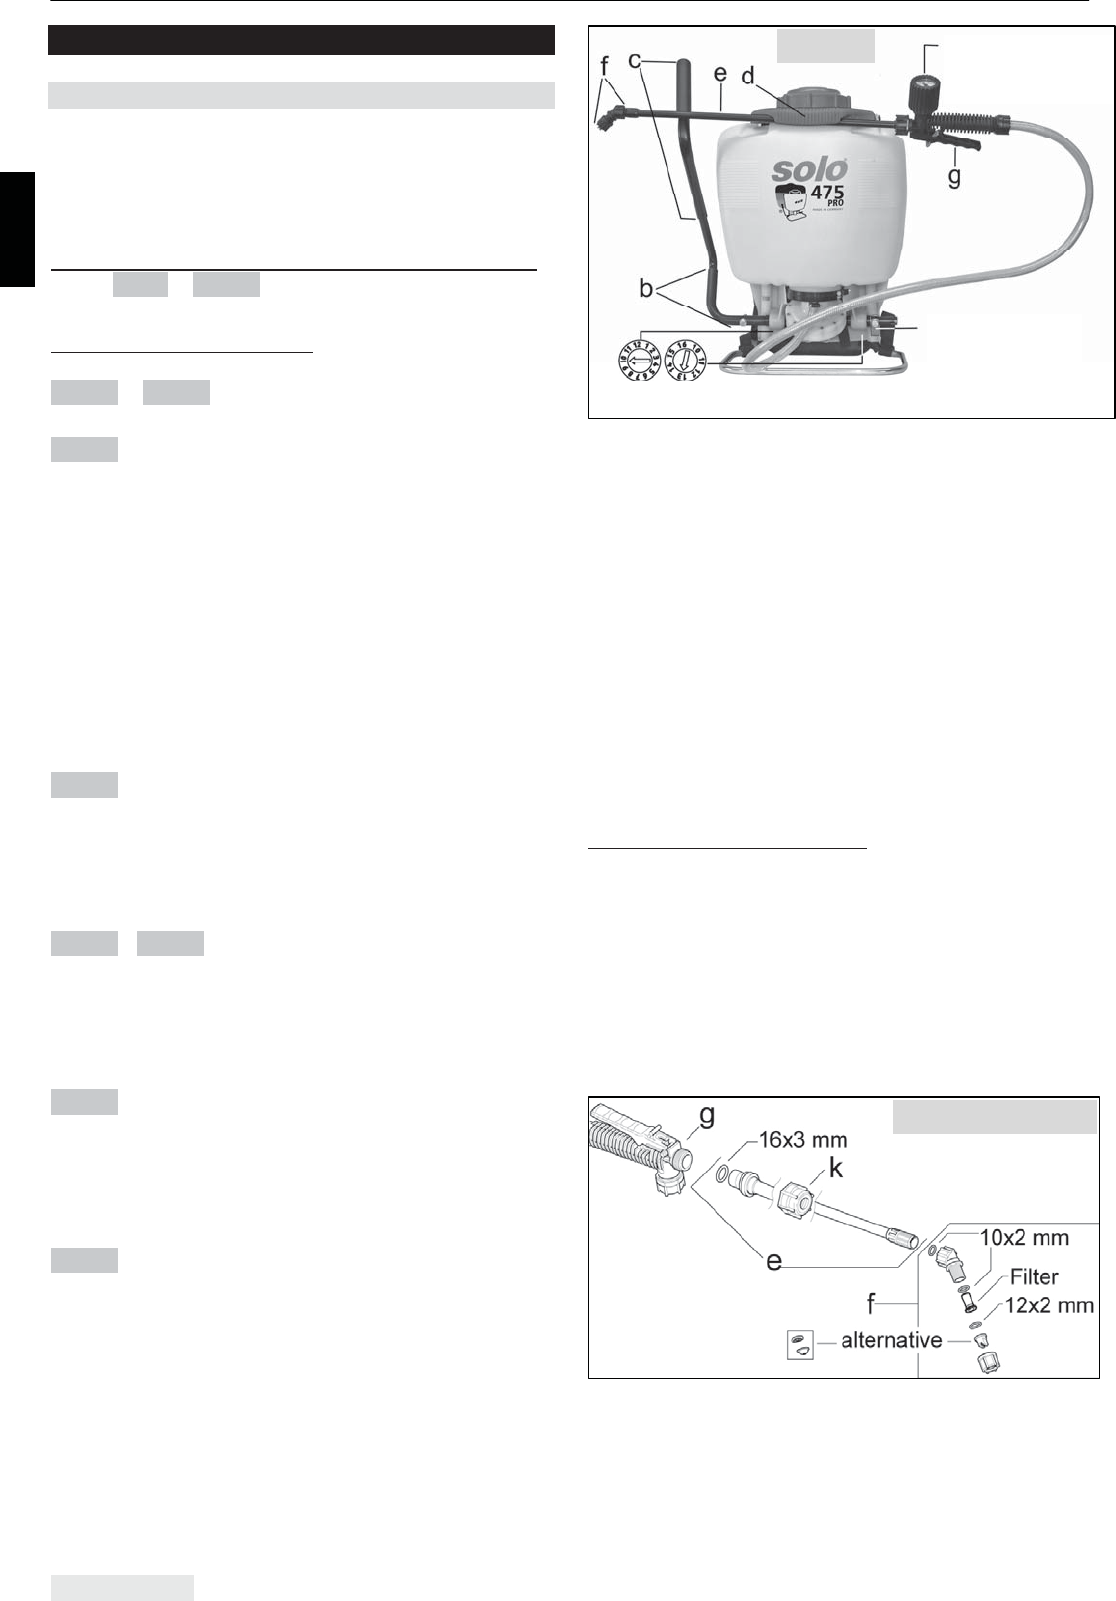
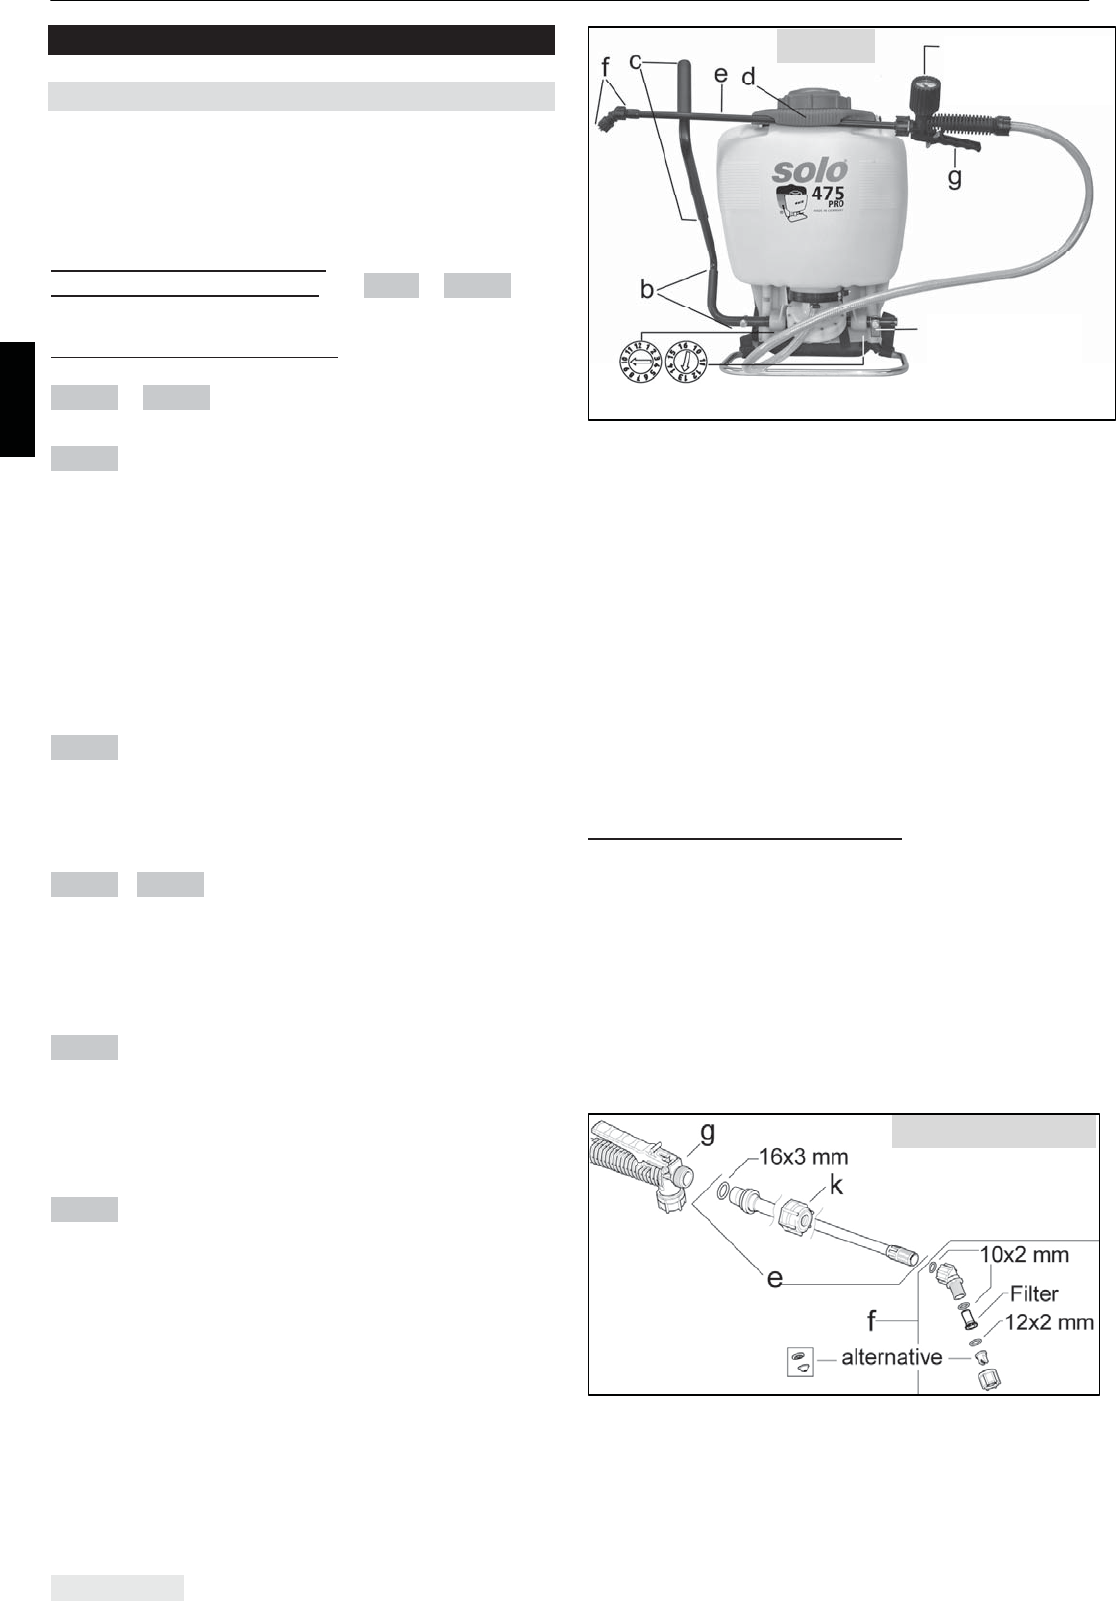
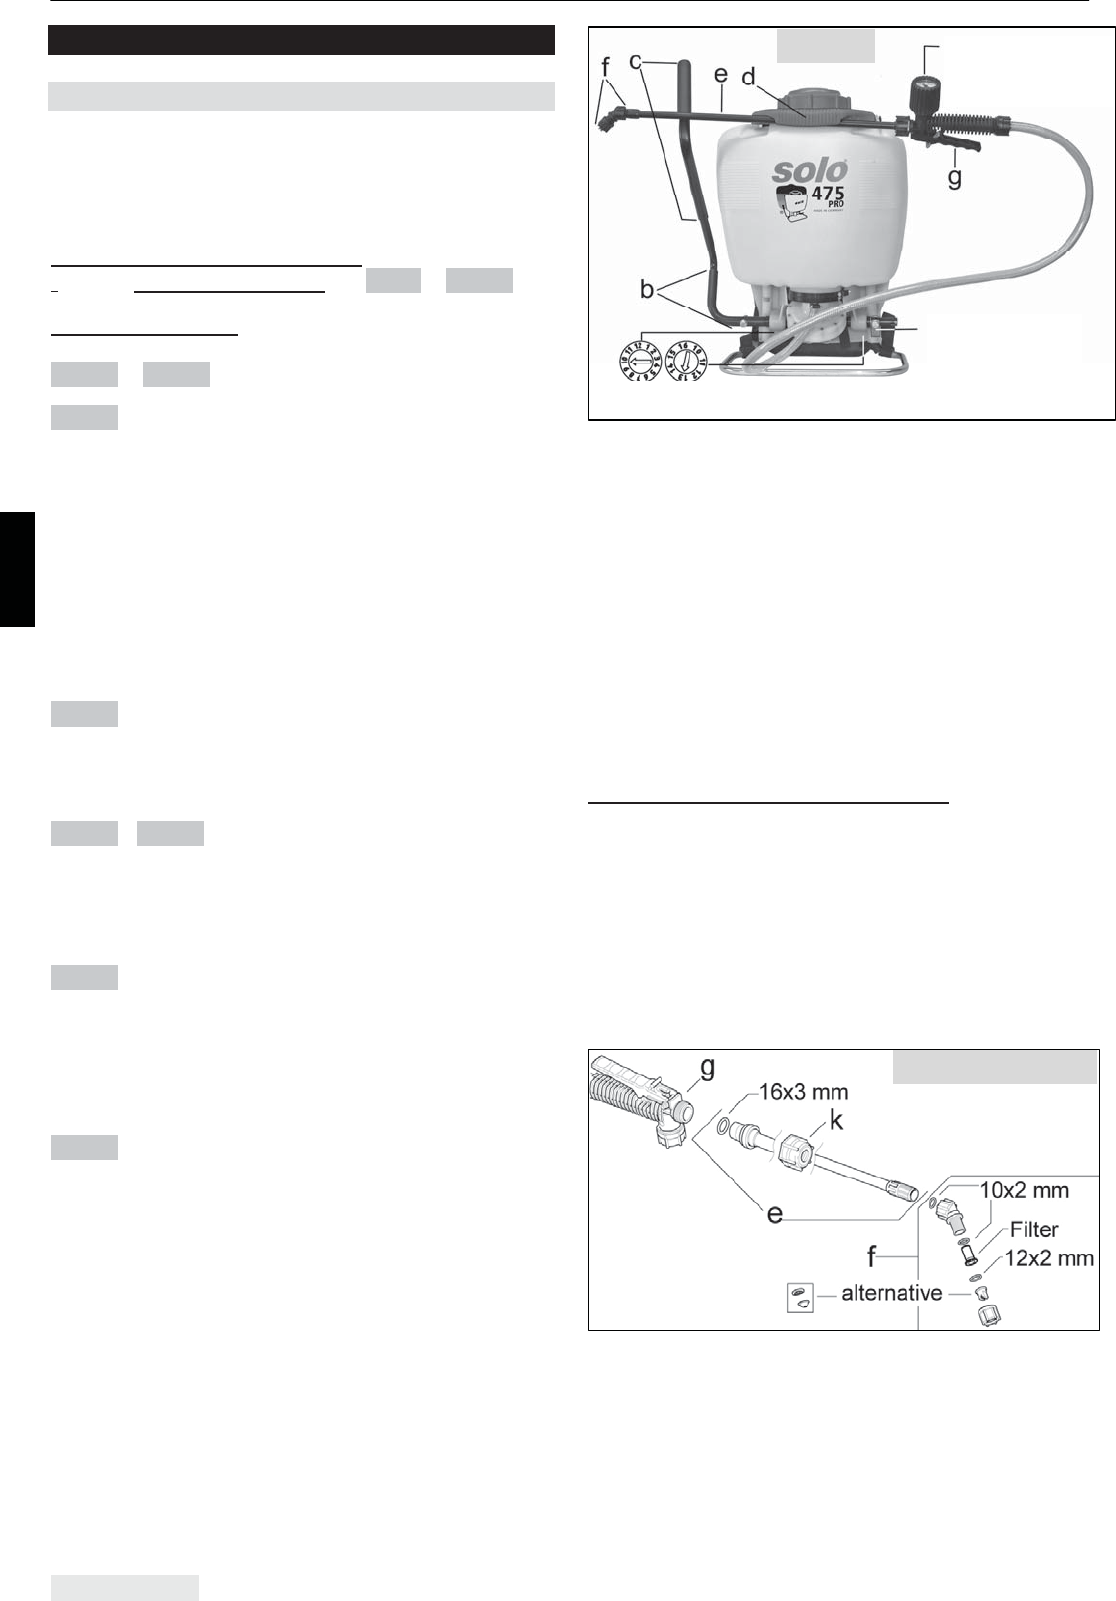
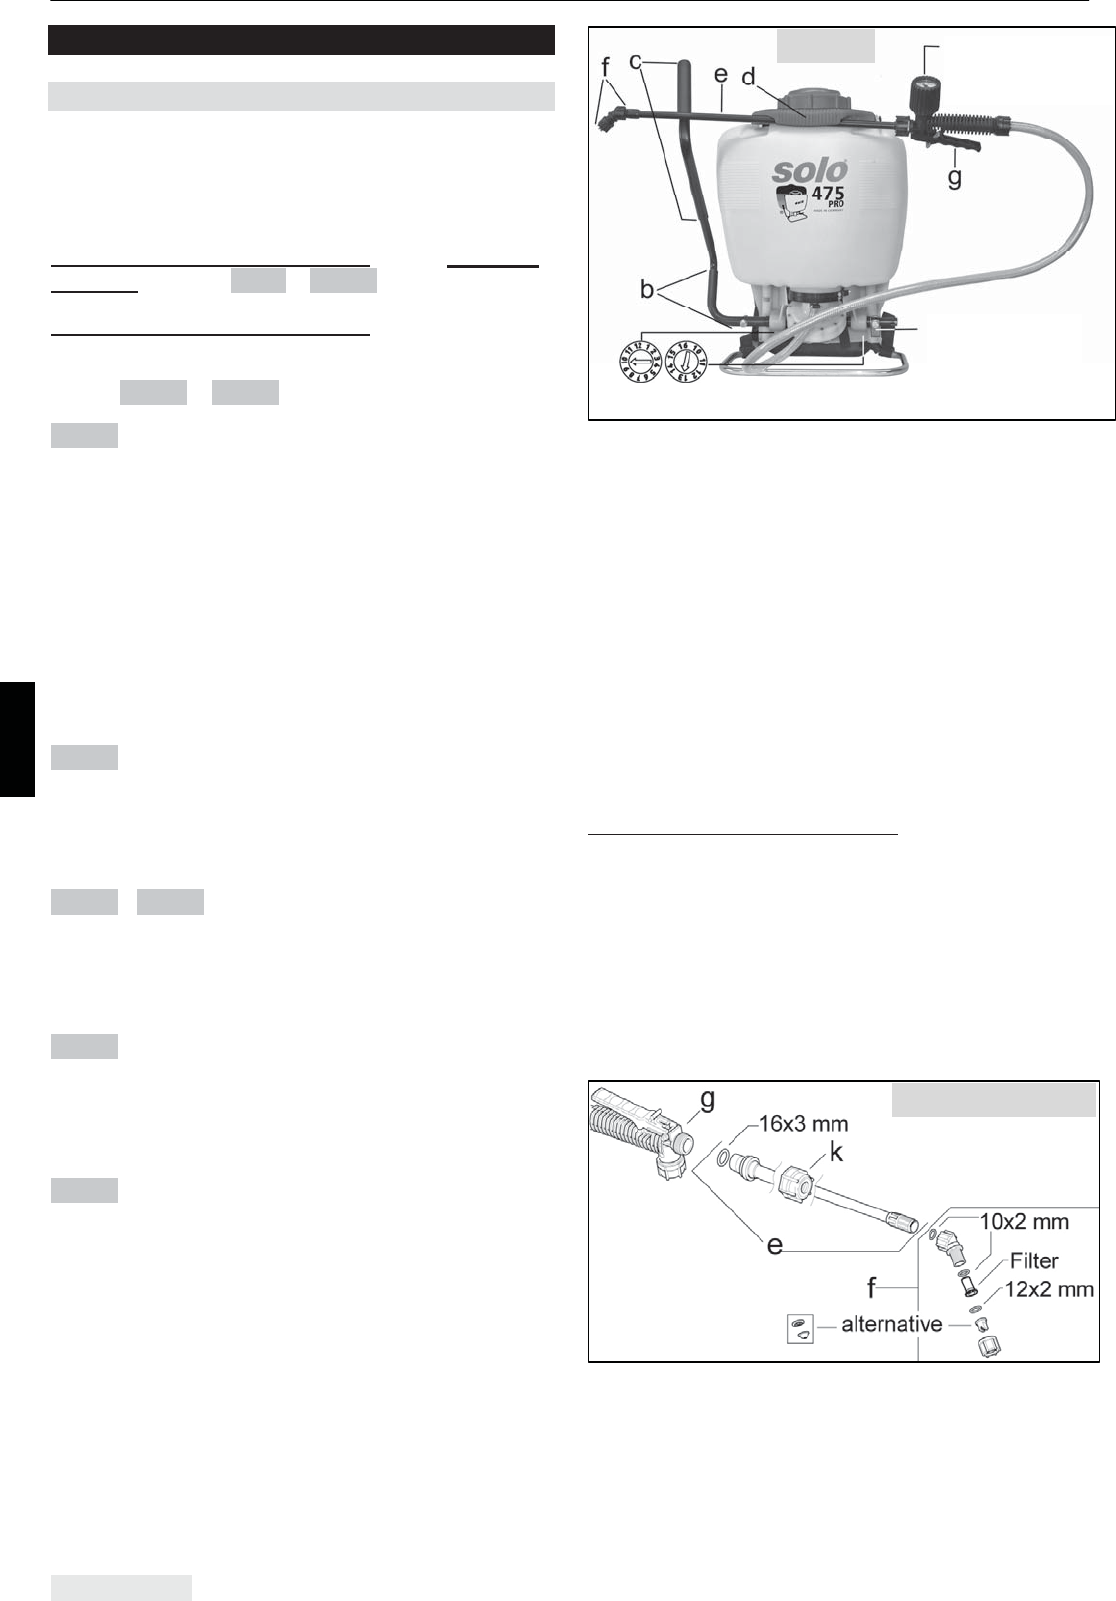
(schematic diagram / depending on the model)
a. safety bracket
(Model 475Comfort, 475 Pro)
b. holder pipe
c. pump handle
d. carry handle (Model 425 Comfort,
475Comfort, 425 Pro, 475 Pro)
e. spraying tube
f. nozzle attachment
g. hand valve
h. pressure gauge (Model 425 Pro, 475 Pro)
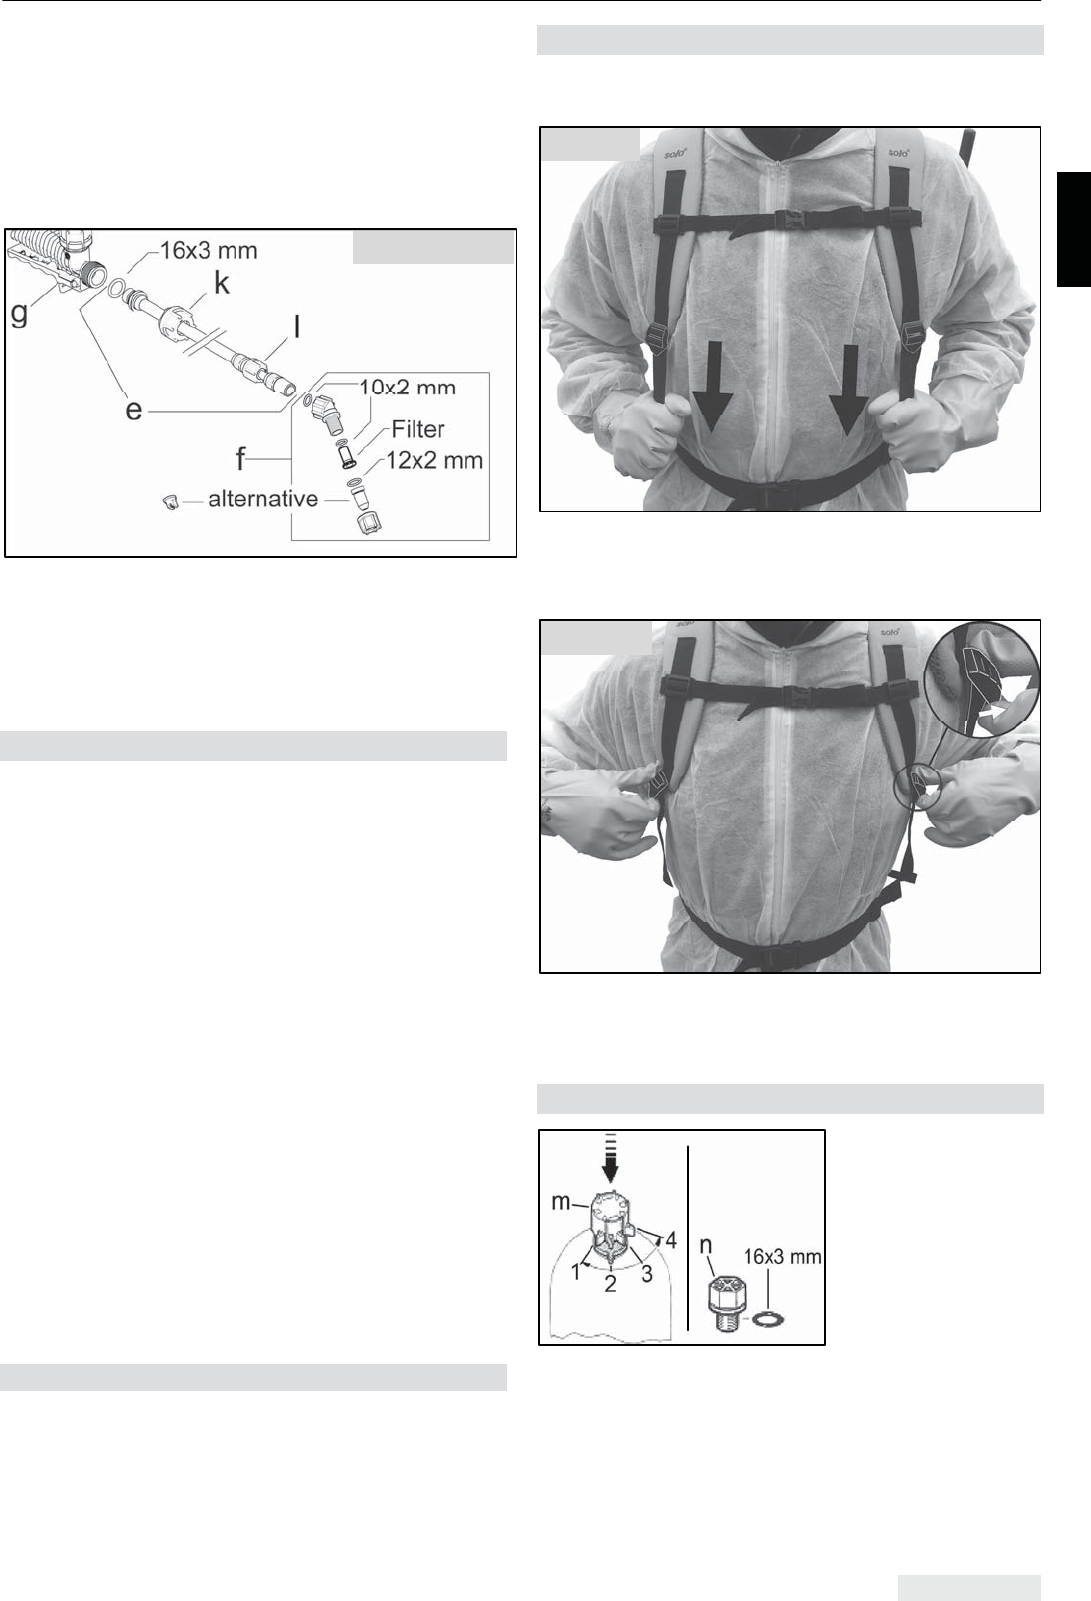
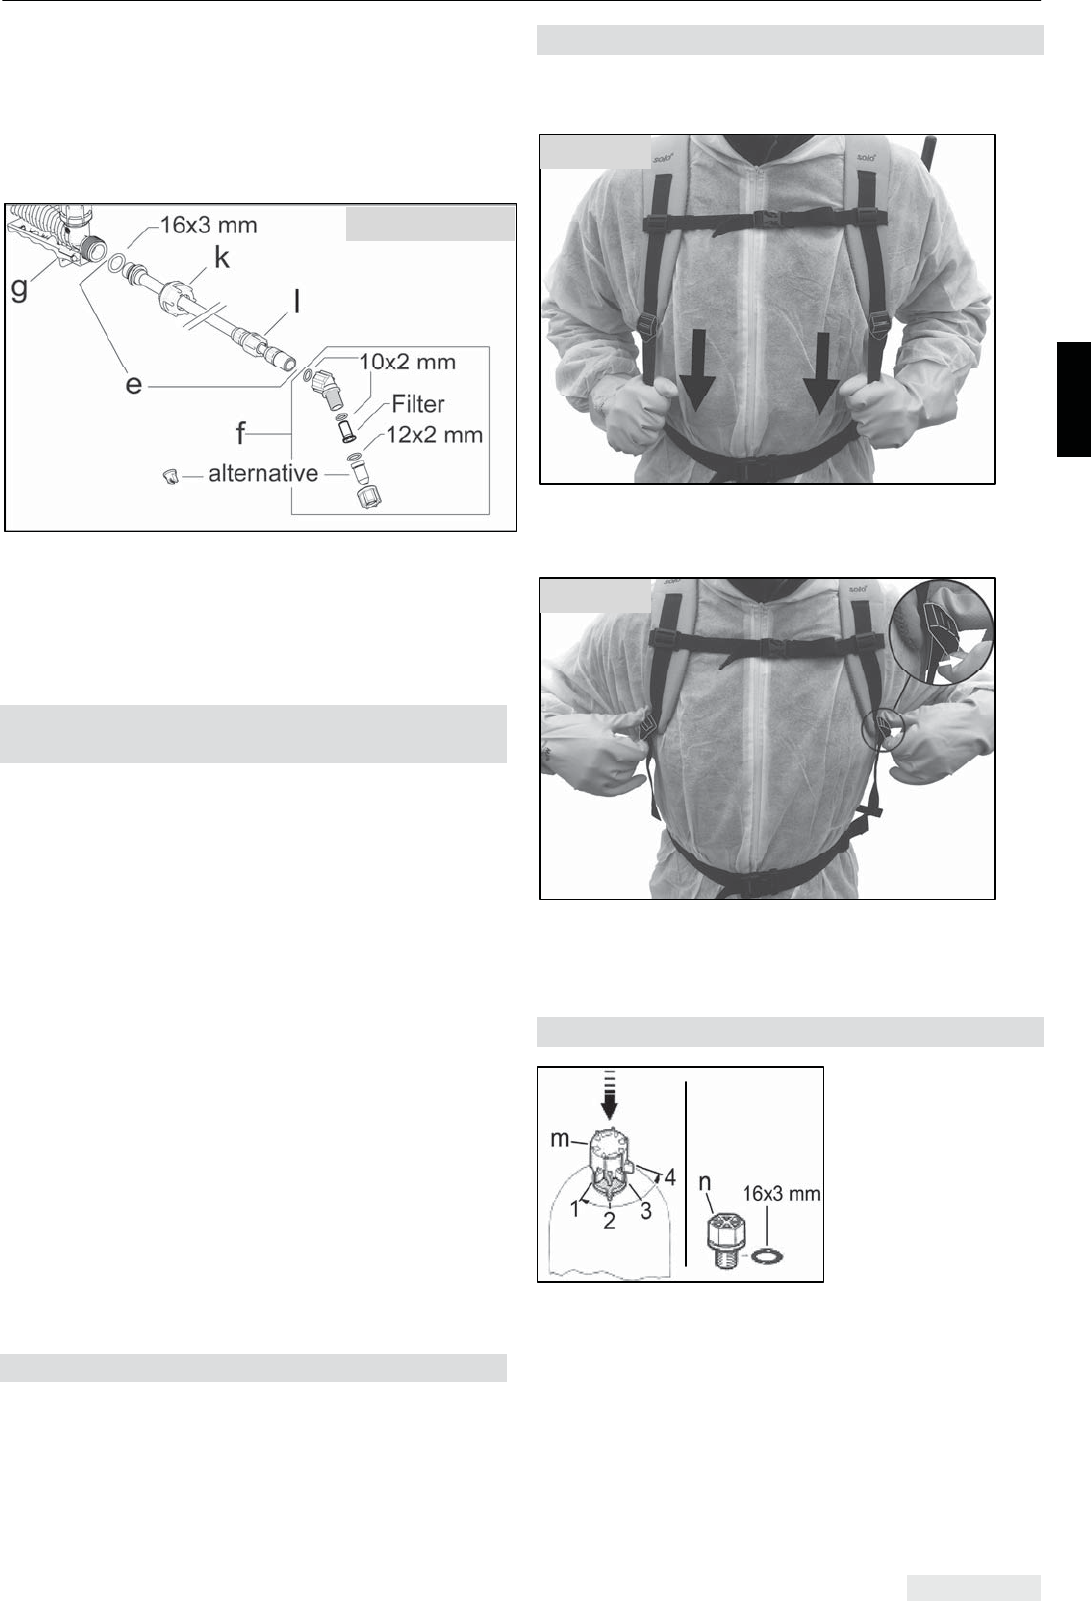
Installation of the spray tube (e):
xFasten the threaded collar (k) on straight and
firmly screw the spray tube with O-ring
(16x3 mm) hand-tight onto the shut-off valve (g).
Do not use any tools!
xFirmly screw the nozzle attachment (f) with the
O-Ring (10x2 mm) hand-tight onto the spray
tube. Do not use any tools!
xModel 425 Comfort, 435 Comfort, 475
Comfort:
Comfort:
Standard nozzle: flat-spray nozzle 04-F110, red,
order no.: 4074263
Alternative nozzle: hollow cone nozzle 1.4 mm Ø,
black, order no.: 4074755 + 4074756
Fig. 22 - Comfort
Fig. 21
a (only for
475 Comfort,
475 Pro)
h (only for
425 Pro,
475 Pro
Month/year of production
3 Preparing the device for use
ENGLISH 7
Model 425 Pro, 475 Pro:
The telescopic spraying tube can be adjusted in
length from 50 cm to 90 cm. For this, release the
fastening nut (l) a little, pull out our push in the
inner tube accordingly and fasten at the desired
length by tightening the fastening nut (l).
Pro:
Standard nozzle: high-spray nozzle, adjustable,
brass, order no.: 4074501
Alternative nozzle: flat-spray nozzle 02-F80, brass,
order no.: 4900504
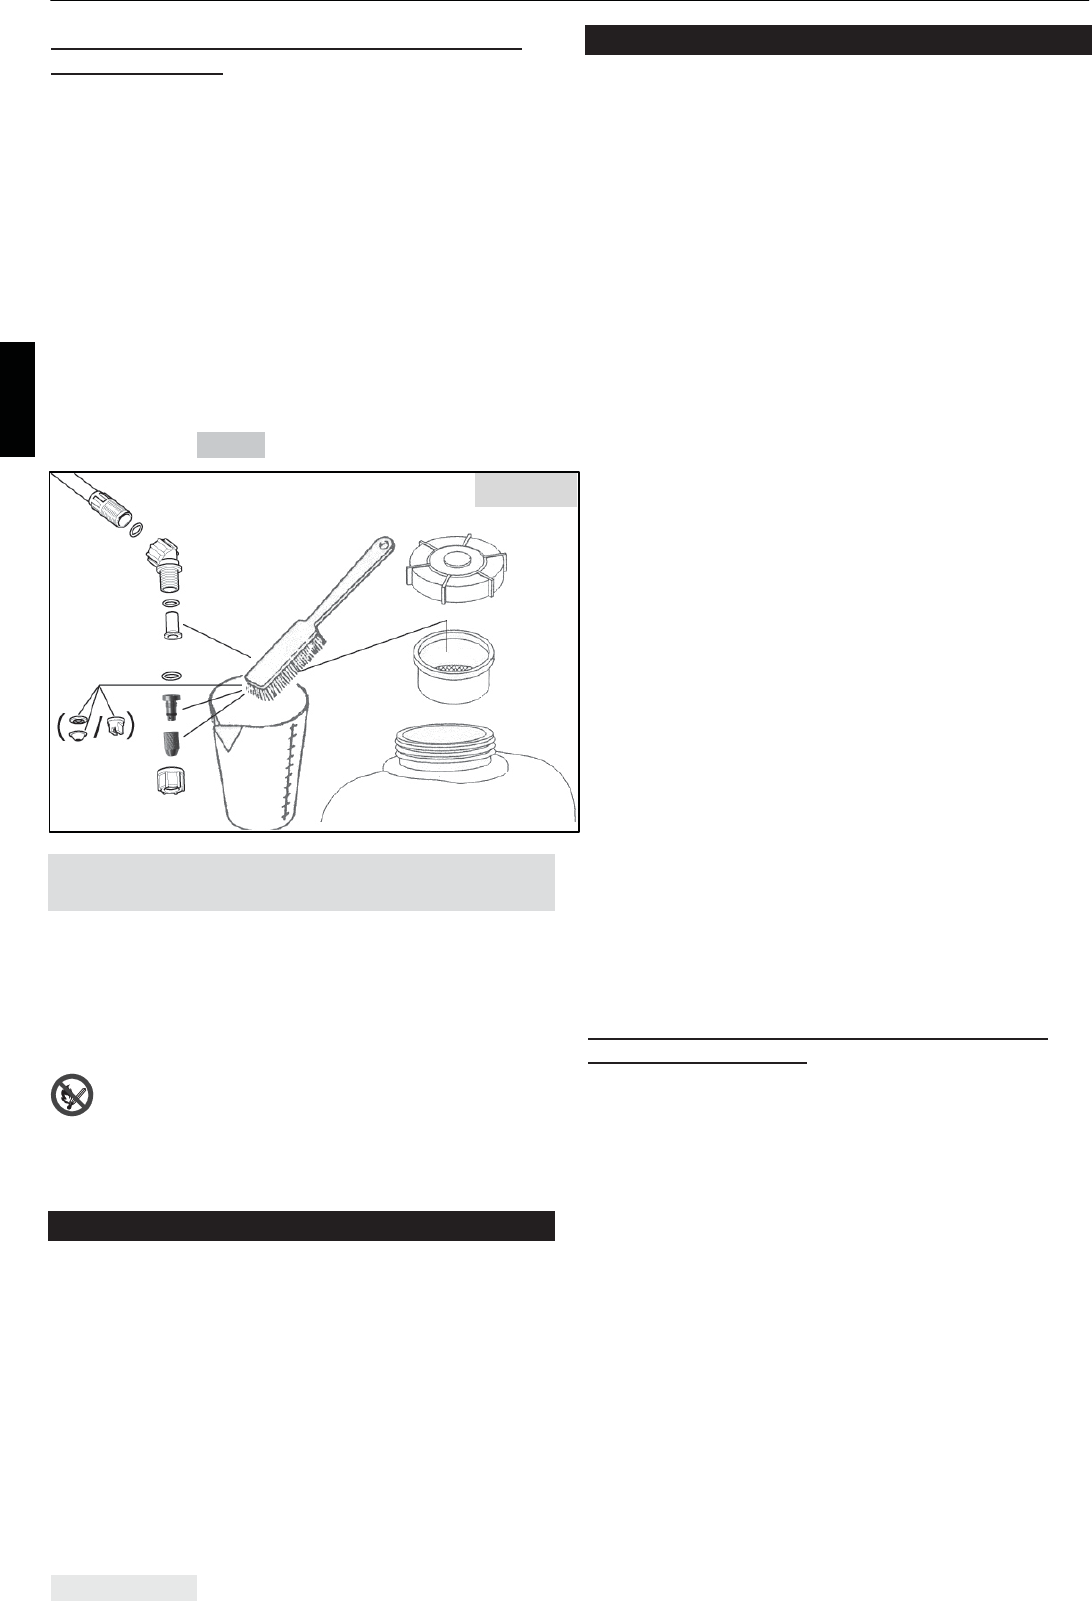
3.2 Spray nozzle, filter element and
filling strainer
A filter element is fitted in the nozzle attachment (f)
upstream of the spray nozzle (mesh aperture:
0.8 mm [0.031"], part no.: 407492225).
Alternatively, the ball valve filter offered in the
accessories with order no.: 4900539, mesh width
0.35 mm can be used.
The backpack sprayer is equipped with a filling
strainer located in the filler neck of the spraying
agent tank (mesh aperture: 2.0 mm [0.079"], part
no.: 420016625).
Use of a genuine filter named above and the
original filling screen, each with the indicated mesh
widths in impeccable conditions is prescribed when
working with the back spray.
In addition to the spraying nozzles listed in chap. 9,
spraying nozzles with a collar height of 2 mm and a
collar diameter of 15 mm with fixed application
quantity, spraying angle and spraying pattern can
be used as well.
Changing spray nozzles and filter element:
See section 6.4
3.3 Trial run
At the start of the spraying season and in frequent
use at least once a month, perform a trial run
according to section 6.2 to check the entire device.
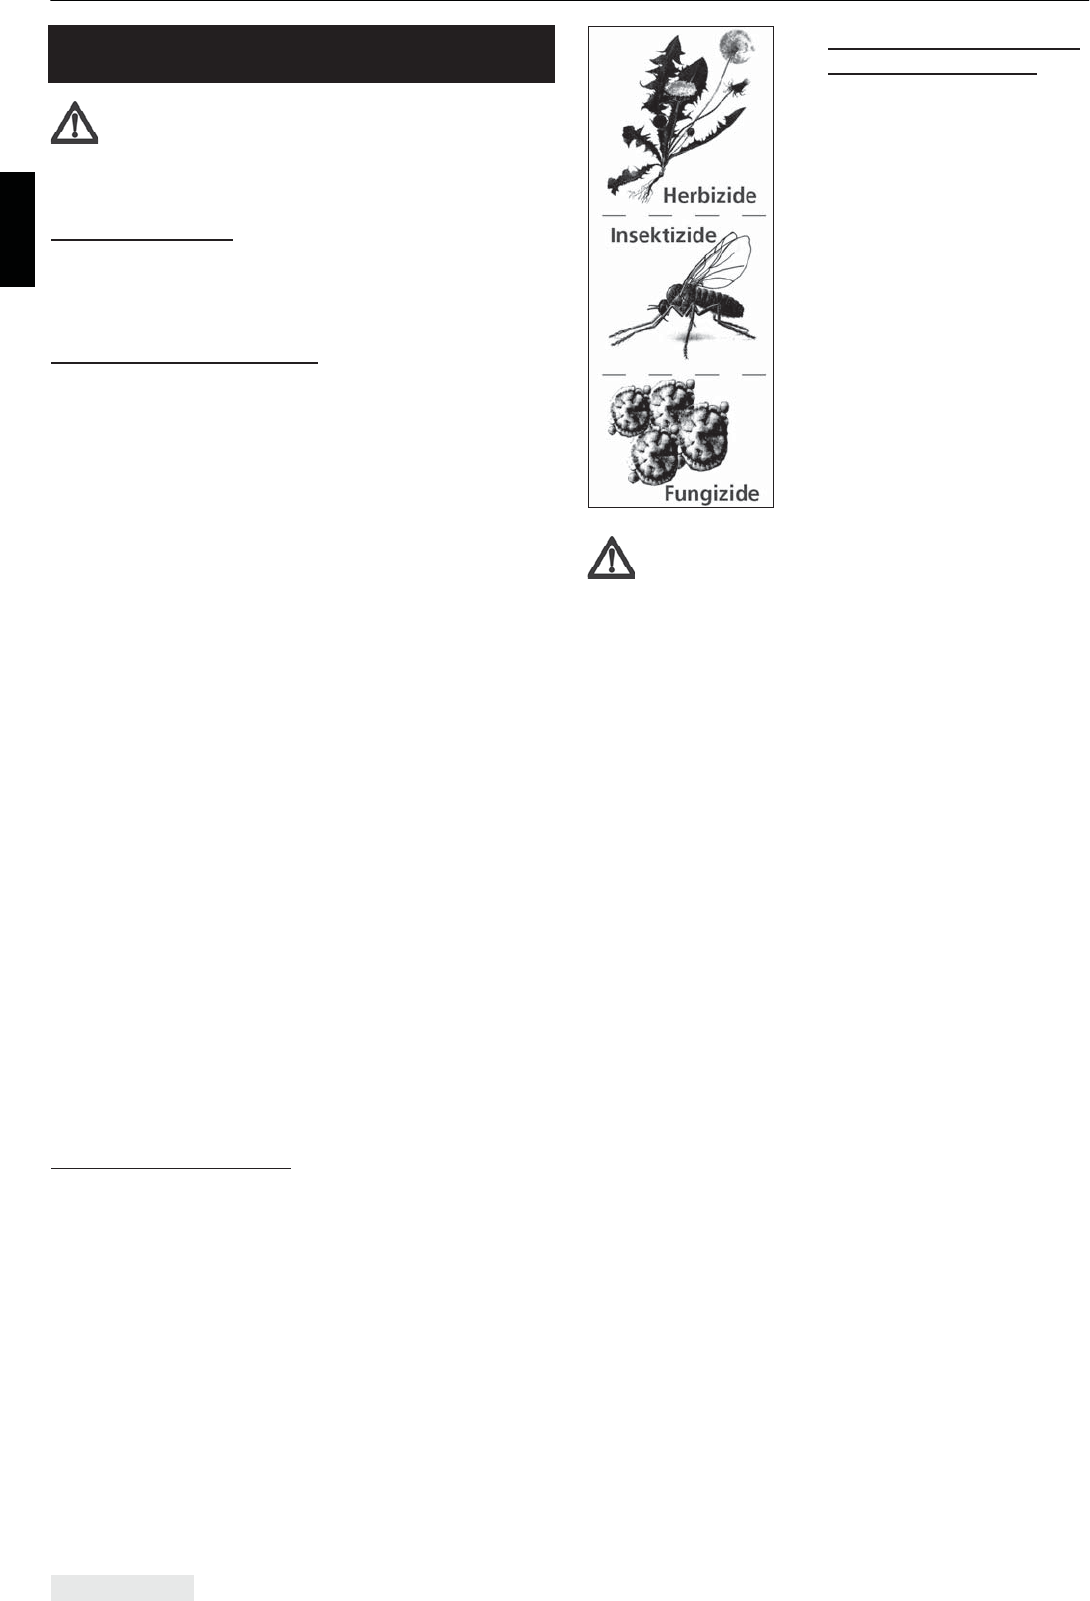
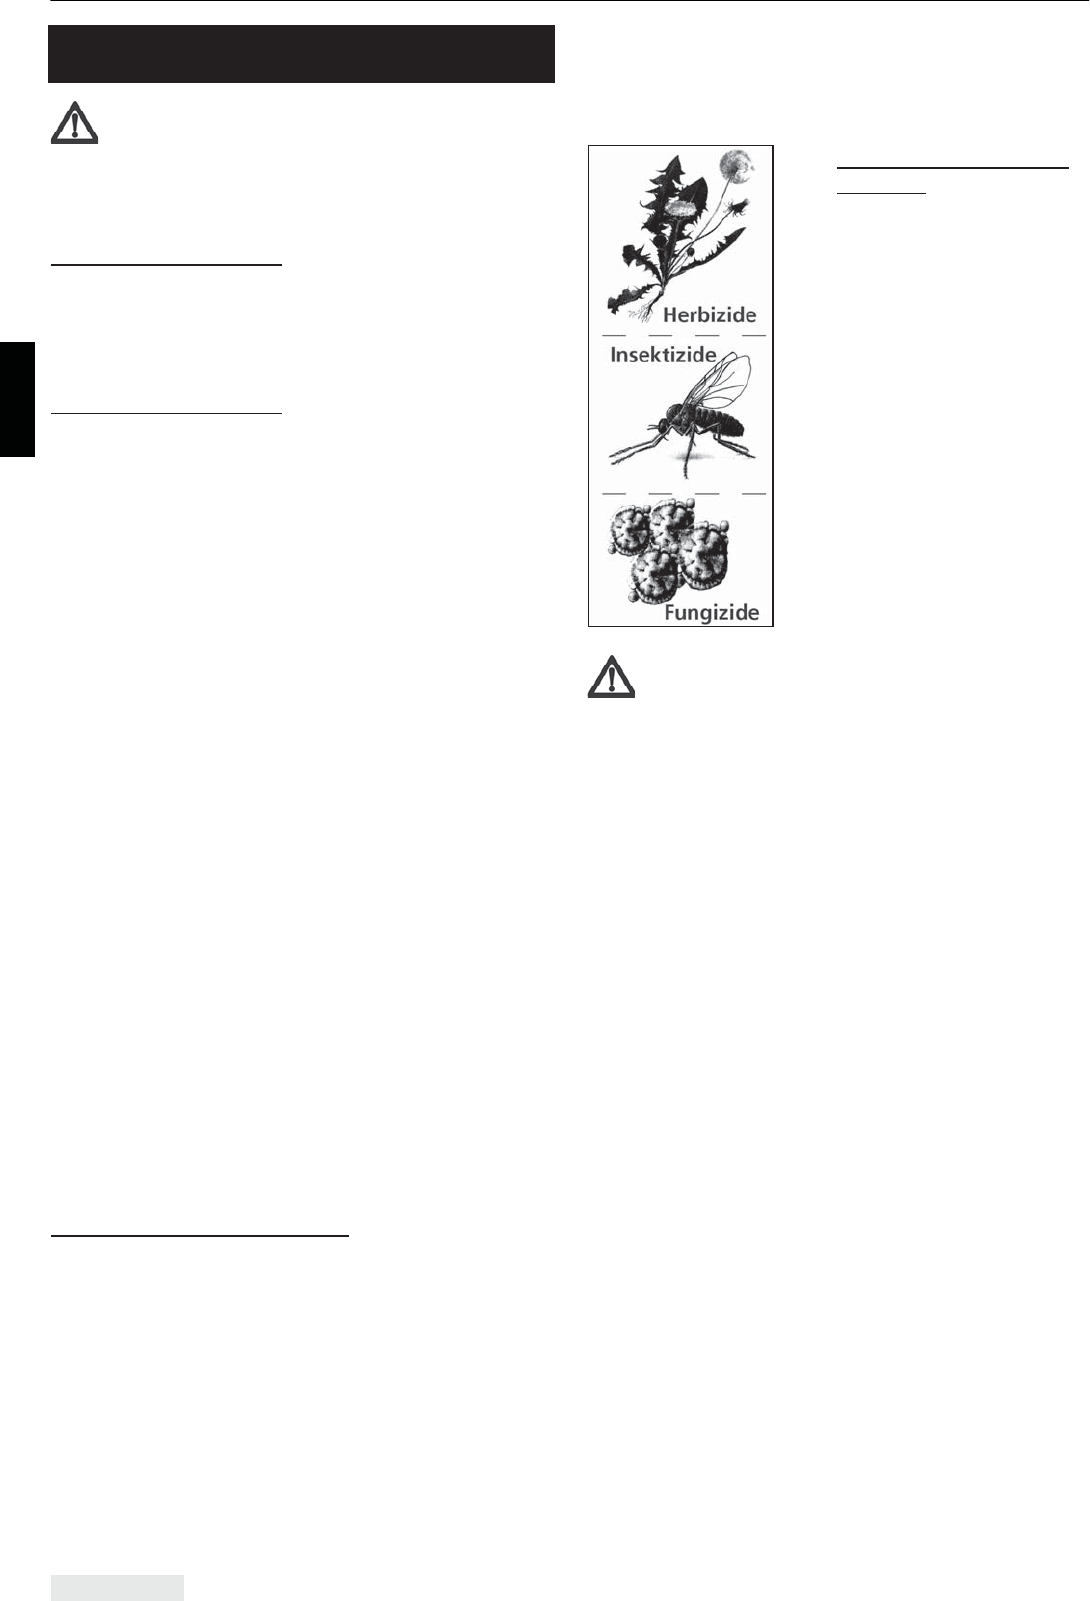
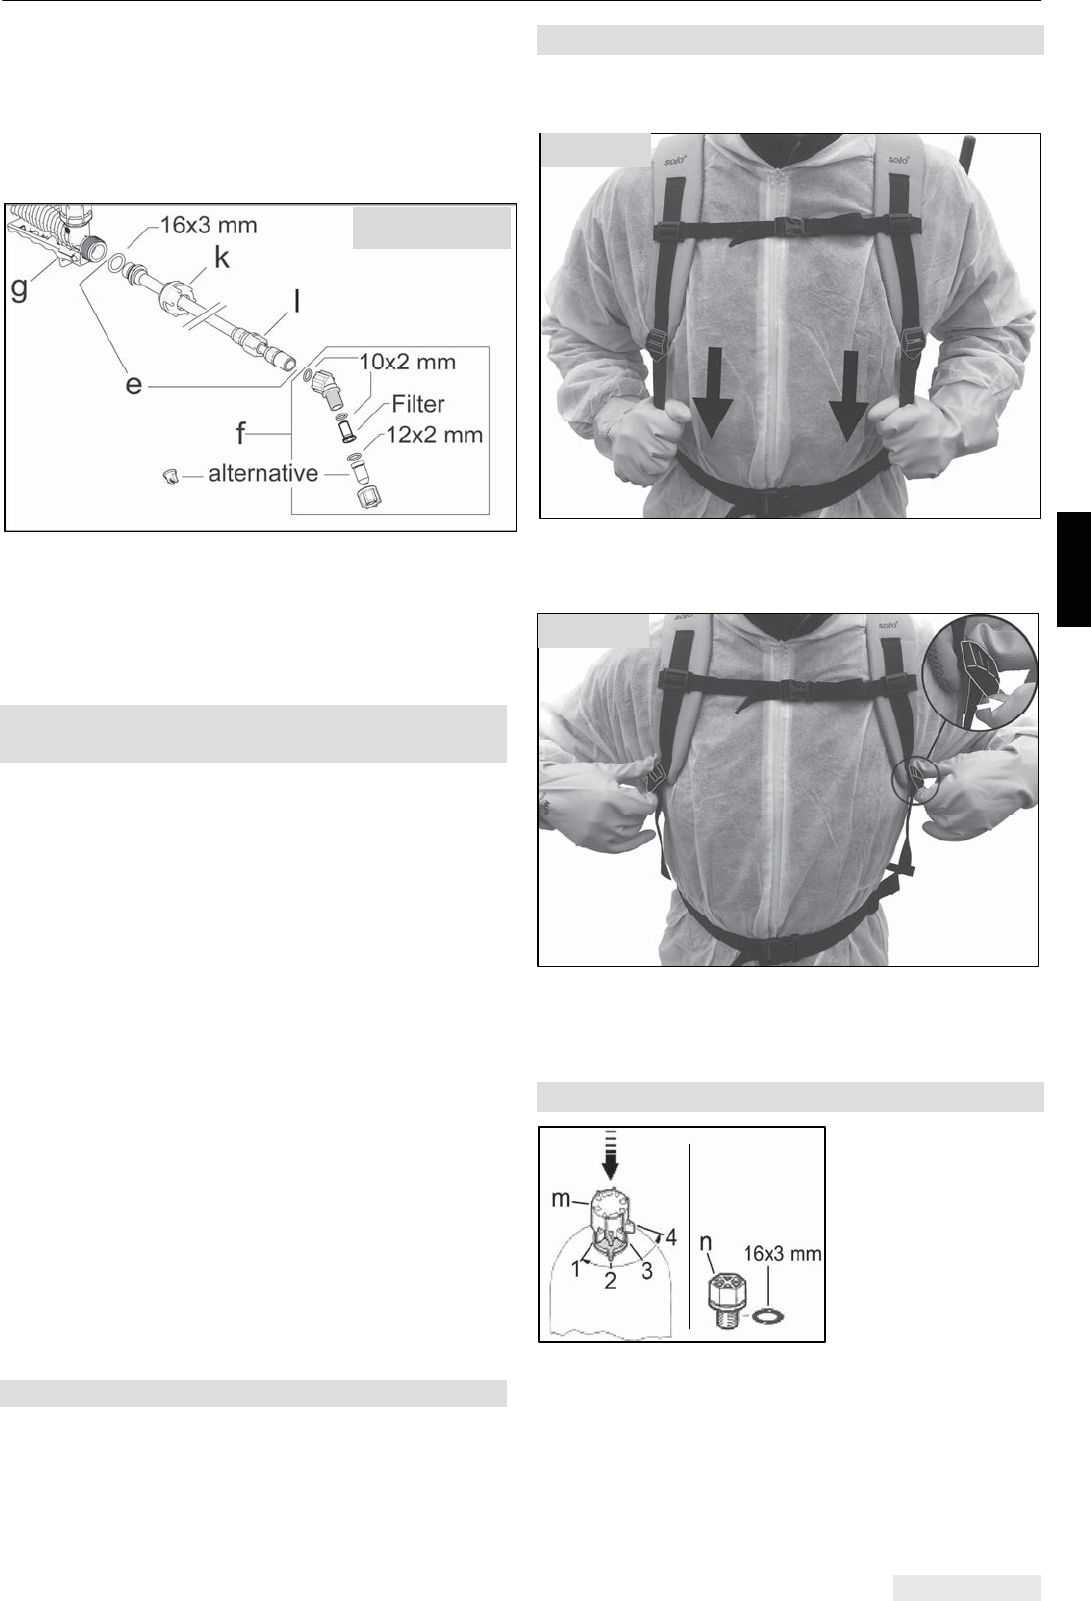
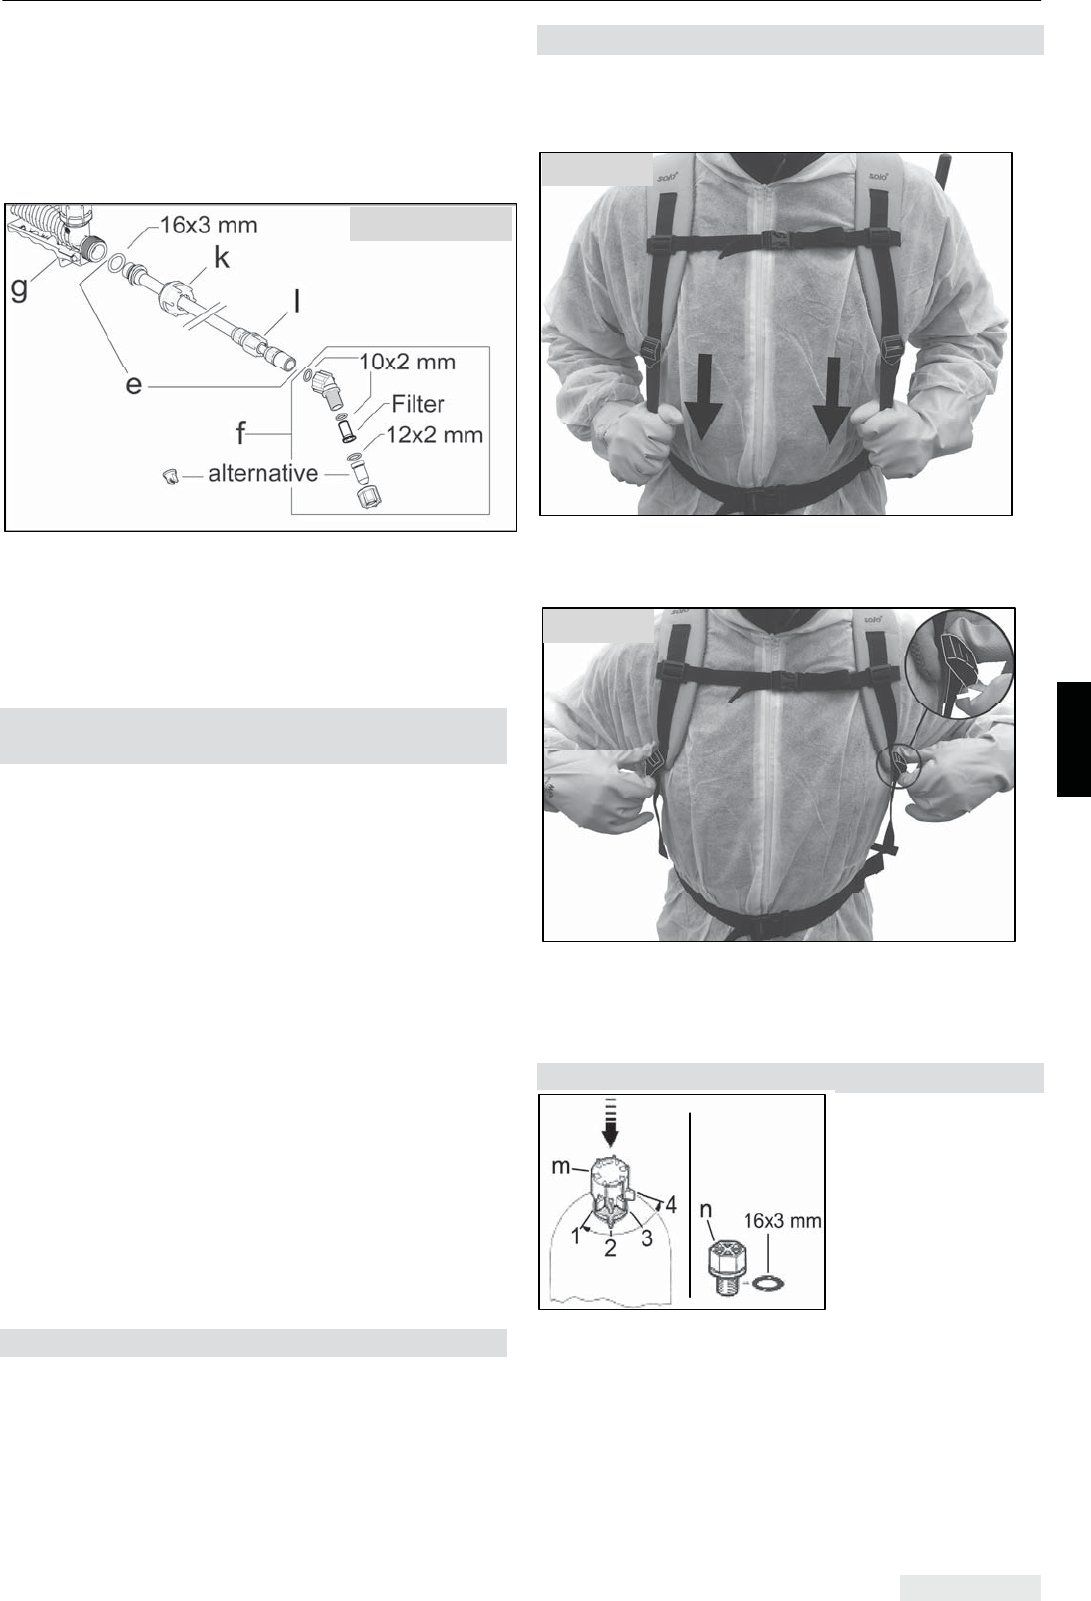
3.4 Carrying straps
The carrying belts can be adjusted to the required
length with clamp sliders.
(schematic diagram / depending on the model)
Pull the loose ends of the carrying straps to tighten
the carrying straps.
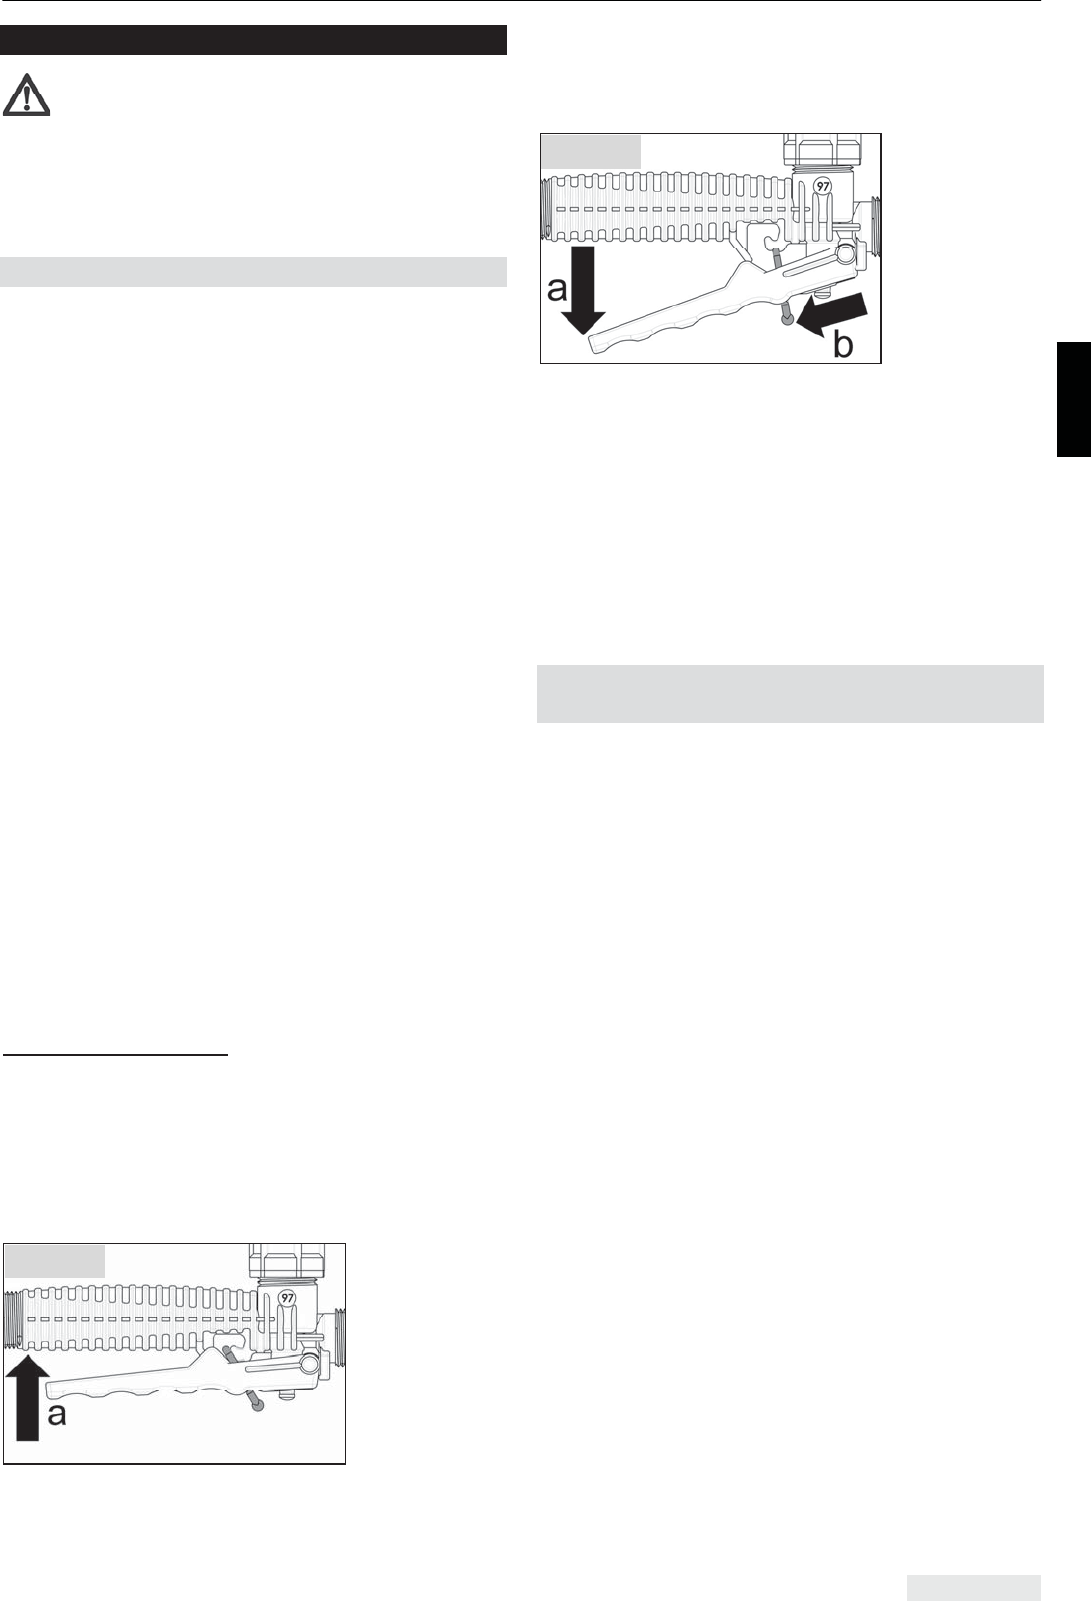
(schematic diagram / depending on the model)
Lift up the two sliding clips again to release the
carrying straps.
3.5 Pressure adjustment
The pressure is
adjusted prior to
filling the tank by
turning the adjuster
cap (m) on top of the
pressure tank. Press
down the adjuster
cap and locate the
selected pressure
marker tooth over the tooth on the pressure tank.
Model 425 Comfort, 425 Pro, 435 Comfort:
Should spray pressure in excess of 4 bar [58 psi]
be required we recommend to replace the pressure
valve with the pressure plug (n) (part no.: 4200215)
which is supplied with the unit. Release any
pressure in the pressure tank first before replacing
the valve.
A spanner width of 24 mm is required.
Fig. 22 - Pro
Fig. 23
Fig. 24
425 Comfort,
425 Pro,
435 Comfort
4 Mixing spraying agents and filling the spraying agent tank
ENGLISH 8
4 Mixing spraying agents and
filling the spraying agent tank
When handling the spraying agents, always
follow the safety instructions of these
operating instructions (pay special attention to
section 2.3) and the information provided by the
manufacturer of the particular spraying agent.
Spraying agent volume:
Mix the spraying agents according to the
instructions provided by the manufacturer of the
spraying agent. Choose the appropriate volume
according to requirements.
Mixing spraying agents:
Only mix spraying agents out in the open. Never do
this inside living spaces, stables or in storage
spaces that are used for food or animal feed.
Never mix the spraying agent directly in the
spraying agent tank.
Spraying agents in powder form:
xMix the spraying agent in a separate container,
not in the spraying agent tank.
xEnsure that the mixture is thoroughly mixed
before pouring it into the spraying agent tank.
xUse the spray tube to thoroughly mix the
spraying agent in the tank.
Liquid spraying agents:
xFill 1/4 of the spraying agent tank with clean
water.
xPre-mix the spraying agent with clean water in a
separate container according to the instructions
provided by the spraying agent manufacturer.
xPour the pre-mixed spraying agent into the
spraying agent tank.
xTop up with the required amount of clean water
according to the manufacturer's instructions.
xUse the spray tube to thoroughly mix the
spraying agent in the tank.
When using spraying agents that have been mixed
from herbal preparations, the liquid needs to be
pre-filtered.
Filling the spraying agent tank:
When filling the spraying agent tank always use the
filling strainer located in the filler neck of the
spraying agent tank and observe the total filling
process.
Avoid any direct contact of the filling hose and the
contents of the spraying agent tank.
Fill level markings are applied to the side of the
spraying agent tank.
When filling up the tank, ensure that you do not fill
above the top marking (maximum fill volume).
Never allow the spraying agent tank to overflow or
public bodies of water, rainwater drains or sewage
drains to become contaminated.
Immediately wipe up any spilled spraying agent.
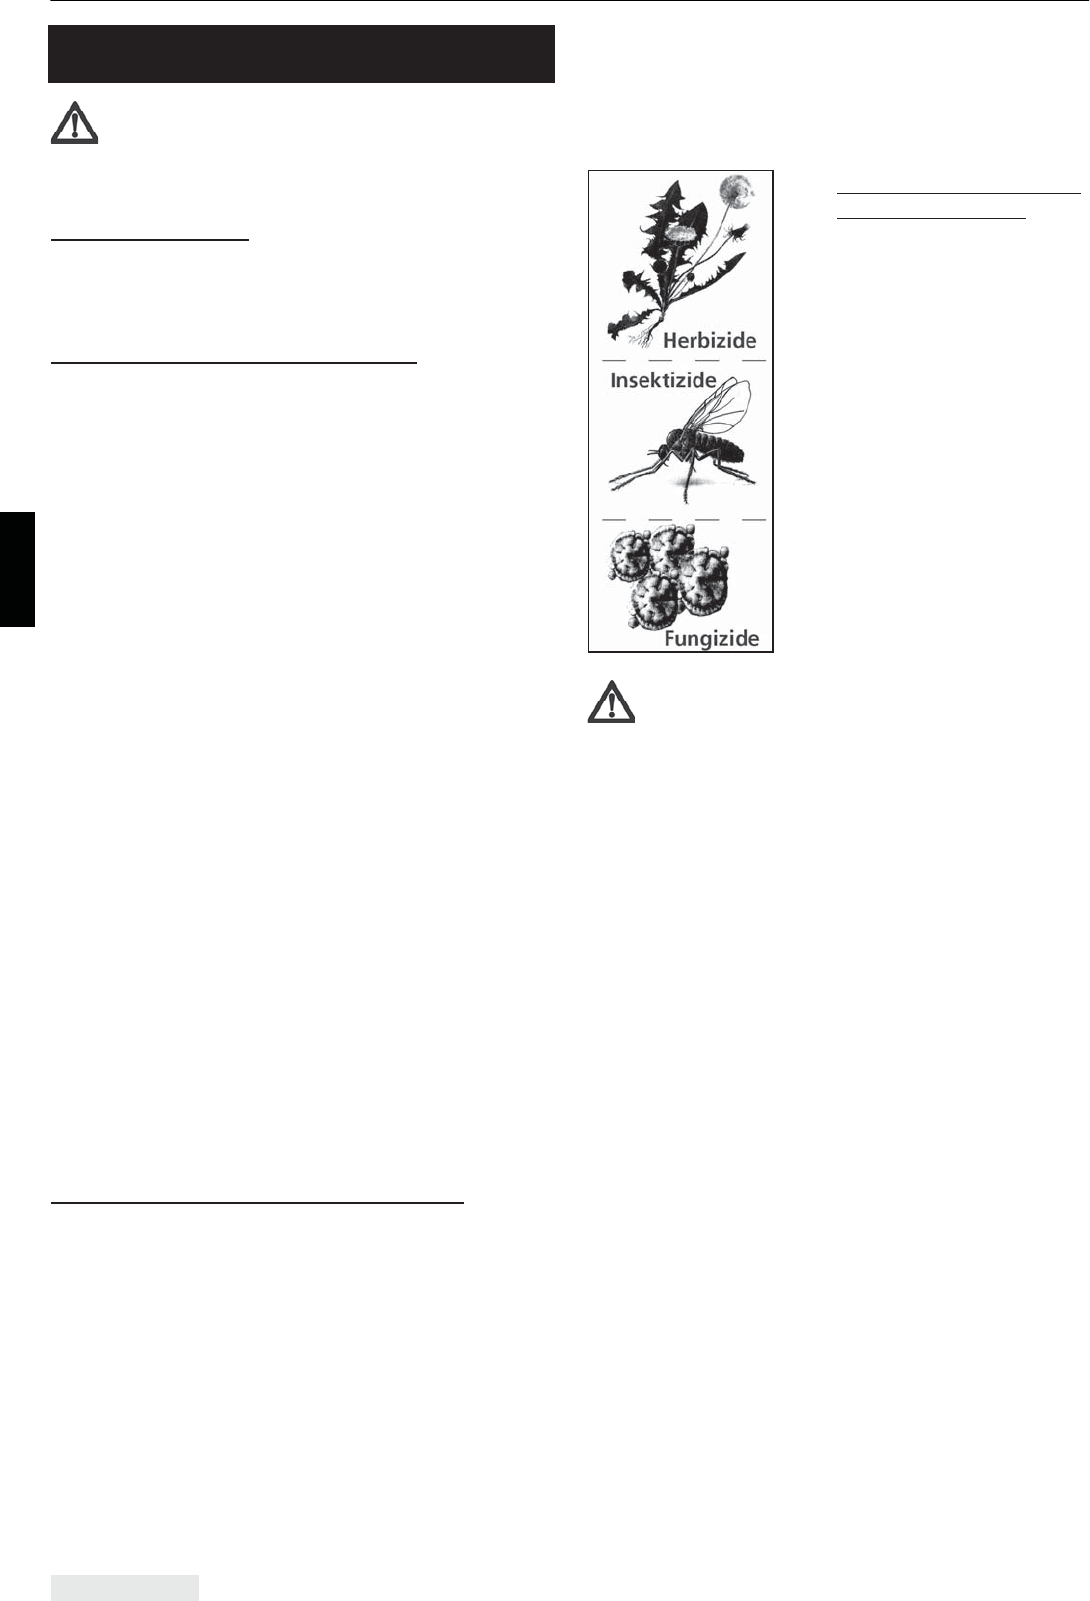
Identification of the tank
contents:
Attach the relevant
sticker to the spraying
agent tank to indicate the
contents of the tank (i.e.,
herbicide, fungicide or
insecticide).
The designation of the
spraying agent used has
to be attached to the
device and has to be
updated every time when
the spraying agent is
changed.
CAUTION:
Never fill different spraying agents into the
spraying agent tank without first thoroughly
cleaning the tank and all parts that come into
contact with the spraying agent and flushing the
system with plenty of clean water.
Recommendation: Use the special SOLO cleaner
for plant protection sprayers (dosing bottle of
500 ml [approx. 16.9 oz], part no.: 4900600).
Never use aggressive, acid- or solvent-containing
cleaning agents (gasoline for example).
5 Using the backpack sprayer
ENGLISH 9
5 Using the backpack sprayer
Ensure that you follow all of the safety
instructions when using the backpack
sprayer.
Every time you use the backpack sprayer, first
check it all over to ensure it is safe to use
according to section 6.1.
5.1 Spraying
xWhen applying spraying agent, ensure by using
appropriate measures and procedures that the
unintended release of agent to other areas is
minimized and the drift to the surrounding areas
is prevented.
xAlways proceed with the greatest care when
spraying.
xNever use the device under windy conditions or
if it is raining, as this would risk widespread
drifting of the spraying agent.
xCheck the wind direction before starting work
and select the spraying direction downwind of
the user.
xIt is best to perform spraying work in the morning
or evening, as it tends to be less windy then.
xEnsure that you only wet what is in fact intended
to be covered with spraying agents.
xNever spray the agent towards persons,
animals, open windows or doors, cars or
anything else that could be damaged by the
spraying agent.
xUse the spray nozzle suitable for your
application. Applicable nozzles: See section 9
xWhen spraying, ensure that the spraying agent
is applied evenly and homogeneously to the
treated area.
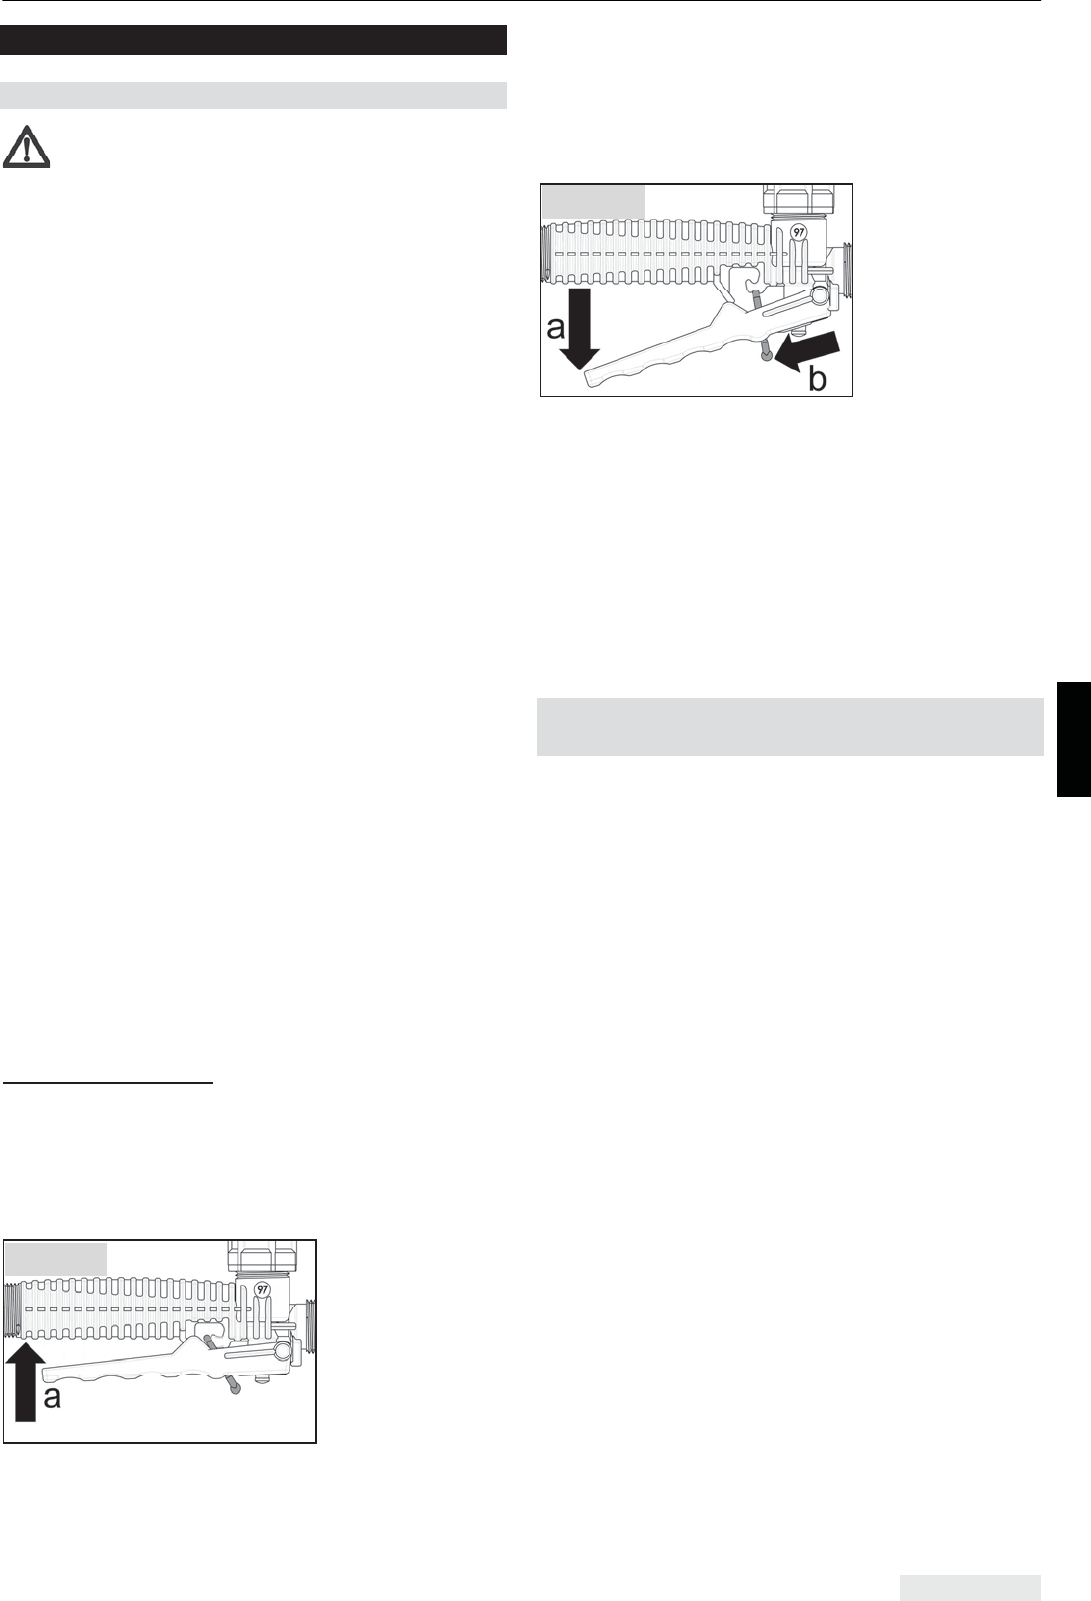
Pumping and spraying:
Prime the pump with a few quick up and down
strokes of the pump lever.
Hold the spray tube at the shut-off valve in your
hand.
Start the spraying process by pressing the shut-off
valve (a).
Releasing the shut-off valve stops the spray
process.
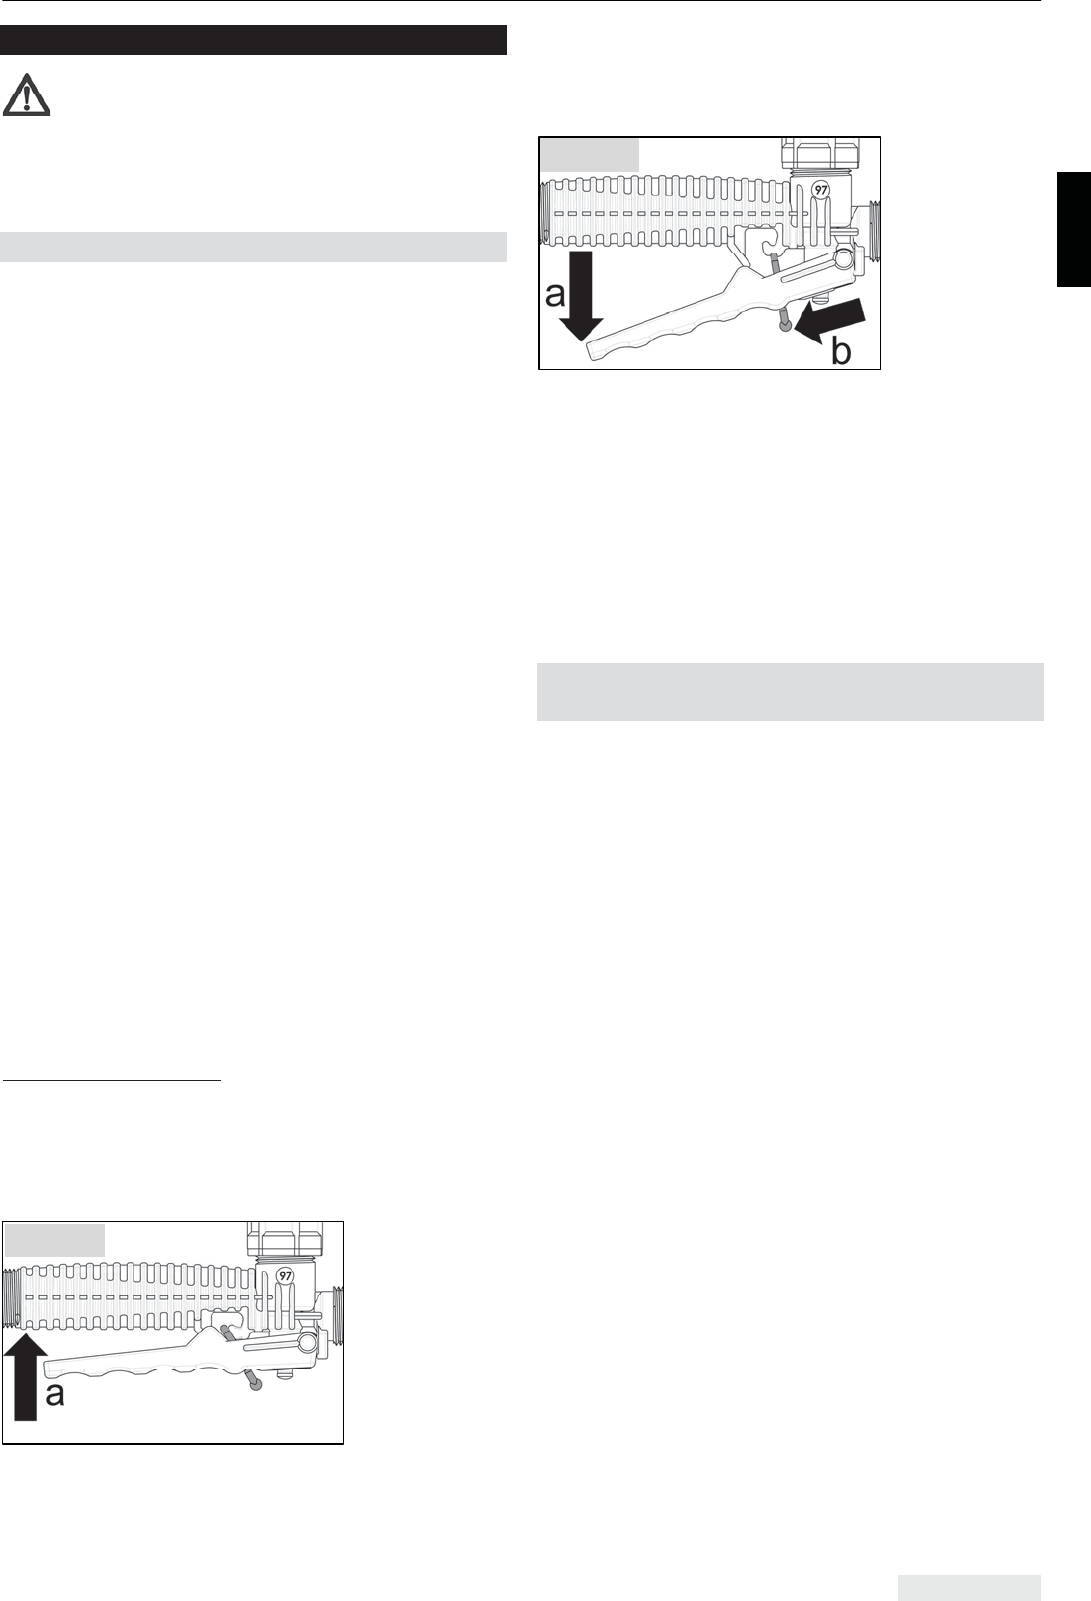
The red clip can be used to secure the shut-off
valve in its rest position to prevent accidental
spraying. For this, pull the lever slightly away (a)
from the handle and lock the clip (b).
The spray tube can be rotated in the shut-off valve
– after loosening the threaded collar– this is useful
for spraying under leaves.
If the spraying agent is not applied properly, spray
nozzle or filter element could be blocked or
damaged. If necessary, clean or replace the nozzle
and the filter element.
Cleaning: See section 6.7
Replacing the spray nozzle and the filter element:
See section 6.4
5.2 Residual spraying agents /
finishing spraying
Stop spraying immediately when any air is sucked
in and sprayed out through the spray nozzle. This
is indicated by a mist being sprayed from the
nozzle. At this point the spraying agent tank will still
contain a residual amount of less than 200 ml
[6.8 oz]. If you do not want to add more spraying
agent and wish to stop spraying instead, dilute this
leftover amount with two litres [68 oz] of clean
water and spray it on the treated area.
When you finish working, prepare the device for
storage according to section 6.7, thoroughly wash
your face and hands with soap, take off your work
clothing and ensure that it is washed regularly.
Fig. 25
Fig. 26
6 Maintenance, cleaning and storage
ENGLISH 10
6 Maintenance, cleaning and storage
6.1 Maintenance plan
Before you start working
After work
When changing the spraying agent
On demand
Monthly
Annually or at the start of the season
After disassembly of the pump
components or after replacing the
piston collar
Entire backpack sprayer
Check whether the device is safe to use:
xVisual inspection of the device
xCheck the tightness of all equipment
components
(at maximum permissible pressure
with open and closed shut-off valve)
xCheck the function of all active
components (pump lever,
shut-off valve)
X
Hoses and their screw
connectors
Visual inspection X
Spraying agent tank Visual inspection X
Clean (section 6.7) X X
Nozzles and filter element Clean (section 6.7) X X X
Trial run to check the spray nozzles and
the filter element by measuring the
delivery rate (section 6.3)
X*: A monthly trial run is required only
if the device is used frequently.
X X* X
Filling strainer Visual inspection X
Clean (section 6.7) X X X
Cap gasket Grease (section 6.5) X X
Piston collar and pump
piston
(Model 425 Comfort,
425 Pro, 435 Comfort)
Grease (section 6.6) X
Never start working if there are any irregularities or leaks, if you can see any damage to the equipment or
if the equipment is not working properly in any way. In this event, immediately have the device checked by
a specialist workshop.
If you have any questions please refer to your authorised SOLO dealer.
6 Maintenance, cleaning and storage
ENGLISH 11
6.2 Trial run
At least at the start of every spraying season and in
frequent use at least once a month, perform a trial
run with clean water to check the following:
xTightness of all equipment components at
maximum permissible pressure with open and
closed shut-off valve
xFunction of all active components
(shut-off valve, pump lever)
xDosing and distribution accuracy of all the
nozzles used by measuring the spraying agent
delivery rate according to section 6.3
Never start working if there are any irregularities or
leaks, if you can see any damage to the equipment
or if the equipment is not working properly in any
way. In this event, immediately have the device
checked by a specialist workshop.
6.3 Checking the spray nozzles and the filter
element
Fill up the tank with clean water to the maximum
marking, start it up and spray for exactly one
minute at an operating pressure of 2 bar [29 psi].
Then measure the quantity of water required to
refill the tank to its maximum level. The value
measured corresponds to the delivery rate of the
device in l/min for the selected operating pressure.
This value must not deviate by more than 10 %
from the value indicated in section 9.
If the actual value is too low, this may be caused
by deposits in the spray nozzle and/or in the filter
element. Clean the parts and repeat the check.
If the actual value is too high, this may be due to
wear or damage to the spray nozzle.
When checking the nozzles, also check whether
the spray nozzle is producing an even, fan-shaped
spray pattern.
If the delivery rate is still too low after cleaning the
nozzle and the filter element, or if the nozzle and/or
the filter element are worn or damaged, replace the
nozzle and/or the filter element by genuine SOLO
replacement parts.
Changing the spray nozzle and the filter element:
See section 6.4
6.4 Changing the spray nozzle and the
filter element
Spray nozzle and filter element must only be
changed if the device is depressurised.
To depressurise the device, hold the spray tube in
the spraying agent tank or in a suitable container
for the spraying agent and operate the shut-off
valve until no more fluid is sprayed.
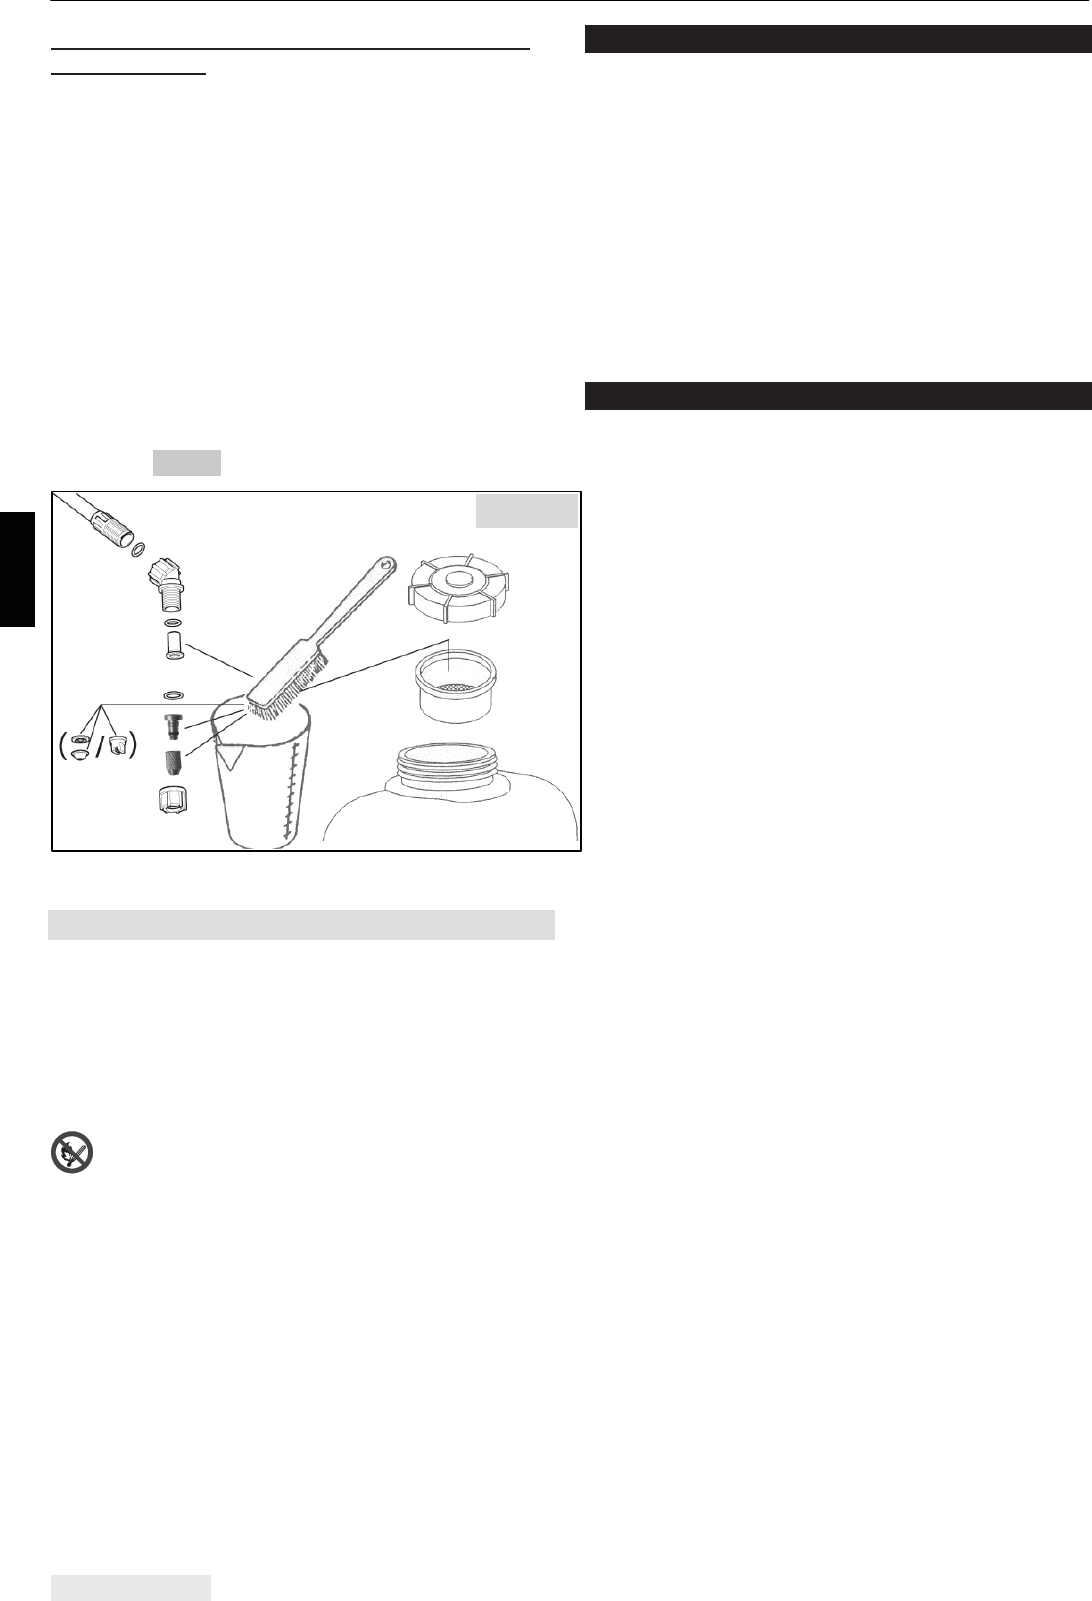
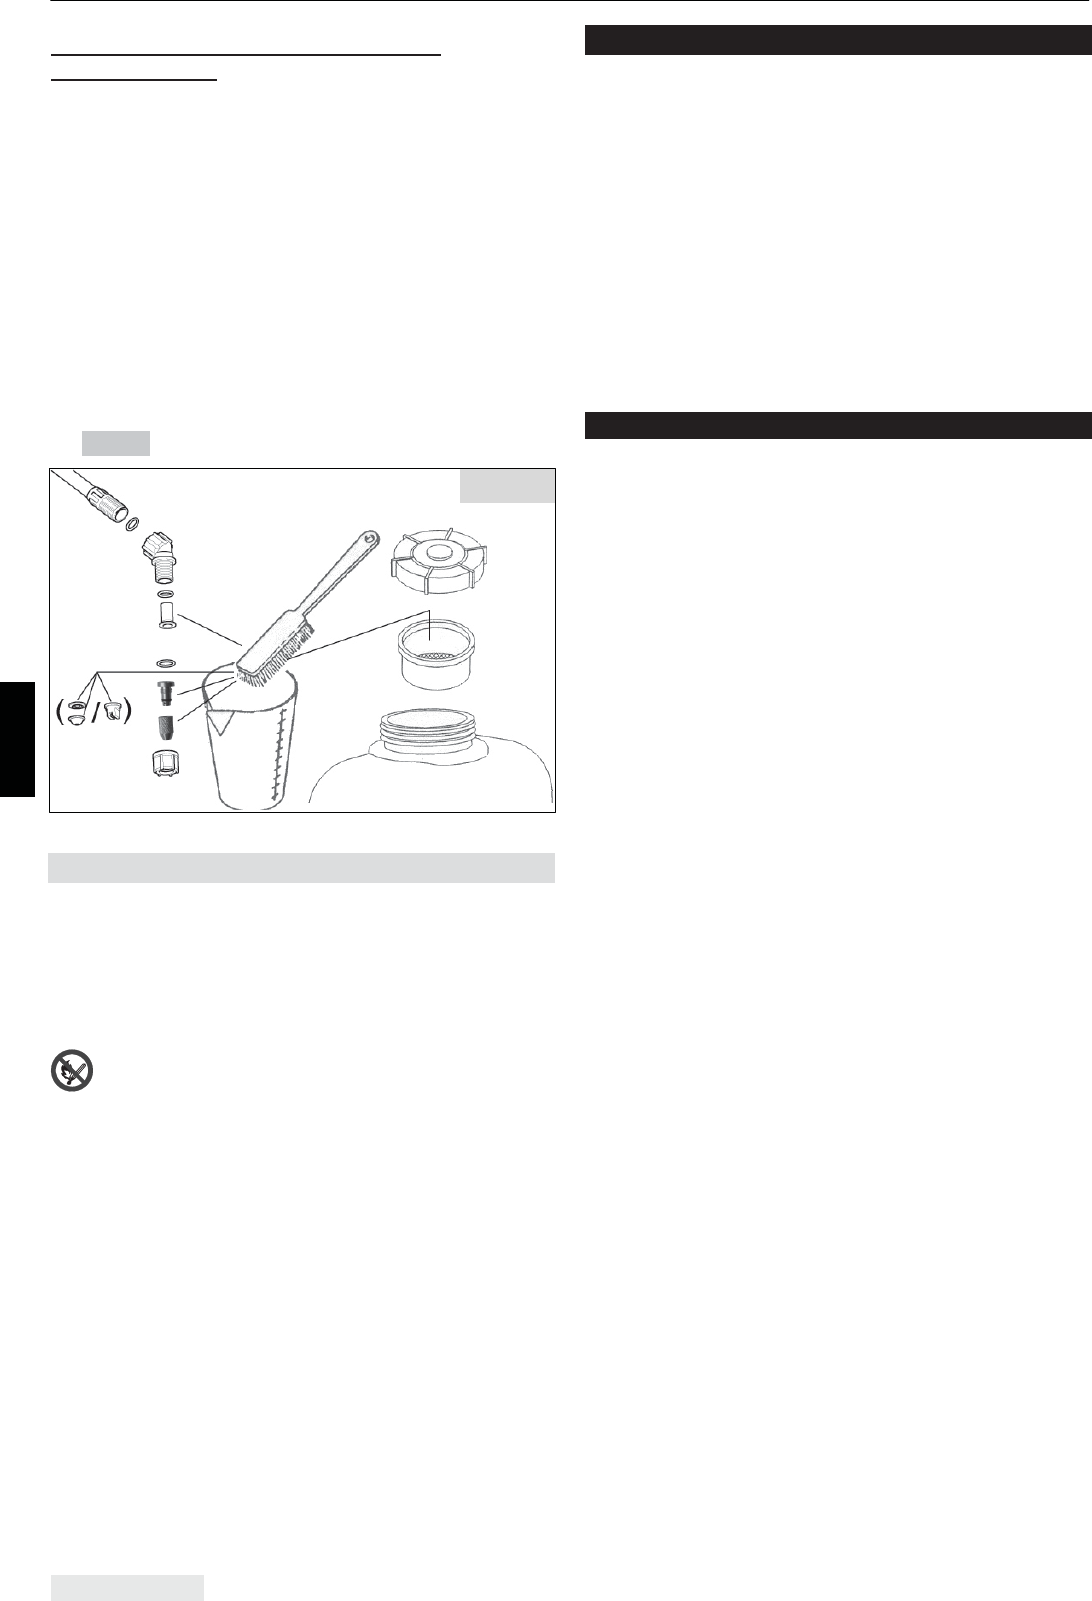
Changing the spray nozzle or the filter element:
xRinse the nozzle attachment with clean water.
xDisassemble the nozzle attachment.
xClean the O-rings, the filter element and the
spray nozzle with clean water and a soft brush.
Never use your mouth to blow through the spray
nozzle! Never use hard objects to clean the
nozzles!
xReplace the previous nozzle by the new nozzle
or the previous filter element by the new filter
element.
xReassemble the components of the nozzle
attachment (Fig. 22).
6.5 Greasing the cap gasket
If the tank lid becomes hard to tighten or open,
apply silicone grease to the lid gasket.
6.6 Greasing the piston collar and the pump
piston pump
(only425Comfort,435Comfort,
425Pro)
After disassembly of the pump components or after
replacing the piston collar, use water resistant
grease to lubricate the piston and the collar.
6.7 Draining the spraying agent tank and
cleaning all other spraying agent carrying
parts
Drain the spraying agent tank, all other spraying
agent carrying parts and the filling strainer daily
after use and particularly at the end of the spraying
season and thoroughly flush them with clean water.
Any unused spraying agent that is left over in the
device could cause corrosion and hence damage
the device. Special attention must be paid to
wearing parts like spray nozzles, filters and seals.
Please read and observe the cleaning instructions
supplied with the spraying agent.
Recommendation: Use the special SOLO cleaner
for plant protection sprayers (dosing bottle of
500 ml [approx. 16.9 oz], part no.: 4900600).
Never use aggressive, acid- or solvent-containing
cleaning agents (gasoline for example).
After cleaning, leave the spraying agent tank open
to dry.
6 Maintenance, cleaning and storage / 7 Wearing part / 8 Warranty
ENGLISH 12
Cleaning the spray nozzle, the filter element and
the filling strainer:
xTo depressurise the device, hold the spray tube
in the spraying agent tank or in a suitable
container for the spraying agent and operate the
shut-off valve until no more fluid is sprayed.
xRinse the nozzle attachment with clean water.
xDisassemble the nozzle attachment .
xClean the O-rings, the filter element, the spray
nozzle and the filling strainer with clean water
and a soft brush.
Never use your mouth to blow through the spray
nozzle! Never use hard objects to clean the
nozzles!
xReassemble the components of the nozzle
attachment (Fig. 22).
6.8 Taking the sprayer out of service and
putting it into storage
Prepare the device for storage according to
section 6.7.
Store the device protected from sunlight in a
secure, dry and frost-free location under a
maximum ambient temperature of 35 °C [95 °F].
There must not be any open fires or similar
nearby.
Ensure that the unit cannot be used by
unauthorised persons, in particular children.
7 Wearing parts
Various parts are subject to application-specific
wear or to normal wear and must be replaced in
good time if necessary.
The following parts are subject to normal wear and
are not covered by the manufacturers guarantee:
xAll rubber parts that come into contact with the
spraying agent
x Spray nozzle
x Filters
x Seals
8 Warranty
We warrant problem free quality and will cover the
cost of replacing parts which are found to be faulty in
material or show manufacturing defects within the
prescribed guarantee period after the date of
purchase.
Please note that specific guarantee conditions may
differ from country to country. When in doubt, please
ask the vendor of the goods. The vendor of the
product is responsible for guarantee applications.
We hope you will understand that we cannot be liable
for damage resulting from these causes:
xNon-compliance with operating instructions.
xNeglecting required maintenance and repair jobs.
xWear from normal use (particularly: gasket seals,
membranes, collars, spray nozzles and filters).
xUsing non-approved tools.
xUse of force, improper treatment, misuse and
accidents.
xAttempted adjustments and repairs by non-
qualified persons.
xUnauthorized modification or changes made to the
device.
xUse of unsuitable spare parts or non-original parts
if such parts are the cause of the damage.
xUse of non-approved media in the spraying agent
tank.
xDamage caused by using the product in the hire or
rental industry.
Normal cleaning, adjustments or maintenance jobs
cannot be claimed as part of the guarantee.
All guarantee work must be carried out by one of our
authorised service centres.
For Australia only: Supplementary warranty notes
specifically for Australia
To make a claim, contact Clayton Engineering, 26
French Ave, Brendale, Q, 4500 on phone 1300 798
022 or email sales@claytonengineering.com.au. You
will be asked to provide proof of purchase and then
will be instructed on the procedure for repairing or
replacement of the product under warranty. All costs
incurred for repair or replace, and additional claims
can be discussed at this stage.
This warranty is provided in addition to other rights
and remedies you have under law: Our goods come
with guarantees that cannot be excluded under the
Australian Consumer Law. You are entitled to a
replacement or refund for a major failure and for
compensation for any other reasonably foreseeable
loss or damage. You are also entitled to have the
goods repaired or replaced if the goods fail to be of
acceptable quality and the failure does not amount to
a major failure.
Fig. 27
9 Specification of spray nozzles
ENGLISH 13
9 Specification of spray nozzles
Specification Part no.
Delivery
l/min
[USgal/min]
Spraying
pressure
bar [psi]
Spraying
angle Applications
Hollow cone jet
1 mm [0.039"]
orifice, grey
40 74 758
+ 40 74 756
0.40 [0.106]
0.55 [0.145]
1,0 [15]
2,0 [29]
50–70° For treatment of shrubs,
bushes and trees
Hollow cone jet
1.4 mm [0.055"]
orifice, black
40 74 755
+ 40 74 756
0.64 [0.169]
0.91 [0.240]
1.11 [0.293]
1.0 [15]
2.0 [29]
3.0 [44]
50–70°
Hollow cone jet
1.8 mm [0.071"]
orifice, blue
40 74 726
+ 40 74 756
0.88 [0.232]
1.25 [0.330]
1.53 [0.404]
1.0 [15]
2.0 [29]
3.0 [44]
50–70°
No-drift DT 1.0
yellow
40 74 385 0.46 [0.122]
0.65 [0.172]
0.80 [0.211]
0.93 [0.246]]
1.0 [15]
2.0 [29]
3.0 [44]
4.0 [58]
105° Mainly for herbicides
at low pressure
No-drift DT 2.0
red
40 74 386 0.91 [0.240]
1.29 [0.341]
1.60 [0.423]
1.85 [0.489]
1.0 [15]
2.0 [29]
3.0 [44]
4.0 [58]
105°
No-drift DT 2.5
brown
40 74 514 1.14 [0.301]
1.61 [0.425]
2.01 [0.531]
2.32 [0.613]
1.0 [15]
2.0 [29]
3.0 [44]
4.0 [58}
105°
Adjustable spray
nozzle
49 00 206
(brass)
49 00 525
(plastic)
0.44–1.10
[0.116–0.291]
0.55–1.45
[0.145–0.383]
0.66–1.75
[0.174–0.462]
0.75–1.85
[0.198–0.489]
1.0 [15]
2.0 [29]
3.0 [44]
4.0 [58]
105°
Flat spray tip
015-F80, green
40 74 504 0.35 [0.092]
0.49 [0.129]
0.60 [0.159]
0.69 [0.182]
1.0 [15]
2.0 [29]
3.0 [44]
4.0 [58]
80° Areal and row treatment
Flat spray tip
02-F80, yellow
49 00 504
(brass)
40 74 501
(plastic)
0.46 [0.122]
0.65 [0.172]
0.80 [0.211]
0.92 [0.243]
1.0 [15]
2.0 [29]
3.0 [44]
4.0 [58]
80°
Flat spray tip
03-F80, blue
40 74 506 0.69 [0.182]
0.98 [0.259]
1.20 [0.317]
1.39 [0.367]
1.0 [15]
2.0 [29]
3.0 [44]
4.0 [58]
80°
Flat spray tip
04-F110, red
40 74 263 0.92 [0.243]
1.31 [0.346]
1.60 [0.423]
1.85 [0.489]
1.0 [15]
2.0 [29]
3.0 [44]
4.0 [58]
110°
10 Specification / 11 Type plate
ENGLISH 14
10 Specification
Model 435
Comfort
425
Comfort
425
Pro
475
Comfort
475
Pro
Spraying agent tank:
Nominal volume ("Total Vol."
1
)
Max. fill volume ("max. Vol"
1
)
22 l [5.8 gal]
20 l [5.3 gal]
16 l [4.2 gal]
15 l[3.9 gal]
Residual volume not properly discharged
by the device
< 200 ml [6.8 oz]
Pump system Piston pump Diaphragm pump
Maximum permissible operating
pressure ("P max."
1
)
4.0 bar [58 psi]
wit pressure plug up to 6 bar [87 psi]
4.0 bar [58 psi]
Pressure tank volume 1.3 l [44 oz]
Stroke volume 80 cm
3
[4.88 cu.in]
Permissible operating
temperature ("T max."
1
)
0–40 °C [32–104 °F]
Pressure hose: Length 1,300 mm [51"]
Maximum delivery ("max."
1
)
(with standard spray nozzle at 4 bar)
1.85 l/min [0.489 USgal/min]
Filter element: Mesh aperture
Part no.
0.8 mm [0.031"]
407492225
Filling strainer: Mesh aperture
Part no.
2.0 mm [0.079"]
420016625
Weight, ready for operation:
Spraying agent tank empty ("m net."
1
)
" tank filled to max. ("m max."
1
)
5.1 kg
[11.2 lbs]
25.1 kg
[55.3 lbs]
4.5 kg
[9.9 lbs]
19.5 kg
[43.0 lbs]
5.2 kg
[11.5 lbs]
20.2 kg
[44.5 lbs]
4.7 kg
[10.4 lbs]
19.7 kg
43.4 lbs]
5.4 kg
[11.9 lbs]
20.4 kg
[45.0 lbs]
Dimensions: Height
(without spray tube, pump lever, Width
and pressure hose) Depth
590 mm [23.2"]
400 mm [15.8"]
250 mm [9.8"]
520 mm [20.5"]
370 mm [14.6"]
240 mm [9.45"]
1
Inscriptions on the type plate
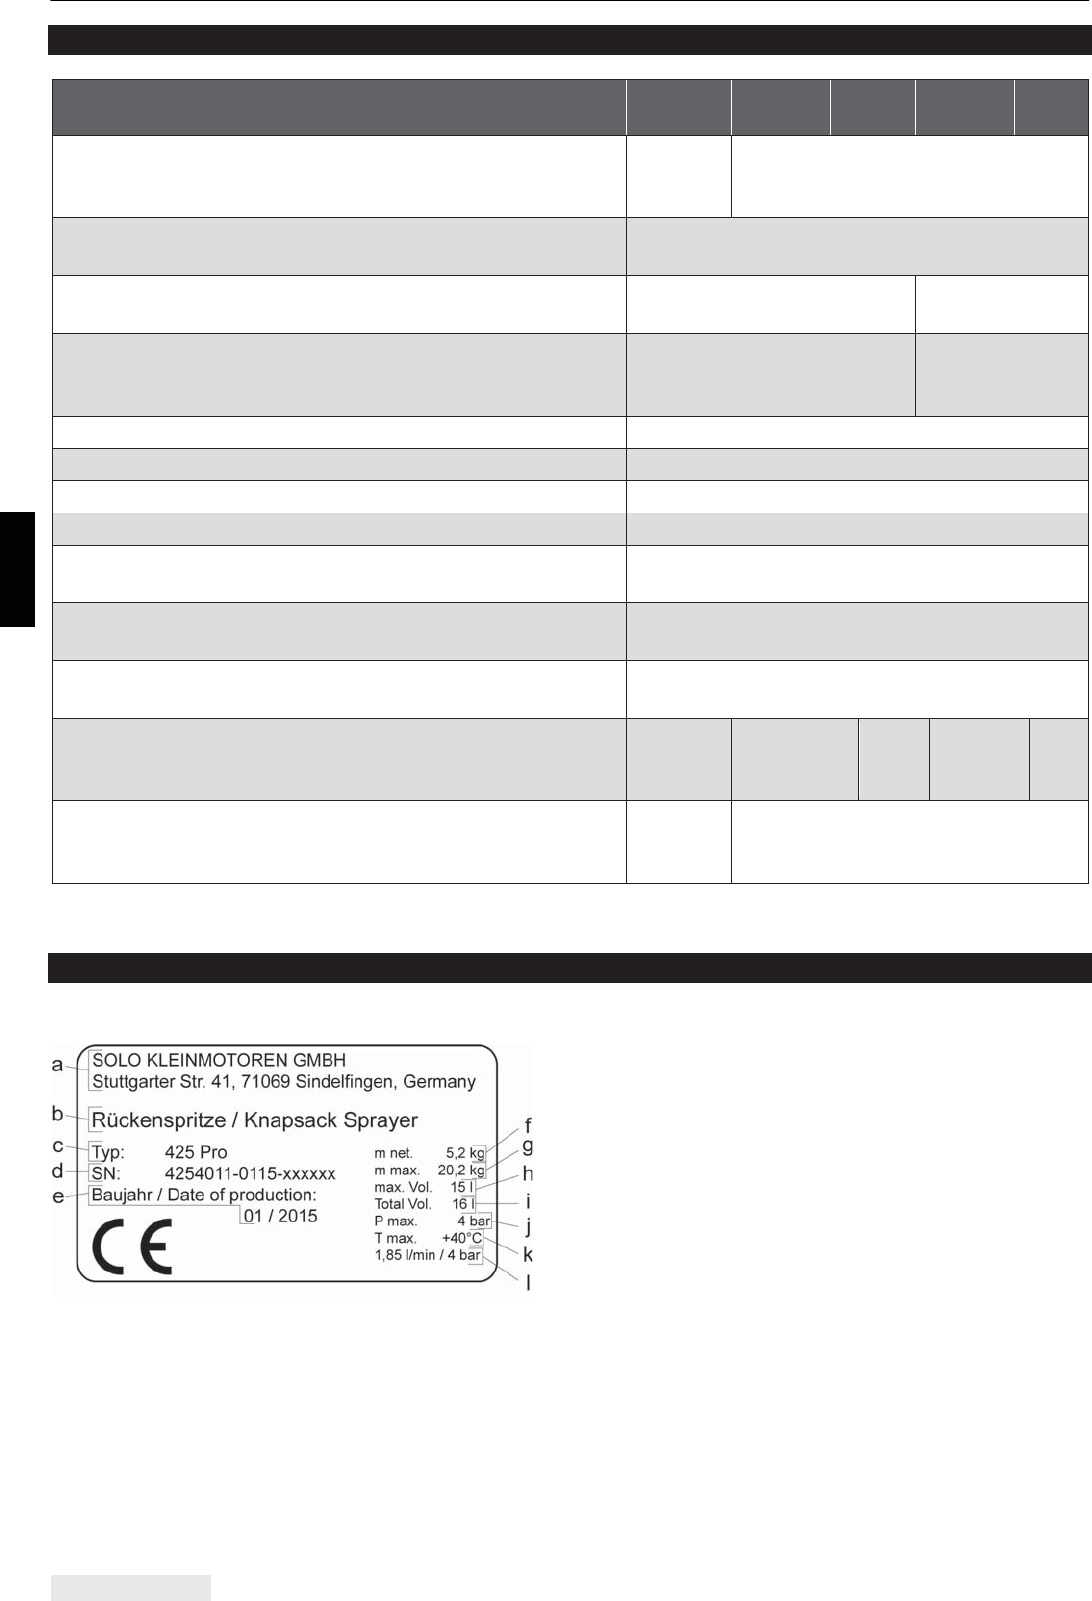
11 Type plate
a:Name and address of the manufacturer
b: Product designation
c: Type designation
d: Serial number
e:Month / year of production
f:Weight (ready for operation, spraying agent
tank empty)
g:Weight (ready for operation, spraying agent
tank filled to max.)
h:Max. fill volume of the spraying agent tank
i:Nominal volume of the spraying agent tank
j:Max. permissible operating pressure
k:Max. permissible operating temperature
l:Max. delivery (with standard spray nozzle at
max. operating pressure)
- FRANÇAIS - Pulvérisateur à dos 425 Comfort / 435 Comfort / 475 Comfort // 425 Pro / 475 Pro
FRANÇAIS 1
Attention !
Lire attentivement le présent manuel
avant la première mise en service et observer
absolument les prescriptions de sécurité !
Pour conserver longtemps toutes les fonctions et
les performances de cet appareil, vous devriez
suivre les conseils d'usage et de maintenance à la
lettre.
Votre revendeur se tient à votre entière disposition
pour d'éventuelles autres questions.
Déclaration de conformité CE
La déclaration de conformité CE présentée sur une
feuille séparée fait partie intégrante de ces
instructions d'emploi.
Exigences nationales
Le pulvérisateur peut être soumis à des exigences
nationales de vérifications périodiques par des
organismes désignés, comme le prévoit la directive
2009/128/CE
1
.
Emballage et élimination
Conservez l'emballage d'origine pour protéger
contre les dommages éventuels résultant de l'envoi
ou du transport.
Si le matériau d'emballage n'est plus nécessaire, il
convient de l'éliminer dans le respect des
règlements locaux.
Les matériaux d'emballage en carton sont des
matières premières et de ce fait ils peuvent être
réutilisés ou être réintroduits dans le cycle des
matières premières.
En fin de vie de l'appareil, éliminez celui-ci dans le
respect des règlements locaux.
1
Directive 2009/128/CE du Parlement européen et
du Conseil du 21 octobre 2009 instituant un
cadre d'action communautaire pour parvenir à
une utilisation durable des pesticides
Symboles
Dans le mode d'emploi et sur l'appareil, on utilise
les symboles suivants :
Lisez attentivement les instructions
d'emploi.
DANGER! Le non-respect des instructions
peut entraîner des blessures pouvant
causer la mort.
Portez des vêtements de protection
prescrits.
Portez des gants de protection.
Portez une protection du visage (comme
des lunettes de protections).
Portez un masque respiratoire.
Interdiction de fumer.
Pas de flamme.
Distance minimum par rapport à toute
personne : 15 m
Mois de construction
Année de construction
En vue d'une amélioration continuelle de nos
produits, nous nous réservons le droit de modifier
le contenu de la livraison tant en ce qui concerne la
forme que la technologie et l'équipement.
Les données et illustrations contenues dans les
présentes instructions n'ouvrent aucun droit à des
prétentions quelconques, merci de votre
compréhension.
Sommaire / 1 Contenu de la livraison
FRANÇAIS 2
Sommaire
1 Contenu de la livraison ............................................................................................................................ 2
2 Consignes de sécurité ............................................................................................................................. 3
Libble nimmt den Missbrauch seiner Dienste sehr ernst. Wir setzen uns dafür ein, derartige Missbrauchsfälle gemäß den Gesetzen Ihres Heimatlandes zu behandeln. Wenn Sie eine Meldung übermitteln, überprüfen wir Ihre Informationen und ergreifen entsprechende Maßnahmen. Wir melden uns nur dann wieder bei Ihnen, wenn wir weitere Einzelheiten wissen müssen oder weitere Informationen für Sie haben.
Art des Missbrauchs:
Forenregeln
Um zu sinnvolle Fragen zu kommen halten Sie sich bitte an folgende Spielregeln:
Lesen Sie zuerst die Anleitung;
Schauen Sie nach, ob die Frage bereits gestellt wurde;
Stellen Sie die Frage so deutlich wie nur einigermaßen möglich;
Erwähnen Sie was Sie bereits versucht haben um das Problem zu lösen;
Ist Ihr Problem von einem Besucher gelöst dann lassen Sie ihn / sie wissen in diesem Forum;
Falls Sie reagieren möchten, so verwenden Sie bitte das Antworten- Formular;
Da ihre Frage für alle Besucher sichtbar ist, sollten Sie lieber keine persönliche Daten erwähnen.
Neu registrieren
Registrieren auf E - Mails für Solo 475 Pro wenn:
neue Frage gestellt werden
neue Handbücher vorhanden sind
Sie erhalten eine E-Mail, um sich für eine oder beide Optionen anzumelden.
Das Handbuch wird per E-Mail gesendet. Überprüfen Sie ihre E-Mail.
Wenn Sie innerhalb von 15 Minuten keine E-Mail mit dem Handbuch erhalten haben, kann es sein, dass Sie eine falsche E-Mail-Adresse eingegeben haben oder dass Ihr ISP eine maximale Größe eingestellt hat, um E-Mails zu erhalten, die kleiner als die Größe des Handbuchs sind.
Ihre Frage wurde zu diesem Forum hinzugefügt
Möchten Sie eine E-Mail erhalten, wenn neue Antworten und Fragen veröffentlicht werden? Geben Sie bitte Ihre Email-Adresse ein.