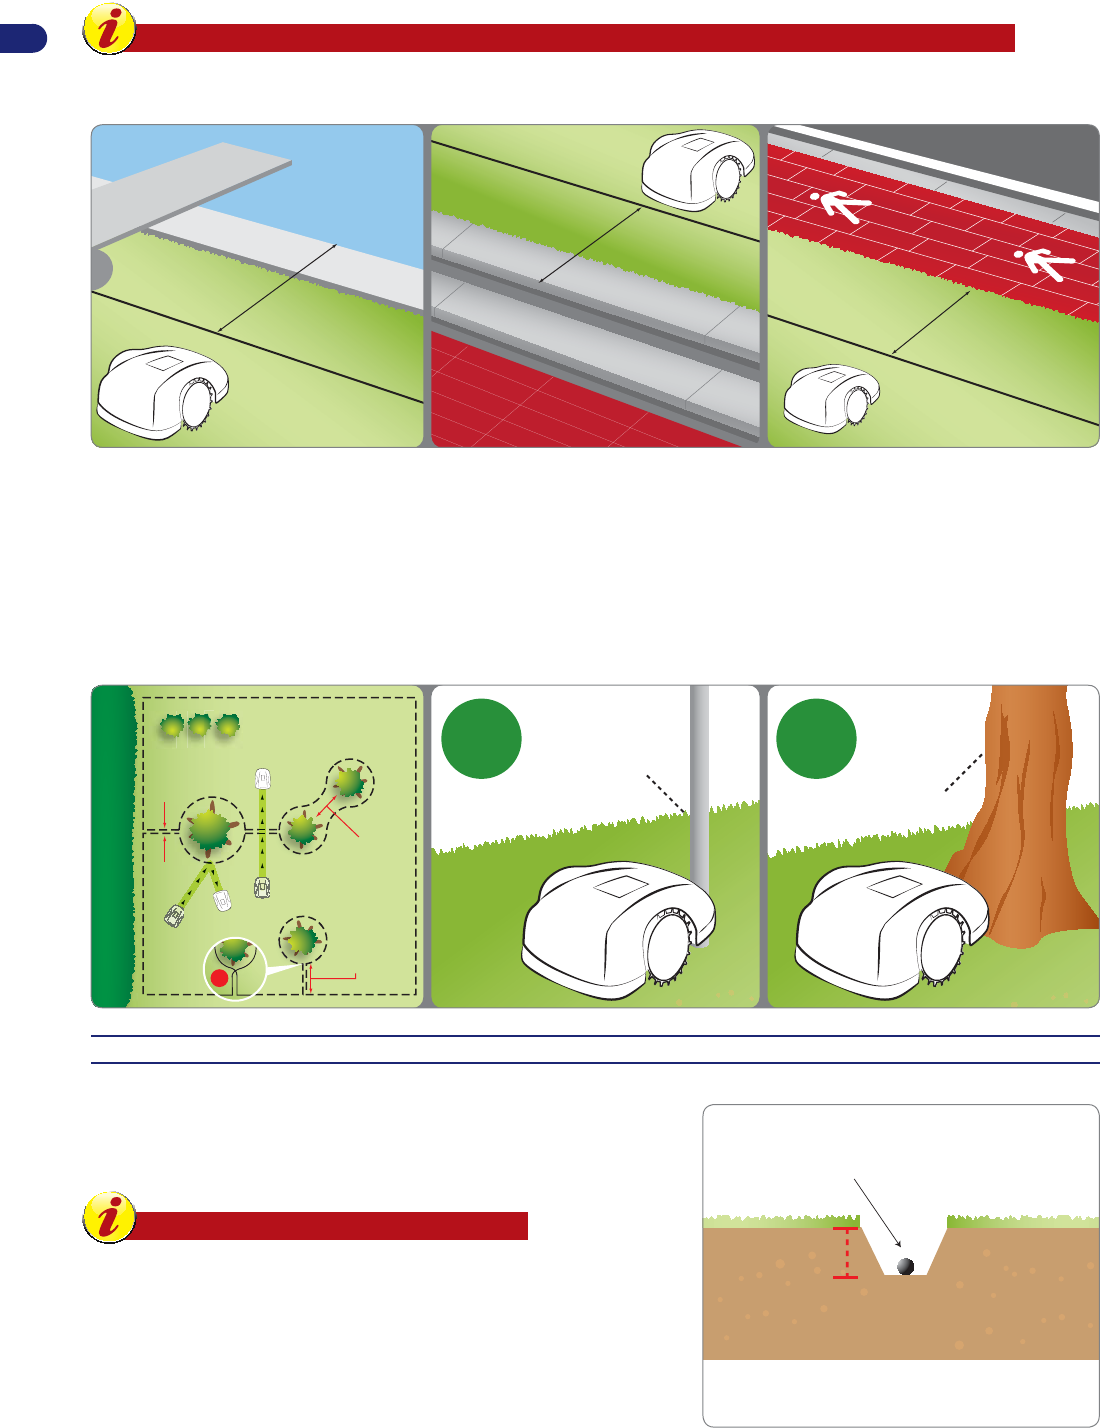
If there is a pool, pond, ravine, ditch, steps or public roads not protected by a wall inside or outside the work area, lay the perimeter wire at least 90
cm (35.43 ") from the edge. To reduce the distance of the perimeter wire for the best set-up and operation of the robot, we recommend installing
an additional fence of at least 15 cm. This will allow laying the perimeter wire at the regular distances described in the previous paragraphs.
Important
Carefully follow the distances and slopes specifi ed in the booklet to guarantee excellent installation and proper functioning
of the robot. Increase the distance by at least 30 cm (11.81 ") in the presence of slopes or slippery ground.
90 cm.
/ 35,44 “
90 cm.
/ 35,44 “
90 cm.
/ 35,44 “
Obstacles resistant to knocks, such as trees, bushes or poles without sharp edges present inside the work area do not need to be delimited. The
robot hits the obstacle and changes direction. If you don’t want the robot to knock into the obstacles and for its safe and silent operation, all the
fi xed obstacles need to be delimited. Slightly sloping obstacles such as fl ower pots, stones or trees with protruding roots must be delimited to
protect the cutting blade and the obstacles themselves.
To mark the boundary of the obstacle, start from the outside point of the perimeter nearest the object to delimit, arrange the perimeter wire so
that it reaches the obstacle, goes around it and then travels back along the previous path, observing the regular distances described in the
previous paragraphs. Overlap the outgoing wire and the incoming wire so that they pass under the same peg, this will allow the robot to go past
the perimeter wire.
For the robot to function correctly, the minimum overlapping length should not be greater than 70 cm (27.56 ") in order to allow the robot to move
regularly.
NO
min. 70 cm
/ 27,56 ”
min. 70 cm
/ 27,56 ”
< 70 cm
/ 27,56 ”
< 70 cm
/ 27,56 ”
0 cm / 0 ”0 cm / 0 ”
plant
pole
OKOK
INSTALLATION OF PERIMETER WIRE
The perimeter wire can be buried or laid on the ground. If you have a
wire trenching machine, it is better to bury the wire for greater protection.
Otherwise, install the wire on the ground with the pegs provided as
described below.
Important
Start laying the perimeter wire from the installation area
of the charging station, leaving a couple of extra meters
so that it can be cut down to size when connecting to the
Libble nimmt den Missbrauch seiner Dienste sehr ernst. Wir setzen uns dafür ein, derartige Missbrauchsfälle gemäß den Gesetzen Ihres Heimatlandes zu behandeln. Wenn Sie eine Meldung übermitteln, überprüfen wir Ihre Informationen und ergreifen entsprechende Maßnahmen. Wir melden uns nur dann wieder bei Ihnen, wenn wir weitere Einzelheiten wissen müssen oder weitere Informationen für Sie haben.
Art des Missbrauchs:
Forenregeln
Um zu sinnvolle Fragen zu kommen halten Sie sich bitte an folgende Spielregeln:
Lesen Sie zuerst die Anleitung;
Schauen Sie nach, ob die Frage bereits gestellt wurde;
Stellen Sie die Frage so deutlich wie nur einigermaßen möglich;
Erwähnen Sie was Sie bereits versucht haben um das Problem zu lösen;
Ist Ihr Problem von einem Besucher gelöst dann lassen Sie ihn / sie wissen in diesem Forum;
Falls Sie reagieren möchten, so verwenden Sie bitte das Antworten- Formular;
Da ihre Frage für alle Besucher sichtbar ist, sollten Sie lieber keine persönliche Daten erwähnen.
Neu registrieren
Registrieren auf E - Mails für Stiga Autoclip 325 wenn:
neue Frage gestellt werden
neue Handbücher vorhanden sind
Sie erhalten eine E-Mail, um sich für eine oder beide Optionen anzumelden.
Das Handbuch wird per E-Mail gesendet. Überprüfen Sie ihre E-Mail.
Wenn Sie innerhalb von 15 Minuten keine E-Mail mit dem Handbuch erhalten haben, kann es sein, dass Sie eine falsche E-Mail-Adresse eingegeben haben oder dass Ihr ISP eine maximale Größe eingestellt hat, um E-Mails zu erhalten, die kleiner als die Größe des Handbuchs sind.
Ihre Frage wurde zu diesem Forum hinzugefügt
Möchten Sie eine E-Mail erhalten, wenn neue Antworten und Fragen veröffentlicht werden? Geben Sie bitte Ihre Email-Adresse ein.