667708
10
Zoom out
Zoom in
Vorherige Seite
1/35
Nächste Seite
10
their screws (4) and (2).
Charge the battery following the battery manufacturer’s
instructions.
To prevent the safety device in the elec-
tronics card from cutting in, never start the engine until the
battery is fully charged!
Follow the battery manufacturer's
instructions regarding safe handling and disposal.
3.3 FITTING THE STEERING WHEEL
Put the machine on a flat
surface and straighten up
the front wheels.
Fit the steering wheel (1)
onto the protruding shaft
(2) with the spokes direct-
ed towards the seat.
Line up the hole in the
steering wheel hub with
the hole in the shaft and
insert the pin supplied (3).
Push the pin in using a hammer, ensuring that it comes com-
pletely through to the opposite side.
WARNING!
IMPORTANT
To avoid damaging the steering wheel
with the hammer, use an awl or a screw-driver of the same
size as the pin to push it in the last part.
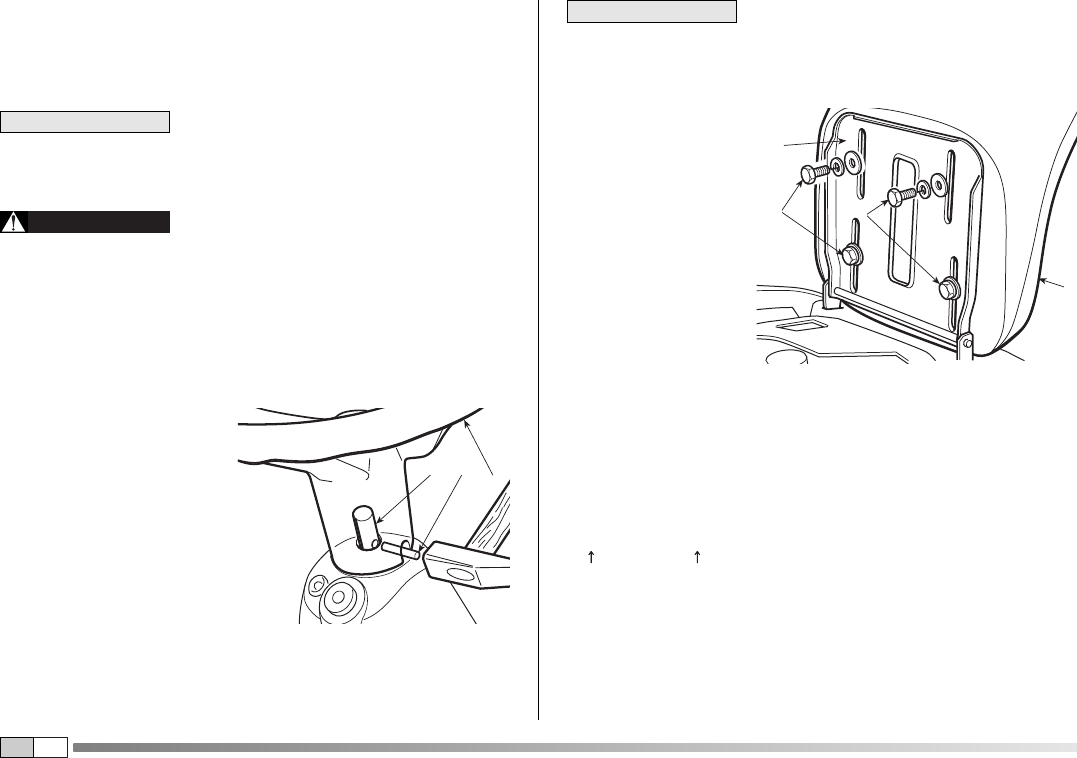
3.4 FITTING
THE SEAT
Fit the seat (1) onto
the plate (2) using
the screws (3).
3.5 FITTING THE GRASS-CATCHER
First of all assemble the frame, joining the upper part (1),
including the opening, to the lower part (2), using the supplied
nuts and screws (3) and following the indicated sequence.
Position the angle supports (4) and (5), respecting the right
(R ) and left (L ) sides, and attach them to the frame using
the four self-tapping screws (6).
Insert this frame into the canvas cover, ensuring that it is cor-
rectly positioned along the base perimeter.
Hook all the plastic profiles to the frame tubes with the help of
a screwdriver (7).
NOTE
EN
132
1
2
3
3
10

Brauchen Sie Hilfe? Stellen Sie Ihre Frage.

Forenregeln

Missbrauch melden von Frage und/oder Antwort

Libble nimmt den Missbrauch seiner Dienste sehr ernst. Wir setzen uns dafür ein, derartige Missbrauchsfälle gemäß den Gesetzen Ihres Heimatlandes zu behandeln. Wenn Sie eine Meldung übermitteln, überprüfen wir Ihre Informationen und ergreifen entsprechende Maßnahmen. Wir melden uns nur dann wieder bei Ihnen, wenn wir weitere Einzelheiten wissen müssen oder weitere Informationen für Sie haben.

Art des Missbrauchs:

Zum Beispiel antisemitische Inhalte, rassistische Inhalte oder Material, das zu einer Gewalttat führen könnte.

Beispielsweise eine Kreditkartennummer, persönliche Identifikationsnummer oder unveröffentlichte Privatadresse. Beachten Sie, dass E-Mail-Adressen und der vollständige Name nicht als private Informationen angesehen werden.

Forenregeln

Um zu sinnvolle Fragen zu kommen halten Sie sich bitte an folgende Spielregeln:

Neu registrieren

Registrieren auf E - Mails für Stiga GARDEN COMBI PRO HST 2011 wenn:


Sie erhalten eine E-Mail, um sich für eine oder beide Optionen anzumelden.


Andere Handbücher von Stiga GARDEN COMBI PRO HST 2011

Stiga GARDEN COMBI PRO HST 2011 Bedienungsanleitung - Deutsch - 35 seiten

Stiga GARDEN COMBI PRO HST 2011 Bedienungsanleitung - Holländisch - 35 seiten


Das Handbuch wird per E-Mail gesendet. Überprüfen Sie ihre E-Mail.

Wenn Sie innerhalb von 15 Minuten keine E-Mail mit dem Handbuch erhalten haben, kann es sein, dass Sie eine falsche E-Mail-Adresse eingegeben haben oder dass Ihr ISP eine maximale Größe eingestellt hat, um E-Mails zu erhalten, die kleiner als die Größe des Handbuchs sind.

Ihre Frage wurde zu diesem Forum hinzugefügt

Möchten Sie eine E-Mail erhalten, wenn neue Antworten und Fragen veröffentlicht werden? Geben Sie bitte Ihre Email-Adresse ein.


Info