In addion to cooling, the air condioner has two other funcons, i.e. air circulaon and dehumidicaon.
The air condioner can be operated via the control panel on the appliance and with the provided remote control.
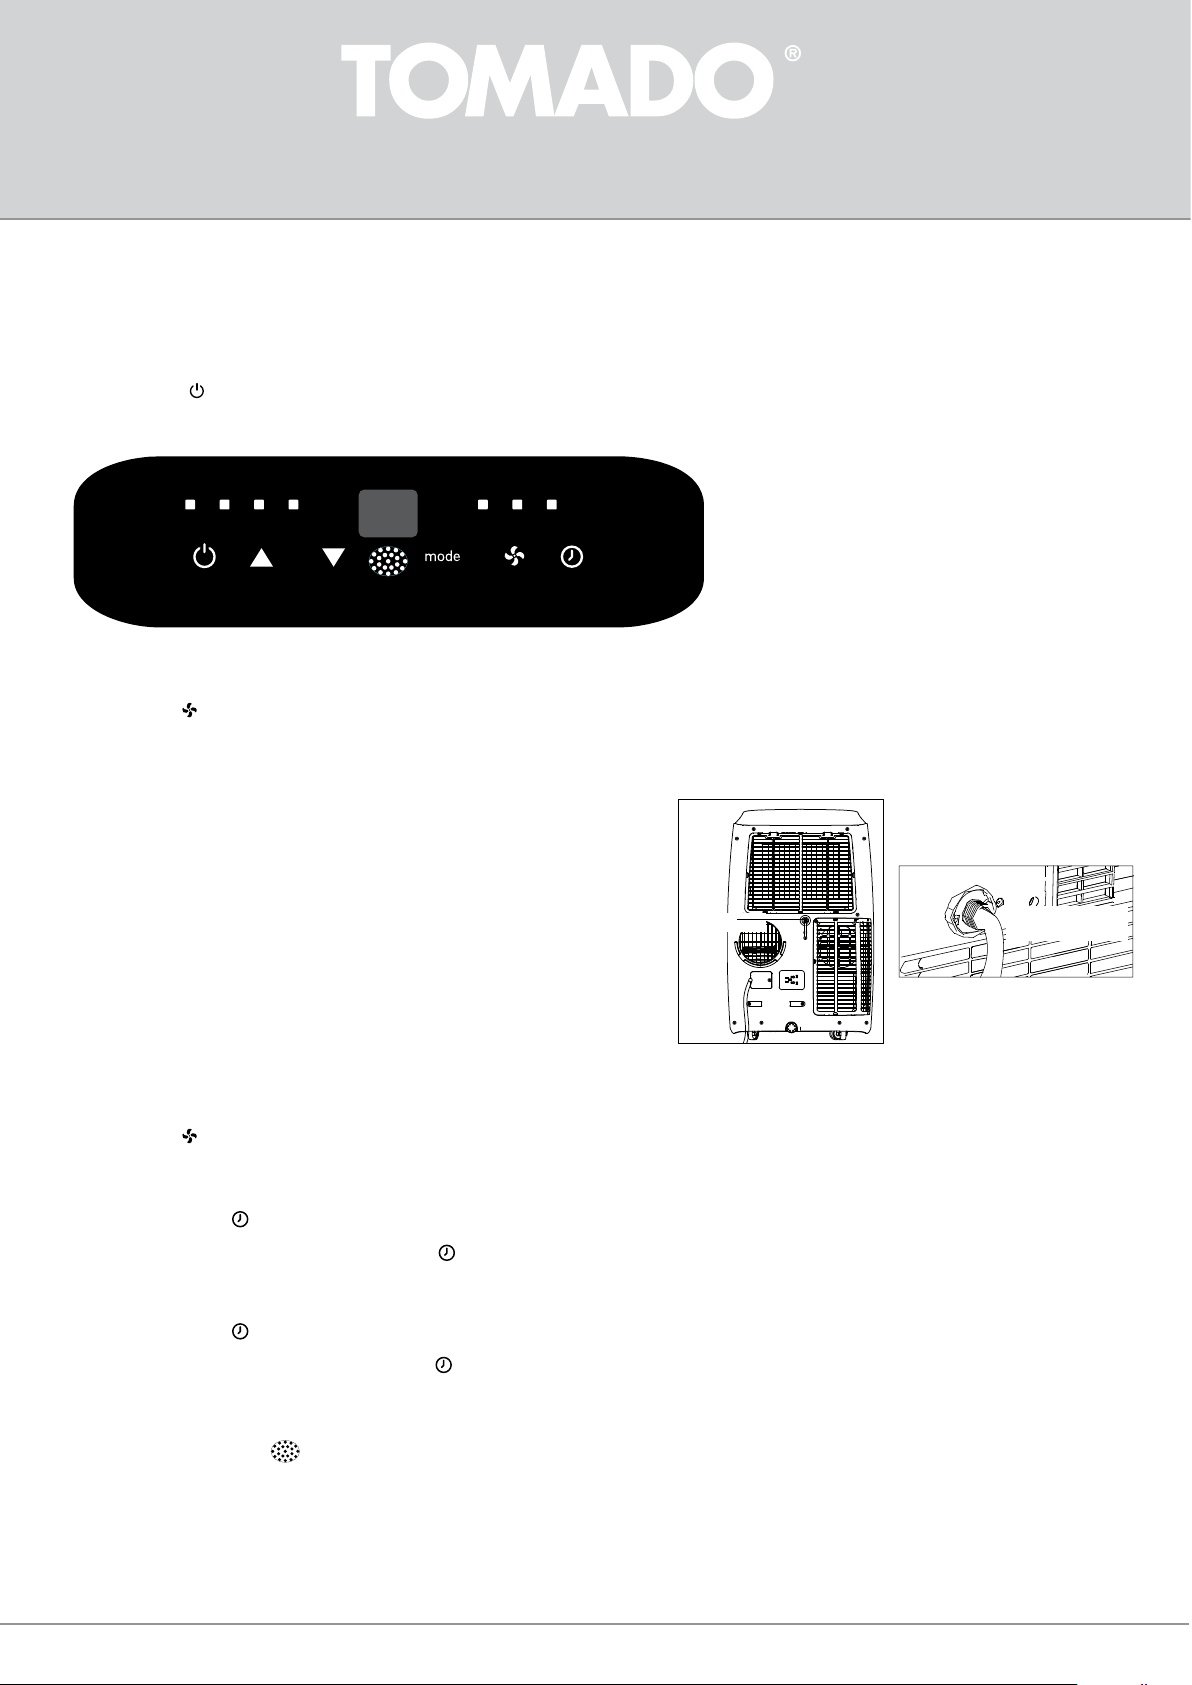
• Choose a locaon near a socket.
• Install the discharge hose in accordance with the gures and make sure the window is closed as much as possible.
• Insert the plug in an earthed socket.
• Press the on/o key to switch on the air condioner.
• The temperature range of the air condioner is: 16 to 31°C.
• Check that the discharge hose is mounted correctly.
• Do not share the socket with any other appliances.
COOLING
• Press the mode key [mode] unl the indicator light for cooling [ cool ] lights up on the display.
• Press the [ temp + / and temp - / ] keys to set the required room temperature (between 16°C and 31°C).
• Press the [ speed / ] key to set the wind speed.
DEHUMIDIFICATION
• Press the mode key [mode] unl the indicator light for dehumidicaon [ dry ] lights up on the display.
• The air condioner automacally adjusts the temperature to the current room temperature minus 2°C.
• The wind speed is at low speed automacally [ low ]. This cannot be changed.
When using this posion, a garden hose (not included in the delivery) or something similar must be
connected to discharge condensaon water.
• Unscrew the screw cap on the back of the appliance.
• Mount the end of a garden hose or a similar discharge hose to the drain and place the other end in
a receptacle, such as a bucket, situated lower than the drain of the appliance, so that the condensate
water can be discharged properly.
Cauon:
• Condensaon water may run out of the drain when the screw cap is removed and the appliance has been
used in cooling mode. Keep a drip tray at hand when removing the screw cap, in order to collect the
condensaon water.
• Make sure the discharge hose for the condensaon water properly descends and is not higher than the
drain of the appliance.
• When using this posion, the air discharge hose does not have to be connected.
• When using the cooling posion, it is recommended to not discharge the condensaon water
connuously, but to close the screw cap again. In this way the appliance is able to provide its best
performance.
AIR CIRCULATION
When using this posion, the air discharge hose does not have to be connected.
• Press the mode key [mode] unl the indicator light for air circulaon [ fan ] lights up on the display.
• Press the [ speed / ] key to adjust the wind speed - [low] or [high].
ADJUSTING THE TIMER
The mer funcon can be used to allow the air condioner to switch on automacally (delayed start) or switch o automacally at a set me (automac deacvaon).
Delayedstart
• Press the mer key [ mer/ ] when the air condioner is o and select the required me at which you want the air condioner to switch on
by means of the [ temp + / en temp - / ] keys. The delayed start can be set between 0 and 24 hours.
• Conrm the number of hours by pressing the mer key [ mer/ ] once more.
• The set number of hours is shown in the display.
• When the set number of hours have passed, the air condioner switches on automacally.
Automacdeacvaon
• Press the mer key [ mer/ ] when the air condioner is on and select the required me at which you want the air condioner to switch o using the
temperature and me [ temp + / and temp - / ] keys. Automac deacvaon can be set between 0 and 24 hours.
• Conrm the number of hours by pressing the mer key [ mer/ ] once more.
• The set number of hours is shown in the display.
• When the set number of hours have passed, the air condioner switches o automacally.
THE REMOTE CONTROL
Aim the remote control to the sensor of the appliance. The range of the remote control is approx. 8 metres (without obstacles between the appliance and the remote control).
Insert the two supplied AAA 1.5 Volt baeries in the remote control. Do take the plus and minus symbols on the inside of the remote control into account.
Note:
• If the remote control is replaced or is no longer used, remove the baeries and dispose them in accordance with applicable legislaon, as they are harmful to the environment.
• Do not mix old and new baeries. Do not use a mix of alkaline, standard (carbon-zinc) or chargeable (nickel-cadmium) baeries.
• Baeries could explode or leak when exposed to open re. Hand in baeries at a waste collecon facility or recognised waste collecon point.
• Remove the baeries from the remote control when the appliance is not being used for a longer period of me (winter storage) and keep them on a cool, dry place.
Libble nimmt den Missbrauch seiner Dienste sehr ernst. Wir setzen uns dafür ein, derartige Missbrauchsfälle gemäß den Gesetzen Ihres Heimatlandes zu behandeln. Wenn Sie eine Meldung übermitteln, überprüfen wir Ihre Informationen und ergreifen entsprechende Maßnahmen. Wir melden uns nur dann wieder bei Ihnen, wenn wir weitere Einzelheiten wissen müssen oder weitere Informationen für Sie haben.
Art des Missbrauchs:
Forenregeln
Um zu sinnvolle Fragen zu kommen halten Sie sich bitte an folgende Spielregeln:
Lesen Sie zuerst die Anleitung;
Schauen Sie nach, ob die Frage bereits gestellt wurde;
Stellen Sie die Frage so deutlich wie nur einigermaßen möglich;
Erwähnen Sie was Sie bereits versucht haben um das Problem zu lösen;
Ist Ihr Problem von einem Besucher gelöst dann lassen Sie ihn / sie wissen in diesem Forum;
Falls Sie reagieren möchten, so verwenden Sie bitte das Antworten- Formular;
Da ihre Frage für alle Besucher sichtbar ist, sollten Sie lieber keine persönliche Daten erwähnen.
Neu registrieren
Registrieren auf E - Mails für Tomado TMA1201W wenn:
neue Frage gestellt werden
neue Handbücher vorhanden sind
Sie erhalten eine E-Mail, um sich für eine oder beide Optionen anzumelden.
Das Handbuch wird per E-Mail gesendet. Überprüfen Sie ihre E-Mail.
Wenn Sie innerhalb von 15 Minuten keine E-Mail mit dem Handbuch erhalten haben, kann es sein, dass Sie eine falsche E-Mail-Adresse eingegeben haben oder dass Ihr ISP eine maximale Größe eingestellt hat, um E-Mails zu erhalten, die kleiner als die Größe des Handbuchs sind.
Ihre Frage wurde zu diesem Forum hinzugefügt
Möchten Sie eine E-Mail erhalten, wenn neue Antworten und Fragen veröffentlicht werden? Geben Sie bitte Ihre Email-Adresse ein.