298839
1
Zoom out
Zoom in
Vorherige Seite
1/100
Nächste Seite
BUTLER 920
User Guide / Handleiding / Manuel d’utilisateur
Bedienungsanleitung / Manuale d’uso
v 1.1
Important
To use ‘Caller ID’ (display caller), this service has to be activated on your
phone line. Normally you need a separate subscription from your telephone
company to activate this function. If you don’t have the Caller ID function on
your phoneline, the incoming telephone numbers will NOT be shown on the
display of your telephone.
Belangrijk
Om de ‘Nummerweergave’ te kunnen gebruiken, moet deze dienst geac-
tiveerd zijn op uw telefoonlijn. Om deze dienst te activeren, hebt U hiervoor
meestal een apart abonnement van uw telefoonmaatschappij nodig. Indien U
geen nummerweergavefunctie hebt op uw telefoonlijn, zullen de inkomende
telefoonnummers NIET op de display van uw toestel verschijnen.
Important
Pour utiliser la fonction ‘Caller ID/Clip’ (affichage de l’appelant), ce service
doit être activé sur votre ligne téléphonique. Généralement, vous avez besoin
d’un abonnement séparé de votre compagnie de téléphone pour activer cette
fonction. Si vous n’avez pas la fonction ‘Caller ID - Affichage Appelant’ sur
votre ligne téléphonique, les numéros de téléphone entrants n’apparaîtront
PAS sur l’écran de votre téléphone.
Wichtig
Zur Verwendung der ‘Rufnummernanzeige’ muss dieser Dienst erst für Ihre
Telefonleitung freigegeben werden. Zur Aktivierung dieser Dienstleistung
benötigen Sie meistens ein separates Abonnement Ihrer Telefongesell-
schaft.Wenn Sie für Ihre Telefonleitung keine Rufnummernanzeigefunktion
haben, erscheinen die eingehenden Telefonnummern NICHT im Display
Ihres Gerätes.
Importante
Per utilizzare la funzione „Caller ID" (visualizzazione chiamante), è necessa-
rio che questo servizio sia attivato sulla propria linea telefonica. General-
mente, è necessario sottoscrivere un abbonamento separato con la propria
società telefonica, per poter attivare questa funzione. Se la propria linea tele-
fonica non è dotata della funzione „Caller ID", i numeri telefonici delle chia-
mate in arrivo NON verranno visualizzati sul display del proprio telefono. In
caso di chiamata entrante, suona soltanto il ricevitore e non la base.
7
4
2
5
8
3
6
9
1
ABC
DEF
GHI
JKL
MNO
PQRS
TUV
WXYZ
0
INT
R
1
2
3
4
5
6
78
9
12
11
10
15
13
14
Butler 920
This product is in compliance with the essential requirements and other
relevant provisions of the R&TTE directive 1999/5/EC.
The Declaration of conformity can be found on:
http://www.topcom.net/support/cedeclarations.php
UK To be connected to the public analogue telephone network.
NL Geschikt voor aansluiting op het openbare analoog geschakelde
telefoonnetwerk.
FR Il est destiné à être raccordé au réseau de télécommunication
public.
DE Kompatibel für den analogen telefonanschluss.
IT Destinato ad essere collegato alla rete telefonica analogica
pubblica.
UK The features described in this manual are published with
reservation to modifications.
NL De in deze handleiding beschreven mogelijkheden worden
gepubliceerd onder voorbehoud van wijzigingen.
FR Les possibilités décrites dans ce manuel sont publiées sous réserve
de modifications.
DE Die in dieser Bedienungsanleitung umschriebenen Möglichkeiten,
werden vorbehaltlich Änderungen publiziert.
IT Le caratteristiche descritte nel presente manuale vengono
pubblicate con riserva di modifica.
UK The CE symbol indicates that the unit complies with the essential
requirements of the R&TTE directive.
NL Het toestel voldoet aan de basiseisen van de R&TTE-richtlijn. Dit
wordt bevestigd door de CE-markering.
FR La conformité de l’appareil avec les exigences fondamentales de la
directive européenne R&TTE relative aux terminaux, est confirmée
par le label CE.
DE Die Übereinstimmung des Gerätes mit den grundlegenden
Anforderungen der R&TTE-Directive ist durch das CE-
Kennzeichen bestätigt.
IT Il simbolo CE indica che l’unità è conforme ai requisiti
fondamentali della direttiva R&TTE.
English ................................................................. 7
1 Safety instructions ............................................................................7
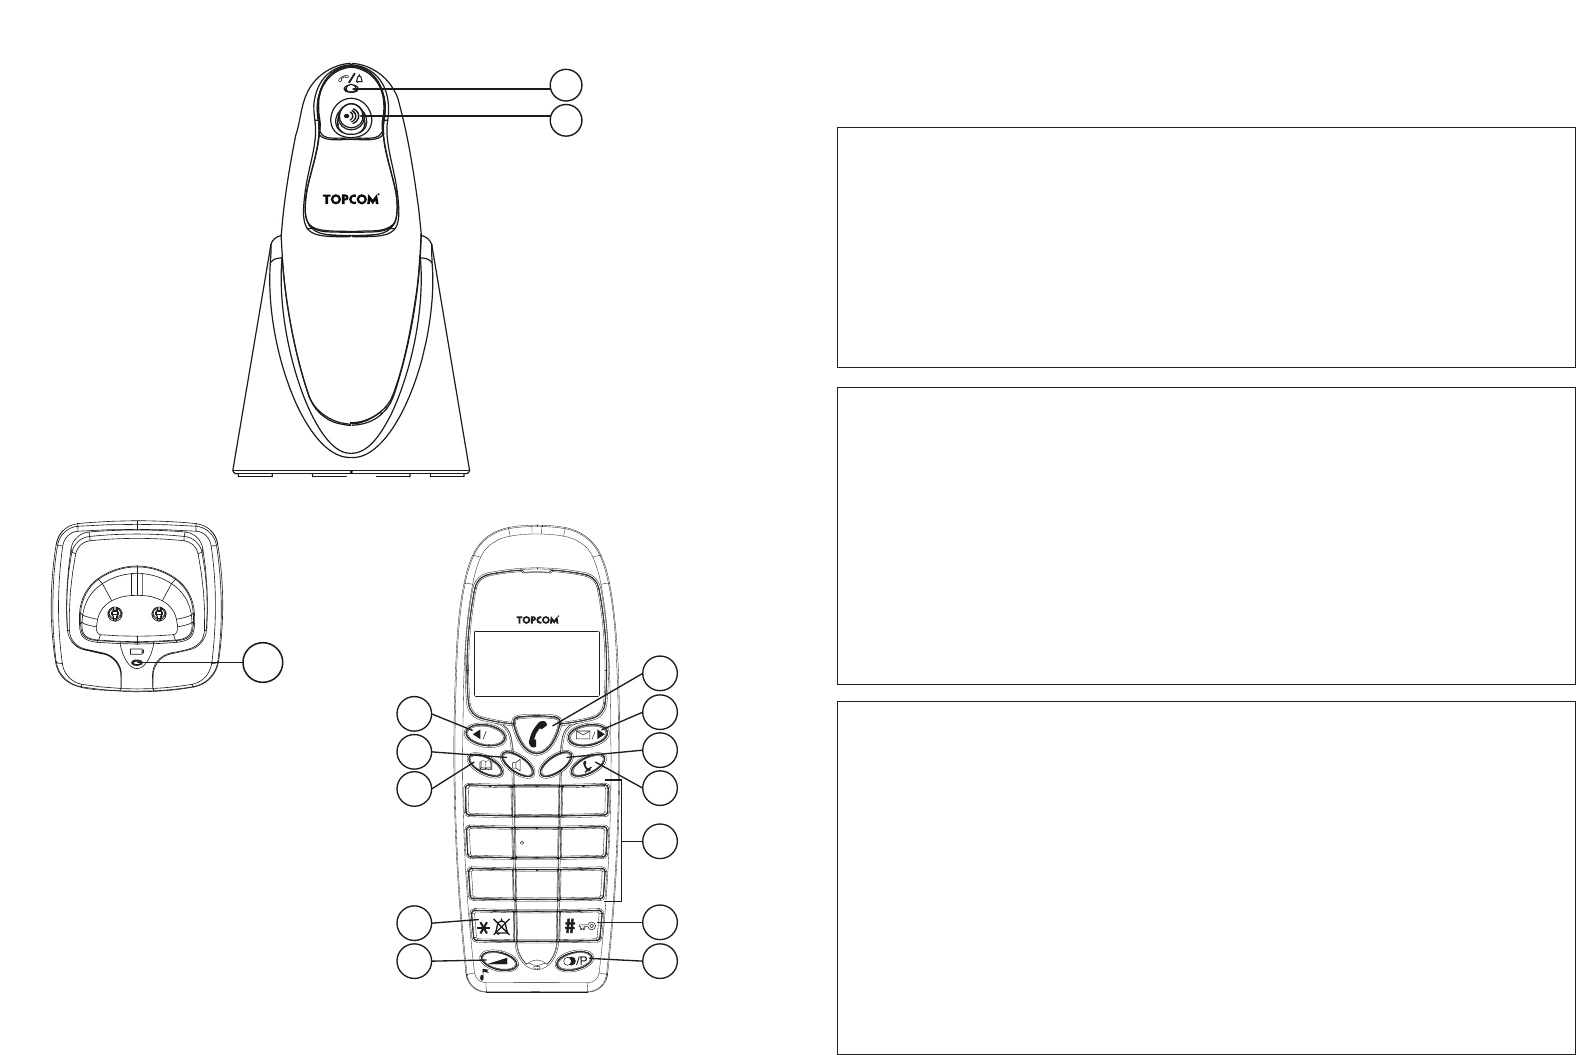
2 Keys....................................................................................................7
2.1 Handset................................................................................................. 7
2.2 Base ...................................................................................................... 8
2.3 Charger ................................................................................................. 8
3 Display ...............................................................................................8
4 Installation.........................................................................................9
4.1 Base ...................................................................................................... 9
4.2 Handset charger.................................................................................... 9
4.3 Handset............................................................................................... 10
5 Battery low indication ....................................................................10
6 Operation handset ..........................................................................11
6.1 Outgoing calls..................................................................................... 11
6.2 Incoming calls .................................................................................... 12
6.3 Activate/Deactivate the handsfree function........................................ 12
6.4 Programming memory numbers......................................................... 12
6.5 Calling a memory number.................................................................. 12
6.6 Mute function ..................................................................................... 13
6.7 Setting the volume.............................................................................. 13
6.8 Flash key (R) ...................................................................................... 13
6.9 Setting the ring volume and melody................................................... 13
6.10Key lock.............................................................................................. 14
6.11Setting the dialling mode.................................................................... 14
7 Caller-ID function (CLIP) .............................................................15
7.1 New calls ............................................................................................ 15
7.2 Consulting the call list........................................................................ 15
7.3 Calling a number from the call list..................................................... 16
7.4 Erasing a number from the call list..................................................... 16
7.5 Storing a number from the call list into the memory.......................... 16
8 Register/de-register a handset.......................................................17
8.1 Register a handset to a Topcom Butler 920 base ............................... 17
8.2 Removing a handset from a Topcom Butler 920 base ....................... 18
9 Call transfer and intercom between two handsets ......................19
9.1 Call transfer and conference call during an external call ................... 19
9.2 Internal call (intercom)....................................................................... 19
10 Troubleshooting..............................................................................19
11 Technical data.................................................................................20
12 Default settings................................................................................22
13 Warranty.........................................................................................22
13.1Warranty period.................................................................................. 22
13.2Warranty handling.............................................................................. 22
13.3Warranty exclusions ........................................................................... 22
14 Cleaning...........................................................................................23
15 Disposal of the device (environment)............................................23
Nederlands ........................................................ 24
1 Veiligheidsinstructies......................................................................24
2 Toetsen.............................................................................................24
2.1 Handset............................................................................................... 24
2.2 Basis ................................................................................................... 25
2.3 Lader................................................................................................... 25
3 Display .............................................................................................25
4 Installatie.........................................................................................26
4.1 Basis ................................................................................................... 26
4.2 Lader van handset............................................................................... 26
4.3 Handset............................................................................................... 27
5 Batterij bijna leeg-indicatie ...........................................................27
6 Werking van de handset.................................................................28
6.1 Uitgaande oproepen............................................................................ 28
6.2 Inkomende oproepen .......................................................................... 29
6.3 De handenvrij-functie activeren/desactiveren .................................... 29
6.4 Nummers in het geheugen programmeren ......................................... 29
6.5 Een geheugennummer bellen ............................................................. 30
6.6 Microfoon uit-functie ......................................................................... 30
6.7 Het volume instellen........................................................................... 30
6.8 Flash-toets (R) .................................................................................... 30
6.9 Het belvolume en de beltoon instellen ............................................... 31
6.10Toetsvergrendeling............................................................................. 31
6.11De belmodus instellen ........................................................................ 32
7 Nummerweergave oproeper-functie (CLIP)................................32
7.1 Nieuwe oproepen................................................................................ 32
7.2 De oproeplijst raadplegen................................................................... 33
7.3 Een nummer bellen uit de oproeplijst................................................. 33
7.4 Een nummer wissen uit de oproeplijst................................................ 34
7.5 Een nummer uit de oproeplijst opslaan in het geheugen ................... 34
8 Een handset aanmelden/afmelden.................................................34
8.1 Een handset aanmelden op een Topcom Butler 920 basisstation....... 34
8.2 Een handset verwijderen van een Topcom Butler 920 basisstation ... 35
9 Gesprek doorschakelen en intercom tussen twee handsets ........37
9.1 Oproepdoorschakeling en conferentiegesprek tijdens
een externe oproep 37
9.2 Interne oproep (intercom)................................................................... 37
10 Probleemoplossing..........................................................................38
11 Technische gegevens.......................................................................39
12 Standaardinstellingen.....................................................................40
13 Garantie...........................................................................................40
13.1Garantieperiode .................................................................................. 40
13.2Hantering van de garantie................................................................... 40
13.3Uitsluitingen van garantie................................................................... 41
14 Reinigen...........................................................................................41
15 Afvoeren van het toestel (milieu)...................................................41
Français ............................................................. 42
1 Instructions de sécurité ..................................................................42
2 Touches............................................................................................42
2.1 Combiné ............................................................................................. 42
2.2 Base .................................................................................................... 43
2.3 Chargeur ............................................................................................. 43
3 Écran................................................................................................43
4 Installation.......................................................................................44
4.1 Base .................................................................................................... 44
4.2 Chargeur du combiné ......................................................................... 44
4.3 Combiné ............................................................................................. 45
5 Indication de faible charge de la batterie.....................................45
6 Utilisation du combiné....................................................................46
6.1 Appels sortants ................................................................................... 46
6.2 Appels entrants ................................................................................... 47
6.3 Activer/désactiver la fonction mains-libres........................................ 47
6.4 Programmer des numéros en mémoire............................................... 47
6.5 Pour appeler un numéro mémorisé..................................................... 48
6.6 Fonction mute..................................................................................... 48
6.7 Pour régler le volume ......................................................................... 48
6.8 Touche flash (R)................................................................................. 48
6.9 Pour régler le volume et la mélodie de la sonnerie ............................ 49
6.10Verrouillage du clavier....................................................................... 49
6.11Pour régler le mode de numérotation ................................................. 50
7 Fonction d'identification de l'appelant (CLIP)............................50
7.1 Nouveaux appels ................................................................................ 51
7.2 Consulter la liste d'appels................................................................... 51
7.3 Pour appeler un numéro de la liste d'appels ....................................... 52
7.4 Pour effacer un numéro de la liste d'appels........................................ 52
7.5 Mémoriser un numéro à partir de la liste d'appels.............................. 52
8 Enregistrer/supprimer un combiné ..............................................53
8.1 Enregistrer un combiné sur une base Topcom Butler 920 ................. 53
8.2 Supprimer un combiné de la base Topcom Butler 920 ...................... 54
9 Transfert d'appel et interphone entre deux combinés ................55
9.1 Transfert d'appel et conférence téléphonique en cas d'appel externe. 55
9.2 Appel interne (interphone) ................................................................. 55
10 Problèmes et solutions....................................................................56
11 Données techniques.........................................................................57
12 Paramètres définis par défaut .......................................................58
13 Garantie...........................................................................................58
13.1Période de garantie ............................................................................. 58
13.2Traitement de la garantie.................................................................... 58
13.3Exclusions de garantie........................................................................ 59
14 Nettoyage .........................................................................................59
15 Mise au rebut de l'appareil (environnement)...............................59
Deutsch .............................................................. 60
1 Sicherheitshinweise.........................................................................60
2 Tasten...............................................................................................60
2.1 Mobilteil ............................................................................................. 60
2.2 Basisstation......................................................................................... 61
2.3 Ladegerät ............................................................................................ 61
3 Display .............................................................................................61
4 Installation.......................................................................................62
4.1 Basisstation......................................................................................... 62
4.2 Mobilteil-Ladegerät............................................................................ 62
4.3 Mobilteil ............................................................................................. 63
5 Anzeige Batterie schwach ..............................................................63
6 Verwendung des Mobilteils............................................................64
6.1 Abgehende Anrufe.............................................................................. 64
6.2 Ankommende Anrufe ......................................................................... 65
6.3 Freisprechmodus aktivieren / deaktivieren......................................... 65
6.4 Kurzwahlnummern programmieren ................................................... 65
6.5 Eine Kurzwahlnummer anrufen ......................................................... 66
6.6 Stummschaltung ................................................................................. 66
6.7 Lautstärke einstellen........................................................................... 66
6.8 Flash R-Taste...................................................................................... 66
6.9 Ruftonlautstärke und Melodie einstellen............................................ 67
6.10Tastatursperre ..................................................................................... 67
6.11Wahlverfahren einstellen.................................................................... 68
7 Anruferkennung (CLIP)................................................................68
7.1 Neue Anrufe ....................................................................................... 69
7.2 Anrufliste aufrufen ............................................................................. 69
7.3 Eine Nummer aus der Anrufliste anrufen........................................... 69
7.4 Eine Nummer aus der Anrufliste löschen........................................... 70
7.5 Eine Nummer aus der Anrufliste als Kurzwahlnummer speichern.... 70
8 Ein Mobilteil an- oder abmelden...................................................70
8.1 Ein Mobilteil an der Topcom Butler 920 Basisstation anmelden....... 70
8.2 Ein Mobilteil von einer Topcom Butler 920 Basisstation abmelden . 72
9 Anrufweiterleitung und Interne Anrufe von einem Mobilteil
zum einem anderen.........................................................................73
9.1 Anrufweiterleitung und Konferenzschaltung während eines
externen Gesprächs 73
9.2 Interner Anruf (Intercom)................................................................... 73
10 Problemlösung ................................................................................74
11 Technische Daten............................................................................75
12 Voreinstellungen .............................................................................76
13 Garantie...........................................................................................76
13.1Garantiezeit......................................................................................... 76
13.2Abwicklung des Garantiefalls ............................................................ 76
13.3Garantieausschlüsse............................................................................ 77
14 Reinigung.........................................................................................77
15 Entsorgung des Geräts (Umweltschutz) .......................................77
Italiano .............................................................. 78
1 Norme di sicurezza .........................................................................78
2 Tasti..................................................................................................78
2.1 Portatile............................................................................................... 78
2.2 Base .................................................................................................... 79
2.3 Caricatore ........................................................................................... 79
3 Display .............................................................................................79
4 Installazione ....................................................................................80
4.1 Base .................................................................................................... 80
4.2 Caricatore portatile ............................................................................. 80
4.3 Portatile............................................................................................... 81
5 Indicazione di batteria scarica.......................................................81
6 Funzionamento del portatile..........................................................82
6.1 Chiamate in uscita .............................................................................. 82
6.2 Chiamate in entrata............................................................................. 83
6.3 Attivazione/disattivazione della funzione Viva voce......................... 83
6.4 Programmazione dei numeri in memoria ........................................... 83
6.5 Chiamata a un numero in memoria .................................................... 84
6.6 Funzione di disattivazione microfono ................................................ 84
6.7 Impostazione del volume.................................................................... 84
6.8 Tasto Flash (R) ................................................................................... 84
6.9 Impostazione della melodia e del volume della suoneria................... 85
6.10Blocco tastiera .................................................................................... 85
6.11Impostazione della modalità di composizione ................................... 86
7 Funzione Caller-ID (CLIP)............................................................86
7.1 Nuove chiamate.................................................................................. 87
7.2 Consultazione dell'Elenco chiamate................................................... 87
7.3 Chiamata a un numero dall'elenco chiamate ...................................... 87
7.4 Cancellazione di un numero dall'elenco chiamate ............................. 88
7.5 Memorizzazione di un numero dal registro chiamate ........................ 88
8 Registrazione/rimozione di un portatile .......................................88
8.1 Registrazione di un portatile ad una base Topcom Butler 920........... 88
8.2 Rimozione di un portatile da una base Topcom Butler 920 ............... 89
9 Trasferimento di chiamata e intercomunicazione tra
due portatili.....................................................................................90
9.1 Trasferimento di chiamata e chiamata in conferenza durante
una chiamata esterna 90
9.2 Chiamata interna (intercomunicazione) ............................................. 91
10 Risoluzione dei problemi................................................................91
11 Caratteristiche tecniche .................................................................93
12 Impostazioni predefinite ................................................................93
13 Garanzia ..........................................................................................94
13.1Periodo di garanzia............................................................................. 94
13.2Utilizzo della garanzia........................................................................ 94
13.3Decadenza della garanzia ................................................................... 94
14 Pulizia ..............................................................................................95
15 Smaltimento dell'apparecchio (ambiente)....................................95
English
7
Safety instructions
English
1 Safety instructions
• Only use the charger plug supplied. Do not use other chargers as this
may damage the battery cells.
Only insert rechargeable batteries of the same type. Never use ordinary,
non-rechargeable batteries. Insert rechargeable batteries so they
connect to the right poles (indicated in the battery compartment of the
handset).
• Do not touch the charger and plug contacts with sharp or metal objects.
• The operations of some medical devices may be affected.
• The handset may cause an unpleasant buzzing sound in hearing aids.
• Do not place the basic unit in a damp room or at a distance of less then
1.5m away from a water source. Keep water away from the handset.
• Do not use the telephone in environments where there is a risk of
explosions.
• Dispose of the batteries and maintain the telephone in an
environment-friendly manner.
As this telephone cannot be used in case of a power cut, you should use
a mains-independent telephone for emergency calls, e.g. a mobile
phone.
2Keys
2.1 Handset
1. Line key
2. Call log / Scroll key
3. Int key
4. Mute key
5. Alphanumerical keys
6. Key lock key
7. Redial / Pause key
8. Volume / Melody key
9. Ringer on/off key
10.Memory key
11.Handsfree key
12.Flash R / Scroll key
8
Display
2.2 Base
13.Visual call / In-use (LED)
14.Paging key
2.3 Charger
15.Handset on charger (LED)
3Display
You are online
There are more digits on the
left
New numbers in call list
There are more digits on the
right
Rechargeable battery level
indicator
During handsfree
The antenna indicates the
quality of reception. The
antenna blinks when the
handset is out of range.
When ring buzzer is turned
off
Microphone is muted
There are new messages in
your voice mail
Memory records are being
retrieved or set up
During internal call
The keypad is locked HS-x x = handset number
English
9
Installation
4 Installation
4.1 Base
1 Plug one end of the telephone cable into the phone unit and the other
end into the telephone line wall socket.
2 Connect the small plug of the AC adaptor to the phone and the other
end of the power cable to the electric socket.
- Back view of base -
A.Telephone wall outlet
B.Power cable
C.Telephone cable
4.2 Handset charger
1 Connect the AC adaptor to the electric socket.
- Back view of charger -
A
B
C
10
Battery low indication
4.3 Handset
1 Insert 2 rechargeable batteries (AAA) inside the battery compartment
of the handset.
- Back view of handset -
A.Cover
B.Rechargeable batteries
5 Battery low indication
When the battery is empty, the handset no longer carries out operations.
When a battery is completely empty and you have put the handset on the
base unit for a short period of time, the battery symbol will appear to be
fully charged, but this is actually not the case. The battery capacity will
decrease rapidly. We advise you to put the handset on the base unit for 12
hours so it can be recharged completely.
When you are in the middle of a conversation and the battery is almost
empty, the handset will emit a warning signal. Place the handset on the
base unit to charge.
Full battery
Empty battery
+
-
+
-
A
B
Butler 900
English
11
Operation handset
6 Operation handset
6.1 Outgoing calls
Making a phone call
Call setup with dial preparation
Redialling the last number dialled
Redial one of the last 3 numbers called
1 Press the line key.
2 Enter the desired telephone number.
3 Press the line key when you want to terminate the call.
1 Enter the desired telephone number.
An incorrect number can be corrected by means of the
mute key. When you haven’t pressed a key for 10 seconds,
the number will disappear and the handset returns to
standby mode.
2 Press the line key.
The number will be dialled automatically.
3 Press the line key again when you want to terminate the
call.
1 Press the line key.
2 Press the redial key.
The number you last called will be dialled automatically.
3 Press the line key again when you want to terminate the
call.
1 Press the redial key.
The number you last called appears on the display.
If you would like to dial one of the last 3 numbers, press
the redial key a few times until the desired number
appears on the display.
2 Press the line key.
The number will be dialled automatically.
456
g h i j k l m n o
456
g h i j k l m n o
12
Operation handset
6.2 Incoming calls
6.3 Activate/Deactivate the handsfree function
This function allows you to communicate without having to pick up the
handset when there is an incoming call or when you are on the phone by
the handset.
6.4 Programming memory numbers
You can program 10 indirect numbers (each of maximum 25 digits) in the
phone.
6.5 Calling a memory number
3 Press the line key again when you want to terminate the
call.
When a call comes in, the handset and base will start to
ring and the visual call LED on the base will blink.
1 Press the line key to answer the incoming call.
2 Press the line key again when you want to terminate the
call.
1 Press the handsfree key to activate the function.
2 Press the handsfree key again to switch the
conversation back to the handset.
1 Press and hold the memory key until the icon appears on
the display.
2 Enter the telephone number you want to store.
3 Press the memory key again to confirm.
4 Enter the memory location (0-9) where you want to
store the number.
You will hear a confirmation tone.
1 Press the memory key, followed by the number of the
memory location (0-9).
2 Press the line key.
The number will be dialled automatically.
456
g h i j k l m n o
456
g h i j k l m n o
456
g h i j k l m n o
English
13
Operation handset
6.6 Mute function
It is possible to deactivate the microphone during a conversation. Now
you can speak openly without being heard by your correspondent.
6.7 Setting the volume
6.8 Flash key (R)
Setting the flash time
6.9 Setting the ring volume and melody
Handset melody
3 Press the line key again when you want to terminate the
call.
1 Press the mute key.
The microphone will be activated.
2 Press the mute key again to deactivate the mute
function.
1 Press the volume key during the conversation.
You can set the volume alternatively in 5 levels.
When you press the flash key (also called recall), the unit
generates a line interruption (100ms of 250ms). It gives
you the possibility to use the special services of your
telephone provider and/or to transfer calls when you have
a telephone exchange.
1 Press and hold the redial key for 3 seconds.
The display will show:
“S” for 100ms
“L” for 250ms
The flash time setting will disappear from the display
after 2 seconds.
1 Press and hold the melody key until the current melody
is heard.
2 Select the desired melody (1-9) or enter a number (1-9).
456
g h i j k l m n o
14
Operation handset
Handset ring volume
6.10 Key lock
6.11 Setting the dialling mode
There are two types of dialling modes:
DTMF/Tone dialling (default and most common used)
Pulse dialling (for older installations)
To change the mode of dialling:
3 Press the melody key again to confirm.
1 Press the volume key.
The handset will ring in the current volume.
2 Select the desired volume (1-5) or enter a number (1-5).
Press “0” to turn the volume off.
3 Press the volume key again to confirm.
You can turn the ringer volume of each individual handset on
or off by simply pressing and holding the ringer on/off key
in standby.
When the keypad is locked, pressing any key will have no
effect during standby (except holding the key lock key).
1 Press and hold the key lock key.
The icon appears on the display and the keypad is locked.
2 Press and hold the key lock key again to unlock the
keypad.
When the keypad is locked and there is an incoming call,
you can still answer the call by pressing the line key.
During the call, the keypad functions as normal. When the
call is ended, the keypad will be locked again.
1 Press and hold the flash key to toggle between dialling
modes.
“P” will appear when set to pulse dialling, “T” will appear
when set to tone (DTMF) dialling.
After 5 seconds, the unit returns to standby.
456
g h i j k l m n o
English
15
Caller-ID function (CLIP)
7 Caller-ID function (CLIP)
The Topcom Butler 920 displays the telephone numbers of incoming
calls. This function is only possible if you are subscribed to a telephone
operator that provides this service. Contact your telephone provider for
more information.
7.1 New calls
7.2 Consulting the call list
A.Progress number
B.Date (DD-MM)*
C.Time (24h format)*
You can change the dial mode of the phone by accident when
pressing the flash key for 5 seconds in standby. The wrong
dialling mode will cause that the number isn’t dialled correctly
or isn’t dialled at all.
When you receive a call, the numbers are saved in a call
list. This list can hold up to 20 telephone numbers (each
of maximum 25 digits).
If the number is longer then 14 digits, you can scroll
further to the right to view the other digits.
When you have received a new unanswered call, the CLIP
symbol will blink on the display.
1 Press the call log key.
The last received call is displayed. If the list is empty,
“NO CLIP” is shown.
The following will appear on the display:
After 5 seconds, the telephone number will be shown.
16
Caller-ID function (CLIP)
* Only when the network sends the time/date together with the telephone
number! On some networks with Caller ID, time and date will not be
displayed.
7.3 Calling a number from the call list
7.4 Erasing a number from the call list
7.5 Storing a number from the call list into the memory
2 Press the right key to skip the date and time.
3 Press the left key to scroll to the previous call, press the
right key to show the next call.
4 Leave the call list by pressing the mute key.
1 Press the call log key.
2 Scroll through the call list until the desired telephone
number is displayed.
3 Press the line key to start the call.
The number will be dialled automatically.
4 Press the line key again when you want to terminate the
call.
1 Press the call log key.
2 Scroll through the call list until the desired telephone
number is displayed.
3 Press and hold the mute key for 3 seconds to erase the
number.
1 Press the call log key.
2 Scroll through the call list until the desired telephone
number is displayed.
3 Press and hold the memory key for 3 seconds.
4 Enter the memory location (0-9) where you want to
store the number.
5 Enter the memory key again to confirm.
456
g h i j k l m n o
English
17
Register/de-register a handset
8 Register/de-register a handset
8.1 Register a handset to a Topcom Butler 920 base
You can subscribe up to 4 handsets to one base unit. By default, each
handset is subscribed on the base unit upon delivery.
You only need to subscribe the handset if:
• the handset subscription has been removed from the base unit (e.g. for
reinitialisation)
• you want to subscribe a different handset to this base unit.
The below procedure is only applicable to a Topcom Butler 920 handset
and base unit!
1 Press and hold the paging key on the base unit for 10
seconds.
The handset on charger LED on the base unit begins to
blink rapidly for 1 minute.
During this minute, the base unit is in register mode and
you must do the following to subscribe he handset:
2 Press and hold the right key for 3 seconds.
3 Press and hold the *-key for 3 seconds.
The following will appear on the display:
4 Enter the number of the base unit (1-4) you would like
to subscribe the handset to.
The unit will start searching for the base and when found,
it will ask to enter the PIN code (4 digits):
5 Enter the base PIN code (0000 by default). If the PIN is
wrong, the handset will restart the searching for the
base.
456
g h i j k l m n o
456
g h i j k l m n o
18
Register/de-register a handset
8.2 Removing a handset from a Topcom Butler 920 base
You can remove a handset from a base to allow another handset to be
registered.
When the handset is registered, it will show “HS”
followed by the handset number.
1 Press and hold the right key for 3 seconds.
2 Press and hold the mute key for 3 seconds.
3 Enter the base PIN code (0000 by default). If the PIN is
wrong, the handset will go back to standby.
4 Enter the number of the handset (1-4) you would like to
remove.
If the removal is successfully, the handset will go back to
standby. If not, it will ask again to enter the handset
number.
You can only remove existing handsets other then the one you
are using.
PIN
456
g h i j k l m n o
PIN 1234 H5?
456
g h i j k l m n o
English
19
Call transfer and intercom between two
9 Call transfer and intercom between two handsets
9.1 Call transfer and conference call during an external call
9.2 Internal call (intercom)
These functions only work when more then one handset (like a
Twin/Triple/Quattro version) is registered to the same base.
1 During an external call, press the INT key, followed by
the number of the handset (1-4).
The other handset will start to ring:
When the other handset takes the line you can talk
internally. If you hang up, the external line will be
connected with the other handset.
2 Press and hold the INT key for 3 seconds. Now you can
talk with the second handset and external line at the
same time (conference call).
3 Press the INT key again to return to the external call.
4 Press the line key when you want to terminate the call.
1 In standby, press the INT key, followed by the number
of the handset (1-4).
The other handset will start to ring.
2 Press the line key to pick up the line.
Now you can talk internally.
3 Press the line key when you want to terminate the call.
20
Troubleshooting
10 Troubleshooting
Symptom Possible cause Solution
No display Batteries uncharged Check the position of
the batteries
Recharge the batteries
Handset turned off Turn on the handset
No tone Telephone cord badly
connected
Check the telephone
cord connection
The line is occupied by
another handset
Wait until the other
handset hangs up
Volume of
conversation partner
too low
Adjust the volume
during the
conversation by
pressing the volume
key
Handset ringer
volume too low
Adjust the ringer
volume
Not possible to dial a
number
Wrong dial mode see ”6.11 Setting the
dialling mode” to set
the correct dialling
mode
The icon flashes Handset out of range Bring the handset
closer to the base
The base has no power
supply
Check the mains
connection to the base
The handset is not
registered on the base
Register the handset
on the base
Handset does not ring The ringing volume is
off or low
Adjust the ringing
volume
Not possible to
transfer a call on
PABX
The Flash Time is too
short
Set the unit to Long
Flash Time
Telephone does not
react to pressing the
keys
Manipulation error Remove the batteries
and put them back in
place
English
21
Technical data
11 Technical data
12 Default settings
Range up to 300m in open space
up to 50m indoors
Handset Batteries: 2 x 1.2V, 600mAh AAA Type NiMh
rechargeable
Base power supply 220/230V / 50 Hz
Handset autonomy 100 hours in standby
Handset talk time 11 hours
Normal conditions of
use
+5 °C to +45 °C
Permitted relative air
humidity
25 to 85%
Dialling mode Pulse / DTMF (Tone)
Memories 10 indirect with max. 25 digits
Flash time 100 ms
Dialling mode: Tone
Ring volume Level 3
Ring melody Ringer 8
Base PIN 0000
22
Warranty
13 Warranty
13.1 Warranty period
The Topcom units have a 24-month warranty period. The warranty period
starts on the day the new unit is purchased. The warranty on batteries is
limited to 6 months after purchase. Consumables or defects causing a
negligible effect on operation or value of the equipment are not covered.
The warranty has to be proven by presentation of the original purchase
receipt, on which the date of purchase and the unit-model are indicated.
13.2 Warranty handling
A faulty unit needs to be returned to a Topcom service centre including a
valid purchase note.
If the unit develops a fault during the warranty period, Topcom or its
officially appointed service centre will repair any defects caused by
material or manufacturing faults free of charge.
Topcom will at its discretion fulfill its warranty obligations by either
repairing or exchanging the faulty units or parts of the faulty units. In case
of replacement, colour and model can be different from the original
purchased unit.
The initial purchase date shall determine the start of the warranty period.
The warranty period is not extended if the unit is exchanged or repaired
by Topcom or its appointed service centres.
13.3 Warranty exclusions
Damage or defects caused by incorrect treatment or operation and
damage resulting from use of non-original parts or accessories not
recommended by Topcom are not covered by the warranty. Topcom
cordless phones are designed to work with rechargeable batteries only.
The damage caused by the use of non-rechargeable batteries is not
covered under warranty.
The warranty does not cover damage caused by outside factors, such as
lightning, water and fire, nor any damage caused during transportation.
English
23
Cleaning
No warranty can be claimed if the serial number on the units has been
changed, removed or rendered illegible.
Any warranty claims will be invalid if the unit has been repaired, altered
or modified by the buyer or by unqualified, non-officially appointed
Topcom service centres.
14 Cleaning
Clean the telephone with a slightly damp cloth or with an anti-static cloth.
Never use cleaning agents or abrasive solvents.
15 Disposal of the device (environment)
At the end of the product lifecycle, you should not throw this
product into the normal household garbage but bring the
product to a collection point for the recycling of electrical and
electronic equipments. The symbol on the product, user guide
and/or box indicate this.
Some of the product materials can be re-used if you bring them to a
recycling point. By re-using some parts or raw materials from used
products you make an important contribution to the protection of the
environment.
Please contact your local authorities in case you need more information
on the collection points in your area.
24
Veiligheidsinstructies
Nederlands
1 Veiligheidsinstructies
• Gebruik alleen de bijgeleverde stekker van de lader. Gebruik geen
andere laders, omdat dit de batterijcellen kan beschadigen.
• Plaats alleen oplaadbare batterijen van hetzelfde type. Gebruik nooit
gewone, niet-oplaadbare batterijen. Plaats de oplaadbare batterijen met
de polen in de juiste richting (aangegeven in het batterijvak van de
handset).
• Raak de contactpunten van de lader en de stekker niet aan met scherpe
of metalen objecten.
• De werking van sommige medische instrumenten kan worden
beïnvloed.
• De handset kan een onaangenaam zoemend geluid veroorzaken in
gehoorapparaten.
• Plaats het basisstation niet in een vochtige ruimte of dichter dan 1,5 m
in de buurt van een waterbron. De handset niet blootstellen aan water.
• Gebruik de telefoon niet in omgevingen met explosiegevaar.
• Recycleer de batterijen en onderhoud de telefoon op een
milieuvriendelijke manier.
• Omdat deze telefoon niet kan worden gebruikt tijdens een
stroomuitval, moet u een telefoon gebruiken die niet afhankelijk is van
het elektriciteitsnet bij noodgevallen, bijv. een mobiele telefoon.
2Toetsen
2.1 Handset
1. Lijntoets
2. Oproeplog / scrollen-toets
3. Int-toets
4. Microfoon uit-toets
5. Alfanumerieke toetsen
6. Toetsvergrendelingstoets
7. Nummerherhaling / pauze-toets
8. Volume / beltoon-toets
9. Beltoon aan/uit-toets
25
Display
Nederlands
10.Geheugentoets
11.Handenvrij-toets
12.Flash R / scrollen-toets
2.2 Basis
13.Visuele oproep / in gebruik (LED)
14.Paging-toets
2.3 Lader
15.Handset op lader (LED)
3Display
U bent online
Er zijn meer cijfers aan de
linkerkant
Nieuwe nummers in de
oproeplijst
Er zijn meer cijfers aan de
rechterkant
Pictogram
oplaadbarebatterijvermogen
Tijdens handenvrij
De antenne geeft de kwaliteit
van de ontvangst aan. De
antenne knippert wanneer de
handset buiten bereik is.
Wanneer de belzoemer is
uitgeschakeld
Microfoon staat uit
U hebt nieuwe berichten in
uw voicemail
Geheugenrecords worden
opgehaald of ingesteld
Tijdens interne oproep
Het toetsenbord is
geblokkeerd
HS-x x = nummer van handset
26
Installatie
4Installatie
4.1 Basis
1 Steek een uiteinde van het telefoonkabel in de telefooneenheid en het
andere uiteinde in de telefoonwandcontactdoos.
2 Sluit de kleine stekker van de AC-adapter aan op de telefoon en steek
het andere uiteinde van de stroomkabel in een stopcontact.
- Achteraanzicht van de basis -
A.Telefoonwandcontactdoos
B.Stroomkabel
C.Telefoonkabel
4.2 Lader van handset
1 Sluit de AC-adapter aan op het stopcontact.
- Achteraanzicht van de lader -
A
B
C
27
Batterij bijna leeg-indicatie
Nederlands
4.3 Handset
1 Plaats 2 oplaadbare batterijen (AAA) in het batterijvak van de handset.
- Achteraanzicht van handset -
A.Afdekplaatje
B.Oplaadbare batterijen
5 Batterij bijna leeg-indicatie
Als de batterij leeg is, werkt de handset niet meer. Wanneer een batterij
volledig leeg is en u de handset korte tijd op het basisstation hebt
geplaatst, zal het batterijsymbool aangeven dat de batterij volledig
opgeladen is, dit is echter niet het geval. Het batterijvermogen zal snel
achteruitgaan. Wij raden u aan om de handset gedurende 12 uur op het
basisstation te plaatsen, zodat de batterij volledig opgeladen kan worden.
Als de batterij tijdens een gesprek bijna leeg is, geeft de handset u een
waarschuwingssignaal. Plaats de handset op het basisstation om op te
laden.
Volle batterij
Lege batterij
+
-
+
-
A
B
Butler 900
28
Werking van de handset
6 Werking van de handset
6.1 Uitgaande oproepen
Een telefoongesprek voeren
Gespreksinstelling met belvoorbereiding
Het laatst gekozen nummer opnieuw vormen
Herkies één van de laatste 3 nummers die zijn gevormd
1 Druk op de lijntoets.
2 Druk het gewenste telefoonnummer in.
3 Druk op de lijntoets wanneer u het gesprek wilt
beëindigen.
1 Druk het gewenste telefoonnummer in.
Een onjuist nummer kan worden gecorrigeerd met de
microfoon uit-toets. Het nummer zal verdwijnen wanneer
u gedurende 10 seconden niet op een toets hebt gedrukt.
De handset keert dan terug naar de standby-modus.
2 Druk op de lijntoets.
Het nummer zal automatisch worden gebeld.
3 Druk nogmaals op de lijntoets wanneer u het gesprek
wilt beëindigen.
1 Druk op de lijntoets.
2 Druk op de nummerherhalingtoets.
Het laatst gebelde nummer zal automatisch worden
gebeld.
3 Druk nogmaals op de lijntoets wanneer u het gesprek
wilt beëindigen.
1 Druk op de nummerherhalingtoets.
Het laatst gekozen nummer verschijnt op de display.
Druk een paar keer op de nummerherhalingtoets totdat het
gewenste nummer op de display verschijnt.
2 Druk op de lijntoets.
Het nummer zal automatisch worden gevormd.
456
g h i j k l m n o
456
g h i j k l m n o
29
Werking van de handset
Nederlands
6.2 Inkomende oproepen
6.3 De handenvrij-functie activeren/desactiveren
Met deze functie kunt u bellen zonder dat u de draadloze handset hoeft
vast te houden bij een inkomende oproep of wanneer u met de handset
belt.
6.4 Nummers in het geheugen programmeren
U kunt 10 indirecte nummers (elk met maximaal 25 cijfers)
programmeren in de draadloze telefoon.
3 Druk nogmaals op de lijntoets wanneer u het gesprek
wilt beëindigen.
Bij een inkomende oproep gaan de handset en de basis
rinkelen en zal de visuele oproep-LED op het basisstation
gaan knipperen.
1 Druk op de lijntoets om de inkomende oproep op te
nemen.
2 Druk nogmaals op de lijntoets wanneer u het gesprek
wilt beëindigen.
1 Druk op de handenvrij-toets om de functie te activeren.
2 Druk nogmaals op de handenvrij-toets om het gesprek
weer door te schakelen naar de handset.
1 Houd de geheugentoets ingedrukt totdat het pictogram
op de display verschijnt.
2 Voer het telefoonnummer in dat u wilt opslaan.
3 Druk nogmaals op de geheugentoets om te bevestigen.
4 Voer de geheugenlocatie (0-9) in waar u het nummer
wilt opslaan.
U hoort een bevestigingstoon.
456
g h i j k l m n o
456
g h i j k l m n o
30
Werking van de handset
6.5 Een geheugennummer bellen
6.6 Microfoon uit-functie
Het is mogelijk om de microfoon tijdens een oproep uit te schakelen. Nu
kunt u openlijk spreken zonder dat uw gesprekspartner u kan horen.
6.7 Het volume instellen
6.8 Flash-toets (R)
De flashtijd instellen
1 Druk op de geheugentoets gevolgd door het nummer van
de geheugenlocatie (0-9).
2 Druk op de lijntoets.
Het nummer zal automatisch worden gebeld.
3 Druk nogmaals op de lijntoets wanneer u het gesprek
wilt beëindigen.
1 Druk op de microfoon uit-toets.
De microfoon zal worden uitgeschakeld.
2 Druk nogmaals op de microfoon uit-toets om de
microfoon uit-functie uit te schakelen.
1 Druk op de volumetoets tijdens de oproep.
U kunt het volume op 5 verschillende niveaus instellen.
Bij het indrukken van de flash-toets (ook opnieuw bellen
genoemd), veroorzaakt de eenheid een lijnonderbreking
(100 ms of 250 ms). U hebt hiermee de mogelijkheid om
de speciale diensten van uw telefoonleverancier te
gebruiken en/of gesprekken door te schakelen bij een
telefoonuitwisseling.
1 Houd de nummerherhalingtoets 3 seconden ingedrukt.
De display geeft het volgende weer:
“S” voor 100 ms
“L” voor 250 ms
De instelling van de flashtijd verdwijnt na 2 seconden uit
de display.
456
g h i j k l m n o
31
Werking van de handset
Nederlands
6.9 Het belvolume en de beltoon instellen
Beltoon van de handset
Belvolume van handset
6.10 Toetsvergrendeling
1 Houd de toontoets ingedrukt totdat de huidige beltoon
wordt afgespeeld.
2 Selecteer de gewenste beltoon (1-9) of voer een
nummer in (1-9).
3 Druk nogmaals op de beltoontoets om te bevestigen.
1 Druk op de volumetoets.
De handset laat de beltoon horen in de huidige volume-
instelling.
2 Selecteer het gewenste volume (1-5) of voer een
nummer in (1-5).
Druk op "0" om het volume UIT te schakelen.
3 Druk nogmaals op de volumetoets om te bevestigen.
U kunt het belvolume van elke individuele handset AAN- of
UITSCHAKELEN door de beltoon AAN/UIT-toets
ingedrukt te houden in de standby-modus.
Er zal niets gebeuren bij het indrukken van een
willekeurige toets tijdens de standby-modus wanneer het
toetsenblok is vergrendeld (behalve het indrukken van de
toetsvergrendelingtoets).
1 Houd de toetsvergrendelingtoets ingedrukt.
Het pictogram verschijnt op de display en het toetsenbord
is vergrendeld.
2 Houd de toetsvergrendelingstoets nogmaals ingedrukt
om het toetsenbord te ontgrendelen.
Als het toetsenbord vergrendeld is en er komt een inko-
mend gesprek, kunt u nog altijd de telefoon opnemen door
de lijntoets in te drukken. Tijdens de oproep werken de
functies van het toetsenbord normaal. Als het gesprek is
beëindigd, zal het toetsenbord weer worden vergrendeld.
456
g h i j k l m n o
456
g h i j k l m n o
32
Nummerweergave oproeper-functie (CLIP)
6.11 De belmodus instellen
Er zijn twee belmodi:
DTMF/Toonkiezen (standaardinstelling en het meeste gebruikt)
Pulskiezen (voor oudere installaties)
De belmodus veranderen:
7 Nummerweergave oproeper-functie (CLIP)
De Topcom Butler 920 geeft de telefoonnummers van de inkomende
oproepen weer. Deze functie is ook mogelijk wanneer u bent geabonneerd
op een telefoonmaatschappij die deze dienst aanbiedt. Neem contact op
met uw telefoonmaatschappij voor meer informatie.
7.1 Nieuwe oproepen
1 Houdt de flash-toets ingedrukt om tussen de belmodi te
wisselen.
"P" verschijnt bij het instellen van pulskiezen, "T"
verschijnt bij het instellen van toonkiezen (DTMF).
Na 5 seconden keert de eenheid weer terug in de standby-
modus.
U kunt de belmodus van de telefoon per ongeluk veranderen
door 5 seconden op de flash-toets te drukken in de standby-
modus. Door de verkeerde belmodus zal het nummer niet goed
worden gebeld of helemaal niet worden gebeld.
De nummers worden opgeslagen in een oproeplijst
wanneer u een oproep ontvangt. Deze lijst kan maximaal
20 telefoonnummers bevatten (elk met maximaal 25
cijfers).
Als het nummer langer is dan 14 cijfers, kunt u verder
naar rechts scrollen om de andere cijfers te bekijken.
Wanneer u een nieuwe onbeantwoorde oproep heeft
ontvangen, zal het CLIP-symbool knipperen op de
display.
33
Nummerweergave oproeper-functie (CLIP)
Nederlands
7.2 De oproeplijst raadplegen
A.Nummer voortzetten
B.Datum (DD-MM)*
C.Tijd (24-uursopmaak)*
* Alleen als het netwerk de tijd/datum samen met het telefoonnummer
verzend! Sommige netwerken met nummerweergave van oproeper geven
de tijd en de datum niet weer.
7.3 Een nummer bellen uit de oproeplijst
1 Druk op de oproeplog-toets.
De laatst ontvangen oproep wordt weergegeven. "NO
CLIP" wordt weergegeven als de lijst leeg is.
Het volgende zal op de display worden weergegeven:
Na 5 seconden zal het telefoonnummer worden
weergegeven.
2 Druk op de rechtertoets om de datum en de tijd over te
slaan.
3 Druk op de linkertoets om naar de vorige oproep te
scrollen, druk op de rechtertoets om de volgende oproep
weer te geven.
4 Sluit de oproeplijst door op de microfoon uit-toets te
drukken.
1 Druk op de oproeplog-toets.
2 Scrol door de oproeplijst totdat u het gewenste
telefoonnummer vindt.
3 Druk op de lijn-toets om het nummer te bellen.
Het nummer zal automatisch worden gebeld.
4 Druk nogmaals op de lijntoets wanneer u het gesprek
wilt beëindigen.
34
Een handset aanmelden/afmelden
7.4 Een nummer wissen uit de oproeplijst
7.5 Een nummer uit de oproeplijst opslaan in het geheugen
8 Een handset aanmelden/afmelden
8.1 Een handset aanmelden op een Topcom Butler 920
basisstation
U kunt 4 handsets aanmelden bij één basisstation. Standaard wordt elke
handset bij het basisstation aangemeld bij levering.
U moet alleen de handset aanmelden indien:
• de handsetaanmelding is gewist uit het basisstation (bijv. voor het
opnieuw initialiseren)
• u een andere handset wilt aanmelden op dit basisstation.
De onderstaande procedure is alleen van toepassing op een Topcom
Butler 920 handset en basisstation!
1 Druk op de oproeplog-toets.
2 Scrol door de oproeplijst totdat u het gewenste
telefoonnummer vindt.
3 Houd de microfoon uit-toets 3 seconden ingedrukt om
het nummer te wissen.
1 Druk op de oproeplog-toets.
2 Scrol door de oproeplijst totdat u het gewenste
telefoonnummer vindt.
3 Houd de geheugentoets 3 seconden ingedrukt.
4 Voer de geheugenlocatie (0-9) in waar u het nummer
wilt opslaan.
5 Druk nogmaals op de geheugentoets om te bevestigen.
1 Houd de paging-toets op het basisstation gedurende 10
seconden ingedrukt.
De handset op lader-LED op het basisstation begint snel
te knipperen gedurende 1 minuut.
Gedurende deze minuut staat het basisstation in de
aanmeldmodus en moet u het volgende uitvoeren om de
handset aan te melden:
456
g h i j k l m n o
35
Een handset aanmelden/afmelden
Nederlands
8.2 Een handset verwijderen van een Topcom Butler 920
basisstation
U kunt een handset verwijderen van een basisstation, zodat een andere
handset kan worden aangemeld.
2 Houd de rechtertoets 3 seconden ingedrukt.
3 Houd de *-toets 3 seconden ingedrukt.
Het volgende zal op de display worden weergegeven:
4 Voer het nummer van het basisstation in (1-4) waarop u
de handset wilt aanmelden.
De eenheid zal naar het basisstation gaan zoeken en zal
naar de pincode (4 cijfers) vragen wanneer het station is
gevonden:
5 Voer de pincode van het basisstation in
(standaardinstelling is 0000). Als de pincode onjuist is,
zal de handset weer naar het basisstation gaan zoeken.
Na aanmelding van de handset, verschijnt "HS" gevolgd
door het nummer van de handset.
1 Houd de rechtertoets 3 seconden ingedrukt.
2 Houd de microfoon uit-toets 3 seconden ingedrukt.
456
g h i j k l m n o
456
g h i j k l m n o
36
Een handset aanmelden/afmelden
3 Voer de pincode van het basisstation in
(standaardinstelling is 0000). Als de pincode onjuist is,
keert de handset terug naar de standby-modus.
4 Voer het nummer van de handset in (1-4) die u wilt
verwijderen.
Als de verwijdering succesvol is, keert de handset terug
naar de standby-modus. Zo niet, dan vraagt de eenheid
weer om het nummer van de handset in te voeren.
U kunt alleen bestaande handsets verwijderen die u niet
gebruikt voor de verwijdering.
PIN
456
g h i j k l m n o
PIN 1234 H5?
456
g h i j k l m n o
37
Gesprek doorschakelen en intercom tussen twee handsets
Nederlands
9 Gesprek doorschakelen en intercom tussen twee
handsets
9.1 Oproepdoorschakeling en conferentiegesprek tijdens een
externe oproep
9.2 Interne oproep (intercom)
Deze functies werken alleen wanneer er meerdere handsets
(net als de Twin/Triple/Quattro-versie) zijn aangemeld bij
hetzelfde basisstation.
1 Druk tijdens een externe oproep op de INT-toets,
gevolgd door het nummer van de handset (1-4).
De andere handset zal een beltoon laten horen:
Wanneer de andere handset de lijn overneemt, kunt u
intern praten. Als u ophangt, zal de externe lijn worden
verbonden met de andere handset.
2 Houd de INT-toets 3 seconden ingedrukt. Nu kunt u
tegelijkertijd praten met de tweede handset en de
externe lijn (conferentiegesprek).
3 Druk nogmaals op de INT-toets om terug te keren naar
het externe gesprek.
4 Druk op de lijntoets wanneer u het gesprek wilt
beëindigen.
U kunt geen intercom-gesprek voeren tussen een vaste telefoon
en een draadloze handset. Alleen tussen twee draadloze
handsets.
1 Druk in de standby-modus op de INT-toets, gevolgd
door het nummer van de handset (1-4).
De andere handset zal een beltoon laten horen.
2 Druk op de lijn-toets om de oproep aan te nemen.
Nu kunt u intern bellen.
3 Druk op de lijntoets wanneer u het gesprek wilt
beëindigen.
38
Probleemoplossing
10 Probleemoplossing
Symptoom Mogelijke oorzaak Oplossing
Geen weergave Batterijen zijn leeg Controleer de positie
van de batterijen
Laad de batterijen op
Handset
UITGESCHAKELD
Schakel de handset IN
Geen toon Telefoonkabel is slecht
aangesloten
Controleer de
aansluiting van de
telefoonkabel
De lijn is bezet door een
andere handset
Wacht totdat de andere
handset het gesprek
heeft beëindigd
Volume van de
gesprekspartner is te
laag
Pas het volume aan
tijdens het gesprek
door op de
volumetoets te
drukken
Volume van beltoon
van handset te laag
Pas het volume van de
beltoon aan
Niet mogelijk om een
nummer te bellen
Verkeerde belmodus zie ”6.11 De belmodus
instellen” om de juiste
belmodus in te stellen
Het pictogram
knippert
Handset is buiten bereik Breng de handset
dichter in de buurt van
het basisstation
Het basisstation heeft
geen stroom
Controleer de
aansluiting van de
stroomkabel bij het
basisstation
De handset is niet
aangemeld op het
basisstation
Meld de handset aan
bij het basisstation
Handset laat geen
beltoon horen
Het beltoonvolume staat
uit of is te laag
Pas het volume van de
beltoon aan
39
Technische gegevens
Nederlands
11 Technische gegevens
Niet mogelijk om een
gesprek naar PABX
door te schakelen
De flashtijd is te kort Stel de eenheid in op
een langere flashtijd
De telefoon reageert
niet op het indrukken
van de toetsen
Gebruikersfout Verwijder de batterijen
en plaats ze weer terug
Bereik tot 300 m in een open ruimte
tot 50 m binnenshuis
Batterijen van
handset:
2 x 1,2 V, 600 mAh AAA Type NiMh
oplaadbaar
Stroomvoorziening
basisstation
220/230 V / 50 Hz
Autonomie van
handset
100 uur in standby
Gesprekstijd van
handset
11 uur
Normale
gebruiksomstandighe
den
+5 °C tot +45 °C
Toegestane relatieve
luchtvochtigheid
25 tot 85%
Belmodus Puls / DTMF (toon)
Geheugen 10 indirecte met max. 25 cijfers
Symptoom Mogelijke oorzaak Oplossing
40
Standaardinstellingen
12 Standaardinstellingen
13 Garantie
13.1 Garantieperiode
De Topcom-eenheden hebben een garantieperiode van 24 maanden. De
garantieperiode gaat in op de aankoopdatum van de nieuwe eenheid. De
garantie op de batterijen is beperkt tot 6 maanden na aankoop.
Verbruiksgoederen of defecten die een verwaarloosbare invloed hebben
op de werking of de waarde van het toestel worden niet gedekt.
De garantie moet worden bewezen door het kunnen overleggen van de
originele aankoopbon waarop de aankoopdatum en het eenheidmodel
staan aangegeven.
13.2 Hantering van de garantie
Een defecte eenheid moet worden geretourneerd aan het
onderhoudscentrum van Topcom samen met de aankoopbon.
Als de eenheid defect raakt tijdens de garantieperiode, zal Topcom of een
van haar bevoegde onderhoudscentra de defecten kostenloos repareren
die zijn veroorzaakt door fouten in materiaal of vakmanschap.
Topcom zal naar eigen inzicht voldoen aan haar garantieverplichtingen
door de defecte eenheden of onderdelen van de defecte eenheden te
repareren of te vervangen. Bij vervanging, kan de kleur en het model
verschillen van de oorspronkelijke eenheid.
De oorspronkelijke aankoopdatum zal het begin van de garantieperiode
bepalen. De garantieperiode wordt niet verlengd als de eenheid is
vervangen of gerepareerd door Topcom of een van haar bevoegde
onderhoudscentra.
Flashtijd 100 ms
Belmodus: Toon
Belvolume Niveau 3
Beltoon Beltoon 8
Pincode van
basisstation
0000
41
Reinigen
Nederlands
13.3 Uitsluitingen van garantie
Schade of defecten als gevolg van een onjuiste behandeling of onjuist
gebruik en schade als gevolg van het gebruik van niet-originele
onderdelen of accessoires die niet worden aanbevolen door Topcom
vallen buiten de garantie. De draadloze telefoons van Topcom zijn alleen
geschikt voor gebruik met oplaadbare batterijen. De schade door het
gebruik van normale, niet-oplaadbare batterijen valt buiten de garantie.
De garantie dekt geen schade als gevolg van factoren buitenshuis, zoals
bliksem, water en vuur, evenals enige schade veroorzaakt tijdens het
verplaatsen.
Er kan geen garantie worden opgeëist als het serienummer op de
eenheden is veranderd, verwijderd of onleesbaar is gemaakt.
Alle garantieclaims zullen ongeldig worden wanneer de eenheid is
gerepareerd, veranderd of aangepast door de koper of onbevoegde, niet
officieel door Topcom toegewezen onderhoudscentra.
14 Reinigen
Reinig de telefoon met een vochtige doek of met een antistatische doek.
Gebruik nooit reinigingsmiddelen of schuurmiddelen.
15 Afvoeren van het toestel (milieu)
Aan het einde van de levensduur van het product, moet u dit
product niet bij het normale huishoudelijke afval gooien, maar
moet u het product naar een inzamelpunt brengen voor de
recyclering van elektrisch en elektronisch apparatuur. Dit
wordt aangegeven door het symbool op het product, de
gebruikshandleiding en/of de verpakking.
Sommige materialen van het product kunnen hergebruikt worden als u ze
naar een inzamelpunt brengt. Door het hergebruiken van sommige
onderdelen of grondstoffen van gebruikte producten draagt u aanzienlijk
bij aan de bescherming van het milieu.
Neem contact op met uw plaatselijke autoriteiten als u meer informatie
wilt hebben over de inzamelpunten bij u in de buurt.
42
Instructions de sécurité
Français
1 Instructions de sécurité
Utilisez uniquement la fiche du chargeur fournie. N'utilisez pas d'autres
chargeurs au risque d'abîmer les éléments de batterie.
• Insérez uniquement des piles rechargeables du même type. N'utilisez
jamais de piles ordinaires non-rechargeables. Insérez des piles
rechargeables en respectant la polarité (indiquée dans le compartiment
à batteries du combiné).
• Ne touchez pas les contacts du chargeur et de la fiche avec des objets
pointus ou métalliques.
• Certains appareils médicaux pourraient ne plus bien fonctionner.
• Le combiné peut provoquer un bourdonnement désagréable dans les
prothèses auditives.
• N'installez pas la base dans une pièce humide ou à moins d'1,5 m d'une
source d'eau. Veillez à ce que le combiné reste sec.
• N'utilisez pas le téléphone dans un environnement qui présente un
risque d'explosion.
• Jetez les piles et entretenez le téléphone dans le strict respect de
l'-environnement.
• Comme ce téléphone est indisponible en cas de coupure de courant,
vous devez utiliser un téléphone autonome -pour les appels urgents, un
téléphone mobile par exemple.
2 Touches
2.1 Combiné
1. Touche ligne
2. Touche journal des appels / défilement
3. Touche Int
4. Touche mute
5. Touches alphanumériques
6. Touche de verrouillage du clavier
7. Touche recomposition / pause
8. Touche volume / mélodie
9. Touche activation/désactivation sonnerie
43
Écran
Français
10.Touche mémoire
11.Touche mains-libres
12.Touche flash R / défilement
2.2 Base
13.Indication visuelle d'appel / En cours d'utilisation (LED)
14.Touche paging
2.3 Chargeur
15.Chargeur du combiné (LED)
3 Écran
Vous êtes en ligne
D'autres chiffres sont
disponibles à gauche
Nouveaux numéros de la liste
d'appels
D'autres chiffres sont
disponibles à droite
Indicateur du niveau de la
batterie rechargeable
Mains-libres
L'antenne indique la qualité
de réception. L'antenne
clignote lorsque le combiné
est hors de portée.
Lorsque la sonnerie est
désactivée
Le micro est en sourdine
Nouveaux messages dans
votre boîte vocale
Les enregistrements
mémorisés sont en cours de
récupération ou de
configuration
Appel interne en cours
Le clavier est verrouillé HS-x x = numéro du combiné
44
Installation
4 Installation
4.1 Base
1 Branchez une extrémité du câble du téléphone au poste téléphonique
et l'autre à la prise murale de la ligne téléphonique.
2 Raccordez la petite fiche de l'adaptateur secteur au téléphone et l'autre
extrémité du câble à la prise électrique.
- Vue arrière de la base -
A.Prise murale du téléphone
B.Câble d'alimentation
C.Câble du téléphone
4.2 Chargeur du combiné
1 Raccordez l'adaptateur secteur à la prise électrique.
- Vue arrière du chargeur -
A
B
C
45
Indication de faible charge de la batterie
Français
4.3 Combiné
1 Insérez 2 piles rechargeables (AAA) dans le compartiment à batteries
du combiné.
- Vue arrière du combiné -
A.Couvercle
B.Piles rechargeables
5 Indication de faible charge de la batterie
Lorsque la batterie est vide, le combiné ne fonctionne plus. Lorsqu'une
batterie est complètement vide et que vous avez replacé le combiné sur la
base pendant un court instant, le symbole de la batterie indique qu'elle est
complètement chargée alors que ce n'est pas le cas. La capacité de la
batterie diminue rapidement. Nous vous conseillons de placer le combiné
sur sa base pendant 12 heures pour recharger complètement la batterie.
Lorsque vous êtes au milieu d'une conversation et que la batterie est
presque vide, le combiné émet un signal sonore. Placez le combiné sur la
base pour recharger le téléphone.
Batterie pleine
Batterie vide
+
-
+
-
A
B
Butler 900
46
Utilisation du combi
6 Utilisation du combiné
6.1 Appels sortants
Passer un appel
Configuration de l'appel avec préparation de la numérotation
Pour recomposer le dernier numéro appelé
Recomposez l'un des 3 derniers numéros appelés.
1 Appuyez sur la touche ligne.
2 Tapez le numéro de téléphone choisi.
3 Appuyez sur la touche ligne lorsque vous voulez mettre
fin à l'appel.
1 Tapez le numéro de téléphone choisi.
Si le numéro est incorrect, vous pouvez le corriger avec la
touche mute. Si aucune touche n'est enfoncée pendant 10
secondes, le numéro disparaît et le combiné se remet en
mode veille.
2 Appuyez sur la touche ligne.
Le numéro se compose automatiquement.
3 Appuyez à nouveau sur la touche ligne lorsque vous
voulez mettre fin à l'appel.
1 Appuyez sur la touche ligne.
2 Appuyez sur la touche recomposition.
Le dernier numéro appelé se compose automatiquement.
3 Appuyez à nouveau sur la touche ligne lorsque vous
voulez mettre fin à l'appel.
1 Appuyez sur la touche recomposition.
Le dernier numéro appelé apparaît à l'écran.
Si vous voulez composer l'un des 3 derniers numéros,
appuyez plusieurs fois sur la touche recomposition jusqu'à
ce que le numéro voulu apparaisse à l'écran.
2 Appuyez sur la touche ligne.
Le numéro se compose automatiquement.
456
g h i j k l m n o
456
g h i j k l m n o
47
Utilisation du combiné
Français
6.2 Appels entrants
6.3 Activer/désactiver la fonction mains-libres
Cette fonction vous permet de communiquer sans besoin de décrocher le
téléphone sans fil en cas d'appel entrant ou lorsque vous êtes au téléphone
avec le combiné.
6.4 Programmer des numéros en mémoire
Vous pouvez programmer 10 numéros indirects (de 25 chiffres
maximum) sur le téléphone sans fil.
3 Appuyez à nouveau sur la touche ligne lorsque vous
voulez mettre fin à l'appel.
En cas d'appel entrant, le combiné et la base commencent
à sonner et la LED d'appel située sur la base clignote.
1 Appuyez sur la touche ligne pour répondre à un appel
entrant.
2 Appuyez à nouveau sur la touche ligne lorsque vous
voulez mettre fin à l'appel.
1 Appuyez sur la touche mains-libres pour activer la
fonction.
2 Appuyez à nouveau sur la touche mains-libres pour
reprendre la conversation avec le combiné.
1 Appuyez sur la touche mémoire et maintenez-la
enfoncée jusqu'à ce que l'icône apparaisse à l'écran.
2 Tapez le numéro de téléphone que vous souhaitez
enregistrer.
3 Appuyez à nouveau sur la touche mémoire pour
confirmer.
4 Tapez l'emplacement de mémoire (0-9) où vous voulez
enregistrer le numéro.
Vous entendrez une tonalité de confirmation.
456
g h i j k l m n o
456
g h i j k l m n o
48
Utilisation du combi
6.5 Pour appeler un numéro mémorisé
6.6 Fonction mute
Il est possible de désactiver le micro pendant une conversation. Vous
pouvez alors parler ouvertement sans être entendu par votre interlocuteur.
6.7 Pour régler le volume
6.8 Touche flash (R)
Pour régler le flash
1 Appuyez sur la touche mémoire puis sur le numéro de
l'emplacement de mémoire (0-9).
2 Appuyez sur la touche ligne.
Le numéro se compose automatiquement.
3 Appuyez à nouveau sur la touche ligne lorsque vous
voulez mettre fin à l'appel.
1 Appuyez sur la touche mute.
Le micro est désactivé.
2 Appuyez à nouveau sur la touche mute pour désactiver
la fonction correspondante.
1 Appuyez sur la touche volume pendant la conversation.
Vous pouvez régler le volume par 5 niveaux.
Lorsque vous appuyez sur la touche flash (également
appelée rappel), l'appareil provoque une coupure de ligne
(100 ms sur 250 ms). Cela vous permet d'utiliser les
services spéciaux de votre opérateur téléphonique et/ou de
transférer des appels avec un commutateur privé.
1 Appuyez sur la touche recomposition et maintenez-la
enfoncée pendant 3 secondes.
L'écran affiche l'une des lettres suivantes :
"S" pour 100 ms
"L" pour 250 ms
Le paramètre du flash disparaît de l'écran au bout de 2
secondes.
456
g h i j k l m n o
49
Utilisation du combiné
Français
6.9 Pour régler le volume et la mélodie de la sonnerie
Mélodie du combiné
Volume de la sonnerie du combiné
6.10 Verrouillage du clavier
1 Appuyez sur la touche mélodie et maintenez-la enfoncée
jusqu'à ce que vous entendiez la mélodie actuelle.
2 Sélectionnez la mélodie choisie (1-9) ou tapez un
numéro (1-9).
3 Appuyez à nouveau sur la touche mélodie pour
confirmer.
1 Appuyez sur la touche volume.
Le combiné sonne au volume actuel.
2 Sélectionnez le volume choisi (1-5) ou tapez un numéro
(1-5).
Appuyez sur "0" pour couper le volume.
3 Appuyez à nouveau sur la touche volume pour
confirmer.
Vous pouvez activer ou désactiver le volume de la sonnerie de
chaque combiné individuellement en appuyant sur la touche
activation/désactivation de sonnerie en veille et en la
maintenant enfoncée.
Lorsque le clavier est verrouillé, le fait d'appuyer sur les
touches n'a aucun effet en mode veille (sauf si la touche
de verrouillage du clavier est enfoncée).
1 Appuyez sur la touche de verrouillage et maintenez-la
enfoncée.
L'icône apparaît à l'écran et le clavier est verrouillé.
2 Appuyez sur la touche de verrouillage du clavier et
maintenez-la enfoncée pour déverrouiller le clavier.
456
g h i j k l m n o
456
g h i j k l m n o
50
Fonction d'identification de l'appelant (CLIP)
6.11 Pour régler le mode de numérotation
Il existe deux types de modes de numérotation :
Numérotation DTMF/tonalités (définie par défaut et la plus courante)
Numérotation à impulsions (sur les installations plus anciennes)
Pour changer le mode de numérotation :
7 Fonction d'identification de l'appelant (CLIP)
Le Topcom Butler 920 affiche les numéros de téléphone des appels
entrants. Cette fonction est disponible uniquement si vous êtes abonné à
ce service. Contactez votre opérateur téléphonique pour en savoir plus.
Lorsque le clavier est verrouillé et en cas d'appel entrant,
vous pouvez toujours prendre l'appel en appuyant sur la
touche ligne. Pendant l'appel, le clavier fonctionne nor-
malement. À la fin de l'appel, le clavier se verrouille à
nouveau.
1 Appuyez sur la touche flash et maintenez-la enfoncée
pour basculer entre les modes de numérotation.
Un "P" apparaît lorsque l'appareil est réglé sur une
numérotation par impulsions et un "T" apparaît lorsqu'il
est réglé sur la numérotation par tonalités (DTMF).
Au bout de 5 secondes, l'appareil revient en mode veille.
Vous pouvez changer le mode de numérotation du téléphone
par accident lorsque vous appuyez sur la touche flash pendant
5 secondes lorsque l'appareil est en veille. Si le mode de
numérotation est incorrect, le numéro risque d'être erroné ou
de ne pas être composé du tout.
Lorsque vous recevez un appel, les numéros sont
enregistrés dans une liste d'appels. Cette liste peut
contenir jusqu'à 20 numéros (de 25 chiffres maximum
chacun).
Si le numéro comporte plus de 14 chiffres, vous pouvez
déplacer le curseur vers la droite pour afficher les autres
chiffres.
51
Fonction d'identification de l'appelant (CLIP)
Français
7.1 Nouveaux appels
7.2 Consulter la liste d'appels
A.Numéro de progression
B.Date (JJ-MM)*
C.Heure (24 heures)*
* Uniquement lorsque le réseau envoie la date et l'heure avec le numéro
de téléphone ! Sur certains réseaux dotés de l'identification de l'appelant,
la date et l'heure ne s'affichent pas.
Lorsque vous avez reçu un appel sans réponse, le symbole
CLIP clignote à l'écran.
1 Appuyez sur la touche journal des appels.
Le dernier appel reçu s'affiche. Si la liste est vide, le
message "NO CLIP" (pas d'identification de l'appelant)
s'affiche.
Les indications suivantes apparaissent à l'écran :
Au bout de 5 secondes, le numéro de téléphone apparaît.
4 Appuyez sur la touche de droite pour passer la date et
l'heure.
5 Appuyez sur la touche de gauche pour revenir à l'appel
précédent puis sur la droite pour afficher l'appel
suivant.
6 Vous pouvez quitter la liste d'appels en appuyant sur la
touche mute.
52
Fonction d'identification de l'appelant (CLIP)
7.3 Pour appeler un numéro de la liste d'appels
7.4 Pour effacer un numéro de la liste d'appels
7.5 Mémoriser un numéro à partir de la liste d'appels
1 Appuyez sur la touche journal des appels.
2 Parcourez la liste d'appels jusqu'à ce que le numéro
choisi s'affiche.
3 Appuyez sur la touche ligne pour lancer l'appel.
Le numéro se compose automatiquement.
4 Appuyez à nouveau sur la touche ligne lorsque vous
voulez mettre fin à l'appel.
1 Appuyez sur la touche journal des appels.
2 Parcourez la liste d'appels jusqu'à ce que le numéro
choisi s'affiche.
3 Appuyez sur la touche mute et maintenez-la enfoncée
pendant 3 secondes pour effacer le numéro.
1 Appuyez sur la touche journal des appels.
2 Parcourez la liste d'appels jusqu'à ce que le numéro
choisi s'affiche.
3 Appuyez sur la touche mémoire et maintenez-la
enfoncée pendant 3 secondes.
4 Tapez l'emplacement de mémoire (0-9) où vous voulez
enregistrer le numéro.
5 Appuyez à nouveau sur la touche mémoire pour
confirmer.
456
g h i j k l m n o
53
Enregistrer/supprimer un combiné
Français
8 Enregistrer/supprimer un combiné
8.1 Enregistrer un combiné sur une base Topcom Butler 920
Vous pouvez enregistrer jusqu'à 4 combinés sur une seule base. Chaque
combiné est, par défaut, enregistré sur une base à la livraison.
Vous devez enregistrer le combiné uniquement dans les cas suivants :
• l'enregistrement du combiné à été supprimé de la base (pour être
réinitialisé par exemple)
• vous voulez enregistrer un autre combiné sur cette base.
La procédure ci-après s'applique uniquement à un combiné et à une base
Topcom Butler 920 !
1 Appuyez sur la touche paging qui se trouve sur la base
et maintenez-la enfoncée pendant 10 secondes.
La LED du chargeur du combiné de la base commence à
clignoter rapidement pendant 1 minute.
Pendant cette minute, la base est en mode enregistrer et
vous devez procéder comme suit pour enregistrer le
combiné :
2 Appuyez sur la touche de droite et maintenez-la
enfoncée pendant 3 secondes.
3 Appuyez sur la touche * et maintenez-la enfoncée
pendant 3 secondes.
Les indications suivantes apparaissent à l'écran :
4 Tapez le numéro de la base (1-4) à laquelle vous voulez
enregistrer le combiné.
L'appareil commence à rechercher la base et une fois cette
dernière détectée, il vous demande de saisir le code PIN
(4 chiffres) :
456
g h i j k l m n o
54
Enregistrer/supprimer un combiné
8.2 Supprimer un combiné de la base Topcom Butler 920
Vous pouvez supprimer un combiné de la base pour enregistrer un autre
combiné.
5 Tapez le code PIN de la base (qui est de 0000 par
défaut). Si le code PIN est incorrect, le combiné relance
une procédure de recherche de la base.
Une fois le combiné enregistré, "HS" s'affiche suivi du
numéro du combiné.
1 Appuyez sur la touche de droite et maintenez-la
enfoncée pendant 3 secondes.
2 Appuyez sur la touche mute et maintenez-la enfoncée
pendant 3 secondes.
3 Tapez le code PIN de la base (qui est de 0000 par
défaut). Si le code PIN est incorrect, le combiné revient
en mode veille.
4 Tapez le numéro du combiné (1-4) que vous voulez
supprimer.
Si la suppression est effectuée, le combiné revient en
mode veille. Dans le cas contraire, il redemande le
numéro du combiné.
Vous ne pouvez supprimer que les combinés existants que vous
n'utilisez pas.
456
g h i j k l m n o
PIN
456
g h i j k l m n o
PIN 1234 H5?
456
g h i j k l m n o
55
Transfert d'appel et interphone entre deux combinés
Français
9 Transfert d'appel et interphone entre deux combinés
9.1 Transfert d'appel et conférence téléphonique en cas
d'appel externe
9.2 Appel interne (interphone)
Ces fonctions sont disponibles uniquement lorsque plusieurs
combinés (version Twin/Triple/Quatro) sont enregistrés sur la
même base.
1 Pendant un appel externe, appuyez sur la touche INT et
tapez le numéro du combiné (1-4).
L'autre combiné se met à sonner :
Lorsque l'autre combiné se connecte sur la ligne, vous
pouvez discuter en interne. Si vous décrochez, la ligne
externe sera reliée à l'autre combiné.
2 Appuyez sur la touche INT et maintenez-la enfoncée
pendant 3 secondes. Vous pouvez désormais parler
avec le deuxième combiné et la ligne externe en même
temps (conférence téléphonique).
3 Appuyez à nouveau sur la touche INT pour reprendre
l'appel externe.
4 Appuyez sur la touche ligne lorsque vous voulez mettre
fin à l'appel.
Vous ne pouvez pas réaliser d'appel en interphone entre le
téléphone à fil et le téléphone sans fil, mais uniquement entre
deux combinés sans fil.
1 En mode veille, appuyez sur la touche INT et tapez le
numéro du combiné (1-4).
L'autre combiné se met à sonner.
2 Appuyez sur la touche ligne pour prendre l'appel.
Vous pouvez alors discuter en interne.
3 Appuyez sur la touche ligne lorsque vous voulez mettre
fin à l'appel.
56
Problèmes et solutions
10 Problèmes et solutions
Symptôme Cause possible Solution
Pas d'écran Batteries déchargées Vérifiez la position
des batteries
Rechargez les batteries
Combiné désactivé Activez le combiné
Pas de tonalité Câble téléphonique mal
raccordé
Vérifiez la connexion
du câble téléphonique
La ligne est occupée par
un autre combiné
Attendez que l'autre
combiné soit
raccroché
Volume sonore trop
faible
Réglez le volume
pendant la
conversation en
appuyant sur la touche
volume
Volume de la sonnerie
du combiné trop faible
Pour régler le volume
de la sonnerie
Impossible de
composer un numéro
Mode de numérotation
incorrect
voir "6.11 Pour régler
le mode de
numérotation" pour
régler le mode de
numérotation qui
convient
L'icône clignote Combiné hors de portée Rapprochez le
combiné de la base
La base n'est pas
alimentée
Vérifiez la connexion
électrique de la base
Le combiné n'est pas
enregistré sur la base
Enregistrez le
combiné sur la base
Le combiné ne sonne
pas
Le volume de la
sonnerie est désactivé
ou faible
Réglez le volume de la
sonnerie
57
Données techniques
Français
11 Données techniques
Impossible de
transférer un appel sur
PABX
Le flash est trop court Réglez l'appareil sur
flash long
Le téléphone ne
répond pas lorsque
vous appuyez sur les
touches
Erreur de manipulation Retirez les piles et
remettez-les en place
Portée jusqu'à 300 m si l'espace est dégagé
jusqu'à 50 m à l'intérieur
Batteries du
combiné :
2 x 1,2 V, 600 mAh type AAA NiMh
rechargeables
Alimentation de la
base
220/230 V/50 Hz
Autonomie du
combiné
100 heures en veille
Temps de
conversation avec le
combiné
11 heures
Conditions normales
d'utilisation
+5 °C à +45 °C
Humidité relative
autorisée de l'air
25 à 85 %
Mode de
numérotation
Impulsions/DTMF (tonalités)
Mémoires 10 mémoires indirectes avec 25 chiffres
maximum
Symptôme Cause possible Solution
58
Paramètres définis par défaut
12 Paramètres définis par défaut
13 Garantie
13.1 Période de garantie
Les appareils de Topcom jouissent d'une période de garantie de 24 mois.
La période de garantie commence le jour d'achat du nouvel appareil. La
garantie sur les piles est limitée à 6 mois à compter de l'achat. Les
accessoires et les défauts qui ont un effet négligeable sur le
fonctionnement de l'appareil ne sont pas couverts.
La garantie doit être prouvée par la présentation du ticket original d'achat
sur lequel sont mentionnés la date de l'achat et le modèle de l'appareil.
13.2 Traitement de la garantie
Tout appareil défectueux doit être retourné à un centre de service après-
vente Topcom accompagné d'un ticket d'achat valable.
Si l'appareil tombe en panne pendant la période de garantie, Topcom ou
son centre de service après-vente officiel réparera gratuitement toute
panne due à un défaut de matériel ou de fabrication.
Topcom assurera, à sa propre discrétion, ses obligations en matière de
garantie en réparant ou en remplaçant les appareils ou les pièces
défectueux. En cas de remplacement, la couleur et le modèle peuvent être
différents de ceux de l'appareil acheté initialement.
La date d'achat initiale détermine le début de la période de garantie. La
période de garantie n'est pas prolongée si l'appareil est remplacé ou réparé
par Topcom ou par l'un de ses centres de service après-vente officiels.
Flash 100 ms
Mode de
numérotation :
Tonalité
Volume de la sonnerie Niveau 3
Mélodie de la
sonnerie
Sonnerie 8
PIN de la base 0000
59
Nettoyage
Français
13.3 Exclusions de garantie
Les dommages et les pannes causés par un mauvais traitement ou une
utilisation incorrecte et les dommages qui résultent de l'utilisation de
pièces et d'accessoires non recommandés par Topcom ne sont pas
couverts par la garantie. Les téléphones sans fil Topcom sont conçus pour
fonctionner avec des piles rechargeables uniquement. Les dommages
causés par l'utilisation de piles non rechargeables ne sont pas couverts par
la garantie.
La garantie ne couvre pas les dommages causés par des facteurs
extérieurs tels que la foudre, l'eau et le feu ni les dommages provoqués par
le transport.
Aucune garantie ne peut être invoquée si le numéro de série sur les
appareils a été modifié, enlevé ou rendu illisible.
Aucune garantie ne peut non plus être invoquée si l'appareil a été réparé
ou modifié par l'acheteur ou par des techniciens non qualifiés et non
agréés par Topcom.
14 Nettoyage
Nettoyez le téléphone à l'aide d'un chiffon légèrement humide ou
antistatique. N'utilisez jamais de détergents ni de solvants abrasifs.
15 Mise au rebut de l'appareil (environnement)
Au terme du cycle de vie de ce produit, ne le jetez pas avec les
déchets ménagers ordinaires mais déposez-le dans un point de
collecte pour le recyclage des équipements électriques et
électroniques. Le symbole sur ce produit, sur le mode d'emploi
et/ou la boîte vous le signale.
Certains matériaux qui composent le produit peuvent être réutilisés si
vous les déposez dans un point de recyclage. En réutilisant certaines
pièces ou matières premières de produits usagés, vous apportez une
contribution importante à la protection de l'environnement.
Pour toute information supplémentaire sur les points de collecte dans
votre région, veuillez contacter vos autorités locales.
1

Brauchen Sie Hilfe? Stellen Sie Ihre Frage.

Forenregeln

Missbrauch melden von Frage und/oder Antwort

Libble nimmt den Missbrauch seiner Dienste sehr ernst. Wir setzen uns dafür ein, derartige Missbrauchsfälle gemäß den Gesetzen Ihres Heimatlandes zu behandeln. Wenn Sie eine Meldung übermitteln, überprüfen wir Ihre Informationen und ergreifen entsprechende Maßnahmen. Wir melden uns nur dann wieder bei Ihnen, wenn wir weitere Einzelheiten wissen müssen oder weitere Informationen für Sie haben.

Art des Missbrauchs:

Zum Beispiel antisemitische Inhalte, rassistische Inhalte oder Material, das zu einer Gewalttat führen könnte.

Beispielsweise eine Kreditkartennummer, persönliche Identifikationsnummer oder unveröffentlichte Privatadresse. Beachten Sie, dass E-Mail-Adressen und der vollständige Name nicht als private Informationen angesehen werden.

Forenregeln

Um zu sinnvolle Fragen zu kommen halten Sie sich bitte an folgende Spielregeln:

Neu registrieren

Registrieren auf E - Mails für Topcom butler 920 wenn:


Sie erhalten eine E-Mail, um sich für eine oder beide Optionen anzumelden.


Das Handbuch wird per E-Mail gesendet. Überprüfen Sie ihre E-Mail.

Wenn Sie innerhalb von 15 Minuten keine E-Mail mit dem Handbuch erhalten haben, kann es sein, dass Sie eine falsche E-Mail-Adresse eingegeben haben oder dass Ihr ISP eine maximale Größe eingestellt hat, um E-Mails zu erhalten, die kleiner als die Größe des Handbuchs sind.

Ihre Frage wurde zu diesem Forum hinzugefügt

Möchten Sie eine E-Mail erhalten, wenn neue Antworten und Fragen veröffentlicht werden? Geben Sie bitte Ihre Email-Adresse ein.


Info