Vehicle fe
Zafira
Quick Reference Guide
Refer to Owner’s M
Illustrations
Oper
Depending o
and access
vehicle may diff
TS 1720-B-13 / KTA 2726 January 2013
*KTA-2726-3*
Vehicle features Vehicle features
Unlocking the
Press button
c on remote control
-
unlock all doors, lo
and fuel fi
Locking the veh
Close doors, load compartment
and fuel
Press butt
e on remote control
- or - turn key in
lock the vehicl
Press
e twice within 15 seconds to
deadlock all doors
anti-theft alarm syste
The vehicle can a
to unlock only the d
load compartmen
flap when pressing button c once
on the remote control. Pressing
button c twice will
vehicle.
A short time af
vehicle with the remote control, the
doors are locked automatically if
no door has be
Electronic imm
Activated automatically when key
is removed fr
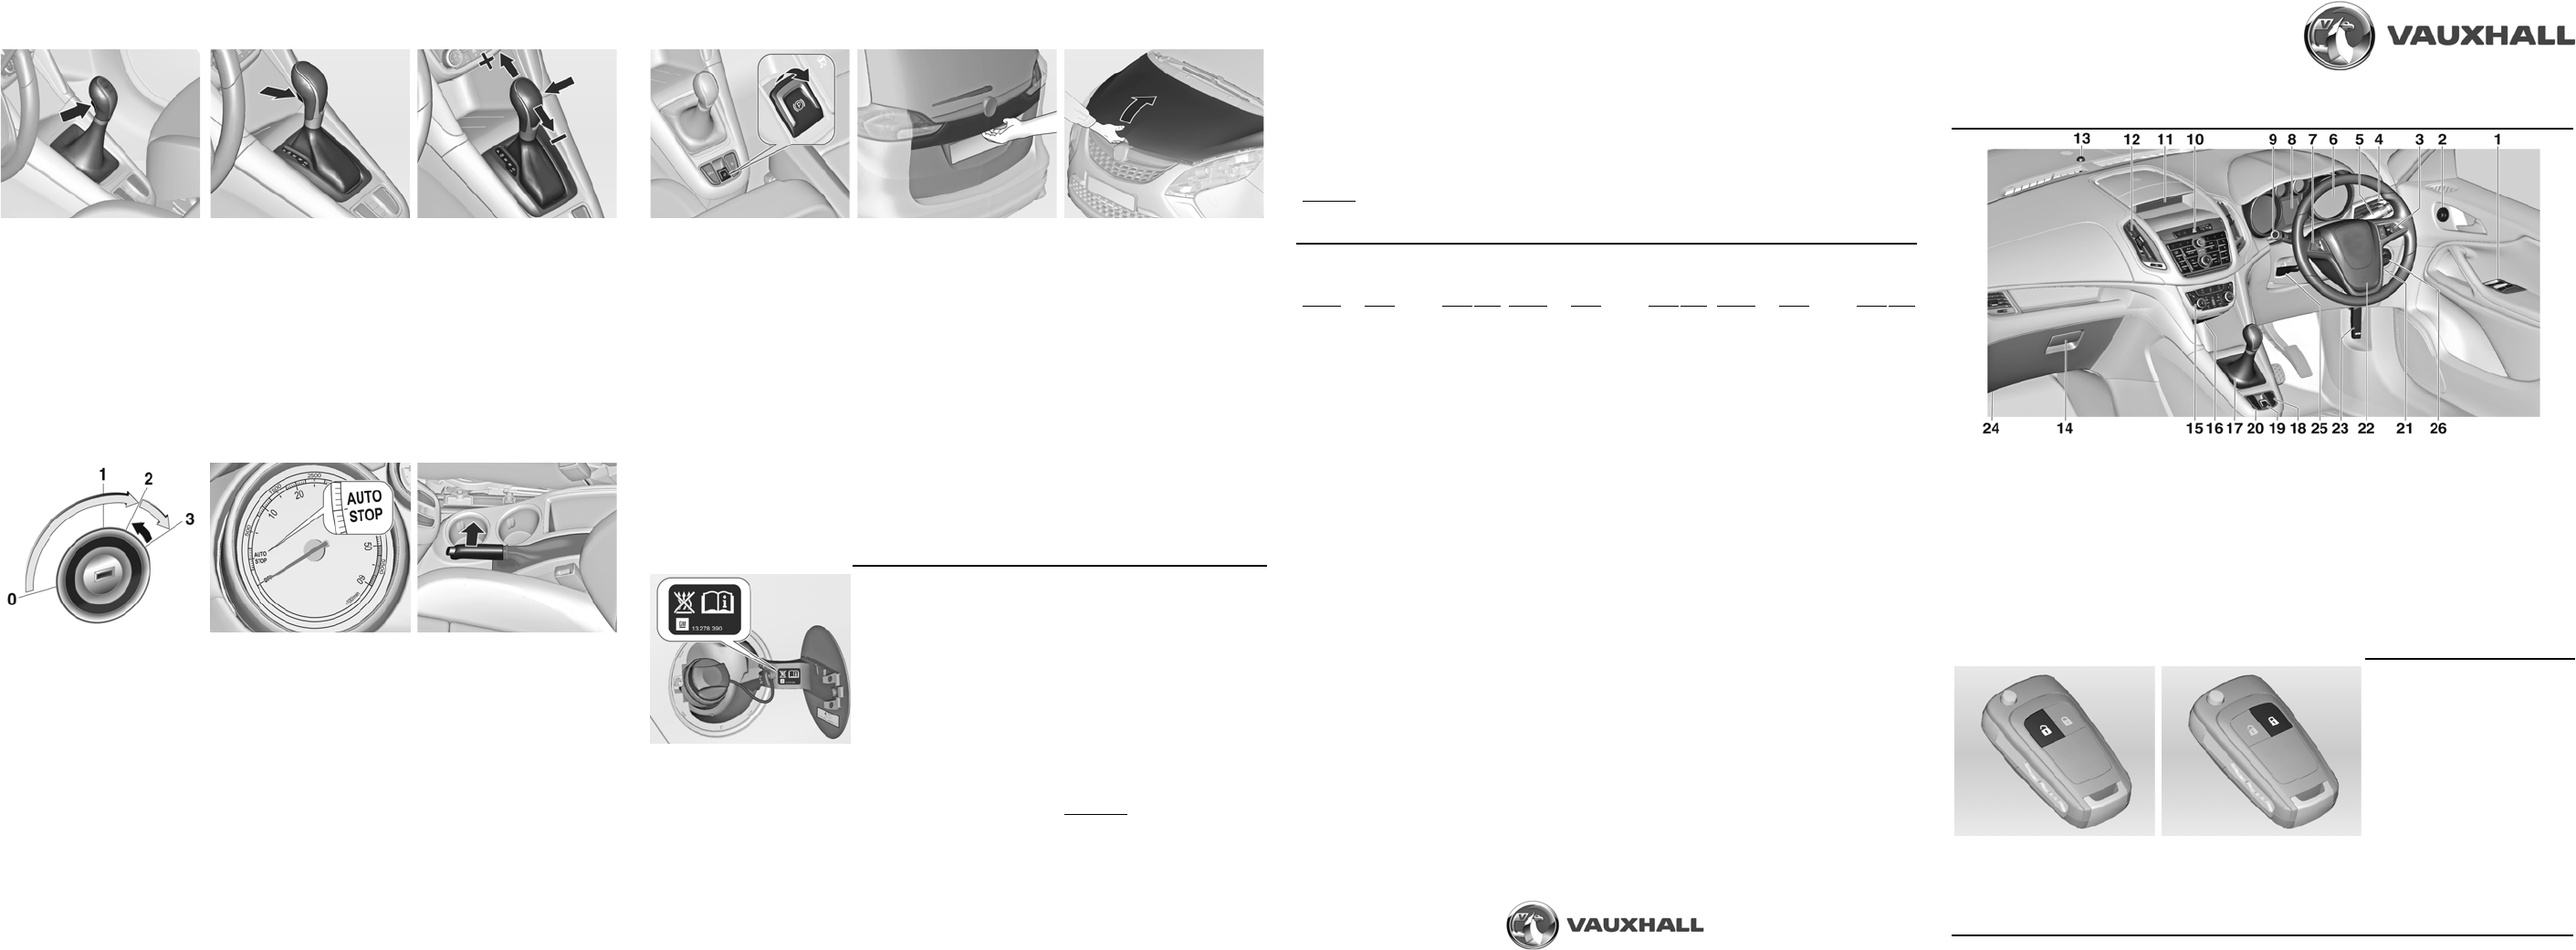
1. Power windows
2. Exterior
3. Cruise contr
adaptive cruise con
Forward coll
4. Side
5. Wipers
6. Instrume
7. Steering wheel
8. Driver
9. Turn signals, hea
low beam, high beam,
exit lighting, park
buttons for Driv
Centre
10. Centra
hazard wa
Sport and Tour mode,
LEDs for airbag deactivation
and passe
11. Info-Dis
12. Centre air ven
13. Anti-theft alarm status LED
14. Glovebox, fu
15. Climate co
16. AUX input, USB input,
SD card slo
17. Selector lever
18. Tractio
Electronic Stabil
lane departur
19. Electrical parking brake
20. Parking assist,
advanced parking
stop-start button
21. Ignition
22. Horn, drive
23. Bonnet rele
24. Storage compartment
25. Steering w
26. Light swi
headlight range adjus
instrument ill
Manual tran
Reverse gear
With vehicle statio
3 seconds after
pedal, press the rele
the selector leve
If the gear does not engage, set the
lever to neutral,
pedal and depress
repeat ge
Do not grind the clutch
unnecessa
When operatin
pedal fully. Do
a foot rest.
Automatic tr
P = Park position, wheel
locked, engage
vehicle is
parking brake is applied
R = Reverse gear, engage only
when vehicle is s
N = N
D = Automatic (drive) mode
with all gears.
The selector leve
moved out of P when the igniti
on and the brak
If brake pedal is not applie
control indicato
j illuminates
To engage P or R , press the rel
button.
The engine
the lever inP or N . When
position N is selected, depress
brake pedal or apply parking brake
before starting.
Manual mode
Move selector lever out of
position D towards the left, then
forwards
< = Sh
] = Shift to a lower gear
The mode or
in the transmission display.
Starting
Turn key to position 1
Move steering wh
release steeri
Manual transmiss
with clutch depressed
Automatic transmission in P or N
with brake pedal depressed
Do not accelerate
Diesel engines
position 2 for preheating and
wait until contr!
extinguishes
Turn key to 3 and release
The key does not have t
position 3 - the Automatic Sta
Control ens
go on starting automatically until
the engine is
the checking proce
starts runnin
Stop-start syste
When conditions al
switches
and reduce emiss
vehicle is
standstill, e.g. at traffic lights or in a
traffic jam. It starts the engine as
soon as the clutch is
To activate an Autostop:
Depress clutch
Shift selector
Release the clutch
The needle poinAUTO STOP in
the tachometer. To re
depress clutch again.
Deactivate stop-start system
manually by pressing the
eco
button on the instrument panel.
The LED in the button extingui
to confirm deactivation.
Manual par
To releas
lever slightly,
and lower leve
Always apply parking b
without operating the release
button and apply as firmly as
possible on
slope.
To reduce the op
the parkin
brake pedal at the same ti
Opening the
To open the bonnet, pull the
release lever lo
instrument panel
The bonnet will th
and will partial open. Return
release leve
To open completely, push the
safety catch to the right and open
the bonnet.
The bonnet is
automatically by a lifter.
If the bonnet is
Autostop, the engine will be
restarted automatically, for safety
reasons.
Closing the bonn
To close, lower
allow it to drop into the catch.
Check that the bon
Electri
Pull switch J for
one second; electrical park
brake is applied automatical
adequate force. For maximum
force, e.g. when parki
attached or on inclines, pull
switch J twice.
To release,
brake pedal de
switch J .
Drive away
Depressing clutch pe
transmissi
gear (a
then depresthe accelerator
pedal relea
parking brake automa
is not possible w
pulled at the same time.
This function also helps when
driving away on in
Unlocking and
Press buttc on remote control
when the ignition is off.
The tailgate is rele
unlocked by pu
switch below the
Closing and
Use interior handle on the
underside of the tailgate to close.
Do not push the touchpad swi
below the tailgate moul
closing or it will
Press button e on remo
lock vehicle.
Refuelling:
Before refu
and any external heaters
combustio
Switch off any mobile phones.
Fuel filler located at right
rear side of
The fuel fi
opened if the vehicle
Pull flap at the recess and open
To open, turn the fu
slowly ant
The fuel fill
the bracket on the
To close, repl
turn clockwis
Wipe off any overflowi
Petrol engin
meeting specificat
DIN EN 228 or E DIN 516
equivalent.
Diesel engi
meeting specificat
DIN EN 590.
Fuel tank capacity (all models) -
58 litres.
Engine oil:
Check eng
a regular basis to preven
to engine. Ensure that the correct
specifica
Check with vehicle on a le
surface. Engine mus
operating temperatu
switched off for at least 5 minutes.
Pull out dipstick, wipe clean, insert
to stop on
read engine
Insert dipstick to stop on handle
and make half a turn.
Important:
It is the owner’s responsibility to
maintain the correct level of an
appropriate q
engine.
A funnel (locat
storage compartment in the load
compartment) may be required to
top-up engine
Tyre pressure:
Check tyre pressures, iys and prior to any long journey;
checked when cold.cles with tyre pressu re monitor
The tyre pressure data refers to cold tyres. It
Always inflate
The ECO tyre press
Incorrect tyre press
wear.
Warning:
If the pressure
separation and even to tyre blow-o
Tyre pressure (psi
Comfort setting for u
3 people:
Engine
Tyres Front Rear
A14NEL, 215/60 R16 32 32
A14NET 225/50 R17 32 32
235/45 R18 32 32
235/40 R19 32 32
A16XHT 225/50 R17 36 33
225/45 R18 36 33
235/45 R18 36 33
235/40 R19 36 33
A18XEL, 215/60 R16 3 32
A18XER 225/50 R17 32 32
235/45 R18 32 32
235/40 R19 32 32
B16DTH 215/60 R16 3 35
225/50 R17 35 35
235/45 R18 35 35
235/40 R19 35 35
A20DTL, 215/60 R16 35 35
A20DT, 225/50 R17 35 35
A20DTJ 235/45 R18 35 35
235/40 R19 35 35
A20DT
1)
215/60 R16 35 35
225/50 R17 35 35
A20DTH,225/50 R17 38 35
A20DTR 22 38 35
235/45 R18 38 35
235/40 R19 38 35
All Spare wheel 61 61
1)
A20DT ECO.
Tyre pressure (psi
With full l
Engine
Tyres Front Re
A14NEL, 215/60 R16 33 43
A14NET 225/50 R17 33 4
235/45 R18 33 43
235/40 R19 33 43
A16XHT 225/50 R17 39 46
225/45 R18 39 46
235/45 R18 39 46
235/40 R19 39 46
A18XEL, 215/60 R1 33 41
A18XER 225/50 R17 33 41
235/45 R18 33 41
235/40 R19 33 41
B16DTH 215 38 43
225/50 R17 38 43
235/45 R18 38 43
235/40 R19 38 43
A20DTL, 215/60 R16 36 43
A20DT, 225/50 R17 36 4
A20DTJ 235/45 R18 36 43
235/40 R19 36 43
A20DT
1)
215/60 R16 38 43
225/50 R17 38 43
A20DTH,225/50 R17 41 46
A20DTR 225 41 46
235/45 R18 41 46
235/40 R19 41 46
All Spare wheel 61 61
1)
A20DT ECO.
Tyre pressure
ECO setting for upt
3 people
Engine
Tyres Front Rear
A14NEL, 215/60 R16 38 38
A14NET 225/ 38 38
235/45 R18 38 38
235/40 R19 38 38
A16XHT 225/50 R17 41 41
225/45 R18 41 41
235/45 R18 41 41
235/40 R19 41 41
A18XEL, 21 38 38
A18XER 225/50 R17 38 38
235/45 R18 38 38
235/40 R19 38 38
B16DTH 21 41 41
225/50 R17 41 41
235/45 R18 41 41
235/40 R19 41 41
A20DTL, 215/60 R16 41 41
A20DT, 225/ 41 41
A20DTJ 235/45 R18 41 41
235/40 R19 41 41
A20DT
1)
215/60 R16 41 41
225/50 R17 41 41
A20DTH,225/50 R17 41 4
A20DTR 22 41 41
235/45 R18 41 41
235/40 R19 41 41
All S -
2)
-
2)
1)
A20DT ECO.
2)
Do not use ECO tyre pressure for this
tyre.