1
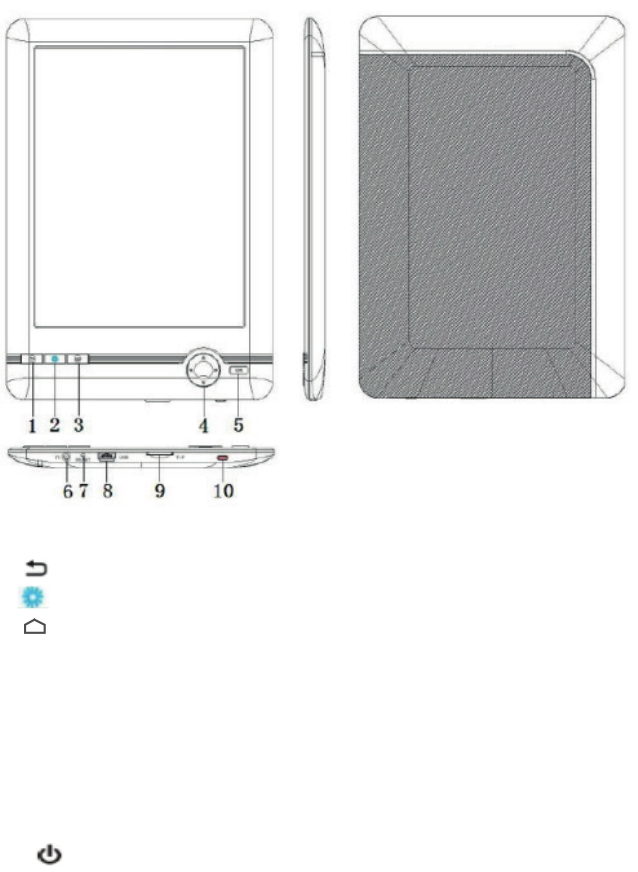
1. Back to previous page
2. Backlight switch, long press allows you to adjust the level of backlight
3. Entry in the menu
4. Navigation buttons: up : volume + / previous page, do volume - / next page, lef: previous
track or back, right : next track or forwar
5. OK: confirm, Play/Pause, menu while reading
6. Headphone port
7. Reset button
8. Mini USB port
9. Memory card slot
10. Power button: press and hold for 5 seconds to turn the device on or off
2.
• New batteries r-
cesses.
• T
• This is a high precision electr-
ble.
• Prevent your device fr
• Do not use the device in the following conditions: high or low temperatures,
humidity-
ght.
• Do not clean the device with chemical solutions, use water and a cotton cloth.
• Keep the device away from water
• T
• Keep the device away from the r
3.
Bat
Before first using your device, fully charge
shorter than eight hours. Then the batter
shows that the battery is fully charged.
Charging via USB
1. Connect the reader to the USB port of your computer using the cable supplied
2. After the reader is connected to your computer
the Safely Remove Hardwar
reader fr
4.
4.1
Press and hold the Power button for 5 seconds
4.2 Main Menu
a) History
Press OK to enter this menu. After entering the History
read.
Press OK to start reading.
Use the arrow buttons to select the book.
Press to exit this menu.
b) E-book
Reading e-books
Select the e-book and press OK to start reading
While reading, you can use the following function buttons
Buttons: Up, Down, Right, Left to change pages
Display backlight switch: turning on the display backlight, long press of this button allows you
to adjust the backlight level
OK button: allows you to rotate the image on the display while r
Menu button: allows you to enter the settings
• Go to page: selection of a page to r
• Save bookmark: saving the last r
• Load bookmark: opening the last saved page to r
• Delete bookmark: deleting the last saved page
• Zoom: selection of the size of the displayed characters
• Br
• Flip time: setting the page turning time
Go to page
Press OK, select the page and pr
Bookmarks
1) Saving bookmarks
Press OK to select or save bookmarks. Y
menu.
2) Displaying bookmarks
Press OK to select one bookmark, pr
exit the menu.
3) Removing bookmarks
In this menu you can individually delete all the saved bookmarks.
c) Music
T
playlist.
In the music playback mode, press the corr
1) Music playback: press OK to open or stop playing music
2) Playback mode: press Menu to change the playback mode
3) Listening to music: long press the right or left button to quickly scr
4) During playback, press OK to stop or r
Note:in order to r
music, the refr
d) Images
Use the Up / Down buttons to select the Images option in the main menu. Press OK to select
the list of images.
Select one image and then press OK to open it.
When viewing images, the buttons below perfor
'Up', 'Down': previous / next photo
'Left', 'Right': previous / next photo
OK: rotating the image in 2 dir
Menu: setting the viewing mode when the image is open
Y
automatic mode.
e) Set
The Settings menu includes the following functions:
• Language: selecting the appropriate language
• Date and time: selection and setting the appr
• Auto off time: if you set the device to turn off after 3, 5, 10, 15 or 20 minutes, the device
will turn off if not in use
• Clear history: deleting recor
• Restor
• System infor
memory card capacity
• Set bright: setting the level of display brightness for r
f) Explorer
Shows all the files on the device and the memory card; in this menu you can read books
and browse photos
Button functions:
'Up', 'Down': scrolling the list of files
'Left', 'Right': buttons used for changing pages
OK: opening file
g) Calendar
Functions of the buttons in the calendar menu:
'Up', 'Down': changing months and days
'Left', 'Right': changing days
OK: selection of the month or year
4.3 T
Press and hold the Power button for 5 seconds to turn the device off.
5.
If the reader displays the content impr
or a needle with which you press the Reset button located in a small opening in the bottom part of the
device.
After a hard r
6.
The reader can be connected to a computer by means of a mini USB cable.
When you connect the reader to your computer
The following icon should appear on the display:
• When downloading or uploading files, do not disconnect the USB cable, otherwise you
may damage the software
• If you want to disconnect the reader fr-
loading or uploading process is complete
• If your computer uses Windows 2000 or Windows XP
double-clicking on 'Safely Remove Hardwar
• After the downloading or uploading process is complete 'Safely Remove Har
disconnect the reader fr
Mor
For more information about our products, practical advices, fr
manuals, updates, etc. visit http://www
T
Dec
GLOBAL WOLDER GROUP S.L, Polígono Industrial de Barros nº29, 39408 Barr
Spain, declares that this pr
99/05/CE on Radio Equiments and T
on Electromagnetic Compatibility