14
ATTENTION: En dehors des tempŽratures
ambiantes indiquŽes par la classe climatique
dÕappartenance de ce produit, il est obligatoire de
respecter les indications suivantes: lorsque la
tempŽrature ambiante descend sous la valeur
minimum, la tempŽrature de conservation du
compartiment congŽlateur peut ne pas •tre
garantie; il est donc conseillŽ de consommer les
produits que ce dernier contient au plus vite.
¥ Un produit dŽcongelŽ ne doit jamais •tre
recongelŽ.
¥ Suivez les indications du fabricant pour la
conservation et/ou congŽlation des aliments.
¥ Dans tous les appareils de rŽfrigŽration et
congŽlation il y a des surfaces qui se couvrent de
givre. Suivant le mod•le, ce givre peut •tre
ŽliminŽ automatiquement (dŽgivrage
automatique) ou bien manuellement.
¥ NÕessayez jamais dÕenlever le givre avec un objet
mŽtallique, vous risqueriez dÕendommager
irrŽparablement lÕŽvaporateur. NÕemployez pour
cela que une spatule en plastique.
¥ De m•me, ne dŽcollez jamais les bacs ˆ glace
avec un couteau ou tout autre objet tranchant.
¥ Ne placez ni bouteilles ni bo”tes de boissons
gazeuses dans le congŽlateur/compartiment ˆ
basse tempŽrature, elles pourraient exploser.
Protection de lÕenvironnement
Cet appareil ne contient pas, dans son circuit de
rŽfrigŽrant et ses mati•res isolantes, de gaz
rŽfrigŽrant nocifs ˆ la couche dÕozone. LÕappareil
ne doit pas •tre mis au rebut avec les ordures
urbaines et la ferraille. Il faut Žviter dÕendom-
mager le circuit de rŽfrigŽrant, surtout ˆ lÕarri•re
de lÕappareil, pr•s de lÕŽnchangeur thermique.
Vous pouvez vous renseigner sur les centres de
ramassage aupr•s de votre bureau municipal.
Les matŽriaux utilisŽs dans cet appareil
identifiŽs par le symbole sont recyclables.
47
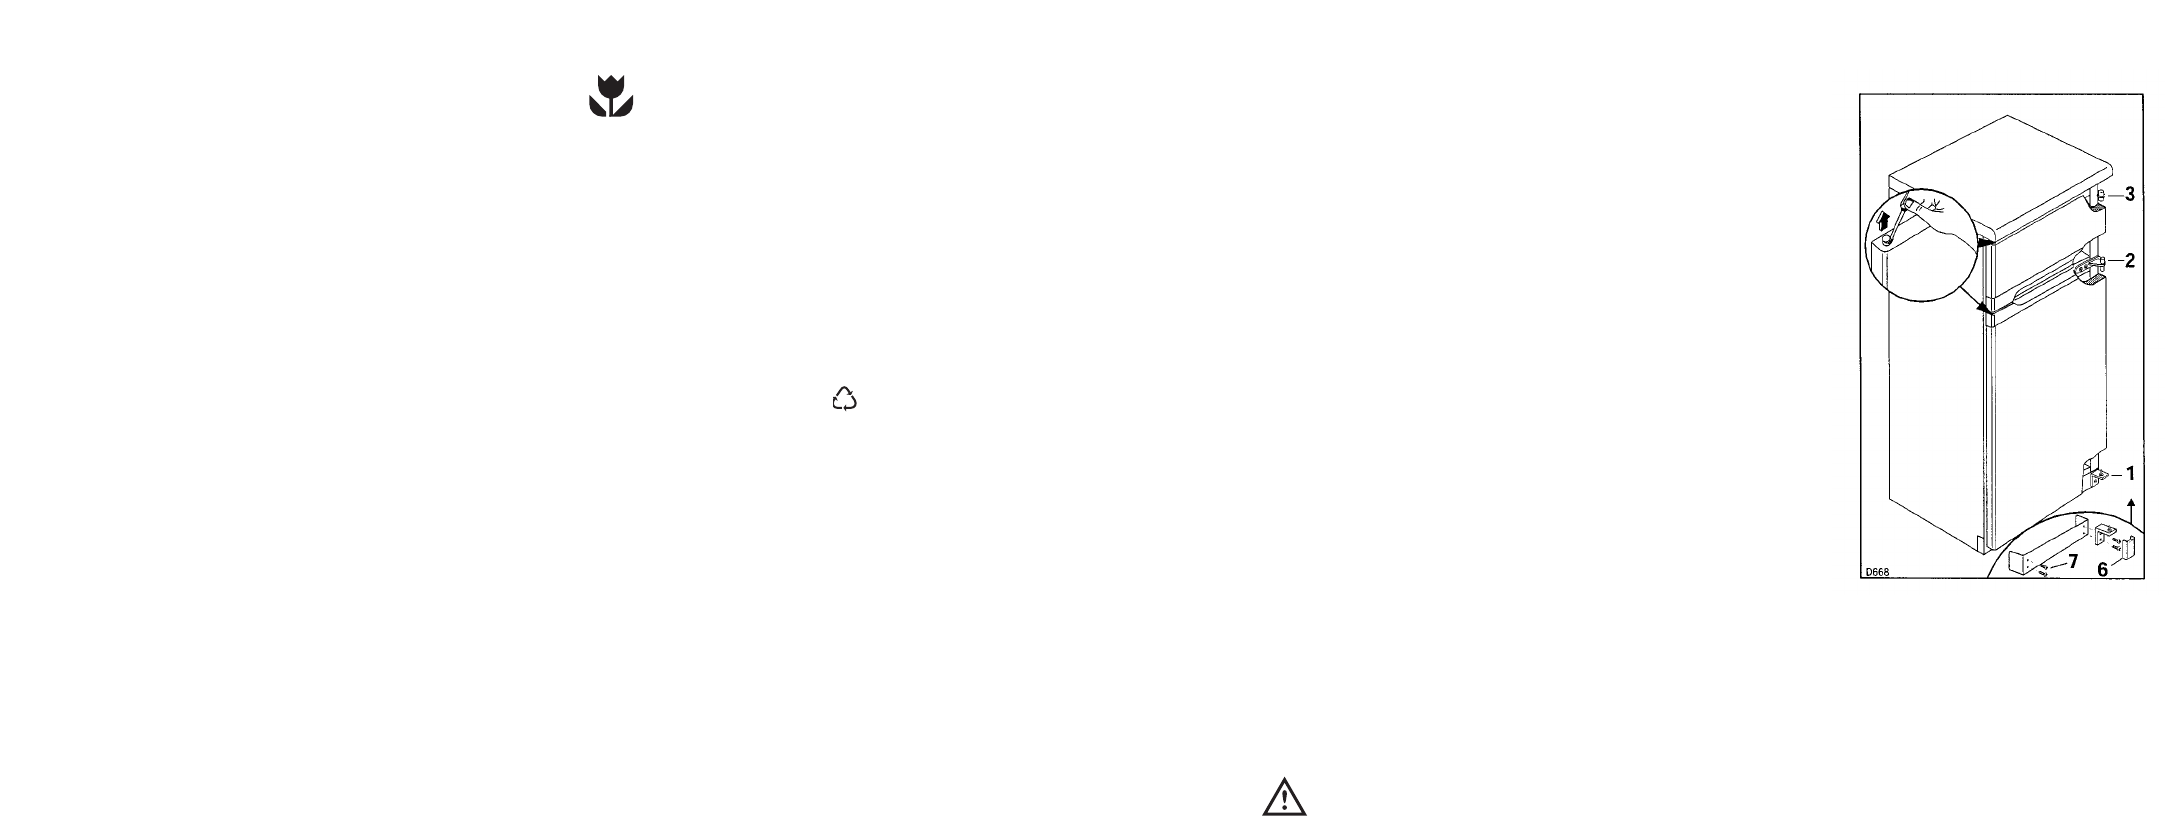
Door reversibility
Unplug the appliance from the power supply before
carrying out the below-mentioned operations.
1. Remove the plastic cover (6) (which has a clip-in
fitting) masking the bottom hinge;
2. Remove bottom hinge (1);
3. Slide out the lower door from middle hinge (2)
and remove the latter;
4. Slide out the upper door from pin (3), unscrew
the latter and then screw it down into the hinge
provided on the opposite side;
5. Remove the two plugs, to reveal the holes for the
hinge pivots, and remount them on the other
side;
6. Refit the upper door and the middle hinge on the
opposite side;
7. Refit the lower door and bottom hinge (1) on the
opposite side, after having removed the plugs (7)
and screws; these must then be refitted in the
holes on the opposite side;
8. Refit the plastic cover (6) on the bottom hinge.
To line up the doors, it is possible to adjust the
middle hinge (H) horizontally by means of a tool,
after slackening the two screws (see figure).
Warning:
After having reversed the opening direction of
the doors check that all the screws are properly
tightened and that the magnetic seal adheres to
the cabinet. If the ambient temperature is cold
(i.e. in Winter), the gasket may not fit perfectly to
the cabinet. In that case, wait for the natural
fitting of the gasket or accelerate this process by
heating up the part involved with a normal
hairdrier.