Operation Guide 3259
E-56
• Note that any change in elevation when ascending that is less than 15 meters (49 feet) is not added to
the total ascent value for the current Altimeter Mode auto measurement session. Also, any change in
elevation when descending that is less than
–
15 meters (
–
49 feet) is not added to the total descent
value for the current Altimeter Mode auto measurement session.
Note
• The high altitude, low altitude, total ascent, and total descent values are retained in memory when you
exit the Altimeter Mode. To clear values, perform the procedure under “To clear the contents of a
specifi
Using Auto Save Values
The watch maintains two independent sets of auto save values as shown below.
Set 1 Set 2
High Altitude (
MAX-1
)
Low Altitude (
MIN-1
)
Total Ascent (
ASC-1
)
Total Descent (
DSC-1
)
High Altitude (
MAX-2
)
Low Altitude (
MIN-2
)
Total Ascent (
ASC-2
)
Total Descent (
DSC-2
)
The values in Set 1 and Set 2 can be cleared independently of each other. This means you can use them
to keep track of daily and cumulative data as described in the example below.
Example:
Keeping track of data on a three-day climb
Day 1
Clear both Set 1 and Set 2, and start your Day 1 climb.
At the end of the day, both sets of auto save values contain the same data (
MAX-1
=
MAX-2
,
MIN-1
=
MIN-2
, etc.).
E-57
Day 2
Clear only Set 1, and start your Day 2 climb. At the end of the day, the values in Set 1 (
MAX-1
,
MIN-1
,
ASC-1
,
DSC-1
) will show the results of Day 2 only. In Set 2,
MAX-2
and
MIN-2
will show the high
altitude and low altitude reached over the two-day span.
ASC-2
will show the total ascent for the two
days (Day 1 + Day 2) and
DSC-2
will show the total descent for the two days.
Day 3
Clear only Set 1, and start your Day 3 climb. At the end of the day, the values in Set 1 will show the
results of Day 3 only. In Set 2,
MAX-2
and
MIN-2
will show the high altitude and low altitude reached
over the three-day span.
ASC-2
will show the total ascent for the three days (Day 1 + Day 2 + Day 3)
and
DSC-2
will show the total descent for the three days.
• For details about clearing altitude data, see “To clear the contents of a specifi
E-58
How does the altimeter work?
Generally, air pressure and temperature decrease as altitude increases. This watch bases its altitude
measurements on International Standard Atmosphere (ISA) values stipulated by the International Civil
Aviation Organization (ICAO). These values defi
temperature.
0 m
500 m
1000 m
1500 m
2000 m
2500 m
3000 m
3500 m
4000 m
899 hPa
795 hPa
701 hPa
616 hPa
8.5°C
2°C
–4.5°C
–11°C
15°C
About 6.5°C
per 1000 m
About 8 hPa per 100 m
About 9 hPa per 100 m
About 10 hPa per 100 m
About 11 hPa per 100 m
About 12 hPa per 100 m
Altitude Air Pressure Temperature
0 ft.
2000 ft.
4000 ft.
6000 ft.
8000 ft.
10000 ft.
12000 ft.
14000 ft.
25.84 inHg
22.23 inHg
19.03 inHg
44.7°F
30.5°F
16.2°F
59.0°F
About 3.6°F
per 1000 ft.
About 0.15 inHg per 200 ft.
About 0.17 inHg per 200 ft.
About 0.192 inHg per 200 ft.
About 0.21 inHg per 200 ft.
Source: International Civil Aviation Organization
E-59
• Note that the following conditions will prevent you from obtaining accurate readings:
When air pressure changes because of changes in the weather
Extreme temperature changes
When the watch itself is subjected to strong impact
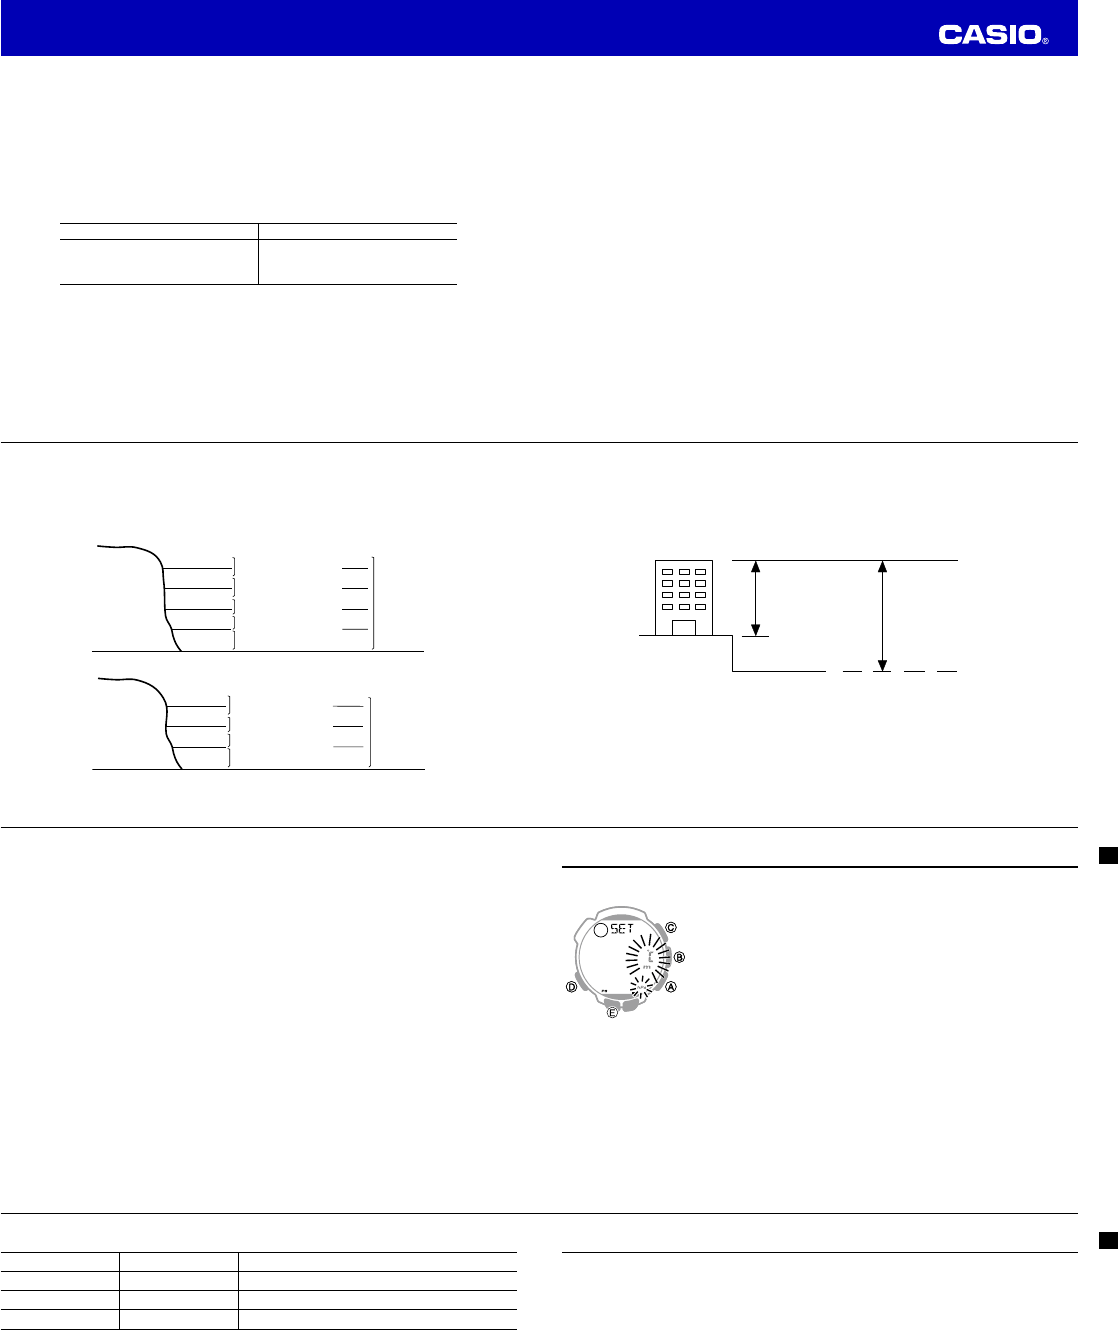
There are two standard methods of expressing altitude: Absolute altitude and relative altitude. Absolute
altitude expresses an absolute height above sea level. Relative altitude expresses the difference between
the height of two different places.
Height of building 130 m
(relative altitude)
Rooftop at an altitude of
230 m above sea level
(absolute altitude)
Sea Level
E-60
Altimeter Precautions
• This watch estimates altitude based on air pressure. This means that altitude readings for the same
location may vary if air pressure changes.
• The semiconductor pressure sensor used by the watch for altitude measurements is also affected by
temperature. When taking altitude measurements, do not subject the watch to temperature changes.
• Do not rely upon this watch for altitude measurements or perform button operations while sky diving,
hang gliding, or paragliding, while riding a gyrocopter, glider, or any other aircraft, or while engaging in
any other activity where there is the chance of sudden altitude changes.
• Do not use this watch for measuring altitude in applications that demand professional or industrial level
precision.
• Remember that the air inside of a commercial aircraft is pressurized. Because of this, the readings
produced by this watch will not match the altitude readings announced or indicated by the fl
E-61
Specifying Temperature, Barometric Pressure, and Altitude Units
Use the procedure below to specify the temperature, barometric pressure, and altitude units to be used in
the Barometer/Thermometer Mode and the Altimeter Mode.
Important!
When
TYO
(Tokyo) is selected as the Home City, the altitude unit is set
automatically to meters (
m
), the barometric pressure unit to hectopascals
(
hPa
), and the temperature unit to Celsius (
°C
). These settings cannot be
changed.
To specify temperature, barometric pressure, and altitude units
1. In the Timekeeping Mode, hold down
E
until
SET Hold
appears on the
display and then the city code starts to fl
2. Press
D
as many times as necessary until
SET
appears on the display.
• Se
curre
to scroll
E-62
3. Perform the operations below to specify the units you want.
To specify this unit: Press this key: To toggle between these settings:
Altitude
A
m
(meters) and
ft
(feet)
Barometric Pressure
B
hPa
(hectopascals) and
inHg
(inches of mercury)
Temperature
C
°C
(Celsius) and
°F
(Fahrenheit)
4. After all of the settings are the way you want, press
E
to exit the setting screen.
• T
E
again.
E-63
Precautions Concerning Simultaneous Measurement of Altitude and Temperature
Though you can perform altitude and temperature measurements at the same time, you should remember
that each of these measurements requires different conditions for best results. With temperature
measurement, it is best to remove the watch from your wrist in order to eliminate the effects of body heat.
In the case of altitude measurement, on the other hand, it is better to leave the watch on your wrist,
because doing so keeps the watch at a constant temperature, which contributes to more accurate altitude
measurements.
• To give altitude measurement priority, leave the watch on your wrist or in any other location where the
temperature of the watch is kept constant.
• To give temperature measurement priority, remove the watch from your wrist and allow it to hang freely
from your bag or in another location where it is not exposed to direct sunlight. Note that removing the
watch from your wrist can affect pressure sensor readings momentarily.