Turn OFF power. Loosen the screw in the presser bar, and attach the hemming foot.
Instale el sujetador del dobladillo.
Desconecte la alimentación eléctrica. Afloje el tornillo en el prensatelas, y coloque el sujetador de dobladillo.
Installer le support d’ourlage.
Mettre la machine hors tension. Desserrer la vis du pied presseur et monter le support d’ourlage.
1
Cut the corner of the material.
Trim the corner part of the material to help make the hemming foot hem the material edge.
Corte la esquina del material.
Corte parte de la esquina del material para que el sujetador de dobladillo pueda dobladillar el borde
del material.
Couper le coin du tissu.
Couper le coin du tissu afin que le support d’ourlage puisse ourler plus facilement le bord du tissu.
2
Fit the trimmed material edge into the vortex groove in the hemming foot.
Fit the material into the vortex groove in the hemming foot until the descended needle reaches the
material, and lower the hemming holder.
Encaje el borde del material cortado en la muesca del vórtice en el sujetador del
dobladillo.
Encaje el material en la muesca del vórtice en el sujetador del dobladillo hasta que la aguja bajada
llegue al material, y baje el sujetador del dobladillo.
Placer le bord du tissu coupé dans le gorge vortex du support d’ourlage.
Mettre le tissu dans la gorge vortex du support d’ourlage de manière que l’aiguille abaissée atteigne
le tissu, puis abaisser le support d’ourlage.
3
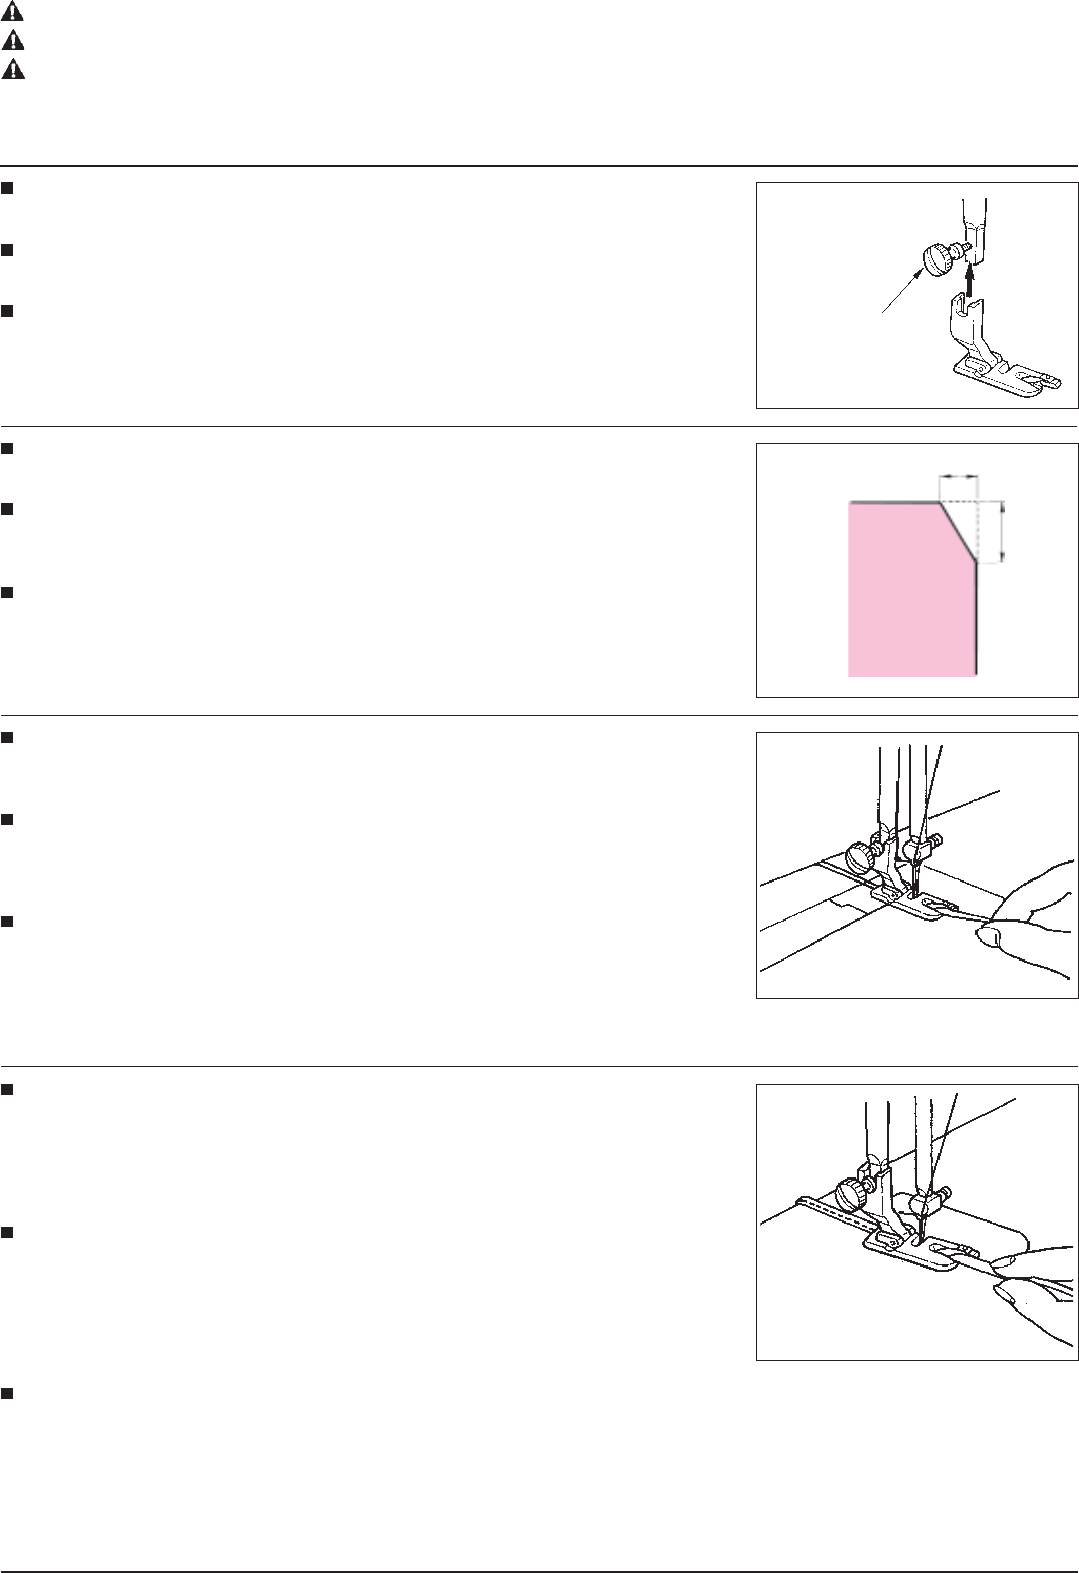
Hem the material edge while helping the material to go into the groove by hand.
Draw the needle and bobbin thread ends with your left hand, turn the handwheel by 3 or 4 rotations
until you are sure that the material edge is rolled into the groove.
Then hem the material edge while pinching the material edge with your right-hand thumb and
index finger to make sure that the appropriate amount of material is fed into the hemming foot with
consistency.
Dobladille el borde del material a la vez que ayuda con la mano a que el material
entre en la ranura del vórtice.
Saque con la mano la aguja y los extremos del hilo de bobina, girando el volante 3 ó 4 vueltas
hasta que vea que el borde del material queda enrollado en la ranura del vórtice. Seguidamente,
dobladille el borde del material mientras continúa agarrando con el dedo pulgar y el dedo índice de
su mano derecha el borde del material para asegurarse de que se transporta la cantidad de
material apropiada con consistencia al sujetador de dobladillado.
4
Screw in the presser foot
Tornillo en el prensatelas
Vis du pied presseur
Material
Material
Tissu
5mm
8mm
Ourler le bord du tissu en guidant le tissu dans la gorge vortex à la main.
Tirer les extrémités du fil d’aiguille et du fil de canette avec la main gauche et tourner le volant de 3 ou 4 tours pour s’assurer que le bord du tissu
est bien roulé dans la gorge vortex. Ourler ensuite le bord du tissu tout en le pinçant entre le pouce et l’index de la main droite de manière que la
longueur appropriée de tissu pénètre régulièrement dans le support d’ourlage.
CAUTION:
Turn OFF the power switch when replacing the presser foot.
AVERTISSEMENT:
Avant de remplacer le pied presseur, placer l’interrupteur d’alimentation sur arrêt.
AVISO:Cuando cambie el prensatelas posicione en OFF el interruptor de la corriente eléctrica.
Libble nimmt den Missbrauch seiner Dienste sehr ernst. Wir setzen uns dafür ein, derartige Missbrauchsfälle gemäß den Gesetzen Ihres Heimatlandes zu behandeln. Wenn Sie eine Meldung übermitteln, überprüfen wir Ihre Informationen und ergreifen entsprechende Maßnahmen. Wir melden uns nur dann wieder bei Ihnen, wenn wir weitere Einzelheiten wissen müssen oder weitere Informationen für Sie haben.
Art des Missbrauchs:
Forenregeln
Um zu sinnvolle Fragen zu kommen halten Sie sich bitte an folgende Spielregeln:
Lesen Sie zuerst die Anleitung;
Schauen Sie nach, ob die Frage bereits gestellt wurde;
Stellen Sie die Frage so deutlich wie nur einigermaßen möglich;
Erwähnen Sie was Sie bereits versucht haben um das Problem zu lösen;
Ist Ihr Problem von einem Besucher gelöst dann lassen Sie ihn / sie wissen in diesem Forum;
Falls Sie reagieren möchten, so verwenden Sie bitte das Antworten- Formular;
Da ihre Frage für alle Besucher sichtbar ist, sollten Sie lieber keine persönliche Daten erwähnen.
Neu registrieren
Registrieren auf E - Mails für Juki TL-98Q wenn:
neue Frage gestellt werden
neue Handbücher vorhanden sind
Sie erhalten eine E-Mail, um sich für eine oder beide Optionen anzumelden.
Das Handbuch wird per E-Mail gesendet. Überprüfen Sie ihre E-Mail.
Wenn Sie innerhalb von 15 Minuten keine E-Mail mit dem Handbuch erhalten haben, kann es sein, dass Sie eine falsche E-Mail-Adresse eingegeben haben oder dass Ihr ISP eine maximale Größe eingestellt hat, um E-Mails zu erhalten, die kleiner als die Größe des Handbuchs sind.
Ihre Frage wurde zu diesem Forum hinzugefügt
Möchten Sie eine E-Mail erhalten, wenn neue Antworten und Fragen veröffentlicht werden? Geben Sie bitte Ihre Email-Adresse ein.