6
40-ACCU, 43-ACCU, R40B, R43B
Pos: 13.6 /Inne
Pos: 13.7 /Inne
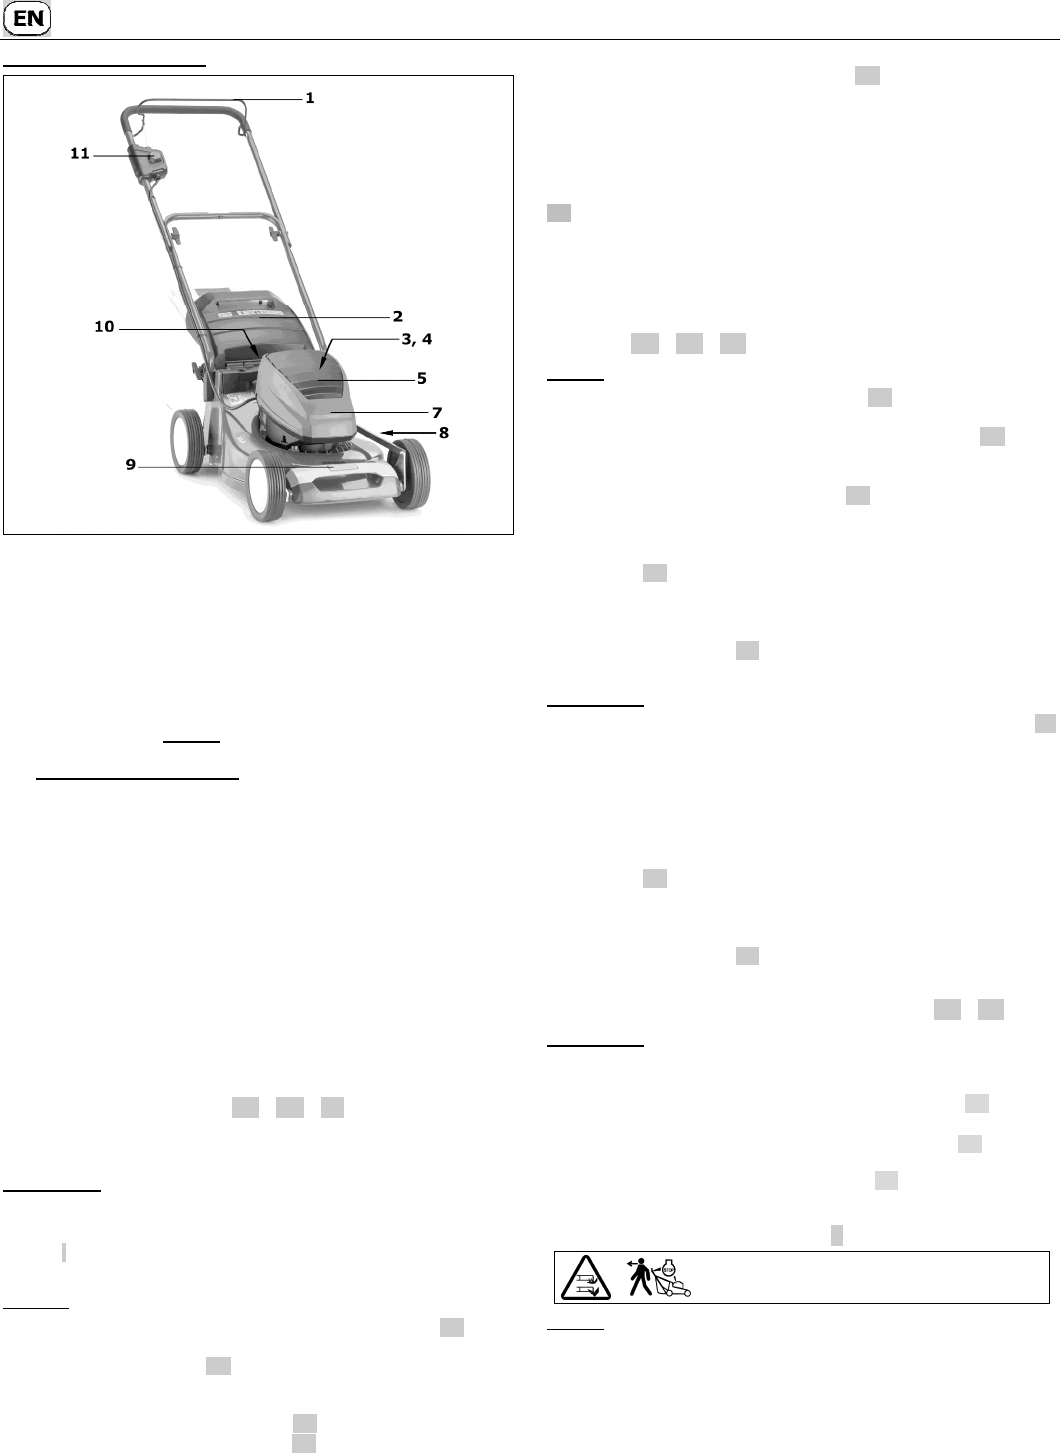
1 Actuation bar for motor (safety control bar)
2 Ejector
3 Battery (under the battery cover)
4 Safety key (under the battery cover)
5 Battery
6 Setting handle for adjusting cutting height with push-button (36-ACCU)
7 Hood
8 Cutting height display
9 Carrying handle, front
10 Carrying handle, rear (36-ACCU)
Setting handle for adjusting cuttarrying handle, rear) with push-button
(40-ACCU, 43-ACCU, R40B, R43B )
11 Locking button (red)
Pos: 14.1 /----
Pos: 14.2 /Inne
8 PREPARATION
Pos: 14.3 /Inne0691 @ @
The following unit parts are included in the package for mower assembly:
• Mower with pre-assembled handlebar
• Grass catch, collecting bag frame, sloped channel
• Battery
• Charger
• Tool bag containing the following:
– Operating instructions with Declaration of Conformity
– Guarantee (depending on the model)
– Diverse attachment parts.
Should a part be missing, please contact your professional dealership.
Pos: 14.4 /Inneocx @ 5
Raise the handlebar (Illu
Pos: 14.5 /Inne91 @ @
IMPORTANT
Make sure that the cable is not kinked or jammed when raising the handlebars.
Pos: 14.6 /Inne
40-ACCU, R40B
Pos: 14.7 /Inne@ 1
NOTE
Before the handlebars are raised, the cutting height
or higher I . The handlebar cannot be pivoted backwards completely in the two lower
cutting positions.
Pos: 14.8 /Inne
All models
Pos: 14.9 /Inne1.do
– Pull the handlebar which is collapsed in a Z-shape upwards into place A1 .
– When the top and bottom parts of the handlebar are on the same level, firmly
tighten the wing nuts by hand O4 .
– Pivot the bottom part of the handlebar backwards until the toothed plastic fitments
lock into place at the lower end in the toothed recess on the mower housing.
Three different handlebar heights can be set B1 .
– Tighten the wing nuts on both sides by hand B1 .
– Insert the cable in the cable guide and fix on the top and bottom part of the
handlebar using the cable ties from the tool bag O4 . Route the cable along the
outside of the handlebar to ensure the ejector flap can still remove freely during
raising and closing.
When folding the top part of the handlebar over, make sure that the cable can
move freely.
Pos: 14.10 /Innenteil/Vorbereitende Arbeiten/Holmhöhenverstellung...Umschlagen des Holms Hinweis 36er, 40er, 43er, 47er @ 13\mod_1280321
CAUTION
When you activate the bar height
B1 used to secure the bar bottom to the housing (only loosen sufficiently to
ensure that the bar can be moved freely) and snapping the toothed plast
adaptations from the cut-
upsetting of the bar may occur
between the bar bottom and t
Pos: 14.11 \mod_
Assemble the collecting
(Illustration Q1 + R1 + S1 )
Pos: 14.12 /In
36-ACCU
Pos: 14.13 /1521.
– Remove the attached fixing panels from the chute Q1 .
– Set the chute into the collecting bag frame at an angle. By moving the chute down
press the holding bracket on either side onto the collecting bag frame Q1 .
– Then press the lower holding brackets of the chute onto the transverse rod of the
collecting bag frame.
– Screw the two fixing panels to the chute again R1 .
– First insert the grass bag frame with the clip forward into the grass bag. Align the
upper seams of the bag with the clip.
– Press the retaining profiles of the collecting sack onto the bars of the collecting
sack frame R1 .
– Open the ejection flap of the mower upwards.
– Pick up the collecting sack by the carrying strap, place the chute (1) at the
collecting sack opening into the ejecti
its two side hooks upwards S1 .
– Attach ejection flap to collector.
Pos: 14.14 /In
40-ACCU, R40B
Pos: 14.15 /1521.
– Press the lateral retaining clip (2) of the cQ1
.
– From below, hang the bar (3) of the crossbar into the chute.
– Then press the lower retaining clips (4) onto the crossbar of the collecting bag
frame.
– First insert the grass bag frame with the clip forward into the grass bag. Align the
upper seams of the bag with the clip.
– Press the retaining profiles of the collecting sack onto the bars of the collecting
sack frame R1 .
– Open the ejection flap of the mower upwards.
– Pick up the collecting sack by the carrying strap, place the chute (1) at the
collecting sack opening into the ejecti
its two side hooks upwards S1 .
– Attach ejection flap to collector.
Pos: 14.16 /.docx @
Attaching the grass collector to the mower (I
Pos: 14.17 /In
43-ACCU, R43B
Pos: 14.18 /In
– Insert the collection bag frame with the bar first into the grass catch. Align the
upper seams of the grass catch on the bar.
– Press the holding profile onto the frame of the collection bag frame R1 .
– Open the ejection flap of the mower upwards.
– Lift the grass collection bag on the carrier bar, insert the chute (1) R1 on the
collection bag opening into the ejection flap and hang the grass collection bag with
the two side hooks to the top of the mower housing S1 .
– Fold the ejection flap onto the grass collection bag.
Pos: 14.19 /In@ 2 @ 1
Adjusting the cutting height (Illustr
Pos: 14.20 /In
Safety instruction!
See table for explanation of symbols page 3
Pos: 14.21 /In
36-ACCU
Pos: 14.22 /005 @ @ 1
The mower is adjusted to the lowest cutting height upon delivery.
– The cutting height is set on the left hand side of the lawnmower
– Press the red button with your thumb and move the handle of the lawnmower into
the required position by moving it up or down.
– By letting go of the button, the lever locks into the required cutting height.
– The marking on the left on the adjusting rod indicates the cutting height.
Pos: 14.23 /In