661045
48
Zoom out
Zoom in
Vorherige Seite
1/112
Nächste Seite
8
Plug the battery charger into a 230V socket W1 .
Push the battery into the charger W1 . Make sure the battery is firmly in the
battery charger.
This is a diagnostic charger. The LEDs on the charger light up in a certain order to
indicate the current battery status T4 .
Display (1) Charging LED (2)
Battery is charging
normally:
RED
RED
Battery is fully charged:
RED
GREEN
Battery is too hot:
(remove for about 30
minutes so that it can cool
down)
RED
ORANGE
No battery inserted:
RED
OFF
Battery is faulty:
(replace battery)
RED
FLASHING
RED
Pos: 15.14 /Innenteil/Vor der Ersten Inbetriebnahme/Falsche Defektanzeige Text Accumäher @ 46\mod_1476792592180_1521.docx @ 521946 @ @ 1
Wrong fault display
Charging LED (2) flashes
If the battery is inserted in the charger and the LED is flashing, remove the battery
from the charger for about 1 minute and then insert it again.
If the LED indicates the normal status, the battery is OK.
If the LED is still flashing, remove the battery and disconnect the charger plug from
the mains. Wait for 1 minute and then connect the charger to the mains power
supply again. Now re-insert the battery.
If the LED indicates the normal status, the battery is OK.
If the LED is still flashing, the battery is faulty and must be replaced.
Display (1) is flickering
If the red display is flickering, remove the battery from the charger and insert it
again within 2 hours.
If the display indicates the charging process, the battery is OK.
If the red LED is still flickering, remove the battery and disconnect the charger plug
from the mains. Wait for 1 minute and then connect the charger to the mains
power supply again. Now re-insert the battery.
If the display indicates the charging process, the battery is OK.
If not, the battery is faulty and must be replaced.
Pos: 15.15 /Innenteil/Vor der Ersten Inbetriebnahme/Überprüfung des Ladegeräts Text Accumäher @ 46\mod_1476796978912_1521.docx @ 521973 @ @ 1
Checking the charger
If the battery is not charged properly:
Check the socket using another electrically operated tool e.g. reading lamp or
similar, which you know to be working correctly.
Make sure that the socked is not switched off.
Check whether the charging contacts have not short-circuited due to dirt or
objects.
Heed the permissible temperature range of 7°C to 40°C during charging
Pos: 15.16 /Innenteil/Vor der Ersten Inbetriebnahme/Ladezeit Text Accumäher @ 46\mod_1476797169491_1521.docx @ 522000 @ @ 1
Charging time
A completely discharged battery takes approx. 2 hours to be charged completely.
When the green LED indicates that the battery is fully charged, it can be removed
from the charger.
Remove the battery charger plug from the socket if it is not required.
Press the battery status display button to check the available charge (see the
section “Battery status display”).
Pos: 15.17 /Innenteil/Vor der Ersten Inbetriebnahme/Sicherheitsschlüssel abziehen Warnung Accumäher @ 46\mod_1476879818158_1521.docx @ 522031 @ @ 1
WARNING
In order to prevent unauthorised use of the mower, particularly by
children, remove the safety key:
when you leave the mower,
when you put the lawn mower away until you need it for mowing again,
before storing the mower for the winter.
Store the battery in a dry, cool and frost-protected room.
Pos: 15.18 /Innenteil/Vor der Ersten Inbetriebnahme/1.1 Batteriestandanzeige (Abbildung U4 ) @ 40\mod_1444303196784_1521.docx @ 425856 @ 2 @ 1
Battery status display (Illustration U4 )
Pos: 15.19 /Innenteil/Vor der Ersten Inbetriebnahme/Batteriestandanzeige Text Accumäher @ 47\mod_1476879971693_1521.docx @ 522058 @ @ 1
In order to check the available battery charge, press the battery status display button.
The display lamps light up in accordance with the battery charge status:
Lamps Capacity
4 green lamps Battery is fully charged
3 green lamps Battery is charged to 70%
2 green lamps Battery is charged to 45%
1 green lamp Battery is charged to 10% and needs to
be recharged soon
Lamps are off An acoustic signal can be heard:
the battery charge status is below 10%;
the battery must be charged
immediately
Pos: 16.1 /---------- 1 Leerzeile ---------- @ 0\mod_1114611787140_1521.docx @ 2070 @ @ 1
Pos: 16.2 /Innenteil/Inbetriebnahme des Accu/Elektro-Mähers/Vertikutierers/1 STARTEN DES MOTORS (Abbildung G2 + A2 ) @ 46\mod_1476435997155_1521.docx @ 520855 @ 1 @ 1
10 STARTING THE MOTOR (Illustration G2 + A2 )
Pos: 16.3 /Innenteil/Sicherheitshinweise/Sicherheitshinweis: Fuss, Stein, Abstand @ 0\mod_1115212854781_1521.docx @ 1529 @ @ 1
Safety instruction!
See table for explanation of symbols page 3
Pos: 16.4 /Innenteil/Starten des Motors/Allgemeine Sicherheitshinweise Heckauswurf @ 26\mod_1377169184915_1521.docx @ 188188 @ @ 1
Only start the engine when you are standing behind the mower.
Always place the mower on a level area which is not covered with high grass (if the
grass is too high it will block the cutter bar start-up and make starting the mower more
difficult). When the engine is started, the machine must not be tilted on end, if
necessary it must be tilted by pressing the guide bar down so that the cutting tool is
pointing in the direction away from the user, but only as far as absolutely necessary. As
long as the mower has not been lowered to the ground again, both your hands must be
on the top part of the bar.
Pos: 16.5 /Innenteil/Inbetriebnahme des Accu/Ele ktro-Mähers/Vertikutierers/Starten des Motors Text Accu-Mäher @ 46\mod_1476437080317_1521.docx @ 520910 @ @ 1
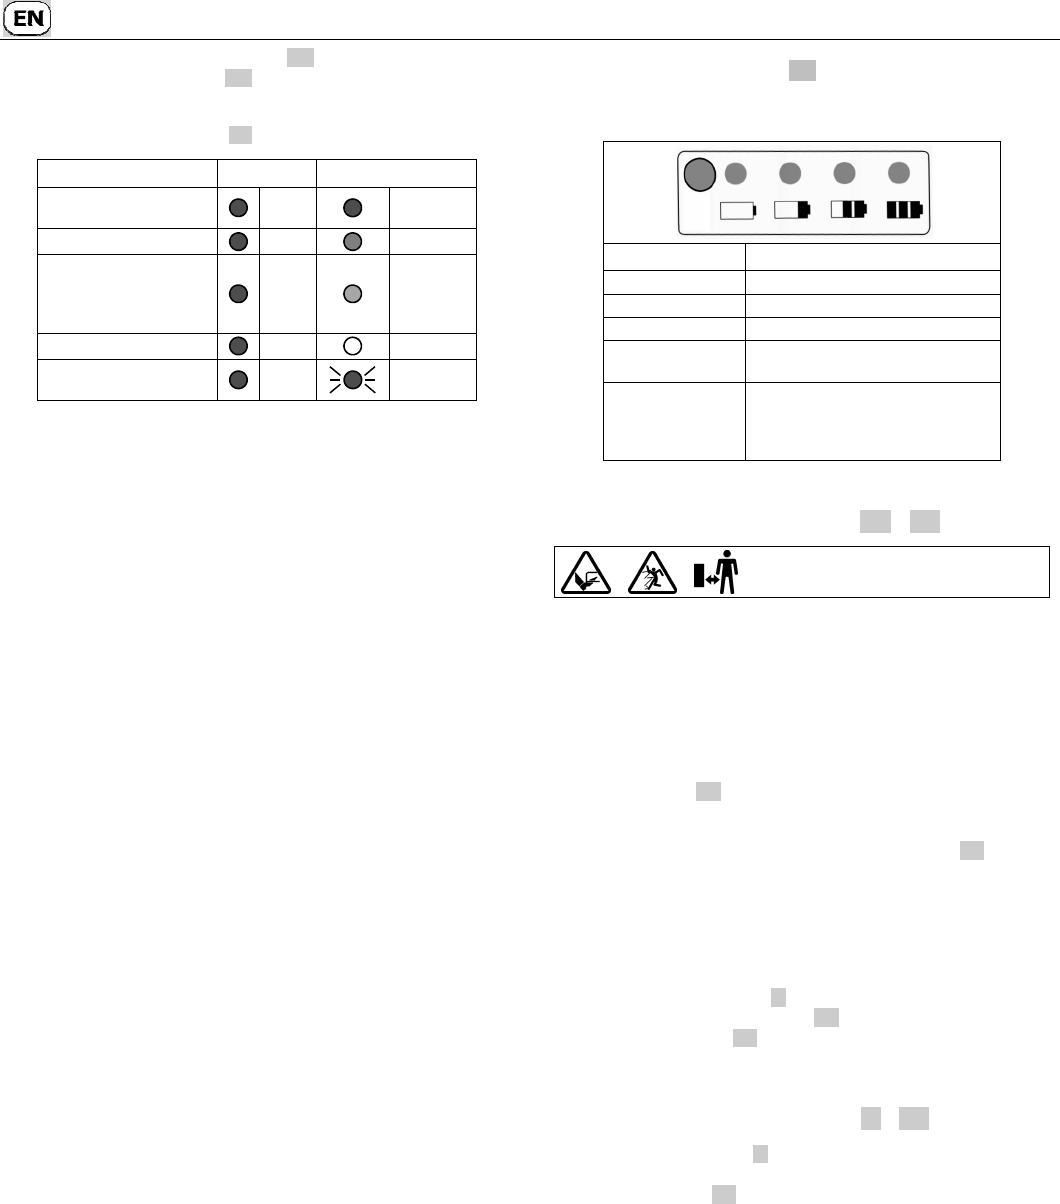
Open the battery cover and keep hold of it.
Insert the safety key G2 .
Close the battery cover. Make sure that the cover closes automatically. Dirt and
grass cuttings can prevent this and must be removed for this reason.
To switch the motor on, press the start button and keep it pressed A2 .
Use the other hand to pull the control handle towards the top part of the handlebar.
During operation, the control handle must remain held in this position.
The start button can then be released.
Pos: 16.14 /Inside/Putting the electric mower/scarifier into operation/Motor does not start up after 5 seconds note mower @ 13\mod_1280933201843_6.docx @ 110722 @ @ 1
Pos: 16.6 /Innenteil/Inbetriebnahme des Accu/Elektro-Mähers/Vertikutierers/Motor läuft nicht an nach 5 Sekunden Hinweis Accumäher @ 46\mod_1476437274823_1521.docx @ 520937 @ @ 1
IMPORTANT
If the motor does not start up within 5 seconds of the tool being switched on or a
warning signal is sounded, then
1. Release the control handle again F .
2. Check whether the safety key is inserted G2 .
3. Check the battery capacity U4 .
4. Check the tool for blockage inside the mower
5. Have it checked by an authorised workshop.
Pos: 17.1 /---------- 1 Leerzeile ---------- @ 0\mod_1114611787140_1521.docx @ 2070 @ @ 1
Pos: 17.2 /Innenteil/Abstellen des Motors/1 ABSTELLEN DES MOTORS (Abbildung F + K2 ) @ 46\mod_1476437765801_1521.docx @ 520991 @ 1 @ 1
11 STOPPING THE MOTOR (Illustration F + K2 )
Pos: 17.3 /Innenteil/Abstellen des Motors/Abstellen des Motors Text Accumäher @ 46\mod_1476437926772_1521.docx @ 521019 @ @ 1
Release the safety control bar F .
Wait for the cutter bar to come to a standstill.
Remove the safety key K2 .
Pos: 17.4 /---------- 1 Leerzeile ---------- @ 0\mod_1114611787140_1521.docx @ 2070 @ @ 1
Pos: 17.5 /Innenteil/Abstellen des Motors/1 ANHALTEN IM NOTFALL @ 5\mod_1183556328817_1521.docx @ 36114 @ 1 @ 1
12 EMERGENCY STOPPING
Pos: 17.6 /Innenteil/Abstellen des Motors/Anhalten im Notfall Text o.A. Elektro @ 5\mod_1184069377301_1521.docx @ 37088 @ @ 1
Release the safety grip.
The blade will stop.
The motor will stop.
Pos: 17.7 /Innenteil/Abstellen des Motors/Anhalten im Notfall Hinweis Elektro o.A. @ 26\mod_1377184911085_1521.docx @ 193016 @ @ 1
NOTE
Before every mowing job, make sure that the safety control bar for the motor
brake is working perfectly.
when the safety control bar is released, the motor and cutter bar must come
to a standstill within three seconds.
If this is not the case, please consult your nearest authorised workshop.
Pos: 18.1 /---------- 1 Leerzeile ---------- @ 0\mod_1114611787140_1521.docx @ 2070 @ @ 1
48

Brauchen Sie Hilfe? Stellen Sie Ihre Frage.

Forenregeln

Missbrauch melden von Frage und/oder Antwort

Libble nimmt den Missbrauch seiner Dienste sehr ernst. Wir setzen uns dafür ein, derartige Missbrauchsfälle gemäß den Gesetzen Ihres Heimatlandes zu behandeln. Wenn Sie eine Meldung übermitteln, überprüfen wir Ihre Informationen und ergreifen entsprechende Maßnahmen. Wir melden uns nur dann wieder bei Ihnen, wenn wir weitere Einzelheiten wissen müssen oder weitere Informationen für Sie haben.

Art des Missbrauchs:

Zum Beispiel antisemitische Inhalte, rassistische Inhalte oder Material, das zu einer Gewalttat führen könnte.

Beispielsweise eine Kreditkartennummer, persönliche Identifikationsnummer oder unveröffentlichte Privatadresse. Beachten Sie, dass E-Mail-Adressen und der vollständige Name nicht als private Informationen angesehen werden.

Forenregeln

Um zu sinnvolle Fragen zu kommen halten Sie sich bitte an folgende Spielregeln:

Neu registrieren

Registrieren auf E - Mails für Sabo R40B wenn:


Sie erhalten eine E-Mail, um sich für eine oder beide Optionen anzumelden.


Das Handbuch wird per E-Mail gesendet. Überprüfen Sie ihre E-Mail.

Wenn Sie innerhalb von 15 Minuten keine E-Mail mit dem Handbuch erhalten haben, kann es sein, dass Sie eine falsche E-Mail-Adresse eingegeben haben oder dass Ihr ISP eine maximale Größe eingestellt hat, um E-Mails zu erhalten, die kleiner als die Größe des Handbuchs sind.

Ihre Frage wurde zu diesem Forum hinzugefügt

Möchten Sie eine E-Mail erhalten, wenn neue Antworten und Fragen veröffentlicht werden? Geben Sie bitte Ihre Email-Adresse ein.


Info