A-12 Recording
E
A-13Recording
RECORDING
1. Turn the white-balance dial to the preset
white balance position, and press the
white-balance button.
2. Turn the front control dial to select the
preset white balance and turn the rear
control dial to adjust the selected preset
white balance.
3. Press the central button to complete the
operation.
1. Turn the white-balance dial to the custom white bal-
ance position, and press the white-balance button.
2. Use the control dials to select “Set”, and
press the central button.
3. Place a white object in the spot-metering area
and press the shutter-release button to cali-
brate in camera.
• Auto white balance: for automatic setting. Preset white balance: to
set the white balance to a specific light. Custom white-balance: to
calibrate the camera to a specific lighting condition. Color temper-
ature: to set the white balance to a specific color temperature.
COLOR MODES
MENU > 1 > Color mode > Select option* > •:enter > MENU
*(Natural: sRGB...natural color reproduction for most purposes.
Natural+:sRGB...increased contrast.
Embed Adobe RGB...similar to Natural Color, but uses the
extended gamut of the Adobe RGB color space and is embed
ded in the image file.)
DIGITAL FX
MENU > 1 > Digital FX > Enter > •:enter > select the parameter with the
up/down keys > change the parameter with left/right keys > •:enter > MENU
– ... 0 ... +
– ... 0 ... +
– ... 0 ... +
– ... 0 ... +
Increase
Accentuates colors
Accentuates details
Shifts color space
Decrease
Subdues colors
Softens details
Shifts color space
Contrast :
Saturation :
Sharpness :
Hue :
CAMERA-SENSITIVITY(ISO) SETTING
Seven settings can be selected for camera
sensitivity (ISO); Auto, 100, 200, 400, 800,
1600, and 3200. 3200 is activated with “ISO
menu set” in custom section 4).
• The higher the ISO setting, the higher the
sensitivity and the longer the flash range,
but noise is increased at the same time.
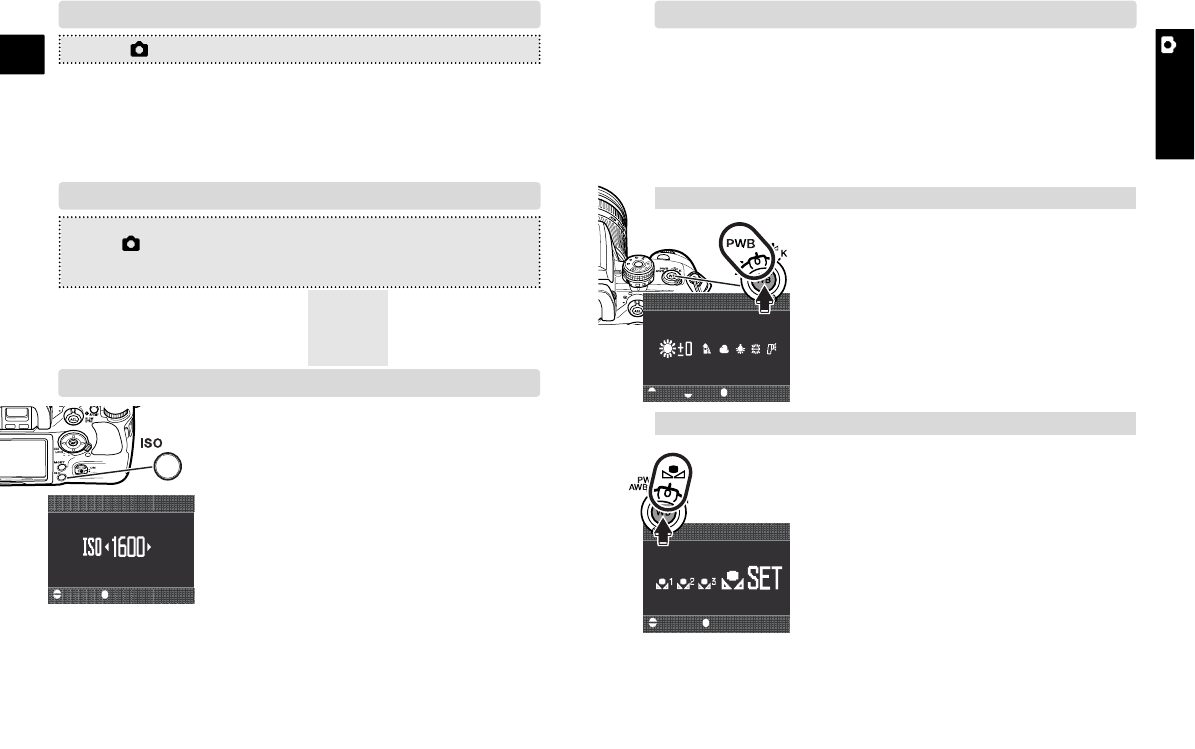
1. Press the camera-sensitivity (ISO) button.
:select :enter
Sensitivity
2. Use the control dials or left/right keys to change the ISO.
3. Press the central button to set the ISO.
• Zone matching can be activated in “ISO button set” in custom
section 4. Zone matching improves reproduction of high-key or
low-key scenes.
WHITE BALANCE
Auto white balance is used when the white-balance dial is set to
AWB. Other dial positions give different controls.
Custom white-balance calibration (p. 61)
:sel. :adj. :enter
Preset white balance
4. Use the control dials or left/right keys to select the white-balance
register, 1, 2 or 3.
5. Press the central button to complete the operation.
(Continued on the next page.)
:select :enter
Custom white balance
Selecting preset white balance (p. 60)
(p. 68)
(p. 69)
(p. 51)
(p. 60-62)