The Sampling Job mode contains a comprehensive set of editing tools and functions you can use to change the sound of the sample you’ve
created and edited in the Sampling Edit mode. It also includes a variety of convenient operations, such as copying or erasing data.
After setting parameters as required in the selected display, press the [ENTER] button to execute the Job.
nUnlike in the Sampling Record mode, all parameters and functions of the Sampling Job mode are the same, no matter which mode was previously selected.
The only exception to this is the Slice Job ([F1] →12 below), which varies depending on whether the previously selected mode was Voice/Performance or
Song/Pattern.
nAll Sampling Job operations apply to the Waveform (actual sample), not the Voice.
PlayModeDetermines how the selected sample is to be played back.
Settings:oneshot, reverse, loop
oneshot............The Sample plays back one time from Start point to End point.
reverse.............The Sample plays back one time in reverse from End point to Start point.
loop..................Sample playback begins from the Start point, continues to the Loop point, then repeats indefinitely between the Loop
point and End point.
nFor details on the above settings, see page 176.
OriginalKeyDetermines the base key for the sample. Since the sample will be pitched shifted for keys played around this base
key, this should be set as close as possible to the original pitch or note value of the actual sample.
Settings:C - 2 ~ G8
FineTuneDetermines the fine tuning for the pitch of the sample.
Settings:-100 cent ~ 0 cent ~ 99 cent
[SF1] AUDITIONYou can hear (audition) the selected sample by pressing the [SF1] button.
[SF2] SELECTPress the [SF2] button to call up in order the Samples assigned to the selected Key Bank.
[F4] RANGE
From this display you can set the Key Range and the Velocity Range for the sample assigned to the selected Key Bank. Note that both the Key range and Velocity
range values are graphically indicated in the display.
nWhen the cursor is at one of the Key Range values, you can directly set the Key Range parameter from the keyboard. (Simultaneously hold down the [INFORMATION] button and
press the appropriate key on the keyboard.)
[SF1] AUDITIONYou can hear (audition) the selected sample by pressing the [SF1] button.
[SF2] SELECTPress the [SF2] button to call up in order the Samples assigned to the selected Key Bank.
Sampling Job mode[INTEGRATED SAMPLING] → [JOB]
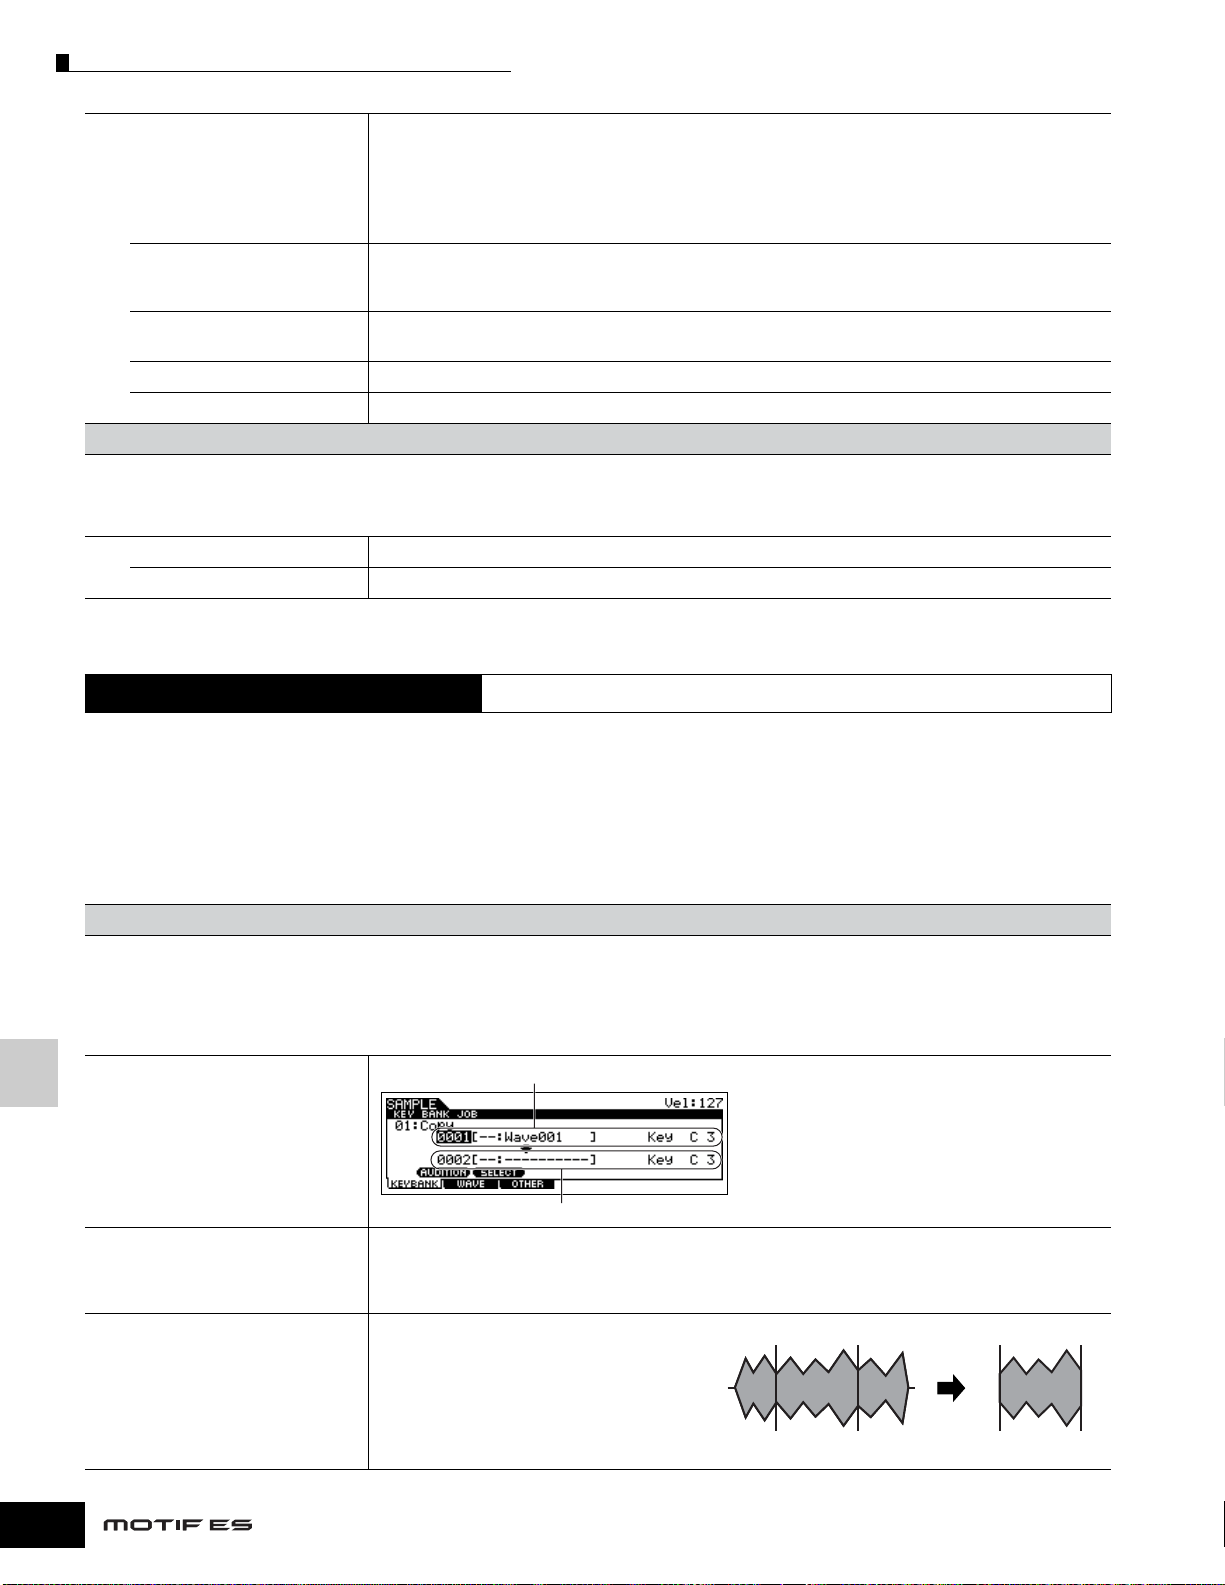
[F1] KEYBANK (Key Bank Job)
Before executing the Key Bank Job by pressing the [ENTER] button, you’ll need to specify the Waveform and Key Bank.
First, select the desired Waveform by moving the cursor to the 4-digit number in the display and change it by using the [INC/YES] and [DEC/NO] buttons or the
data dial. Second, move the cursor to the Key value, select the desired key by using the [INC/YES] and [DEC/NO] buttons or the data dial, then use the [SF2]
SELECT button to select in order the Key Bank (sample) assigned to the selected key. You can select the desired key also by pressing the note on the keyboard
directly while holding the [INFORMATION] button. As in the Sampling Edit mode, the [SF1] AUDITION button lets you hear the sample assigned to the selected
Key Bank.
01: CopyThis Job copies the data of a sample contained in a
specified Key Bank to another Key Bank. After
specifying the source Waveform and Key Bank as well
as the destination Waveform and Key Bank, press the
[ENTER] button to execute the Copy Job.
02: DeleteThis Job deletes the specified Key Bank and its sample. After specifying the Waveform and Key Bank, press the
[ENTER] button to execute the Delete Job. If the Key Bank is set to “all” and the Job is executed, all the samples of
the selected Waveform are deleted.
nIf all the samples of the specified Waveform are deleted, the Waveform itself is deleted.
03: ExtractThis Job deletes all unnecessary sample data
(located ahead of the Start point and located after the
End point). In effect, it extracts only the sample data
you want to use, trimming all unneeded sound from
the start and end of the sample.
After specifying the Waveform and Key Bank, press
the [ENTER] button to execute the Extract Job. If the
Key Bank is set to “all” and the Job is executed, this Job is applied to all the samples of the selected Waveform.
Libble nimmt den Missbrauch seiner Dienste sehr ernst. Wir setzen uns dafür ein, derartige Missbrauchsfälle gemäß den Gesetzen Ihres Heimatlandes zu behandeln. Wenn Sie eine Meldung übermitteln, überprüfen wir Ihre Informationen und ergreifen entsprechende Maßnahmen. Wir melden uns nur dann wieder bei Ihnen, wenn wir weitere Einzelheiten wissen müssen oder weitere Informationen für Sie haben.
Art des Missbrauchs:
Forenregeln
Um zu sinnvolle Fragen zu kommen halten Sie sich bitte an folgende Spielregeln:
Lesen Sie zuerst die Anleitung;
Schauen Sie nach, ob die Frage bereits gestellt wurde;
Stellen Sie die Frage so deutlich wie nur einigermaßen möglich;
Erwähnen Sie was Sie bereits versucht haben um das Problem zu lösen;
Ist Ihr Problem von einem Besucher gelöst dann lassen Sie ihn / sie wissen in diesem Forum;
Falls Sie reagieren möchten, so verwenden Sie bitte das Antworten- Formular;
Da ihre Frage für alle Besucher sichtbar ist, sollten Sie lieber keine persönliche Daten erwähnen.
Neu registrieren
Registrieren auf E - Mails für Yamaha MOTIF ES7 wenn:
neue Frage gestellt werden
neue Handbücher vorhanden sind
Sie erhalten eine E-Mail, um sich für eine oder beide Optionen anzumelden.
Das Handbuch wird per E-Mail gesendet. Überprüfen Sie ihre E-Mail.
Wenn Sie innerhalb von 15 Minuten keine E-Mail mit dem Handbuch erhalten haben, kann es sein, dass Sie eine falsche E-Mail-Adresse eingegeben haben oder dass Ihr ISP eine maximale Größe eingestellt hat, um E-Mails zu erhalten, die kleiner als die Größe des Handbuchs sind.
Ihre Frage wurde zu diesem Forum hinzugefügt
Möchten Sie eine E-Mail erhalten, wenn neue Antworten und Fragen veröffentlicht werden? Geben Sie bitte Ihre Email-Adresse ein.